TWeCall 是腾讯云物联网开发平台提供的设备与微信小程序之间的双向音视频通话能力。设备端一键呼叫,微信小程序端持续响铃提醒,接通后即可进行音视频通话,达到微信原生通话体验。
本文将介绍设备如何实现获取小程序联系人列表、呼叫微信小程序、响应通话状态回调与挂断通话,帮助您快速完成 TWeCall(微信通话)的设备端接入。
前提条件
已完成 登录与注册 文档中的登录功能,设备能够成功
tc_iot_login 并保持在线。已在物联网开发平台完成 TWeCall 服务激活与小程序授权,详见 微信通话服务(TWeCall)。
已完成小程序接入文档 设备呼叫小程序 中授权小程序音视频通话。
接入步骤
TWeCall 设备端接入分为以下步骤:
1. 注册通话事件回调。
2. 获取联系人列表。
3. 发起呼叫。
4. 处理通话状态回调。
5. 创建通话推流通道并推送音视频帧。
6. 挂断通话。
步骤 1:注册通话事件回调
调用
tc_iot_av_init 初始化音视频模块并注册通话事件回调。设备作为主叫时,需要关注对端的接听、拒绝、超时、挂断回调;设备作为被叫时,需要关注来电请求回调。tc_iot_error_e tc_iot_av_init(const tc_iot_av_observer_s *observer);
observer 回调说明
回调 | 触发时机 | 说明 |
on_call_requested | 收到对端(小程序)发起的来电请求。 | 设备作为被叫时触发,在此回调中调用 tc_iot_av_accept 接听或 tc_iot_av_reject 拒绝。 |
on_call_accepted | 对端接听呼叫。 | 设备作为主叫时触发,此时可开始推送音视频。 |
on_call_rejected | 对端拒绝呼叫。 | 设备作为主叫时触发。 |
on_call_timeout | 对端无人接听,呼叫超时。 | 设备作为主叫时触发。 |
on_call_hangup | 对端主动挂断。 | 通话过程中对端挂断时触发。 |
on_audio_frame_received | 收到对端音频帧。 | 用于播放对端音频。 |
on_video_frame_received | 收到对端视频帧。 | 用于播放对端视频。 |
注意:
observer 在 tc_iot_av_init 时会被 SDK 内部拷贝,传入栈变量即可,无需长期保活。// 通话状态回调static void on_call_accepted(const tc_iot_contact_s *contact) {printf("[twecall] on_call_accepted: user_id=%s\\n", contact->user_id);// 对端已接听,开始上推音视频(见步骤 5)start_call_streams();}static void on_call_rejected(const tc_iot_contact_s *contact) {printf("[twecall] on_call_rejected: user_id=%s\\n", contact->user_id);// 对端拒接,清理本地状态}static void on_call_timeout(const tc_iot_contact_s *contact) {printf("[twecall] on_call_timeout: user_id=%s\\n", contact->user_id);// 呼叫超时,清理本地状态}static void on_call_hangup(const tc_iot_contact_s *contact) {printf("[twecall] on_call_hangup: user_id=%s\\n", contact->user_id);// 对端挂断,停止推流并清理通道(见步骤 5/6)stop_call_streams();}// 被叫:收到来电请求static void on_call_requested(const tc_iot_contact_s *contact, tc_iot_call_option_t option) {printf("[twecall] on_call_requested: user_id=%s media=%d quality=%d\\n",contact->user_id, option.media_content, option.video_quality);// 这里选择接听,也可调用 tc_iot_av_reject 拒绝tc_iot_av_accept(contact, NULL);}// 初始化tc_iot_av_observer_s observer;memset(&observer, 0, sizeof(observer));observer.on_call_requested = on_call_requested;observer.on_call_accepted = on_call_accepted;observer.on_call_rejected = on_call_rejected;observer.on_call_timeout = on_call_timeout;observer.on_call_hangup = on_call_hangup;tc_iot_error_e rc = tc_iot_av_init(&observer);if (rc != TC_IOT_ERR_SUCCESS) {printf("tc_iot_av_init failed: %d\\n", rc);}
步骤 2:获取联系人列表
调用
tc_iot_av_get_contacts 拉取可呼叫的微信小程序联系人列表。接口采用游标(cursor)分页,首次调用传 NULL,后续传入上一次回调返回的 next_cursor 继续拉取,直到 next_cursor 为 NULL 表示已到末尾。说明:
如果设备调用
tc_iot_av_get_contacts 后获取到联系人列表为空,说明小程序没有正常完成音视频授权。建议用户将小程序删除,重新添加小程序。小程序第一次授权时,会有如下弹窗提示。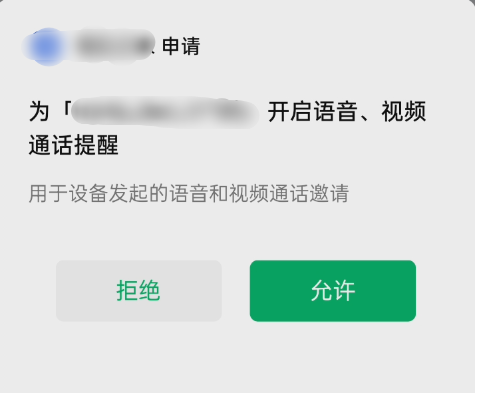
tc_iot_error_e tc_iot_av_get_contacts(const char *cursor, uint32_t limit,tc_iot_av_contacts_cb callback);
参数 | 说明 |
cursor | 分页游标,首次传 NULL(SDK 内部等价于 "0"),后续传入上次回调的 next_cursor。 |
limit | 本次拉取数量,有效范围 (0, 1024]。 |
callback | 结果回调,原型见下。 |
回调原型
typedef void (*tc_iot_av_contacts_cb)(tc_iot_error_e error_code, const char *error_message,const tc_iot_contact_s *contacts, uint32_t count,const char *next_cursor);
参数 | 说明 |
error_code | TC_IOT_ERR_SUCCESS 表示成功,其余为失败码。 |
contacts | 联系人数组指针,失败时为 NULL。 |
count | 本次返回的联系人数量, 0 表示已无更多联系人。 |
next_cursor | 下一页游标, NULL 表示已是最后一页,无需继续拉取。 |
联系人结构体
typedef struct {const char *user_id; // 呼叫目标标识,格式 "modelId/wxAppId/openId"const char *user_name; // 用户昵称(可能为空)const char *avatar_url; // 头像 URL(可能为空)} tc_iot_contact_s;
说明:
user_id 是发起呼叫的关键标识,由 modelId、wxAppId、openId 三段以 / 拼接而成。该字符串内存由 SDK 在回调期间管理,回调返回后会被释放,如需长期使用请自行拷贝。示例:完整拉取所有联系人
static const char *g_target_user_id = NULL;static void on_get_contacts(tc_iot_error_e error_code, const char *error_message,const tc_iot_contact_s *contacts, uint32_t count,const char *next_cursor) {printf("[twecall] get_contacts: code=%d count=%u next_cursor=%s\\n",error_code, count, next_cursor ? next_cursor : "(end)");if (error_code != TC_IOT_ERR_SUCCESS) {printf("get_contacts failed: %s\\n", error_message ? error_message : "");return;}for (uint32_t i = 0; i < count; i++) {printf(" [%u] user_id=%s name=%s\\n", i, contacts[i].user_id,contacts[i].user_name ? contacts[i].user_name : "");// 记录第一个联系人作为呼叫目标if (g_target_user_id == NULL) {g_target_user_id = strdup(contacts[i].user_id);}}// next_cursor 非空说明还有更多联系人,继续翻页if (next_cursor != NULL) {tc_iot_av_get_contacts(next_cursor, 50, on_get_contacts);}}// 首次拉取,每页 50 条tc_iot_av_get_contacts(NULL, 50, on_get_contacts);
步骤 3:发起呼叫
呼叫体验版小程序(重要)
特别强调:
开发调试阶段,设备端必须在初始化之后、登录之前调用
tc_iot_call_experiment_api 显式指定呼叫的小程序版本为体验版(DEMO)或开发版(DEBUG),否则会因小程序版本不匹配导致呼叫失败或无法接通。/*"DEBUG" 开发版"DEMO" 体验版*/tc_iot_call_experiment_api("set_wx_miniapp_flavor", "DEMO", NULL);
待完成体验版功能自测后,将设备寄送至微信团队进行验证。验证通过后,小程序的 VoIP 音视频能力方可正式上线发布,小程序 VoIP 音视频正式上线后,无需再调用此接口,SDK 将默认呼叫线上版小程序。
选定联系人后,调用
tc_iot_av_call 向该联系人(微信小程序)发起呼叫。接口为异步调用,结果通过 callback 返回。tc_iot_error_e tc_iot_av_call(const tc_iot_contact_s *contact, tc_iot_call_option_t option,tc_iot_av_operation_cb callback);
参数 | 说明 |
contact | 呼叫目标, contact.user_id 必填(取自 tc_iot_av_get_contacts 返回的 user_id)。 |
option | 呼叫选项,见下表。 |
callback |
呼叫选项
tc_iot_call_option_t字段 | 说明 |
media_content | 媒体内容,见下表枚举。 |
video_quality | 视频清晰度,见下表枚举。 |
custom_data | 自定义数据(最长256字节),随呼叫信令透传到小程序端。 |
媒体内容枚举
tc_iot_media_content_e取值 | 说明 |
TC_IOT_MEDIA_CONTENT_AUDIO | 仅音频通话。 |
TC_IOT_MEDIA_CONTENT_VIDEO | 仅视频通话。 |
TC_IOT_MEDIA_CONTENT_AUDIO_VIDEO | 音视频通话(默认推荐)。 |
清晰度枚举
tc_iot_video_quality_e取值 | 说明 |
TC_IOT_VIDEO_QUALITY_LD | 流畅(低清晰度)。 |
TC_IOT_VIDEO_QUALITY_SD | 标清。 |
TC_IOT_VIDEO_QUALITY_HD | 高清。 |
TC_IOT_VIDEO_QUALITY_FHD | 超清(全高清)。 |
示例
static void on_call_op(tc_iot_error_e error_code, const char *error_message) {printf("[twecall] call op: code=%d msg=%s\\n", error_code, error_message ? error_message : "");}// 使用联系人列表中的 user_id 发起音视频呼叫tc_iot_contact_s contact = {0};contact.user_id = g_target_user_id; // 取自步骤 2contact.user_name = "";contact.avatar_url = "";tc_iot_call_option_t option = {0};option.media_content = TC_IOT_MEDIA_CONTENT_AUDIO_VIDEO;option.video_quality = TC_IOT_VIDEO_QUALITY_SD;tc_iot_error_e rc = tc_iot_av_call(&contact, option, on_call_op);if (rc != TC_IOT_ERR_SUCCESS) {printf("tc_iot_av_call failed: %d\\n", rc);}
注意:
tc_iot_av_call 返回 TC_IOT_ERR_SUCCESS 仅表示呼叫信令已发出,并不代表通话已建立。需等待 on_call_accepted 回调后,通话才算真正接通,此时再开始上推音视频。步骤 4:处理通话状态回调
呼叫发出后,设备会依次收到以下回调,业务侧需在对应回调中管理本地状态:
示例:状态机式处理
static bool g_in_call = false;static tc_iot_av_channel_t *g_video_channel = NULL;static tc_iot_av_channel_t *g_audio_channel = NULL;static void on_call_accepted(const tc_iot_contact_s *contact) {printf("[twecall] on_call_accepted: user_id=%s\\n", contact->user_id);g_in_call = true;start_call_streams(); // 见步骤 5}static void on_call_rejected(const tc_iot_contact_s *contact) {printf("[twecall] on_call_rejected: user_id=%s\\n", contact->user_id);g_in_call = false;}static void on_call_timeout(const tc_iot_contact_s *contact) {printf("[twecall] on_call_timeout: user_id=%s\\n", contact->user_id);g_in_call = false;}static void on_call_hangup(const tc_iot_contact_s *contact) {printf("[twecall] on_call_hangup: user_id=%s\\n", contact->user_id);g_in_call = false;stop_call_streams(); // 见步骤 6}
说明:
建议在收到
on_call_accepted 后再启动编码器与推流,避免对端尚未接听就占用编码资源。on_call_rejected、on_call_timeout、on_call_hangup 均表示通话结束,应统一做资源清理。步骤 5:创建通话推流通道并推送音视频帧
通话接通后(
on_call_accepted 触发),创建音视频发送通道并向 SDK 推送编码后的音视频裸流。tc_iot_av_channel_t *tc_iot_create_video_channel(int channel_id, tc_iot_video_quality_e quality);tc_iot_av_channel_t *tc_iot_create_audio_channel();tc_iot_error_e tc_iot_push_video_frame(tc_iot_av_channel_t *av_channel, const tc_iot_video_frame *frame);tc_iot_error_e tc_iot_push_audio_frame(tc_iot_av_channel_t *av_channel, const tc_iot_audio_frame *frame);tc_iot_error_e tc_iot_destroy_video_channel(tc_iot_av_channel_t *av_channel);tc_iot_error_e tc_iot_destroy_audio_channel(tc_iot_av_channel_t *av_channel);
接口 | 说明 |
tc_iot_create_video_channel | 创建视频发送通道, channel_id 通话场景固定为 0。 |
tc_iot_create_audio_channel | 创建音频发送通道,无需传 channel_id。 |
tc_iot_push_video_frame | 推送一帧编码后的视频。 |
tc_iot_push_audio_frame | 推送一帧编码后的音频。 |
tc_iot_destroy_video_channel | 销毁视频通道。 |
tc_iot_destroy_audio_channel | 销毁音频通道。 |
视频帧
tc_iot_video_frame字段 | 说明 |
codec | 视频编码格式, H264 , H265 或 MJPEG。 |
type | 帧类型, IDR 关键帧或 P 帧。 |
rotation | 画面旋转角度(0/90/180/270)。 |
width / height | 画面宽高(像素)。 |
data / data_size | 编码后视频裸流数据指针与长度。 |
pts_ms | 帧时间戳(毫秒),传0的话由 SDK 内部填写。 |
音频帧
tc_iot_audio_frame字段 | 说明 |
codec | 音频编码格式,推荐 PCM ,OPUS ,AAC,G722。 |
sample_rate | 采样率,推荐 16000。 |
channels | 声道数,推荐 MONO(单声道)。 |
frame_duration_ms | 单帧时长(毫秒),推荐 20ms。 |
data / data_size | 编码后音频裸流数据指针与长度。 |
pts_ms | 帧时间戳(毫秒)。 |
注意:
设备通常只有一路麦克风采集源,
tc_iot_create_audio_channel 建议全局只创建一次,多路复用。建议推送第一个 IDR 关键帧之后才开始持续推流,以保证对端能快速解码出画面。
示例
static void start_call_streams(void) {// 视频通道:通话场景 channel_id = 0g_video_channel = tc_iot_create_video_channel(0, TC_IOT_VIDEO_QUALITY_SD);// 音频通道:全局唯一g_audio_channel = tc_iot_create_audio_channel();// 之后由采集线程持续调用 push 推流}// 推送一帧视频(在视频采集/编码线程中调用)static void push_one_video_frame(void) {tc_iot_video_frame frame = {0};frame.codec = TC_IOT_VIDEO_CODEC_H264;frame.type = TC_IOT_VIDEO_FRAME_TYPE_IDR; // 首帧用 IDRframe.rotation = TC_IOT_VIDEO_ROTATION_0;frame.width = 640;frame.height = 480;frame.data = encoded_video_buf;frame.data_size = encoded_video_len;frame.pts_ms = current_time_ms();tc_iot_push_video_frame(g_video_channel, &frame);}// 推送一帧音频(在音频采集线程中调用)static void push_one_audio_frame(void) {tc_iot_audio_frame frame = {0};frame.codec = TC_IOT_AUDIO_CODEC_PCM;frame.sample_rate = TC_IOT_AUDIO_SAMPLE_RATE_16000;frame.channels = TC_IOT_AUDIO_CHANNEL_MONO;frame.frame_duration_ms = 20;frame.data = audio_buf;frame.data_size = audio_len;frame.pts_ms = current_time_ms();tc_iot_push_audio_frame(g_audio_channel, &frame);}
步骤 6:挂断通话
通话过程中,任意一方均可挂断。设备主动挂断调用
tc_iot_av_hangup;对端挂断时设备会收到 on_call_hangup 回调。无论哪种情况,都应销毁推流通道、停止采集。
tc_iot_error_e tc_iot_av_hangup(const tc_iot_contact_s *contact, tc_iot_av_operation_cb callback);
参数 | 说明 |
contact | 通话对端, contact.user_id 需与呼叫/接听时一致。 |
callback | 操作结果回调。 |
示例
static void on_hangup_op(tc_iot_error_e error_code, const char *error_message) {printf("[twecall] hangup op: code=%d msg=%s\\n", error_code, error_message ? error_message : "");}// 主动挂断tc_iot_contact_s contact = {0};contact.user_id = g_target_user_id;tc_iot_av_hangup(&contact, on_hangup_op);// 销毁通道(主动挂断与收到 on_call_hangup 后均需调用)static void stop_call_streams(void) {if (g_video_channel) {tc_iot_destroy_video_channel(g_video_channel);g_video_channel = NULL;}if (g_audio_channel) {tc_iot_destroy_audio_channel(g_audio_channel);g_audio_channel = NULL;}}
注意:
tc_iot_av_hangup 的 callback 用于确认挂断信令发送结果。即使主动挂断,也建议在 on_call_hangup 或 callback 中统一做通道销毁,避免重复释放。完整示例代码
以下示例整合上述步骤,演示设备拉取联系人、呼叫小程序、接通后推流、挂断的完整流程。
#include <stdbool.h>#include <stdio.h>#include <stdlib.h>#include <string.h>#include "tc_iot.h"#include "tc_iot_av.h"// ==================== 全局状态 ====================static bool g_in_call = false;static tc_iot_av_channel_t *g_video_channel = NULL;static tc_iot_av_channel_t *g_audio_channel = NULL;static char g_target_user_id[128] = {0};// ==================== 工具 ====================static uint64_t current_time_ms(void) {struct timespec ts;clock_gettime(CLOCK_MONOTONIC, &ts);return (uint64_t)ts.tv_sec * 1000 + ts.tv_nsec / 1000000;}static void start_call_streams(void) {g_video_channel = tc_iot_create_video_channel(0, TC_IOT_VIDEO_QUALITY_SD);g_audio_channel = tc_iot_create_audio_channel();printf("[twecall] call streams started\\n");}static void stop_call_streams(void) {if (g_video_channel) {tc_iot_destroy_video_channel(g_video_channel);g_video_channel = NULL;}if (g_audio_channel) {tc_iot_destroy_audio_channel(g_audio_channel);g_audio_channel = NULL;}printf("[twecall] call streams stopped\\n");}// ==================== 通话状态回调 ====================static void on_call_requested(const tc_iot_contact_s *contact, tc_iot_call_option_t option) {printf("[twecall] on_call_requested: user_id=%s media=%d quality=%d\\n",contact->user_id, option.media_content, option.video_quality);// 设备作为被叫,这里选择接听tc_iot_av_accept(contact, NULL);}static void on_call_accepted(const tc_iot_contact_s *contact) {printf("[twecall] on_call_accepted: user_id=%s\\n", contact->user_id);g_in_call = true;start_call_streams();}static void on_call_rejected(const tc_iot_contact_s *contact) {printf("[twecall] on_call_rejected: user_id=%s\\n", contact->user_id);g_in_call = false;}static void on_call_timeout(const tc_iot_contact_s *contact) {printf("[twecall] on_call_timeout: user_id=%s\\n", contact->user_id);g_in_call = false;}static void on_call_hangup(const tc_iot_contact_s *contact) {printf("[twecall] on_call_hangup: user_id=%s\\n", contact->user_id);g_in_call = false;stop_call_streams();}static void on_audio_frame_received(const tc_iot_audio_frame *frame) {// 实际接入时:将 frame->data 送入音频播放器}static void on_video_frame_received(const tc_iot_video_frame *frame) {// 实际接入时:将 frame->data 送入视频解码器/渲染器}static void on_av_op(tc_iot_error_e error_code, const char *error_message) {printf("[twecall] av op: code=%d msg=%s\\n", error_code, error_message ? error_message : "");}// ==================== 获取联系人 ====================static void make_call(const char *user_id);static void on_get_contacts(tc_iot_error_e error_code, const char *error_message,const tc_iot_contact_s *contacts, uint32_t count,const char *next_cursor) {printf("[twecall] get_contacts: code=%d count=%u next_cursor=%s\\n",error_code, count, next_cursor ? next_cursor : "(end)");if (error_code != TC_IOT_ERR_SUCCESS) {printf("get_contacts failed: %s\\n", error_message ? error_message : "");return;}for (uint32_t i = 0; i < count; i++) {printf(" [%u] user_id=%s name=%s\\n", i, contacts[i].user_id,contacts[i].user_name ? contacts[i].user_name : "");if (g_target_user_id[0] == '\\0' && contacts[i].user_id) {strncpy(g_target_user_id, contacts[i].user_id, sizeof(g_target_user_id) - 1);}}// 还有更多联系人,继续翻页if (next_cursor != NULL) {tc_iot_av_get_contacts(next_cursor, 50, on_get_contacts);return;}// 拉取完成,呼叫第一个联系人if (g_target_user_id[0] != '\\0') {make_call(g_target_user_id);} else {printf("[twecall] no contact to call\\n");}}// ==================== 发起呼叫 ====================static void make_call(const char *user_id) {printf("[twecall] calling user_id=%s\\n", user_id);tc_iot_contact_s contact = {0};contact.user_id = user_id;contact.user_name = "";contact.avatar_url = "";tc_iot_call_option_t option = {0};option.media_content = TC_IOT_MEDIA_CONTENT_AUDIO_VIDEO;option.video_quality = TC_IOT_VIDEO_QUALITY_SD;tc_iot_error_e rc = tc_iot_av_call(&contact, option, on_av_op);if (rc != TC_IOT_ERR_SUCCESS) {printf("[twecall] tc_iot_av_call failed: %d\\n", rc);}}// ==================== 挂断 ====================static void hangup_call(void) {if (!g_in_call) {return;}tc_iot_contact_s contact = {0};contact.user_id = g_target_user_id;tc_iot_av_hangup(&contact, on_av_op);}// ==================== main ====================int main(int argc, char **argv) {// 1) 初始化 + 登录(参考快速接入文档)// ... tc_iot_init / tc_iot_login ...// 2) 注册通话事件回调tc_iot_av_observer_s observer;memset(&observer, 0, sizeof(observer));observer.on_call_requested = on_call_requested;observer.on_call_accepted = on_call_accepted;observer.on_call_rejected = on_call_rejected;observer.on_call_timeout = on_call_timeout;observer.on_call_hangup = on_call_hangup;observer.on_audio_frame_received = on_audio_frame_received;observer.on_video_frame_received = on_video_frame_received;tc_iot_error_e rc = tc_iot_av_init(&observer);if (rc != TC_IOT_ERR_SUCCESS) {printf("tc_iot_av_init failed: %d\\n", rc);return -1;}// 3) 拉取联系人,回调中自动发起呼叫tc_iot_av_get_contacts(NULL, 50, on_get_contacts);// 4) 通话结束后挂断// hangup_call();// 5) 反初始化tc_iot_av_deinit();return 0;}
说明:
1. 示例中省略了
tc_iot_init / tc_iot_login 的细节,请参考 登录与注册 完成登录。2. 实际接入时,音视频帧推送需替换为真实摄像头采集与编码逻辑。
3. SDK 自带
iot_video_demo 示例已完整实现上述流程,可参考 src/demo/iot_video_demo/ 目录。4. 以上仅为单人通话场景演示。监控/通话及呼叫中接听第二个呼入电话等复杂场景,请参考
iot_video_demo。编译并运行
SDK 自带的
iot_video_demo 已集成 TWeCall 完整流程,可直接编译验证:cd iot# Linux 平台(CC TRTC,功能全)bash build.sh --platform=linux --trtc=cc# 将 CC TRTC 动态库加入系统动态库搜索路径export LD_LIBRARY_PATH=tc_iot_sdk/sdk/lib:$LD_LIBRARY_PATH# 运行(替换为你的设备三元组)./build/iot_video_demo -p YOUR_PRODUCT_ID -d YOUR_DEVICE_NAME -s 'YOUR_DEVICE_SECRET'
成功启动后会看到:
tc_iot_av_init success
在另一个终端通过命名管道
/tmp/tciot 发命令:# 拉取联系人列表echo "get_contacts -n 50" > /tmp/tciot# 呼叫小程序联系人(user_id 取自联系人列表)echo "call -u user_id" > /tmp/tciot# 挂断echo "hangup -u user_id" > /tmp/tciot
常见问题
现象 | 排查建议 |
get_contacts 回调返回 count=0 | 确认设备已完成 TWeCall 激活与小程序授权;确认设备已绑定可呼叫联系人。 |
tc_iot_av_call 返回成功但回调中提示 TWeCall device not active | TWeCall 是增值服务,需要在控制台激活。 |
tc_iot_av_call 返回成功但回调中提示wechat VoIP API error | 检查小程序中设备是否授权 VoIP 音视频通话。 |
tc_iot_av_call 返回 TC_IOT_ERR_NOT_INITIALIZED | 确认已调用 tc_iot_av_init,且 tc_iot_login 成功在线。 |
tc_iot_av_call 返回成功但长时间无 on_call_accepted | 等待 on_call_timeout;确认 user_id 格式正确(modelId/wxAppId/openId);确认小程序端在线且已授权。 |
on_call_accepted 后对端看不到画面 | 确认首帧推送的是 IDR 关键帧;确认视频通道已创建且 channel_id=0;确认 width/height 与编码实际尺寸一致。 |
on_call_accepted 后对端听不到声音 | 确认音频通道已创建;确认 sample_rate(推荐 16000)、channels(推荐 MONO)配置正确。 |
多次通话后内存持续增长 | 确认每次 on_call_hangup 后均调用了 tc_iot_destroy_video_channel / tc_iot_destroy_audio_channel。 |
tc_iot_av_get_contacts 返回 TC_IOT_ERR_INVALID_ARGUMENT | 确认 limit 在 (0, 1024] 范围内。 |


