本文介绍开发者如何基于物联网开发平台小程序 SDK(下称 SDK)构建自主品牌小程序,通过 SDK 使用平台提供的能力。
前提条件
1. 使用 SDK 需要您的运行环境包含 Node.js 以及 npm。
2. 登录 物联网开发平台控制台 创建项目及产品,具体操作请参见 产品定义。
3. 登录 物联网开发平台控制台 获取 AppKey 和 AppSecret,具体操作请参见 获取应用 AppKey 和 AppSecret。
接入 SDK
安装 SDK
1. 在微信小程序目录下,通过 npm 安装 SDK 。
npm install qcloud-iotexplorer-appdev-sdk
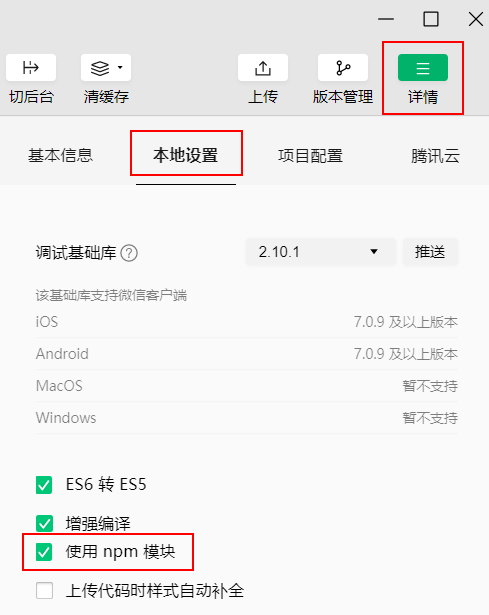
2. 在 微信开发者工具 的项目界面中,单击界面右上角的详情,选择本地设置,勾选“使用 npm 模块”。
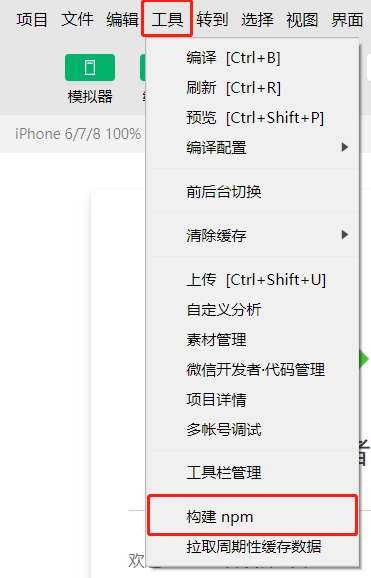
3. 在微信开发者工具的项目界面中,选择菜单栏的工具 > 构建 npm,构建成功后界面提示完成构建。
配置小程序服务器域名
小程序 SDK 通过以下域名连接到物联网开发平台。
request 域名:
https://iot.cloud.tencent.comsocket 域名:
wss://iot.cloud.tencent.com在接入小程序 SDK 时,需要将上述域名添加到小程序的服务器域名列表中,步骤如下。
1. 登录 小程序后台。
2. 选择开发管理 > 开发设置。
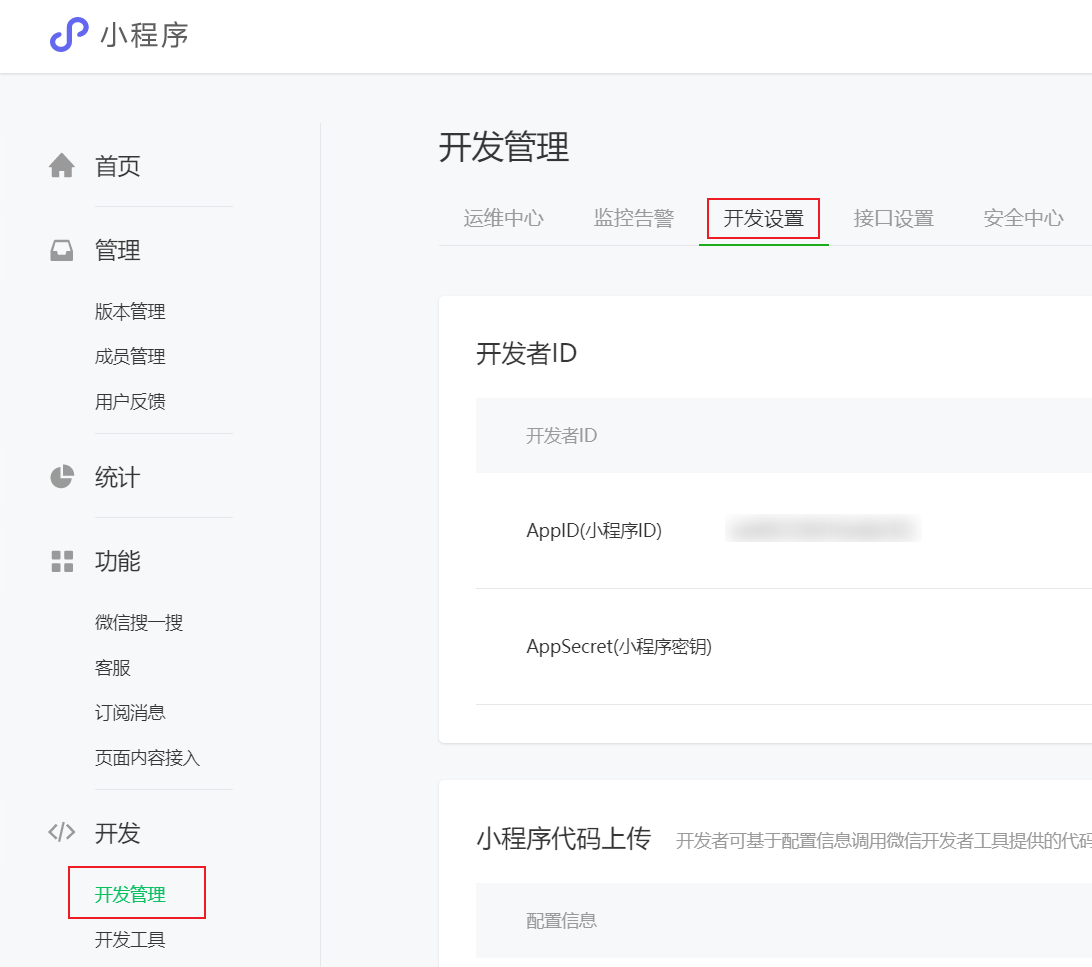
3. 在“服务器域名”页面单击开始配置(若曾经配置过则单击修改),根据页面指引完成身份确认。

4. 填写服务器信息。
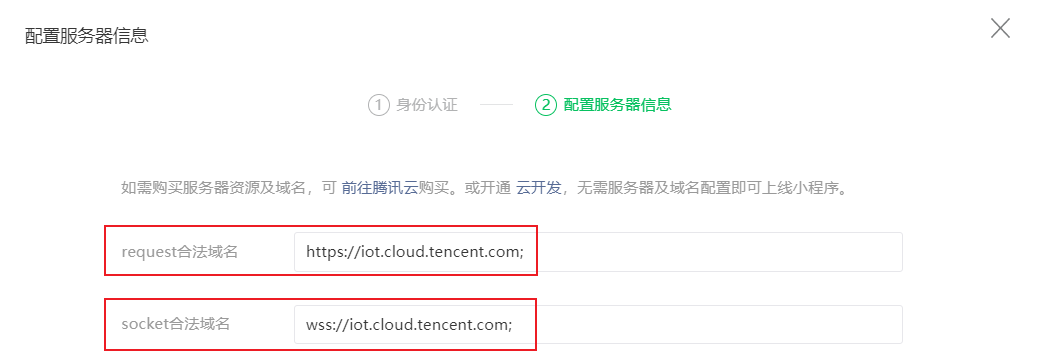
request 合法域名:
https://iot.cloud.tencent.comsocket 合法域名:
wss://iot.cloud.tencent.com5. 单击保存并提交。
接入微信登录
使用物联网开发平台的 微信号注册登录 应用端 API,可以让小程序用户通过微信注册登录到物联网开发平台。出于安全考虑,不建议在小程序端直接调用微信号注册登录 API,请在自建的后端服务调用该 API,以避免密钥的泄露。
小程序接入微信登录需要实现以下流程:
1. 小程序调用 wx.login 获取临时登录凭证
code。2. 小程序将临时登录凭证
code 传递给自建的后端服务。3. 后端服务调用微信服务端 API auth.code2Session ,通过临时登录凭证 code 获取小程序用户的 OpenID。
4. 后端服务调用物联网开发平台应用端 API 微信号注册登录 ,通过小程序用户的 OpenID 获取 AccessToken。
5. 后端服务将 AccessToken 返回给小程序。
6. 小程序将 AccessToken 传入小程序 SDK 以完成小程序 SDK 的初始化。
示例代码
请按照以下步骤并参考示例代码以实现接入微信登录:
1. 在
AppDevSdk 的构造函数参数中,将 appKey 的值修改为您实际获取的 AppKey。2. 补充
getAccessToken 函数的实现。在 getAccessToken 函数中,您需要调用自建后端服务的登录接口,传入登录所需的信息,并将获取到的 AccessToken 放入 getAccessToken 函数的返回值。// app.jsconst { AppDevSdk } = require('qcloud-iotexplorer-appdev-sdk');App({onLaunch() {this.sdk = new AppDevSdk({appKey: '此处填写您的 AppKey',getAccessToken: () => this.getAccessToken()});sdk.init().then(() => {// SDK 初始化完成});},async getAccessToken() {// 获取小程序登录凭证 codeconst code = await new Promise((resolve, reject) => {wx.login({success: (res) => resolve(res.code),fail: reject});});// 调用开发者自建后端服务,传入 code,获取物联网开发平台的 AccessToken// 请根据实际情况调整实现const resp = await new Promise((resolve, reject) => {wx.request({url: '开发者自建后端服务的 URL',method: 'POST',data: {code: code,nickName: '新用户的默认昵称',avatarUrl: '新用户的默认头像 URL'},header: {'content-type': 'application/json'},success(res) {resolve(res.data);},fail(err) {reject(err);}});});return {Token: resp.Token,ExpireAt: resp.ExpireAt,};}})
使用 SDK
调用应用端 API
应用端 API 是物联网开发平台为了满足智能家居场景,为用户开发自有品牌的小程序或 App 而提供的云端服务,用户无需实现用户管理、设备管理、设备定时、家庭管理等基础能力,可通过调用应用端 API 快速完成移动应用端的开发。关于应用端 API 的更多信息,请参见 应用端 API 简介。
SDK 对应用端 API 的调用过程进行了封装,发送请求时会自动带上公共参数
AccessToken 与 RequestId。sdk.requestApi('AppGetFamilyDeviceList', // 请求应用端 API 的 Action 名{ FamilyId: 'default' } // 请求应用端 API 的数据).then(data => {// 请求成功console.log(data);}).catch(err => {// 请求失败console.error(err);});
设备配网
SDK 目前支持 softAP 和 SmartConfig 和 simpleConfig 和 AirKiss方式进行设备配网。
softAP 配网
const WifiConfConstants = require('qcloud-iotexplorer-appdev-plugin-wificonf-core').constants;const {// 错误的中文描述WifiConfErrorMsg,// 步骤codeWifiConfStepCode,// 步骤code的中文描述WifiConfStepDesp} = WifiConfConstants;/*** softap配网*/function SoftApConfigure({token,wifiInfo = {SSID: '';password: '';BSSID: '';},familyId = 'default',roomId,reporter,onStepChange,onStatusChange,}) {const onProgress = (data) => {reporter.info(data.code, data.detail);switch (data.code) {case WifiConfStepCode.CREATE_UDP_CONNECTION_SUCCESS:onStepChange(1);break;case WifiConfStepCode.PROTOCOL_SUCCESS:onStepChange(2);break;case WifiConfStepCode.SOFTAP_GET_DEVICE_SIGNATURE_SUCCESS:case WifiConfStepCode.BUSINESS_QUERY_TOKEN_STATE_SUCCESS:onStepChange(3);break;case WifiConfStepCode.WIFI_CONF_SUCCESS:onStepChange(4);break;}};const onComplete = ({ productId, deviceName }) => {onStatusChange({status: 'success',productId,deviceName,});};const onError = async ({ code, detail }) => {reporter.error(code, detail);onStatusChange({ status: 'error' });};sdk.plugins['wifiConfSoftAp'].start({wifiConfToken: token,targetWifiInfo: wifiInfo,autoRetry: true, // 自动处理故障流程familyId,roomId,onProgress,onComplete,onError});}module.exports = SoftApConfigure;
SmartConfig 配网
const WifiConfConstants = require('qcloud-iotexplorer-appdev-plugin-wificonf-core').constants;const {// 错误的中文描述WifiConfErrorMsg,// 步骤codeWifiConfStepCode,// 步骤code的中文描述WifiConfStepDesp} = WifiConfConstants;/*** smartconfig一键配网*/function SmartConfigConfigure({token,wifiInfo = {SSID: '';password: '';BSSID: '';},familyId = 'default',roomId,reporter,onStepChange,onStatusChange,}) {const onProgress = (data) => {reporter.info(data.code, data.detail);switch (data.code) {case WifiConfStepCode.PROTOCOL_SUCCESS:onStepChange(1);break;case WifiConfStepCode.CREATE_UDP_CONNECTION_SUCCESS:onStepChange(2);break;case WifiConfStepCode.BUSINESS_QUERY_TOKEN_STATE_SUCCESS:onStepChange(3);break;case WifiConfStepCode.WIFI_CONF_SUCCESS:onStepChange(4);break;}};const onComplete = ({ productId, deviceName }) => {onStatusChange({status: 'success',productId,deviceName,});};const onError = async ({ code, detail }) => {reporter.error(code, detail);onStatusChange({ status: 'error' });};sdk.plugins['wifiConfSmartConfig'].start({wifiConfToken: token,targetWifiInfo: wifiInfo,autoRetry: true, // 自动处理故障流程familyId,roomId,onProgress,onComplete,onError});}module.exports = SmartConfigConfigure;
simpleConfig 配网
const WifiConfConstants = require('qcloud-iotexplorer-appdev-plugin-wificonf-core').constants;const {// 错误的中文描述WifiConfErrorMsg,// 步骤codeWifiConfStepCode,// 步骤code的中文描述WifiConfStepDesp} = WifiConfConstants;/*** SimpleConfig一键配网*/function SimpleConfigConfigure({token,wifiInfo = {SSID: '';password: '';},familyId = 'default',roomId,reporter,onStepChange,onStatusChange,}) {const onProgress = (data) => {reporter.info(data.code, data.detail);switch (data.code) {case WifiConfStepCode.PROTOCOL_SUCCESS:onStepChange(1);break;case WifiConfStepCode.CREATE_UDP_CONNECTION_SUCCESS:onStepChange(2);break;case WifiConfStepCode.BUSINESS_QUERY_TOKEN_STATE_SUCCESS:onStepChange(3);break;case WifiConfStepCode.WIFI_CONF_SUCCESS:onStepChange(4);break;}};const onComplete = ({ productId, deviceName }) => {onStatusChange({status: 'success',productId,deviceName,});};const onError = async ({ code, detail }) => {reporter.error(code, detail);onStatusChange({ status: 'error' });};sdk.plugins['wifiConfSimpleConfig'].start({wifiConfToken: token,targetWifiInfo: wifiInfo,autoRetry: true, // 自动处理故障流程familyId,roomId,onProgress,onComplete,onError});}module.exports = SimpleConfigConfigure;
AirKiss 配网
const WifiConfConstants = require('qcloud-iotexplorer-appdev-plugin-wificonf-core').constants;const {// 错误的中文描述WifiConfErrorMsg,// 步骤codeWifiConfStepCode,// 步骤code的中文描述WifiConfStepDesp} = WifiConfConstants;/*** AirKiss一键配网*/function AirKissConfigure({token,wifiInfo = {SSID: '';password: '';},familyId = 'default',roomId,reporter,onStepChange,onStatusChange,}) {const onProgress = (data) => {reporter.info(data.code, data.detail);switch (data.code) {case WifiConfStepCode.PROTOCOL_SUCCESS:onStepChange(1);break;case WifiConfStepCode.CREATE_UDP_CONNECTION_SUCCESS:onStepChange(2);break;case WifiConfStepCode.BUSINESS_QUERY_TOKEN_STATE_SUCCESS:onStepChange(3);break;case WifiConfStepCode.WIFI_CONF_SUCCESS:onStepChange(4);break;}};const onComplete = ({ productId, deviceName }) => {onStatusChange({status: 'success',productId,deviceName,});};const onError = async ({ code, detail }) => {reporter.error(code, detail);onStatusChange({ status: 'error' });};sdk.plugins['wifiConfAirKiss'].start({wifiConfToken: token,targetWifiInfo: wifiInfo,autoRetry: true, // 自动处理故障流程familyId,roomId,onProgress,onComplete,onError});}module.exports = AirKissConfigure;
控制设备
// 指定要控制的设备的属性数据const deviceData = {light_switch: 0,};sdk.requestApi('AppControlDeviceData', {ProductId: '要控制的设备的产品 ID',DeviceName: '要控制的设备的设备名称',Data: JSON.stringify(deviceData) // 控制报文 JSON}).then(data => {// 请求成功console.log(data);}).catch(err => {// 请求失败console.error(err);});
长连接通信能力
SDK 支持通过 WebSocket 为用户订阅所绑定设备的上报数据以及状态信息,SDK 初始化时默认自动连接 WebSocket 服务端。
通过设备 ID 列表订阅
sdk.subscribeDevices(['Product1/Device1','Product1/Device2','Product2/Device3']);
通过设备列表订阅
sdk.requestApi('AppGetFamilyDeviceList', { FamilyId: 'default' }).then(data => {sdk.subscribeDevices(data.DeviceList);}).catch(err => {// 请求失败console.error(err);});
监听设备上报数据及状态信息
const { EventTypes } = require('qcloud-iotexplorer-appdev-sdk').AppDevSdk.constants;// 监听设备上报数据推送sdk.on(EventTypes.WsReport, ({ deviceId, deviceData }) => {console.log('websocket device report', deviceId, deviceData);});// 监听设备在线状态变更推送sdk.on(EventTypes.WsStatusChange, ({ deviceId, deviceStatus }) => {console.log('websocket device status change', deviceId, deviceStatus);});// 监听设备控制推送sdk.on(EventTypes.WsControl, ({ deviceId, deviceData }) => {console.log('websocket device control', deviceId, deviceData);});
获取用户基本信息
通过读取 SDK 对象上的属性,可以获取用户的基本信息,请参照以下示例代码。
// sdk.isLogin: boolean; 用户是否登录console.log(sdk.isLogin);// sdk.userId: string; 用户 IDconsole.log(sdk.userId);// sdk.nickName: string; 用户昵称console.log(sdk.nickName);// sdk.userInfo: UserInfo; 用户详细信息console.log(sdk.userInfo);console.log(sdk.userInfo.Avatar);// sdk.getDefaultFamilyId: () => Promise< string >; 获取用户默认的家庭 IDsdk.getDefaultFamilyId().then(familyId => console.log(familyId));
UserInfo 数据结构说明
属性名 | 属性描述 | 类型 |
Avatar | 头像。 | string |
CountryCode | 国家代码。 | string |
Email | 邮箱。 | string |
NickName | 昵称。 | string |
PhoneNumber | 电话号码。 | string |
UserID | 用户 ID。 | string |
SDK Demo
Demo 项目 GitHub 地址:qcloud-iotexplorer-appdev-miniprogram-sdk-demo。
Demo 使用指引:请参见 快速入门。


