功能介绍
当主持人或联席主持人在会中使用云录制,会议结束后仅在会议创建者的账号下生成一份云录制文件,会议创建者可在个人中心管理云录制内容。
适用场景
远程办公:会议存档、会议录制文件分享。
线上培训:储存、剪辑培训录像。
企业培训:储存、分享培训录像。
使用条件
登录用户:免费版、专业版、商业版、企业版、教育版、教育加强版用户。
版本要求:客户端3.7版本及以上。
系统要求:Windows/macOS/Android/iOS。
注意事项
升级为专业版可享受最高100G 超大云录制空间,单击前往 了解专业版。
商业版、企业版、教育版、教育加强版账户到期后,云录制文件无法查看,但可以在后台自动保存90天。
90天内,用户成功续费,则云录制文件可以重新查看、下载、共享。
超过90天,如果用户仍未续费,则云录制文件将无法访问。
多流录制暂不支持剪辑,切换为“单流录制”进行剪辑。
使用转存至“我的录制”时,若原文件本身存在转写和智能化内容,则转存后的文件会同步生成相关内容;若原文件本身不存在转写和智能化内容,则转存后可根据账号权限选择是否生成相关内容。
当录制访问权限为“所有人可查看”、“所有人输入密码可查看”时,录制水印将无法生效。
管理云录制
录制管理列表
Windows/macOS
客户端3.22版本及以上支持在 Windows、macOS 端上查找和管理录制文件。
全部文件
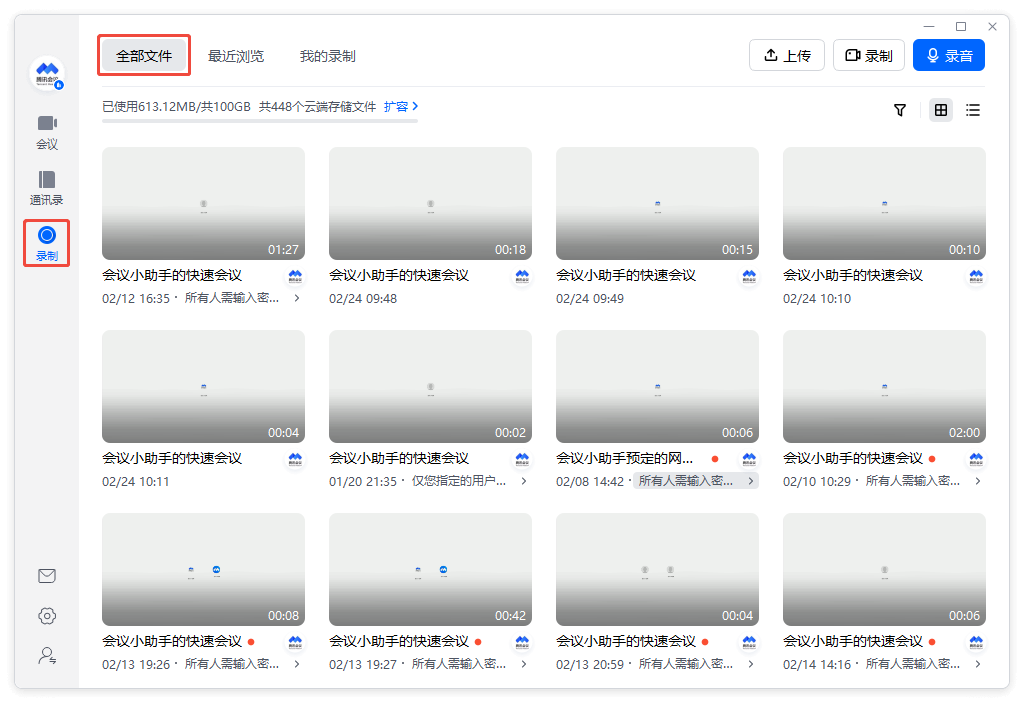
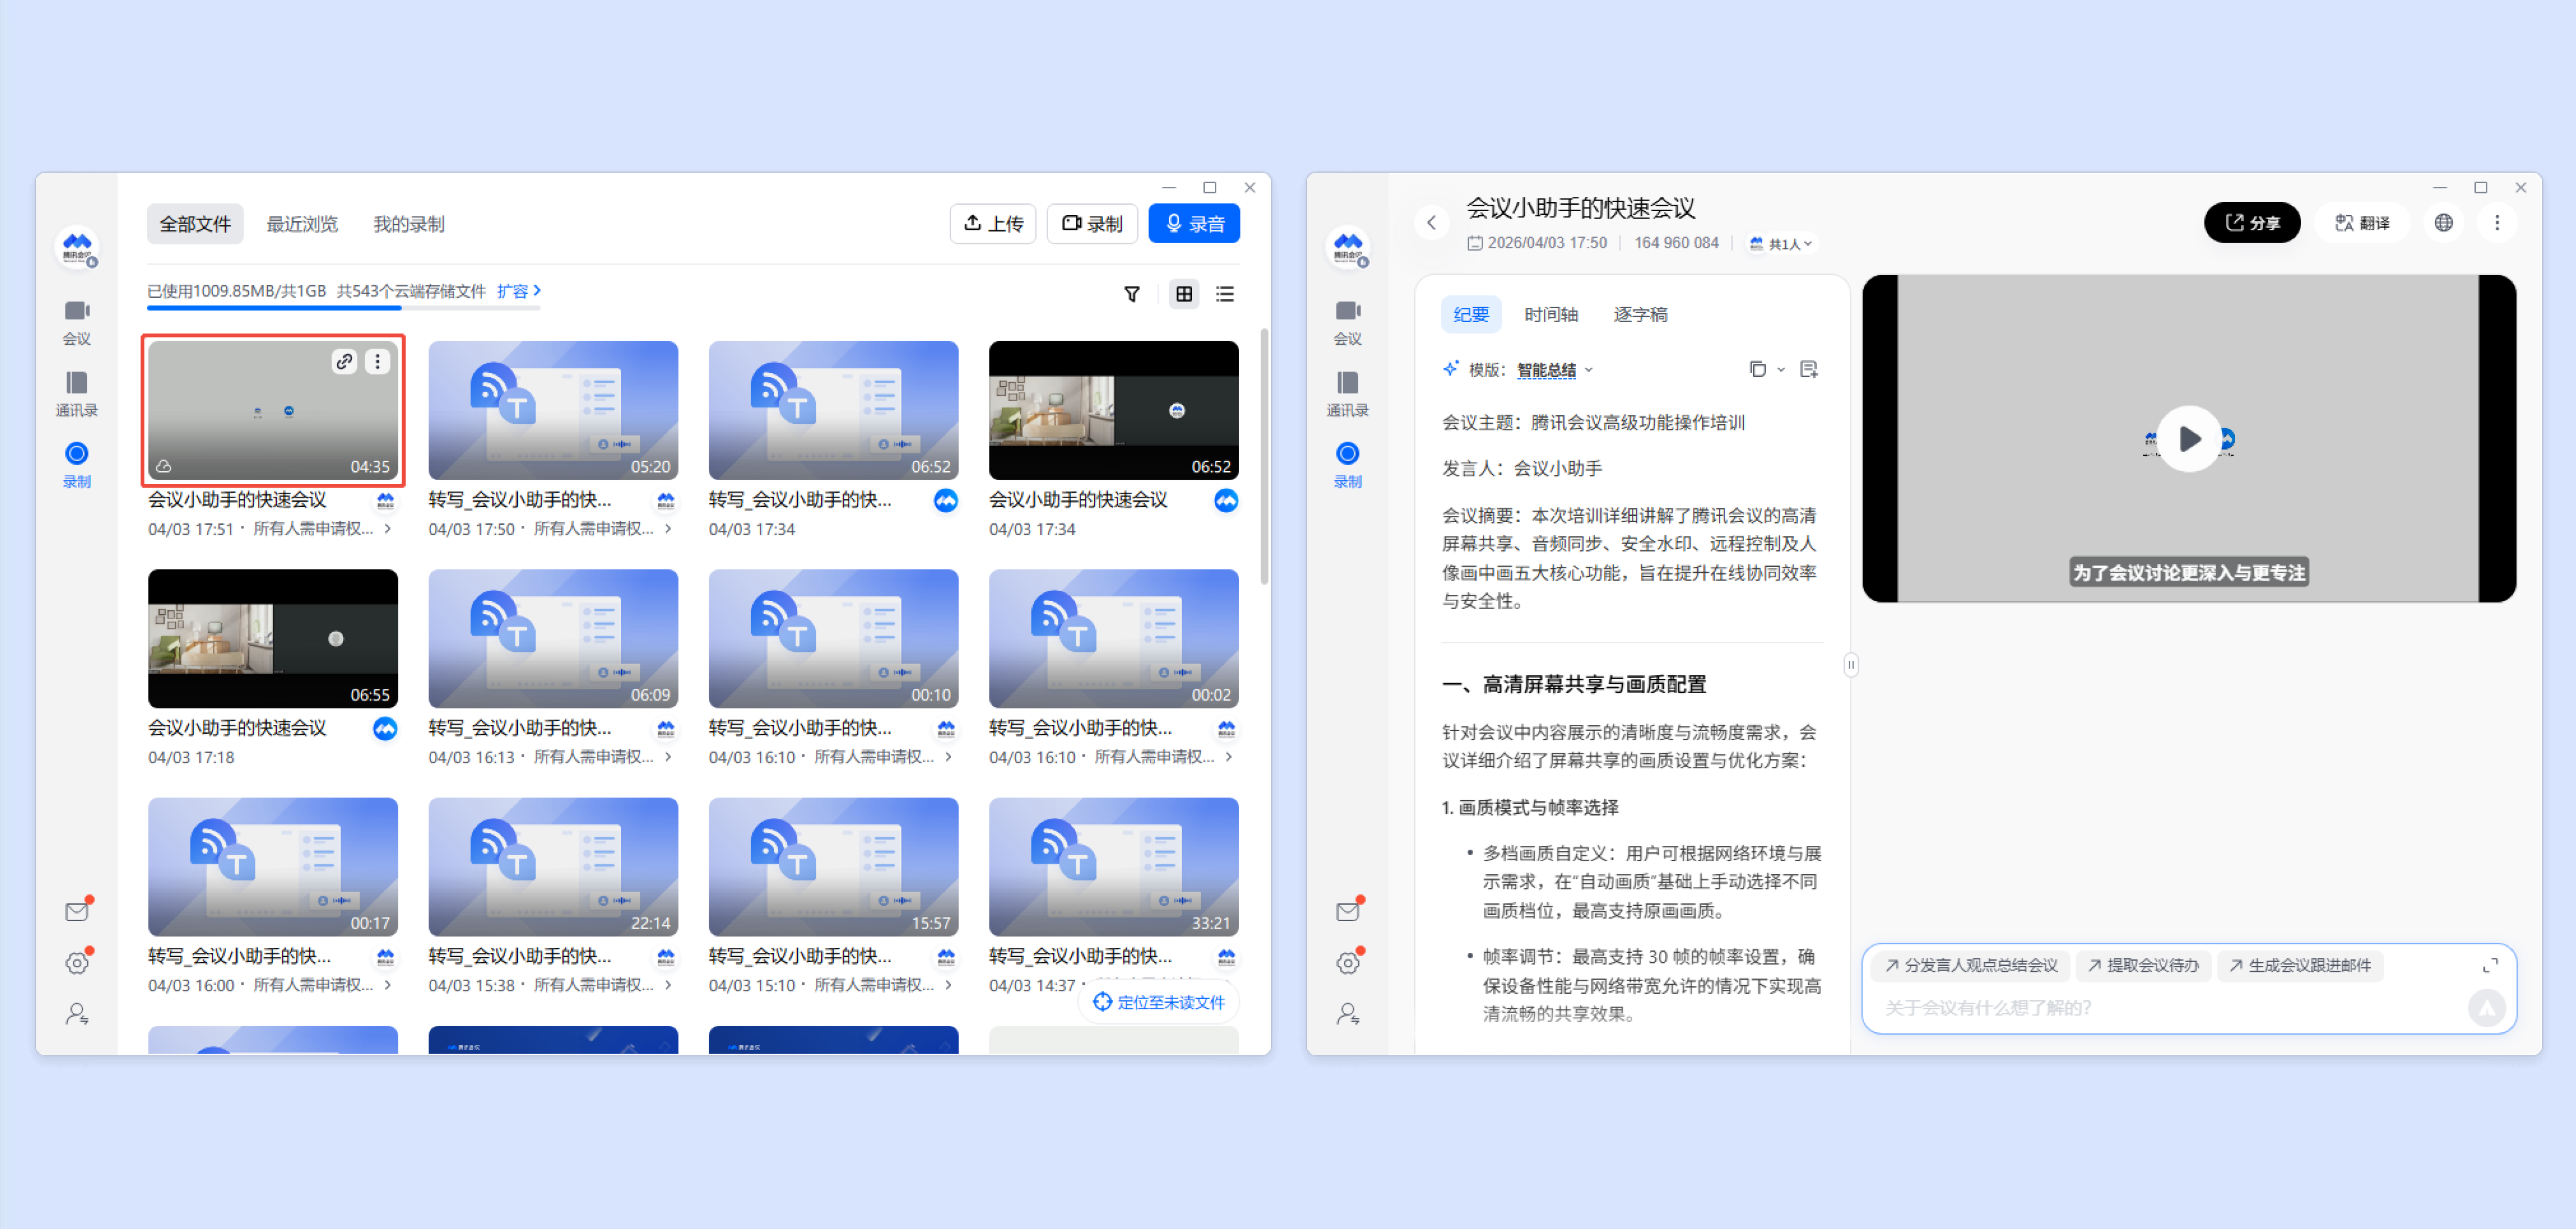
单击录制 > 全部文件,即可查看您账号下所有云录制文件、本地设备中的本地录制文件、会议外录制的文件(即原会记文件)和上传的音视频文件,以及浏览过、处于审批中的他人录制文件,并显示您的云存储空间使用情况。文件显示按文件加入列表的时间排序,即优先显示最新加入列表的文件。
最近浏览
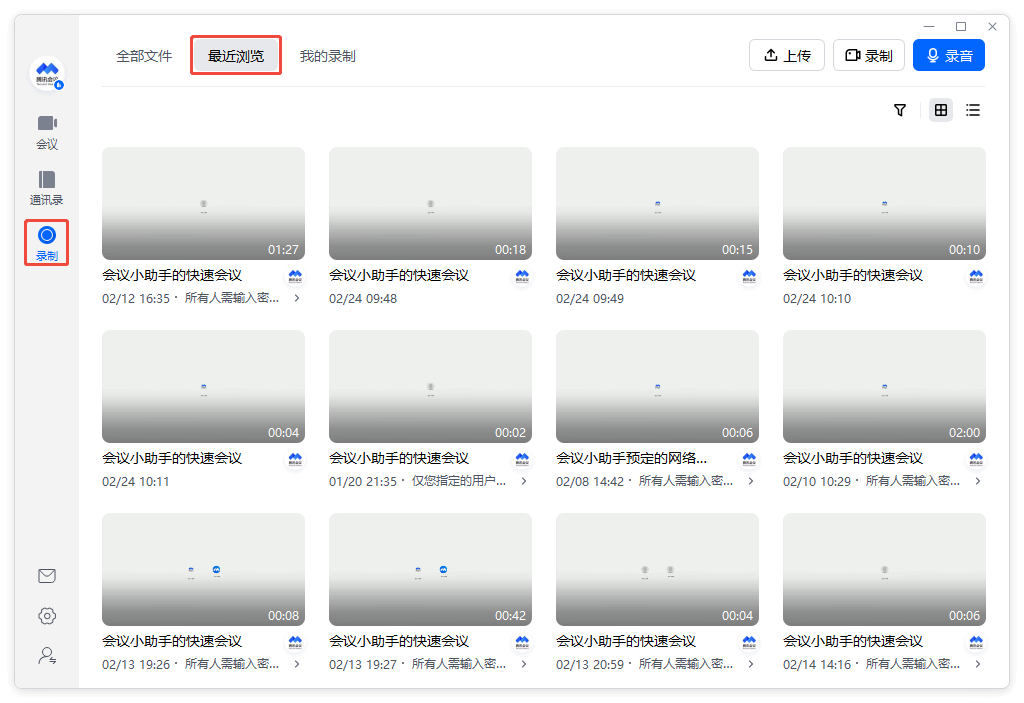
单击录制 > 最近浏览,即可查看您最近浏览过的录制文件。文件显示按文件的浏览时间排序,即优先显示最新查看的文件。
我的录制
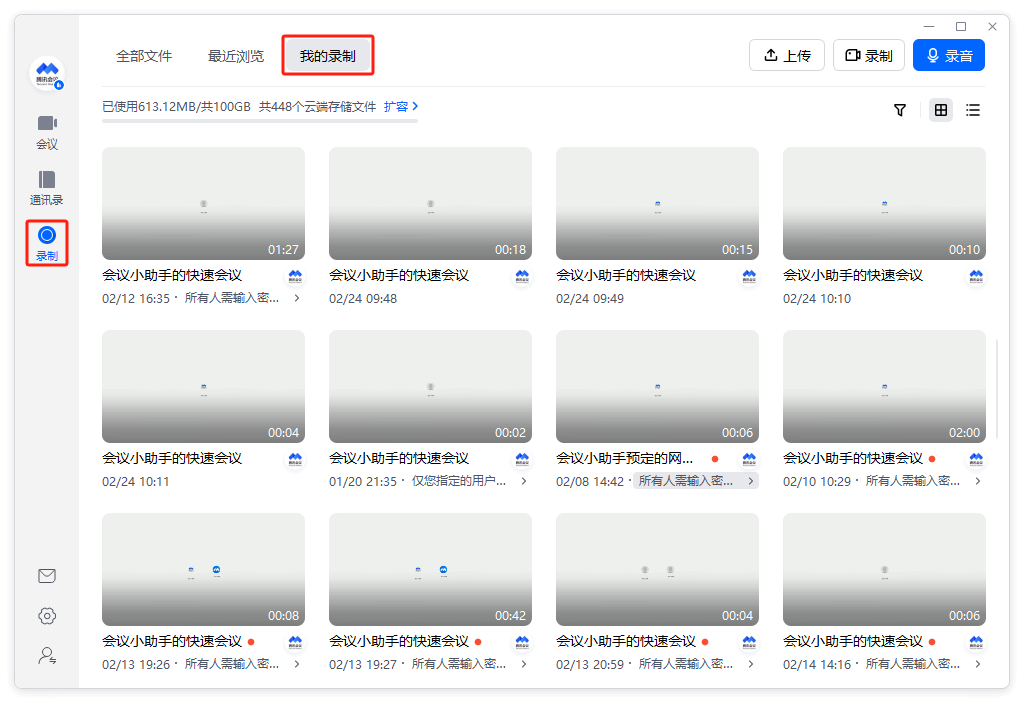
单击录制 > 我的录制,即可查看您账号下所有的录制文件。文件显示按文件生成的时间排序,即优先显示最新生成的文件。
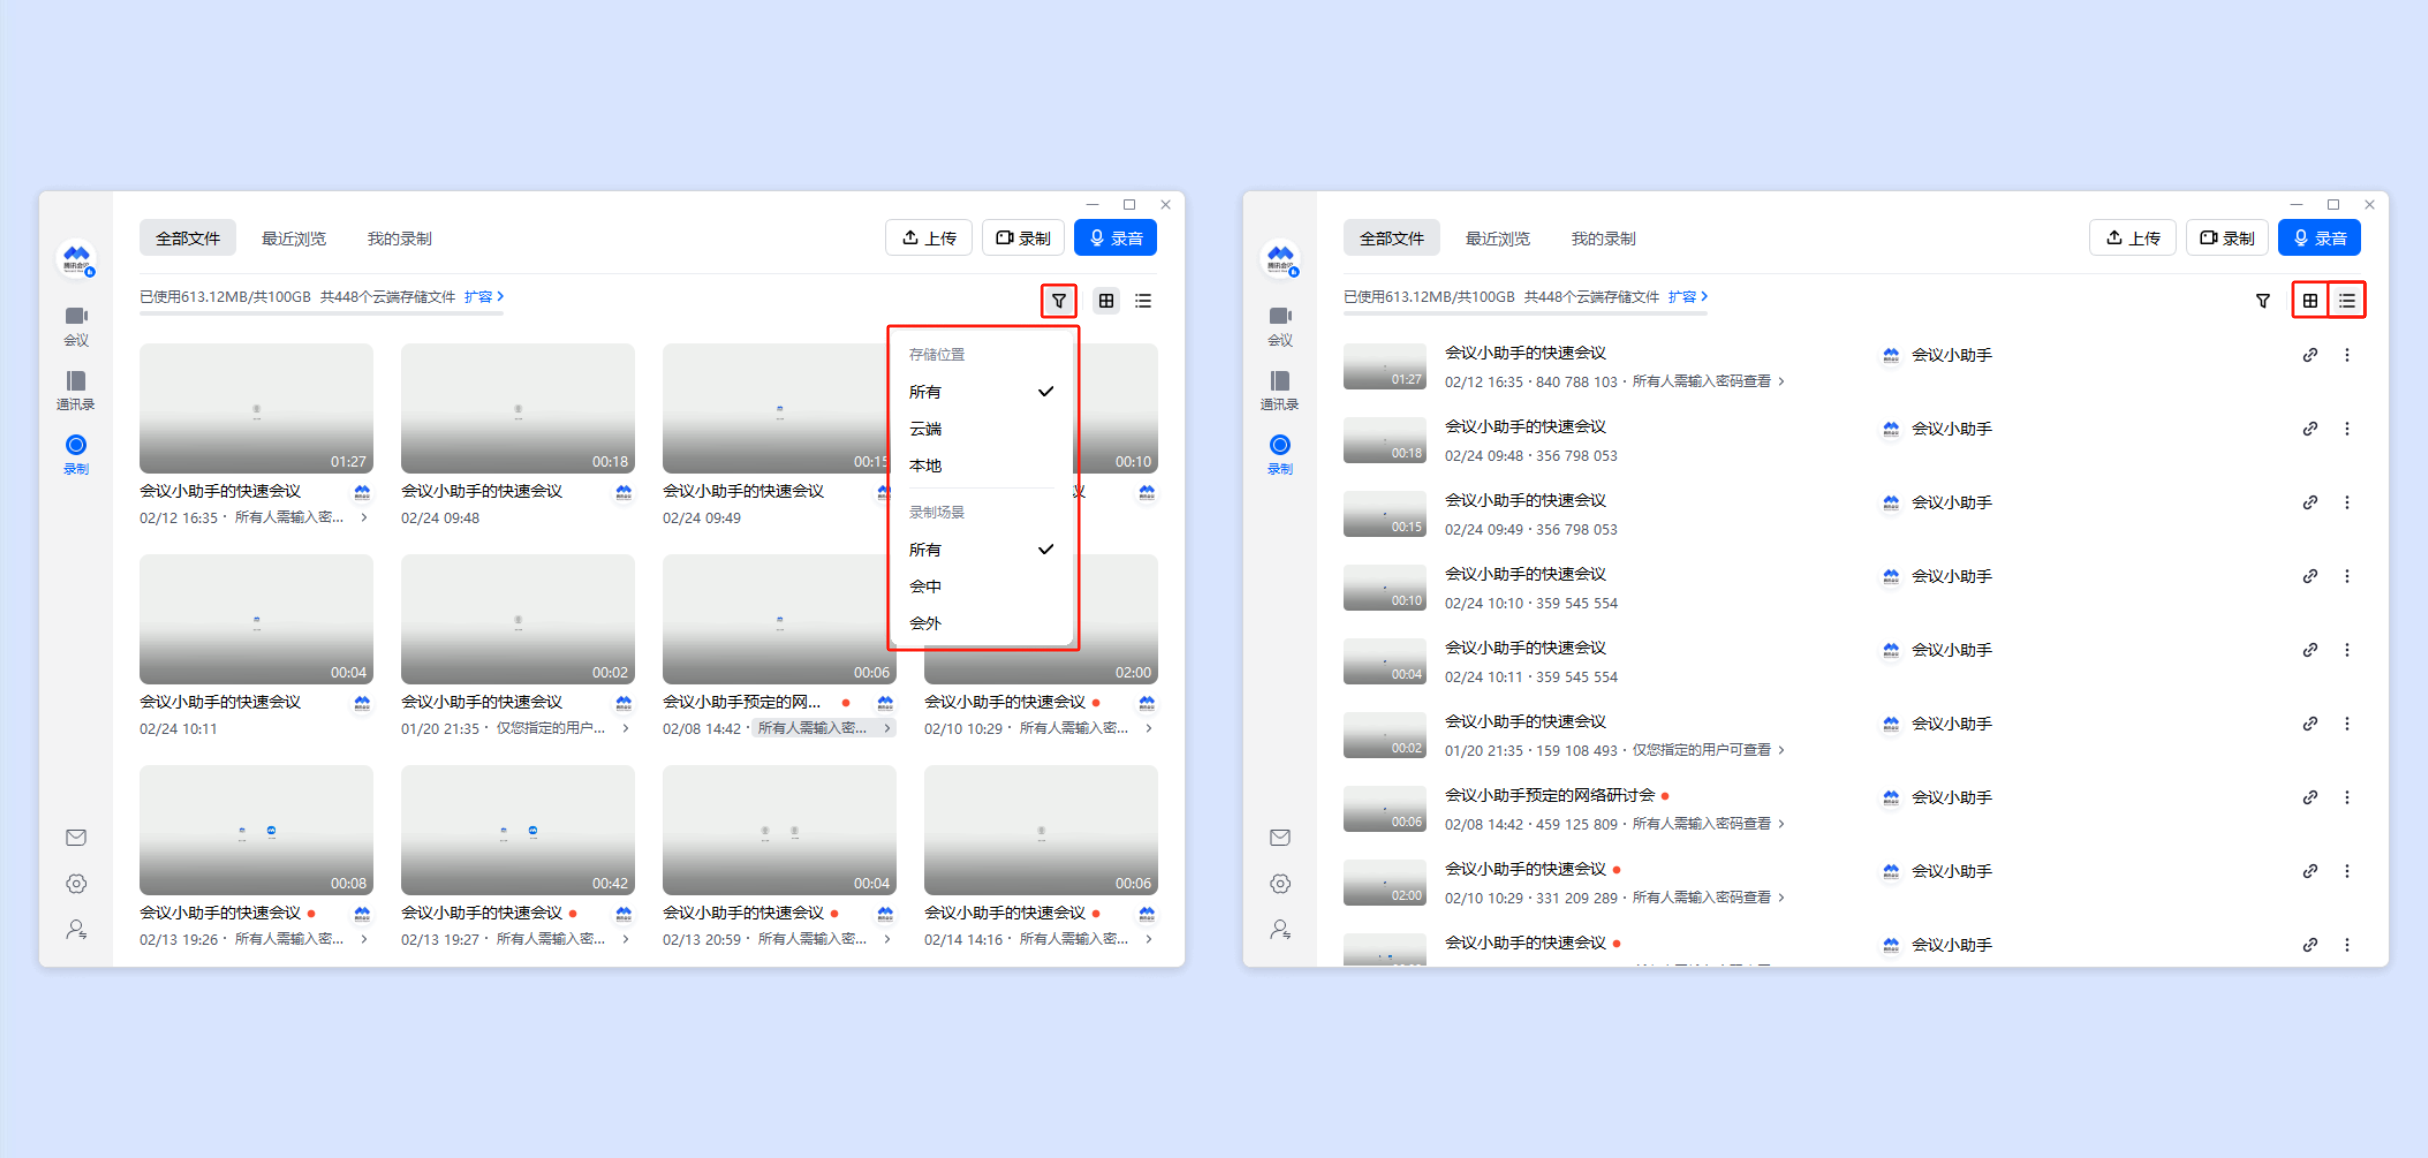
显示布局
单击右上角筛选图标,即可根据需要选择所显示的录制内容。
单击右上角布局图标,选择切换宫格、列表显示布局。
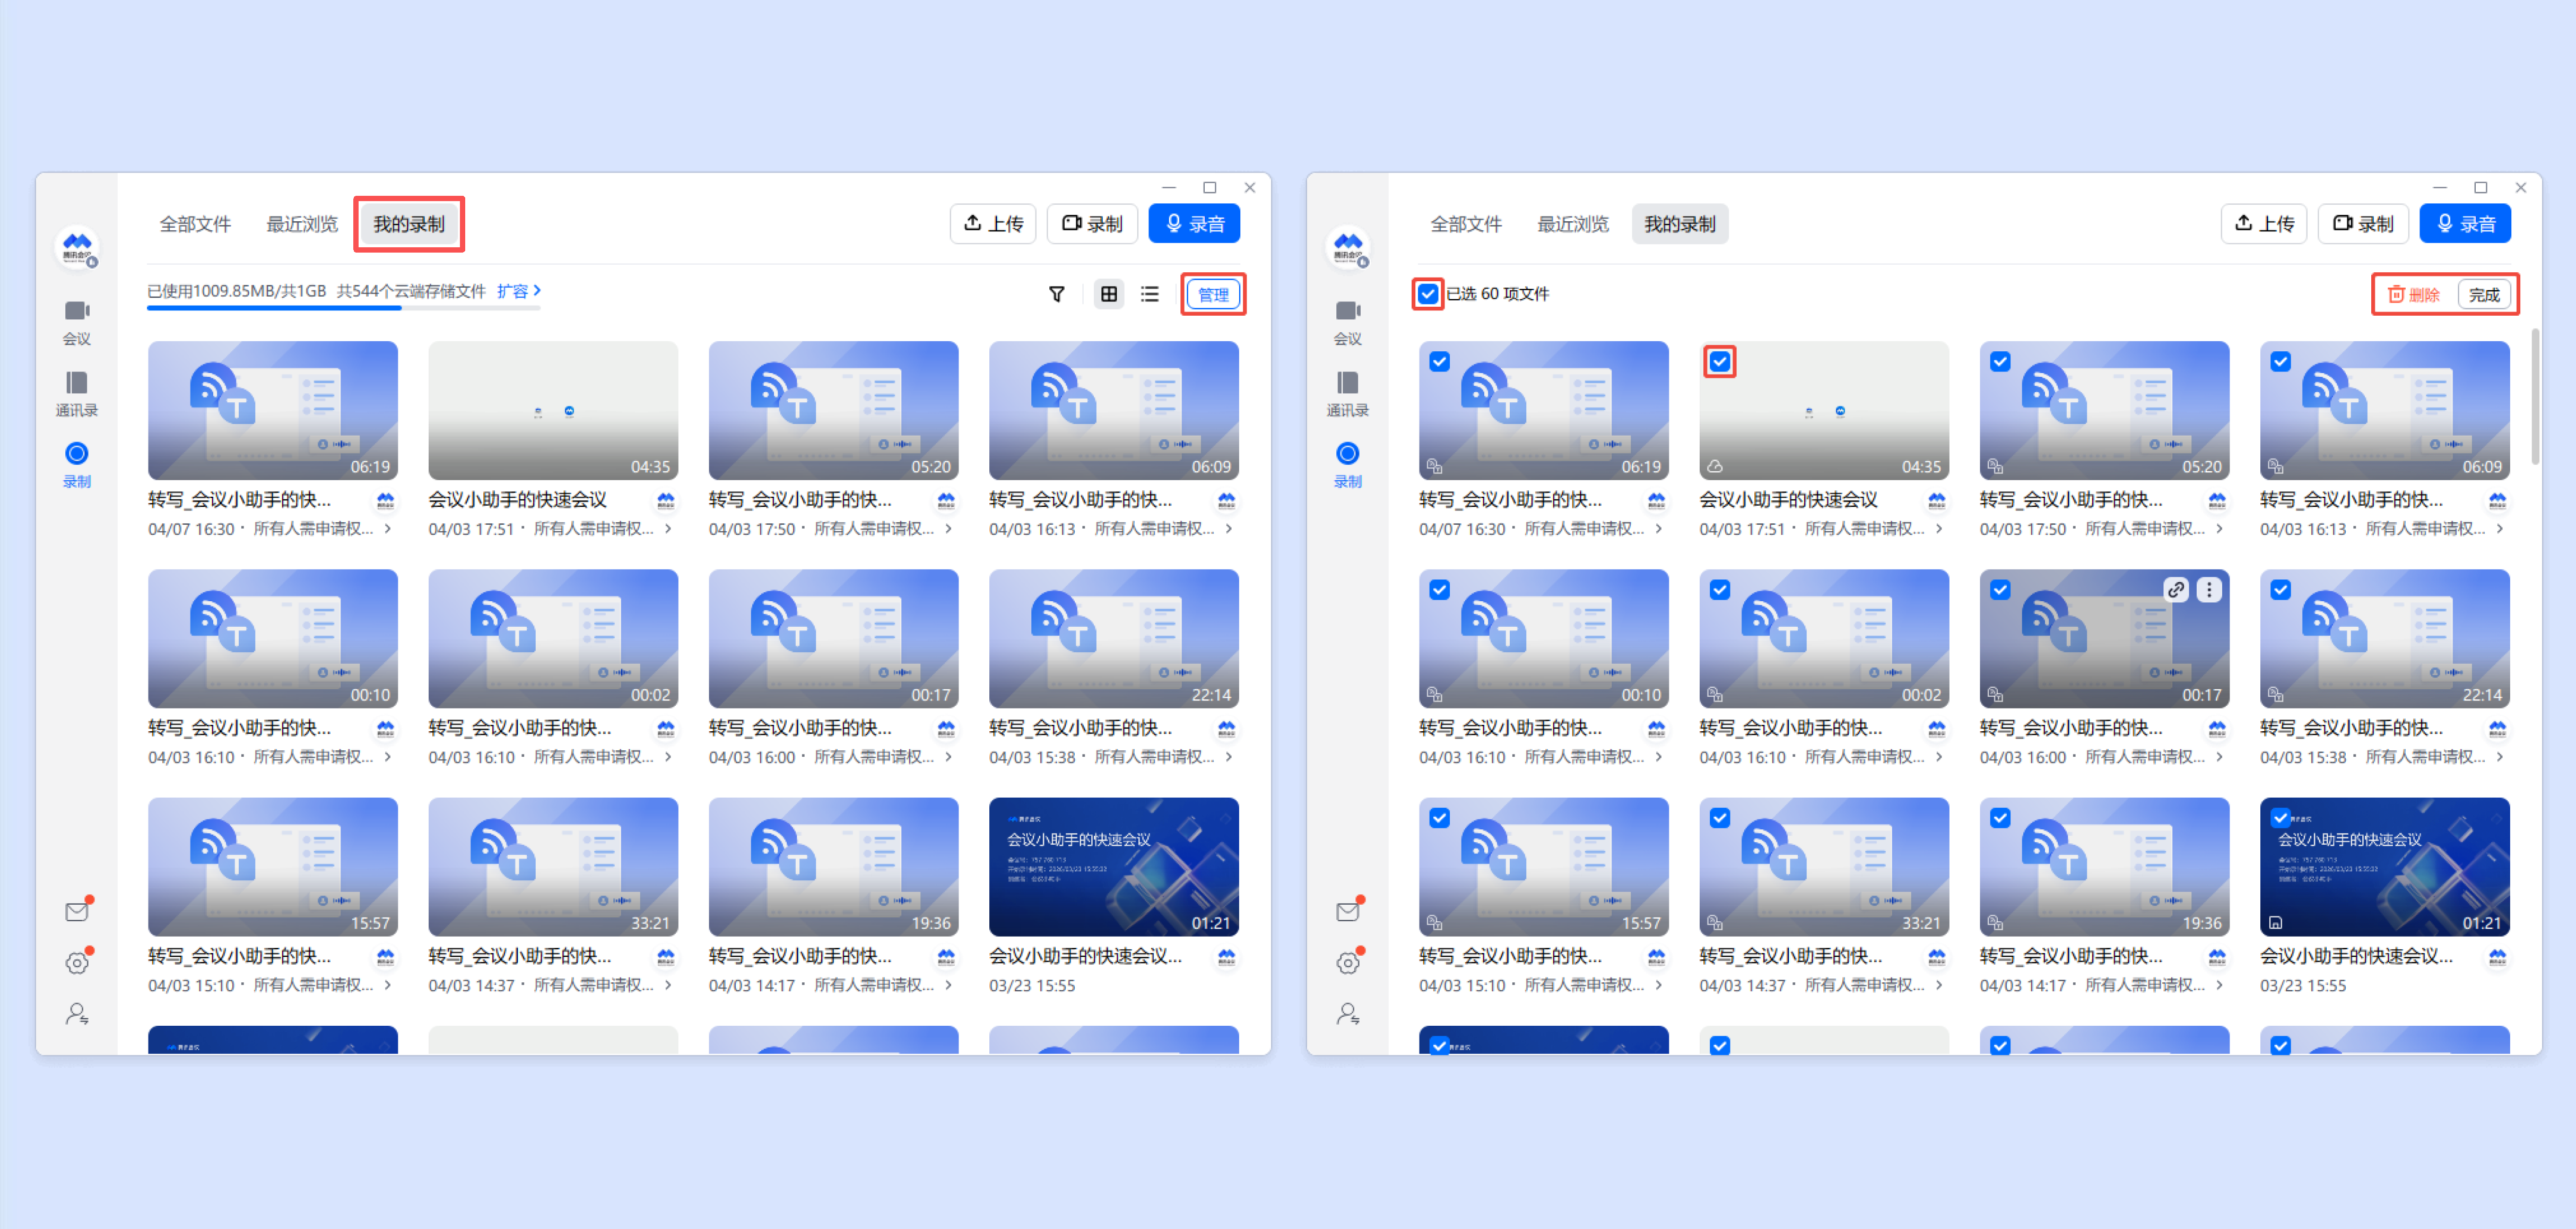
文件管理
在我的录制页面,单击右上角管理,可多选、全选录制文件批量删除。
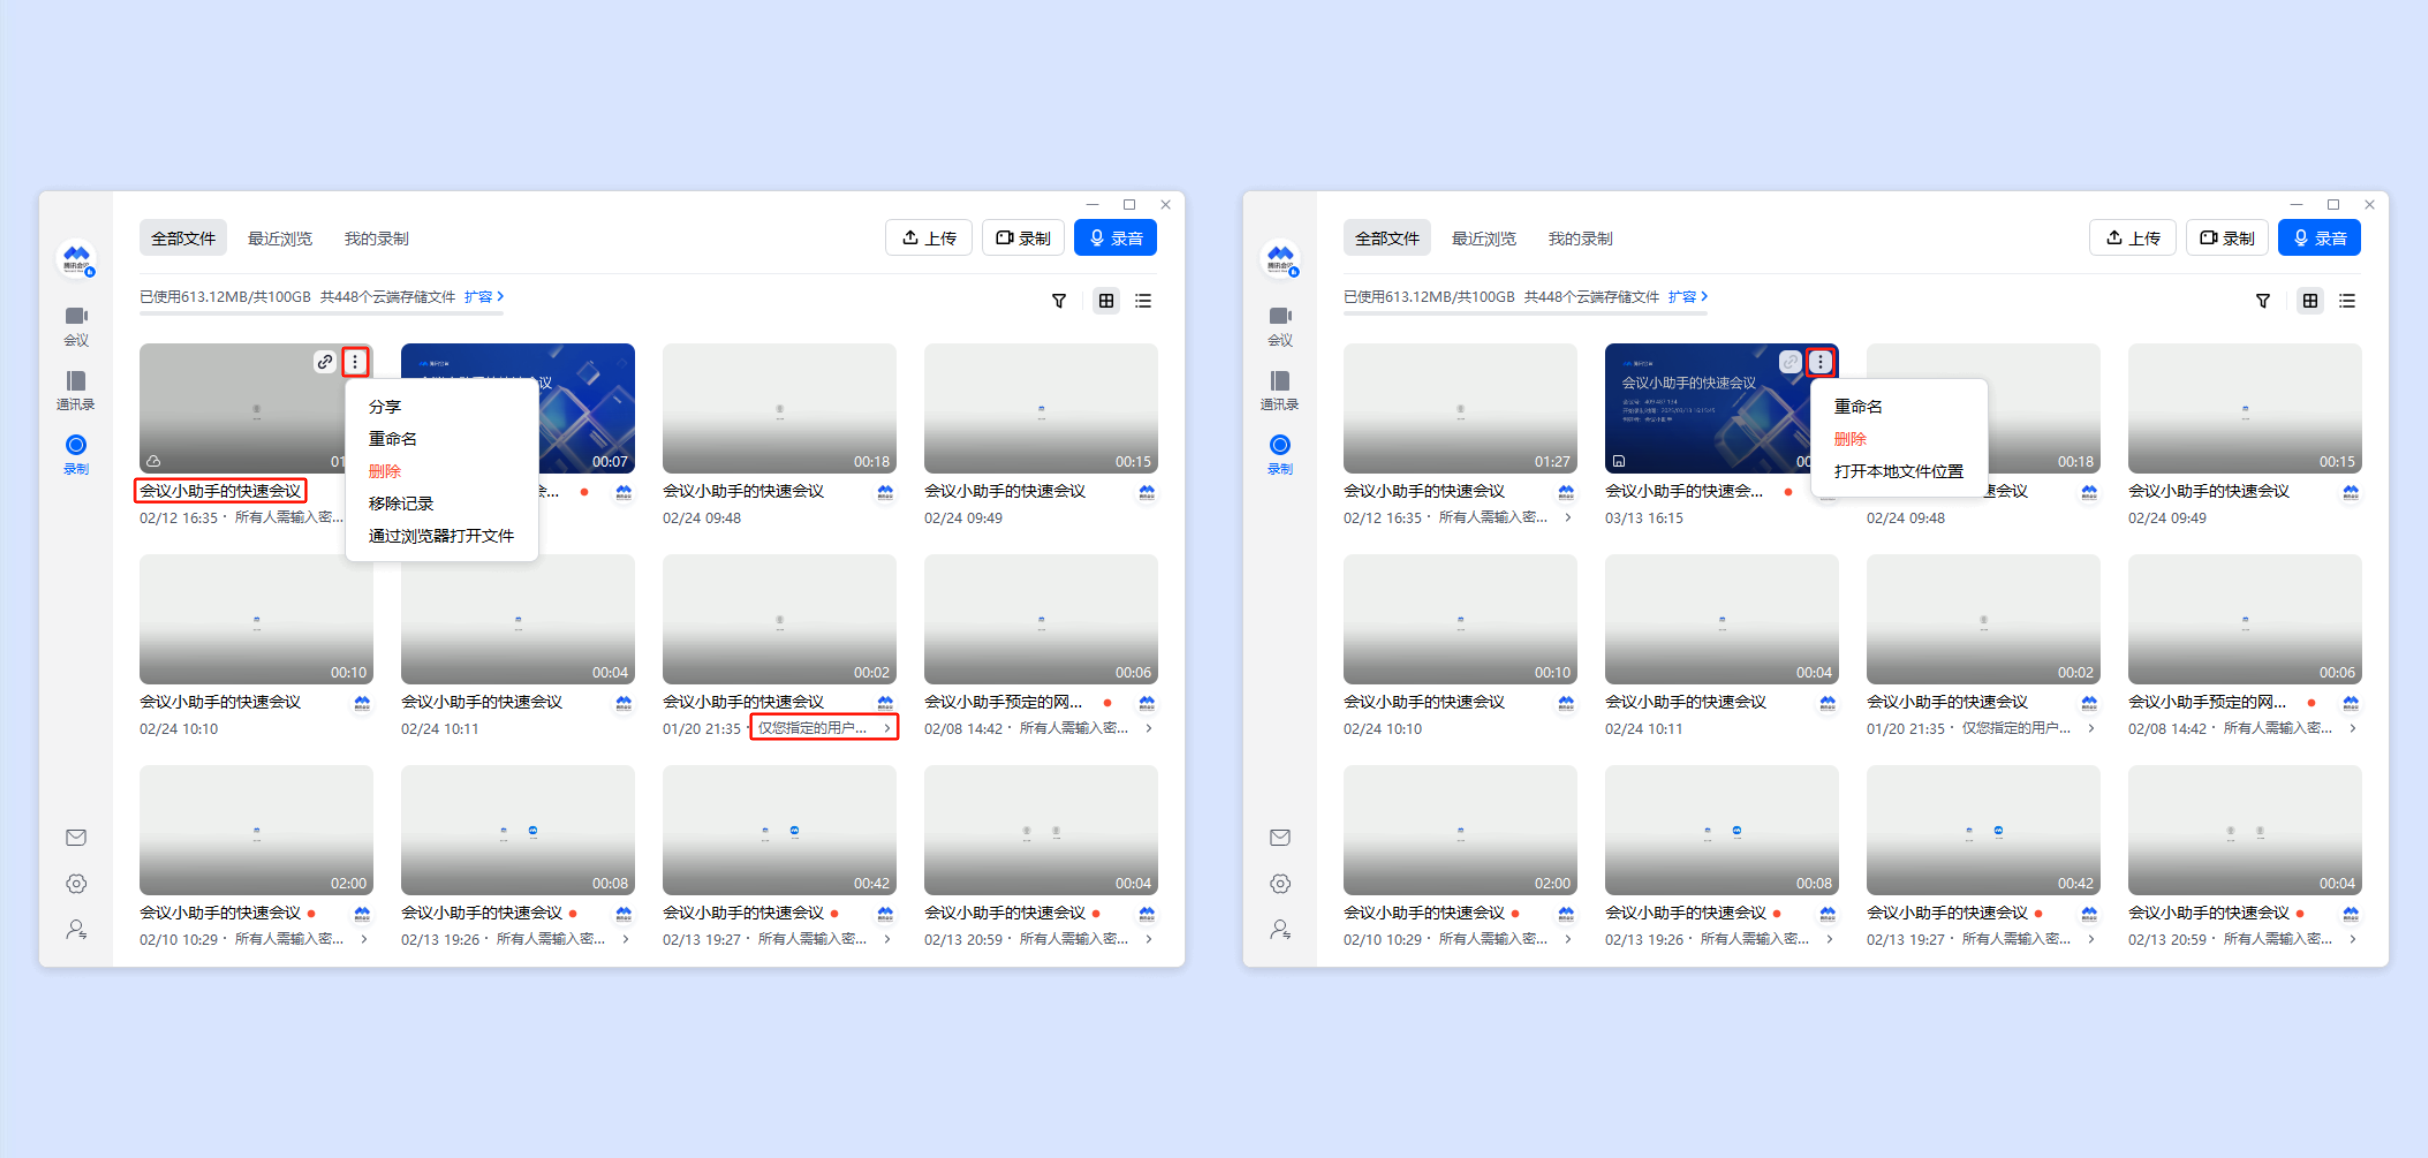
单击录制文件即可查看录制内容;将鼠标悬浮在文件上,会在文件右上角显示操作按钮,通过左下角的图标区分文件存储在云端还是本地设备。
云录制文件:
单击链接图标可快捷复制分享链接。
单击更多支持对自己的文件进行分享、重命名、删除、移除记录、通过浏览器打开文件操作,对于他人的文件支持移除记录。
单击自己的云录制文件下方文件可见范围可以快捷设置分享权限。
单击文件名称即可快捷重新命名。
本地录制文件:单击更多支持重命名、删除、打开本地文件位置操作。
Android/iOS
全部文件
单击 App 主界面底部我的 > 录制 > 全部文件即可查看您账号下所有云录制文件、会议外录制的文件(即原会记文件)和上传的音视频文件,以及浏览过、处于审批中的他人录制文件,并显示您的录制空间使用情况。单击对应的录制文件,即可查看录制详情。
文件显示按文件加入列表的时间排序,即优先显示最新加入列表的文件。
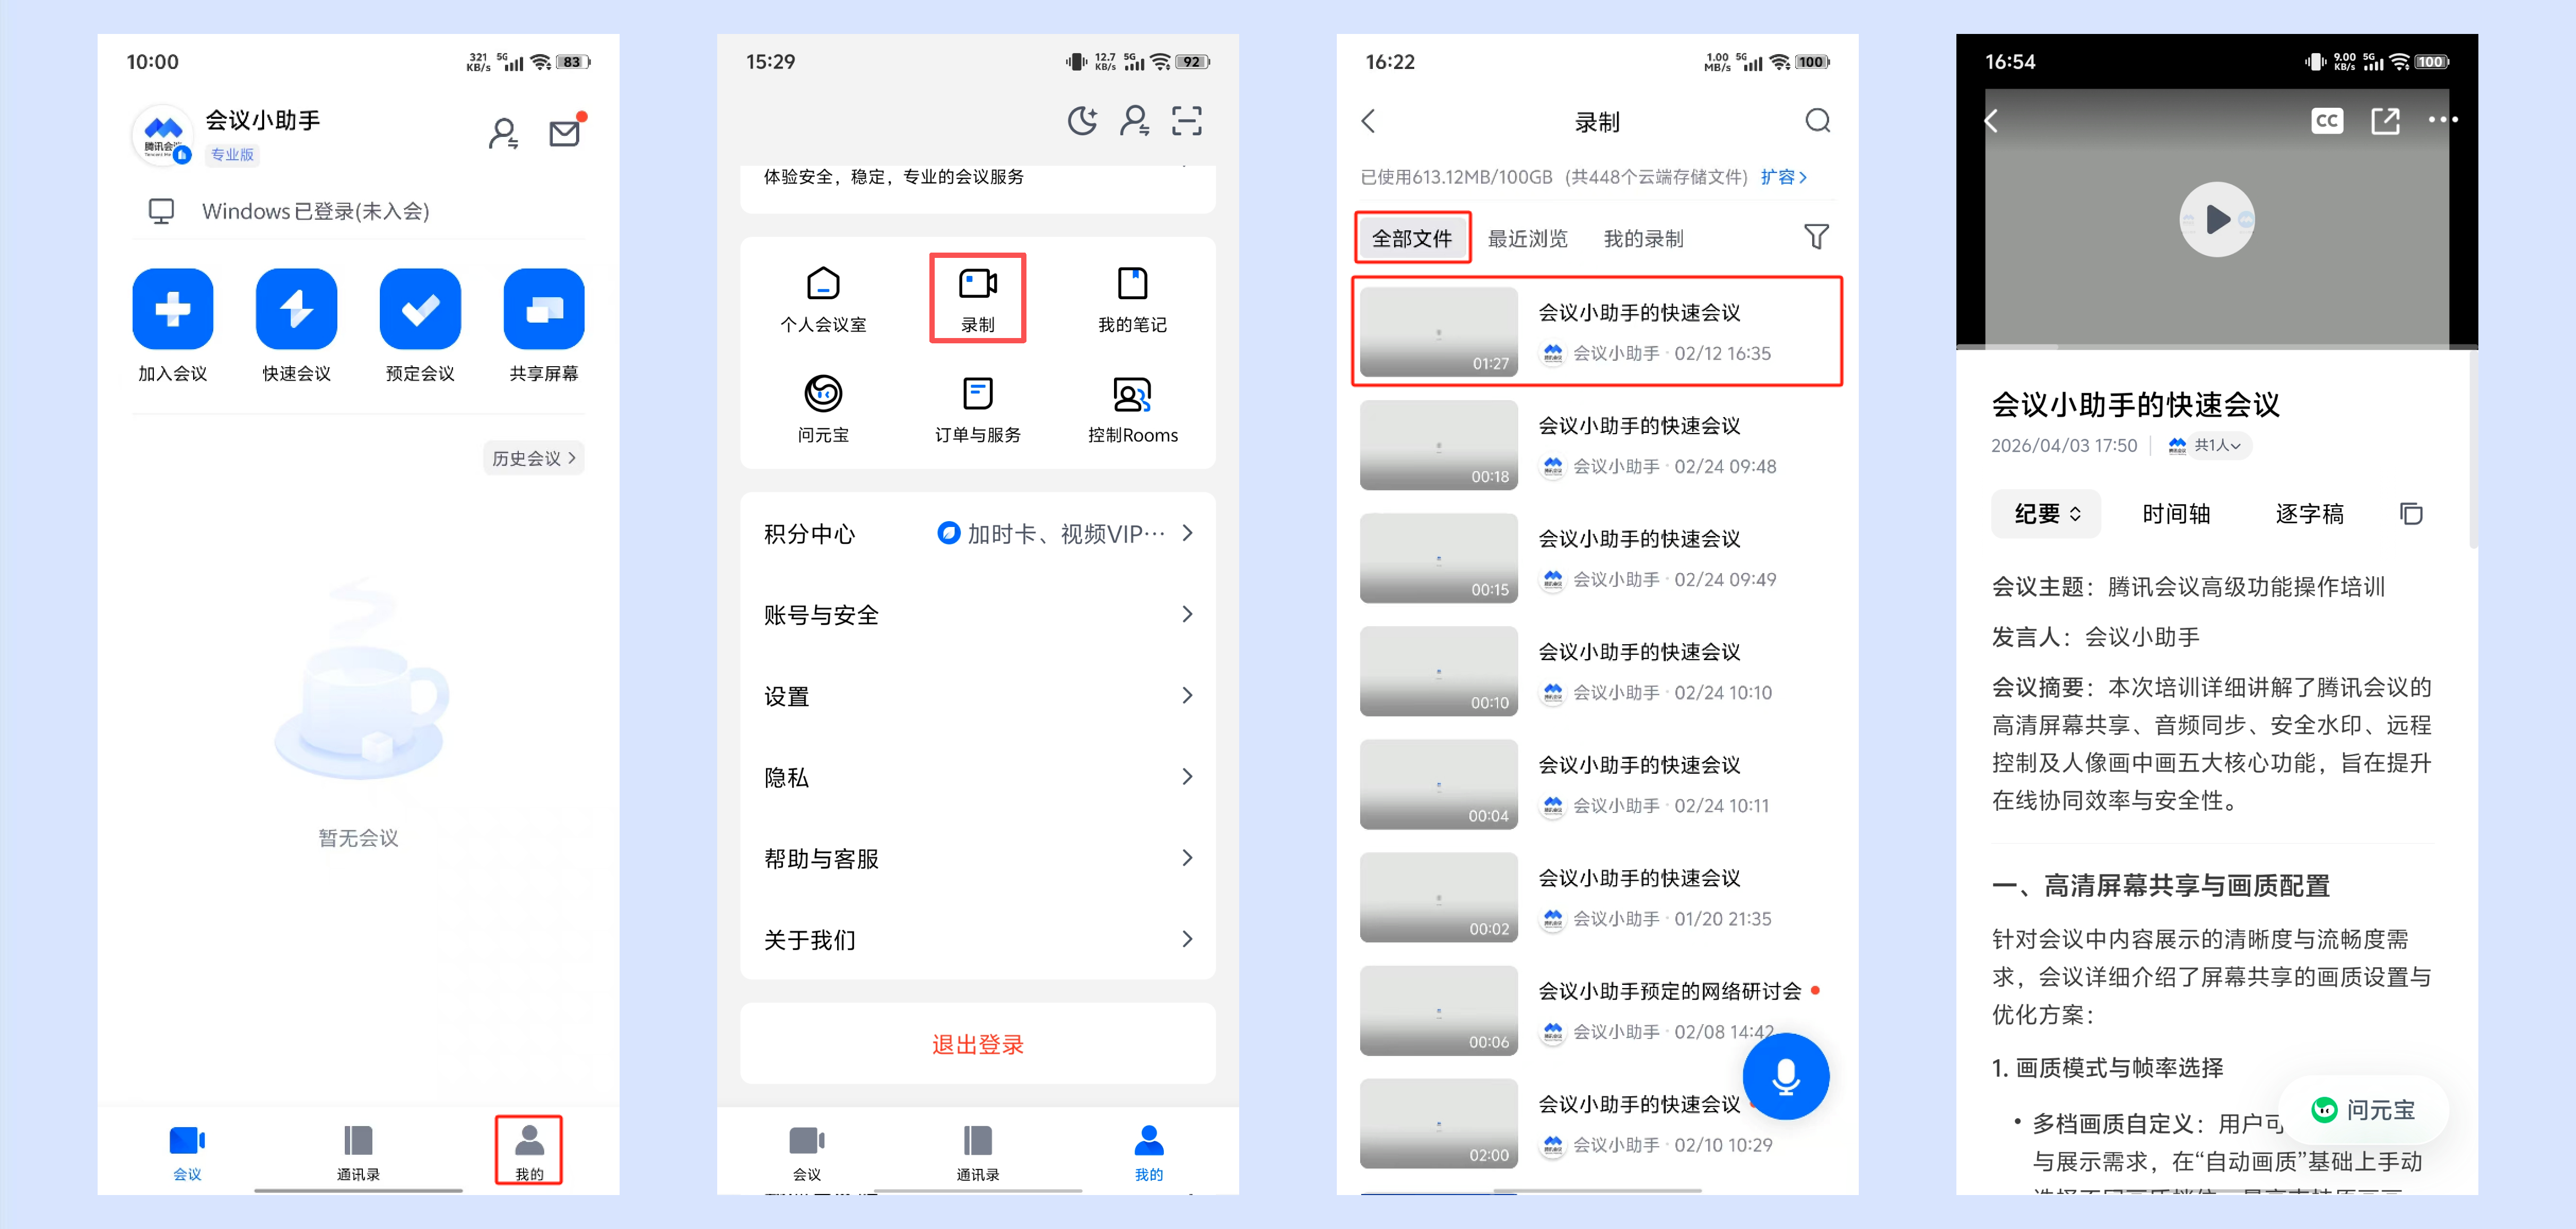
单击右上角筛选图标,即可根据需要选择全部文件列表下所显示的录制内容。
针对单个录制文件左滑操作,可快捷分享、移除记录、删除文件(删除仅针对自己的录制文件)。
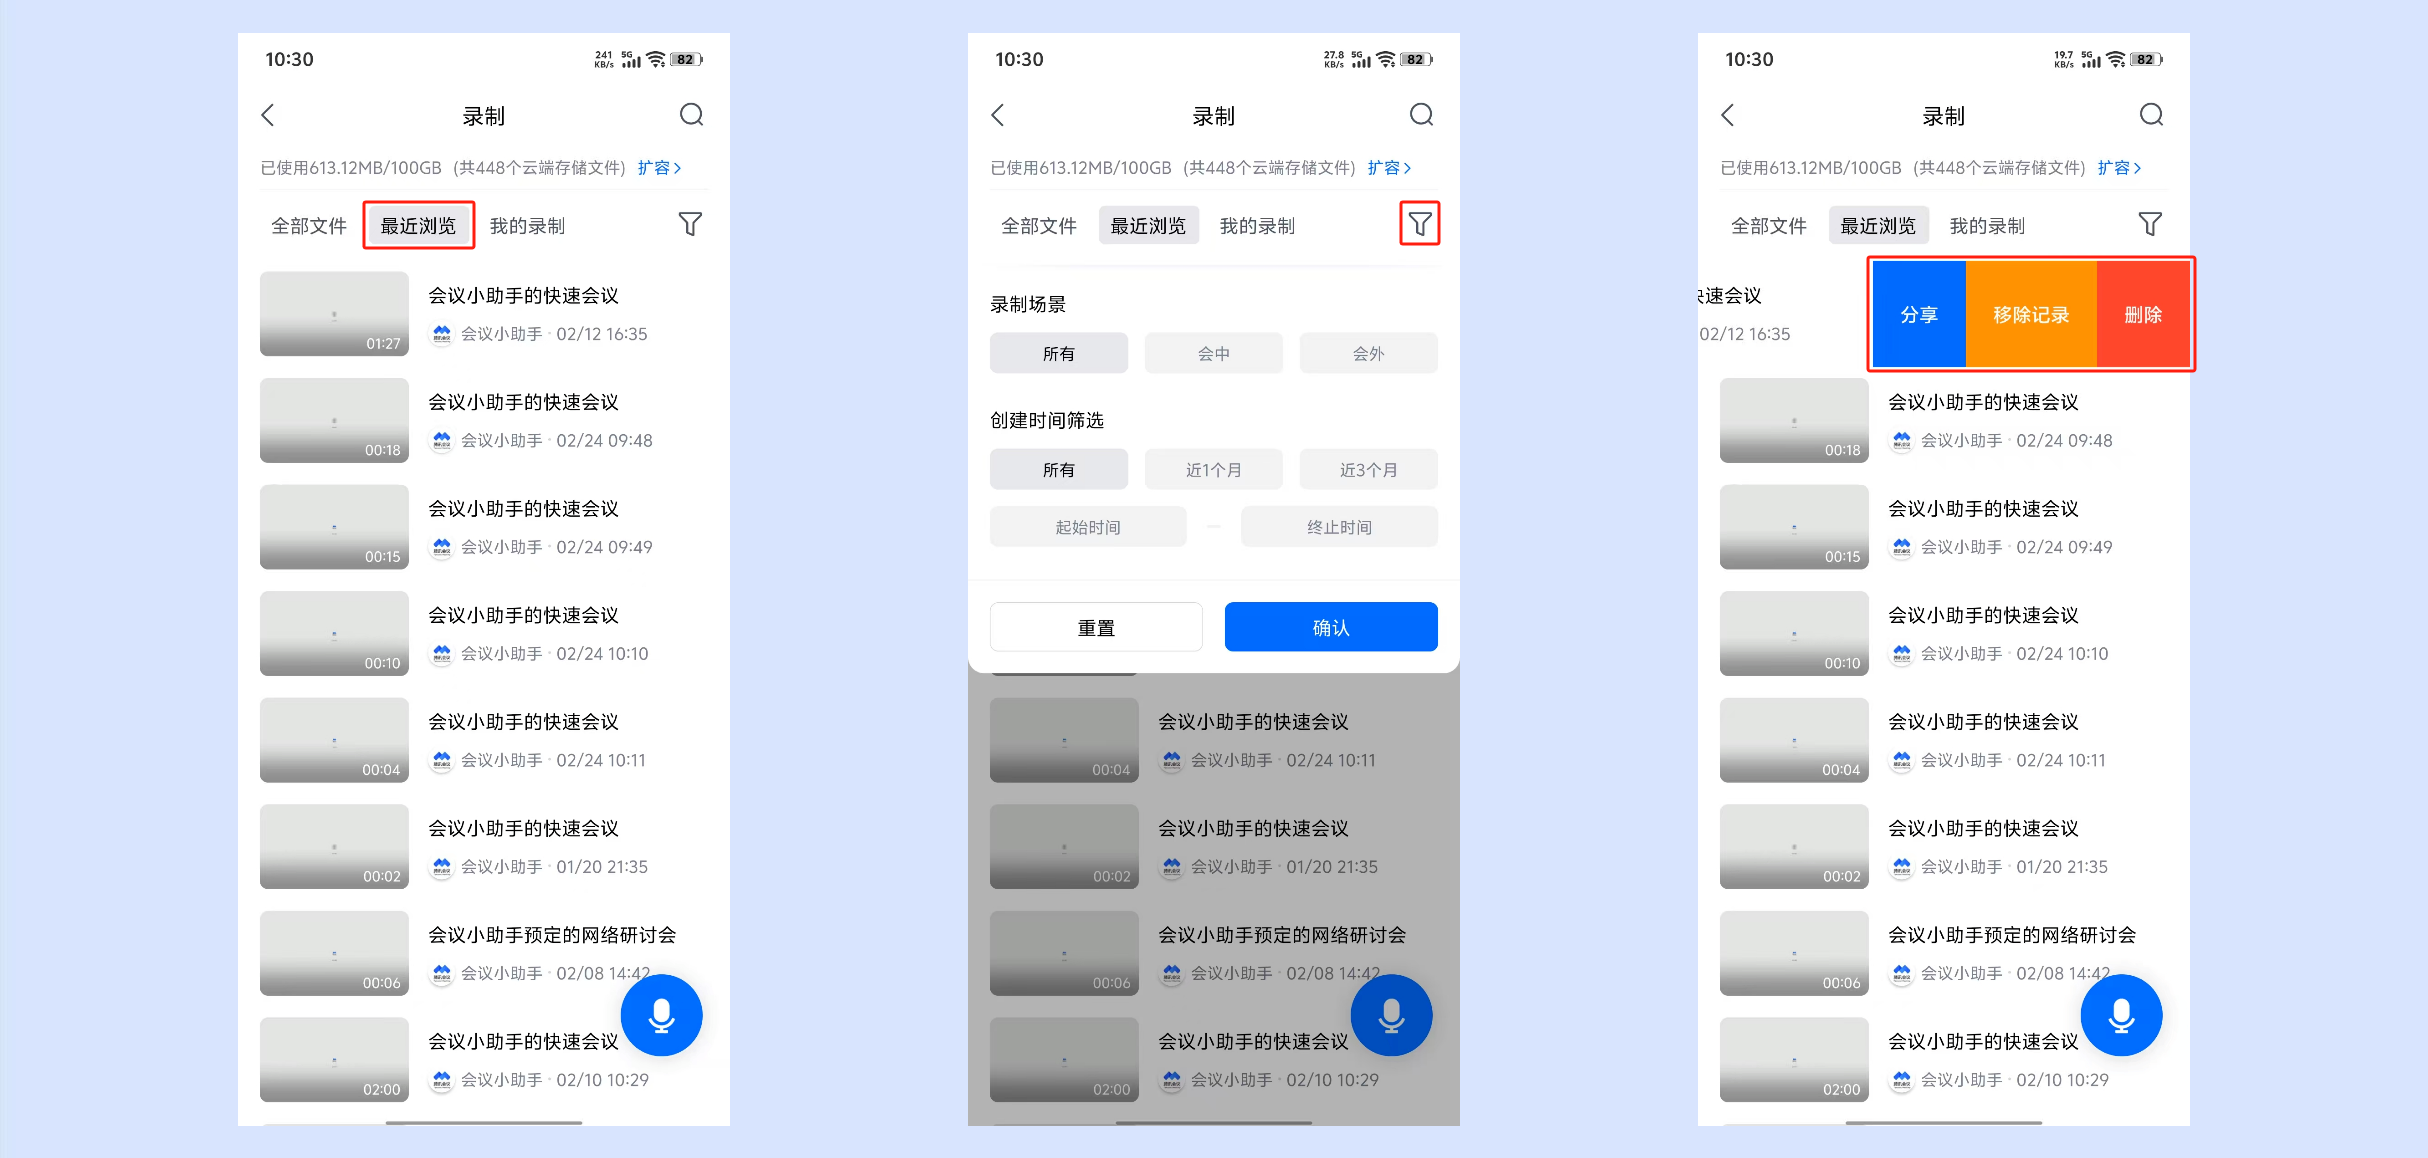
最近浏览
单击最近浏览,即可查看您最近浏览过的录制文件。文件显示按文件的浏览时间排序,即优先显示最新查看的文件。
单击右上角筛选图标,即可根据需要选择最近浏览列表下所显示的录制内容。
针对单个录制文件左滑操作,可快捷分享、移除记录、删除该文件(删除仅针对自己的录制文件)。
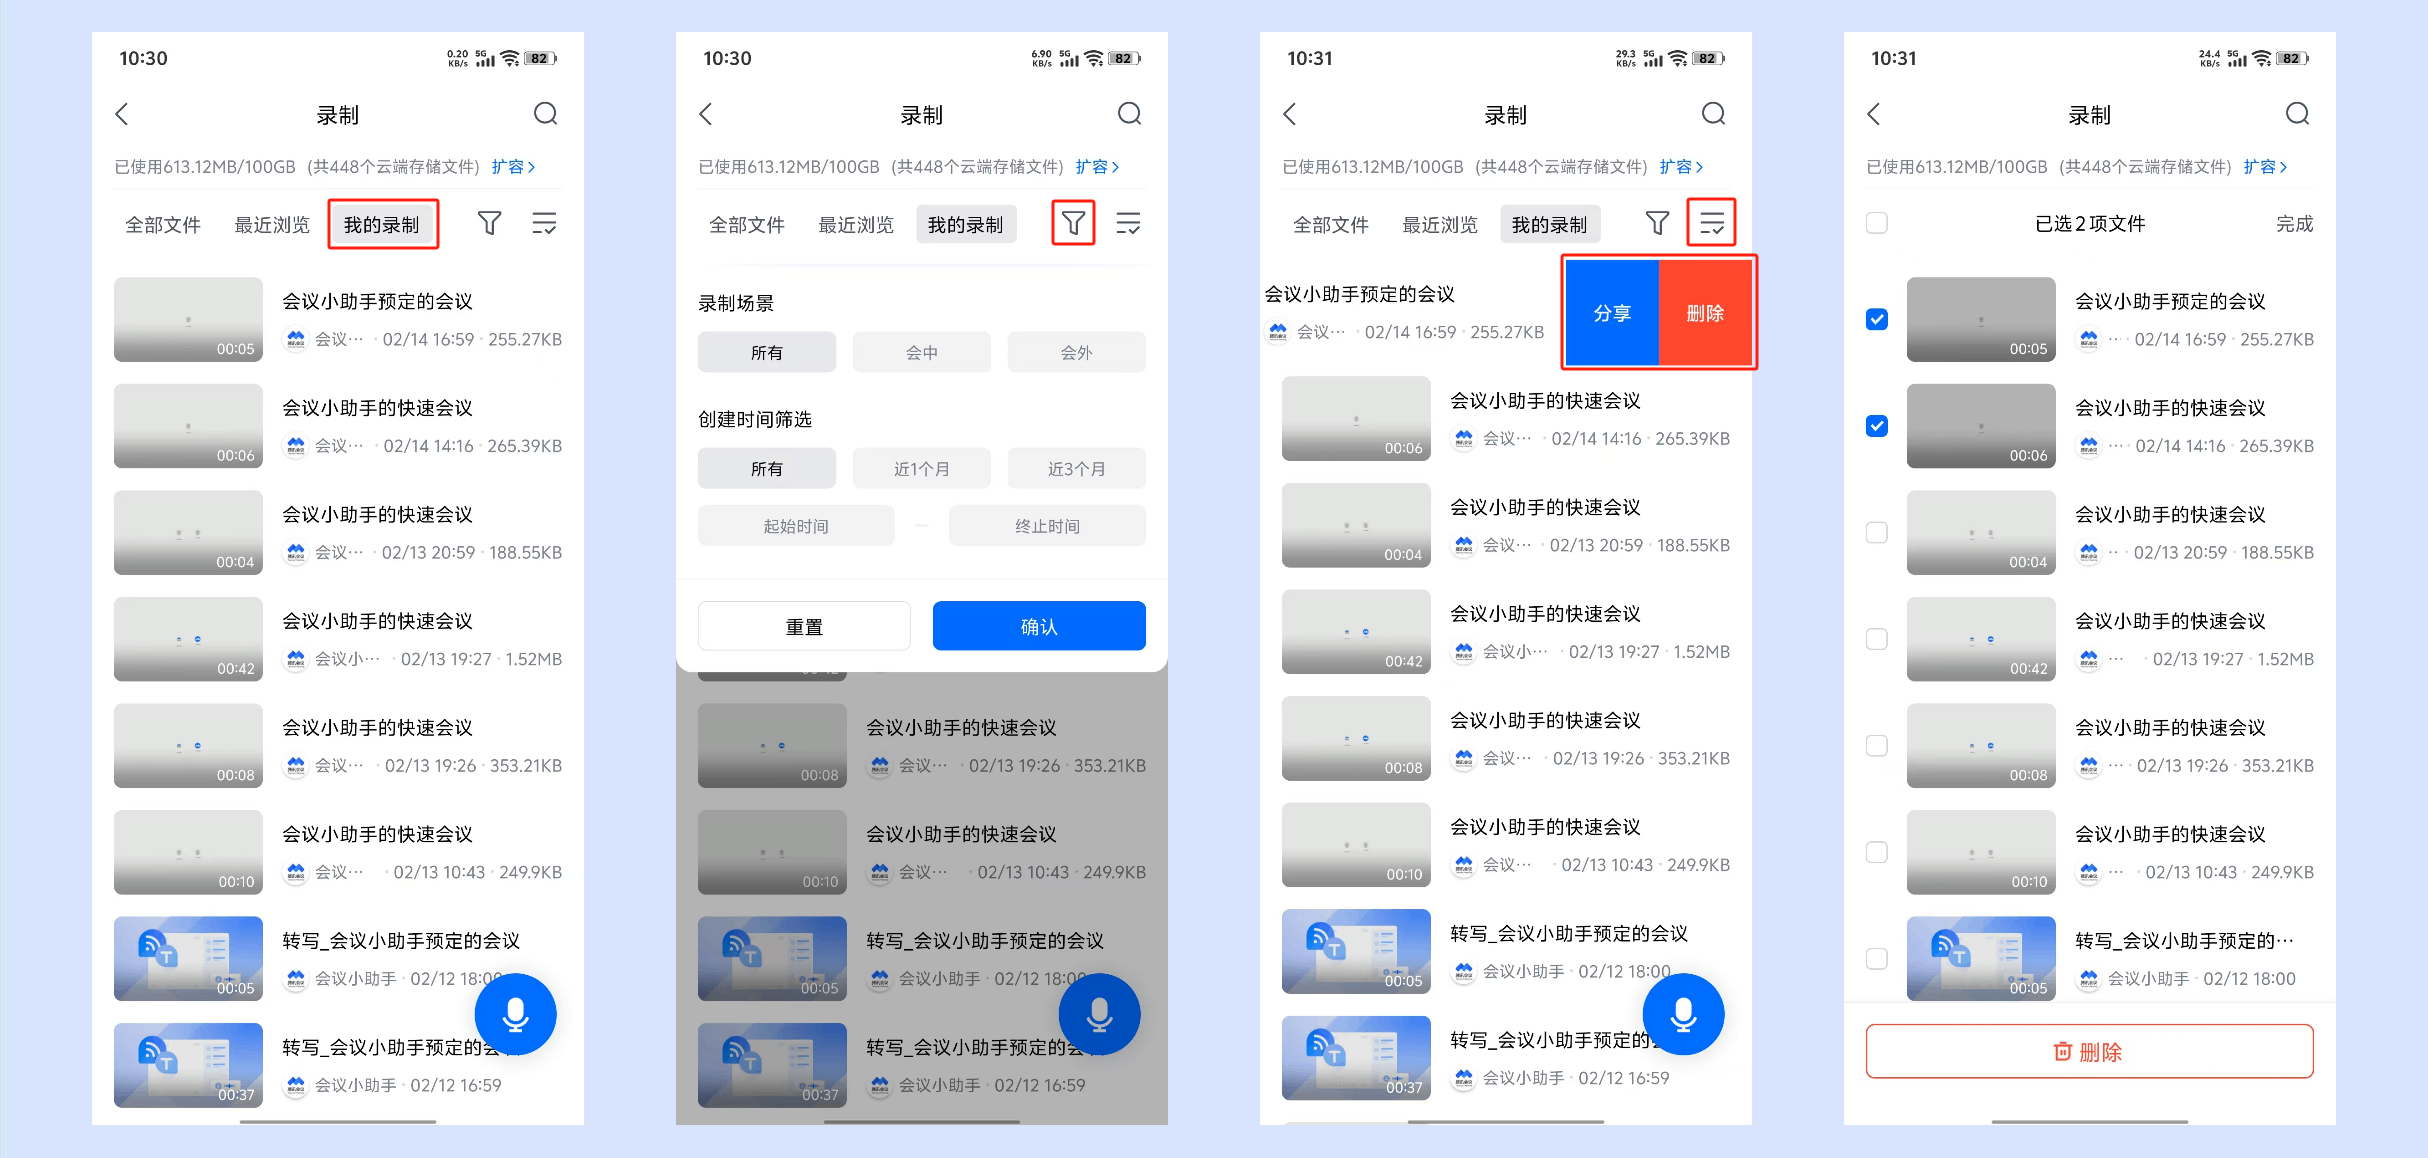
我的录制
单击我的录制,即可查看您账号下所有云录制文件、会议外录制的文件(即原会记文件)和上传的音视频文件。文件显示按文件生成的时间排序,即优先显示最新生成的文件。
单击右上角筛选图标,即可根据需要选择我的录制列表下所显示的录制内容。
针对单个录制文件左滑操作,可快捷分享、删除该文件。
单击右上角批量管理图标,可同时选择多个录制文件批量删除。
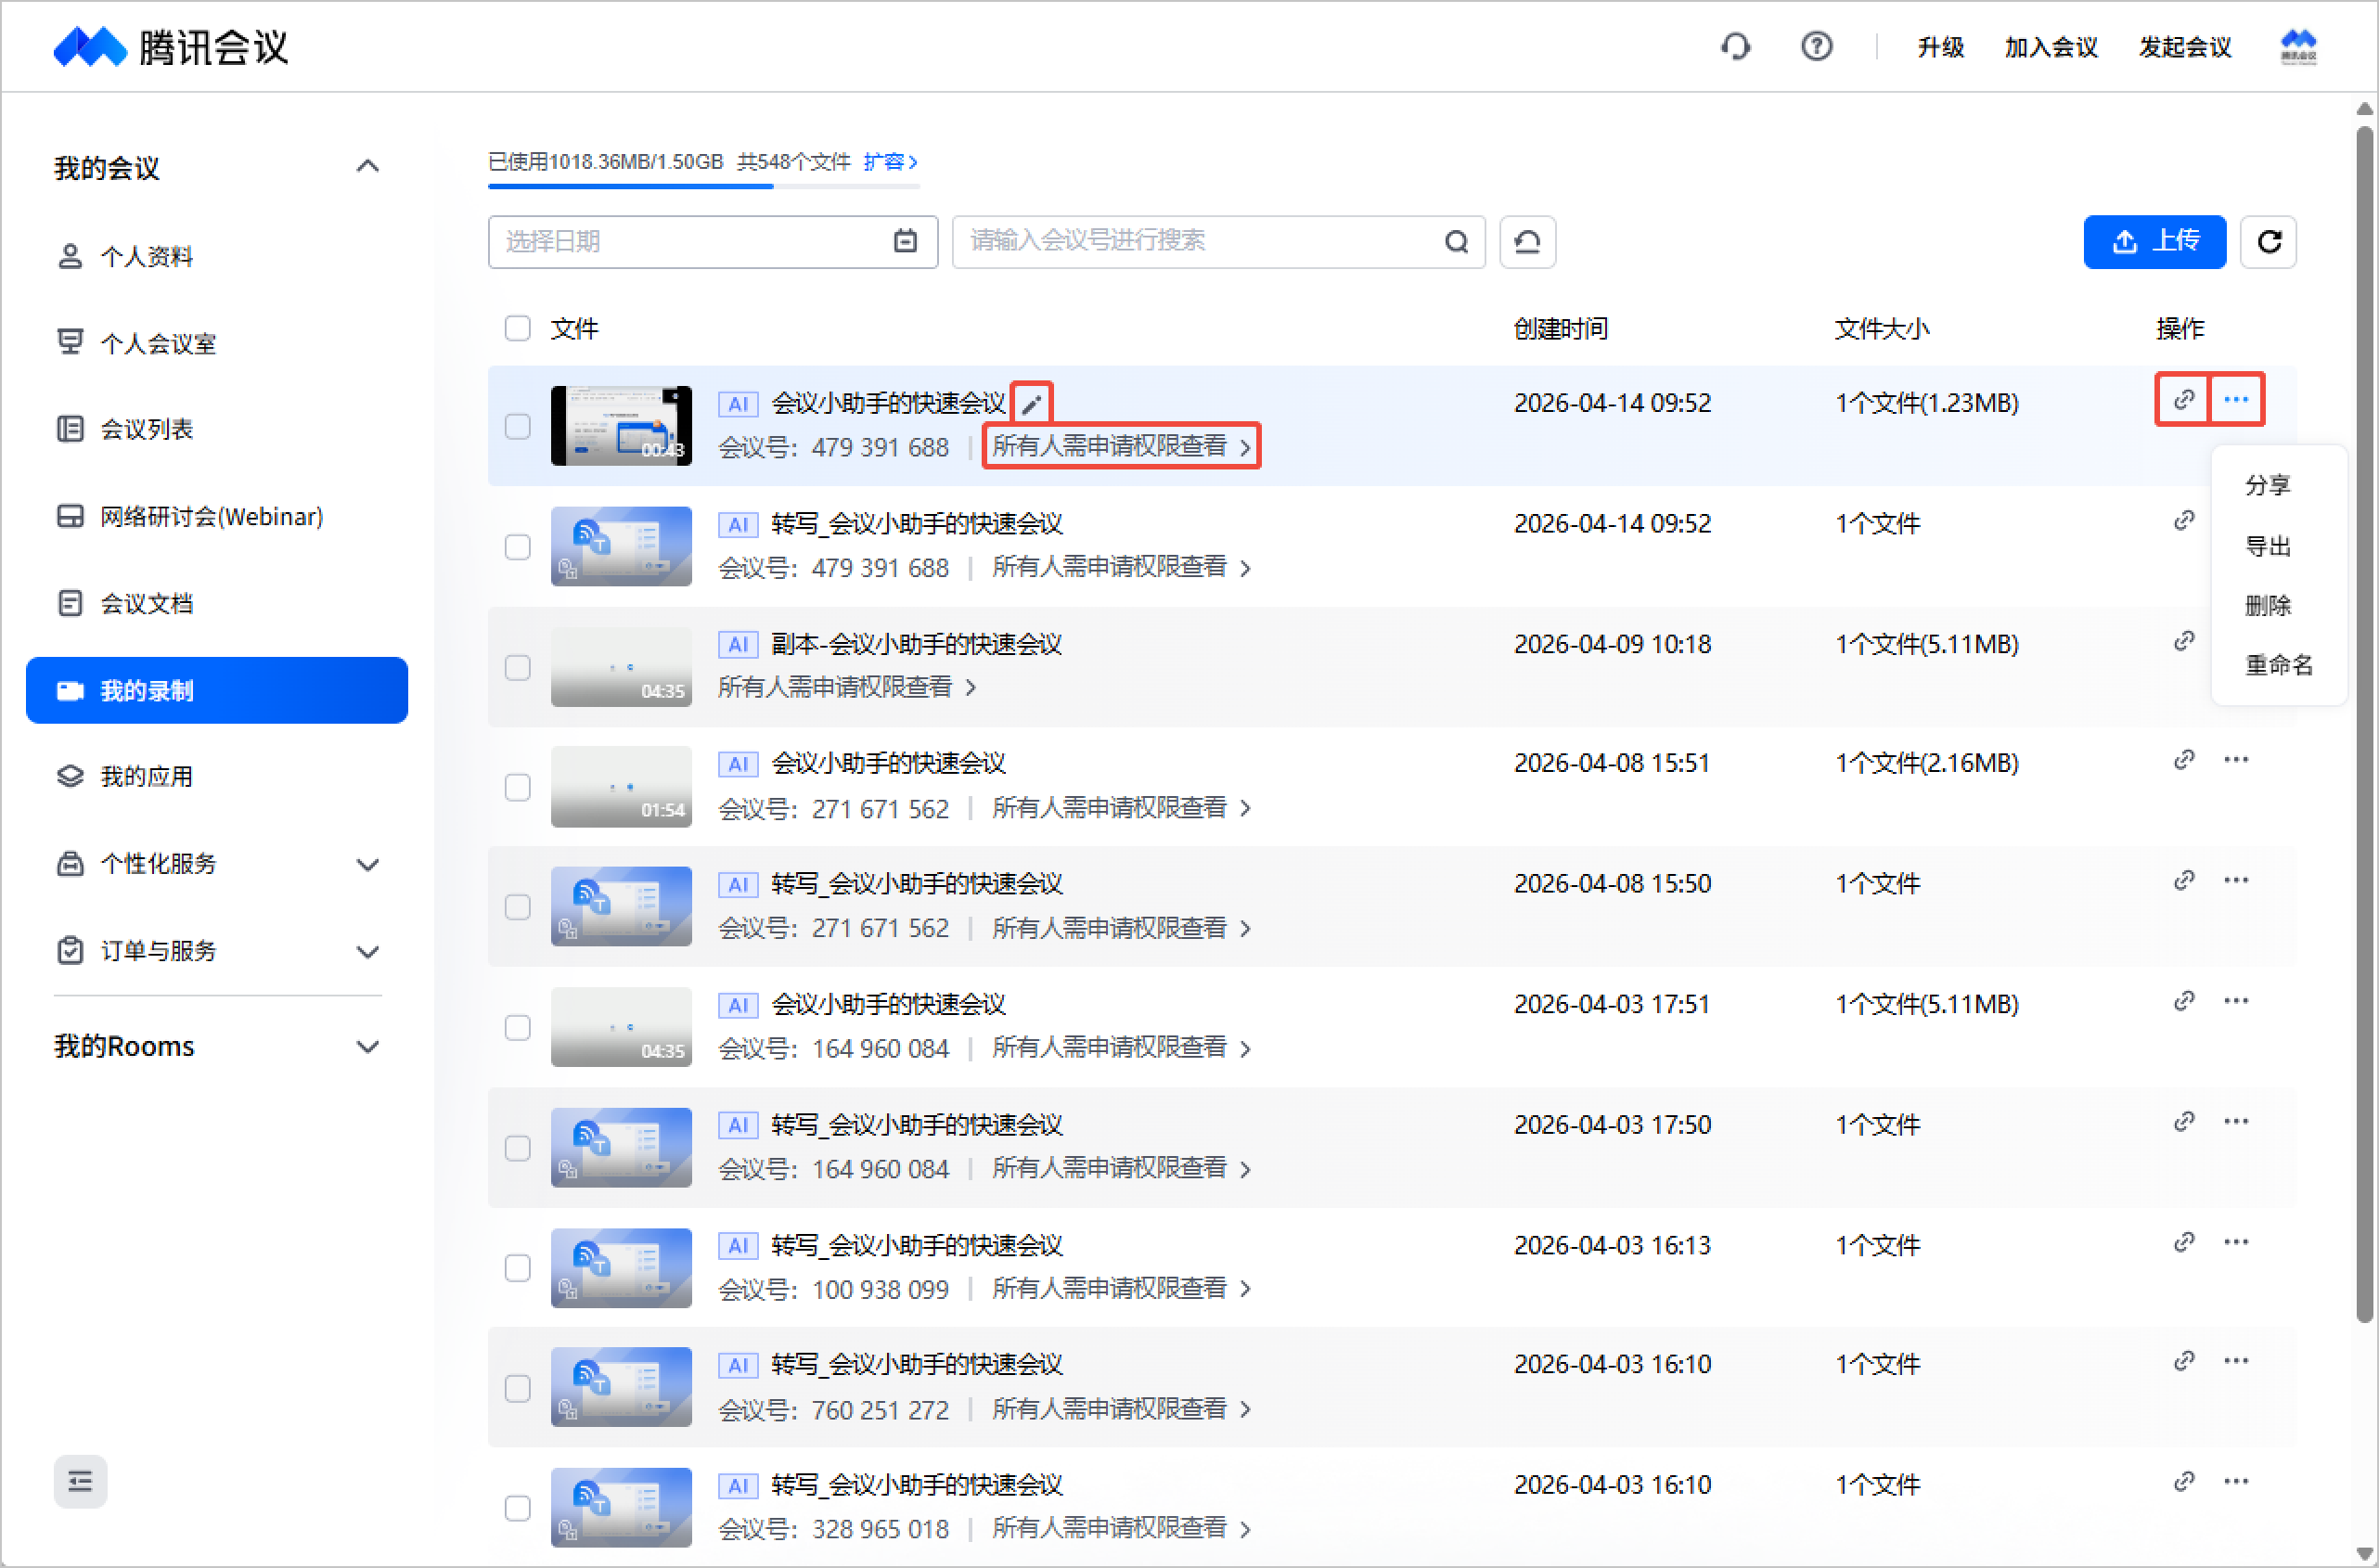
我的录制列表
存储空间使用情况:您的云存储空间占用情况及文件数量。
搜索:列表顶部的搜索框可根据录制文件创建时间区间、会议号进行搜索。
文件信息:文件名称、所属会议号、分享权限、创建时间、文件大小,单击文件即可进入录制详情页。
复制链接:单击复制图标即可快捷复制分享链接到剪贴板。
更多操作:
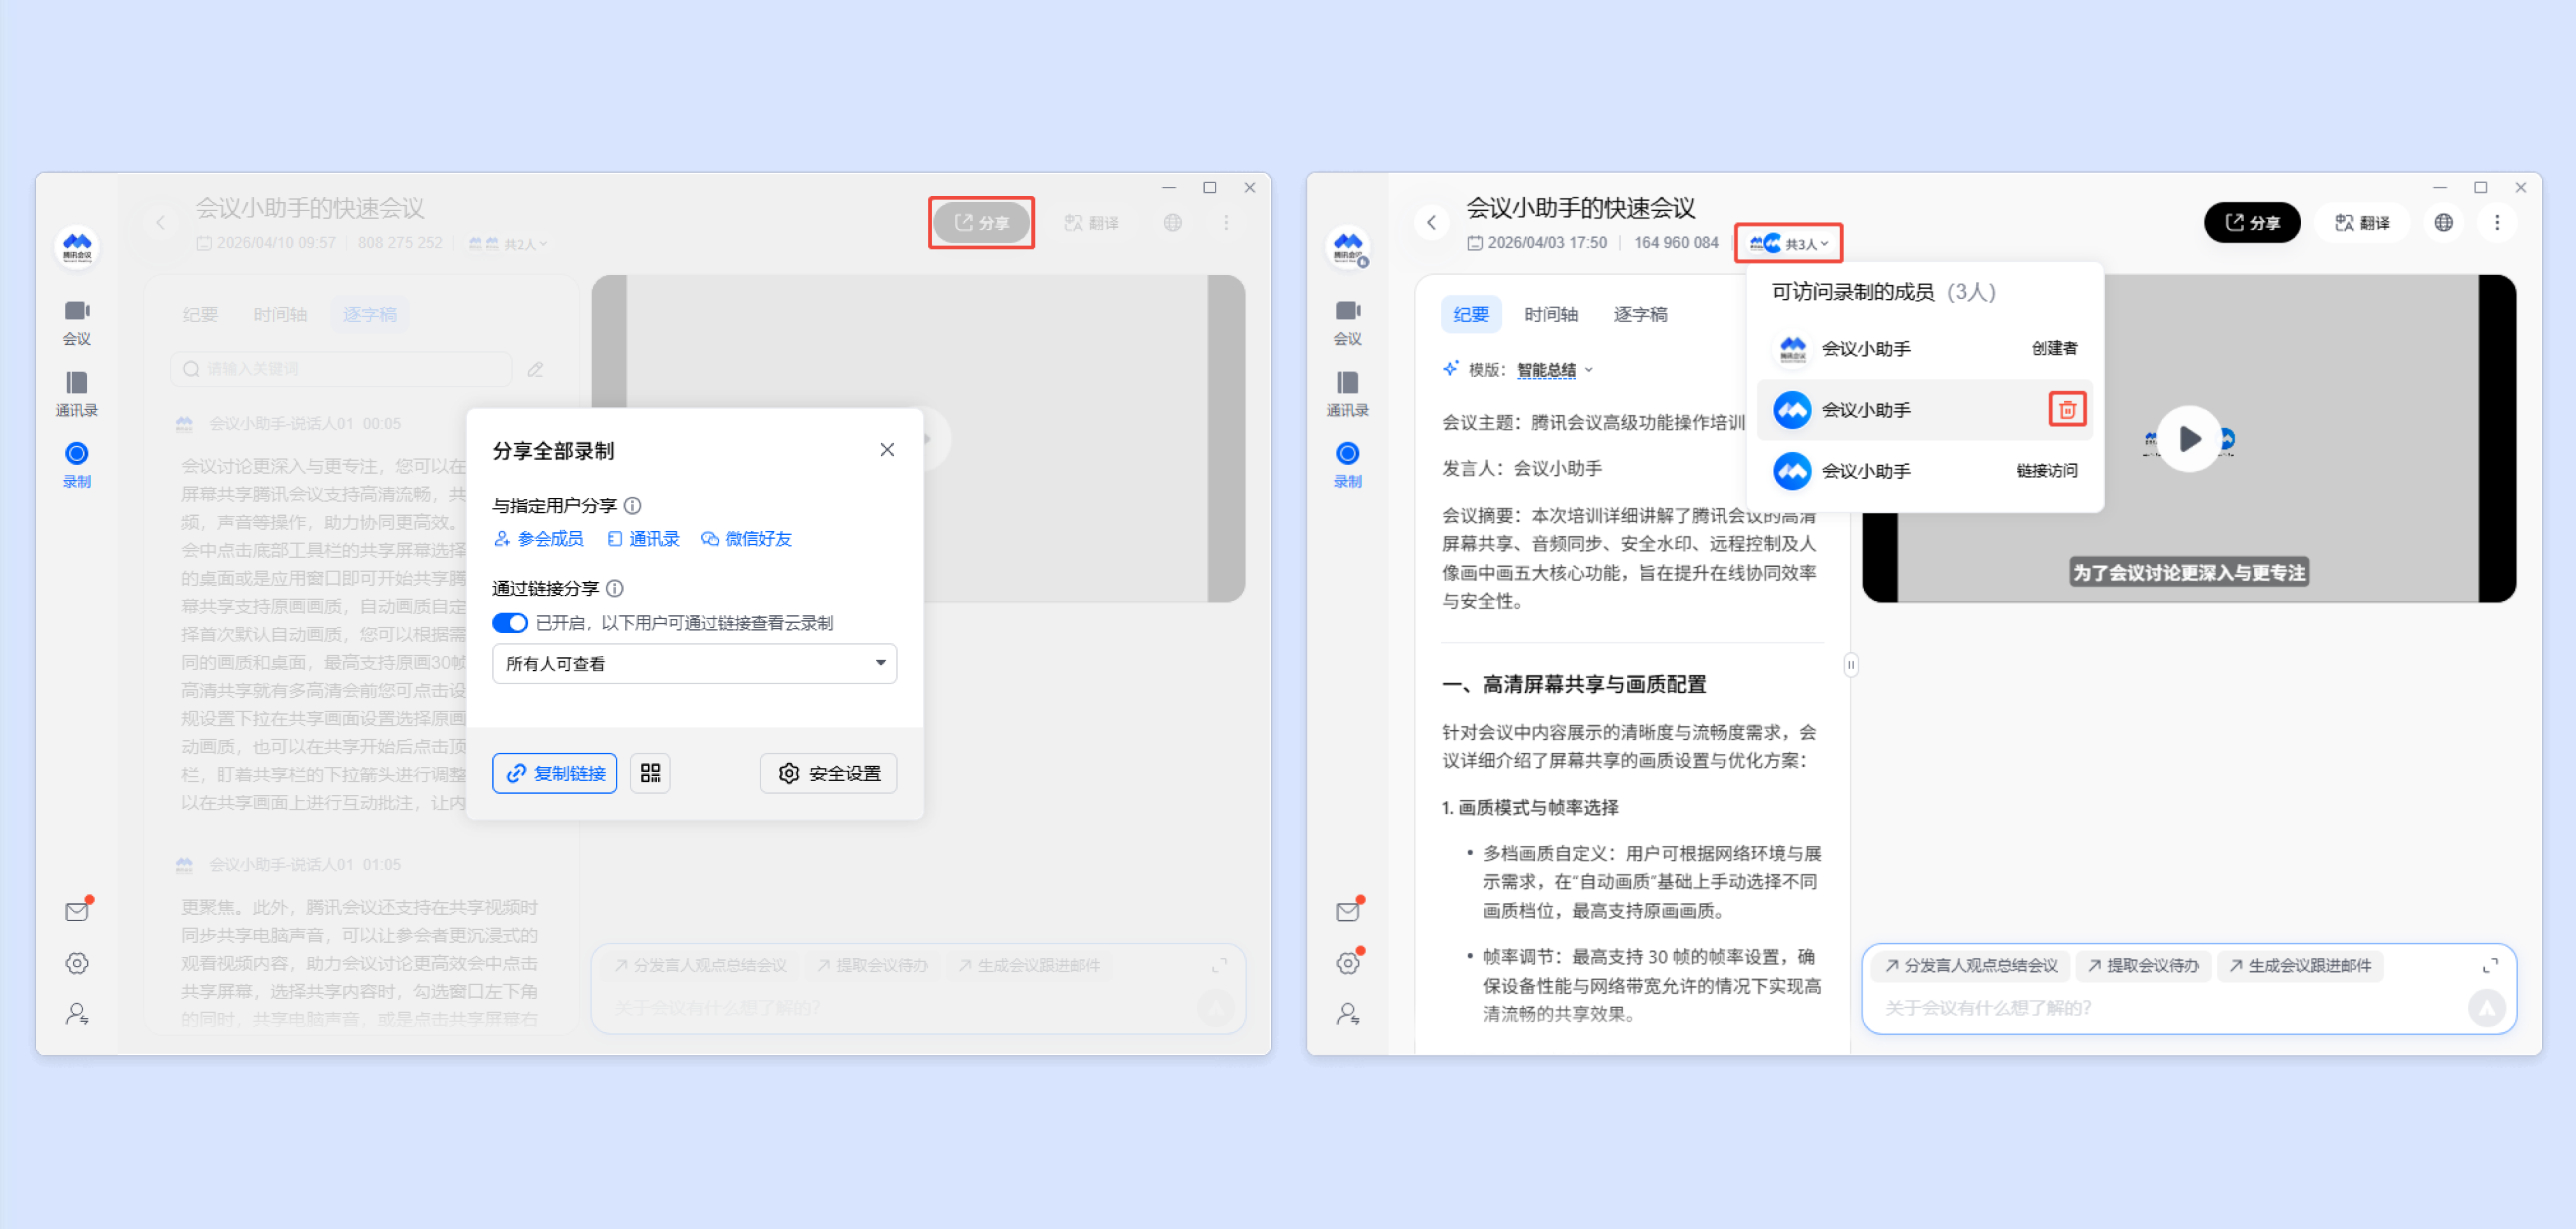
分享:设置开启/关闭分享该录制,单击后弹窗显示分享设置。此处分享代指分享这个会议中所有的录制文件,收到分享链接/二维码的用户按照分享设置权限查看/下载会议录制。
导出:可导出视频内容,当存在多个录制文件时则导出所有视频内容,导出路径为浏览器下载保存位置。
删除:可删除该录制文件所有内容,删除后将无法恢复。
重命名:可修改录制文件名称。
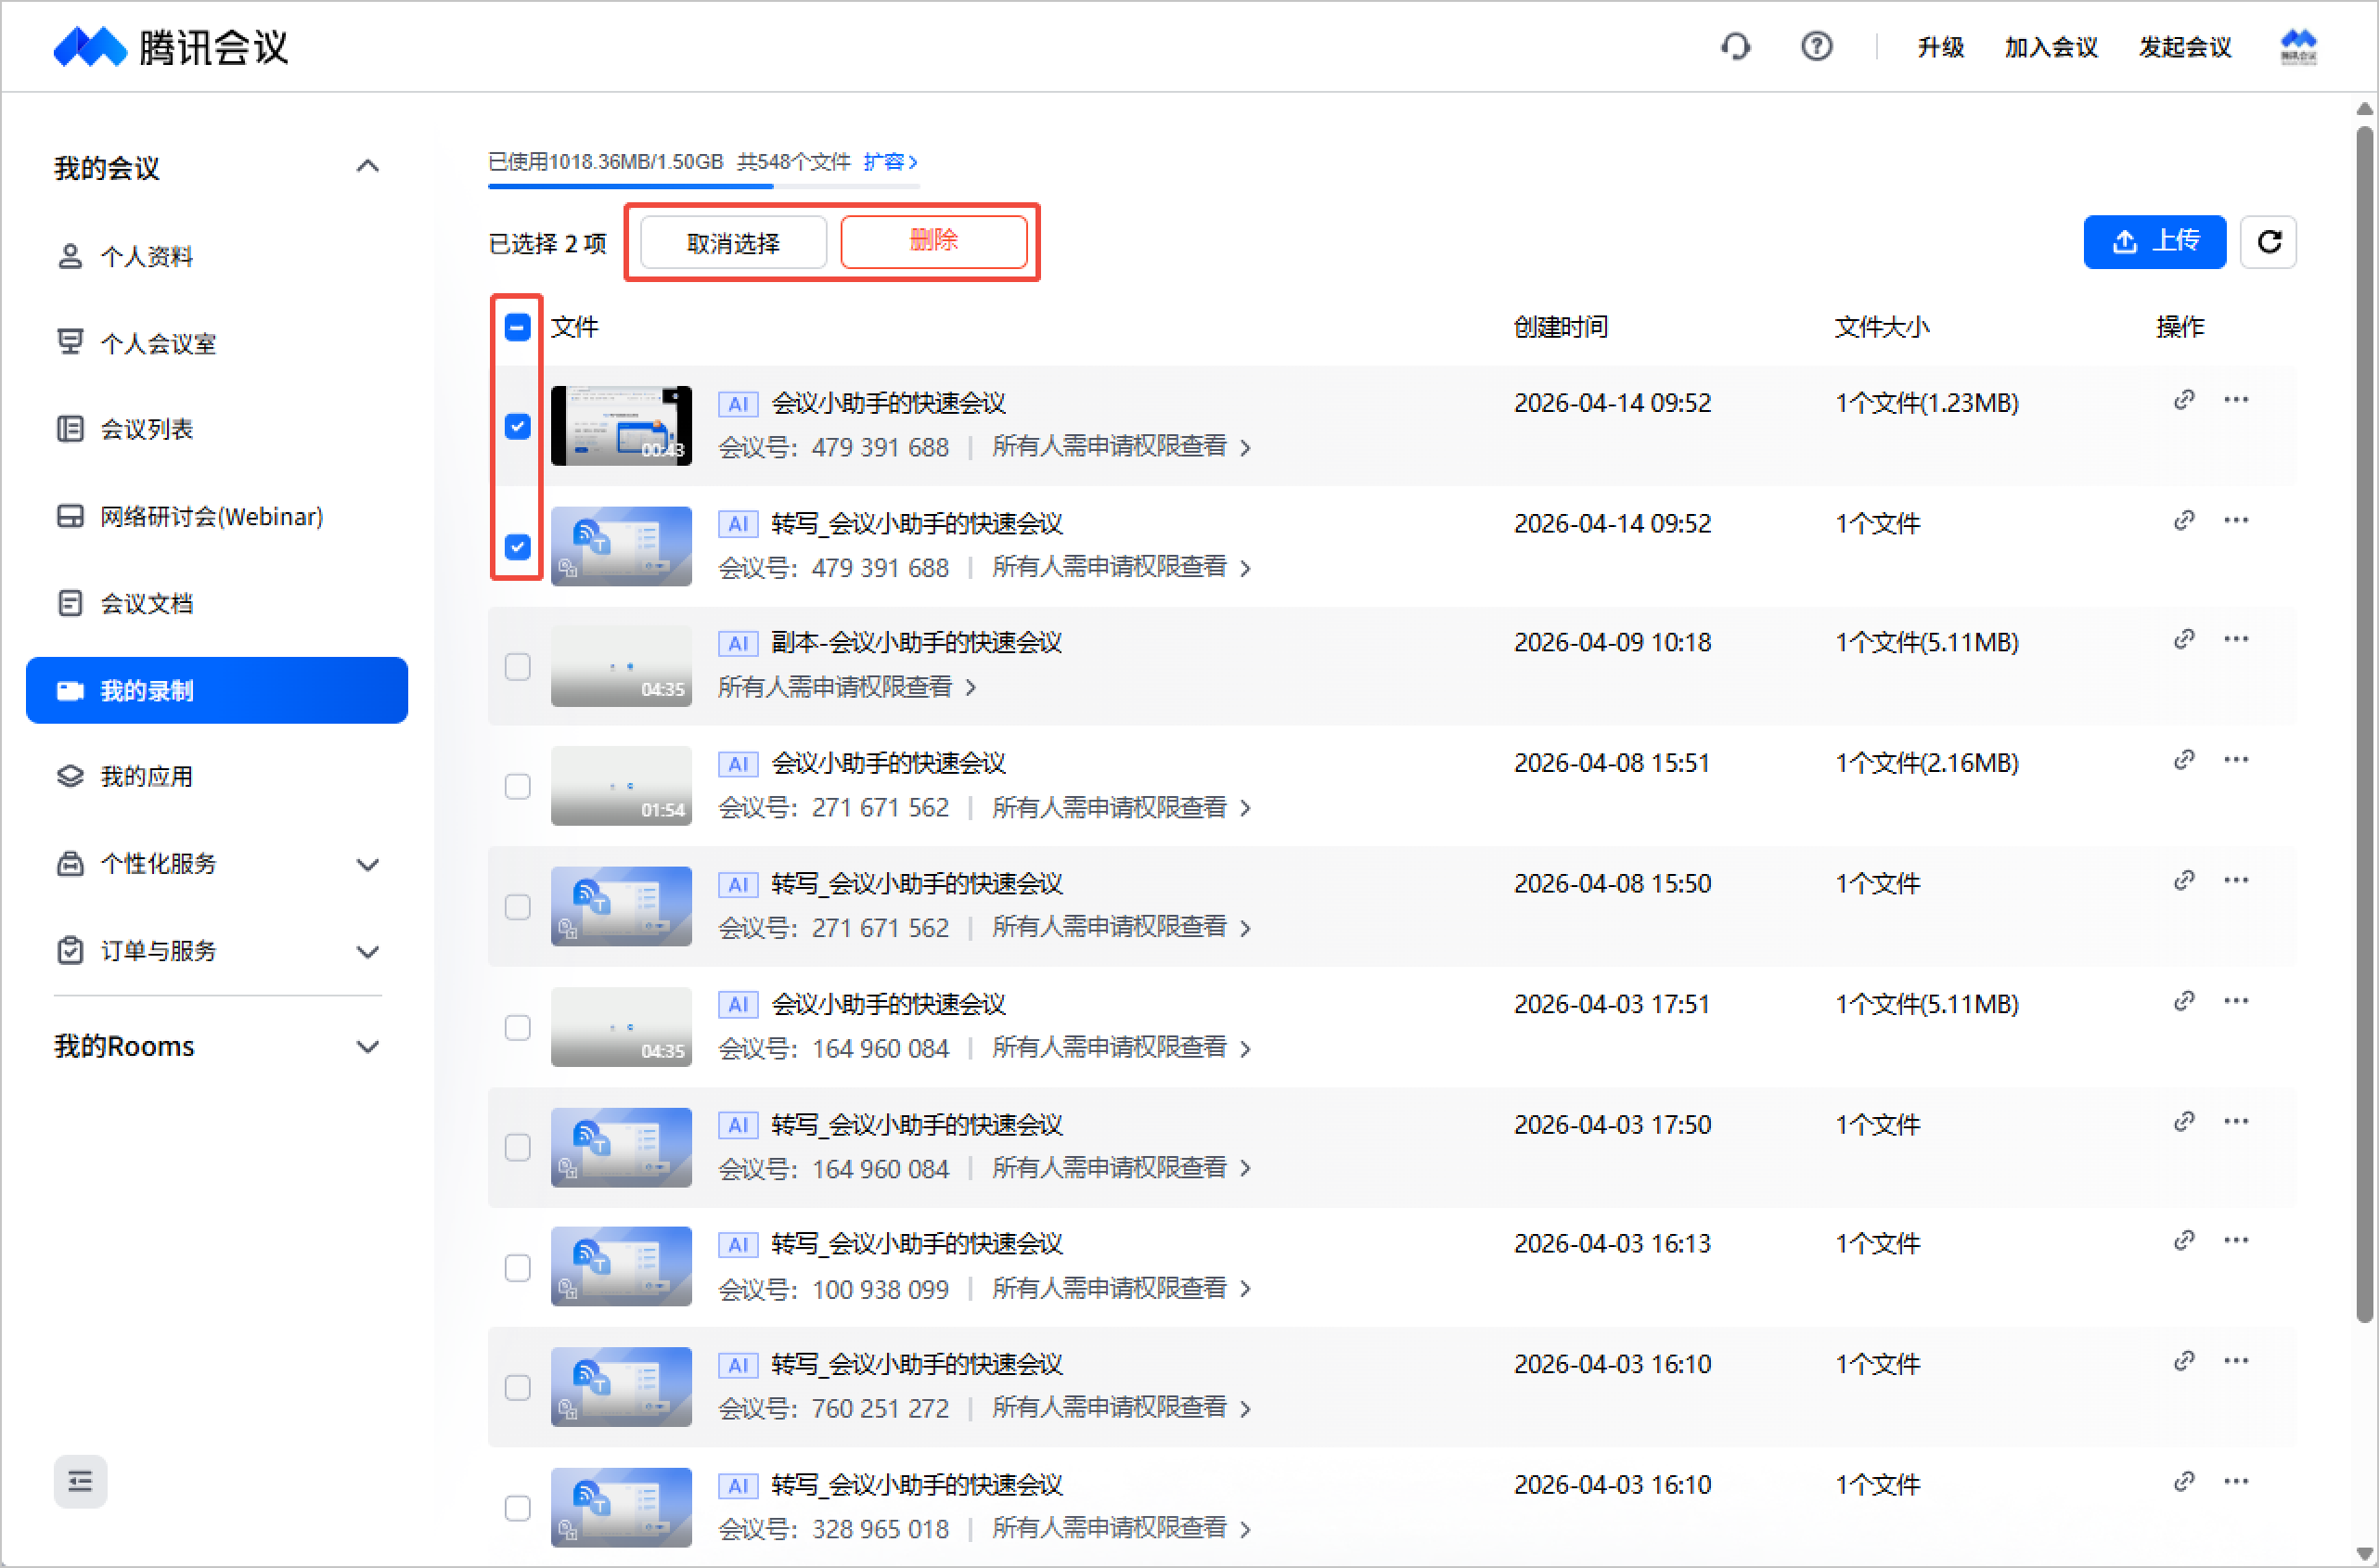
复选框:勾选文件前的复选框,即可批量选择删除所选内容,删除后将无法恢复。
录制文件详情页
3.29.20版本及以上支持在 Windows、macOS 端内查看录制文件详情页。
Windows/macOS
单击录制文件卡片即可在客户端内查看录制内容。
创建者单击右上角分享,即可设置分享查看权限,支持指定用户分享和通过链接分享。
当有用户访问此录制文件时,创建者可单击顶部访问者头像,查看可访问录制的成员,选中成员可移除其访问权限。
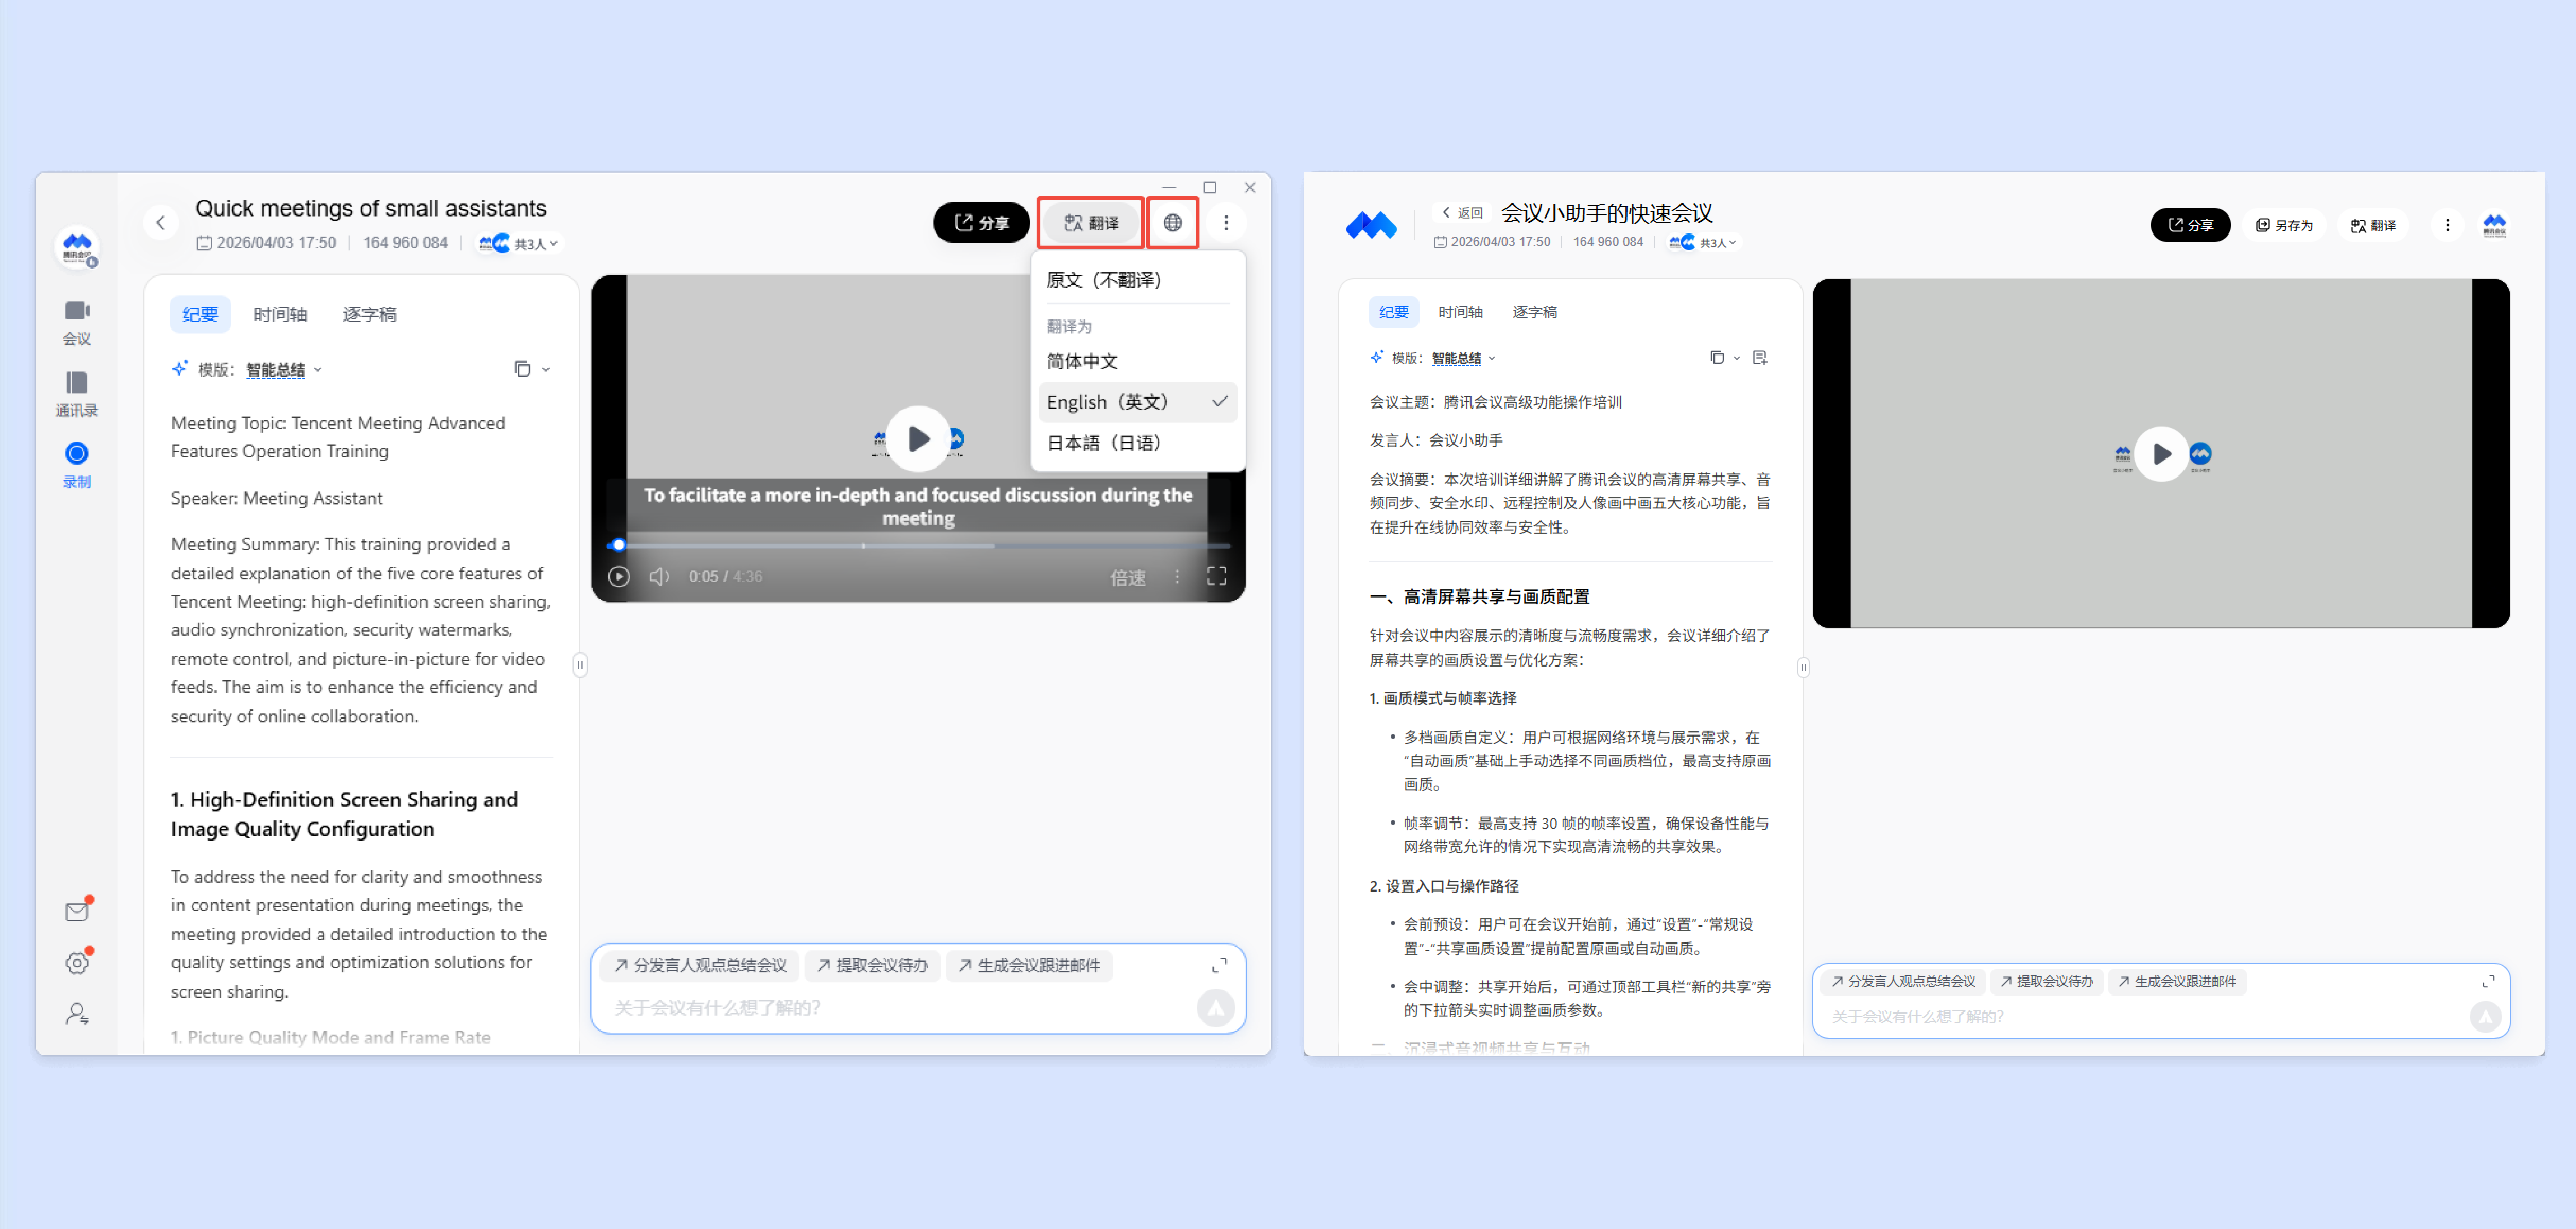
单击右上角翻译,可将录制详情页内容翻译为所选语言。商业版、企业版、教育版、教育加强版支持翻译为更多语言。
单击右上角使用默认浏览器打开按钮,即可跳转网页查看录制详情。
创建者单击右上角更多按钮,可对录制文件进行设置、另存为、录制文件、查看统计、刷新、复制链接、删除文件操作;访问者仅支持另存为(需创建者开启权限)、刷新、复制链接、举报操作。
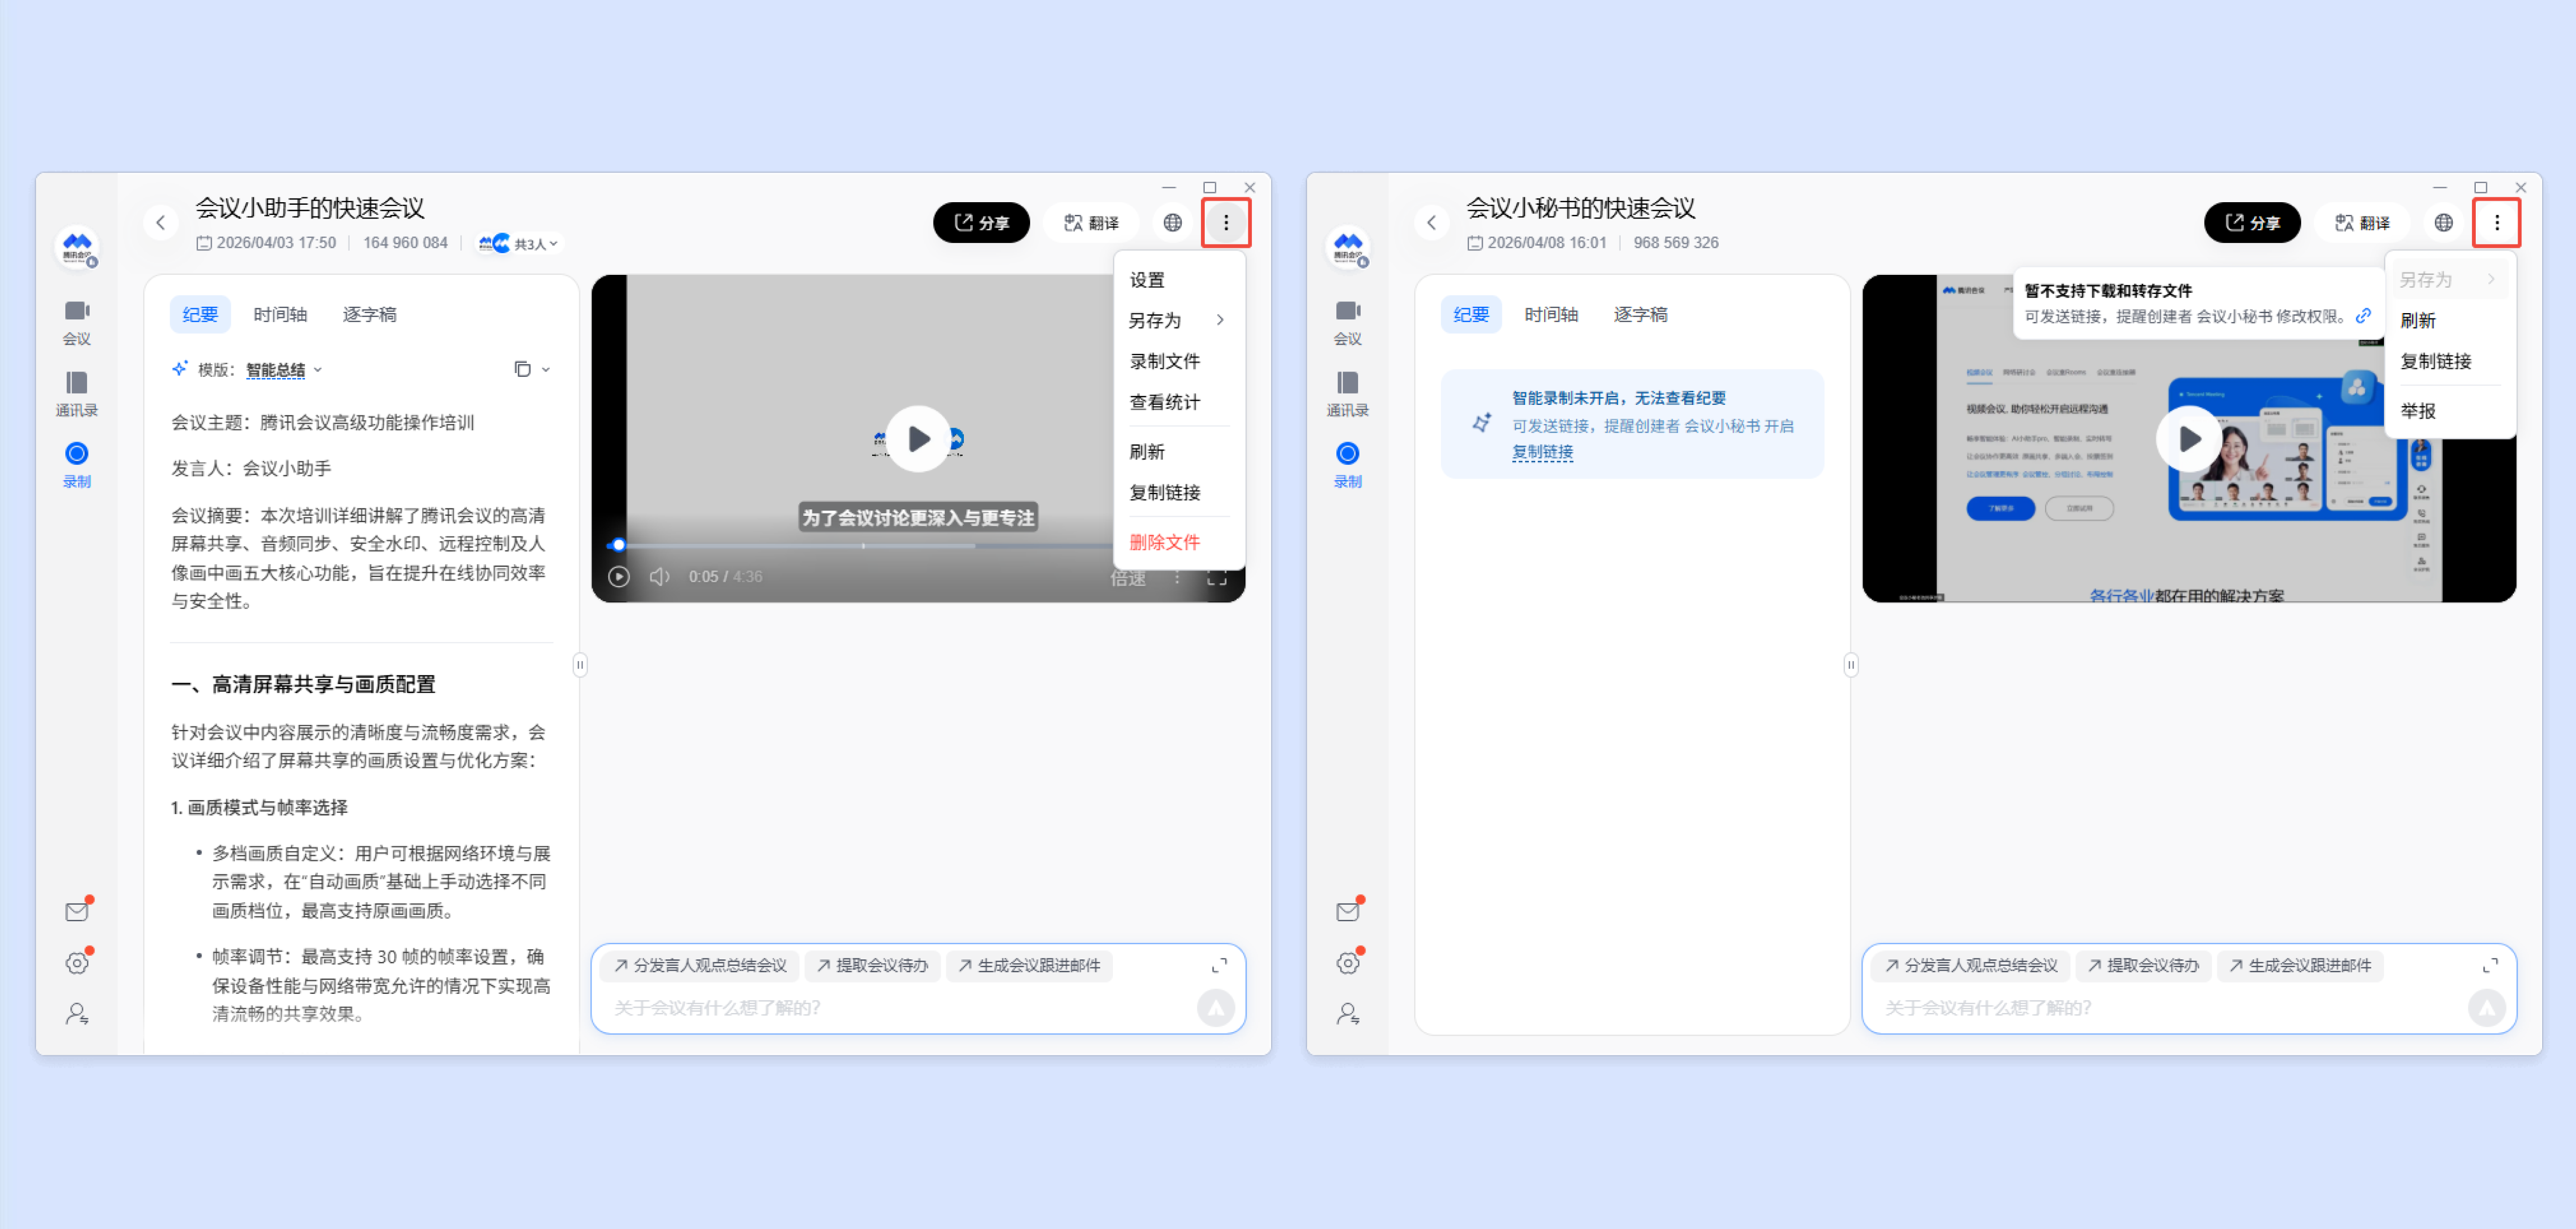
设置:可设置是否向有访问权限的成员展示智能录制、逐字稿;以及是否允许成员下载和转存、成员观看录制时展示水印、允许我们使用录制数据改善智能录制。
另存为:可将云录制文件转存至“我的录制”(可将其生成云副本文件转存至您的录制空间中,转存文件成功后即可查看文件详情)、下载至本地。
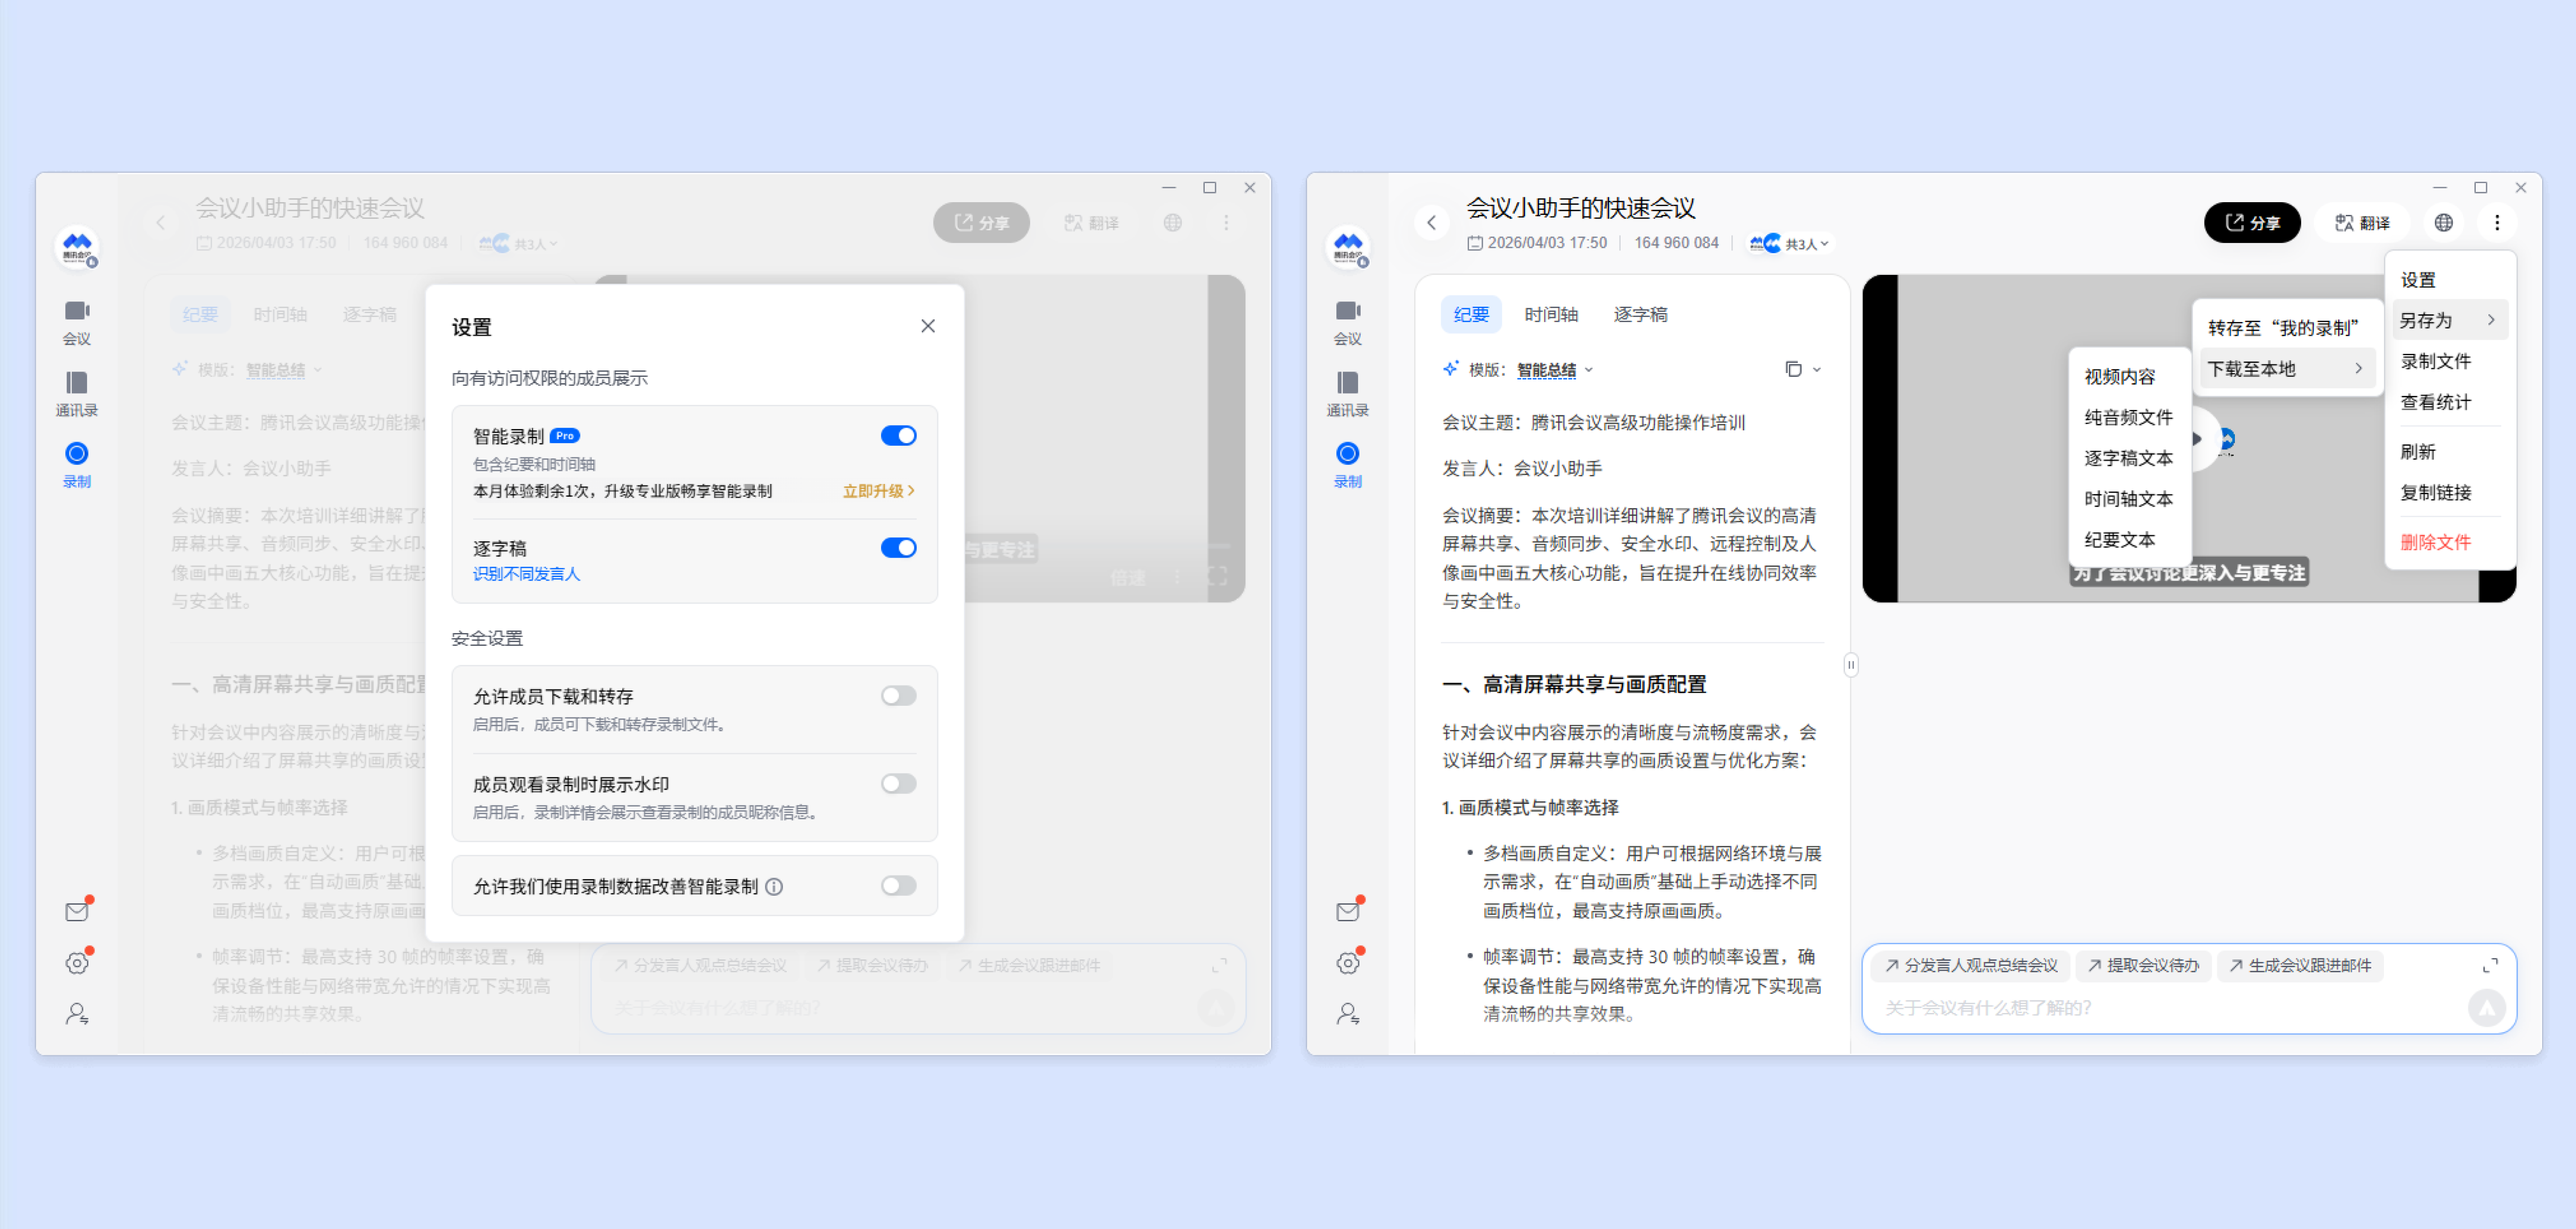
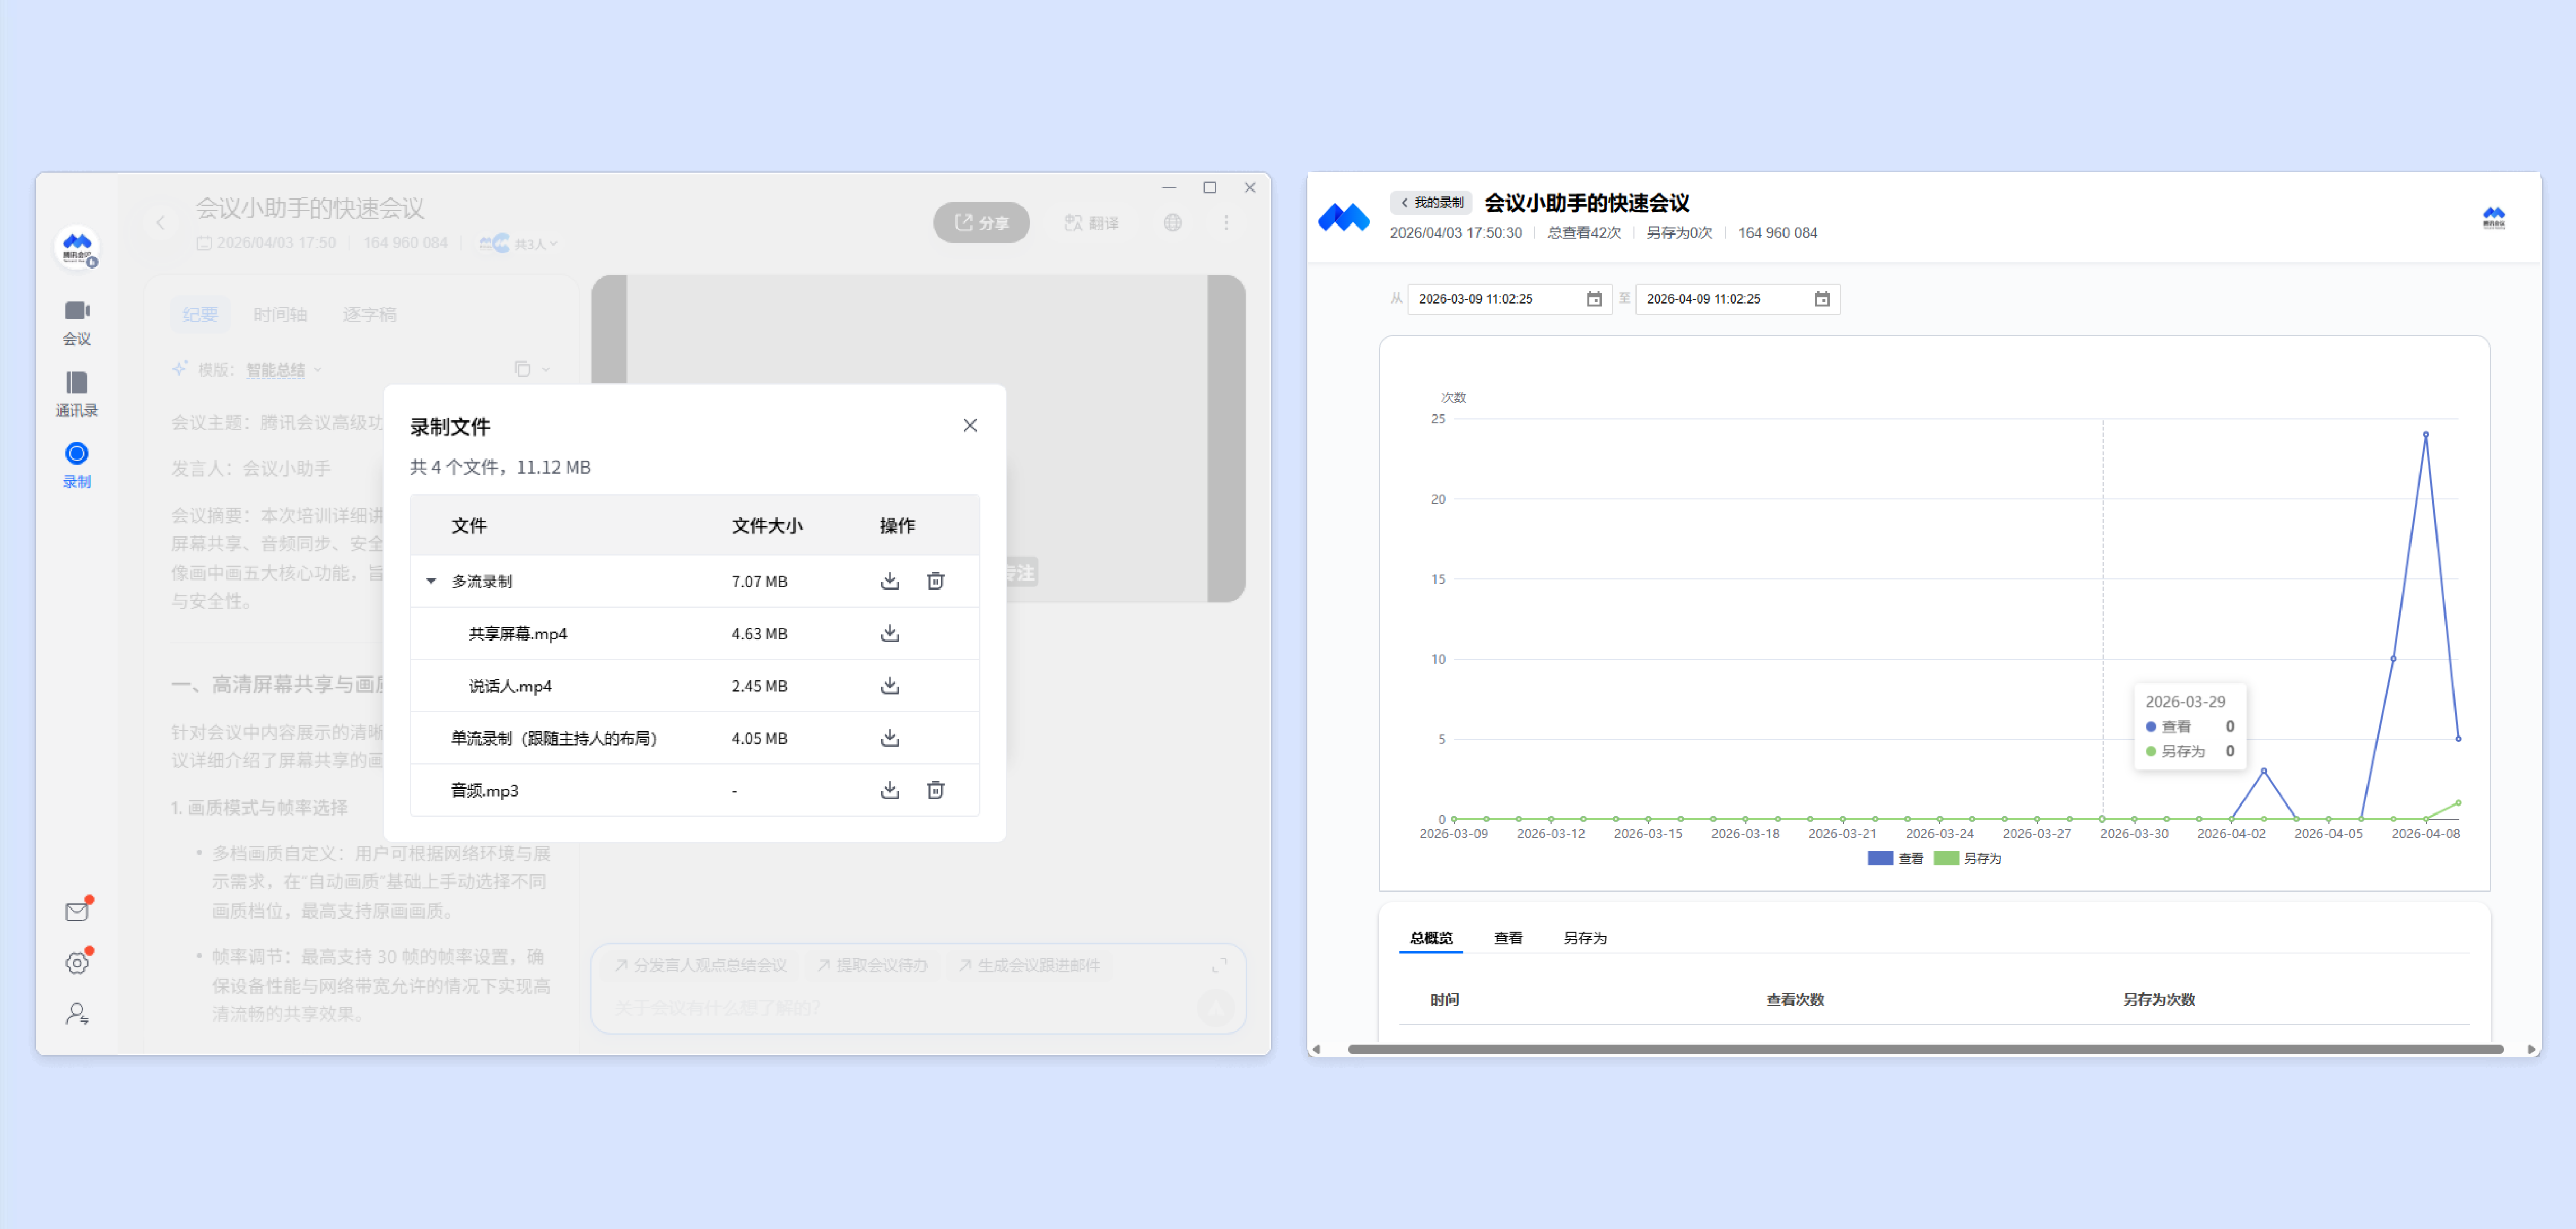
录制文件:可查看、导出、删除此录制文件下所生成的多流录制、单流录制、音频文件。
查看统计:即可进入录制分析页面。可在录制分析页面查看该录制文件的被查看、下载次数图表,以及该录制文件总概览、查看、另存为情况的详细数据。
单击视频右下角倍速,根据需要选择播放的速度,即可倍速播放录制文件。
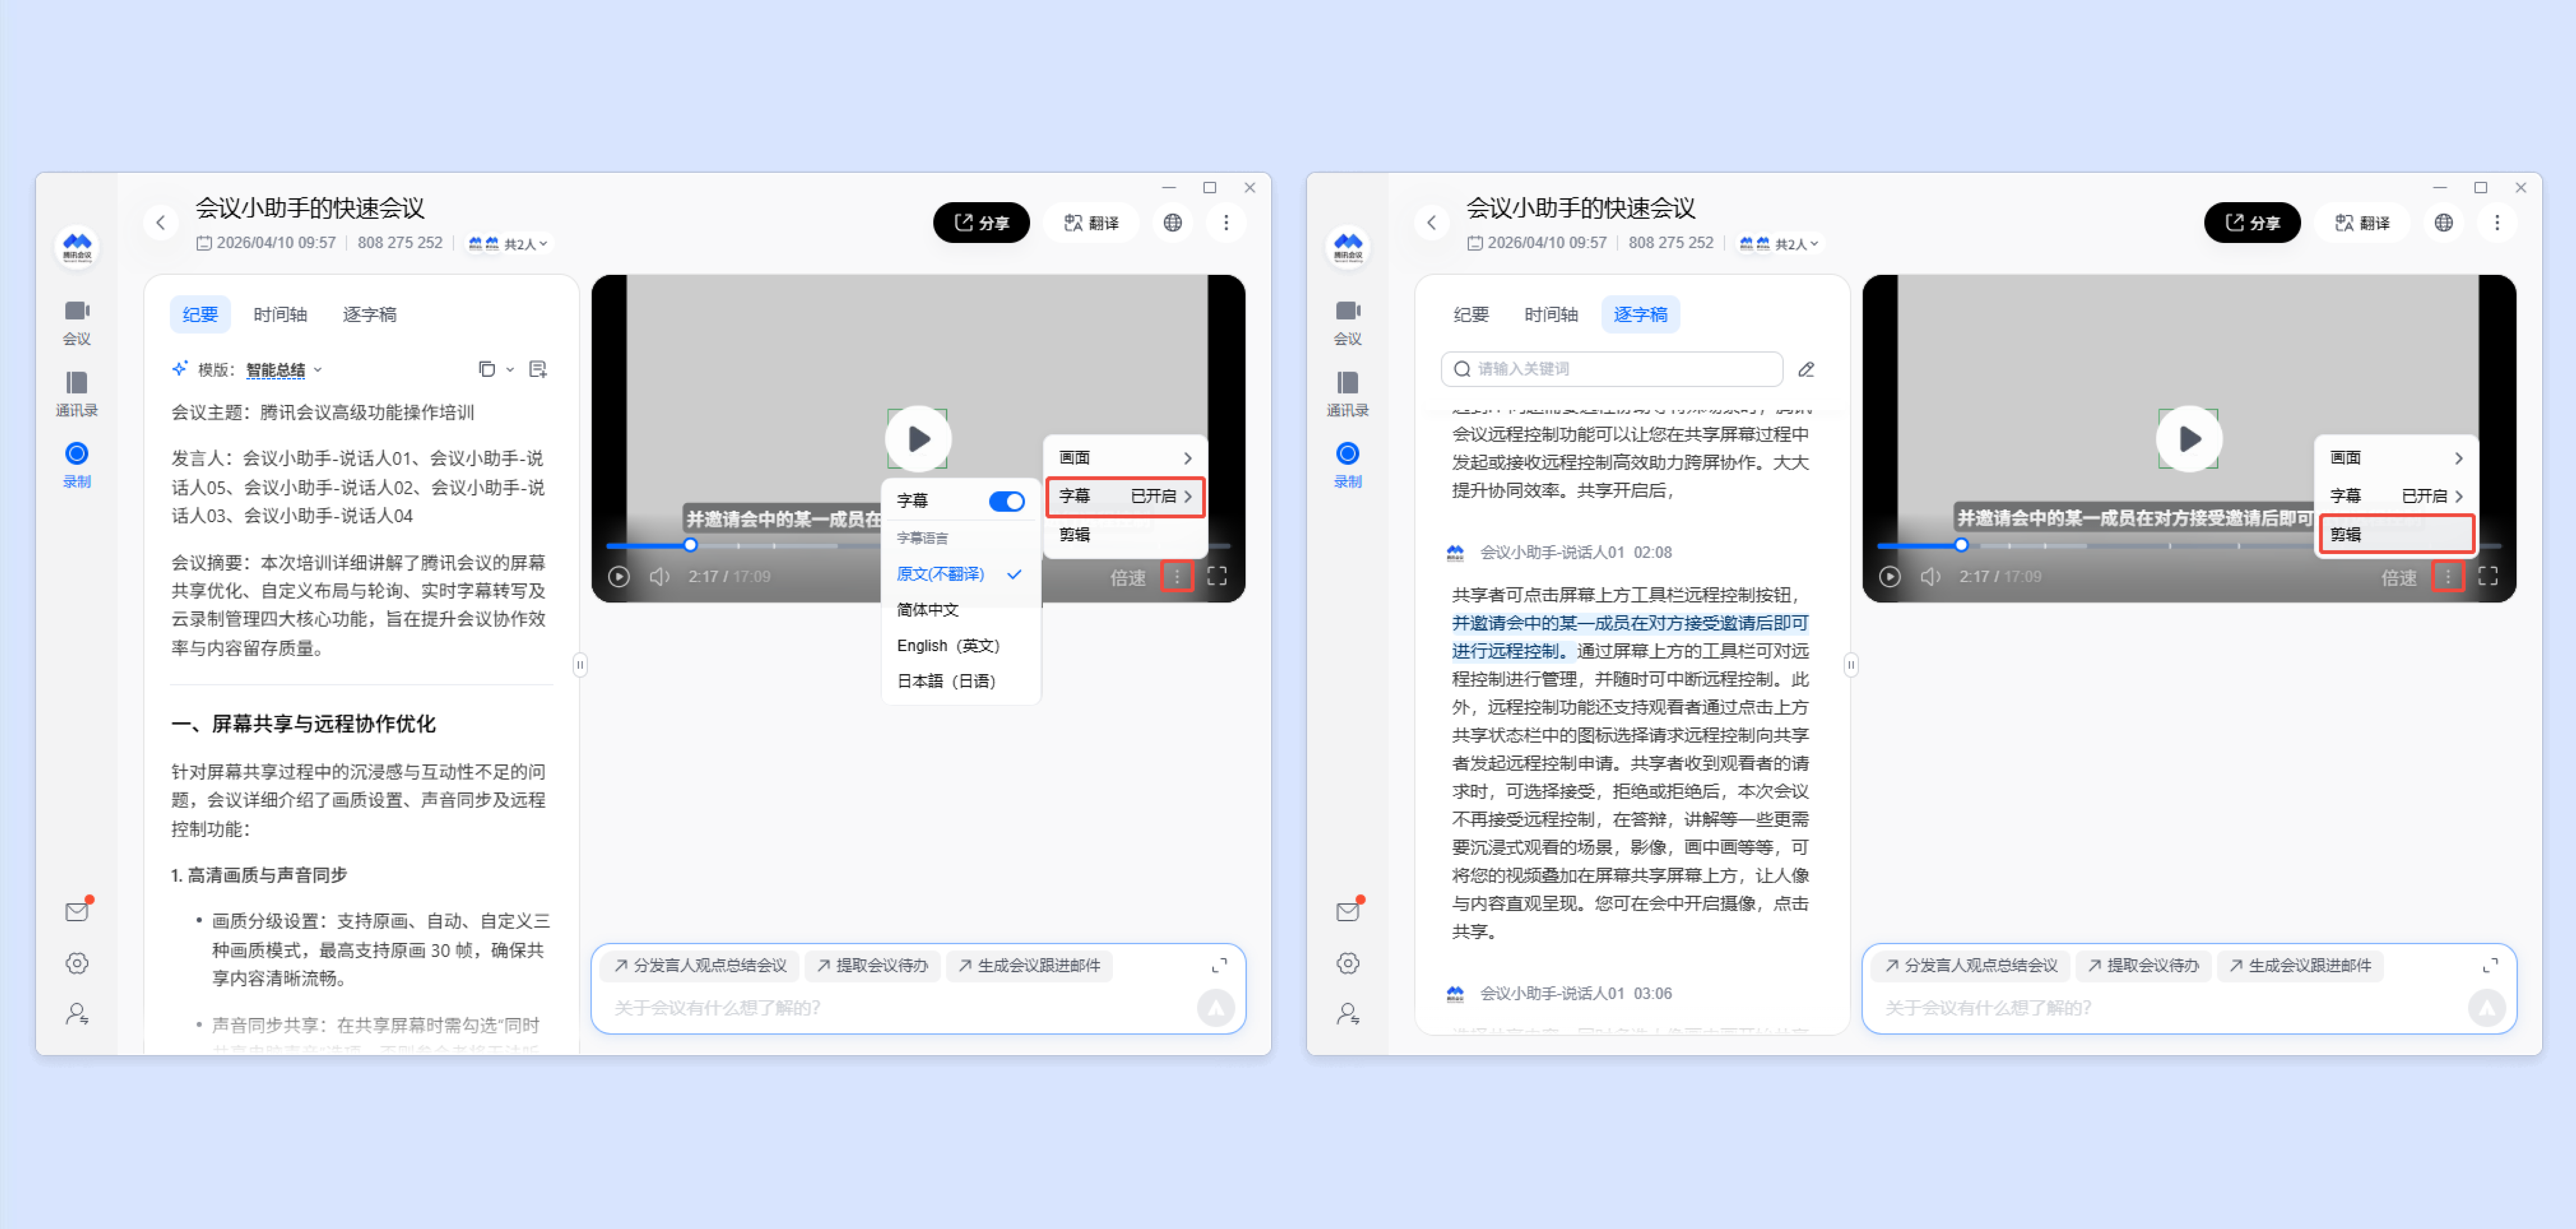
当开启多流录制后,可单击视频右下角“···”按钮 > 画面,选择需要查看的视图,即可切换播放。
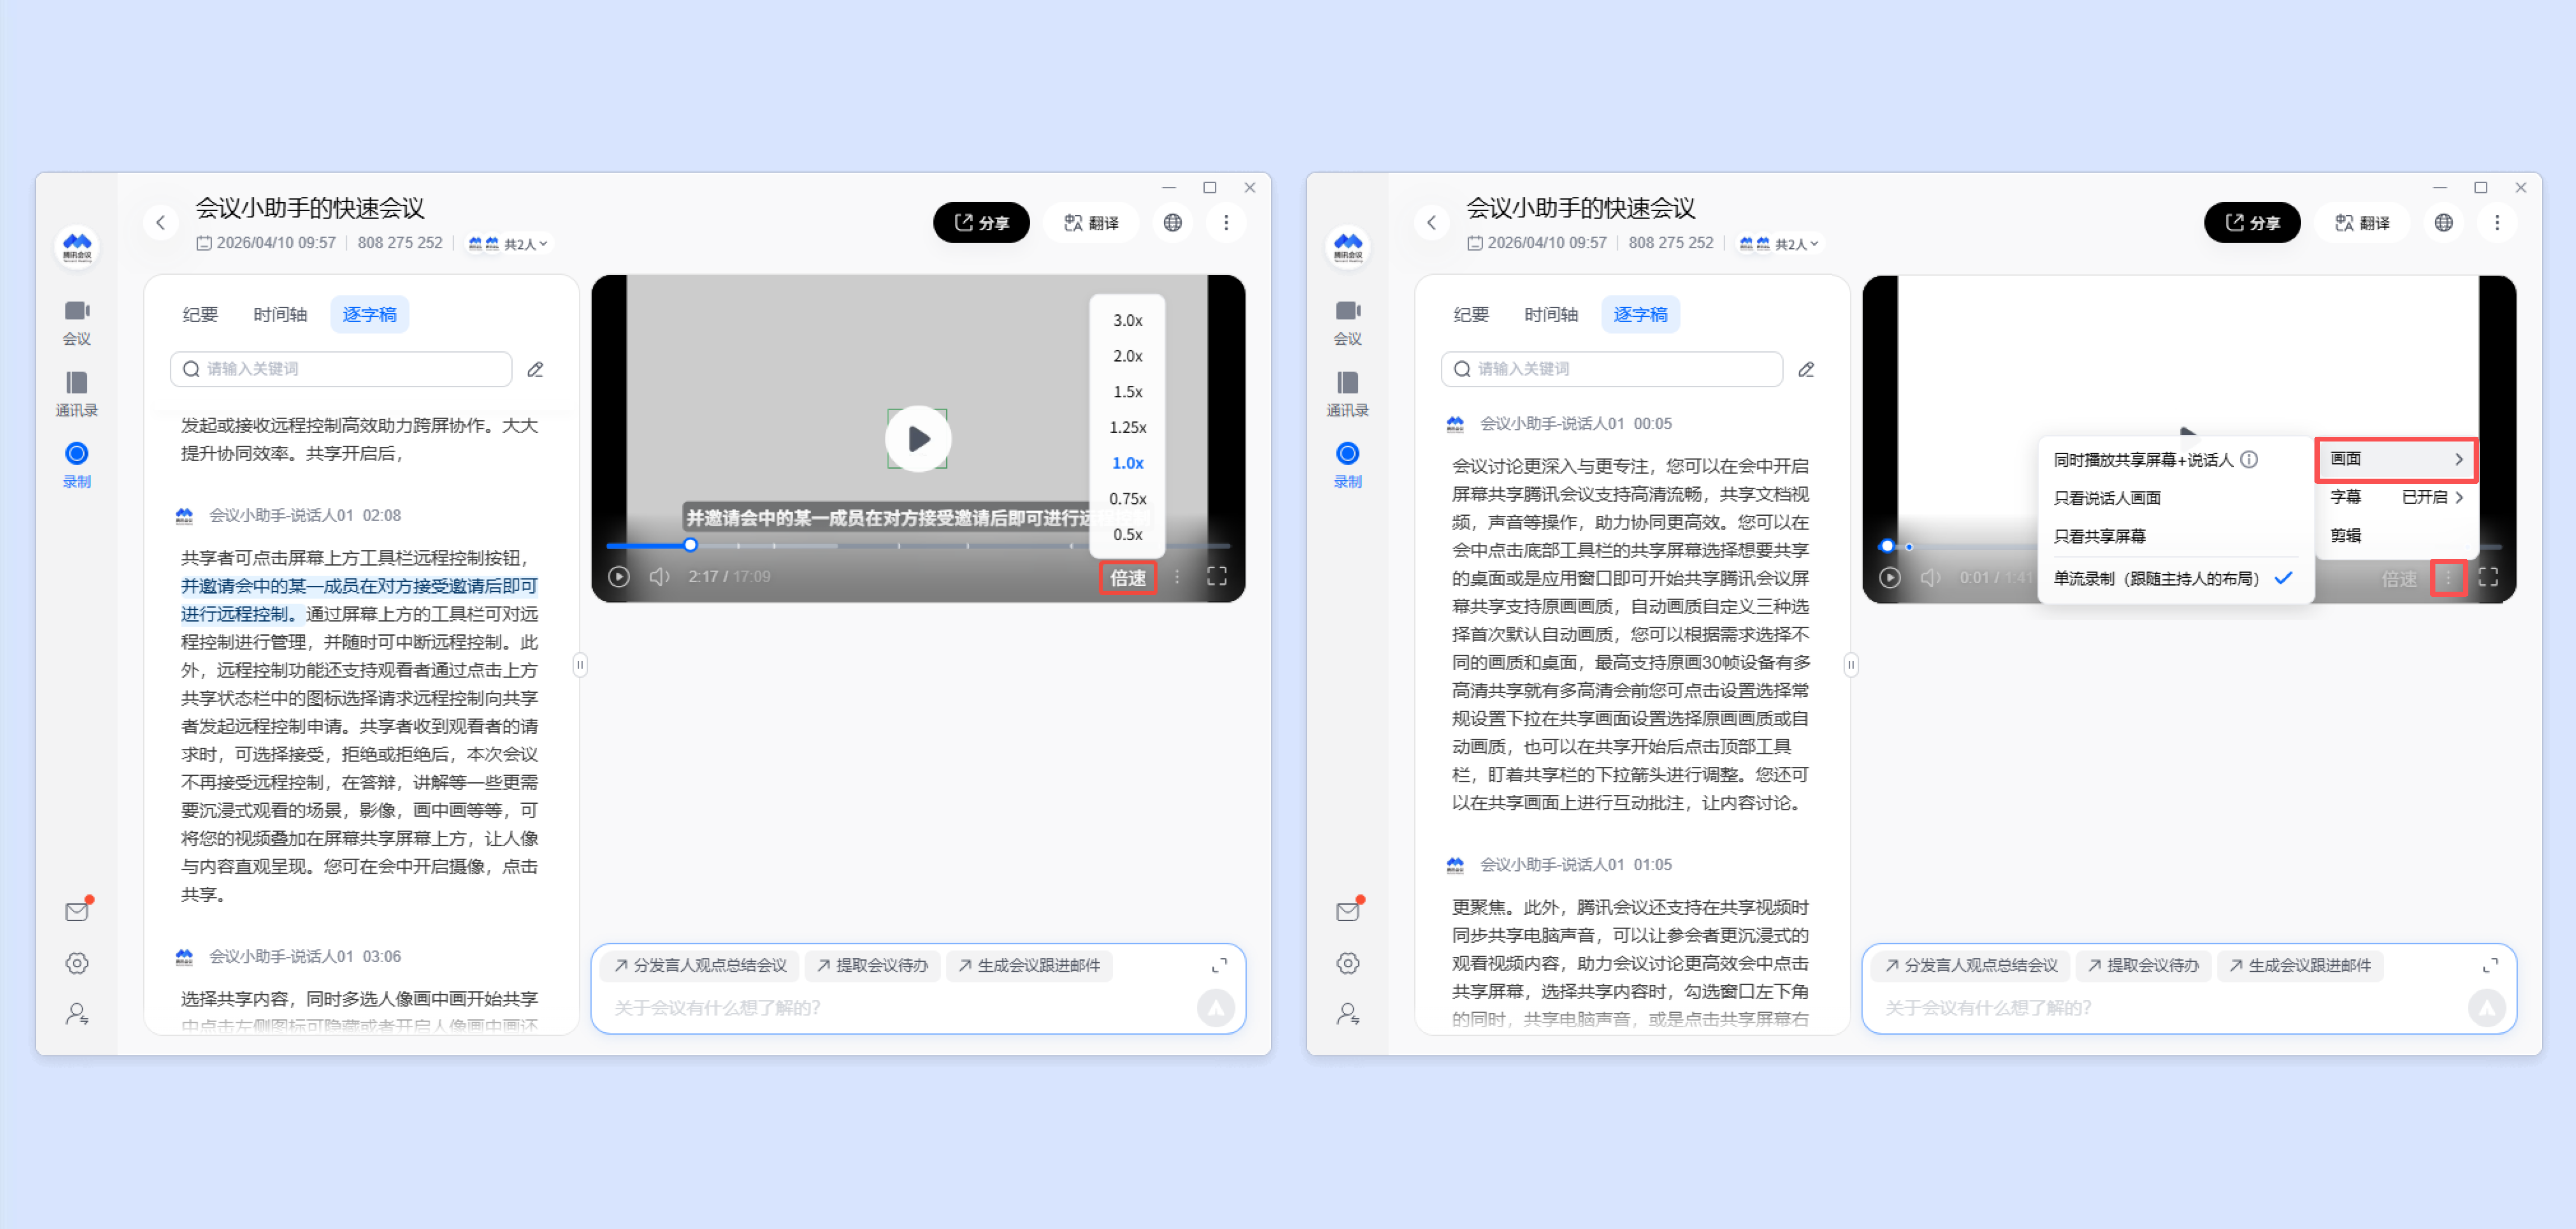
单击视频右下角“···”按钮 > 字幕,开启字幕,即可显示云录制字幕;并支持选择字幕语言,商业版、企业版、教育版、教育加强版支持更多字幕语言。
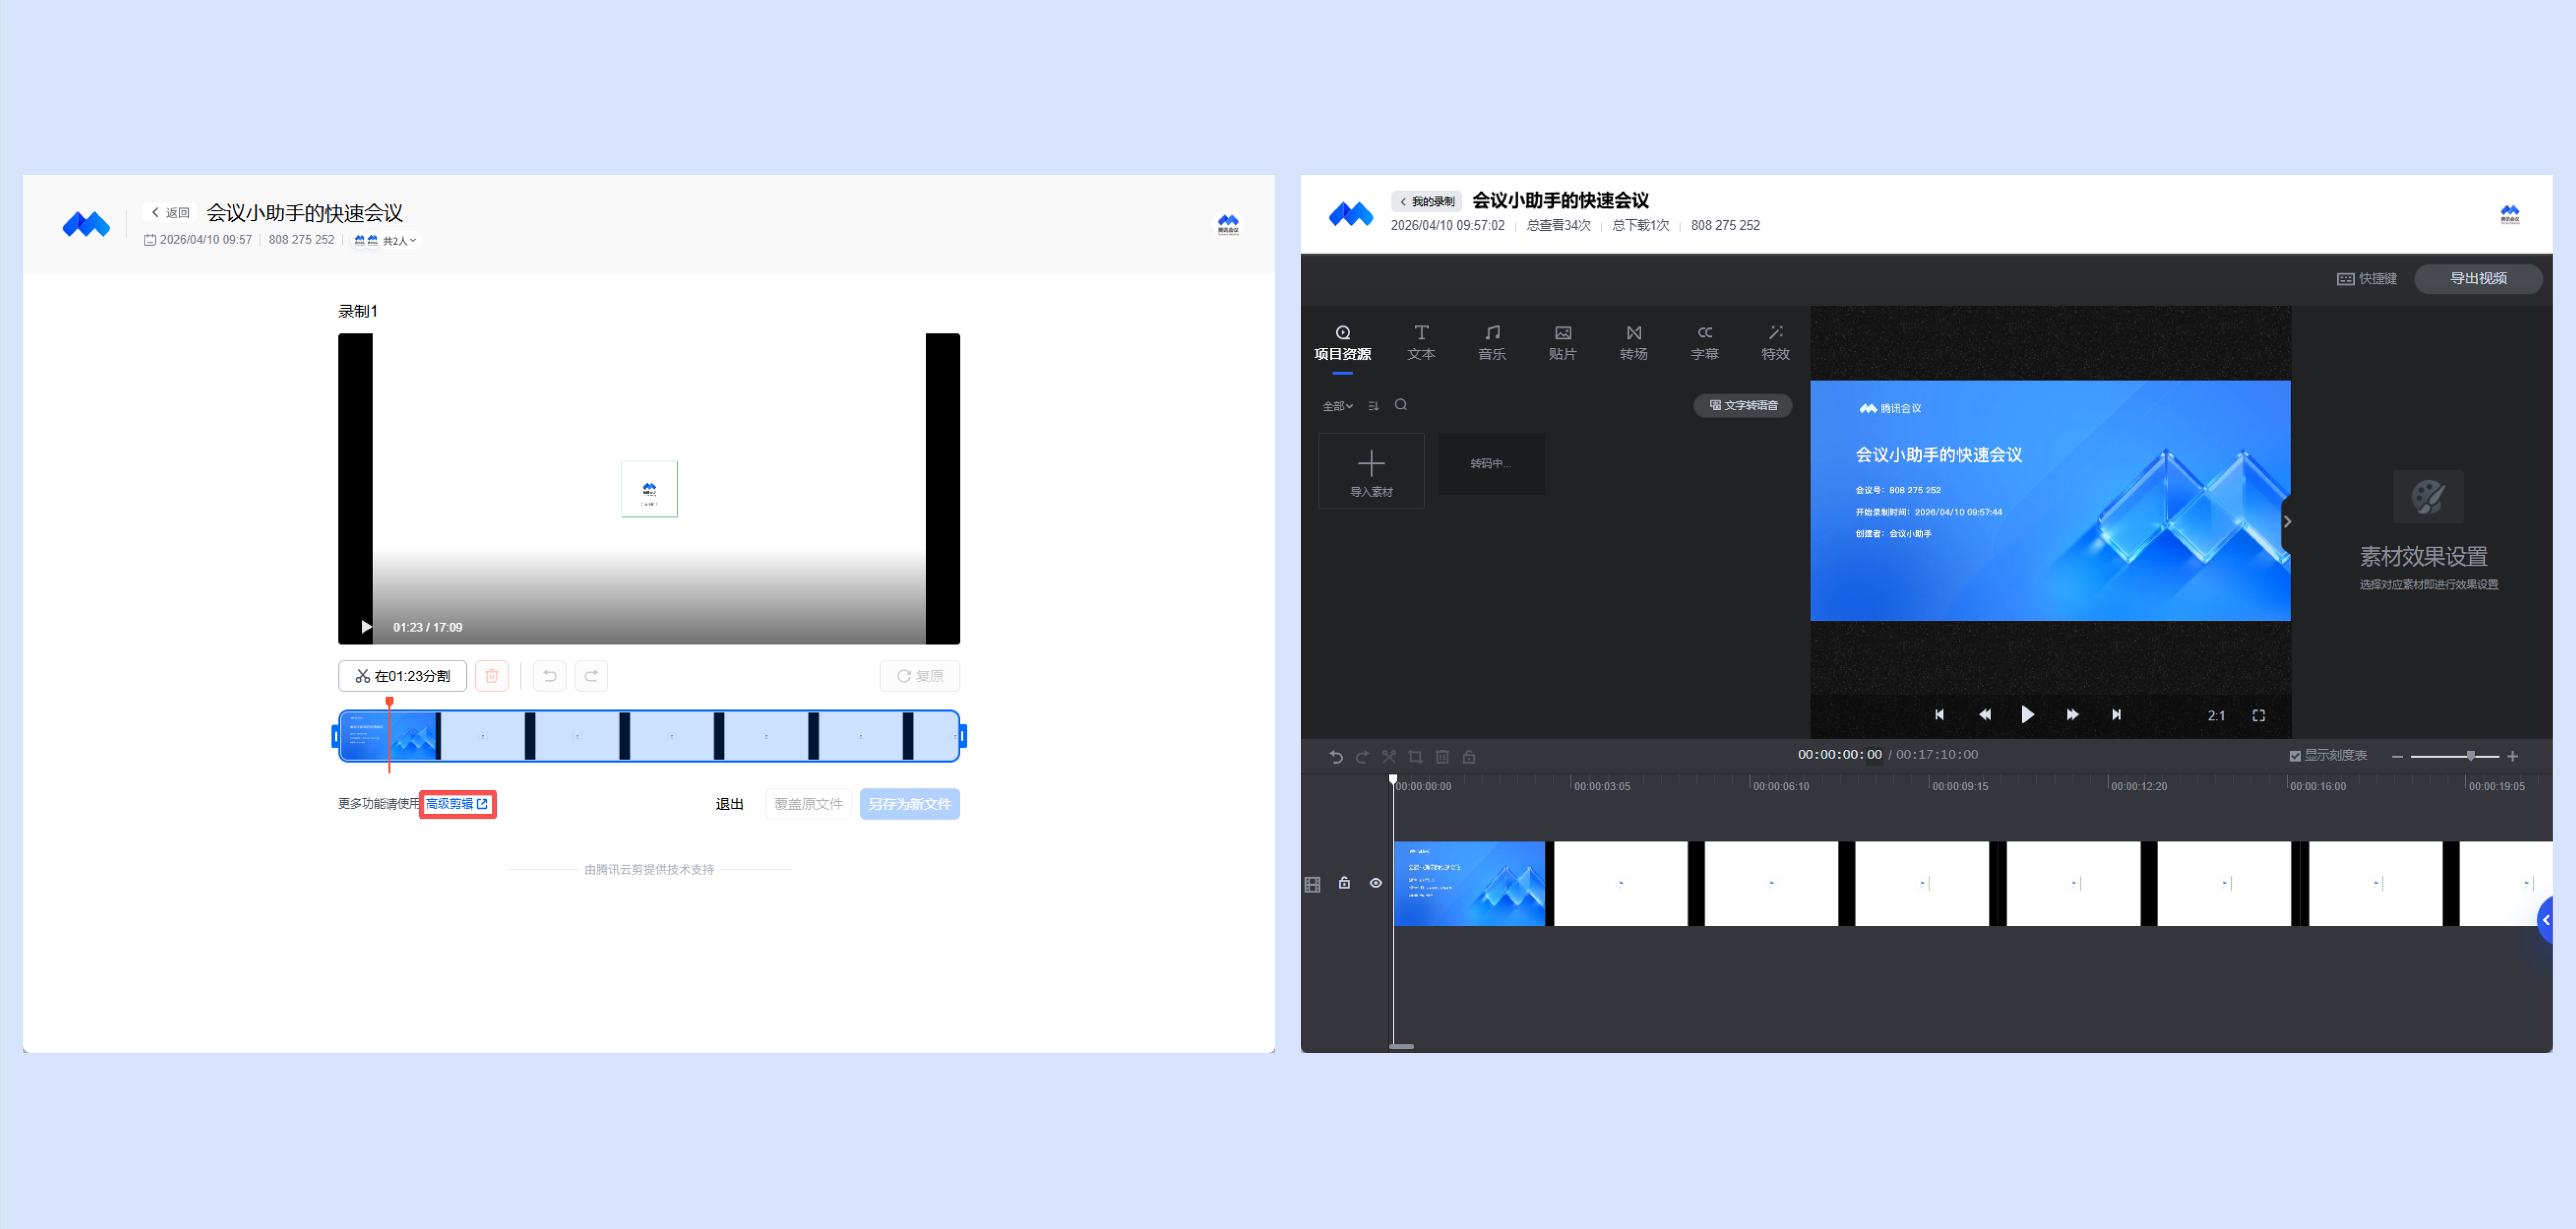
创建者单击视频右下角“···”按钮 > 剪辑,即可进入视频剪辑页面,可对当前显示录制内容进行剪辑。
单击视频剪辑页面左下角高级剪辑,即可使用更多剪辑功能。
Android/iOS
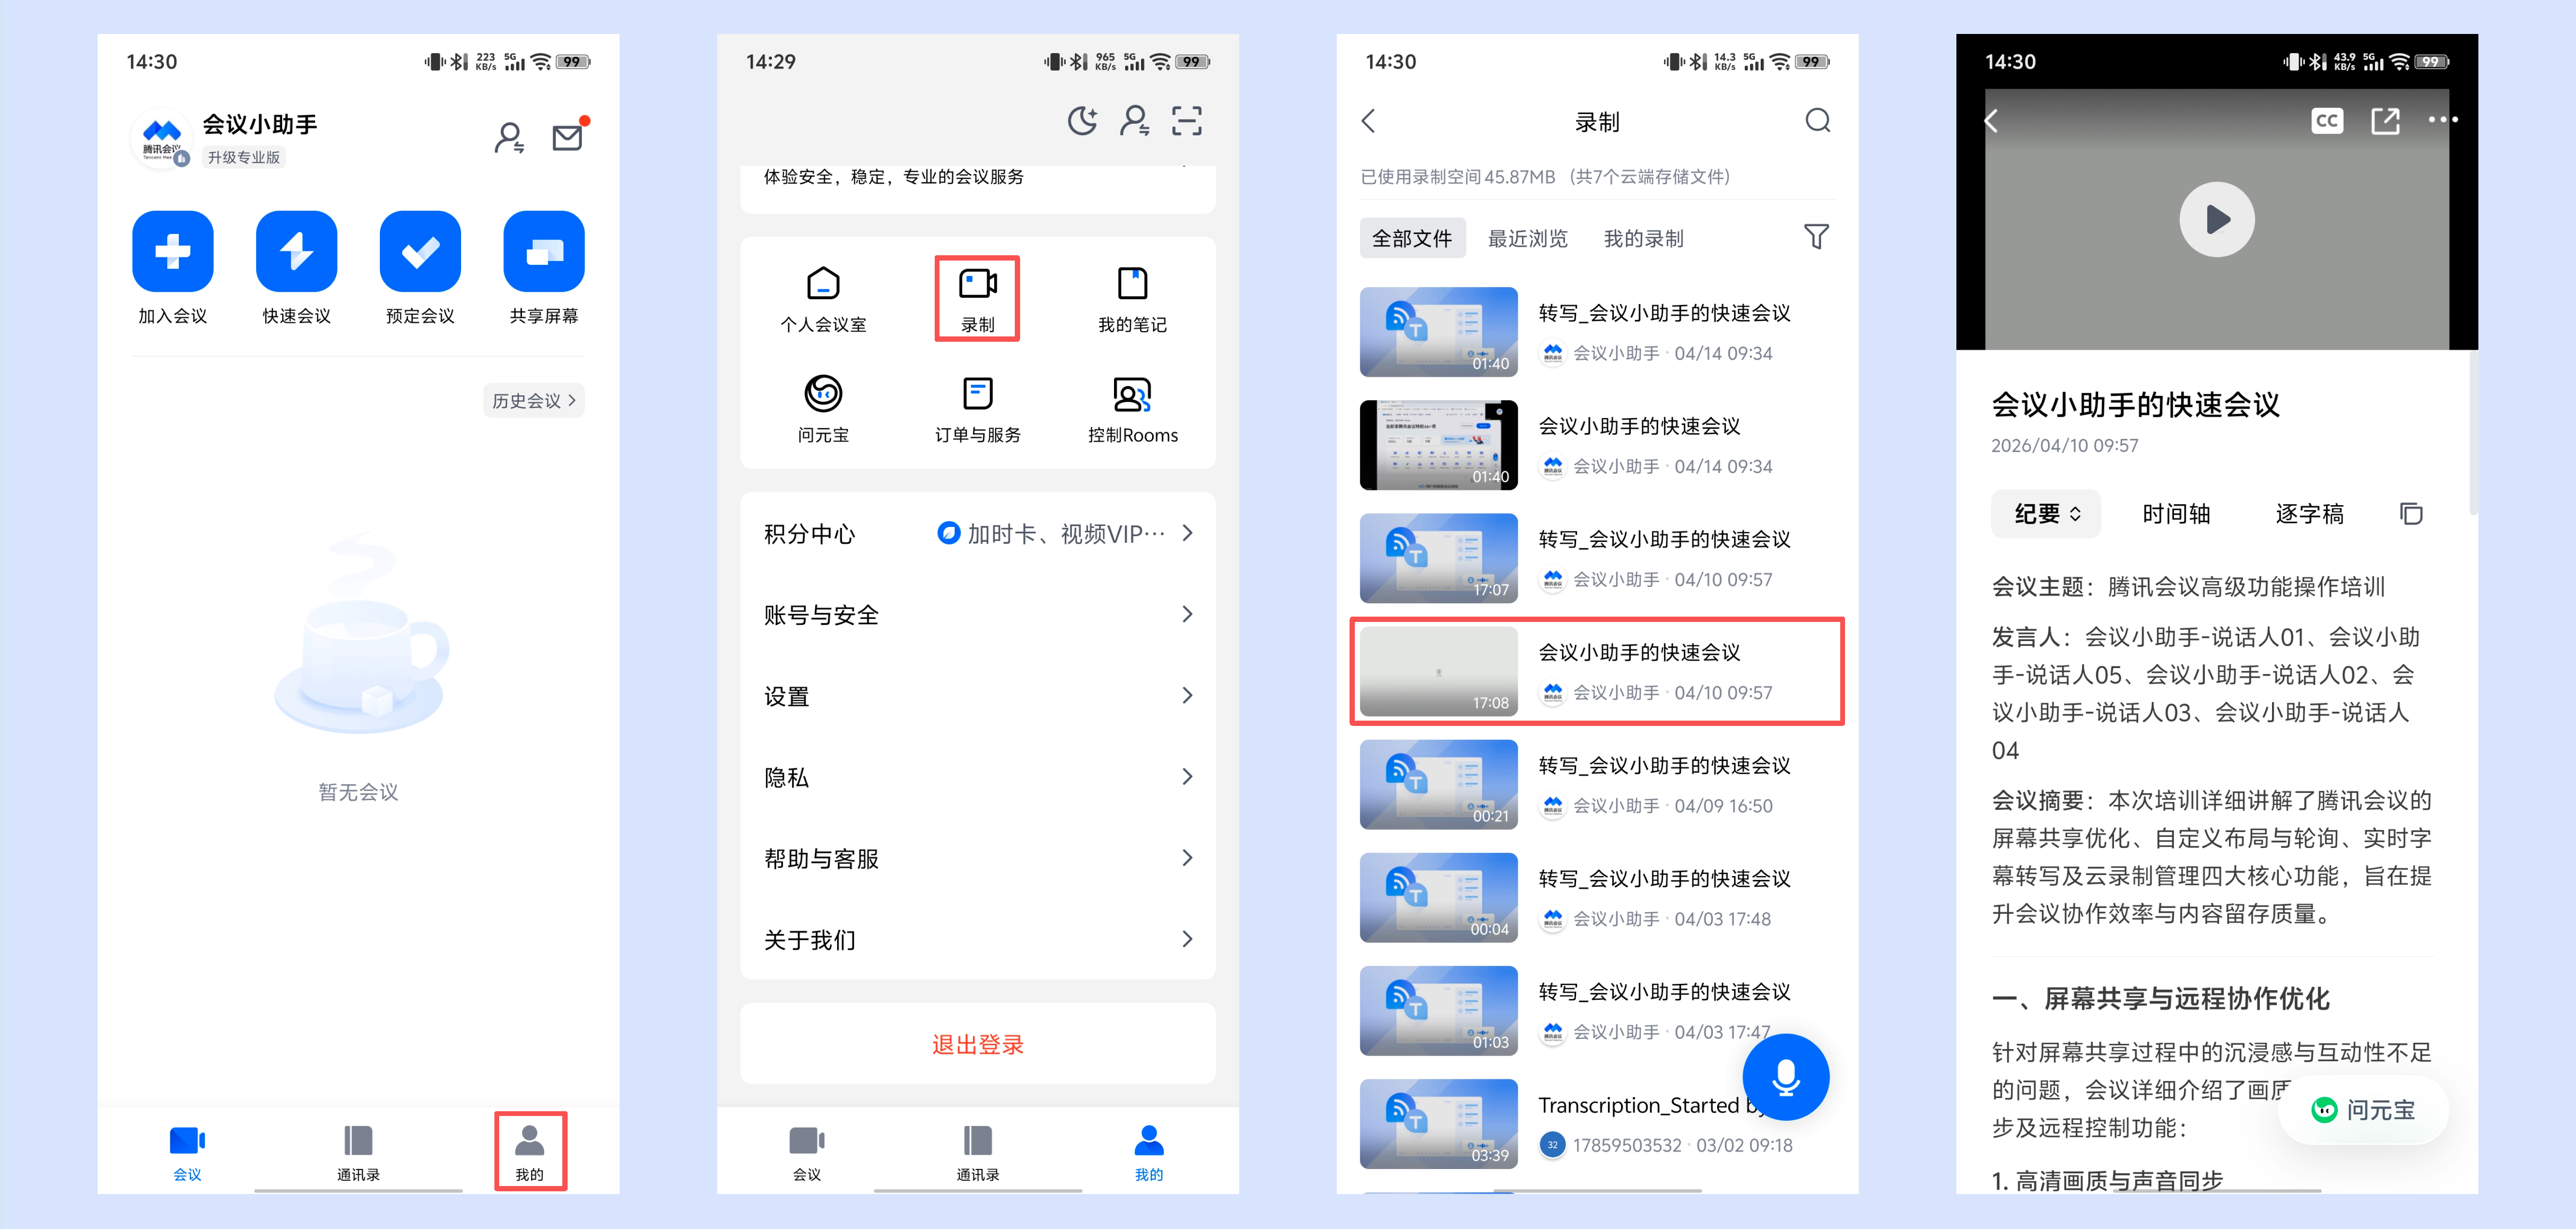
单击 App 主界面底部我的 > 录制 > 全部文件,单击对应的录制文件,即可查看录制详情。
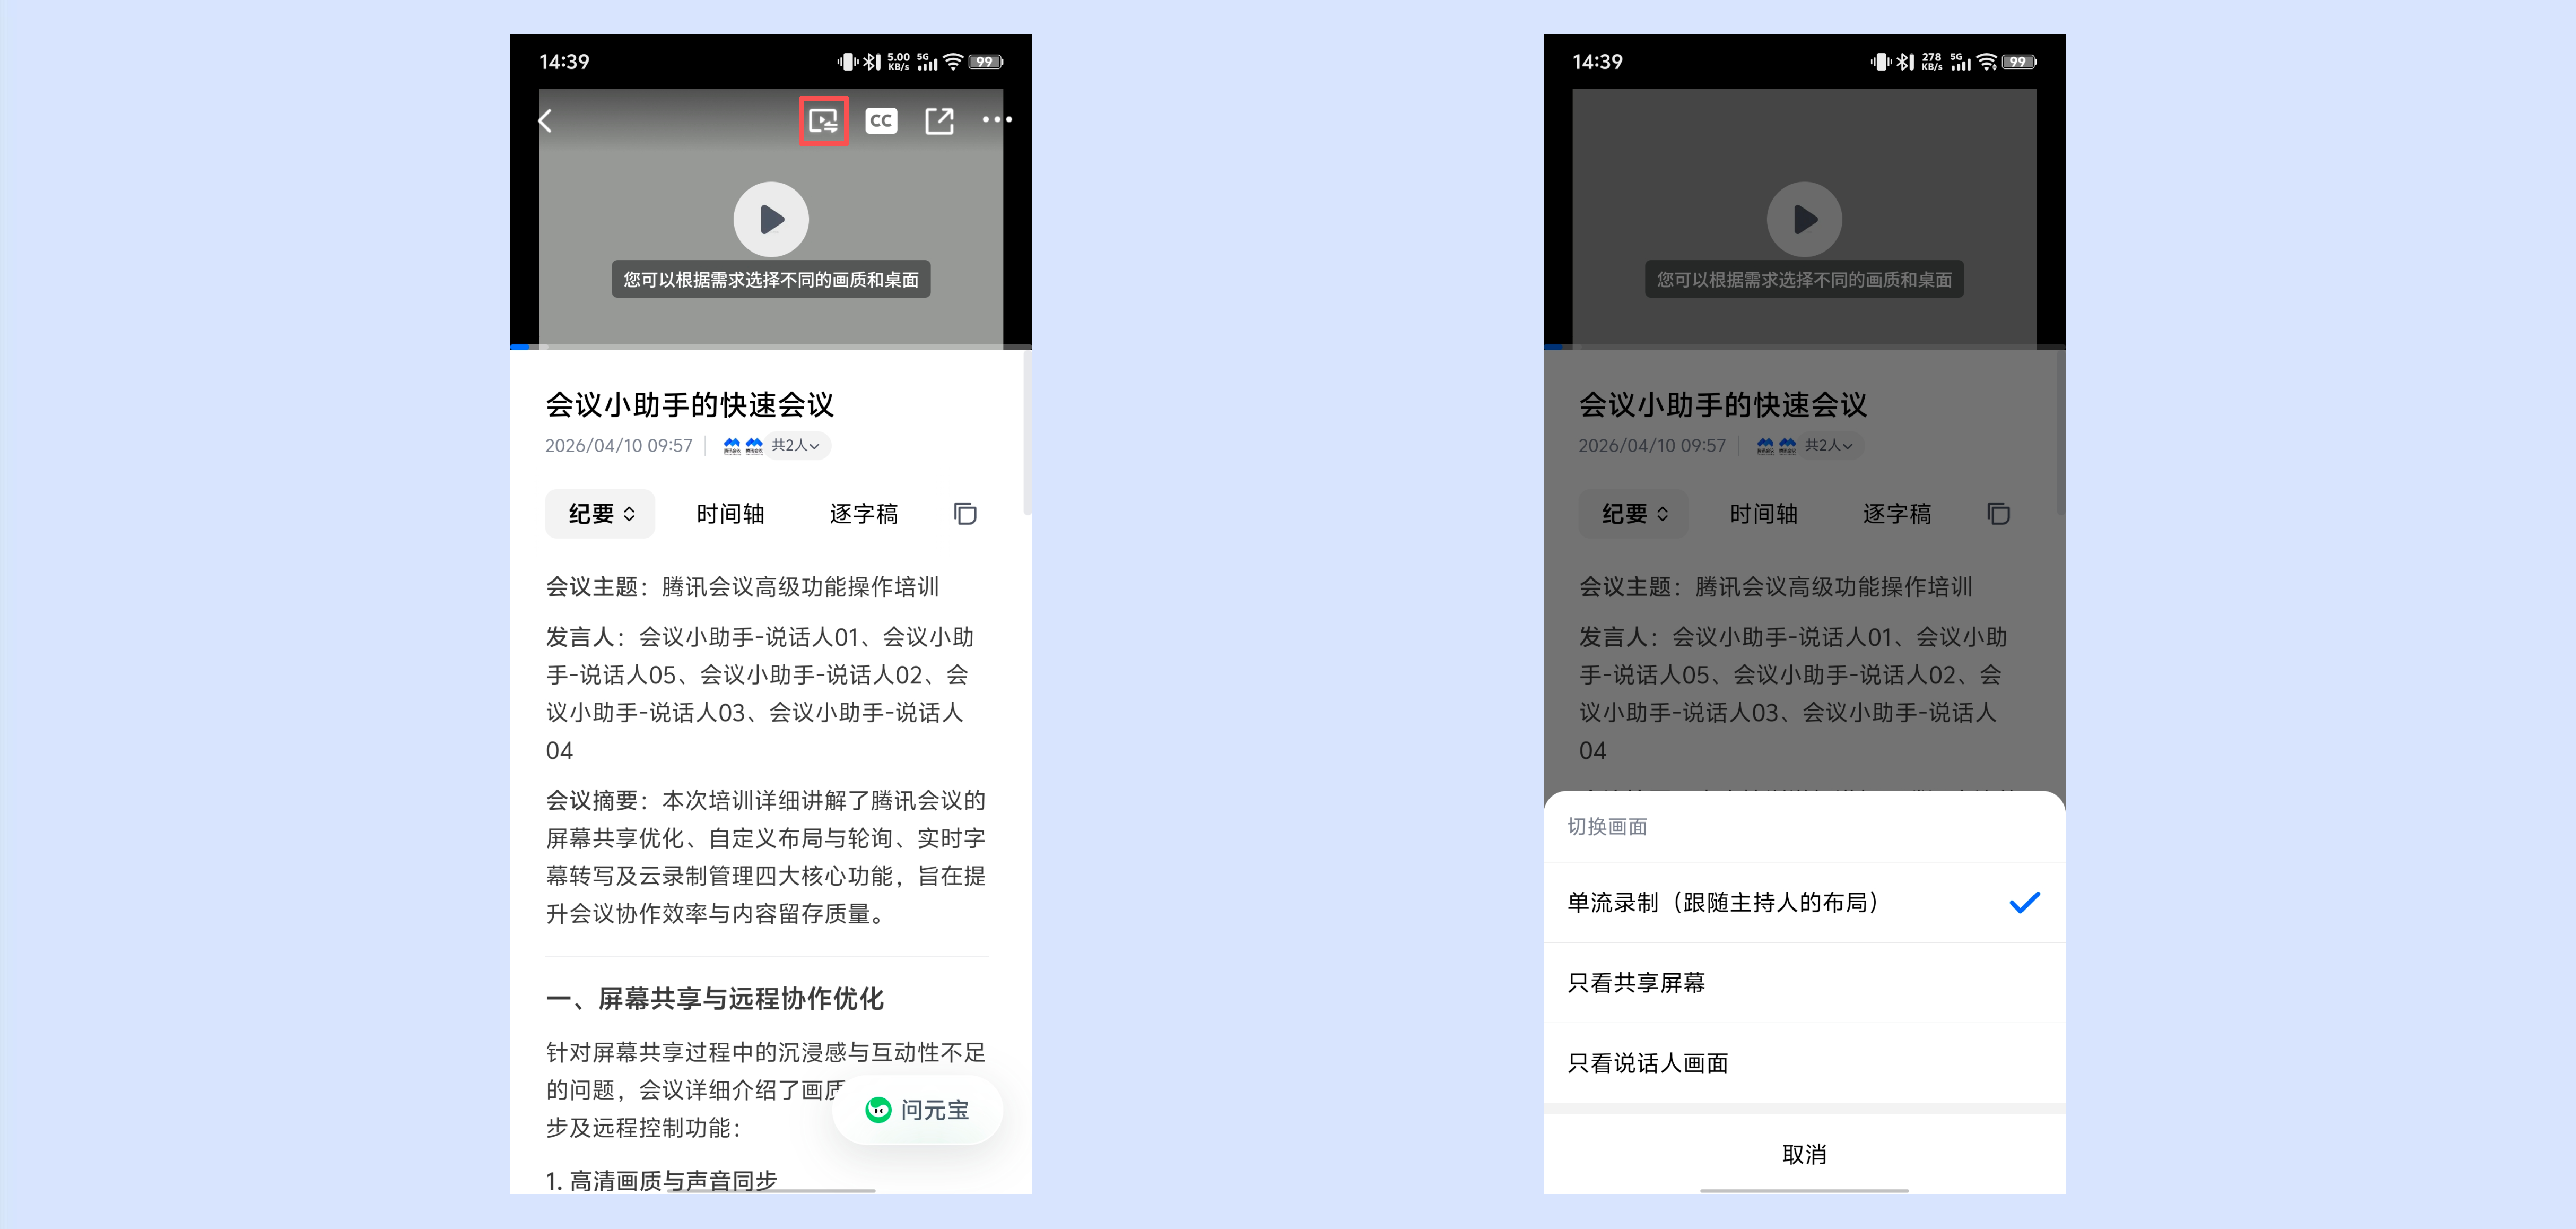
当开启多流录制后,单击视频右上角切换录制视图图标,选择需要查看的视图,即可切换播放。
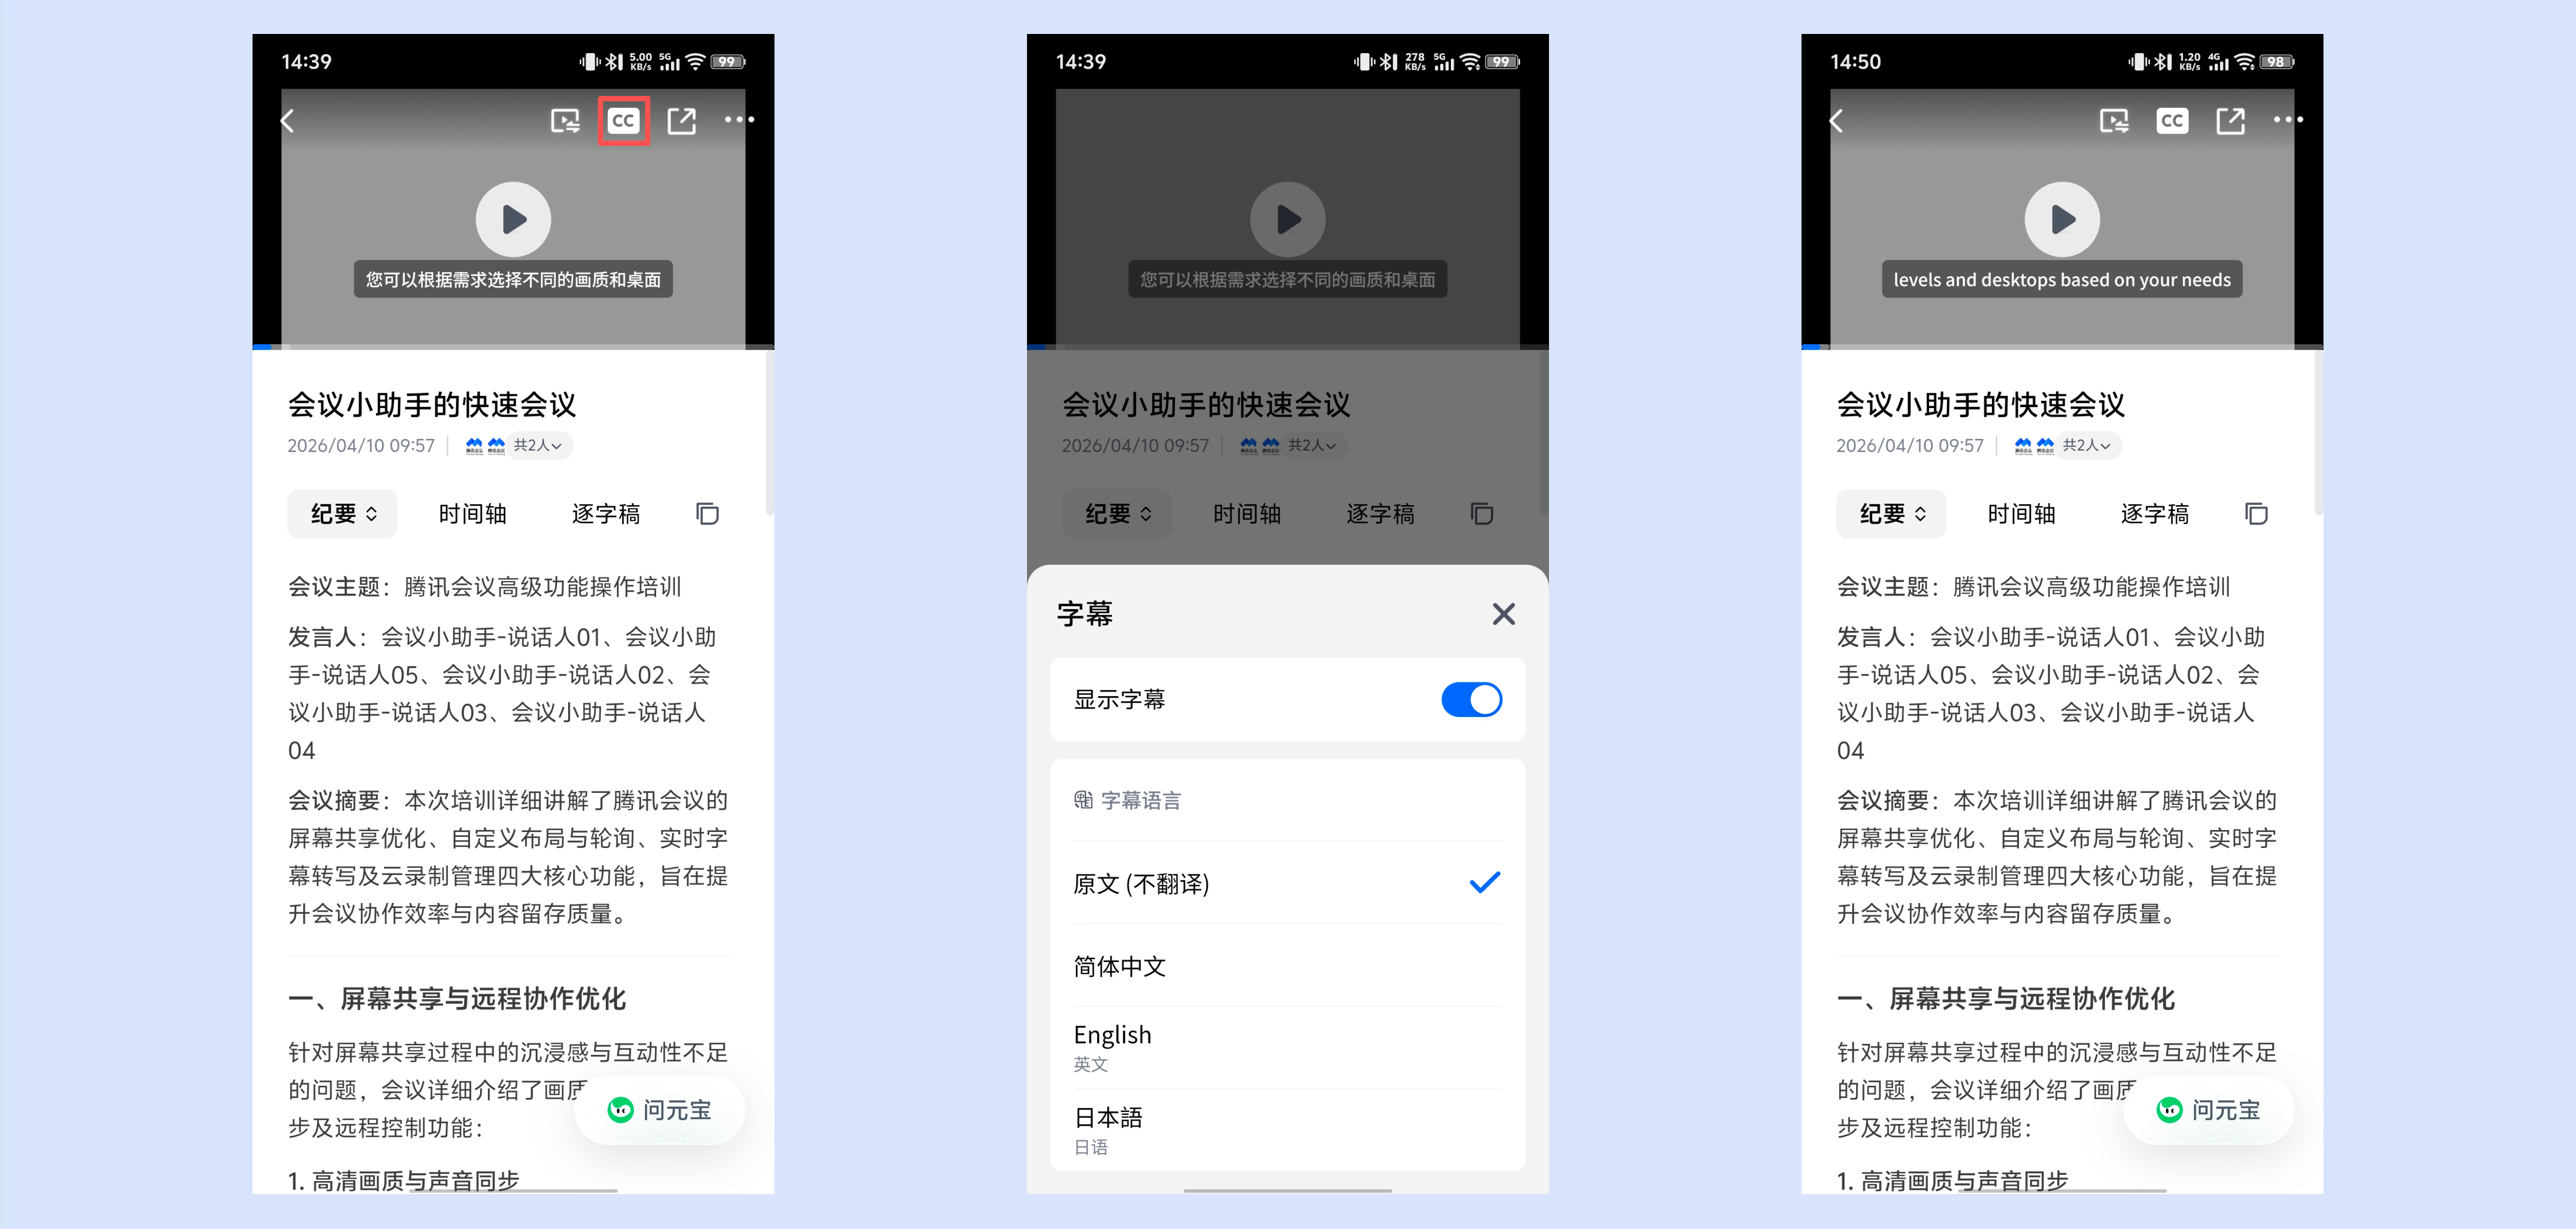
单击视频右上角字幕图标,开启显示字幕,即可显示云录制字幕;并支持选择字幕语言,商业版、企业版、教育版、教育加强版支持更多字幕语言。
创建者单击右上角分享按钮,即可设置分享查看权限,支持指定用户分享和通过链接分享。
当有用户访问此录制文件时,创建者可单击顶部访问者头像,查看可访问录制的成员,选中成员左滑操作,可移除该成员访问权限。
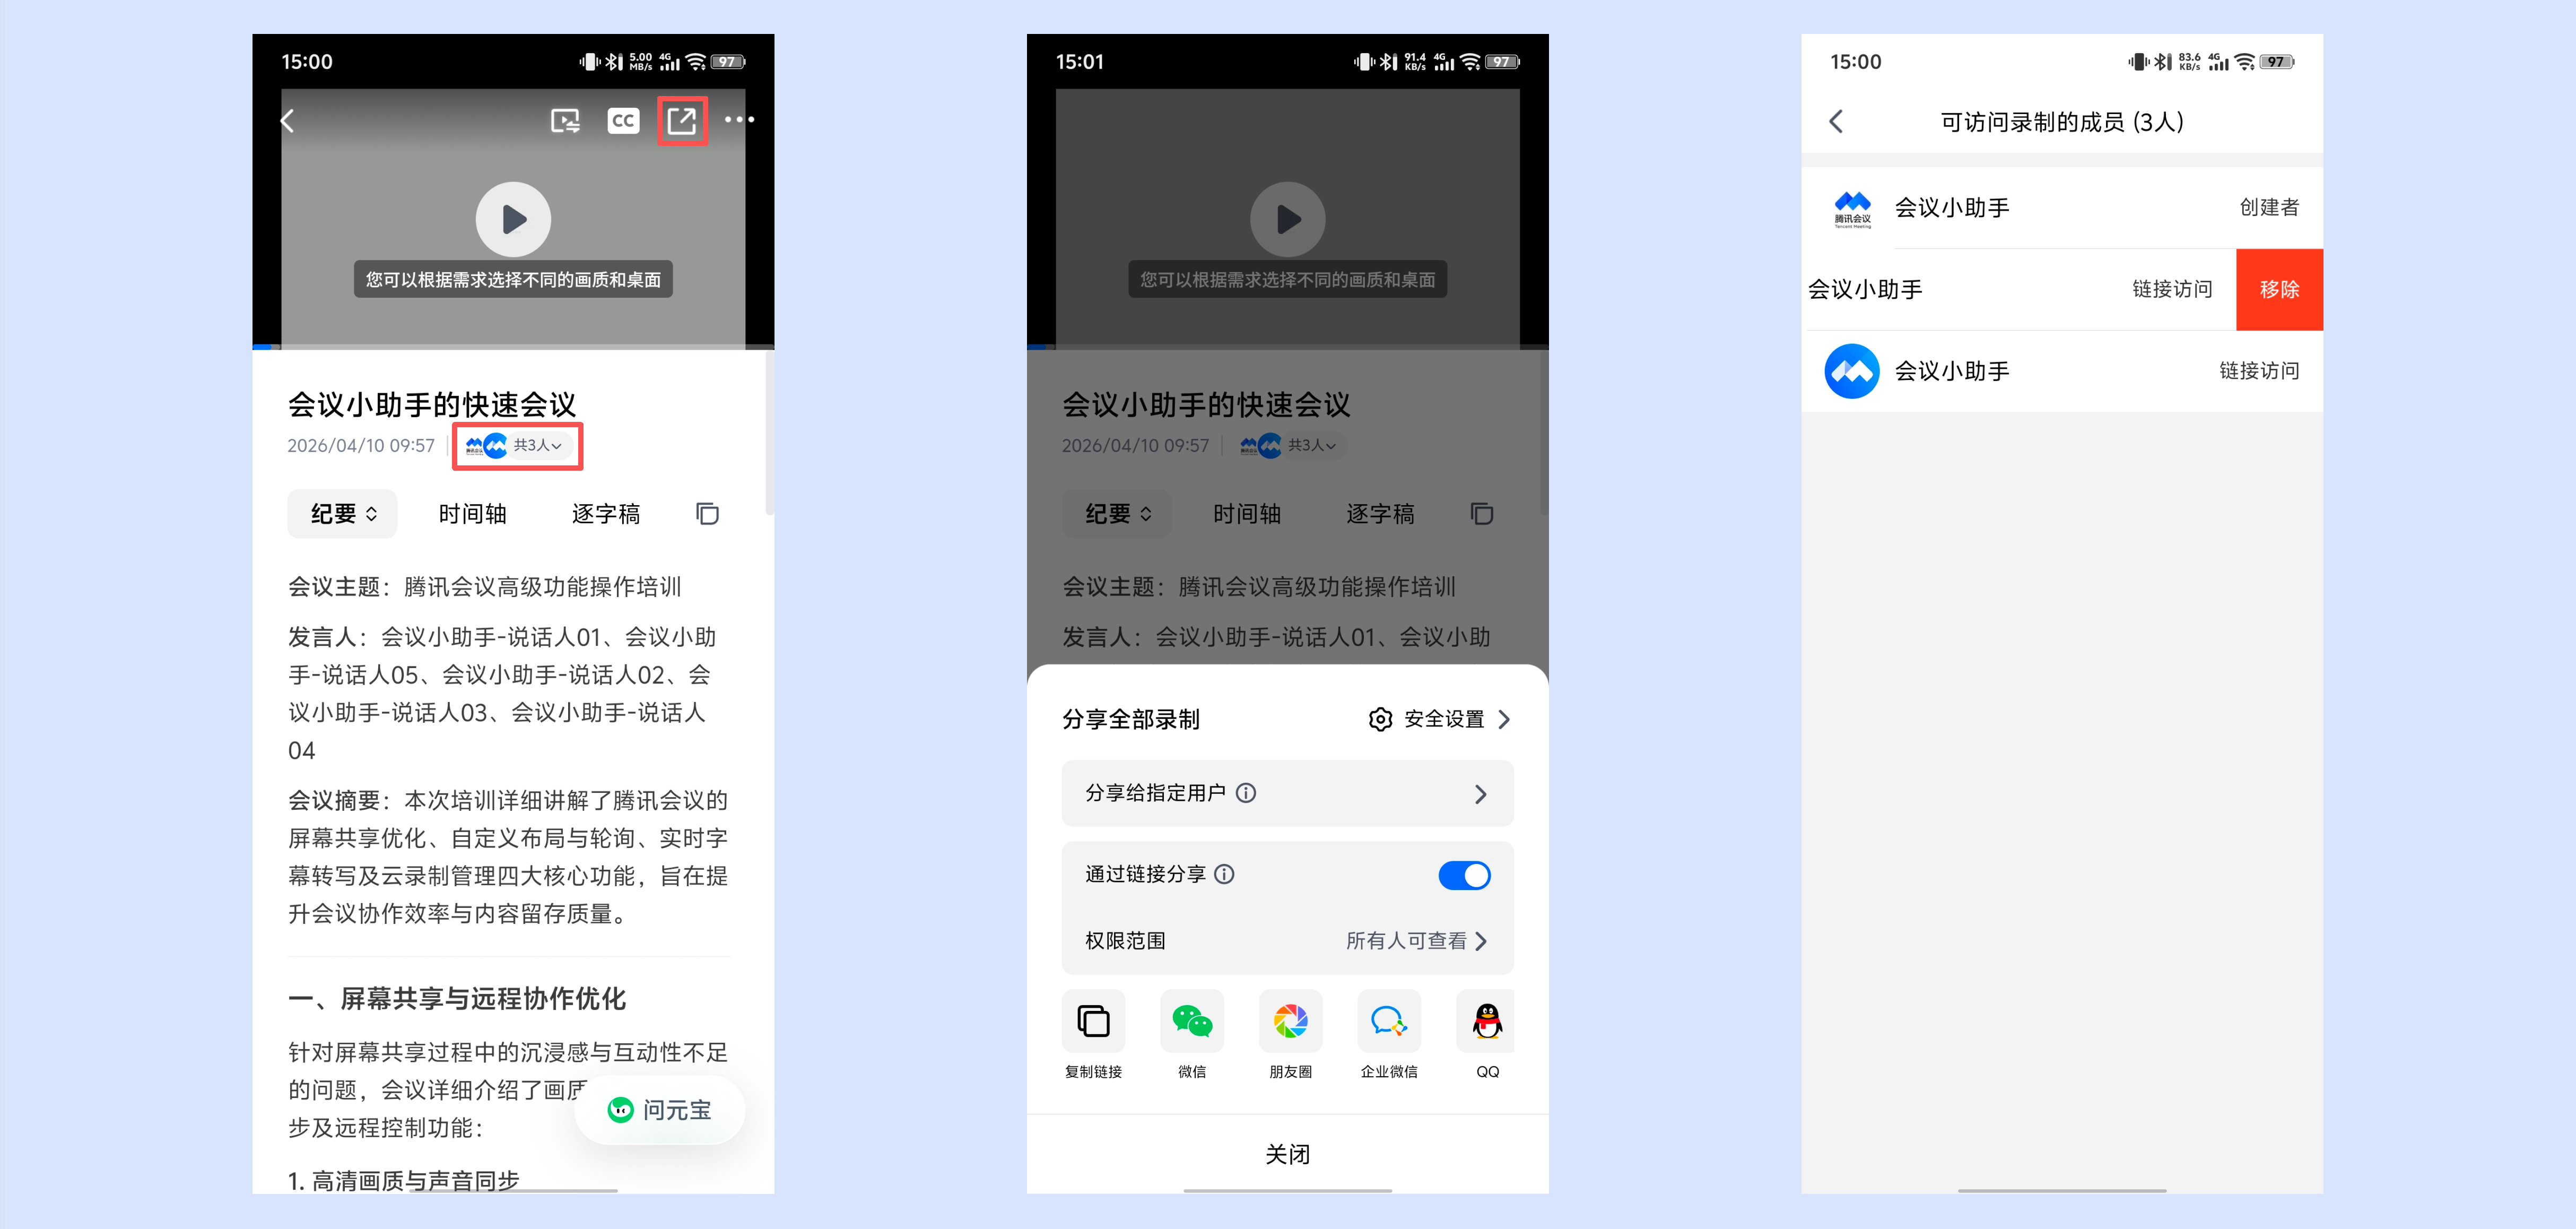
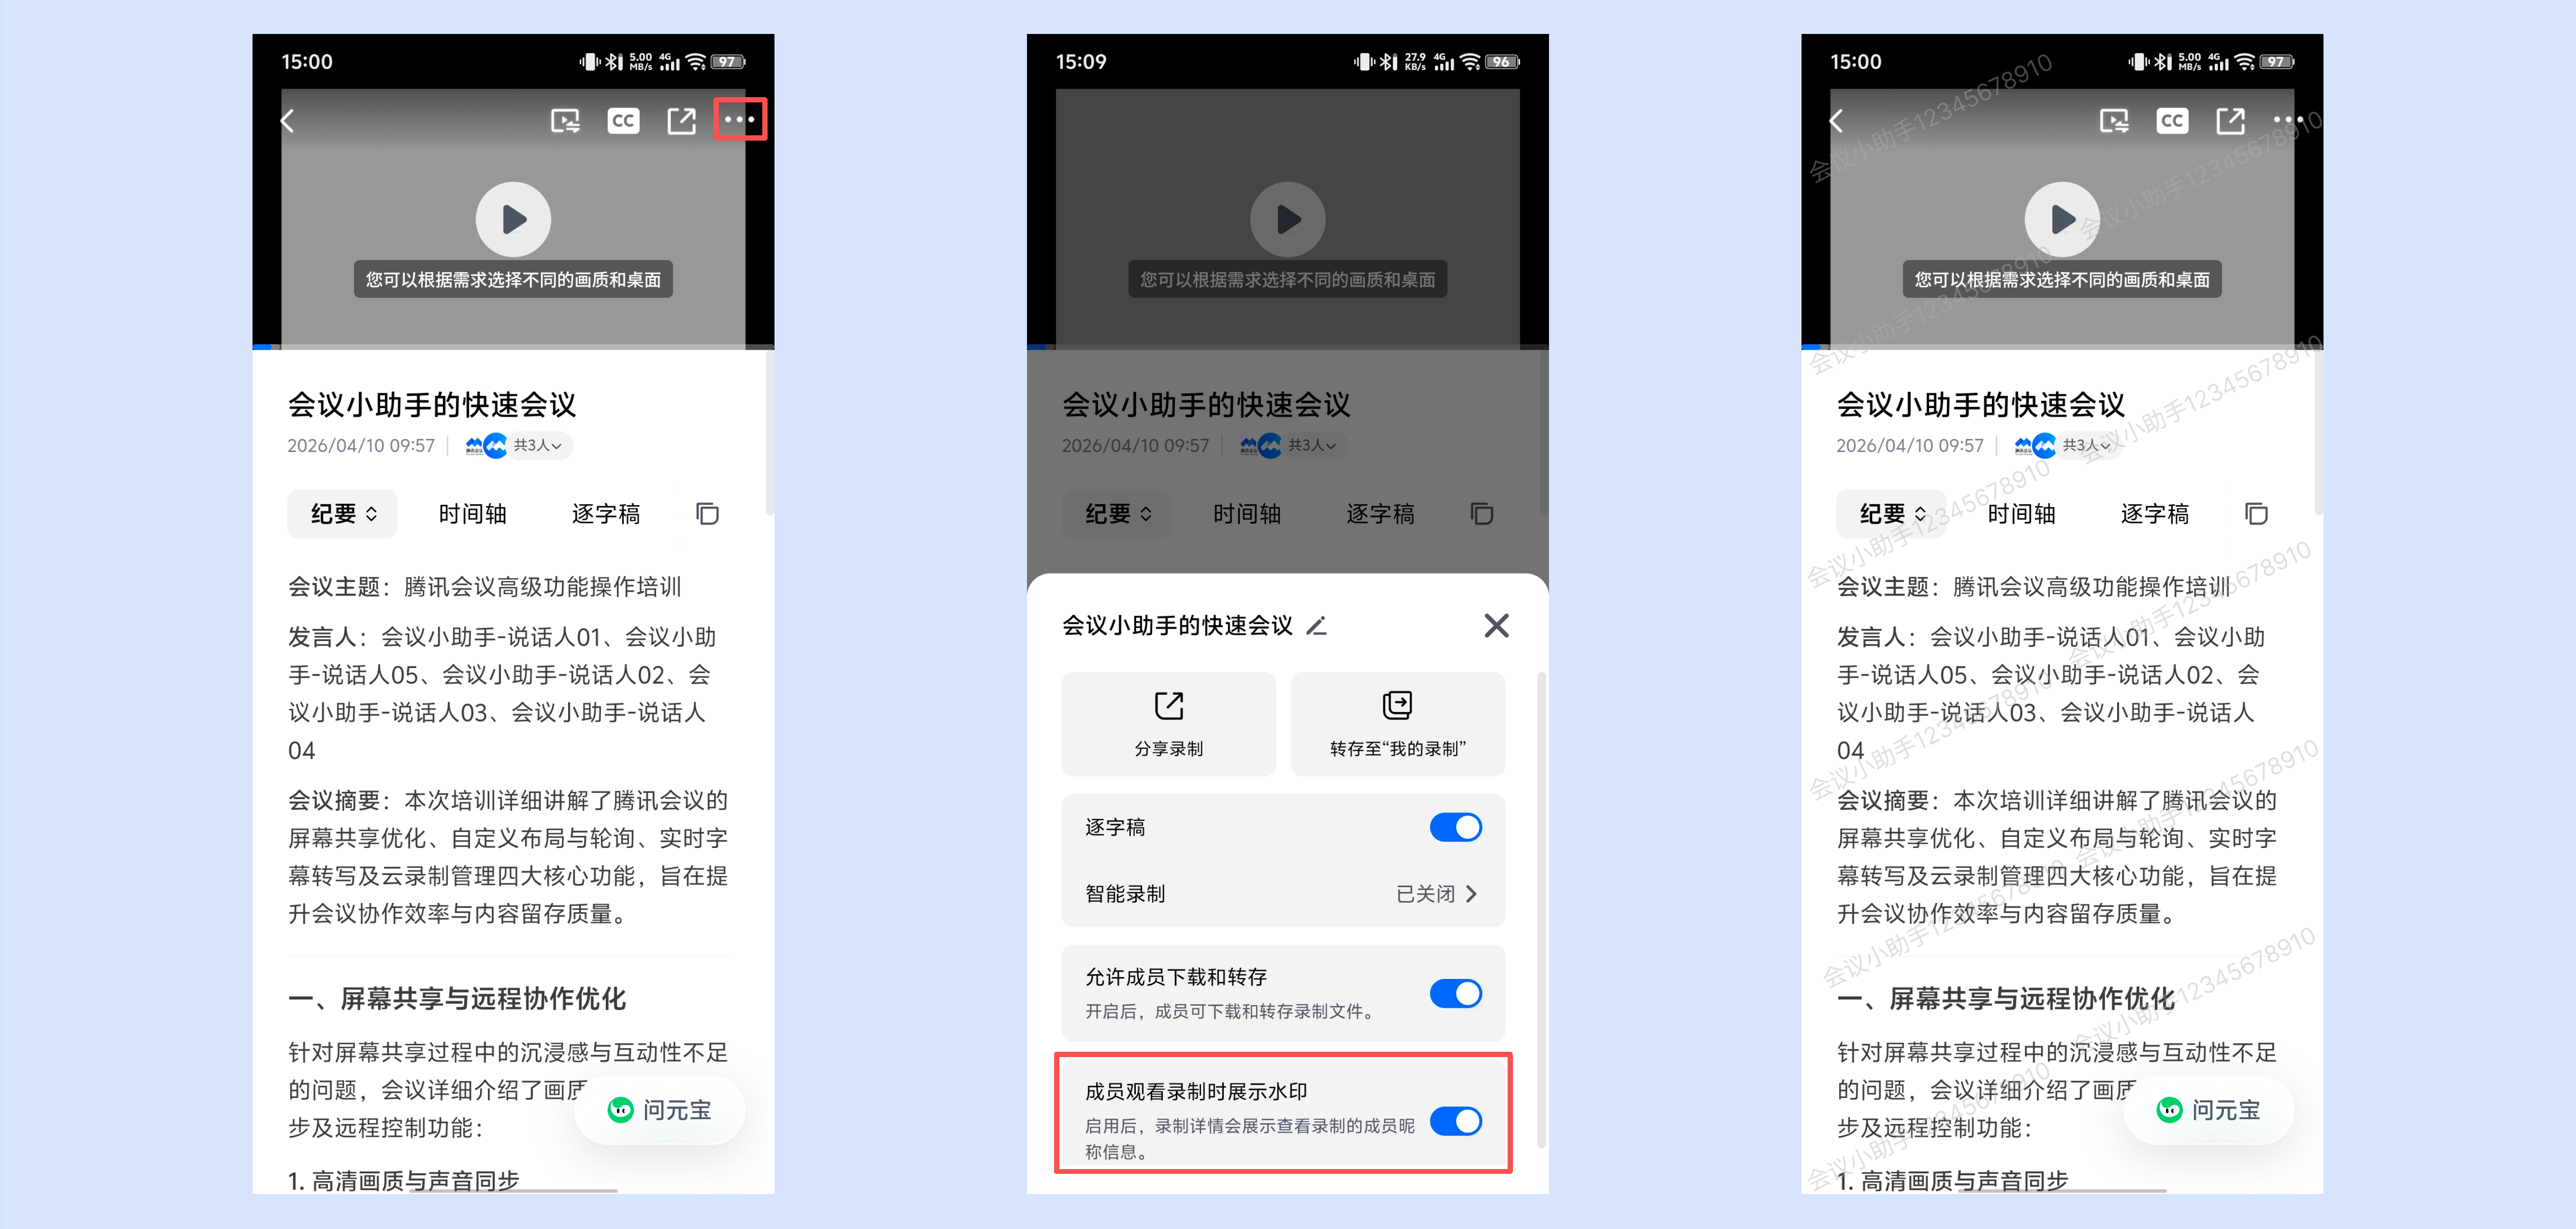
创建者单击页面右上角“···”按钮,可对录制文件进行分享录制、转存至“我的录制”、逐字稿、智能录制、允许成员下载和转存、成员观看录制时展示水印操作;访问者仅支持分享录制、转存至“我的录制”(需创建者开启权限)、举报操作。