本节主要介绍如何使用 Spring Boot 框架连接 TDSQL PG 数据库,实现数据的增删查改等基本操作。
简介
Spring Boot 是一个基于 Spring 的套件,可以简化 Spring 应用的创建及部署。它提供了丰富的 Spring 模块化支持,可以帮助开发者更轻松快捷地构建出企业级应用。Spring Boot 通过自动配置功能,降低了复杂性,同时支持基于 JVM 的多种开源框架,可以缩短开发时间,使开发更加简单和高效。
引入和配置 Spring Boot 框架
前置依赖
在配置之前需要保证你的机器上已安装对应版本的 JDK,本例是 JDK 8。内核 Oracle 模式下建议使用腾讯自研驱动,请单击 驱动下载。联系数据库管理员获取数据库相关信息:包括数据库 IP、端口、实例名、用户、密码等。驱动名和连接 URL 如下:
驱动名
com.tencentcloud.tdsql.pg.jdbc.Driver连接 URL(Oracle 模式下需打开 oracle_compile 参数)
jdbc:tdsql-pg://host:port/database?oracle_compile=true创建 Maven 项目
创建 Maven 项目,如下:
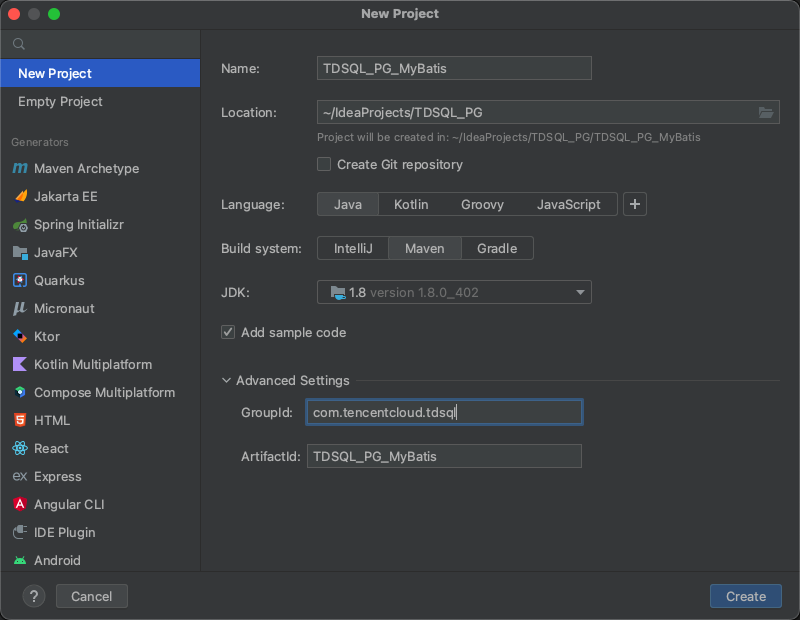
注意:
本文档示例项目使用的 IDE 是 IntelliJ IDEA 2022.3 (Ultimate Edition),也可根据喜好选择合适的 IDE。
配置 pom.xml 文件,导入项目依赖
配置文件
pom.xml如下:<?xml version="1.0" encoding="UTF-8"?><project xmlns="http://maven.apache.org/POM/4.0.0"xmlns:xsi="http://www.w3.org/2001/XMLSchema-instance"xsi:schemaLocation="http://maven.apache.org/POM/4.0.0 http://maven.apache.org/xsd/maven-4.0.0.xsd"><modelVersion>4.0.0</modelVersion><!-- 配置父项依赖 --><parent><groupId>org.springframework.boot</groupId><artifactId>spring-boot-starter-parent</artifactId><version>2.7.18</version><relativePath/></parent><groupId>com.tencentcloud.tdsql</groupId><artifactId>TDSQL_PG_SpringBoot</artifactId><version>1.0-SNAPSHOT</version><properties><java.version>1.8</java.version><maven.compiler.source>8</maven.compiler.source><maven.compiler.target>8</maven.compiler.target></properties><dependencies><!-- Spring Boot --><dependency><groupId>org.springframework.boot</groupId><artifactId>spring-boot-starter</artifactId></dependency><dependency><groupId>org.springframework.boot</groupId><artifactId>spring-boot-starter-jdbc</artifactId></dependency><dependency><groupId>org.springframework.boot</groupId><artifactId>spring-boot-starter-test</artifactId><scope>test</scope></dependency><!-- TDSQL-PG JDBC驱动 --><dependency><groupId>com.tencentcloud.tdsql</groupId><artifactId>tdsql-pg-connector-java8</artifactId><version>1.1.0</version><scope>system</scope><systemPath>${project.basedir}/lib/tdsql-pg-connector-java8-1.1.0.jar</systemPath></dependency></dependencies><!-- 配置Maven插件 --><build><plugins><plugin><groupId>org.springframework.boot</groupId><artifactId>spring-boot-maven-plugin</artifactId></plugin></plugins></build></project>
1. 通过
<parent>配置父项依赖:配置父项目依赖spring-boot-starter-parent,引入 Spring Boot 的预置配置。2. 通过
<dependencies> 定义项目所依赖的组件,主要包括:spring-boot-starter:Spring Boot 的核心启动器。spring-boot-starter-jdbc:Spring JDBC 依赖包。spring-boot-starter-test:Spring Boot 单元测试依赖包。spring-boot 填写好后会从公共库自动下载。
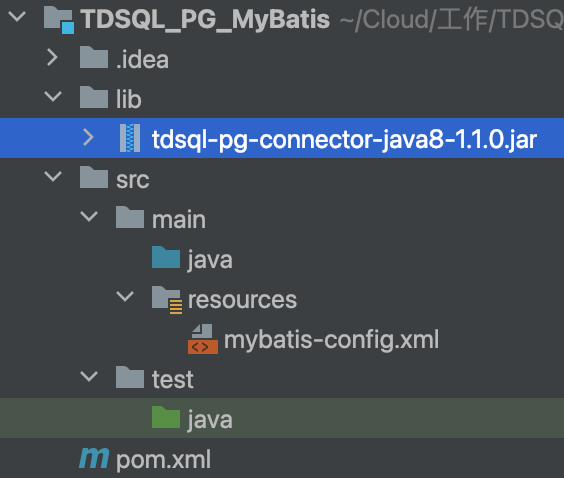
下载 TDSQL PG JDBC 驱动包,并在
TDSQL_PG_SpringBoot目录下新建lib目录,将驱动包拷贝到lib目录下。3. 配置 Maven 插件
spring-boot-maven-plugin,配合spring-boot-starter-parent可以把 Spring Boot 应用打包成 JAR 来直接运行。配置 Spring Boot
在
TDSQL_PG_SpringBoot/src/main/resources目录下新建 application.properties 文件,用于配置 Spring Boot,application.properties 配置如下:# 配置JDBC连接信息:host、port、database、user、password 需要替换为数据库管理员提供的数据库相关信息。spring.datasource.driverClassName=com.tencentcloud.tdsql.pg.jdbc.Driverspring.datasource.url=jdbc:tdsql-pg://host:port/database?oracle_compile=truespring.datasource.username=userspring.datasource.password=password# 设置日志打印级别为WARNlogging.level.root=WARN
其中,需要配置 JDBC 连接信息:
spring.datasource.driverClassName:指定驱动包名为com.tencentcloud.tdsql.pg.jdbc.Driver。spring.datasource.url:指定连接 URL,包括数据库地址、端口、数据库名、连接属性等信息。spring.datasource.username:指定用户名。spring.datasource.password:指定相应用户的密码。至此,已完成 Spring Boot 项目的基本配置,完整的项目目录结构如下图所示:
开发示例
添加数据表对应的实体类
首先,开发使用的数据表为
STUDENT表(CREATE TABLE STUDENT(ID INT PRIMARY KEY, NAME VARCHAR(50))),对应地,添加实体类
Student,先在 TDSQL_PG_SpringBoot/src/main/java/ 下创建 Package: com.tencentcloud.tdsql.pojo 再,在TDSQL_PG_SpringBoot/src/main/java/com/tencentcloud/tdsql/pojo下新建 Student.java 文件:package com.tencentcloud.tdsql.pojo;public class Student {private int id;private String name;public Student() {}public Student(int id, String name) {this.id = id;this.name = name;}public int getId() {return id;}public void setId(int id) {this.id = id;}public String getName() {return name;}public void setName(String name) {this.name = name;}@Overridepublic String toString() {return "Student [id=" + id + ", name=" + name + "]";}}
定义数据库的增删查改操作
其次,在
TDSQL_PG_SpringBoot/src/main/java/ 下创建 Package com.tencentcloud.tdsql.dao ,在TDSQL_PG_SpringBoot/src/main/java/com/tencentcloud/tdsql/dao下新建StudentDao.java文件,定义数据库的增删查改操作,如下:package com.tencentcloud.tdsql.dao;import com.tencentcloud.tdsql.pojo.Student;import java.util.List;import org.springframework.beans.factory.annotation.Autowired;import org.springframework.jdbc.core.BeanPropertyRowMapper;import org.springframework.jdbc.core.JdbcTemplate;import org.springframework.stereotype.Repository;@Repositorypublic class StudentDao {@Autowiredprivate JdbcTemplate jdbcTemplate;// 插入public Integer insertStudent(Student student) {return jdbcTemplate.update("insert into STUDENT values(?, ?)",new Object[]{student.getId(), student.getName()});}// 查询public List<Student> selectAllStudent() {return jdbcTemplate.query("select * from STUDENT order by ID",new BeanPropertyRowMapper<>(Student.class));}// 更新public Integer updateStudentById(Student student) {return jdbcTemplate.update("update STUDENT set NAME = ? where ID = ?",new Object[]{student.getName(), student.getId()});}// 删除public Integer deleteStudentById(Integer id) {return jdbcTemplate.update("delete from STUDENT where ID = ?", id);}}
StudentDao 类通过JdbcTemplate对象执行 SQL 语句,实现了对STUDENT表的插入、查询、更新和删除操作。构建启动类
然后,在
TDSQL_PG_SpringBoot/src/main/java/com/tencentcloud/tdsql下新建Application.java文件,用于启动 Spring Boot 应用程序,如下:package com.tencentcloud.tdsql;import org.springframework.boot.SpringApplication;import org.springframework.boot.autoconfigure.SpringBootApplication;@SpringBootApplicationpublic class Application {public static void main(String[] args) {SpringApplication.run(Application.class, args);}}
测试
最后,在
TDSQL_PG_SpringBoot/src/test/java/com/tencentcloud/tdsql下添加测试类TestStudent,展示了基本的增删查改功能,如下:package com.tencentcloud.tdsql;import com.tencentcloud.tdsql.dao.StudentDao;import com.tencentcloud.tdsql.pojo.Student;import java.util.List;import org.junit.jupiter.api.Test;import org.springframework.beans.factory.annotation.Autowired;import org.springframework.boot.test.context.SpringBootTest;@SpringBootTestpublic class TestStudent {@Autowiredprivate StudentDao studentDao;@Testvoid contextLoads() {System.out.println("------插入数据------");studentDao.insertStudent(new Student(1, "Alex"));studentDao.insertStudent(new Student(2, "Bob"));studentDao.insertStudent(new Student(3, "John"));System.out.println("插入3条数据");System.out.println("------查询数据------");List<Student> students1 = studentDao.selectAllStudent();for (Student student: students1) {System.out.println(student);}System.out.println("------更改数据------");studentDao.updateStudentById(new Student(1, "Alice"));System.out.println("更改id为1的数据");System.out.println("------查询数据------");List<Student> students2 = studentDao.selectAllStudent();for (Student student: students2) {System.out.println(student);}System.out.println("------删除数据------");studentDao.deleteStudentById(2);System.out.println("删除id为2的数据");System.out.println("------查询数据------");List<Student> students3 = studentDao.selectAllStudent();for (Student student: students3) {System.out.println(student);}}}
运行结果如下:
------插入数据------插入3条数据------查询数据------Student [id=1, name=Alex]Student [id=2, name=Bob]Student [id=3, name=John]------更改数据------更改id为1的数据------查询数据------Student [id=1, name=Alice]Student [id=2, name=Bob]Student [id=3, name=John]------删除数据------删除id为2的数据------查询数据------Student [id=1, name=Alice]Student [id=3, name=John]
附:项目结构
至此,完成了 Spring Boot 项目的配置和开发示例,项目的整体结构如下图所示:


