VPC 边界防火墙支持通过云联网(CCN)的多路由表和接入模式实现流量牵引。在手动接入模式下,开启防火墙开关后,云联网实例的流量不会自动接入防护。您需要前往该云联网实例的控制台,根据所选模式进行手动配置。
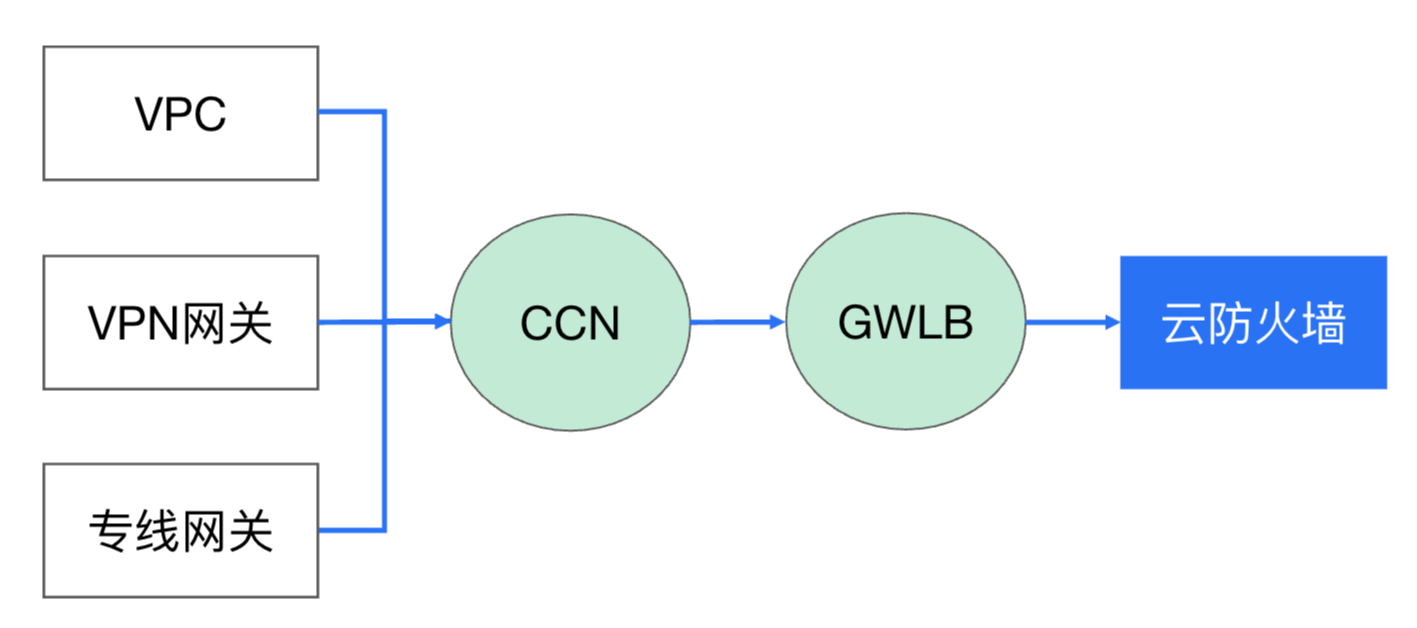
多路由表接入模式
多路由表接入模式是 VPC 边界防火墙(集群模式)手动接入的一种路由方式。该模式通过在云联网中为每个需要防护的实例创建专属路由表,将流量引流至云防火墙进行检测和管控。适用于云联网仅支持多路由表、不支持策略路由的场景,或用户希望手动精细化控制路由的场景。
步骤一:选择手动接入模式
步骤二:配置引流策略
1. 选择引流私有网络的创建方式:
暂不创建:至少需要在一个地域创建引流私有网络,请选择自动分配或自定义。
自动选择:云防火墙会自动探测空闲的 /26 网段用于防火墙引流。
自定义:您可以自定义供防火墙使用的私有网络网段,请注意必须为 /26 网段(如 10.0.0.0/26)。
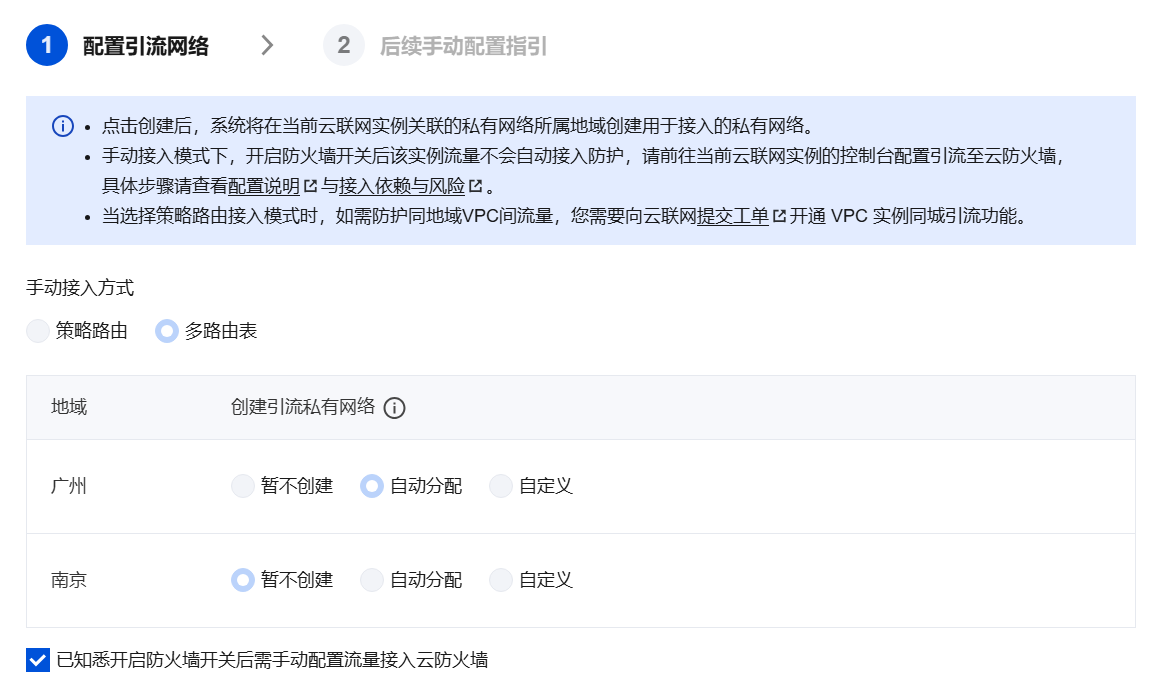
2. 单击创建,系统将在当前云联网实例关联的私有网络所属地域创建用于接入的私有网络,预计需要 30秒,请耐心等待。
步骤三:确认防火墙引流 VPC 是否创建成功
1. 登录 私有网络控制台,在左侧导航栏中,单击云联网。
2. 在云联网实例列表中,单击目标实例的 ID/名称。
3. 在关联实例页签中,检查是否存在名称为防火墙专用 VPC_请勿删改的 VPC 实例,且其状态为已连接。

说明:
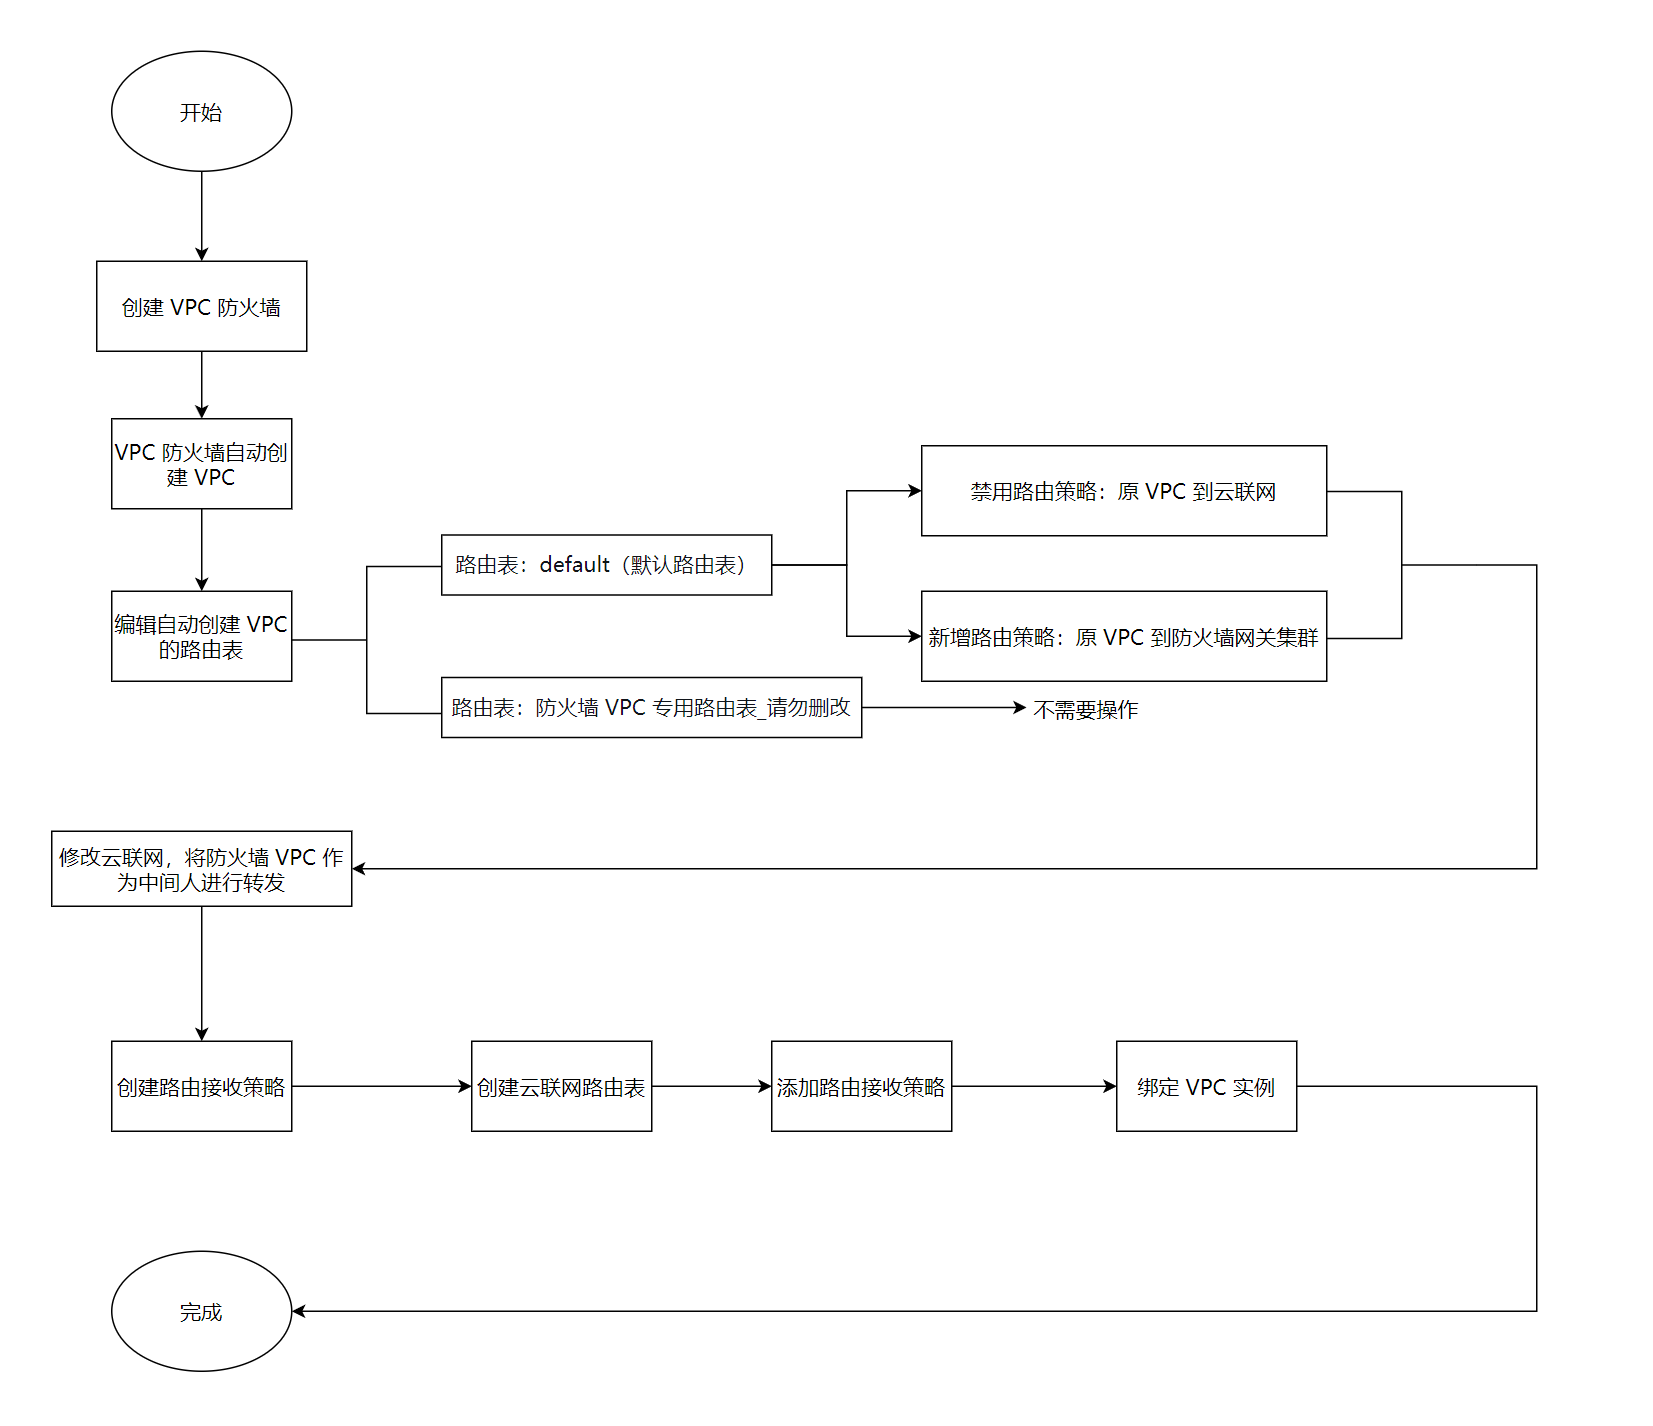
步骤四:配置防火墙引流 VPC 的路由策略
防火墙引流 VPC 创建成功后,系统会在该 VPC 下自动生成两张路由表,各自作用如下:
路由表 ID/名称 | 作用 |
default | 用于将流量引流到防火墙网关集群,需要用户手动配置路由策略 |
防火墙 VPC 专用路由表_请勿删改 | 用于将经过防火墙检测后的流量转发到目的 VPC,由云防火墙自动创建和维护,无需手动操作 |
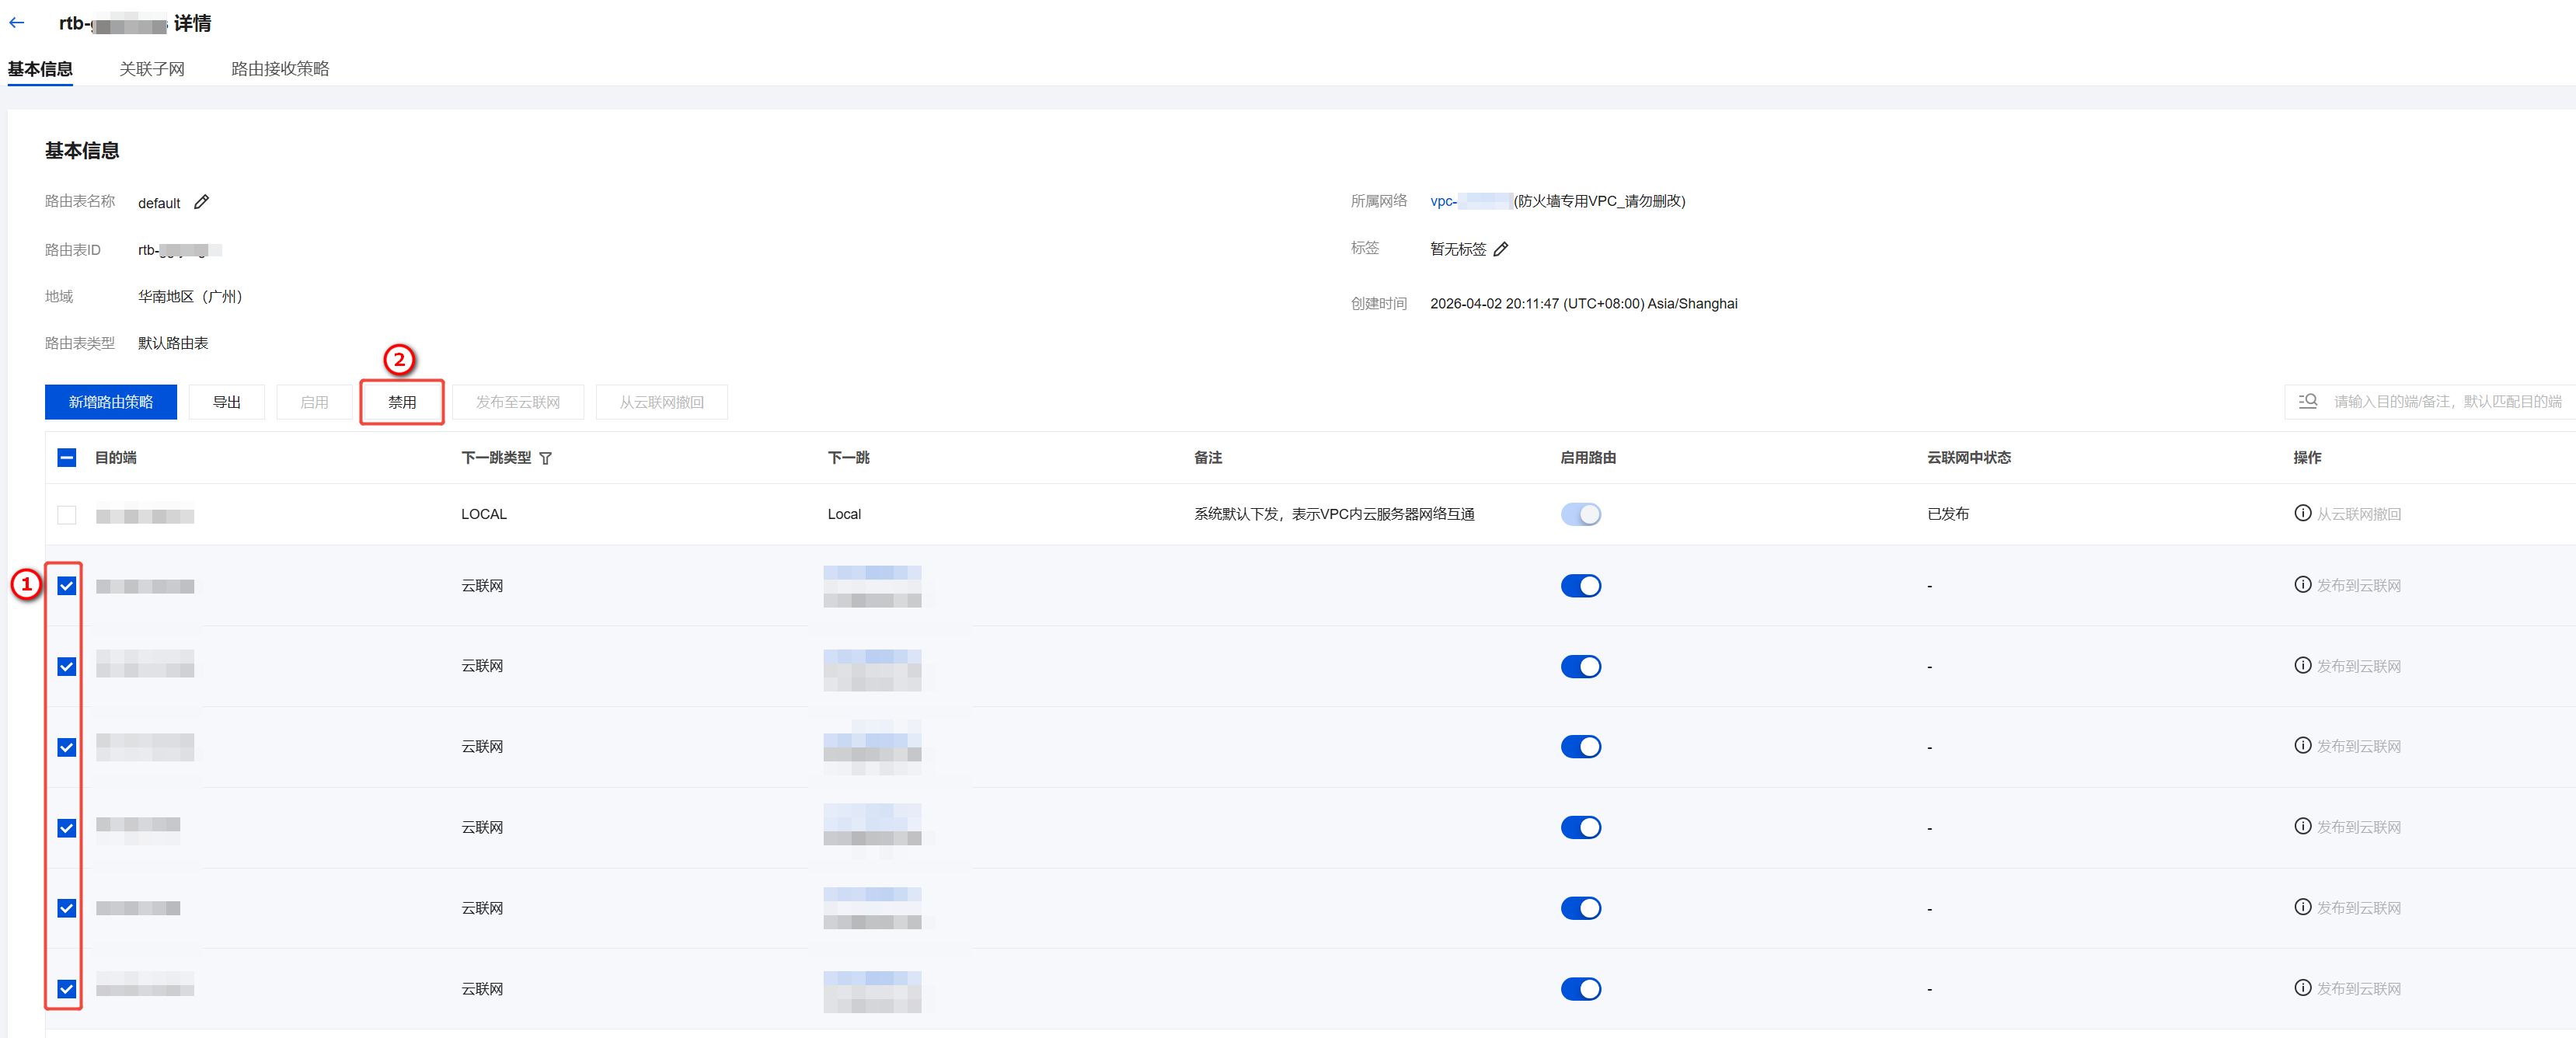
4.1 进入防火墙引流 VPC 的 default 路由表
1. 前往 私有网络控制台 > 路由表 > 路由表页面。
2. 在顶部选择防火墙引流 VPC 所在的地域。
3. 选择系统自动创建的防火墙引流 VPC,可以看到上述两张路由表。

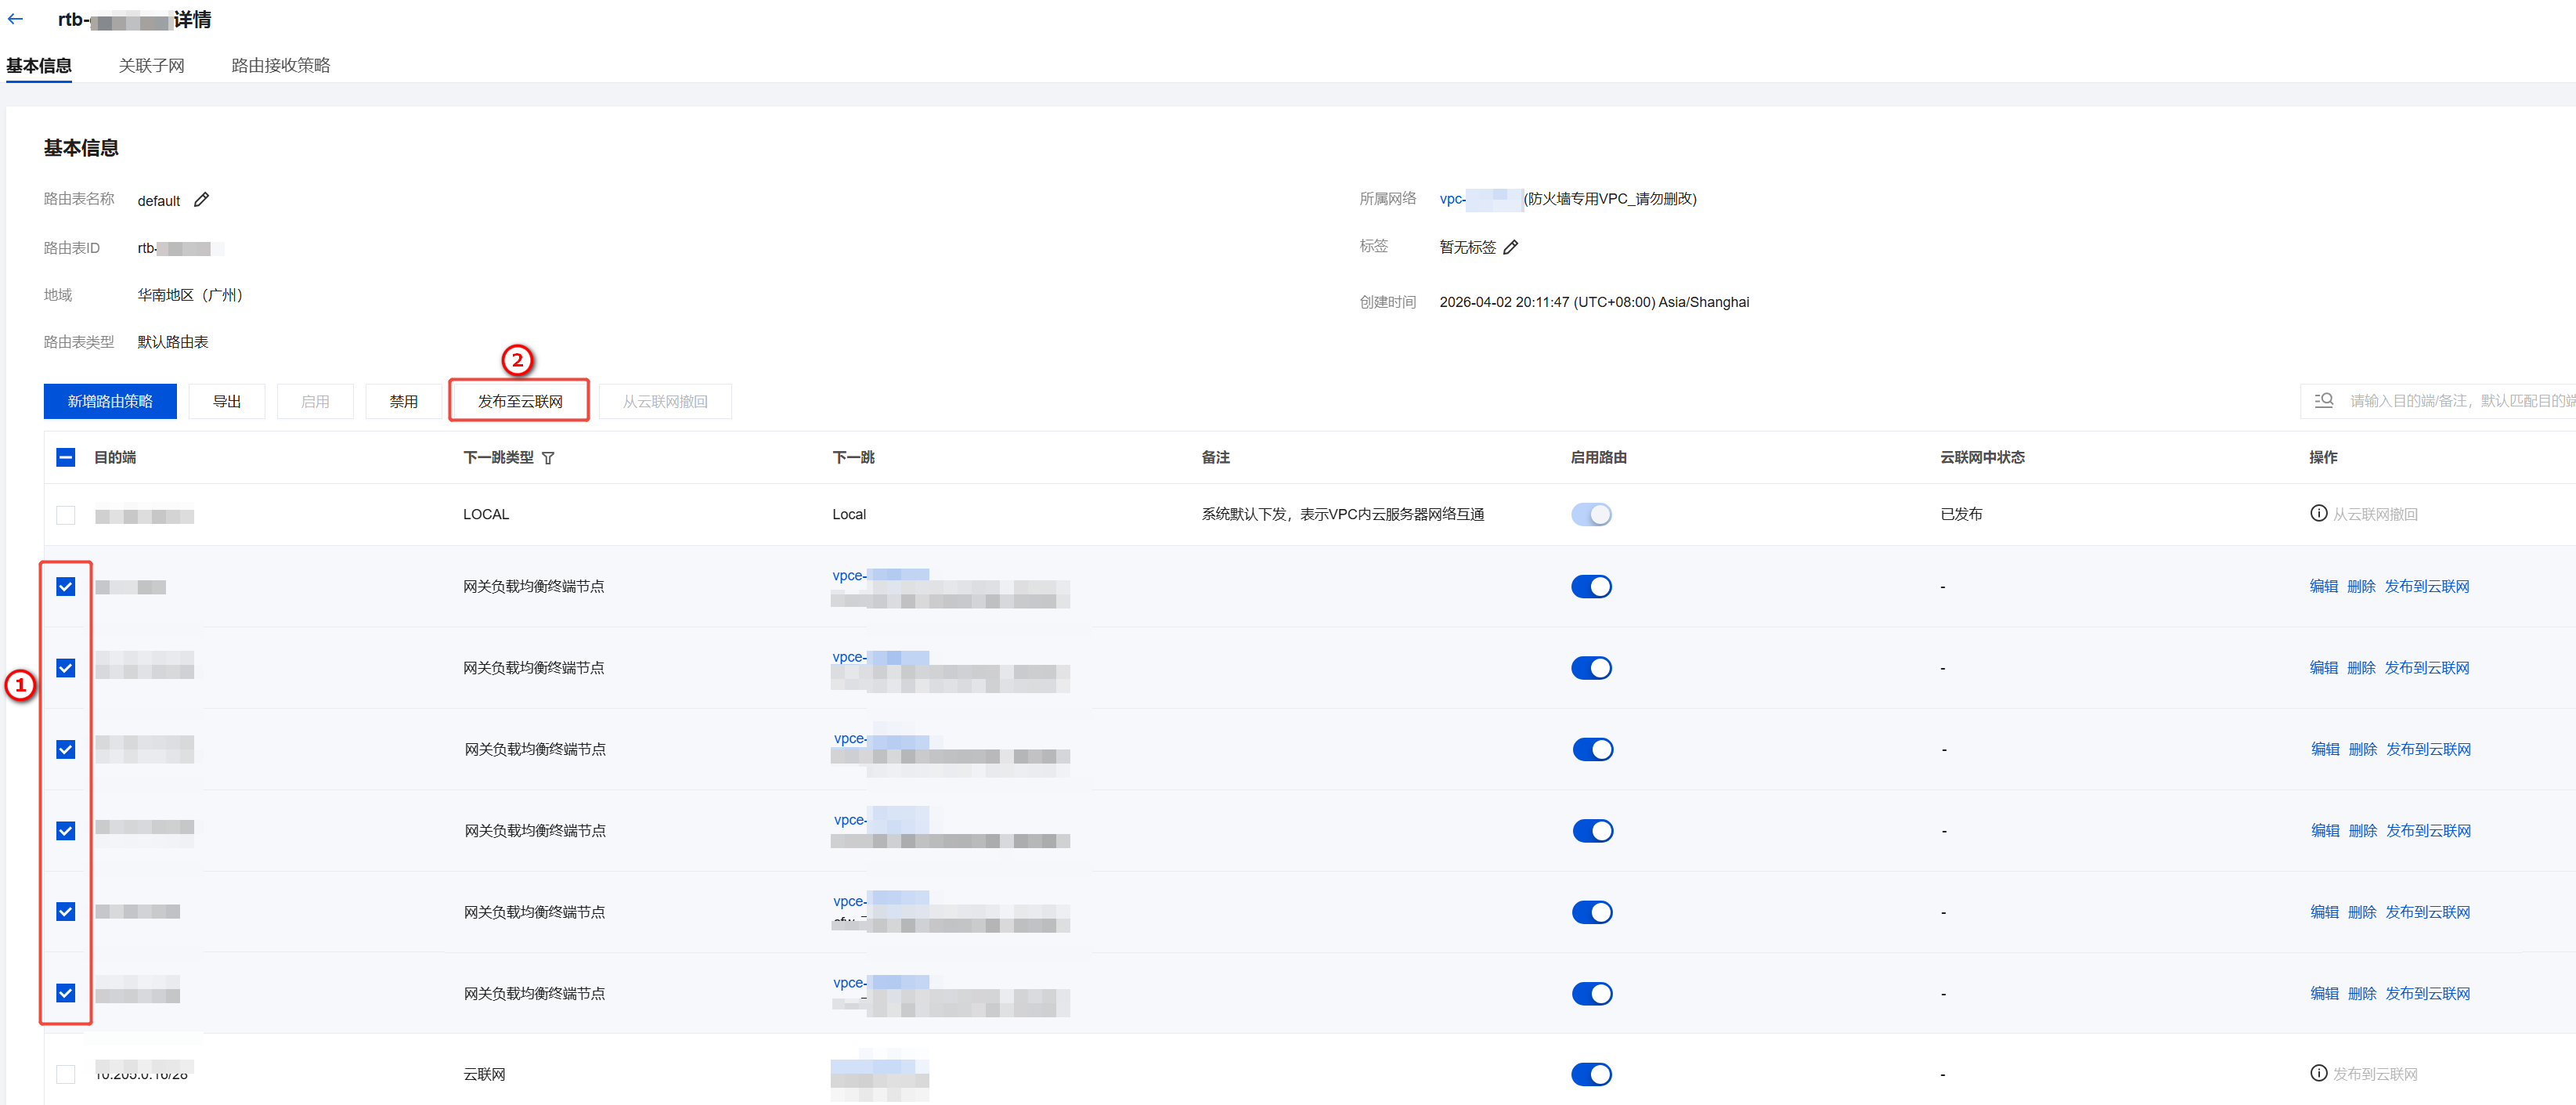
4. 单击 default 路由表,进入 default 路由表详情页。
4.2 禁用原有路由条目
在 default 路由表 > 基本信息中,找到需要防护的所有业务实例(如业务 VPC 或专线网关)对应的路由条目(下一跳类型为"云联网"),将其禁用。
说明:
此操作的对象是防火墙引流 VPC 的 default 路由表,不是业务 VPC 的路由表。
禁用这些路由条目不会影响现有业务网络,因为业务流量此时仍按照云联网原有路由表运行。
4.3 新增指向防火墙网关的路由策略
1. 在 default 路由表中,单击新增路由策略,为所有需要防护的业务实例配置引流路由:
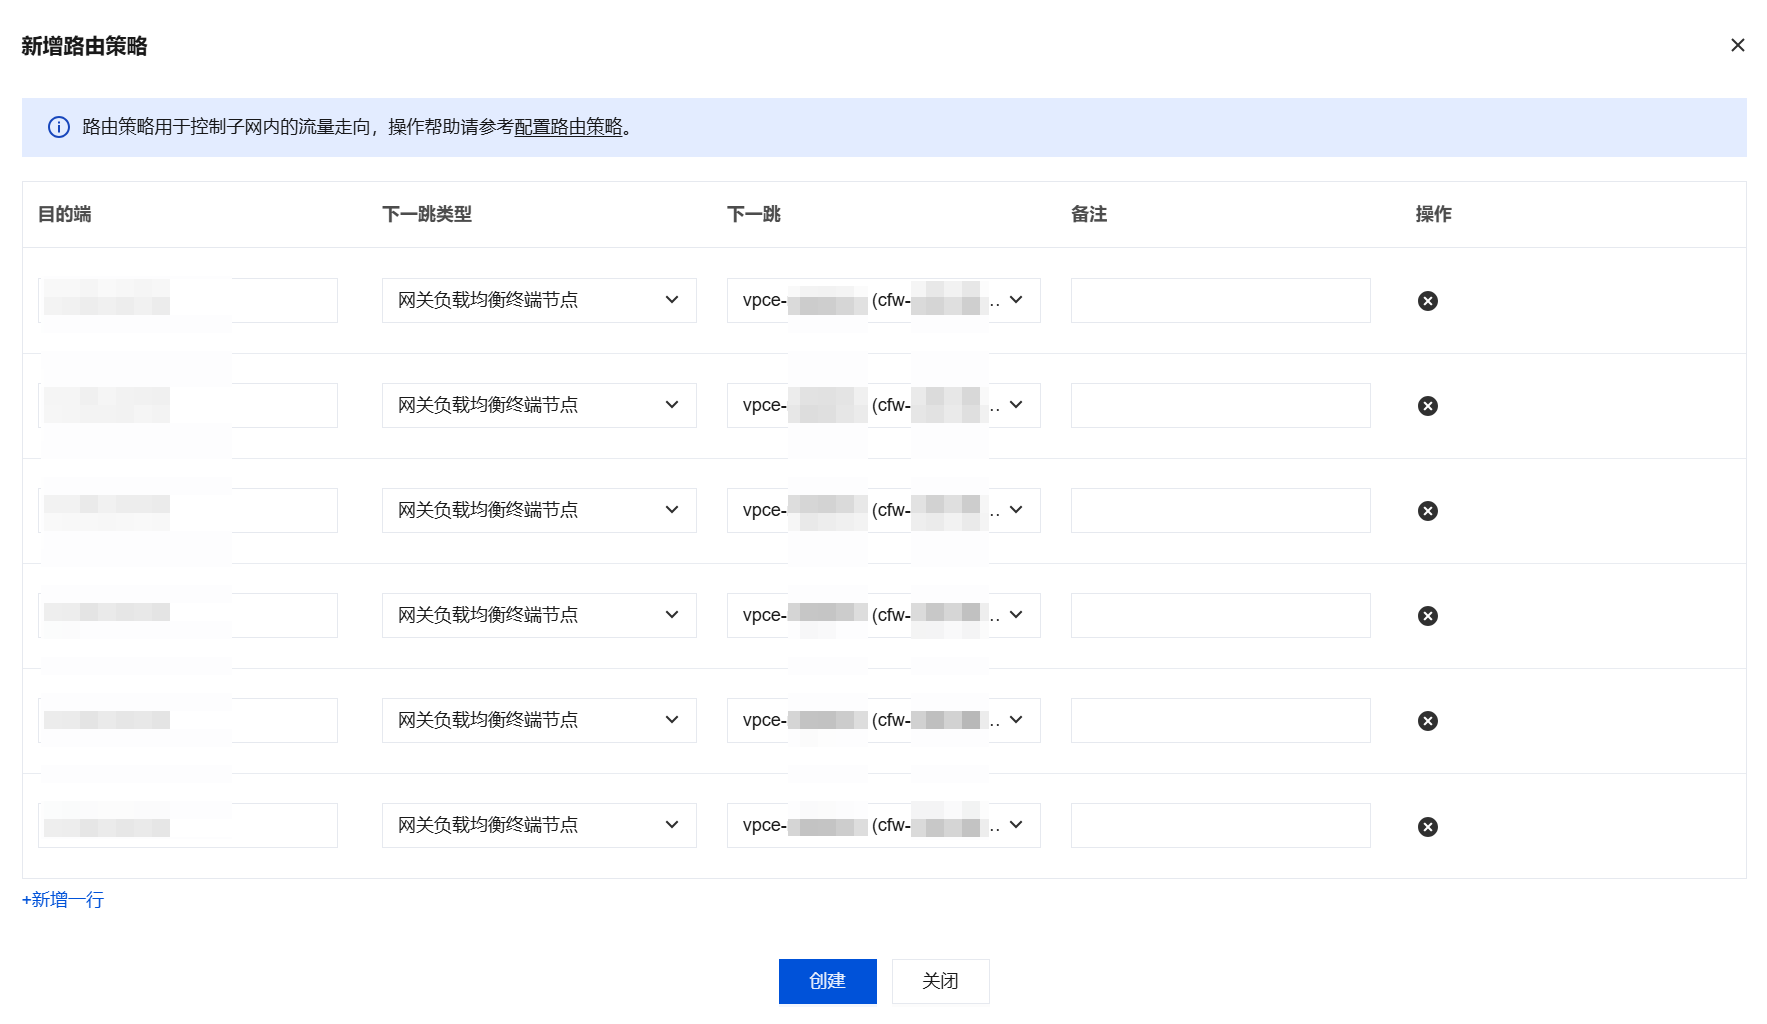
参数 | 说明 |
目的端 | 填写需要防护的业务 VPC 的 CIDR(如 10.0.0.0/16) |
下一跳类型 | 选择网关负载均衡器终端节点 |
下一跳 | 选择防火墙网关 ID |
备注 | 自定义填写,建议填写业务 VPC 名称便于识别 |
2. 单击创建。配置完成后,将新建的路由发布到云联网。如有网段冲突,需先禁用原有条目。
说明:
混合云场景补充:如果需要防护 VPC 与专线网关之间的双向流量,还需要在 default 路由表中为反方向配置引流路由。例如:
专线网关 → VPC 方向:目的端填写业务 VPC 的 CIDR,下一跳选择防火墙网关。
VPC → 专线网关方向:目的端填写业务 VPC 的 CIDR(来源方向),同样禁用原有云联网路由条目后,新增指向防火墙网关的路由策略。
确保双向流量均经过防火墙检测。
4.4 "防火墙 VPC 专用路由表_请勿删改"路由表
对于防火墙 VPC 专用_请勿删改路由表,无需进行任何操作。该路由表由云防火墙自动维护,用于将经过防火墙检测后的流量正确转发到目的 VPC。
步骤五:创建 VPC 间互访路由表并绑定实例
完成防火墙引流 VPC 的路由配置后,还需要在云联网侧为所有需要接入防火墙的实例创建专属路由表,将流量引流至防火墙引流 VPC。
5.1 创建专属路由表
说明:
每个需要接入防火墙的实例(VPC 或专线网关)都需要一张独立的专属路由表。例如,如果有 1 个 VPC 和 1 个专线网关需要接入防火墙,则需要创建 2 张专属路由表。
1. 登录私有网络控制台,在左侧导航栏中,单击云联网。
2. 在云联网页面,单击目标云联网实例的 ID/名称。
3. 在目标云联网实例详情页,单击路由表页签。
4.
在
路由表页签,单击新建路由表,为需要接入防火墙的实例创建一张专属路由表,单击确定。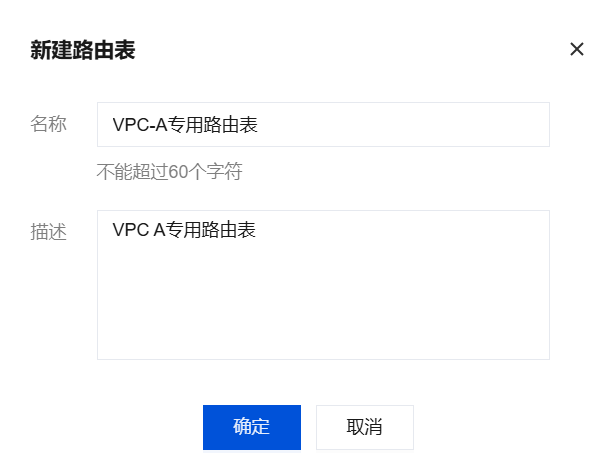
5. 重复执行上一步,为所有需要接入防火墙的实例创建一张专属路由表。
5.2 配置路由接收策略
1. 对每张专属路由表,单击路由接收策略 > 添加策略。
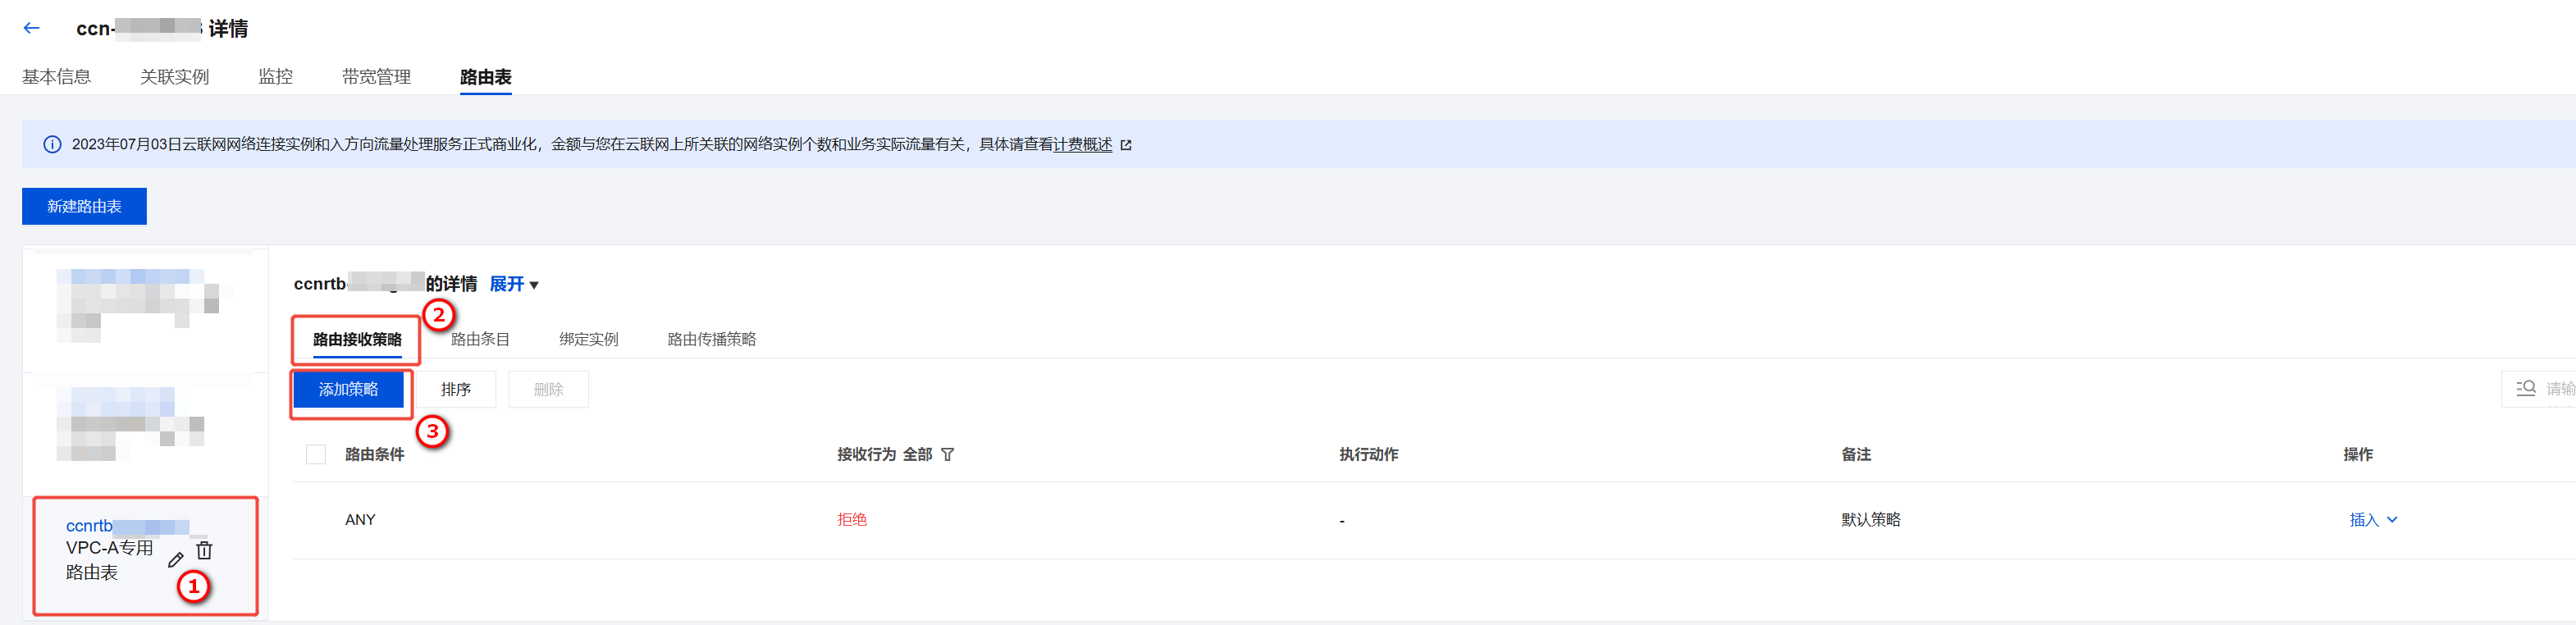
2. 单击添加匹配条件,将以下实例添加到路由接收策略中,接收行为选择允许。
需添加的实例 | 说明 |
该路由表对应的实例自身 | 这张路由表为哪个实例创建的,就添加哪个实例 |
云联网内所有不接入防火墙的实例 | 确保不接入防火墙的实例之间的路由正常 |
防火墙引流 VPC | 确保流量可以到达防火墙引流 VPC |
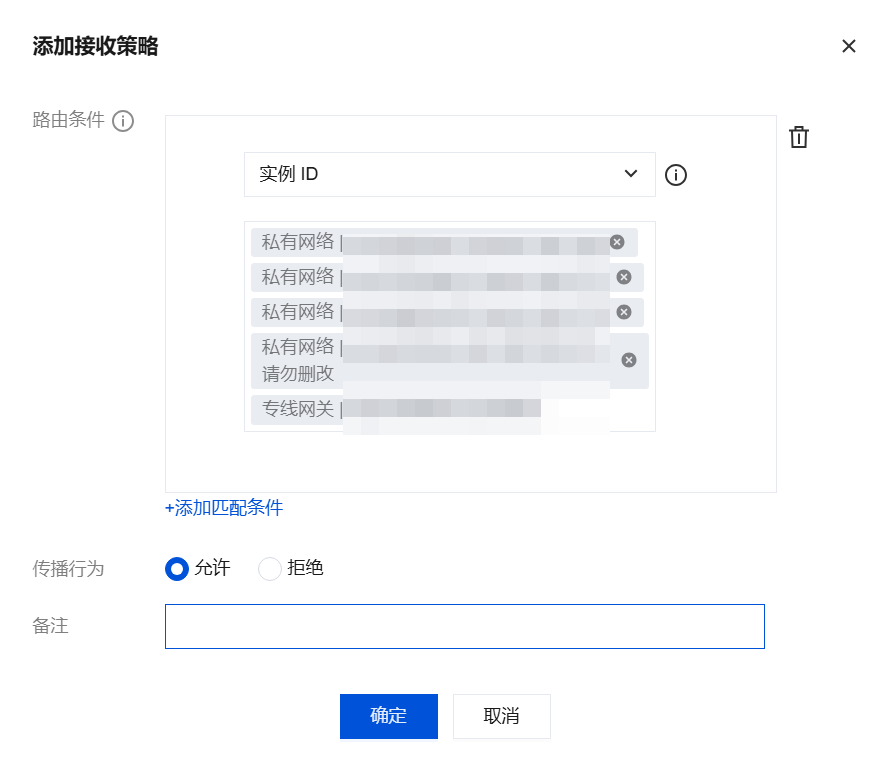
3. 单击确定。重复执行 以上步骤,为其他需要接入防火墙的实例的专属路由表进行相同配置。
5.3 检查路由条目
配置完成后,检查每张专属路由表中的路由条目是否符合预期,确保:
包含防火墙引流 VPC 的路由条目。
包含不接入防火墙的实例的路由条目。
不包含其他需要接入防火墙的实例的直连路由(这些流量应通过防火墙引流 VPC 转发)。
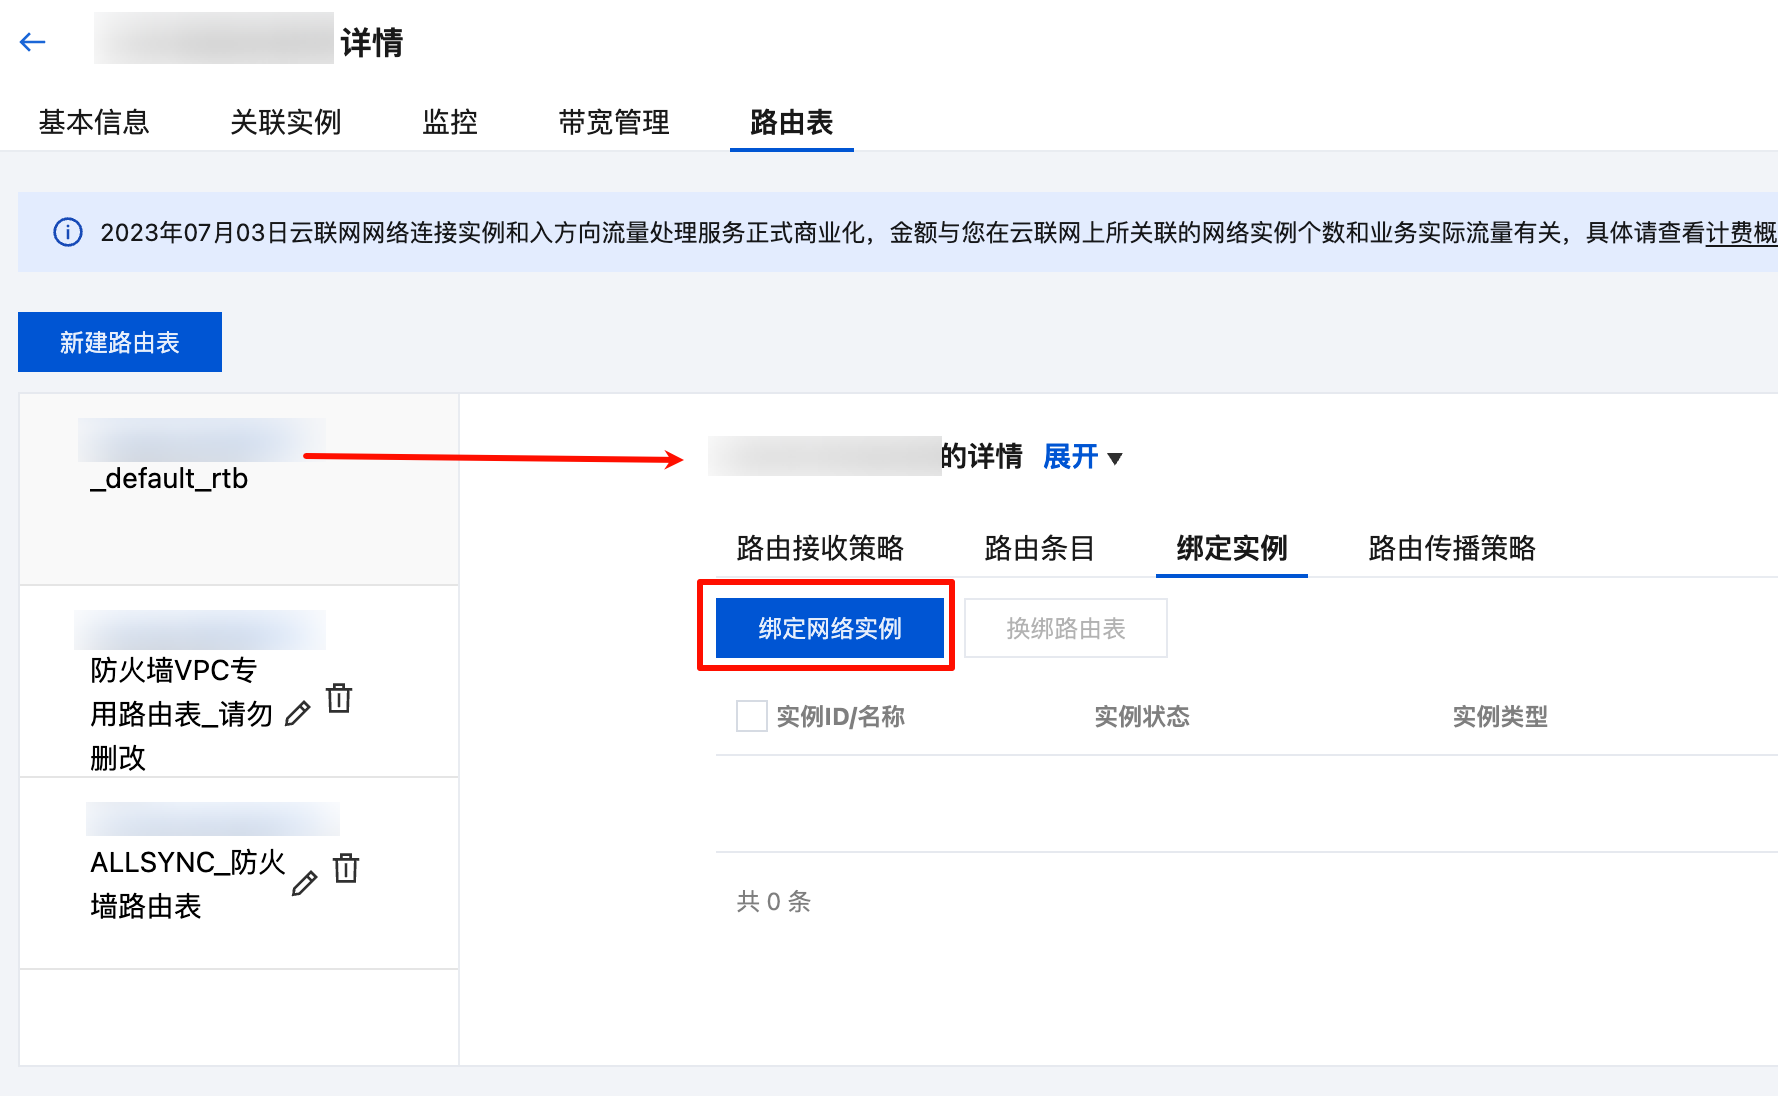
5.4 绑定实例
将每张专属路由表绑定到对应的实例,例如:为 VPC-A 创建的专属路由表,就绑定 VPC-A 实例。
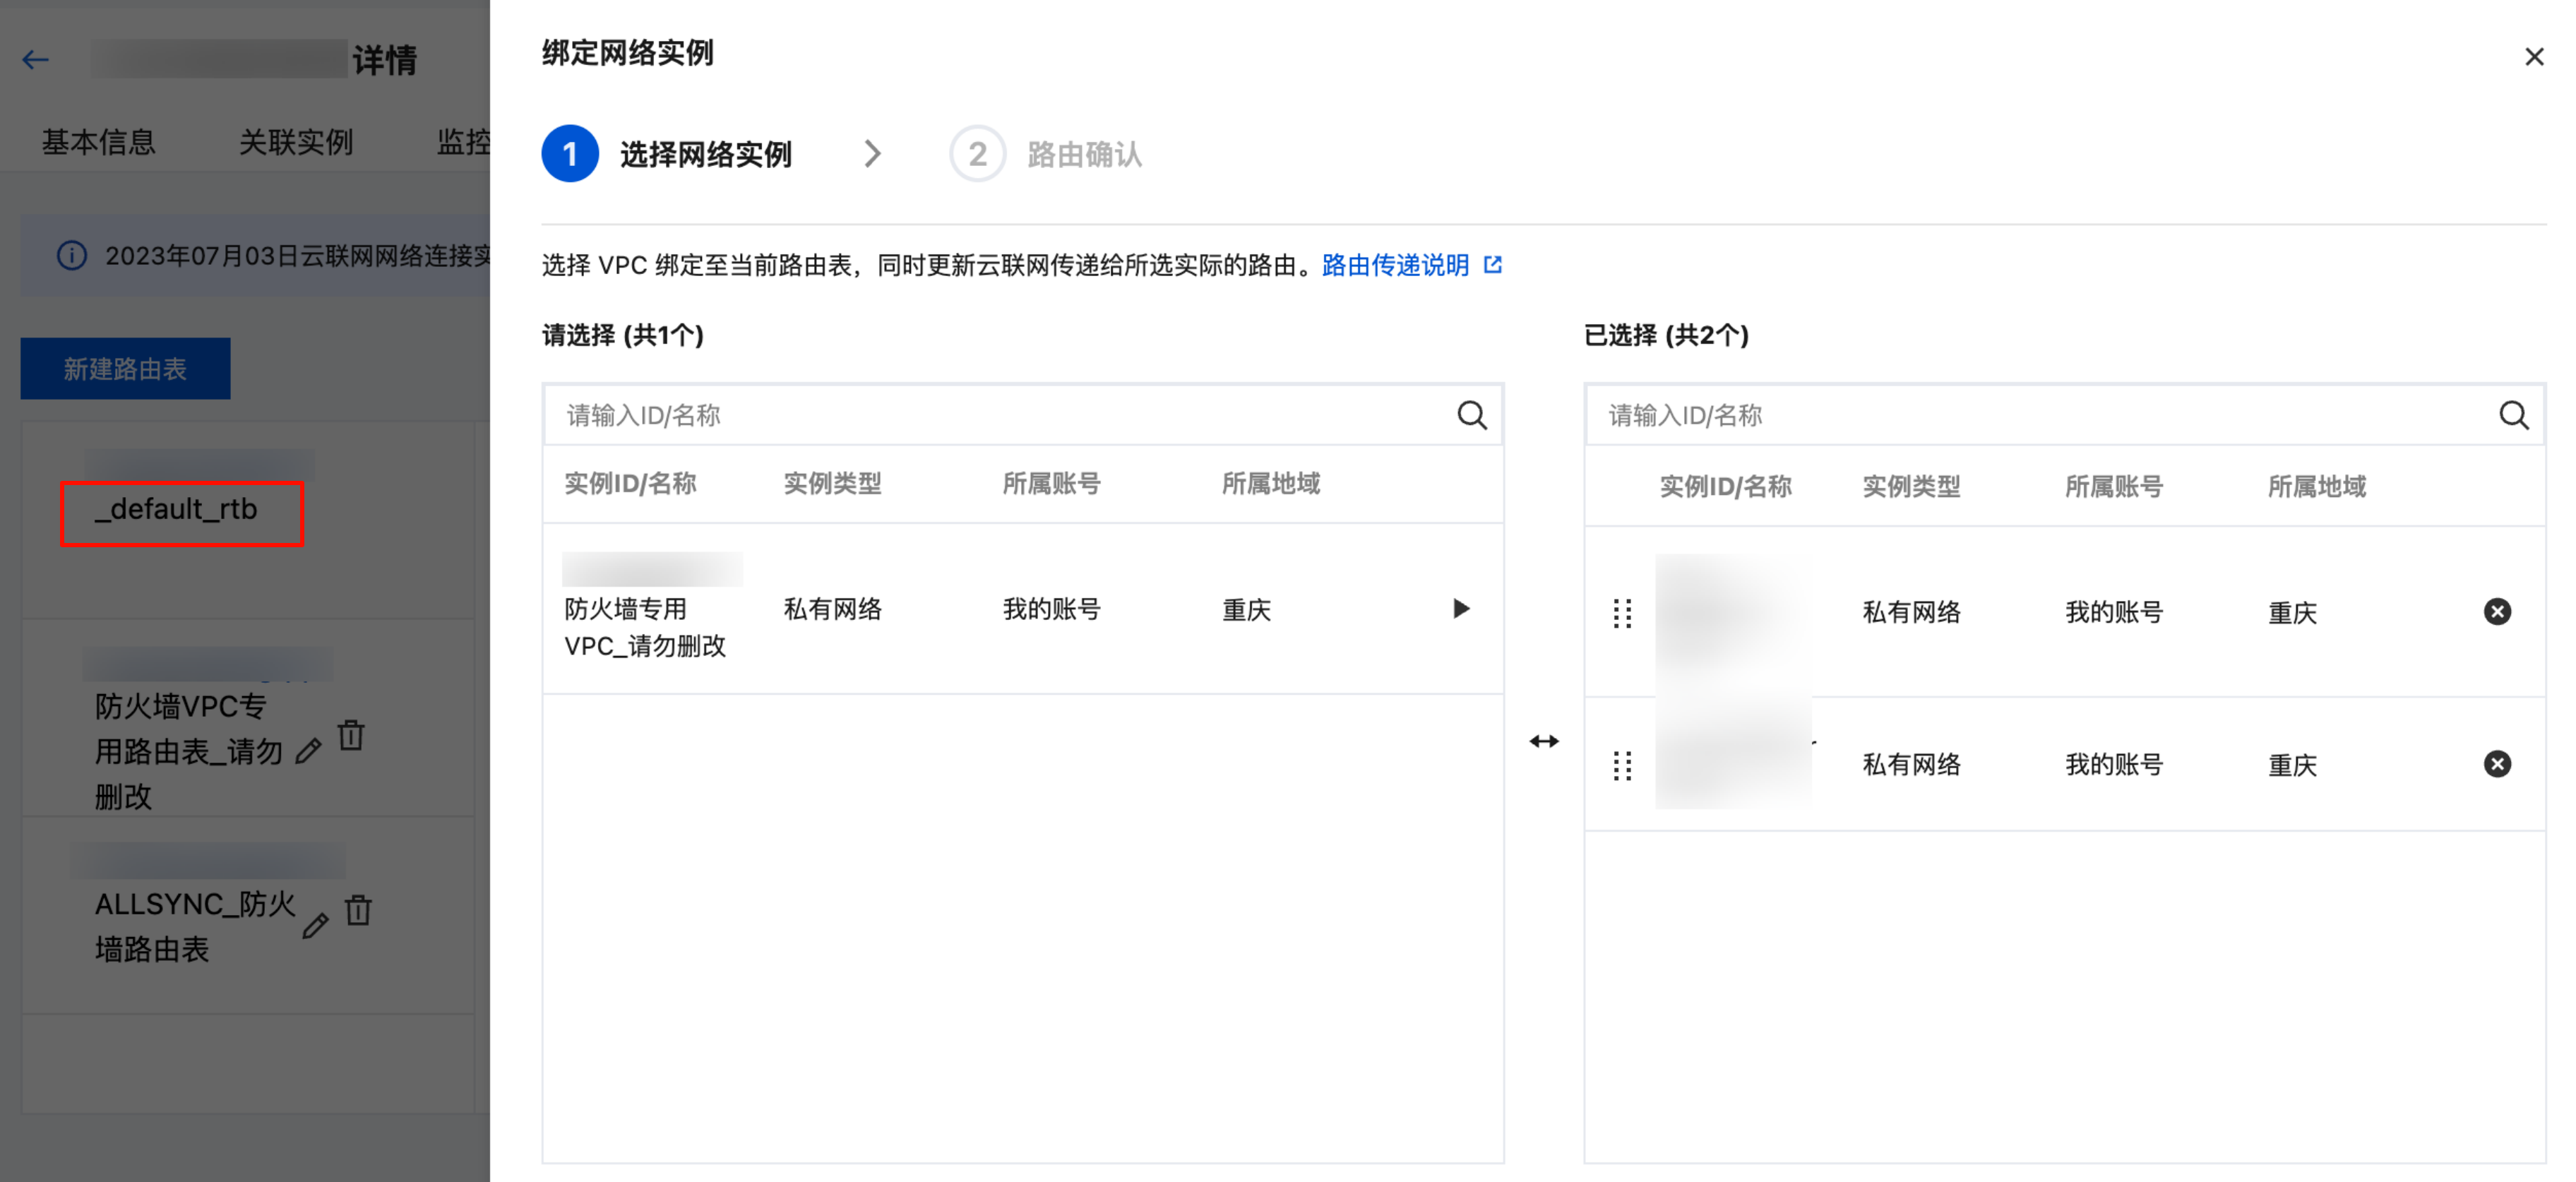
1. 对每张专属路由表,单击绑定实例 > 绑定网络实例。
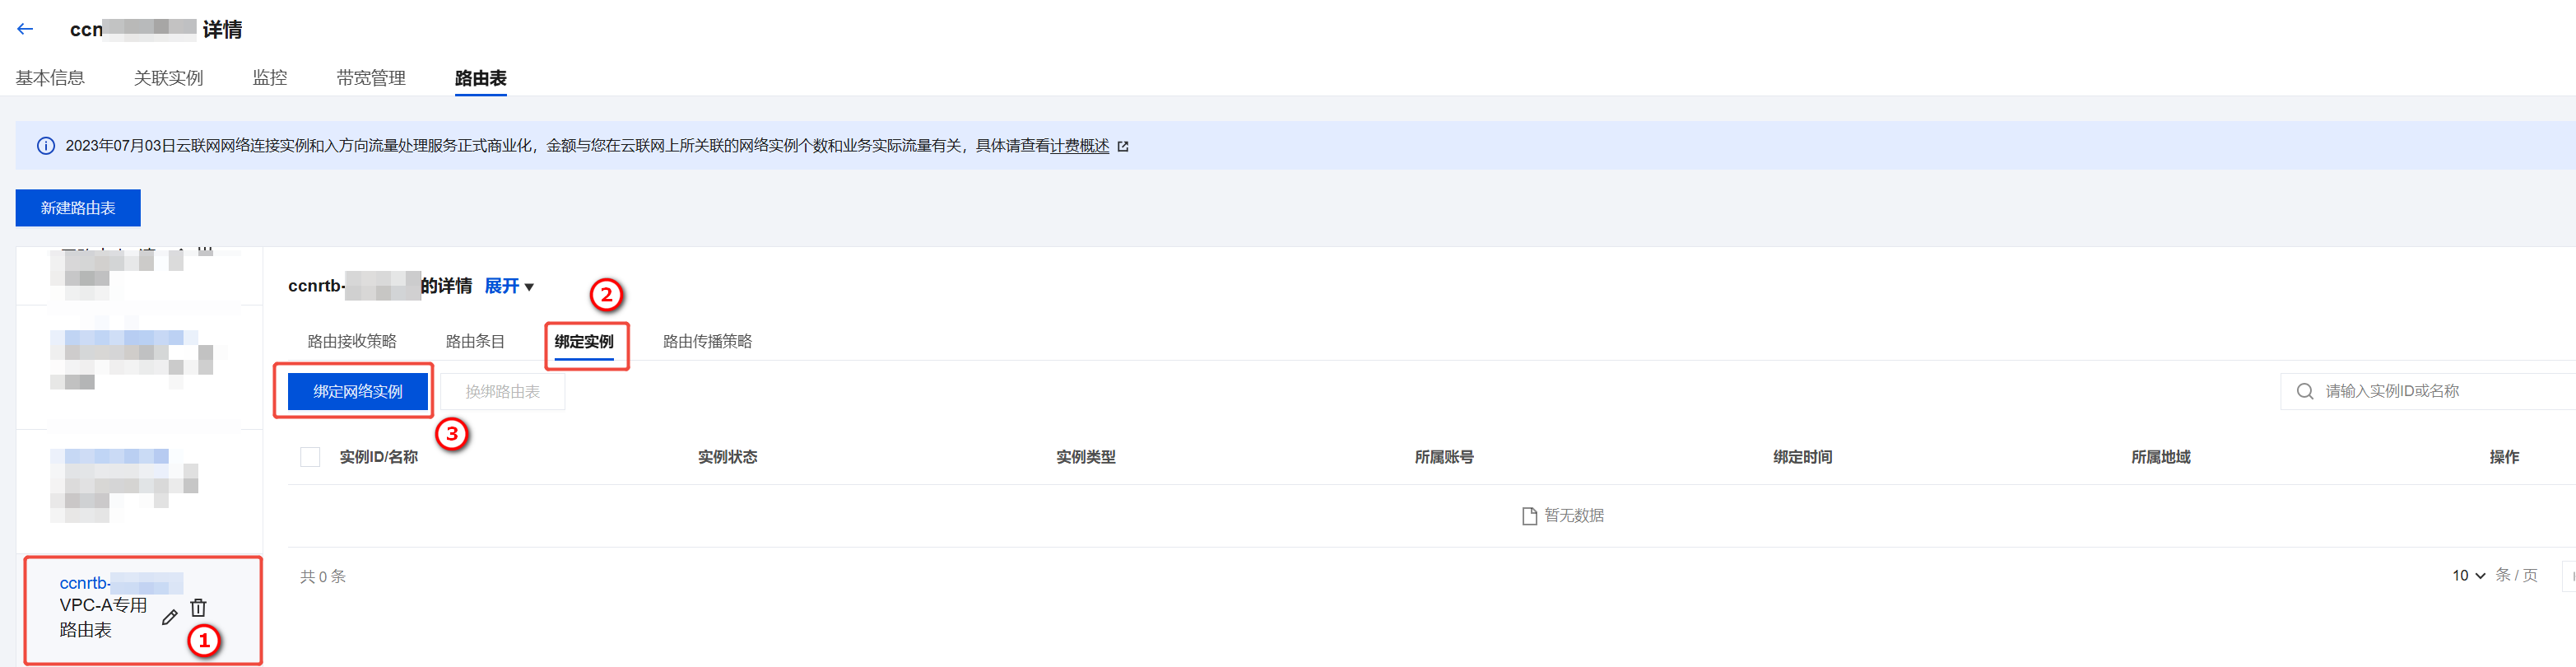
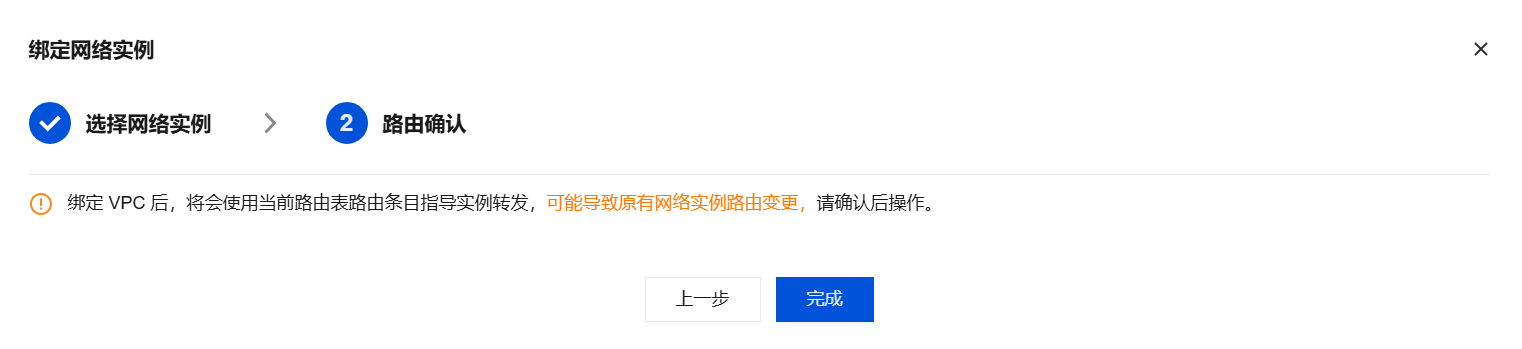
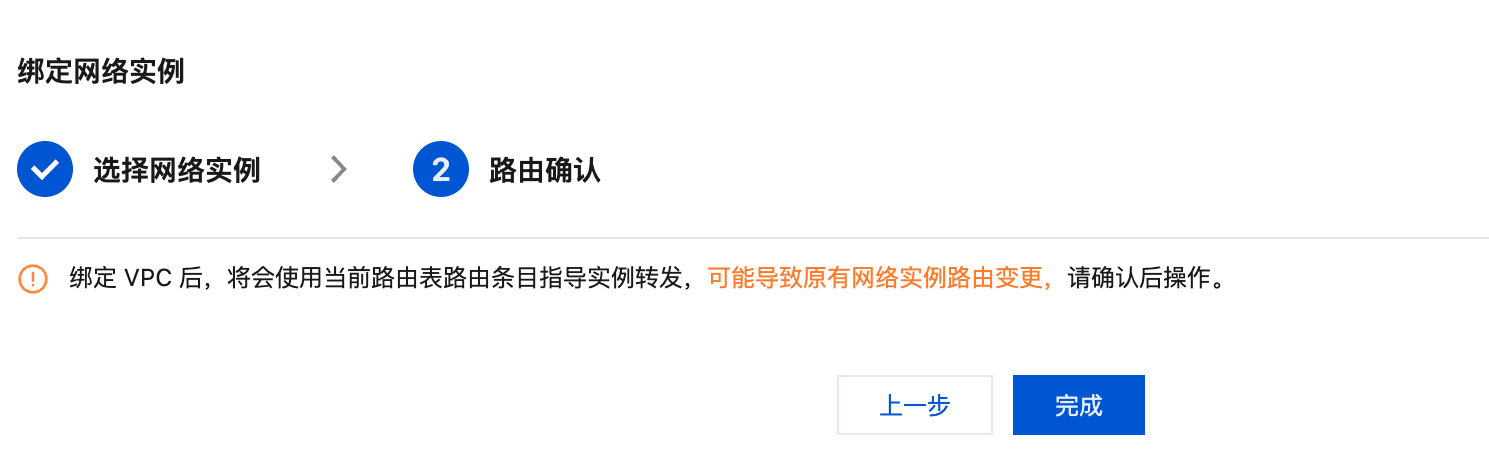
2. 选择该专属路由表对应的网络实例(如 VPC 或专线网关),单击下一步:路由确认。
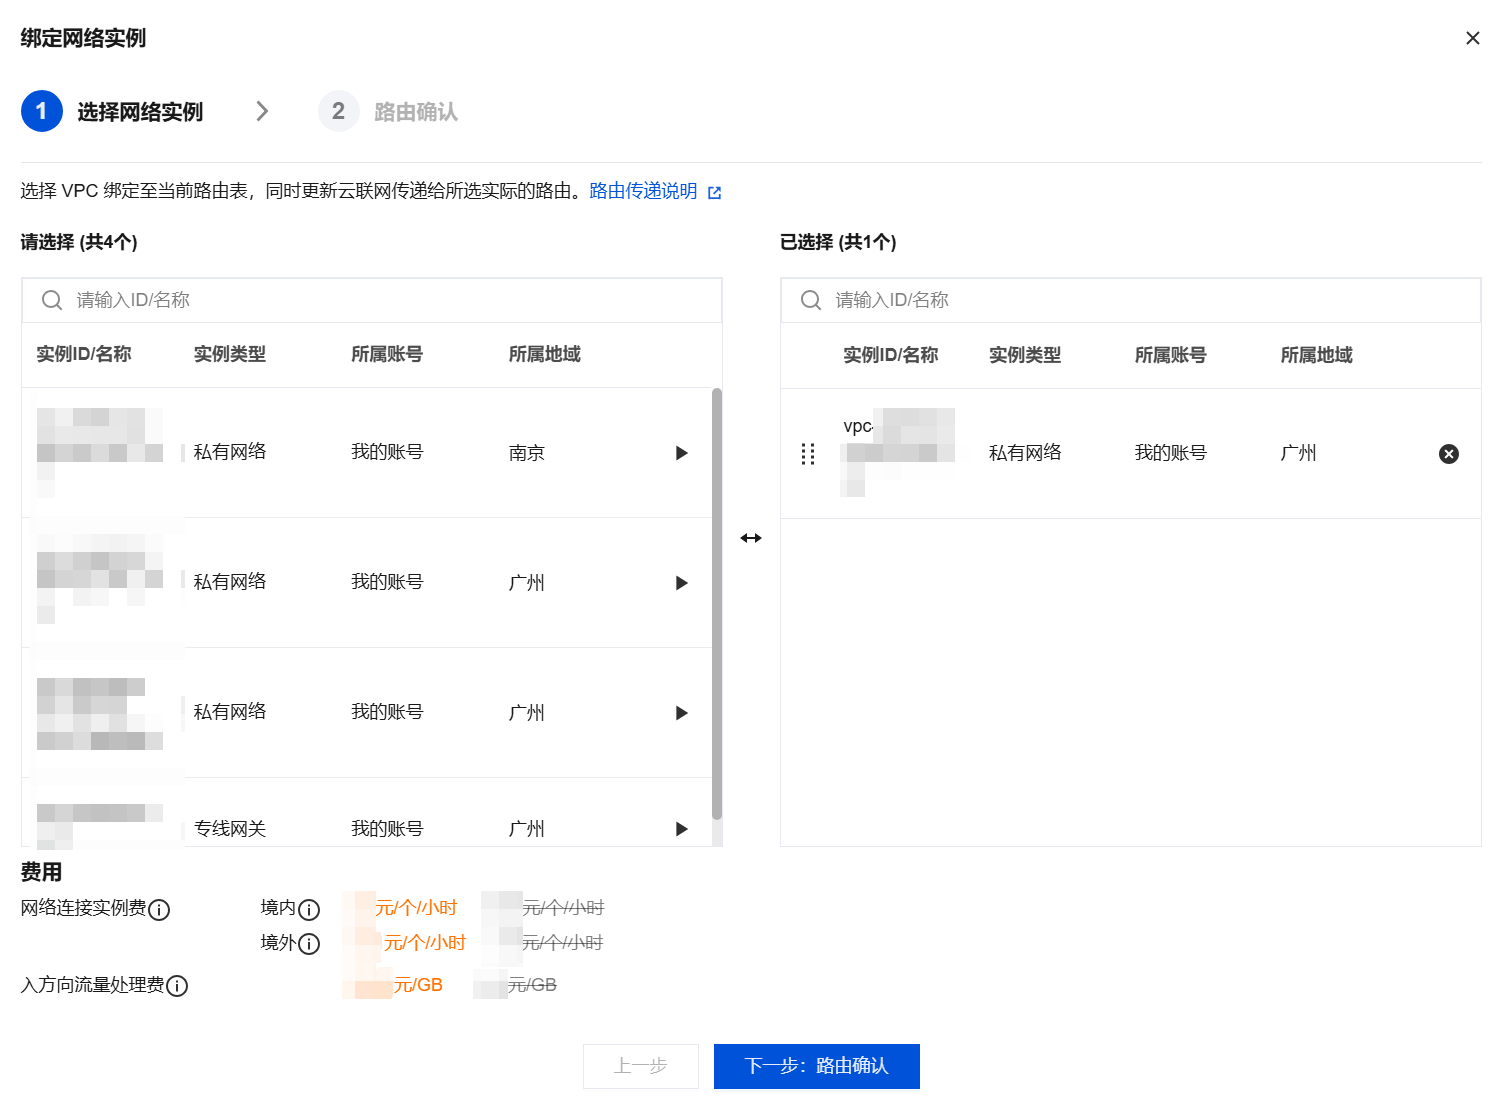
注意:
绑定实例时,流量才会真正引流到防火墙。在绑定之前,流量仍按照原有路由表运行。请确认路由配置无误后再执行绑定操作。
3. 单击完成。重复执行 以上步骤,将其他实例的专属路由表绑定到对应的实例。
步骤六:验证网络实例是否连接成功
2. 参考 日志审计 查看入侵防御是否正常。
3. 配置 VPC 边界规则,检查是否正常命中。
云联网实例取消接入云防火墙(多路由表)
注意:
请务必确认云联网实例取消接入云防火墙后,再关闭对应 VPC 边界防火墙开关,否则将会造成网络中断。
1. 登录 私有网络控制台,前往需要关闭 VPC 边界防火墙的云联网实例的控制台,查看多路由表模式防护对象关联的云联网实例详情。
2. 除了防火墙专用 VPC 之外,将所有网络实例绑定到接入云防火墙之前使用的路由表中。
2.1 选择接入云防火墙之前使用的路由表,一般为 _default_rtb 表。
2.2 选择除防火墙专用之外的所有实例。
2.3 进行路由确认,单击完成。
3. 检查网络正常后,在云防火墙控制台关闭当前云联网实例对应的防火墙开关。
4. 系统将自动清理创建的引流 VPC 和终端节点。


