本文档提供基于容器网络策略的常见隔离场景说明,指导您如何实施容器间网络隔离。
场景1:设置仅允许指定的 Pods 之间请求
策略说明
设定只允许具有标签“app=web”的 pod 应用间请求,拒绝和其它 pod 请求,该场景常用于项目内资源间访问控制。
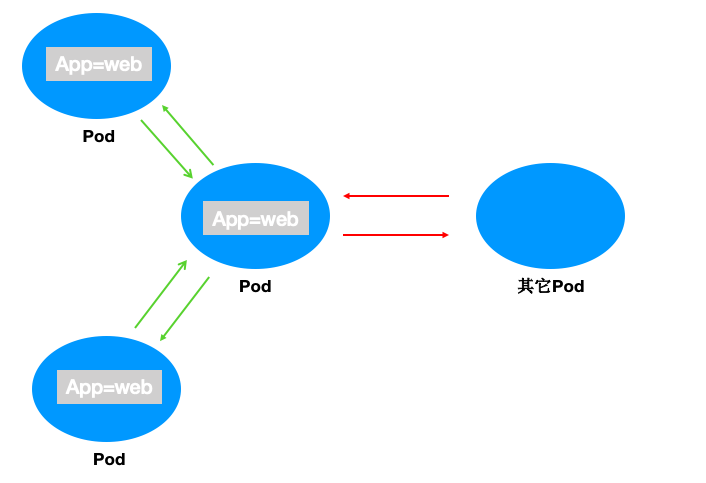
验证步骤
1. 创建标签为“app=web”的 pod 应用并启动服务。
kubectl run --generator=run-pod/v1 apiserver --image=nginx --labels app=web --expose --port 80
查看 pod 创建成功。
[root@VM-0-11-centos ~]# kubectl get pods webNAME READY STATUS RESTARTS AGEweb 1/1 Running 0 4s
查看 svc 创建成功。
[root@VM-0-11-centos ~]# kubectl get svc webNAME TYPE CLUSTER-IP EXTERNAL-IP PORT(S) AGEweb ClusterIP 172.*.*.* <none> 80/TCP 16s
2. 验证默认情况下任何来源都可以请求 Web 服务。
[root@VM-0-11-centos ~]# kubectl run --rm -it --image=alpine testwebIf you don't see a command prompt, try pressing enter./ # wget -qO- http://172.*.*.*<!DOCTYPE html><html><head><title>Welcome to nginx!</title>...
3. 创建容器网络策略并启用。
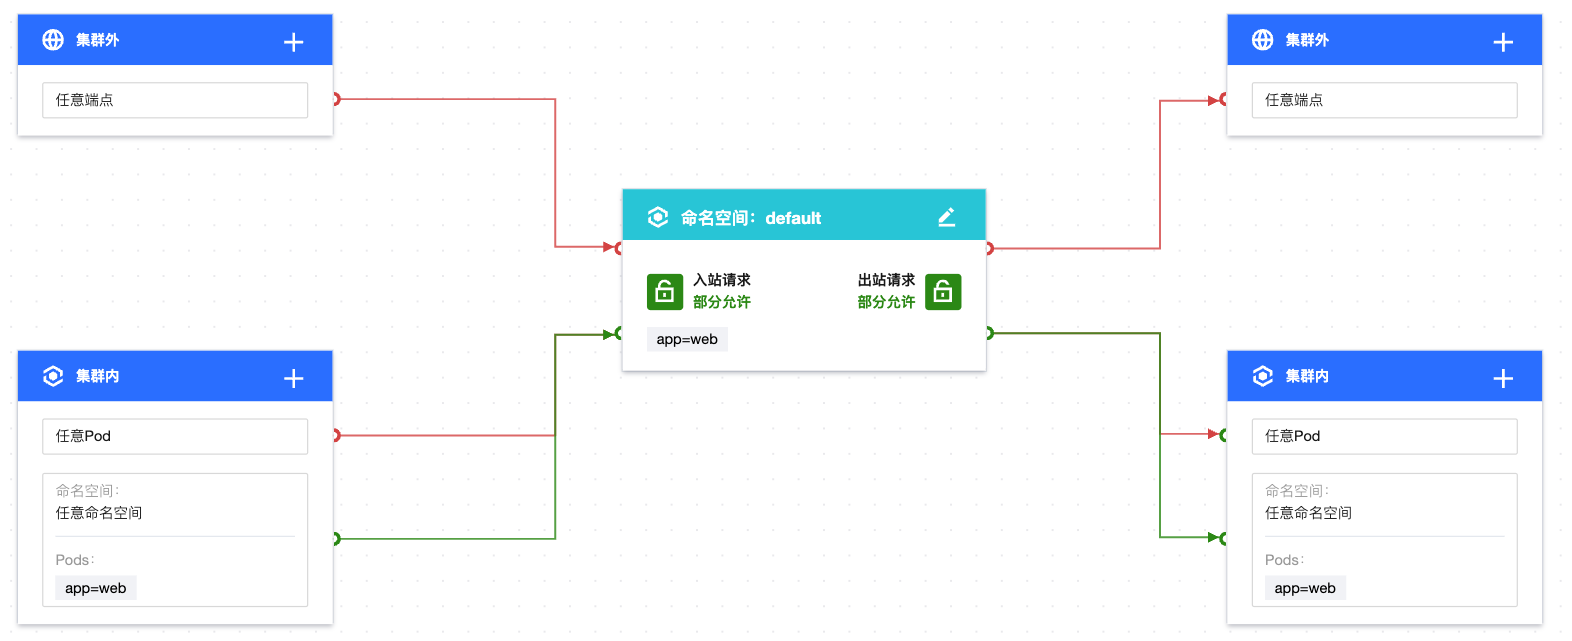
设置防护对象 Pods 标签为 app=web,入站规则使用自定义规则配置来源类型为 Pods,指定 Pods 标签 app=web 为允许的入站来源,出站规则同理。策略规则配置如图:

注意
若 Pods 类型不指定命名空间,则策略作用范围为当前命名空间(default),其它命名空间内的 pod 应用即使包含“app=web”仍会被拒绝。
4. 验证网络策略效果,只有具有 app=web 标签的 pod 可以访问 Web 服务。
当前命名空间下具有 app=web 标签的应用,可以正常请求 Web 服务。
[root@VM-0-11-centos ~]# kubectl run --rm -it --image=alpine testweb --labels app=web -- shIf you don't see a command prompt, try pressing enter./ # wget -qO- http://172.*.*.*<!DOCTYPE html><html><head><title>Welcome to nginx!</title>...
当前命名空间下不具有 app=web 标签的应用,无法请求 Web 服务。
[root@VM-0-11-centos ~]# kubectl run --rm -it --image=alpine testweb --labels app2=web2 -- shIf you don't see a command prompt, try pressing enter./ # wget -qO- http://172.*.*.*wget: can't connect to remote host (172.*.*.*): Connection refused
其它命名空间下具有 app=web 标签的应用,可以请求 Web 服务。
[root@VM-0-11-centos ~]# kubectl run --rm -it --image=alpine testweb --labels app=web -n secondary -- shIf you don't see a command prompt, try pressing enter./ # wget -qO- http://172.*.*.*<!DOCTYPE html><html><head><title>Welcome to nginx!</title>...
5. 清理环境。
kubectl delete pod webkubectl delete service web//前往控制台停用网络策略效果等同于kubectl delete networkpolicy
场景2:设置 pod 应用不允许被外部请求
策略说明
设定具有标签“app=web”的 pod 应用不允许被外部来源请求,出向不受影响。
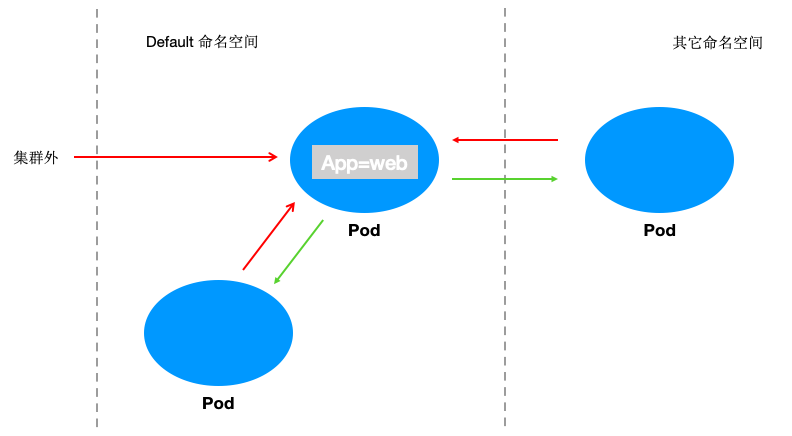
验证步骤
1. 创建标签为“app=web”的 pod 应用并启动服务。
[root@VM-0-11-centos ~]# kubectl run web --image=nginx --labels app=web --expose --port 80service/web createdpod/web created[root@VM-0-11-centos ~]# kubectl get pods webNAME READY STATUS RESTARTS AGEweb 1/1 Running 0 4s[root@VM-0-11-centos ~]# kubectl get svc webNAME TYPE CLUSTER-IP EXTERNAL-IP PORT(S) AGEweb ClusterIP 172.*.*.* <none> 80/TCP 16s
2. 验证默认情况下请求 Web 服务没有限制。
[root@VM-0-11-centos ~]# kubectl run --rm -it --image=alpine testwebIf you don't see a command prompt, try pressing enter./ # wget -qO- http://172.*.*.*<!DOCTYPE html><html><head><title>Welcome to nginx!</title>...
3. 创建容器网络策略并启用。
设置防护对象 Pods 标签为 app=web,入站规则为拒绝全部入站请求。策略规则配置如图:


4. 验证网络策略效果,任何外部来源无法访问 app=web 应用。
kubectl run --rm -i -t --image=alpine testweb -- shIf you don't see a command prompt, try pressing enter./ # wget -qO- --timeout=2 http://webwget: can't connect to remote host (172.*.*.*): Connection refused
5. 清理环境。
kubectl delete pod webkubectl delete service web//前往控制台停用网络策略效果等同于kubectl delete networkpolicy
场景3:设置 pod 应用禁止与其它命名空间请求
策略说明
设定具有标签为“app=web”的应用禁止与其他命名空间请求,只允许在当前命名空间内请求。场景示意图:
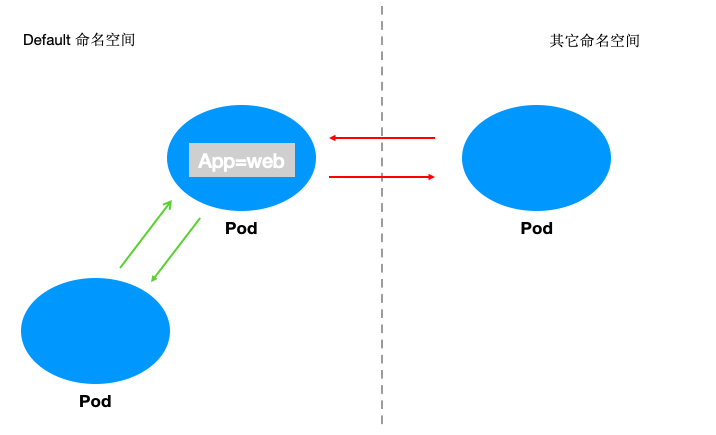
验证步骤
1. 创建标签为“app=web”的 pod 应用并启动服务。
[root@VM-0-11-centos ~]# kubectl run web --image=nginx --labels app=web --expose --port 80service/web createdpod/web created[root@VM-0-11-centos ~]# kubectl get pods webNAME READY STATUS RESTARTS AGEweb 1/1 Running 0 5s[root@VM-0-11-centos ~]# kubectl get svc webNAME TYPE CLUSTER-IP EXTERNAL-IP PORT(S) AGEweb ClusterIP 172.*.*.* <none> 80/TCP 13s
2. 验证默认情况下 app=web 可以被其它命名空间正常请求。
[root@VM-0-11-centos ~]# kubectl run --rm -it --image=alpine testweb --labels app=web -n secondary -- shIf you don't see a command prompt, try pressing enter./ # wget -qO- http://172.*.*.*<!DOCTYPE html><html><head><title>Welcome to nginx!</title>...
3. 创建容器网络策略并启用。
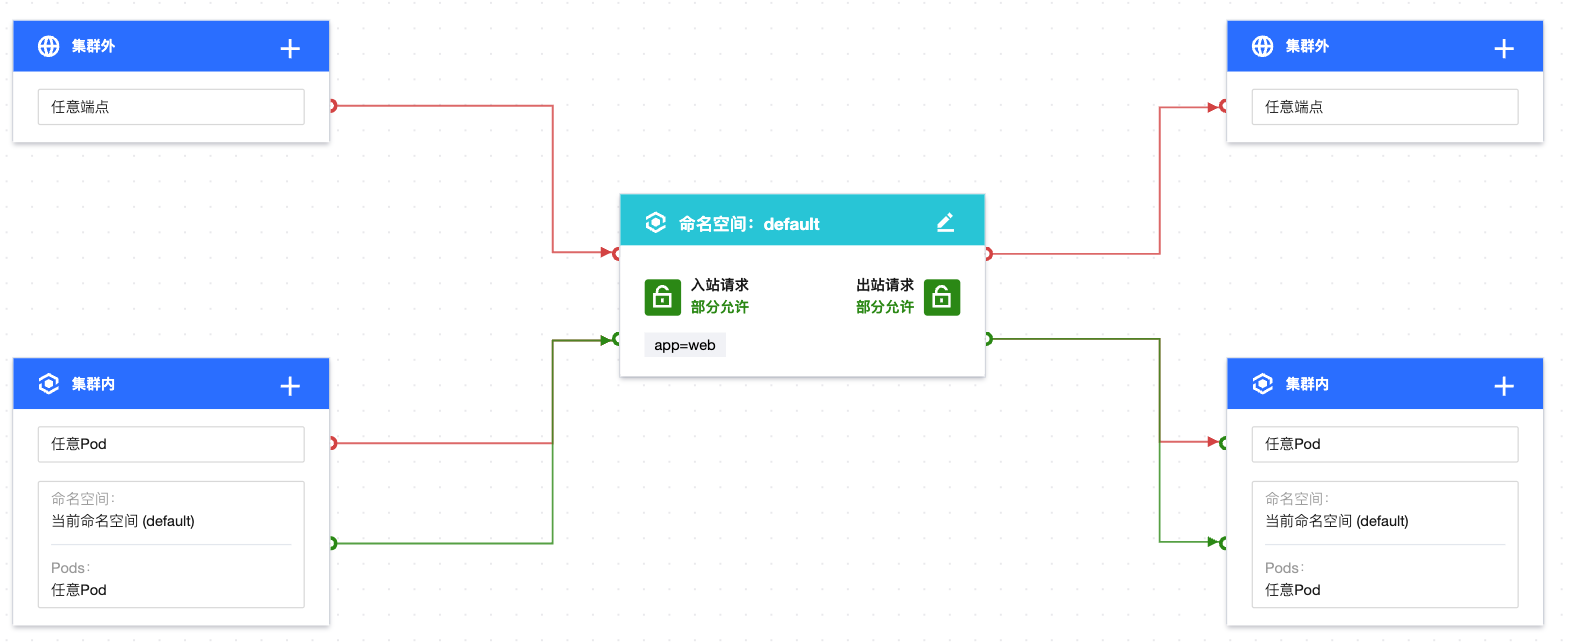
设置防护对象 Pods 标签为 app=web,入站规则使用自定义规则配置来源类型为 Pods,命名空间不填写默认为空,指定任意 Pods 为允许的入站来源。出向配置同理。策略规则配置如图:

4. 验证网络策略效果。
当前命名空间内来源可以访问 app=web 服务。
[root@VM-0-11-centos ~]# kubectl run testweb --namespace=default --rm -it --image=alpine -- shIf you don't see a command prompt, try pressing enter./ # wget -qO- --timeout=2 http://web.default<!DOCTYPE html><html><head><title>Welcome to nginx!</title>...
其它命名空间来源无法访问防护对象 app=web 服务。
[root@VM-0-11-centos ~]# kubectl run --rm -it --image=alpine testweb --labels app=web -n secondary -- shIf you don't see a command prompt, try pressing enter./ # wget -qO- --timeout=2 http://web.defaultwget: can't connect to remote host (172.*.*.*): Connection refused
5. 清理环境。
kubectl delete pod webkubectl delete service web//前往控制台停用网络策略效果等同于kubectl delete networkpolicy
场景4:设置命名空间内只有指定的 pod 应用能被访问
策略说明
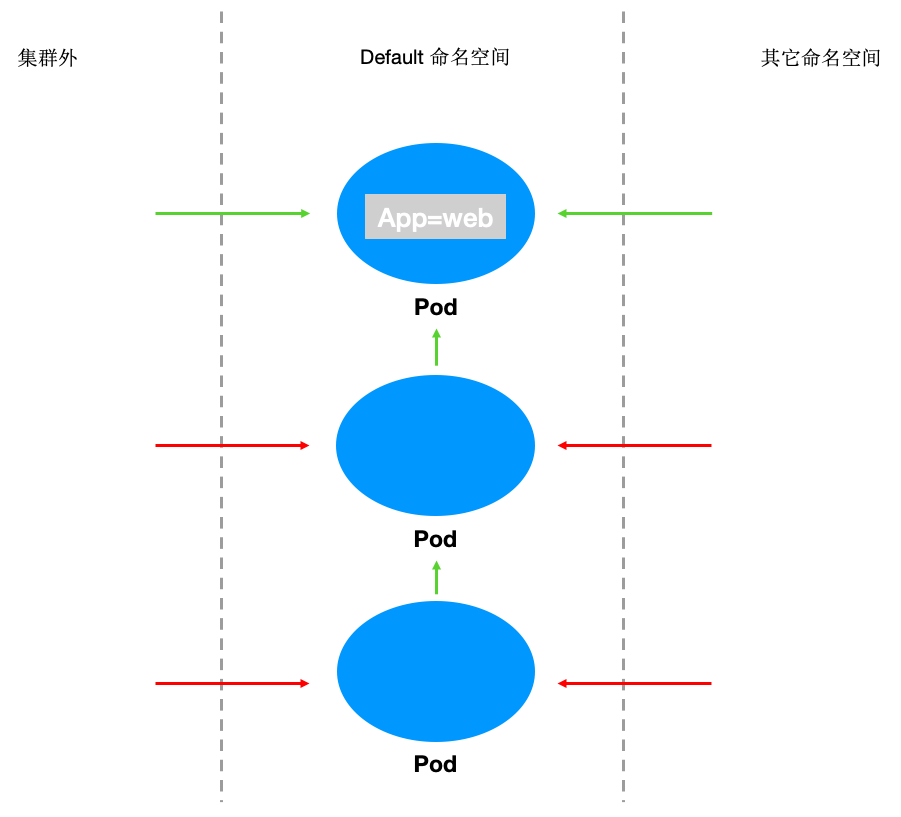
指定命名空间内只有具有标签 app=web 的应用能被命名空间外访问,其它 pod 应用不允许被命名空间外访问。
验证步骤
1. 创建标签为“app=web”的pod应用和“app=web1”的 pod 应用并启动服务。
1.1 创建 app=web 的应用。
[root@VM-0-11-centos ~]# kubectl run web --image=nginx --namespace default --labels=app=web --expose --port 80service/web createdpod/web created[root@VM-0-11-centos ~]# kubectl get svc webNAME TYPE CLUSTER-IP EXTERNAL-IP PORT(S) AGEweb ClusterIP 172.*.*.* <none> 80/TCP 5s
1.2 创建 app=web1的应用。
[root@VM-0-11-centos ~]# kubectl run web1 --image=nginx --namespace default --labels=app=web1 --expose --port 80service/web1 createdpod/web1 created[root@VM-0-11-centos ~]# kubectl get svc web1NAME TYPE CLUSTER-IP EXTERNAL-IP PORT(S) AGEweb1 ClusterIP 172.*.*.* <none> 80/TCP 7s
2. 验证默认情况下 app=web 和 app=web1均可以正常访问。
2.1 app=web 访问正常。
[root@VM-0-11-centos ~]# kubectl run --rm -it --image=alpine testweb -- shIf you don't see a command prompt, try pressing enter./ # wget -qO- http://172.*.*.*<!DOCTYPE html><html><head><title>Welcome to nginx!</title>...
2.2 app=web1访问正常。
[root@VM-0-11-centos ~]# kubectl run --rm -it --image=alpine testweb -- shIf you don't see a command prompt, try pressing enter./ # wget -qO- http://172.*.*.*<!DOCTYPE html><html><head><title>Welcome to nginx!</title>...
3. 创建容器网络策略并启用。
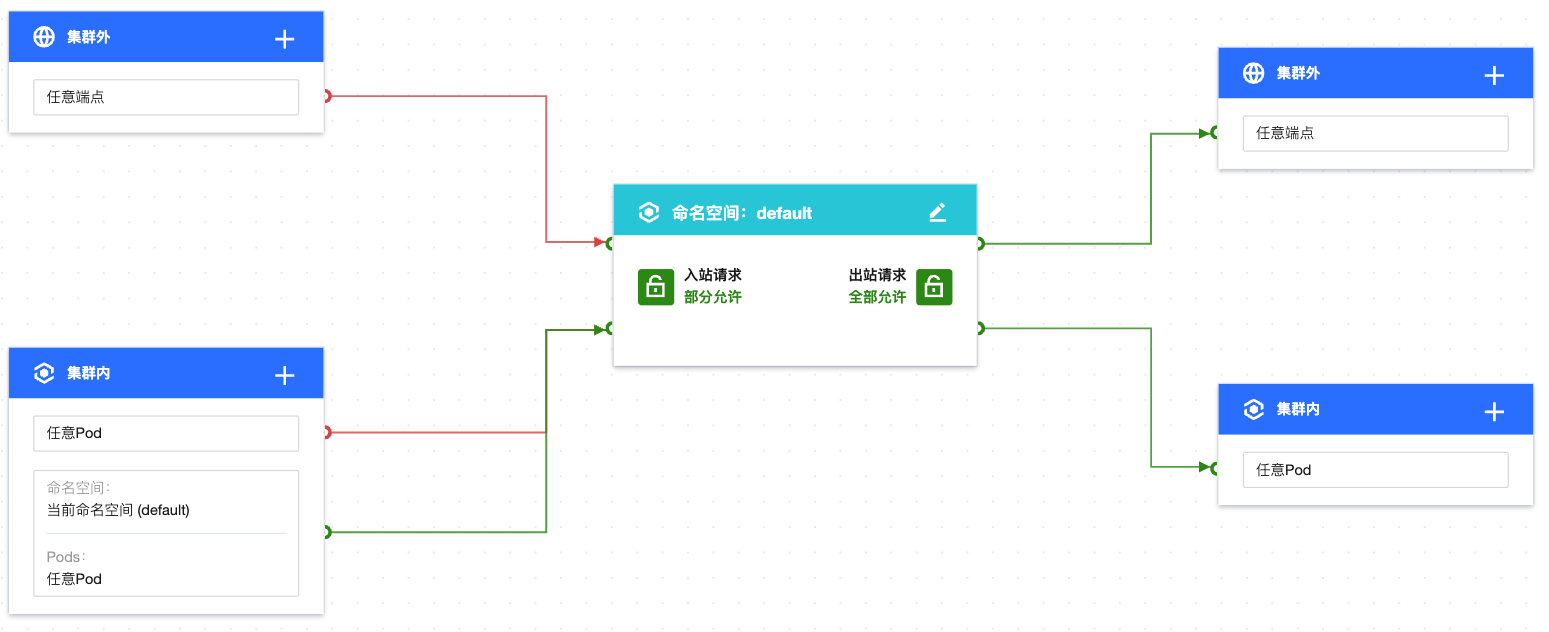
3.1 通过设置防护对象针对当前命名空间(此处为 default)和 app=web 的2个策略组合实现,创建策略 A,设定具有 app=web 标签的 pod 应用允许全部入站请求。


3.2 创建策略 B,设定 default 命名空间内的所有 pod 只允许当前命名空间内来源请求,拒绝命名空间之外的来源请求。

4. 验证网络策略效果,default 命名空间下只有 app=web 应用可以被外部命名空间来源请求,其它 pod(以 app=web1为例)应用无法被外部命名空间来源请求。
外部命名空间访问 app=web 正常。
[root@VM-0-11-centos ~]# kubectl create namespace secondary[root@VM-0-11-centos ~]# kubectl run testweb --namespace=secondary --rm -i -t --image=alpine -- sh/ # wget -qO- --timeout=2 http://web.default<!DOCTYPE html><html><head><title>Welcome to nginx!</title>...
外部命名空间无法访问 app=web1。
[root@VM-0-11-centos ~]# kubectl create namespace secondary[root@VM-0-11-centos ~]# kubectl run testweb --namespace=secondary --rm -i -t --image=alpine -- sh/ # wget -qO- --timeout=2 http://web1.defaultwget: can't connect to remote host (172.*.*.*): Connection refused
5. 清理环境。
kubectl delete pod web -n defaultkubectl delete service web -n defaultkubectl delete namespace secondary//前往控制台停用网络策略效果等同于kubectl delete networkpolicy
场景5:设置应用只允许指定命名空间访问
策略说明
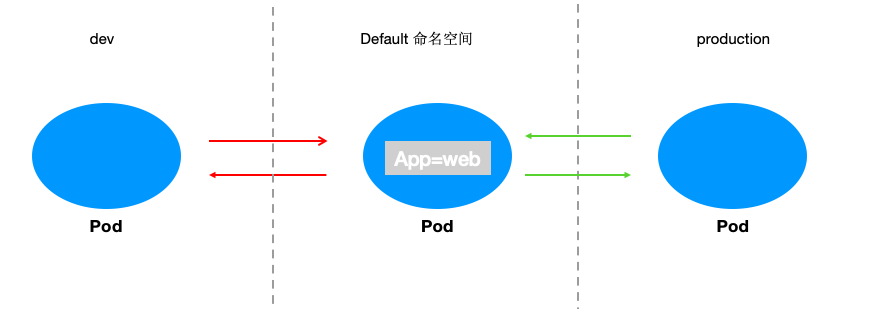
设定具有标签“app=web”的应用只允许与指定的命名空间访问。

验证步骤
1. 创建标签为“app=web”的 pod 应用并启动服务。
[root@VM-0-11-centos ~]# kubectl run web --image=nginx --namespace default --labels=app=web --expose --port 80service/web createdpod/web created[root@VM-0-11-centos ~]# kubectl get svc webNAME TYPE CLUSTER-IP EXTERNAL-IP PORT(S) AGEweb ClusterIP 172.*.*.* <none> 80/TCP 5s
2. 创建测试命名空间 dev 和 production,验证默认情况下所有命名空间都能访问 Web 应用。
[root@VM-0-11-centos ~]# kubectl create namespace devnamespace/dev created[root@VM-0-11-centos ~]# kubectl label namespace/dev env=devnamespace/dev labeled[root@VM-0-11-centos ~]# kubectl create namespace productionnamespace/production created[root@VM-0-11-centos ~]# kubectl label namespace/production env=productionnamespace/production labeled[root@VM-0-11-centos ~]#
默认 dev 空间可以访问 Web 应用。
kubectl run testweb --namespace=dev --rm -i -t --image=alpine -- shIf you don't see a command prompt, try pressing enter./ # wget -qO- --timeout=2 http://web.default<!DOCTYPE html><html><head><title>Welcome to nginx!</title>...
默认 production 空间可以访问 Web 应用。
kubectl run testweb --namespace=production --rm -i -t --image=alpine -- shIf you don't see a command prompt, try pressing enter./ # wget -qO- --timeout=2 http://web.default<!DOCTYPE html><html><head><title>Welcome to nginx!</title>...
3. 创建容器网络策略并启用。
设置防护对象 Pods 标签为 app=web,入站规则配置来源类型为命名空间,设置只允许具有 env=production 标签的命名空间来源,出向规则配置同理。规则配置如下图:
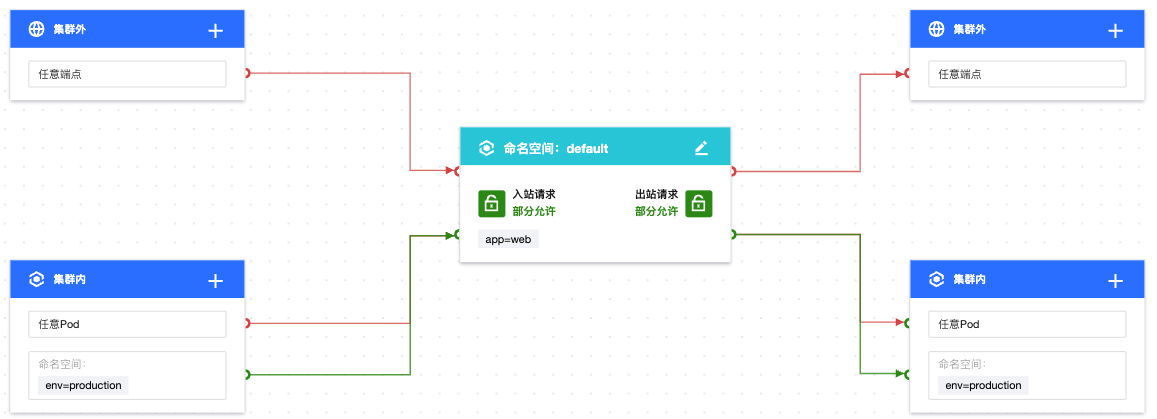

4. 验证网络访问效果。
命名空间 dev 来源无法访问 Web服务。
kubectl run testweb --namespace=dev --rm -i -t --image=alpine -- shIf you don't see a command prompt, try pressing enter./ # wget -qO- --timeout=2 http://web.defaultwget: can't connect to remote host (172.*.*.*): Connection refused
命名空间 production 来源可以正常访问 Web服务。
kubectl run testweb --namespace=production --rm -i -t --image=alpine -- shIf you don't see a command prompt, try pressing enter./ # wget -qO- --timeout=2 http://web.default<!DOCTYPE html><html><head><title>Welcome to nginx!</title>...
5. 清理环境。
kubectl delete pod webkubectl delete service webkubectl delete namespace {prod,dev}//前往控制台停用网络策略效果等同于kubectl delete networkpolicy
场景6:设置 pod 只允许在集群内请求
策略说明
设定具有标签为“app=web”的应用只允许在集群内请求,禁止集群外请求。
验证步骤
1. 创建标签为“app=web”的 pod 应用和“app=web1”的 pod 应用并启动服务。web1用于模拟集群内服务。
[root@VM-0-11-centos ~]# kubectl run web --image=nginx --labels=app=web --expose --port 80service/web createdpod/web created[root@VM-0-11-centos ~]# kubectl run web1 --image=nginx --labels=app=web1 --expose --port 80service/web createdpod/web created[root@VM-0-11-centos ~]# kubectl get svc webNAME TYPE CLUSTER-IP EXTERNAL-IP PORT(S) AGEweb ClusterIP 172.*.*.* <none> 80/TCP 5s[root@VM-0-11-centos ~]# kubectl get svc web1NAME TYPE CLUSTER-IP EXTERNAL-IP PORT(S) AGEweb1 ClusterIP 172.*.*.* <none> 80/TCP 7s
2. 验证默认情况下 Web 服务可以请求集群内部服务和外部 IP 地址。
Web 应用正常访问集群内 web1服务。
[root@VM-0-11-centos ~]# kubectl exec -it web -- sh# curl 172.*.*.*:80<!DOCTYPE html><html><head><title>Welcome to nginx!</title>...
Web 应用正常访问集群外 IP 地址。
[root@VM-0-11-centos ~]# kubectl exec -it web -- sh# curl 220.*.*.*:80<html><meta http-equiv="refresh" content="0;url=http://www.baidu.com/"></html>
3. 创建网络策略并启用。
设置防护对象 Pods 标签为 app=web,入站规则配置集群内只允许任意命名空间来源请求,出向规则配置同理。规则配置如下图:


4. 验证网络策略效果。
Web 应用正常访问集群内 web1服务。
[root@VM-0-11-centos ~]# kubectl exec -it web -- sh# curl 172.*.*.*:80<!DOCTYPE html><html><head><title>Welcome to nginx!</title>...
Web 应用无法访问集群外任意 IP 地址。
[root@VM-0-11-centos ~]# kubectl exec -it web -- sh# curl 220.*.*.*:80curl: (: not foundo connect to 220.*.*.* port 80: Connection refused
5. 清理环境。
kubectl delete pod webkubectl delete service webkubectl delete pod web1kubectl delete service web1//前往控制台停用网络策略效果等同于kubectl delete networkpolicy
场景7:设置 pod 应用只允许通过指定端口访问
策略说明
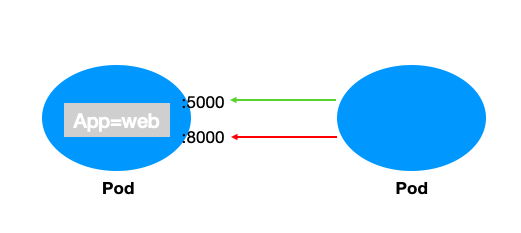
设定具有标签为“app=web”的应用通过 TCP 协议只允许指定的5000端口访问,拒绝其它端口的来源请求(UDP 协议不受影响)。

验证步骤
1. 创建标签为“app=web”的 pod 应用并启动5000和8000两个端口。
kubectl run web --image=ahmet/app-on-two-ports --labels app=webpod/web created[root@VM-0-11-centos ~]# kubectl get pod web -o wideNAME READY STATUS RESTARTS AGE IP NODE NOMINATED NODE READINESS GATESweb 1/1 Running 0 117s 172.*.*.* 172.*.*.* <none> <none>
2. 验证默认情况下 Web 应用的5000端口和8000端口均可被正常访问。
[root@VM-0-11-centos ~]# kubectl run testweb --namespace=dev --rm -i -t --image=alpine -- shIf you don't see a command prompt, try pressing enter./ # wget -qO- http://172.*.*.*:5000/metricshttp.requests=2go.goroutines=5go.cpus=4/ # wget -qO- http://172.*.*.*:8000Hello from HTTP server.
3. 创建网络策略并启用。
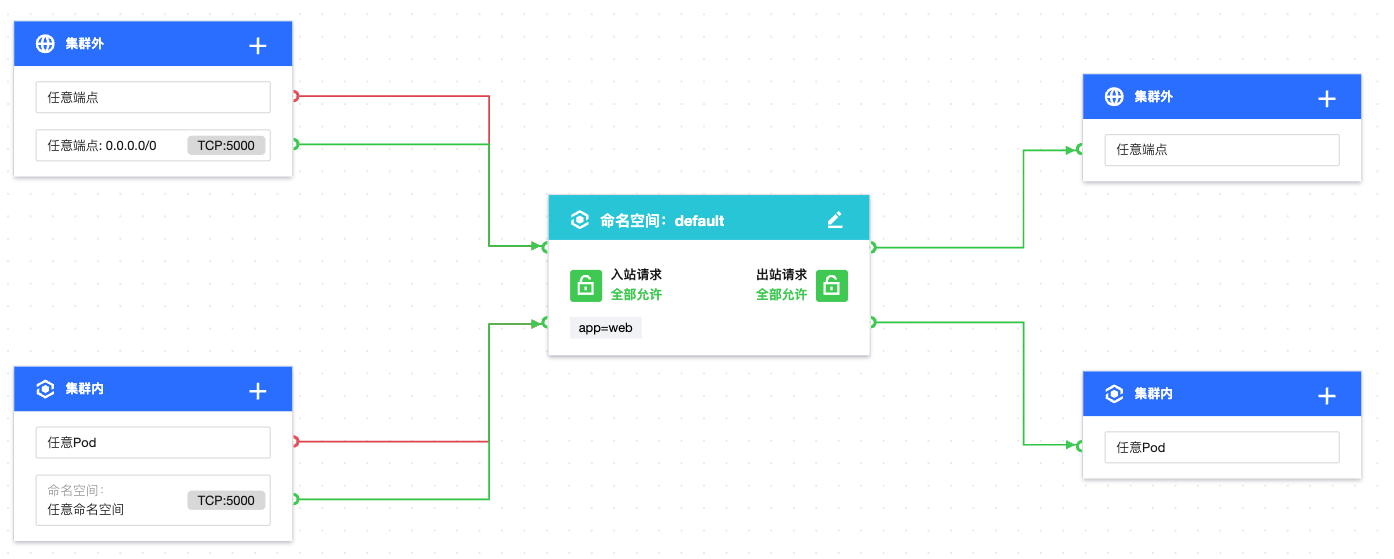
设置防护对象 Pods 标签为 app=web,入站规则配置集群内任意命名空间通过 TCP 协议只允许5000端口来源请求,集群外配置任意端点通过 TCP 协议只允许5000端口来源请求,规则配置如下图:
注意
若需要设置 UDP 协议也只允许指定端口访问,需要增加针对 UDP 协议的端口规则。
4. 验证网络策略效果。
Web 应用的5000端口可以正常被访问,Web 应用的8000端口已无法访问。
[root@VM-0-11-centos ~]# kubectl run testweb --namespace=dev --rm -i -t --image=alpine -- shIf you don't see a command prompt, try pressing enter./ # wget -qO- http://172.*.*.*:5000/metricshttp.requests=2go.goroutines=5go.cpus=4/ # wget -qO- http://172.*.*.*:8000wget: can't connect to remote host (172.*.*.*): Connection refused
5. 清理环境。
kubectl delete pod webkubectl delete service web//前往控制台停用网络策略效果等同于kubectl delete networkpolicy
场景8:设置 pod 应用只允许指定 IP 来源访问
策略说明
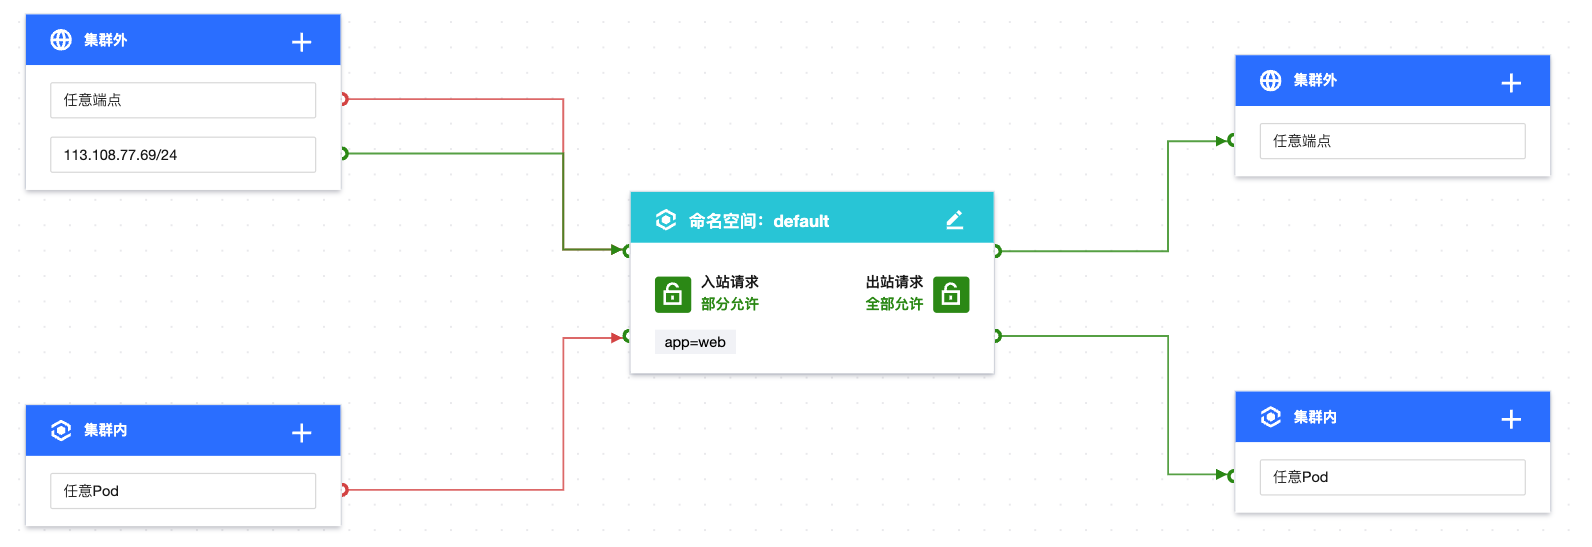
设定具有标签为“app=web”的应用只允许指定的 IP 地址来源访问。
验证步骤
1. 创建标签为“app=web”的 pod 应用并启动服务。
[root@VM-0-11-centos ~]# kubectl run web --namespace default --image=nginx --labels=app=webpod/web created[root@VM-0-11-centos ~]# kubectl get svc webNAME TYPE CLUSTER-IP EXTERNAL-IP PORT(S) AGEweb ClusterIP 172.*.*.* <none> 80/TCP 6s
2. 为 Web 服务绑定公网 IP。
2.1 在 集群页面,创建公网 LB 类型 Service 绑定 Web 服务,详情请参见 Service 基本功能。
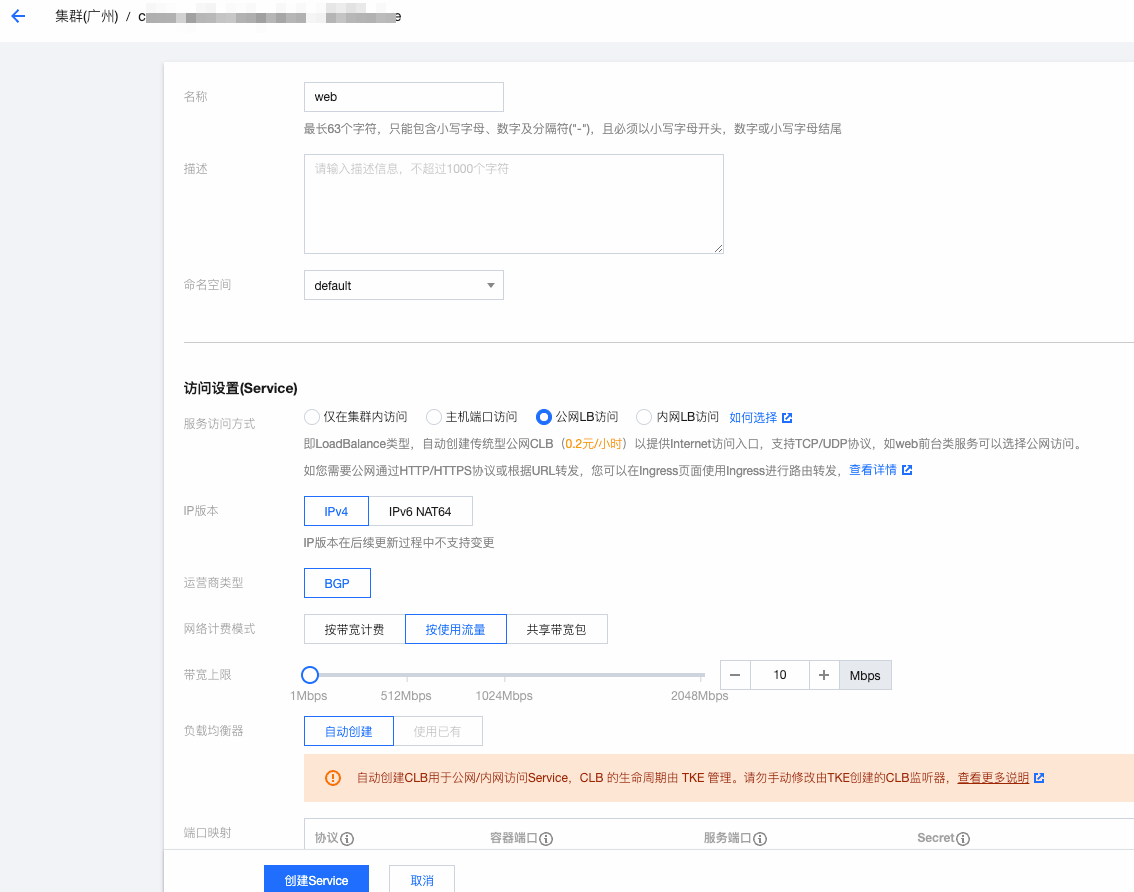
2.2 创建公网 LB 成功,访问地址为:106.*.*.*。


3. 验证默认情况下任意 IP 来源可以正常访问 Web 应用。
任意 pod 正常访问 Web 应用。
[root@VM-0-11-centos ~]# kubectl run --rm -it --image=alpine testweb -- shIf you don't see a command prompt, try pressing enter./ # wget -qO- http://web.default<!DOCTYPE html><html><head><title>Welcome to nginx!</title>...
任意 IP 来源正常访问 Web 应用。
~/workspace/networkpolicy_test curl cip.ccIP : 113.*.*.*地址 : 中国 广东 深圳运营商 : 电信数据二 : 广东省深圳市 | 腾讯云数据三 : 中国广东省深圳市 | 电信URL : http://www.cip.cc/113.*.*.*~/workspace/networkpolicy_test curl 106.*.*.*<!DOCTYPE html><html><head><title>Welcome to nginx!</title>...[root@VM-0-11-centos ~]# curl cip.ccIP : 175.*.*.*地址 : 中国 中国数据二 : 广东省广州市 | 腾讯云数据三 : 中国福建省厦门市 | 腾讯URL : http://www.cip.cc/175.*.*.*[root@VM-0-11-centos ~]# curl --connect-timeout 5 106.*.*.*<!DOCTYPE html><html><head><title>Welcome to nginx!</title>...
4. 创建网络策略并启用。
设置防护对象 Pods 标签为 app=web,入站规则配置集群外只允许指定 IP 地址来源。规则配置如下图:

5. 验证网络策略效果。
只有指定 IP 地址来源可以访问 Web 应用。
~/workspace/networkpolicy_test curl 106.*.*.*<!DOCTYPE html><html><head><title>Welcome to nginx!</title>...
其它 IP 地址来源无法访问 Web 应用。
[root@VM-0-11-centos ~]# curl cip.ccIP : 175.*.*.*地址 : 中国 中国数据二 : 广东省广州市 | 腾讯云数据三 : 中国福建省厦门市 | 腾讯URL : http://www.cip.cc/175.*.*.*[root@VM-0-11-centos ~]# curl --connect-timeout 5 106.*.*.*curl: (28) Connection timed out after 5001 milliseconds
6. 清理环境。
kubectl delete pod webkubectl delete service web//前往控制台停用网络策略效果等同于kubectl delete networkpolicy
场景9:设置 pod 只允许访问指定目标端口和目标 IP
策略说明
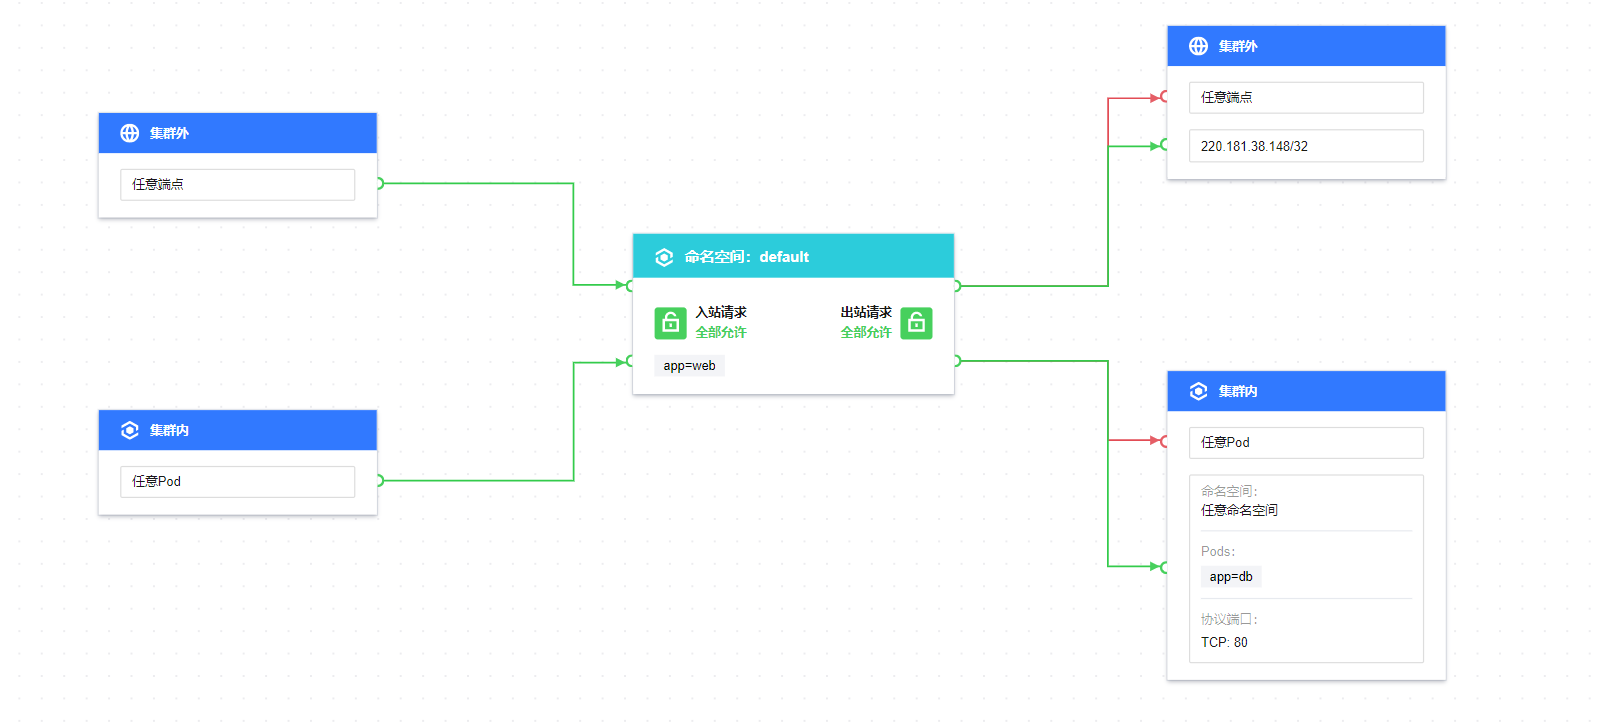
设定具有标签为“app=web”应用只允许访问具有“app=db”标签应用的80端口和特定 IP 目标。
验证步骤
1. 创建标签为“app=web”的 pod 应用和“app=db”的 pod 应用并启动服务。
[root@VM-0-11-centos ~]# kubectl run web --image=nginx --labels=app=web --expose --port 80service/web createdpod/web created[root@VM-0-11-centos ~]# kubectl get svc webNAME TYPE CLUSTER-IP EXTERNAL-IP PORT(S) AGEweb ClusterIP 172.*.*.* <none> 80/TCP 5s[root@VM-0-11-centos ~]# kubectl run db --image=nginx --port 80 --expose --labels app=dbservice/db createdpod/db created[root@VM-0-11-centos ~]# kubectl get svc dbNAME TYPE CLUSTER-IP EXTERNAL-IP PORT(S) AGEdb ClusterIP 172.*.*.* <none> 80/TCP 6s
2. 验证默认情况下 Web 服务可以请求任意 Pod 应用和任意 IP 地址目标。
[root@VM-0-11-centos ~]# kubectl exec -it web -- sh# curl 172.*.*.*<!DOCTYPE html><html><head><title>Welcome to nginx!</title>...# curl 220.*.*.*:80<html><meta http-equiv="refresh" content="0;url=http://www.baidu.com/"></html># curl 103.*.*.*:80<!DOCTYPE html><html lang="zh">...
3. 创建网络策略并启用。
设置防护对象 Pods 标签为 app=web,出站规则配置集群外只允许特定 IP 地址目标,集群内通过 TCP 协议只允许任意命名空间具有 app=db 标签 Pod 的80端口请求,规则配置如下图:
注意
协议端口未配置 UDP 协议,将不对 UDP 协议生效。
4. 验证网络策略效果。
Web 服务可以正常访问 app=db 服务的80端口。
[root@VM-0-11-centos ~]# kubectl exec -it web -- sh# curl 172.*.*.*:80<!DOCTYPE html><html><head><title>Welcome to nginx!</title>...
Web 服务无法访问 app=db 的其他端口。
[root@VM-0-11-centos ~]# kubectl exec -it web -- sh# curl 172.*.*.*:81curl:(7)Failed to connect to 172.*.*.* port 81: Connection refused
Web 服务无法访问其它 pod 服务。
[root@VM-0-11-centos ~]# kubectl get svc web1NAME TYPE CLUSTER-IP EXTERNAL-IP PORT(S) AGEweb1 ClusterIP 172.*.*.* <none> 80/TCP 55m[root@VM-0-11-centos ~]# kubectl exec -it web -- sh# curl 172.*.*.*:80curl:(7)Failed to connect to 172.*.*.* port 80: Connection refused
Web 服务可以正常访问特定目标 IP。
[root@VM-0-11-centos ~]# kubectl exec -it web -- sh# curl 220.*.*.*:80<html><meta http-equiv="refresh" content="0;url=http://www.baidu.com/"></html>
Web 服务无法访问其他 IP 目标。
[root@VM-0-11-centos ~]# kubectl exec -it web -- sh# curl 103.*.*.*curl:(7)Failed to connect to 103.*.*.* port 80: Connection refused
5. 清理环境。
kubectl delete pod webkubectl delete service webkubectl delete pod dbkubectl delete service db1//前往控制台停用网络策略效果等同于kubectl delete networkpolicy

