操作场景
若您在使用 Terraform 管理云资源之前,已经通过腾讯云控制台创建了资源,则可参考本文进行操作,将现存资源使用 Terraform 管理。
操作步骤
使用 Terraform 接管已经存在的资源,实际上在 Terraform 源文件和状态文件里都反映出该资源的状态即可。本文以使用 Terraform 管理现存的 弹性微服务环境与应用 为例。
步骤1:获取资源 ID
1. 获取应用 ID,您可以在控制台 > 应用管理界面中获取现存应用的 ID。
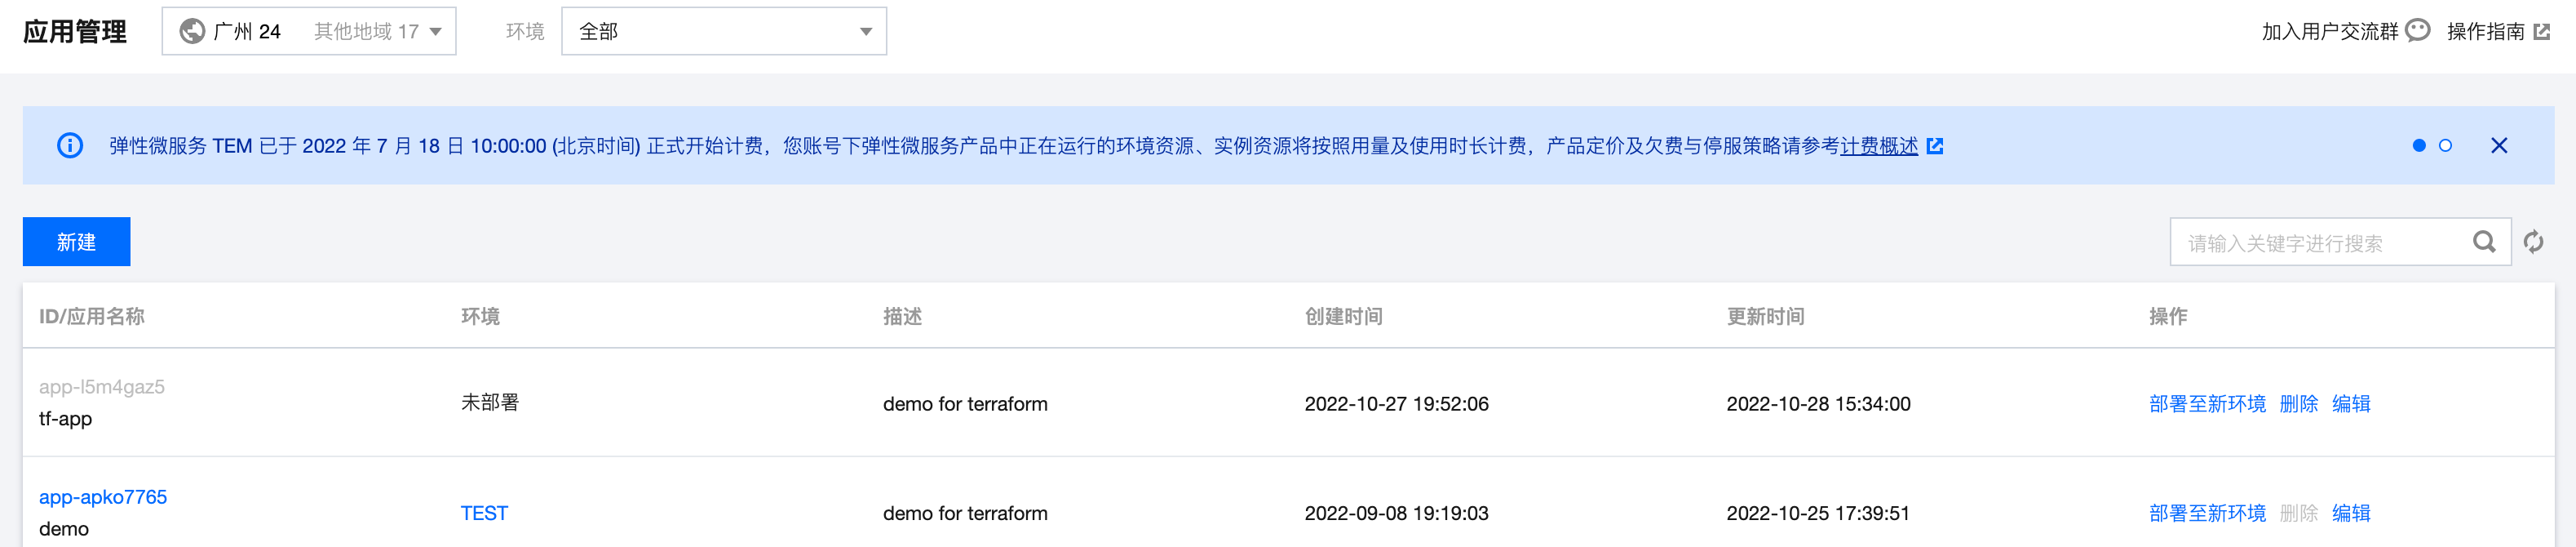
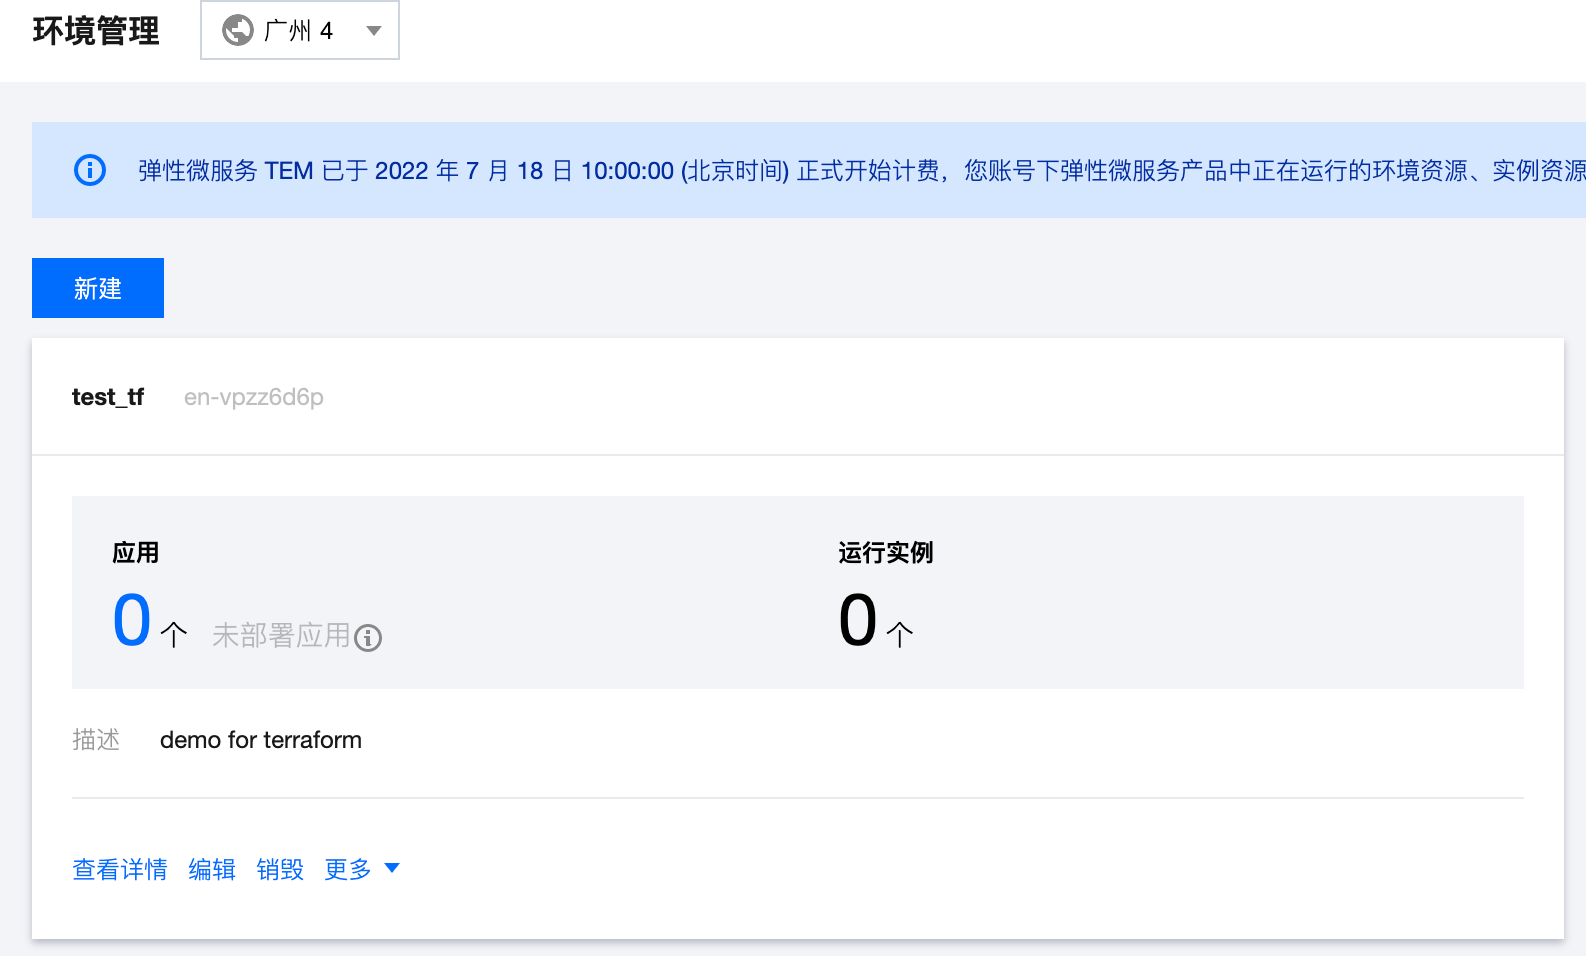
2. 获取环境 ID,您可以在控制台 > 环境管理界面中获取现存环境的 ID。
步骤2:导入资源文件
1. 进入 Terraform 工作目录,执行以下命令,查看 main.tf 内容。
cat main.tf
返回结果如下:
resource "tencentcloud_tem_environment" "environment" { }resource "tencentcloud_tem_application" "application" { }resource "tencentcloud_tem_workload" "workload" {application_id = tencentcloud_tem_application.application.idenvironment_id = tencentcloud_tem_environment.environment.iddeploy_version = "1.9"deploy_mode = "IMAGE"img_repo = "qcloud/nginx"init_pod_num = 1cpu_spec = 1memory_spec = 1}
在此示例中,main.tf 中已经规划了一个名为 environment 的环境和一个名为 application 的应用,并通过名为 workload 的工作负载部署至以上的环境,但是从以上代码中可以看出,application 和 environment 为空。在此将展示如何将已经创建的存量环境和应用纳入 Terraform 管理。
2. 在文件所在目录下执行以下命令,完成初始化工作。
terraform init --upgrade
返回结果如下:
Initializing the backend...Initializing provider plugins...- Finding latest version of tencentcloudstack/tencentcloud...- Using previously-installed tencentcloudstack/tencentcloud v1.78.6Terraform has been successfully initialized!You may now begin working with Terraform. Try running "terraform plan" to seeany changes that are required for your infrastructure. All Terraform commandsshould now work.If you ever set or change modules or backend configuration for Terraform,rerun this command to reinitialize your working directory. If you forget, othercommands will detect it and remind you to do so if necessary.
3. 初始化完成后,执行以下命令,将资源导入状态文件。
terraform import tencentcloud_tem_application.application recourceIDterraform import tencentcloud_tem_environment.environment en-vpzz6d6p
返回的信息如下所示:
tencentcloud_tem_application.application: Importing from ID "app-l5m4gaz5"...tencentcloud_tem_application.application: Import prepared!Prepared tencentcloud_tem_application for importtencentcloud_tem_application.application: Refreshing state... [id=app-l5m4gaz5]Import successful!The resources that were imported are shown above. These resources are now inyour Terraform state and will henceforth be managed by Terraform.
tencentcloud_tem_environment.environment: Importing from ID "en-vpzz6d6p"...tencentcloud_tem_environment.environment: Import prepared!Prepared tencentcloud_tem_environment for importtencentcloud_tem_environment.environment: Refreshing state... [id=en-vpzz6d6p]Import successful!The resources that were imported are shown above. These resources are now inyour Terraform state and will henceforth be managed by Terraform.
4. 执行以下命令,查看状态文件
cat terraform.tfstate
可查看如下关于资源的信息:
{"version": 4,"terraform_version": "1.2.8","serial": 47,"lineage": "c12a26a4-134b-e0e5-9ba1-0b2234xxxxxx","outputs": {},"resources": [{"mode": "managed","type": "tencentcloud_tem_application","name": "application","provider": "provider[\\"registry.terraform.io/tencentcloudstack/tencentcloud\\"]","instances": [{"schema_version": 0,"attributes": {"application_name": "demo","coding_language": "JAVA","description": "demo for terraform","id": "app-apko7765","instance_id": "","repo_name": "qcloud/nginx","repo_server": null,"repo_type": 2,"use_default_image_service": null},"sensitive_attributes": [],"private": "eyJzY2hlbWFfdmVyc2lvbiI6XXXXXX=="}]},{"mode": "managed","type": "tencentcloud_tem_environment","name": "environment","provider": "provider[\\"registry.terraform.io/tencentcloudstack/tencentcloud\\"]","instances": [{"schema_version": 0,"attributes": {"description": "demo for terraform","environment_name": "test_tf","id": "en-vpzz6d6p","subnet_ids": ["subnet-5ob92rbm","subnet-dwpro9ni"],"vpc": "vpc-dd5m94px"},"sensitive_attributes": [],"private": "eyJzY2hlbWFfdmVyc2lvbiI6XXXXXX=="}]}]}
步骤3:更新源文件
1. 执行以下命令,打印资源信息。
terraform show
返回的信息如下所示:
# tencentcloud_tem_application.application:resource "tencentcloud_tem_application" "application" {application_name = "demo"coding_language = "JAVA"description = "demo for terraform"id = "app-apko7765"repo_name = "qcloud/nginx"repo_type = 2}# tencentcloud_tem_environment.environment:resource "tencentcloud_tem_environment" "environment" {description = "demo for terraform"environment_name = "test_tf"id = "en-vpzz6d6p"subnet_ids = ["subnet-5ob92rbm","subnet-dwpro9ni",]vpc = "vpc-dd5m94px"}
2. 将资源代码拷贝至 Terraform 源文件 main.tf 中。需删除其中不可设置的选项,例如 id。完成编辑后,main.tf 文件内容如下所示:
resource "tencentcloud_tem_environment" "environment" {description = "demo for terraform"environment_name = "test_tf"# id = "en-vpzz6d6p"subnet_ids = ["subnet-5ob92rbm","subnet-dwpro9ni",]vpc = "vpc-dd5m94px"}resource "tencentcloud_tem_application" "application" {application_name = "demo"coding_language = "JAVA"description = "demo for terraform"# id = "app-apko7765"repo_name = "qcloud/nginx"repo_type = 2}resource "tencentcloud_tem_workload" "workload" {application_id = "${tencentcloud_tem_application.application.id}"environment_id = "${tencentcloud_tem_environment.environment.id}"deploy_version = "1.9"deploy_mode = "IMAGE"img_repo = "qcloud/nginx"init_pod_num = 1cpu_spec = 1memory_spec = 1}
步骤4:验证结果
1. 执行以下命令,使用当前工作目录下的代码和状态文件更新 Terraform 规划。
terraform plan
2. 返回信息如下所示,可查看 Terraform 已成功接管。
Terraform used the selected providers to generate the following execution plan. Resource actions are indicated with the following symbols:+ createTerraform will perform the following actions:# tencentcloud_tem_workload.workload will be created+ resource "tencentcloud_tem_workload" "workload" {+ application_id = "app-apko7765"+ cpu_spec = 1+ deploy_mode = "IMAGE"+ deploy_version = "1.9"+ environment_id = "en-vpzz6d6p"+ id = (known after apply)+ img_repo = "qcloud/nginx"+ init_pod_num = 1+ memory_spec = 1+ env_conf {+ config = (known after apply)+ key = (known after apply)+ secret = (known after apply)+ type = (known after apply)+ value = (known after apply)}}Plan: 1 to add, 0 to change, 0 to destroy.
至此,Terraform 已经接管了现存的 environment 和 application 资源,并将规划创建 workload。之后,您可以通过 Terraform 对资源进行编辑和删除。


