本文档介绍如何预估通过在线迁移方式,将您的源服务器上的系统、应用程序等从自建机房(IDC)或云平台等源环境迁移至腾讯云云服务器的时间。
迁移时间主要受迁移过程中数据传输速度的影响,您可通过测试迁移源端服务器和迁移目标云服务器之间传输速度,预估迁移时间。
不同场景下迁移时间预估
场景1:源端服务器迁移到腾讯云 CVM
Linux 系统迁移的目标是云服务器时,迁移时间取决于实际数据传输所需的时间。
Windows 系统迁移的目标是云服务器时,迁移时间取决于磁盘总容量传输所需的时间。
举例来说,如果您的 Linux 系统源端服务器待迁移的所有磁盘数据实际占用量为50GB,出口带宽100Mbps,则预估总迁移时间为1.14个小时。步骤如下:
1. 单位换算:
将实际宽带速度换算为MB/s,100Mbps = 100 / 8 = 12.5MB/s。
将实际磁盘数据量换算为MB,50GB = 50 × 1024 = 51200MB。
2. 实际数据迁移时间估算:
51200 / 12.5 = 4096秒 = 1.14小时。
场景2:源端服务器迁移到腾讯云 CVM 镜像
Linux 系统迁移的目标是云服务器镜像时,迁移时间取决于实际数据传输所需的时间和制作镜像时间。
Windows 系统迁移的目标是云服务器镜像时,迁移时间取决于磁盘总容量传输所需的时间和制作镜像时间。
举例来说,如果您的 Windows 系统源端服务器待迁移的磁盘总容量为50GB,出口带宽100Mbps,预估总迁移时间为1.23个小时。步骤如下:
1. 单位换算:
将实际宽带速度换算为MB/s,100Mbps = 100/8 = 12.5MB/s。
将实际磁盘数据量换算为MB,50GB = 50 × 1024 = 51200MB。
2. 实际数据迁移时间估算:
51200 / 12.5 = 4096秒 = 1.14小时。
3. 制作镜像时间,制作速度约为160MB/s
51200 / 160 = 320秒 = 0.089小时
4. 总迁移时间:
1.14+0.089=1.23个小时。
相关操作:测试数据传输速度
可使用 iperf3 工具测试数据传输速度,例如测试客户端到服务器传输数据的带宽、速率等。
传输速度影响因素
源端服务器的出口带宽和目标云服务器实例的入口带宽。
例如,源端服务器出口带宽为50Mbps,目标实例入口带宽为100Mbps,则理论上实际传输速度不超过50Mbps。
迁移时并不会一直占满带宽。迁移时可以动态调整目标云服务器实例(或中转实例)的入网带宽。
源端服务器与目标云服务器实例如果处于不同地域时,其传输速度比同地域下慢。
说明:
通过控制台在线迁移时,如果迁移目标是云服务器镜像,迁移时会创建一台中转实例(名称为 do_not_delete_csm_instance),带宽上限为50Mbps。
迁移时您可以在控制台动态调整目标云服务器实例(或中转实例)的入网带宽,控制迁移速度。
迁移至腾讯云 Linux 云服务器速度测试
例如,通过控制台在线迁移功能,将服务器迁移至腾讯云 CentOS 7.5 实例。其传输速度测试步骤如下:
1. 在迁移目标地域创建一台按量计费的 CentOS 7.5 实例。
说明:
若迁移目标是云服务器镜像,则迁移时会创建一台 CentOS 7.5 的中转实例。如需测试其速度,建议选择可用的标准型,且 CPU、内存配置较低的机型,与实际迁移时场景更接近。
iperf3 服务端默认端口为 TCP 5201,需要为测试 CentOS 7.5实例的安全组入方向添加并放行 TCP 5201端口。安全组配置操作请参见 配置安全组。
2. 分别在目标测试云服务器实例和源端服务器上安装 iperf3 工具。
执行以下命令,在目标 CentOS 7.5 实例上安装 iperf3 工具。
yum -y install iperf3
在源端服务器上安装 iperf3 工具。请根据源端服务器 Linux 发行版本使用对应的安装命令安装 iperf3 工具。
3. 执行以下命令,启动目标 CentOS 7.5 测试实例的 iperf3 为服务端。
iperf3 -s
返回如 “Server listening on 5201” 信息,则表示启动成功。
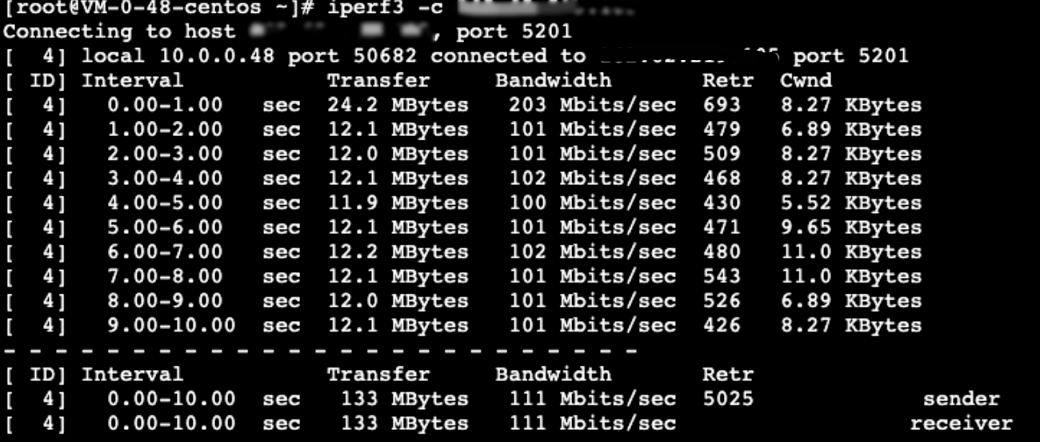
4. 执行以下命令,在源端服务器中启动 iperf3 为客户端。
iperf3 -c [目标实例IP]
返回测试结果如下图所示,可知源端服务器与测试 CentOS 7.5 实例之间传输速度大概为111Mbps。