本文主要提供专业版应用的服务端上传指引。
适用场景
开发者通过 API 或 SDK 方式将存储在其后台服务器中的文件上传到专业版存储,本文将介绍如何使用 AWS S3 SDK 上传文件。
上传方式
服务端需通过专业版预置域名上传,支持方式如下:
上传方式 | 上传域名 | 上传凭证 | 支持操作 |
存储桶预置域名 | [BucketId].vodpro.[存储地域].eovod.com | 永久密钥(推荐) | 上传至指定存储桶 |
| | 临时凭证 | 上传至指定存储桶 |
应用预置域名 | [SubAppId].vodpro-upload.com | 临时凭证 | 上传至指定存储桶 就近上传至应用内某区域的存储桶 |
存储桶预置域名
专业版为每个存储桶预置了一个公网访问域名,可使用该域名上传文件至指定存储桶。
使用永久密钥通过 AWS S3 SDK 上传文件
下文介绍在常用的编程语言中,如何使用永久密钥上传文件至专业版应用的存储桶。
假设专业版应用 ID 为
1234567890 ,存储桶的存储地域为 ap-guangzhou,存储桶 ID 为 bucketid1。本示例使用的存储桶公网访问域名为:
bucketid1.vodpro.ap-guangzhou.eovod.com。准备工作
1. 创建专业版应用和存储桶
2. 获取应用级别永久密钥对
上传示例
常用语言初始化 S3 客户端并上传文件,代码实现如下所示:
// Package main// 本示例基于 AWS SDK for Go v2 service/s3 v1.72.3 实现。// AWS SDK for Go v2 service/s3 v1.73.0 及以后版本需禁用 S3 的默认完整性保护。// 具体参考: https://github.com/aws/aws-sdk-go-v2/discussions/2960package mainimport ("context""errors""fmt""log""net/url""os""github.com/aws/aws-sdk-go-v2/aws""github.com/aws/aws-sdk-go-v2/credentials""github.com/aws/aws-sdk-go-v2/feature/s3/manager""github.com/aws/aws-sdk-go-v2/service/s3"smep "github.com/aws/smithy-go/endpoints""github.com/aws/smithy-go/logging")// customEndpointResolverV2 自定义接入点type customEndpointResolverV2 struct{}// ResolveEndpoint 自定义接入点func (r *customEndpointResolverV2) ResolveEndpoint(ctx context.Context,params s3.EndpointParameters) (smep.Endpoint, error) {if params.Bucket == nil || params.Region == nil {return smep.Endpoint{}, errors.New("invalid endpoint param")}return smep.Endpoint{URI: url.URL{Scheme: "https",Host: fmt.Sprintf("%s.vodpro.ap-guangzhou.eovod.com", *params.Bucket),},}, nil}func main() {// new s3 clients3cli := s3.New(s3.Options{Credentials: credentials.NewStaticCredentialsProvider("AccessKeyId", // 填入密钥对中的 AccessKeyId"SecretAccessKey", // 填入密钥对中的 SecretAccessKey""), // 永久密钥无需填充 SessionTokenEndpointResolverV2: new(customEndpointResolverV2), // 自定义接入点UsePathStyle: false, // 请求禁用 path styleLogger: logging.NewStandardLogger(os.Stdout), // 日志打印到标准输出流ClientLogMode: aws.LogRequest | aws.LogResponse, // 打印请求头和响应头Region: "auto", // 固定填写 auto})// 打开本地文件file, err := os.Open("demo.mp4") // 本地文件路径if err != nil {log.Fatalf("failed to open file: %v", err)return}defer file.Close()// 上传文件到 S3// 创建上传器uploader := manager.NewUploader(s3cli, func(u *manager.Uploader) {u.PartSize = 10 * 1024 * 1024 // 设置分片大小为 10MBu.Concurrency = 5 // 设置并发上传的分片数})// 上传文件result, err := uploader.Upload(context.TODO(), &s3.PutObjectInput{Bucket: aws.String("bucketid1"), // Bucket 设置为点播专业版应用中的存储桶 IDKey: aws.String("upload/demo.mp4"), // 媒体文件在存储桶中的路径Body: file,})if err != nil {log.Fatalf("failed to upload file: %v", err)return}log.Printf("etag: %s", *result.ETag) // 获取上传文件 etag}O
// 本示例基于 AWS SDK for Java v2 service/s3 v2.31.35 实现。// AWS SDK for Java 2.30.0 及以后版本需禁用 S3 的默认完整性保护。// 具体参考: https://github.com/aws/aws-sdk-java-v2/issues/5801import software.amazon.awssdk.auth.credentials.AwsBasicCredentials;import software.amazon.awssdk.auth.credentials.StaticCredentialsProvider;import software.amazon.awssdk.http.nio.netty.NettyNioAsyncHttpClient;import software.amazon.awssdk.regions.Region;import software.amazon.awssdk.services.s3.S3AsyncClient;import software.amazon.awssdk.services.s3.S3Configuration;import software.amazon.awssdk.transfer.s3.S3TransferManager;import software.amazon.awssdk.transfer.s3.model.UploadFileRequest;import software.amazon.awssdk.transfer.s3.progress.LoggingTransferListener;import software.amazon.awssdk.core.checksums.RequestChecksumCalculation;import software.amazon.awssdk.core.checksums.ResponseChecksumValidation;import java.io.File;import java.net.URI;import java.util.concurrent.CompletableFuture;public class Main {public static void main(String[] args) {S3AsyncClient s3AsyncClient = null;S3TransferManager transferManager = null;try {// 专业版应用永久密钥 AccessKeyIdAwsBasicCredentials credentials = AwsBasicCredentials.create("AccessKeyId", // 专业版应用永久密钥 AccessKeyId"SecretAccessKey" // 专业版应用永久密钥 SecretAccessKey);String region = "ap-guangzhou"; // 专业版应用存储桶地域String bucketId = "bucketid1"; // 专业版应用存储桶IDString filePath = "demo.mp4"; // 本地文件路径String key = "upload/demo.mp4"; // 文件在存储桶中的路径String endpointUrl = String.format("https://vodpro.%s.eovod.com", region); // 桶级别预置域名端点// 使用自定义端点构建S3异步客户端s3AsyncClient = S3AsyncClient.builder().credentialsProvider(StaticCredentialsProvider.create(credentials)) // 设置凭证提供者.endpointOverride(URI.create(endpointUrl)) // 设置端点.region(Region.of("auto")) // 固定填写 auto.httpClient(NettyNioAsyncHttpClient.builder().build()) // 设置HTTP客户端.serviceConfiguration(S3Configuration.builder().pathStyleAccessEnabled(false) // 设置路径样式访问, 桶级别需明确禁用 PathStyle 模式.build()).requestChecksumCalculation(RequestChecksumCalculation.WHEN_REQUIRED).responseChecksumValidation(ResponseChecksumValidation.WHEN_REQUIRED).build();// 使用S3异步客户端创建S3TransferManagertransferManager = S3TransferManager.builder().s3Client(s3AsyncClient).build();File fileToUpload = new File(filePath);// 创建上传请求并添加传输监听器用于进度跟踪UploadFileRequest uploadRequest = UploadFileRequest.builder().putObjectRequest(builder -> builder.bucket(bucketId).key(key)).addTransferListener(LoggingTransferListener.create()).source(fileToUpload).build();// 开始上传CompletableFuture<Void> future = transferManager.uploadFile(uploadRequest).completionFuture().thenAccept(response -> {System.out.println("上传成功! ETag: " + response.response().eTag());});// 等待上传完成future.join();System.out.println("上传任务完成");} catch (Exception e) {System.err.println("上传失败: " + e.getMessage());e.printStackTrace();} finally {// 资源释放try {if (transferManager != null) {transferManager.close();}if (s3AsyncClient != null) {s3AsyncClient.close();}System.out.println("资源已释放");} catch (Exception e) {System.err.println("关闭资源时发生错误: " + e.getMessage());}}}}
// 本示例基于 AWS SDK for C++ v1.11.560 实现。// AWS SDK for C++ v1.11.486 及以后版本需禁用 S3 的默认完整性保护。// 具体参考: https://github.com/aws/aws-sdk-cpp/issues/3253#include <aws/core/Aws.h>#include <aws/core/auth/AWSCredentials.h>#include <aws/core/client/ClientConfiguration.h>#include <aws/s3/S3Client.h>#include <aws/transfer/TransferManager.h>#include <iostream>int main(){// AWS SDK 初始化Aws::SDKOptions options;options.loggingOptions.logLevel = Aws::Utils::Logging::LogLevel::Info;Aws::InitAPI(options);{// 定义认证和端点信息const Aws::String accessKeyId = "AccessKeyId"; // 填入点播专业版密钥对中的 AccessKeyIdconst Aws::String secretAccessKey = "SecretAccessKey"; // 填入点播专业版密钥对中的 SecretAccessKeyconst Aws::String region = "ap-guangzhou"; // 存储桶所在地域const Aws::String bucketId = "bucketid1"; // 点播专业版应用中的存储桶 IDconst Aws::String keyName = "upload/demo.mp4"; // 文件在存储桶中的路径const Aws::String filePath = "demo.mp4"; // 本地文件路径// 配置客户端Aws::Client::ClientConfiguration clientConfig;clientConfig.region = "auto"; // 固定填写 autoclientConfig.scheme = Aws::Http::Scheme::HTTPS; // 协议使用 HTTPSclientConfig.enableEndpointDiscovery = false; // 禁用 endpoint discoveryclientConfig.verifySSL = true; // 启用 SSL 证书验证clientConfig.endpointOverride = "vodpro." + region + ".eovod.com"; // 桶级别预置域名// 禁用完整性校验clientConfig.checksumConfig.requestChecksumCalculation = Aws::Client::RequestChecksumCalculation::WHEN_REQUIRED;clientConfig.checksumConfig.responseChecksumValidation = Aws::Client::ResponseChecksumValidation::WHEN_REQUIRED;// 设置认证信息Aws::Auth::AWSCredentials credentials(accessKeyId, secretAccessKey); // 填入点播专业版永久密钥// 创建 S3 客户端auto s3Client = Aws::MakeShared<Aws::S3::S3Client>("S3Client",credentials,clientConfig,Aws::Client::AWSAuthV4Signer::PayloadSigningPolicy::Never, // 禁用 payload signingtrue // 桶级别预置域名需明确使用 VirtualAddressing);// 创建线程池执行器auto executor = Aws::MakeShared<Aws::Utils::Threading::PooledThreadExecutor>("executor", 10);// 配置 TransferManagerAws::Transfer::TransferManagerConfiguration transferConfig(executor.get());transferConfig.s3Client = s3Client;// 设置分片大小为 10MBtransferConfig.bufferSize = 10 * 1024 * 1024;// 创建 TransferManagerauto transferManager = Aws::Transfer::TransferManager::Create(transferConfig);std::cout << "Starting file upload: " << filePath << " to " << bucketId << "/" << keyName << std::endl;// 执行上传auto uploadHandle = transferManager->UploadFile(filePath, // 本地文件路径bucketId, // 存储桶IDkeyName, // 对象键(存储路径)"application/octet-stream", // 内容类型Aws::Map<Aws::String, Aws::String>() // 元数据);// 等待上传完成uploadHandle->WaitUntilFinished();// 检查上传状态if (uploadHandle->GetStatus() == Aws::Transfer::TransferStatus::COMPLETED){std::cout << "File upload completed successfully!" << std::endl;}else{auto lastError = uploadHandle->GetLastError();std::cerr << "File upload failed: " << lastError.GetMessage() << std::endl;}}// 清理SDK资源Aws::ShutdownAPI(options);return 0;}
#!/usr/bin/env python3# -*- coding: utf-8 -*-"""本示例基于 AWS SDK for Python v1.38.7 实现。Boto3 的 AWS SDK for Python v1.36.0 及以后版本需禁用 S3 的默认完整性保护。具体参考: https://github.com/boto/boto3/issues/4392"""import boto3from botocore.config import Configfrom botocore.exceptions import ClientError# 常量定义REGION = "ap-guangzhou" # 存储桶地域BUCKET_ID = "bucketid1" # 填入点播专业版应用中的存储桶 IDFILE_PATH = "demo.mp4" # 本地文件路径OBJECT_KEY = "upload/demo.mp4" # 文件在存储桶中的路径# 创建 S3 客户端s3_client = boto3.client("s3",aws_access_key_id="AccessKeyId", # 填入密钥对中的 AccessKeyIdaws_secret_access_key="SecretAccessKey", # 填入密钥对中的 SecretAccessKeyendpoint_url=f"https://vodpro.{REGION}.eovod.com", # 桶级别预置上传域名region_name="auto", # 固定填写 autoconfig=Config(s3={"addressing_style": "virtual"}, # 使用 virtual hosted-stylerequest_checksum_calculation="when_required", # Boto3 的 AWS SDK for Python v1.36.0 及以后版本需禁用 S3 的默认完整性保护。response_checksum_validation="when_required", # Boto3 的 AWS SDK for Python v1.36.0 及以后版本需禁用 S3 的默认完整性保护。),)try:# 上传文件response = s3_client.upload_file(Bucket=BUCKET_ID, # 填入点播专业版应用中的存储桶 IDKey=OBJECT_KEY, # 文件在存储桶中的路径Filename=FILE_PATH, # 本地文件路径)print(response)except ClientError as e:print(f"Error: {e}")
注意:
使用 AWS SDK 请确认数据完整性保护特性,详情请参考 AWS SDK 的相关文档 Data Integrity Protections for Amazon S3。
使用存储桶预置公网域名,路径必须为 VirtualStyle 格式。
使用临时凭证通过 AWS S3 SDK 上传文件
下面介绍在常用的编程语言中,如何使用临时凭证上传文件至专业版应用的存储桶。
假设专业版应用 ID 为
1234567890 ,存储桶的存储地域为 ap-guangzhou,存储桶 ID 为 bucketid1。本示例使用的存储桶访问域名为:
bucketid1.vodpro.ap-guangzhou.eovod.com。上传步骤
临时凭证通常用于对密钥安全性要求较高的场景。服务端使用临时凭证上传文件至专业版存储示意图如下:
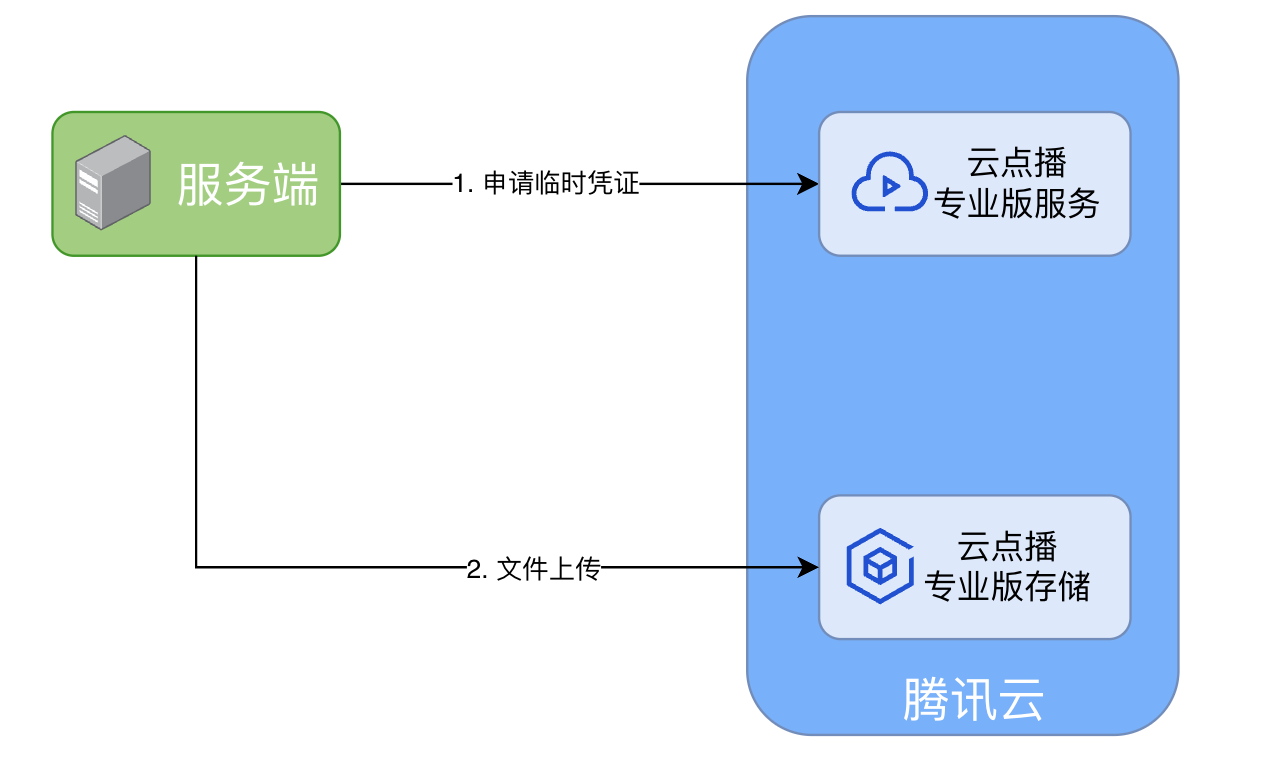
1. 申请上传临时凭证:服务端调用云点播专业版服务的 创建应用存储临时访问凭证 接口。
2. 上传文件:服务端使用临时凭证上传文件至云点播专业版存储。
准备工作
1. 创建专业版应用和存储桶
2. 获取腾讯云账号永久密钥对
2.1 登录腾讯云控制台,选择访问管理 > 访问密钥 > API 密钥管理,进入“API 密钥管理” 页面。
2.2 获取云 API 密钥。如果您尚未创建密钥,则单击新建密钥即可创建一对
SecretId 和 SecretKey。上传文件
申请上传临时凭证
申请
bucketid1存储桶上传 upload/demo.mp4的临时凭证。// Package mainpackage mainimport ("context""encoding/json""fmt""log""net/url""github.com/tencentcloud/tencentcloud-sdk-go/tencentcloud/common""github.com/tencentcloud/tencentcloud-sdk-go/tencentcloud/common/profile"vod20240718 "github.com/tencentcloud/tencentcloud-sdk-go/tencentcloud/vod/v20240718")const (appId = 251000000 // 腾讯云账号 APPIDsubAppId = 1234567890 // 云点播专业版应用 APPIDbucketId = "bucketid1" // 云点播专业版应用存储桶的 IDfileKey = "upload/demo.mp4" // 上传到存储后的文件 KEY,包含完整路径和文件名,例如 upload/demo.mp4)// createStorageCredentialsPolicy 创建存储凭证策略type createStorageCredentialsPolicy struct {Statement []policyStatement `json:"statement"`Version string `json:"version"`}// policyStatement 策略语句type policyStatement struct {Action []string `json:"action"`Effect string `json:"effect"`Resource []string `json:"resource"`}// cred 临时凭证type cred struct {AccessKeyId stringSecretAccessKey stringSessionToken string}// getCredential 获取临时凭证func getCredential(context.Context) (*cred, error) {// 1. 获取临时凭证// 1.1 初始化调用腾讯云 API 对象credential := common.NewCredential("SecretId", // 腾讯云账号 SecretId"SecretKey", // 腾讯云账号 SecretKey)prof := profile.NewClientProfile()vodClient, err := vod20240718.NewClient(credential, "ap-guangzhou", prof)if err != nil {log.Fatalf("create VOD client fail: %+v", err)return nil, fmt.Errorf("create VOD client fail: %w", err)}// 1.2 构造申请上传临时凭证请求policy := createStorageCredentialsPolicy{Statement: []policyStatement{{Action: []string{ // 当前仅支持如下 action,可以只申请其中一部分"name/vod:PutObject","name/vod:ListParts","name/vod:PostObject","name/vod:CreateMultipartUpload","name/vod:UploadPart","name/vod:CompleteMultipartUpload","name/vod:AbortMultipartUpload","name/vod:ListMultipartUploads",},Effect: "allow",Resource: []string{fmt.Sprintf("qcs::vod:%s:uid/%d:prefix//%d/%s/%s","ap-guangzhou", // 存储桶所在地域appId, // 腾讯云账号 APPIDsubAppId, // 云点播专业版应用 APPIDbucketId, // 云点播专业版应用存储桶的 IDfileKey, // 上传到存储后的文件 KEY,包含完整路径和文件名,例如 upload/demo.mp4),},}},Version: "2.0",}req := vod20240718.NewCreateStorageCredentialsRequest()req.SubAppId = common.Uint64Ptr(subAppId)policyStr, _ := json.Marshal(policy)req.Policy = common.StringPtr(url.QueryEscape(string(policyStr)))// 1.3 申请上传临时凭证resp, err := vodClient.CreateStorageCredentials(req)if err != nil {log.Fatalf("create storage credentials fail: %+v", err)return nil, fmt.Errorf("create storage credentials fail: %w", err)}log.Printf("create storage credentials success: %+v", resp)creds := resp.Response.Credentialsreturn &cred{AccessKeyId: *creds.AccessKeyId,SecretAccessKey: *creds.SecretAccessKey,SessionToken: *creds.SessionToken,}, nil}
import com.tencentcloudapi.common.Credential;import com.tencentcloudapi.common.exception.TencentCloudSDKException;import com.tencentcloudapi.common.profile.ClientProfile;import com.tencentcloudapi.vod.v20240718.VodClient;import com.tencentcloudapi.vod.v20240718.models.CreateStorageCredentialsRequest;import com.tencentcloudapi.vod.v20240718.models.CreateStorageCredentialsResponse;import org.json.JSONArray;import org.json.JSONObject;import java.net.URLEncoder;import java.nio.charset.StandardCharsets;/*** 凭证辅助类,负责获取临时存储凭证*/public class CredentialHelper {// 常量定义private static final long APP_ID = 251000000; // 腾讯云账号 APPIDprivate static final long SUB_APP_ID = 1234567890; // 云点播专业版应用 APPIDprivate static final String BUCKET_ID = "bucketid1"; // 云点播专业版应用存储桶的 IDprivate static final String FILE_KEY = "upload/demo.mp4"; // 上传到存储后的文件 KEYprivate static final String REGION = "ap-guangzhou"; // 存储桶所在地域/*** 凭证对象,存储临时凭证信息*/public static class Cred {private final String accessKeyId;private final String secretAccessKey;private final String sessionToken;public Cred(String accessKeyId, String secretAccessKey, String sessionToken) {this.accessKeyId = accessKeyId;this.secretAccessKey = secretAccessKey;this.sessionToken = sessionToken;}public String getAccessKeyId() {return accessKeyId;}public String getSecretAccessKey() {return secretAccessKey;}public String getSessionToken() {return sessionToken;}}/*** 获取临时凭证** @return 临时凭证对象* @throws Exception 如果获取凭证失败*/public static Cred getCredential() throws Exception {try {// 1. 初始化腾讯云 API 客户端Credential credential = new Credential("SecretId", "SecretKey"); // 腾讯云账号 SecretId 和 SecretKeyClientProfile clientProfile = new ClientProfile(); // 客户端配置VodClient vodClient = new VodClient(credential, "ap-guangzhou", clientProfile); // 创建 VodClient 对象// 2. 构造并编码策略String policyJson = createPolicyJson();String encodedPolicy = URLEncoder.encode(policyJson, StandardCharsets.UTF_8.name());// 3. 创建并发送请求CreateStorageCredentialsRequest req = new CreateStorageCredentialsRequest();req.setSubAppId(SUB_APP_ID); // 云点播专业版应用 APPIDreq.setPolicy(encodedPolicy); // 策略// 4. 获取响应并返回凭证CreateStorageCredentialsResponse resp = vodClient.CreateStorageCredentials(req);return new Cred(resp.getCredentials().getAccessKeyId(),resp.getCredentials().getSecretAccessKey(),resp.getCredentials().getSessionToken());} catch (TencentCloudSDKException e) {System.err.println("获取存储凭证失败: " + e.getMessage());throw new Exception("获取存储凭证失败", e);}}/*** 创建策略JSON字符串,使用 org.json 库** @return 策略JSON字符串*/private static String createPolicyJson() {// 构建资源路径String resource = String.format("qcs::vod:%s:uid/%d:prefix//%d/%s/%s",REGION,APP_ID,SUB_APP_ID,BUCKET_ID,FILE_KEY);// 构建操作列表String[] actions = {"name/vod:PutObject","name/vod:ListParts","name/vod:PostObject","name/vod:CreateMultipartUpload","name/vod:UploadPart","name/vod:CompleteMultipartUpload","name/vod:AbortMultipartUpload","name/vod:ListMultipartUploads"};// 使用 JSONObject 构建 JSONJSONObject policy = new JSONObject();policy.put("version", "2.0");JSONArray statements = new JSONArray();JSONObject statement = new JSONObject();JSONArray actionArray = new JSONArray();for (String action : actions) {actionArray.put(action);}statement.put("action", actionArray);statement.put("effect", "allow");JSONArray resources = new JSONArray();resources.put(resource);statement.put("resource", resources);statements.put(statement);policy.put("statement", statements);return policy.toString();}}
#include <tencentcloud/core/TencentCloud.h>#include <tencentcloud/core/profile/ClientProfile.h>#include <tencentcloud/core/profile/HttpProfile.h>#include <tencentcloud/core/Credential.h>#include <tencentcloud/vod/v20240718/VodClient.h>#include <tencentcloud/vod/v20240718/model/CreateStorageCredentialsRequest.h>#include <tencentcloud/vod/v20240718/model/CreateStorageCredentialsResponse.h>#include <string>#include <sstream>#include <iomanip>#include <iostream>#include <nlohmann/json.hpp>using json = nlohmann::json;const uint64_t APP_ID = 251000000; // 腾讯云账号 APPIDconst uint64_t SUB_APP_ID = 1234567890; // 云点播专业版应用 APPIDconst std::string BUCKET_ID = "bucketid1"; // 云点播专业版应用存储桶的 IDconst std::string REGION = "ap-guangzhou"; // 云点播专业版应用存储桶地域const std::string OBJECT_KEY = "upload/demo.mp4"; // 申请权限的存储文件 KEY// 凭证结构体struct Credential{std::string accessKeyId;std::string secretAccessKey;std::string sessionToken;};// URL 编码函数std::string UrlEncode(const std::string &value){std::ostringstream escaped;escaped.fill('0');escaped << std::hex;for (char c : value){if (isalnum(c) || c == '-' || c == '_' || c == '.' || c == '~'){escaped << c;}else{escaped << std::uppercase;escaped << '%' << std::setw(2) << int((unsigned char)c);escaped << std::nouppercase;}}return escaped.str();}// 获取临时凭证Credential GetCredential(){// 初始化腾讯云 SDKTencentCloud::InitAPI();// 创建 VOD 客户端TencentCloud::Credential credential("SecretId", "SecretKey"); // 填入腾讯云账号 SecretId 和 SecretKeyTencentCloud::HttpProfile httpProfile;TencentCloud::ClientProfile clientProfile;clientProfile.SetHttpProfile(httpProfile);TencentCloud::Vod::V20240718::VodClient client(credential, "ap-guangzhou", clientProfile);// 构建策略json policy_json = {{"statement", {{{"action", {"name/vod:PutObject", "name/vod:ListParts", "name/vod:PostObject", "name/vod:CreateMultipartUpload", "name/vod:UploadPart", "name/vod:CompleteMultipartUpload", "name/vod:AbortMultipartUpload", "name/vod:ListMultipartUploads"}}, {"effect", "allow"}, {"resource", {"qcs::vod:" + REGION + ":uid/" + std::to_string(APP_ID) + ":prefix//" + std::to_string(SUB_APP_ID) + "/" + BUCKET_ID + "/" + OBJECT_KEY}}}}},{"version", "2.0"}};std::string policy = policy_json.dump();// 创建请求对象TencentCloud::Vod::V20240718::Model::CreateStorageCredentialsRequest req;req.SetSubAppId(SUB_APP_ID);req.SetPolicy(UrlEncode(policy));// 发送请求auto outcome = client.CreateStorageCredentials(req);if (!outcome.IsSuccess()){std::cerr << "Failed to get storage credentials: " << outcome.GetError().GetErrorMessage() << std::endl;TencentCloud::ShutdownAPI();exit(1);}// 提取凭证auto response = outcome.GetResult();auto creds = response.GetCredentials();Credential result;result.accessKeyId = creds.GetAccessKeyId();result.secretAccessKey = creds.GetSecretAccessKey();result.sessionToken = creds.GetSessionToken();// 清理腾讯云 SDKTencentCloud::ShutdownAPI();return result;}
#!/usr/bin/env python3# -*- coding: utf-8 -*-import jsonimport urllib.parsefrom typing import NamedTuplefrom tencentcloud.common import credentialfrom tencentcloud.common.profile import client_profilefrom tencentcloud.vod.v20240718 import vod_client, models# 常量定义APP_ID = 251000000 # 腾讯云账号 APPIDSUB_APP_ID = 1234567890 # 云点播专业版应用 APPIDBUCKET_ID = "bucketid1" # 云点播专业版应用存储桶的 IDOBJECT_KEY = "upload/demo.mp4" # 上传到存储后的文件 KEYREGION = "ap-guangzhou" # 地域class Credential(NamedTuple):"""临时凭证"""access_key_id: strsecret_access_key: strsession_token: strdef get_credential() -> Credential:"""获取临时凭证"""# 1. 初始化调用腾讯云 API 对象cred = credential.Credential("SecretId", # 腾讯云账号 SecretId"SecretKey", # 腾讯云账号 SecretKey)prof = client_profile.ClientProfile()vod_cli = vod_client.VodClient(cred, "ap-guangzhou", prof)# 2. 构造申请上传临时凭证请求policy = {"statement": [{"action": ["name/vod:PutObject","name/vod:ListParts","name/vod:PostObject","name/vod:CreateMultipartUpload","name/vod:UploadPart","name/vod:CompleteMultipartUpload","name/vod:AbortMultipartUpload","name/vod:ListMultipartUploads",],"effect": "allow","resource": [f"qcs::vod:{REGION}:uid/{APP_ID}:prefix//{SUB_APP_ID}/{BUCKET_ID}/{OBJECT_KEY}"],}],"version": "2.0",}req = models.CreateStorageCredentialsRequest()req.SubAppId = SUB_APP_IDreq.Policy = urllib.parse.quote(json.dumps(policy))# 3. 申请上传临时凭证resp = vod_cli.CreateStorageCredentials(req)creds = resp.Credentialsreturn Credential(access_key_id=creds.AccessKeyId,secret_access_key=creds.SecretAccessKey,session_token=creds.SessionToken,)
文件上传
常用语言初始化 S3 客户端并上传文件至存储桶,代码实现如下所示:
// Package main// 本示例基于 AWS SDK for Go v2 service/s3 v1.72.3 实现。// AWS SDK for Go v2 service/s3 v1.73.0 及以后版本需禁用 S3 的默认完整性保护。// 具体参考: https://github.com/aws/aws-sdk-go-v2/discussions/2960package mainimport ("context""errors""fmt""log""net/url""os""github.com/aws/aws-sdk-go-v2/aws""github.com/aws/aws-sdk-go-v2/credentials""github.com/aws/aws-sdk-go-v2/feature/s3/manager""github.com/aws/aws-sdk-go-v2/service/s3"smep "github.com/aws/smithy-go/endpoints""github.com/aws/smithy-go/logging")type customEndpointResolverV2 struct {}// ResolveEndpoint 自定义接入点func (r *customEndpointResolverV2) ResolveEndpoint(ctx context.Context,params s3.EndpointParameters) (smep.Endpoint, error) {if params.Bucket == nil || params.Region == nil {return smep.Endpoint{}, errors.New("invalid endpoint param")}return smep.Endpoint{URI: url.URL{Scheme: "https",Host: fmt.Sprintf("%s.vodpro.ap-guangzhou.eovod.com",*params.Bucket, // 填入点播专业版应用中的存储桶 ID),},}, nil}func main() {// 1. 获取临时凭证cred, err := getCredential(context.Background())if err != nil {log.Fatalf("get credential fail: %v", err)return}// 2. 使用临时凭证上传文件// 2.1 创建 s3 clients3cli := s3.New(s3.Options{Credentials: credentials.NewStaticCredentialsProvider(cred.AccessKeyId, // 填入临时凭证中的 AccessKeyIdcred.SecretAccessKey, // 填入临时凭证中的 SecretAccessKeycred.SessionToken, // 填入临时凭证中的 SessionToken),EndpointResolverV2: new(customEndpointResolverV2), // 自定义接入点UsePathStyle: false, // 请求禁用 path styleLogger: logging.NewStandardLogger(os.Stdout), // 日志打印到标准输出流ClientLogMode: aws.LogRequest | aws.LogResponse, // 打印请求头和响应头Region: "auto", // 固定填写 auto})// 2.2 打开本地文件file, err := os.Open("demo.mp4") // 本地文件路径if err != nil {log.Fatalf("failed to open file: %v", err)return}defer file.Close()// 2.3 上传文件到 S3// 2.3.1 创建上传器uploader := manager.NewUploader(s3cli, func(u *manager.Uploader) {u.PartSize = 10 * 1024 * 1024 // 设置分片大小为 10MBu.Concurrency = 5 // 设置并发上传的分片数})// 2.3.2 上传文件result, err := uploader.Upload(context.TODO(), &s3.PutObjectInput{Bucket: aws.String(bucketId), // Bucket 设置为点播专业版应用中的存储桶 IDKey: aws.String(fileKey), // 媒体文件在存储桶中的路径Body: file,})if err != nil {log.Fatalf("failed to upload file: %v", err)return}log.Printf("etag: %s", *result.ETag) // 获取上传文件 etag}
// 本示例基于 AWS SDK for Java v2 service/s3 v2.31.35 实现。// AWS SDK for Java 2.30.0 及以后版本需禁用 S3 的默认完整性保护。// 具体参考: https://github.com/aws/aws-sdk-java-v2/issues/5801import software.amazon.awssdk.auth.credentials.AwsBasicCredentials;import software.amazon.awssdk.auth.credentials.AwsCredentials;import software.amazon.awssdk.auth.credentials.AwsSessionCredentials;import software.amazon.awssdk.auth.credentials.StaticCredentialsProvider;import software.amazon.awssdk.http.nio.netty.NettyNioAsyncHttpClient;import software.amazon.awssdk.regions.Region;import software.amazon.awssdk.services.s3.S3AsyncClient;import software.amazon.awssdk.services.s3.S3Configuration;import software.amazon.awssdk.transfer.s3.S3TransferManager;import software.amazon.awssdk.transfer.s3.model.UploadFileRequest;import software.amazon.awssdk.transfer.s3.progress.LoggingTransferListener;import software.amazon.awssdk.core.checksums.RequestChecksumCalculation;import software.amazon.awssdk.core.checksums.ResponseChecksumValidation;import java.io.File;import java.net.URI;import java.util.concurrent.CompletableFuture;public class Main {public static void main(String[] args) {S3AsyncClient s3AsyncClient = null;S3TransferManager transferManager = null;try {// 1. 获取临时凭证CredentialHelper.Cred cred = CredentialHelper.getCredential();System.out.println("获取临时凭证成功, AccessKeyId: " + cred.getAccessKeyId());// 2. 创建会话凭证(包含临时 token)AwsSessionCredentials sessionCredentials = AwsSessionCredentials.create(cred.getAccessKeyId(), // 临时凭证 AccessKeyIdcred.getSecretAccessKey(), // 临时凭证 SecretAccessKeycred.getSessionToken() // 临时凭证 SessionToken);String region = "ap-guangzhou"; // 专业版应用存储桶地域String bucketId = "bucketid1"; // 专业版应用存储桶IDString filePath = "demo.mp4"; // 本地文件路径String key = "upload/demo.mp4"; // 文件在存储桶中的路径String endpointUrl = String.format("https://vodpro.%s.eovod.com", region); // 桶级别预置域名端点// 3. 使用自定义端点构建S3异步客户端s3AsyncClient = S3AsyncClient.builder().credentialsProvider(StaticCredentialsProvider.create(sessionCredentials)) // 设置凭证提供者.endpointOverride(URI.create(endpointUrl)) // 设置端点.region(Region.of("auto")) // 设置区域 auto 自动选择.httpClient(NettyNioAsyncHttpClient.builder().build()) // 设置HTTP客户端.serviceConfiguration(S3Configuration.builder().pathStyleAccessEnabled(false) // 设置路径样式访问, 桶级别需明确禁用 PathStyle 模式.build()).requestChecksumCalculation(RequestChecksumCalculation.WHEN_REQUIRED).responseChecksumValidation(ResponseChecksumValidation.WHEN_REQUIRED).build();// 4. 使用S3异步客户端创建S3TransferManagertransferManager = S3TransferManager.builder().s3Client(s3AsyncClient).build();// 5. 准备上传文件File fileToUpload = new File(filePath);if (!fileToUpload.exists()) {throw new RuntimeException("文件不存在: " + filePath);}// 6. 创建上传请求并添加传输监听器用于进度跟踪UploadFileRequest uploadRequest = UploadFileRequest.builder().putObjectRequest(builder -> builder.bucket(bucketId).key(key)).addTransferListener(LoggingTransferListener.create()).source(fileToUpload).build();// 7. 开始上传System.out.println("开始上传文件...");CompletableFuture<Void> future = transferManager.uploadFile(uploadRequest).completionFuture().thenAccept(response -> {System.out.println("上传成功! ETag: " + response.response().eTag());});// 8. 等待上传完成future.join();System.out.println("上传任务完成");} catch (Exception e) {System.err.println("上传失败: " + e.getMessage());e.printStackTrace();} finally {// 资源释放try {if (transferManager != null) {transferManager.close();}if (s3AsyncClient != null) {s3AsyncClient.close();}System.out.println("资源已释放");} catch (Exception e) {System.err.println("关闭资源时发生错误: " + e.getMessage());}}}}
// 本示例基于 AWS SDK for C++ v1.11.560 实现。// AWS SDK for C++ v1.11.486 及以后版本需禁用 S3 的默认完整性保护。// 具体参考: https://github.com/aws/aws-sdk-cpp/issues/3253#include <aws/core/Aws.h>#include <aws/core/auth/AWSCredentials.h>#include <aws/core/client/ClientConfiguration.h>#include <aws/s3/S3Client.h>#include <aws/transfer/TransferManager.h>#include <iostream>#include <string>// 引用 get_cred.cpp 中定义的凭证结构体struct Credential{std::string accessKeyId;std::string secretAccessKey;std::string sessionToken;};// 引用 get_cred.cpp 中定义的函数extern Credential GetCredential();int main(){// AWS SDK 初始化Aws::SDKOptions options;options.loggingOptions.logLevel = Aws::Utils::Logging::LogLevel::Info;Aws::InitAPI(options);{// 获取临时凭证std::cout << "Getting temporary credentials..." << std::endl;Credential cred = GetCredential();std::cout << "Successfully obtained temporary credentials, access key Id: " << cred.accessKeyId << std::endl;// 定义端点信息const Aws::String region = "ap-guangzhou"; // 云点播专业版应用存储桶所在地域const Aws::String bucketId = "bucketid1"; // 云点播专业版应用存储桶的 IDconst Aws::String keyName = "upload/demo.mp4"; // 文件在存储桶中的路径const Aws::String filePath = "demo.mp4"; // 本地文件路径// 配置客户端Aws::Client::ClientConfiguration clientConfig;clientConfig.region = "auto"; // 固定填写 autoclientConfig.scheme = Aws::Http::Scheme::HTTPS; // 协议使用 HTTPSclientConfig.enableEndpointDiscovery = false; // 禁用 endpoint discoveryclientConfig.verifySSL = true; // 启用 SSL 证书验证clientConfig.endpointOverride = "vodpro." + region + ".eovod.com"; // 桶级别预置域名// 禁用完整性校验clientConfig.checksumConfig.requestChecksumCalculation = Aws::Client::RequestChecksumCalculation::WHEN_REQUIRED;clientConfig.checksumConfig.responseChecksumValidation = Aws::Client::ResponseChecksumValidation::WHEN_REQUIRED;// 设置认证信息(使用临时凭证)Aws::Auth::AWSCredentials credentials(cred.accessKeyId.c_str(),cred.secretAccessKey.c_str(),cred.sessionToken.c_str());// 创建 S3 客户端auto s3Client = Aws::MakeShared<Aws::S3::S3Client>("S3Client",credentials,clientConfig,Aws::Client::AWSAuthV4Signer::PayloadSigningPolicy::Never, // 禁用 payload signingtrue // 桶级别预置域名需明确使用 VirtualAddressing);// 创建线程池执行器auto executor = Aws::MakeShared<Aws::Utils::Threading::PooledThreadExecutor>("executor", 10);// 配置 TransferManagerAws::Transfer::TransferManagerConfiguration transferConfig(executor.get());transferConfig.s3Client = s3Client;// 设置分片大小为 10MBtransferConfig.bufferSize = 10 * 1024 * 1024;// 创建 TransferManagerauto transferManager = Aws::Transfer::TransferManager::Create(transferConfig);std::cout << "Starting file upload: " << filePath << " to " << bucketId << "/" << keyName << std::endl;// 执行上传auto uploadHandle = transferManager->UploadFile(filePath, // 本地文件路径bucketId, // 存储桶IDkeyName, // 对象键(存储路径)"application/octet-stream", // 内容类型Aws::Map<Aws::String, Aws::String>() // 元数据);// 等待上传完成uploadHandle->WaitUntilFinished();// 检查上传状态if (uploadHandle->GetStatus() == Aws::Transfer::TransferStatus::COMPLETED){std::cout << "File upload completed successfully!" << std::endl;}else{auto lastError = uploadHandle->GetLastError();std::cerr << "File upload failed: " << lastError.GetMessage() << std::endl;}}// 清理SDK资源Aws::ShutdownAPI(options);return 0;}
#!/usr/bin/env python3# -*- coding: utf-8 -*-"""本示例基于 AWS SDK for Python v1.38.7 实现。Boto3 的 AWS SDK for Python v1.36.0 及以后版本需禁用 S3 的默认完整性保护。具体参考: https://github.com/boto/boto3/issues/4392"""import boto3from botocore.config import Configfrom botocore.exceptions import ClientErrorfrom get_cred import get_credential, REGION, BUCKET_ID, OBJECT_KEY# 常量定义FILE_PATH = "demo.mp4"try:# 1. 获取临时凭证cred = get_credential()# 2. 创建 S3 客户端s3_client = boto3.client("s3",aws_access_key_id=cred.access_key_id, # 临时凭证的 AccessKeyIdaws_secret_access_key=cred.secret_access_key, # 临时凭证的 SecretAccessKeyaws_session_token=cred.session_token, # 临时凭证的 SessionTokenendpoint_url=f"https://vodpro.{REGION}.eovod.com", # 桶级别预置上传域名region_name="auto", # 固定填写 autoconfig=Config(s3={"addressing_style": "virtual"}, # 使用 virtual hosted-stylerequest_checksum_calculation="when_required", # Boto3 的 AWS SDK for Python v1.36.0 及以后版本需禁用 S3 的默认完整性保护。response_checksum_validation="when_required", # Boto3 的 AWS SDK for Python v1.36.0 及以后版本需禁用 S3 的默认完整性保护。),)# 3. 上传文件response = s3_client.upload_file(Bucket=BUCKET_ID, # 填入点播专业版应用中的存储桶 IDKey=OBJECT_KEY, # 文件在存储桶中的路径Filename=FILE_PATH, # 本地文件路径)print(response)except ClientError as e:print(f"Error: {e}")
注意:
使用 AWS SDK 请确认数据完整性保护特性,详情请参考 AWS SDK 的相关文档 Data Integrity Protections for Amazon S3。
使用存储桶预置公网域名,路径必须为 VirtualStyle 格式。
应用预置域名
专业版为每个应用预置了一个公网上传加速域名,可使用该域名上传至应用内所有存储桶。
使用临时凭证通过 AWS S3 SDK 上传文件
下面介绍在常用的编程语言中,如何进行适配以上传文件至专业版应用的存储桶。
假设专业版应用 ID 为
1234567890 ,存储桶的存储地域为 ap-guangzhou,存储桶 ID 为 bucketid1。示例使用的应用上传加速域名为:1234567890.vodpro-upload.com。准备工作
1. 创建专业版应用和存储桶
2. 获取腾讯云账号永久密钥对
2.1 登录腾讯云控制台,选择访问管理 > 访问密钥 > API 密钥管理,进入“API 密钥管理” 页面。
2.2 获取云 API 密钥。如果您尚未创建密钥,则单击新建密钥即可创建一对
SecretId 和 SecretKey。上传示例
申请上传临时凭证
// Package mainpackage mainimport ("context""encoding/json""fmt""log""net/url""github.com/tencentcloud/tencentcloud-sdk-go/tencentcloud/common""github.com/tencentcloud/tencentcloud-sdk-go/tencentcloud/common/profile"vod20240718 "github.com/tencentcloud/tencentcloud-sdk-go/tencentcloud/vod/v20240718")const (appId = 251000000 // 腾讯云账号 APPIDsubAppId = 1234567890 // 云点播专业版应用 APPIDfileKey = "upload/demo.mp4" // 申请权限的存储文件 KEY,包含完整路径和文件名,例如 upload/demo.mp4bucketId = "auto" // 云点播专业版应用存储桶的 ID,auto 表示自动就近选择存储桶region = "auto" // 云点播专业版应用存储桶地域,auto 表示自动就近选择地域)// createStorageCredentialsPolicy 创建存储凭证策略type createStorageCredentialsPolicy struct {Statement []policyStatement `json:"statement"`Version string `json:"version"`}// policyStatement 策略语句type policyStatement struct {Action []string `json:"action"`Effect string `json:"effect"`Resource []string `json:"resource"`}// cred 临时凭证type cred struct {AccessKeyId stringSecretAccessKey stringSessionToken string}// getCredential 获取临时凭证func getCredential(context.Context) (*cred, error) {// 1. 获取临时凭证// 1.1 初始化调用腾讯云 API 对象credential := common.NewCredential("SecretId", // 腾讯云账号 SecretId"SecretKey", // 腾讯云账号 SecretKey)prof := profile.NewClientProfile()vodClient, err := vod20240718.NewClient(credential, "ap-guangzhou", prof)if err != nil {log.Fatalf("create VOD client fail: %+v", err)return nil, fmt.Errorf("create VOD client fail: %w", err)}// 1.2 构造申请上传临时凭证请求policy := createStorageCredentialsPolicy{Statement: []policyStatement{{Action: []string{ // 当前仅支持如下 action,可以只申请其中一部分"name/vod:PutObject","name/vod:ListParts","name/vod:PostObject","name/vod:InitiateMultipartUpload","name/vod:UploadPart","name/vod:CompleteMultipartUpload","name/vod:AbortMultipartUpload","name/vod:ListMultipartUploads",},Effect: "allow",Resource: []string{fmt.Sprintf("qcs::vod:%s:uid/%d:prefix//%d/%s/%s",region, // 就近地域上传appId, // 腾讯云账号 APPIDsubAppId, // 云点播专业版应用 APPIDbucketId, // 就近地域的存储桶fileKey, // 上传到存储后的文件 KEY,包含完整路径和文件名,例如 upload/demo.mp4),},}},Version: "2.0",}req := vod20240718.NewCreateStorageCredentialsRequest()req.SubAppId = common.Uint64Ptr(subAppId)policyStr, _ := json.Marshal(policy)req.Policy = common.StringPtr(url.QueryEscape(string(policyStr)))// 1.3 申请上传临时凭证resp, err := vodClient.CreateStorageCredentials(req)if err != nil {log.Fatalf("create storage credentials fail: %+v", err)return nil, fmt.Errorf("create storage credentials fail: %w", err)}log.Printf("create storage credentials success: %+v", resp)creds := resp.Response.Credentialsreturn &cred{AccessKeyId: *creds.AccessKeyId,SecretAccessKey: *creds.SecretAccessKey,SessionToken: *creds.SessionToken,}, nil}
import com.tencentcloudapi.common.Credential;import com.tencentcloudapi.common.exception.TencentCloudSDKException;import com.tencentcloudapi.common.profile.ClientProfile;import com.tencentcloudapi.vod.v20240718.VodClient;import com.tencentcloudapi.vod.v20240718.models.CreateStorageCredentialsRequest;import com.tencentcloudapi.vod.v20240718.models.CreateStorageCredentialsResponse;import org.json.JSONArray;import org.json.JSONObject;import java.net.URLEncoder;import java.nio.charset.StandardCharsets;/*** 凭证辅助类,负责获取临时存储凭证*/public class CredentialHelper {// 常量定义private static final long APP_ID = 251000000; // 腾讯云账号 APPIDprivate static final long SUB_APP_ID = 1234567890; // 云点播专业版应用 APPIDprivate static final String BUCKET_ID = "auto"; // 云点播专业版应用存储桶的 ID,auto 表示自动就近选择存储桶private static final String FILE_KEY = "upload/demo.mp4"; // 申请权限的存储文件 KEY,包含完整路径和文件名,例如 upload/demo.mp4private static final String REGION = "auto"; // 云点播专业版应用存储桶地域,auto 表示自动就近选择地域/*** 凭证对象,存储临时凭证信息*/public static class Cred {private final String accessKeyId;private final String secretAccessKey;private final String sessionToken;public Cred(String accessKeyId, String secretAccessKey, String sessionToken) {this.accessKeyId = accessKeyId;this.secretAccessKey = secretAccessKey;this.sessionToken = sessionToken;}public String getAccessKeyId() {return accessKeyId;}public String getSecretAccessKey() {return secretAccessKey;}public String getSessionToken() {return sessionToken;}}/*** 获取临时凭证** @return 临时凭证对象* @throws Exception 如果获取凭证失败*/public static Cred getCredential() throws Exception {try {// 1. 初始化腾讯云 API 客户端Credential credential = new Credential("SecretId", "SecretKey"); // 腾讯云账号 SecretId 和 SecretKeyClientProfile clientProfile = new ClientProfile(); // 客户端配置VodClient vodClient = new VodClient(credential, "ap-guangzhou", clientProfile); // 创建 VodClient 对象// 2. 构造并编码策略String policyJson = createPolicyJson();String encodedPolicy = URLEncoder.encode(policyJson, StandardCharsets.UTF_8.name());// 3. 创建并发送请求CreateStorageCredentialsRequest req = new CreateStorageCredentialsRequest();req.setSubAppId(SUB_APP_ID); // 云点播专业版应用 APPIDreq.setPolicy(encodedPolicy); // 策略// 4. 获取响应并返回凭证CreateStorageCredentialsResponse resp = vodClient.CreateStorageCredentials(req);return new Cred(resp.getCredentials().getAccessKeyId(),resp.getCredentials().getSecretAccessKey(),resp.getCredentials().getSessionToken());} catch (TencentCloudSDKException e) {System.err.println("获取存储凭证失败: " + e.getMessage());throw new Exception("获取存储凭证失败", e);}}/*** 创建策略JSON字符串,使用 org.json 库** @return 策略JSON字符串*/private static String createPolicyJson() {// 构建资源路径String resource = String.format("qcs::vod:%s:uid/%d:prefix//%d/%s/%s",REGION,APP_ID,SUB_APP_ID,BUCKET_ID,FILE_KEY);// 构建操作列表String[] actions = {"name/vod:PutObject","name/vod:ListParts","name/vod:PostObject","name/vod:CreateMultipartUpload","name/vod:UploadPart","name/vod:CompleteMultipartUpload","name/vod:AbortMultipartUpload","name/vod:ListMultipartUploads"};// 使用 JSONObject 构建 JSONJSONObject policy = new JSONObject();policy.put("version", "2.0");JSONArray statements = new JSONArray();JSONObject statement = new JSONObject();JSONArray actionArray = new JSONArray();for (String action : actions) {actionArray.put(action);}statement.put("action", actionArray);statement.put("effect", "allow");JSONArray resources = new JSONArray();resources.put(resource);statement.put("resource", resources);statements.put(statement);policy.put("statement", statements);return policy.toString();}}
#include <tencentcloud/core/TencentCloud.h>#include <tencentcloud/core/profile/ClientProfile.h>#include <tencentcloud/core/profile/HttpProfile.h>#include <tencentcloud/core/Credential.h>#include <tencentcloud/vod/v20240718/VodClient.h>#include <tencentcloud/vod/v20240718/model/CreateStorageCredentialsRequest.h>#include <tencentcloud/vod/v20240718/model/CreateStorageCredentialsResponse.h>#include <string>#include <sstream>#include <iomanip>#include <iostream>#include <nlohmann/json.hpp>using json = nlohmann::json;// 常量定义const uint64_t APP_ID = 251000000; // 腾讯云账号 APPIDconst uint64_t SUB_APP_ID = 1234567890; // 云点播专业版应用 APPIDconst std::string BUCKET_ID = "auto"; // 云点播专业版应用存储桶的 ID,auto 表示自动就近选择存储桶const std::string REGION = "auto"; // 云点播专业版应用存储桶地域,auto 表示自动就近选择地域const std::string OBJECT_KEY = "upload/demo.mp4"; // 申请权限的存储文件 KEY,包含完整路径和文件名,例如 upload/demo.mp4// 凭证结构体struct Credential{std::string accessKeyId;std::string secretAccessKey;std::string sessionToken;};// URL 编码函数std::string UrlEncode(const std::string &value){std::ostringstream escaped;escaped.fill('0');escaped << std::hex;for (char c : value){if (isalnum(c) || c == '-' || c == '_' || c == '.' || c == '~'){escaped << c;}else{escaped << std::uppercase;escaped << '%' << std::setw(2) << int((unsigned char)c);escaped << std::nouppercase;}}return escaped.str();}// 获取临时凭证Credential GetCredential(){// 初始化腾讯云 SDKTencentCloud::InitAPI();// 创建 VOD 客户端TencentCloud::Credential credential("SecretId", "SecretKey"); // 填入腾讯云账号 SecretId 和 SecretKeyTencentCloud::HttpProfile httpProfile;TencentCloud::ClientProfile clientProfile;clientProfile.SetHttpProfile(httpProfile);TencentCloud::Vod::V20240718::VodClient client(credential, "ap-guangzhou", clientProfile);// 构建策略json policy_json = {{"statement", {{{"action", {"name/vod:PutObject", "name/vod:ListParts", "name/vod:PostObject", "name/vod:CreateMultipartUpload", "name/vod:UploadPart", "name/vod:CompleteMultipartUpload", "name/vod:AbortMultipartUpload", "name/vod:ListMultipartUploads"}}, {"effect", "allow"}, {"resource", {"qcs::vod:" + REGION + ":uid/" + std::to_string(APP_ID) + ":prefix//" + std::to_string(SUB_APP_ID) + "/" + BUCKET_ID + "/" + OBJECT_KEY}}}}},{"version", "2.0"}};std::string policy = policy_json.dump();// 创建请求对象TencentCloud::Vod::V20240718::Model::CreateStorageCredentialsRequest req;req.SetSubAppId(SUB_APP_ID);req.SetPolicy(UrlEncode(policy));// 发送请求auto outcome = client.CreateStorageCredentials(req);if (!outcome.IsSuccess()){std::cerr << "Failed to get storage credentials: " << outcome.GetError().GetErrorMessage() << std::endl;TencentCloud::ShutdownAPI();exit(1);}// 提取凭证auto response = outcome.GetResult();auto creds = response.GetCredentials();Credential result;result.accessKeyId = creds.GetAccessKeyId();result.secretAccessKey = creds.GetSecretAccessKey();result.sessionToken = creds.GetSessionToken();// 清理腾讯云 SDKTencentCloud::ShutdownAPI();return result;}
#!/usr/bin/env python3# -*- coding: utf-8 -*-import jsonimport urllib.parsefrom typing import NamedTuplefrom tencentcloud.common import credentialfrom tencentcloud.common.profile import client_profilefrom tencentcloud.vod.v20240718 import vod_client, models# 常量定义APP_ID = 251000000 # 腾讯云账号 APPIDSUB_APP_ID = 1234567890 # 云点播专业版应用 APPIDBUCKET_ID = "auto" # 云点播专业版应用存储桶的 ID, auto 表示自动就近选择存储桶OBJECT_KEY = "upload/demo.mp4" # 上传到存储后的文件 KEYREGION = "auto" # 地域 auto 表示自动就近选择地域class Credential(NamedTuple):"""临时凭证"""access_key_id: strsecret_access_key: strsession_token: strdef get_credential() -> Credential:"""获取临时凭证"""# 1. 初始化调用腾讯云 API 对象cred = credential.Credential("SecretId", # 腾讯云账号 SecretId"SecretKey", # 腾讯云账号 SecretKey)prof = client_profile.ClientProfile()vod_cli = vod_client.VodClient(cred, "ap-guangzhou", prof)# 2. 构造申请上传临时凭证请求policy = {"statement": [{"action": ["name/vod:PutObject","name/vod:ListParts","name/vod:PostObject","name/vod:CreateMultipartUpload","name/vod:UploadPart","name/vod:CompleteMultipartUpload","name/vod:AbortMultipartUpload","name/vod:ListMultipartUploads",],"effect": "allow","resource": [f"qcs::vod:{REGION}:uid/{APP_ID}:prefix//{SUB_APP_ID}/{BUCKET_ID}/{OBJECT_KEY}"],}],"version": "2.0",}req = models.CreateStorageCredentialsRequest()req.SubAppId = SUB_APP_IDreq.Policy = urllib.parse.quote(json.dumps(policy))# 3. 申请上传临时凭证resp = vod_cli.CreateStorageCredentials(req)creds = resp.Credentialsreturn Credential(access_key_id=creds.AccessKeyId,secret_access_key=creds.SecretAccessKey,session_token=creds.SessionToken,)
上传文件
常用语言初始化 S3 客户端并上传文件,代码实现如下所示:
// Package main// 本示例基于 AWS SDK for Go v2 service/s3 v1.72.3 实现。// AWS SDK for Go v2 service/s3 v1.73.0 及以后版本需禁用 S3 的默认完整性保护。// 具体参考: https://github.com/aws/aws-sdk-go-v2/discussions/2960package mainimport ("context""errors""fmt""log""net/url""os""github.com/aws/aws-sdk-go-v2/aws""github.com/aws/aws-sdk-go-v2/credentials""github.com/aws/aws-sdk-go-v2/feature/s3/manager""github.com/aws/aws-sdk-go-v2/service/s3"smep "github.com/aws/smithy-go/endpoints""github.com/aws/smithy-go/logging")type customEndpointResolverV2 struct {}// ResolveEndpoint 自定义接入点func (r *customEndpointResolverV2) ResolveEndpoint(ctx context.Context,params s3.EndpointParameters) (smep.Endpoint, error) {if params.Bucket == nil || params.Region == nil {return smep.Endpoint{}, errors.New("invalid endpoint param")}return smep.Endpoint{URI: url.URL{Scheme: "https",Host: fmt.Sprintf("%d.vodpro-upload.com",subAppId, // 子账号 Id),},}, nil}func main() {// 1. 获取临时凭证cred, err := getCredential(context.Background())if err != nil {log.Fatalf("get credential fail: %v", err)return}// 2. 使用临时凭证上传文件// 2.1 创建 s3 clients3cli := s3.New(s3.Options{Credentials: credentials.NewStaticCredentialsProvider(cred.AccessKeyId,cred.SecretAccessKey,cred.SessionToken,),EndpointResolverV2: new(customEndpointResolverV2), // 自定义接入点UsePathStyle: true, // 应用级别域名需明确请求启用 path style 模式Logger: logging.NewStandardLogger(os.Stdout), // 日志打印到标准输出流ClientLogMode: aws.LogRequest | aws.LogResponse, // 打印请求头和响应头Region: "auto", // 固定填写 "auto"})// 2.2 打开本地文件file, err := os.Open("demo.mp4") // 本地文件路径if err != nil {log.Fatalf("failed to open file: %v", err)return}defer file.Close()// 2.3 上传文件到 S3// 2.3.1 创建上传器uploader := manager.NewUploader(s3cli, func(u *manager.Uploader) {u.PartSize = 10 * 1024 * 1024 // 设置分片大小为 10MBu.Concurrency = 5 // 设置并发上传的分片数})// 应用级别上传上传路径为 bucketId/fileKey// S3 SDK Uploader 不支持 path style 模式,此处需拼接后作为上传 keypath, err := url.JoinPath(bucketId, fileKey)if err != nil {log.Fatalf("failed to join path: %v", err)return}// 2.3.2 上传文件result, err := uploader.Upload(context.TODO(), &s3.PutObjectInput{Bucket: aws.String(bucketId), // Bucket 设置为点播专业版应用中的存储桶 ID// 文件在存储桶中的路径// 应用级别上传上传路径为 bucketId/fileKey// S3 SDK Uploader 不支持 path style 模式,此处需拼接后作为上传 keyKey: aws.String(path),Body: file,})if err != nil {log.Fatalf("failed to upload file: %v", err)return}log.Printf("etag: %s", *result.ETag) // 获取上传文件 etag}
// 本示例基于 AWS SDK for Java v2 service/s3 v2.31.35 实现。// AWS SDK for Java 2.30.0 及以后版本需禁用 S3 的默认完整性保护。// 具体参考: https://github.com/aws/aws-sdk-java-v2/issues/5801import software.amazon.awssdk.auth.credentials.AwsBasicCredentials;import software.amazon.awssdk.auth.credentials.AwsCredentials;import software.amazon.awssdk.auth.credentials.AwsSessionCredentials;import software.amazon.awssdk.auth.credentials.StaticCredentialsProvider;import software.amazon.awssdk.http.nio.netty.NettyNioAsyncHttpClient;import software.amazon.awssdk.regions.Region;import software.amazon.awssdk.services.s3.S3AsyncClient;import software.amazon.awssdk.services.s3.S3Configuration;import software.amazon.awssdk.transfer.s3.S3TransferManager;import software.amazon.awssdk.transfer.s3.model.UploadFileRequest;import software.amazon.awssdk.transfer.s3.progress.LoggingTransferListener;import software.amazon.awssdk.core.checksums.RequestChecksumCalculation;import software.amazon.awssdk.core.checksums.ResponseChecksumValidation;import java.io.File;import java.net.URI;import java.util.concurrent.CompletableFuture;public class Main {public static void main(String[] args) {S3AsyncClient s3AsyncClient = null;S3TransferManager transferManager = null;try {// 1. 获取临时凭证CredentialHelper.Cred cred = CredentialHelper.getCredential();System.out.println("获取临时凭证成功, AccessKeyId: " + cred.getAccessKeyId());// 2. 创建会话凭证(包含临时 token)AwsSessionCredentials sessionCredentials = AwsSessionCredentials.create(cred.getAccessKeyId(), // 临时凭证 AccessKeyIdcred.getSecretAccessKey(), // 临时凭证 SecretAccessKeycred.getSessionToken() // 临时凭证 SessionToken);long subAppId = 1234567890; // 云点播专业版应用 APPIDString bucketId = "auto"; // 云点播专业版应用存储桶的 ID,auto 表示自动就近选择存储桶String filePath = "demo.mp4"; // 本地文件路径String key = "upload/demo.mp4"; // 申请权限的存储文件 KEY,包含完整路径和文件名,例如 upload/demo.mp4String endpointUrl = String.format("https://%d.vodpro-upload.com", subAppId); // 应用级别的预置域名端点// 3. 使用自定义端点构建S3异步客户端s3AsyncClient = S3AsyncClient.builder().credentialsProvider(StaticCredentialsProvider.create(sessionCredentials)) // 设置凭证提供者.endpointOverride(URI.create(endpointUrl)) // 设置端点.region(Region.of("auto")) // 固定填写 auto.httpClient(NettyNioAsyncHttpClient.builder().build()) // 设置HTTP客户端.serviceConfiguration(S3Configuration.builder().pathStyleAccessEnabled(true) // 设置路径样式访问, 应用级别需明确使用 PathStyle 模式.build()).requestChecksumCalculation(RequestChecksumCalculation.WHEN_REQUIRED).responseChecksumValidation(ResponseChecksumValidation.WHEN_REQUIRED).build();// 4. 使用S3异步客户端创建S3TransferManagertransferManager = S3TransferManager.builder().s3Client(s3AsyncClient).build();// 5. 准备上传文件File fileToUpload = new File(filePath);if (!fileToUpload.exists()) {throw new RuntimeException("文件不存在: " + filePath);}// 6. 创建上传请求并添加传输监听器用于进度跟踪UploadFileRequest uploadRequest = UploadFileRequest.builder().putObjectRequest(builder -> builder.bucket(bucketId).key(key)).addTransferListener(LoggingTransferListener.create()).source(fileToUpload).build();// 7. 开始上传System.out.println("开始上传文件...");CompletableFuture<Void> future = transferManager.uploadFile(uploadRequest).completionFuture().thenAccept(response -> {System.out.println("上传成功! ETag: " + response.response().eTag());});// 8. 等待上传完成future.join();System.out.println("上传任务完成");} catch (Exception e) {System.err.println("上传失败: " + e.getMessage());e.printStackTrace();} finally {// 资源释放try {if (transferManager != null) {transferManager.close();}if (s3AsyncClient != null) {s3AsyncClient.close();}System.out.println("资源已释放");} catch (Exception e) {System.err.println("关闭资源时发生错误: " + e.getMessage());}}}}
// 本示例基于 AWS SDK for C++ v1.11.560 实现。// AWS SDK for C++ v1.11.486 及以后版本需禁用 S3 的默认完整性保护。// 具体参考: https://github.com/aws/aws-sdk-cpp/issues/3253#include <aws/core/Aws.h>#include <aws/core/auth/AWSCredentials.h>#include <aws/core/client/ClientConfiguration.h>#include <aws/s3/S3Client.h>#include <aws/transfer/TransferManager.h>#include <iostream>#include <string>// 引用 get_cred.cpp 中定义的凭证结构体struct Credential{std::string accessKeyId;std::string secretAccessKey;std::string sessionToken;};// 引用 get_cred.cpp 中定义的函数extern Credential GetCredential();int main(){// AWS SDK 初始化Aws::SDKOptions options;options.loggingOptions.logLevel = Aws::Utils::Logging::LogLevel::Info;Aws::InitAPI(options);{// 获取临时凭证std::cout << "Getting temporary credentials..." << std::endl;Credential cred = GetCredential();std::cout << "Successfully obtained temporary credentials, access key Id: " << cred.accessKeyId << std::endl;// 定义常量const uint64_t subAppId = 1234567890; // 云点播专业版应用 SubAppIdconst Aws::String bucketId = "auto"; // 云点播专业版应用存储桶的 ID,auto 表示自动就近选择存储桶const Aws::String keyName = "upload/demo.mp4"; // 文件在存储桶中的路径,包含完整路径和文件名,例如 upload/demo.mp4const Aws::String filePath = "demo.mp4"; // 本地文件路径// 配置客户端Aws::Client::ClientConfiguration clientConfig;clientConfig.region = "auto"; // 固定填写 autoclientConfig.scheme = Aws::Http::Scheme::HTTPS; // 协议使用 HTTPSclientConfig.enableEndpointDiscovery = false; // 禁用 endpoint discoveryclientConfig.verifySSL = true; // 启用 SSL 证书验证clientConfig.endpointOverride = std::to_string(subAppId) + ".vodpro-upload.com"; // 应用级别预置域名// 禁用完整性校验clientConfig.checksumConfig.requestChecksumCalculation = Aws::Client::RequestChecksumCalculation::WHEN_REQUIRED;clientConfig.checksumConfig.responseChecksumValidation = Aws::Client::ResponseChecksumValidation::WHEN_REQUIRED;// 设置认证信息(使用临时凭证)Aws::Auth::AWSCredentials credentials(cred.accessKeyId.c_str(),cred.secretAccessKey.c_str(),cred.sessionToken.c_str());// 创建 S3 客户端auto s3Client = Aws::MakeShared<Aws::S3::S3Client>("S3Client",credentials,clientConfig,Aws::Client::AWSAuthV4Signer::PayloadSigningPolicy::Never, // 禁用 payload signingfalse // 应用级别预置域名需明确使用 PathStyle 格式);// 创建线程池执行器auto executor = Aws::MakeShared<Aws::Utils::Threading::PooledThreadExecutor>("executor", 10);// 配置 TransferManagerAws::Transfer::TransferManagerConfiguration transferConfig(executor.get());transferConfig.s3Client = s3Client;// 设置分片大小为 10MBtransferConfig.bufferSize = 10 * 1024 * 1024;// 创建 TransferManagerauto transferManager = Aws::Transfer::TransferManager::Create(transferConfig);std::cout << "Starting file upload: " << filePath << " to " << bucketId << "/" << keyName << std::endl;// 执行上传auto uploadHandle = transferManager->UploadFile(filePath, // 本地文件路径bucketId, // 存储桶IDkeyName, // 对象键(存储路径)"application/octet-stream", // 内容类型Aws::Map<Aws::String, Aws::String>() // 元数据);// 等待上传完成uploadHandle->WaitUntilFinished();// 检查上传状态if (uploadHandle->GetStatus() == Aws::Transfer::TransferStatus::COMPLETED){std::cout << "File upload completed successfully!" << std::endl;}else{auto lastError = uploadHandle->GetLastError();std::cerr << "File upload failed: " << lastError.GetMessage() << std::endl;}}// 清理SDK资源Aws::ShutdownAPI(options);return 0;}
#!/usr/bin/env python3# -*- coding: utf-8 -*-"""本示例基于 AWS SDK for Python v1.38.7 实现。Boto3 的 AWS SDK for Python v1.36.0 及以后版本需禁用 S3 的默认完整性保护。具体参考: https://github.com/boto/boto3/issues/4392"""import boto3from botocore.config import Configfrom botocore.exceptions import ClientErrorfrom get_cred import get_credential, SUB_APP_ID, BUCKET_ID, OBJECT_KEY# 常量定义FILE_PATH = "demo.mp4"try:# 1. 获取临时凭证cred = get_credential()# 2. 创建 S3 客户端s3_client = boto3.client("s3",aws_access_key_id=cred.access_key_id, # 临时凭证的 AccessKeyIdaws_secret_access_key=cred.secret_access_key, # 临时凭证的 SecretAccessKeyaws_session_token=cred.session_token, # 临时凭证的 SessionTokenendpoint_url=f"https://{SUB_APP_ID}.vodpro-upload.com", # 应用级别预置上传域名region_name="auto", # 固定填写 autoconfig=Config(s3={"addressing_style": "path"}, # 使用 path-stylerequest_checksum_calculation="when_required", # Boto3 的 AWS SDK for Python v1.36.0 及以后版本需禁用 S3 的默认完整性保护。response_checksum_validation="when_required", # Boto3 的 AWS SDK for Python v1.36.0 及以后版本需禁用 S3 的默认完整性保护。),)# 3. 上传文件response = s3_client.upload_file(Bucket=BUCKET_ID, # 填入点播专业版应用中的存储桶 IDKey=OBJECT_KEY, # 文件在存储桶中的路径Filename=FILE_PATH, # 本地文件路径)print(response)except ClientError as e:print(f"Error: {e}")
注意:
使用 AWS SDK 请确认数据完整性保护特性,详情请参考 AWS SDK 的相关文档 Data Integrity Protections for Amazon S3。
使用应用级别上传加速域名,必须使用 PathStyle 格式。


