前置条件
1. 应用中已集成 TencentCloud-TIMPush,可参见 uniapp TIMPush 快速接入。
2. 应用已完成 uniapp 离线打包。
3. 下载 TencentCloud-TIMPush 插件到本地。
4. Android Studio / Xcode。
离线打包集成 TencentCloud-TIMPush
步骤1. 导入 TencentCloud-TIMPush 本地依赖。
将 TencentCloud-TIMPush/android 下的 aar 包 导入项目的 /app/libs 中。如图所示:

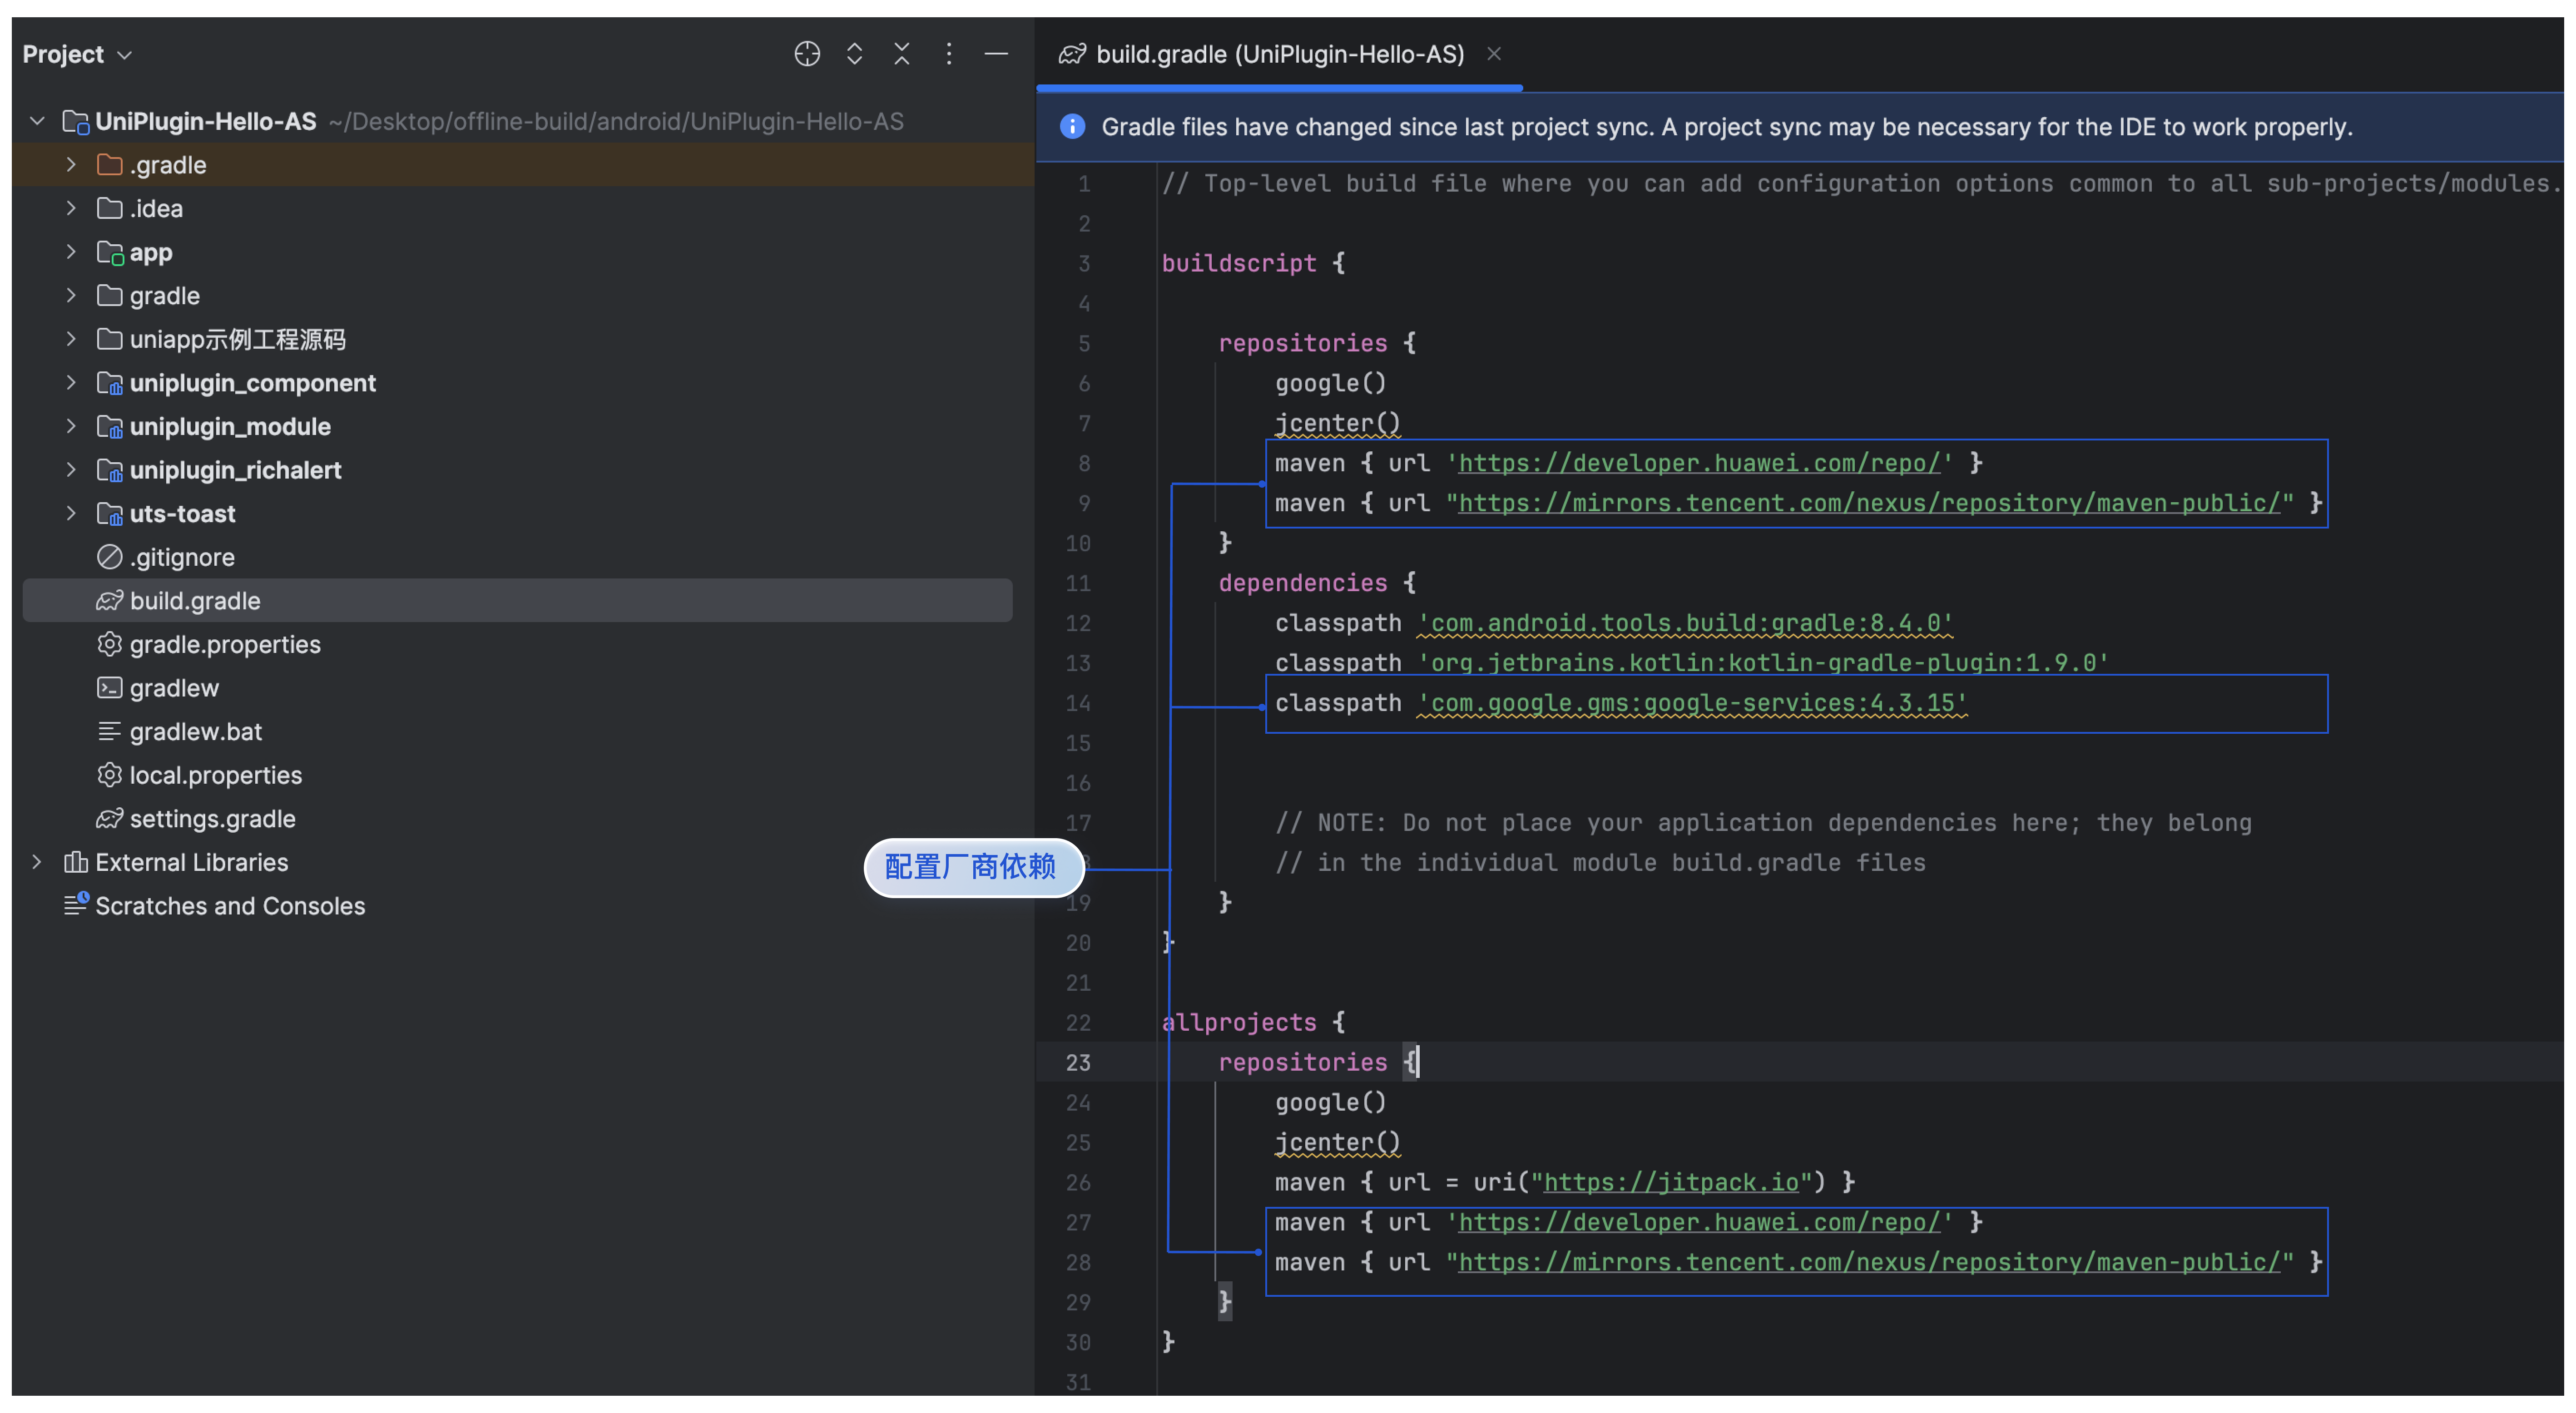
步骤2. 配置 TencentCloud-TIMPush 厂商仓库。
将 TencentCloud-TIMPush 的厂商仓库地址补充到项目的 /app/src/build.gradle 中。如图所示:
注意:
仓库地址的配置涉及 buildscript.repositories、buildscript.dependencies 和 allprojects.repositories,参考图示进行配置。
buildscript { repositories {...... maven { url 'https://developer.huawei.com/repo/' } maven { url "https://mirrors.tencent.com/nexus/repository/maven-public/" } } dependencies { ...... classpath 'com.google.gms:google-services:4.3.15' } } allprojects { repositories { ...... maven { url 'https://developer.huawei.com/repo/' } maven { url "https://mirrors.tencent.com/nexus/repository/maven-public/" } } }
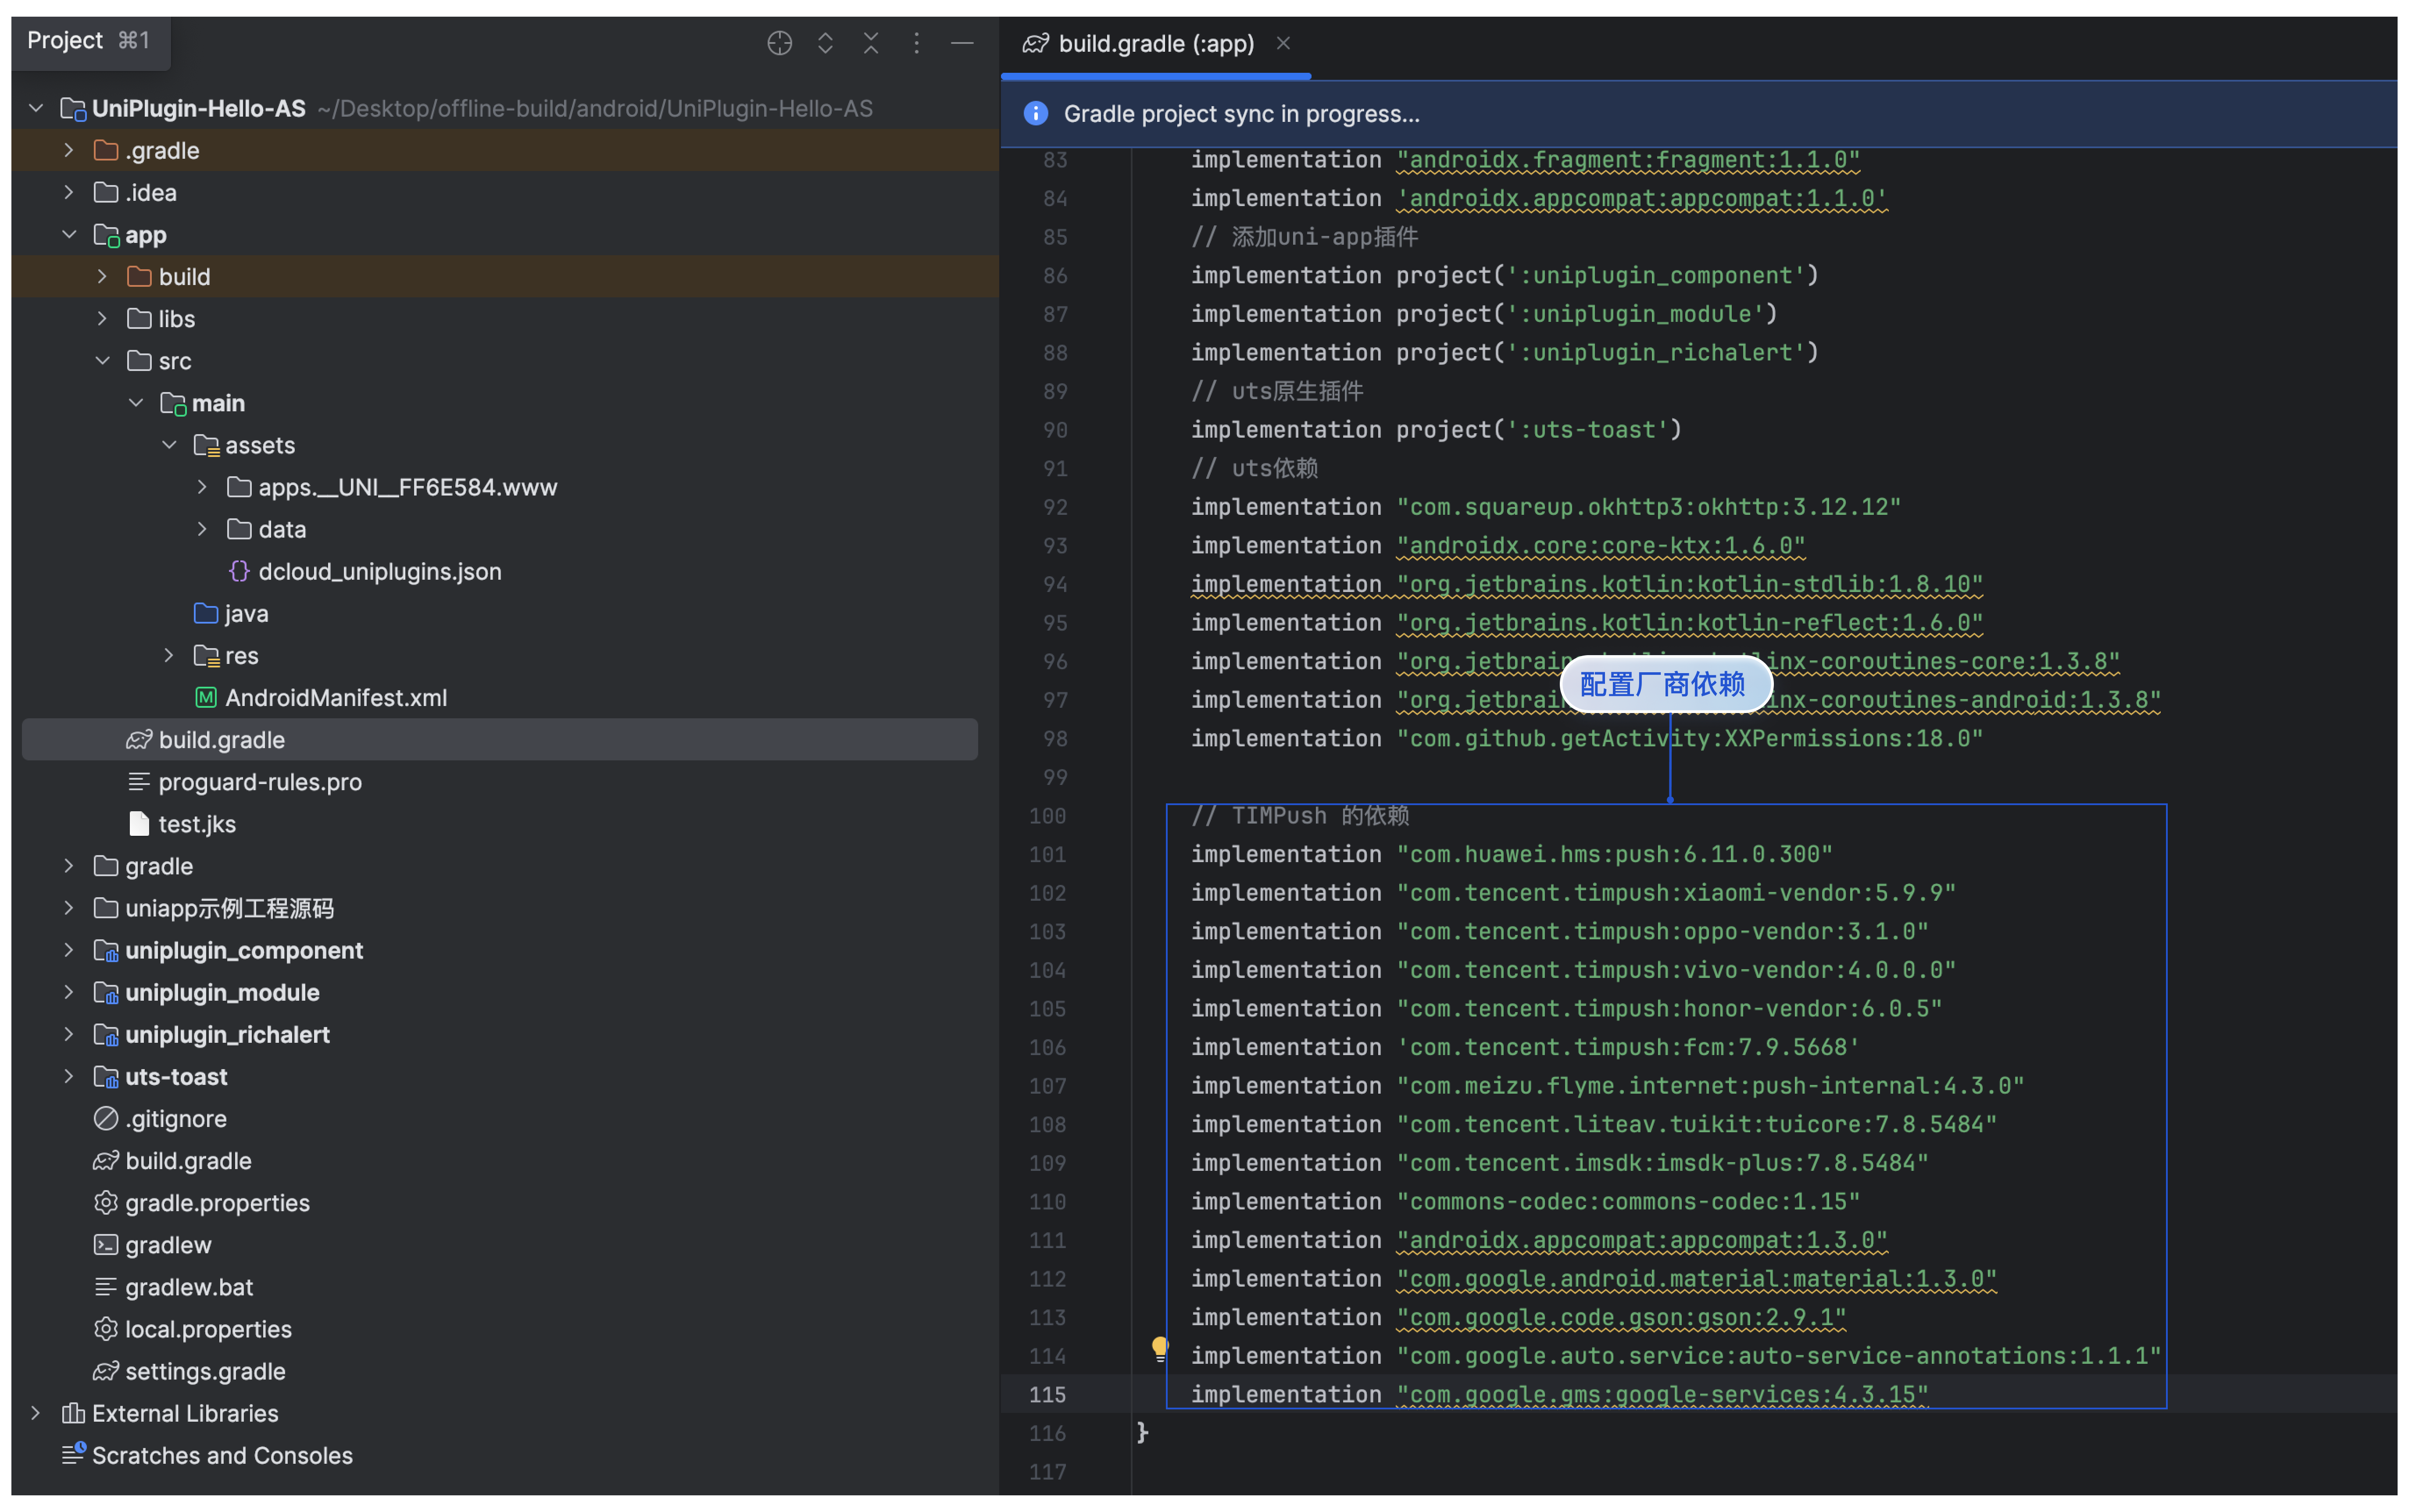
步骤3. 配置 TencentCloud-TIMPush 厂商依赖。
将 TencentCloud-TIMPush 的厂商依赖补充到项目的 /app/src/build.gradle 中。如图所示:
// TIMPush 的依赖
implementation "com.huawei.hms:push:6.11.0.300"
implementation "com.tencent.timpush:xiaomi-vendor:5.9.9"
implementation "com.tencent.timpush:oppo-vendor:3.1.0"
implementation "com.tencent.timpush:vivo-vendor:4.0.0.0"
implementation "com.tencent.timpush:honor-vendor:6.0.5"
implementation "com.tencent.timpush:fcm:7.9.5668"
implementation "com.meizu.flyme.internet:push-internal:4.3.0"
implementation "com.tencent.liteav.tuikit:tuicore:7.8.5484"
implementation "com.tencent.imsdk:imsdk-plus:7.8.5484"
implementation "commons-codec:commons-codec:1.15"
implementation "androidx.appcompat:appcompat:1.3.0"
implementation "com.google.android.material:material:1.3.0"
implementation "com.google.code.gson:gson:2.9.1"
implementation "com.google.auto.service:auto-service-annotations:1.1.1"
implementation "com.google.gms:google-services:4.3.15"
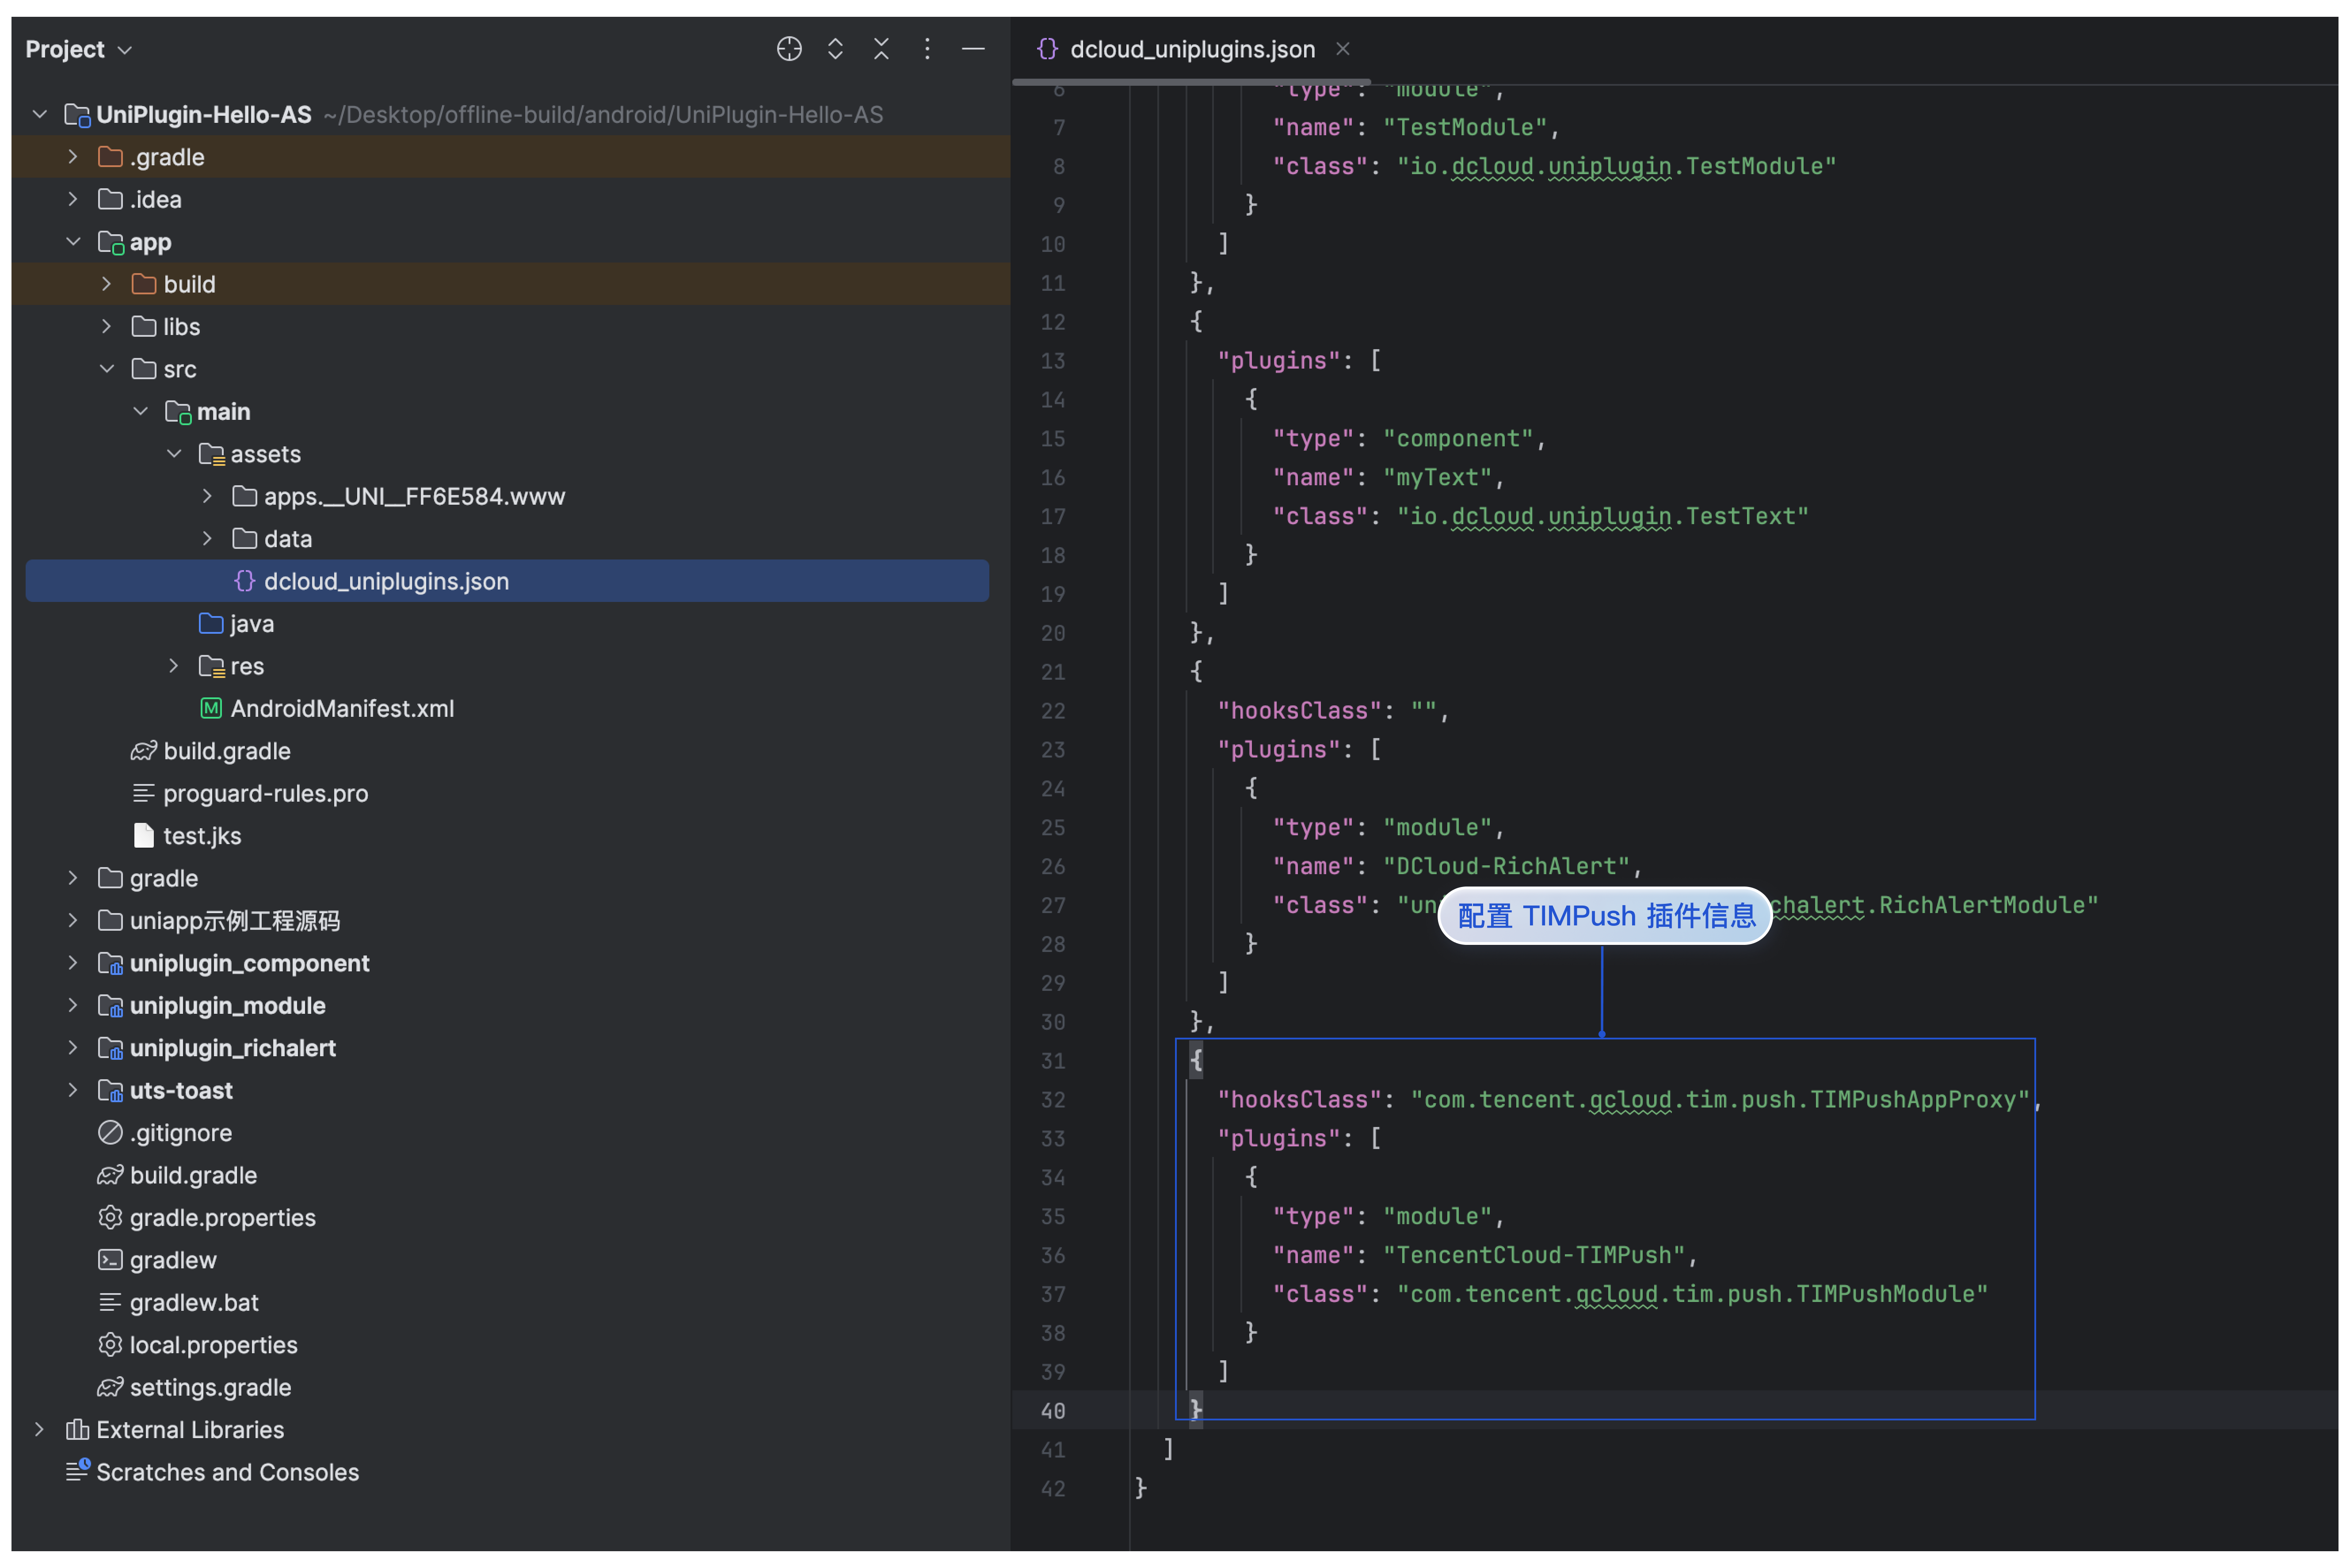
步骤4. 配置 TencentCloud-TIMPush 插件信息。
将 TencentCloud-TIMPush 插件信息配置到项目的 /app/src/main/assets/dcloud_uniplugins.json 中。如图所示:
{
  "hooksClass": "com.tencent.qcloud.tim.push.TIMPushAppProxy",
  "plugins": [
    {
      "type": "module",
      "name": "TencentCloud-TIMPush",
      "class": "com.tencent.qcloud.tim.push.TIMPushModule"
    }
  ]
}
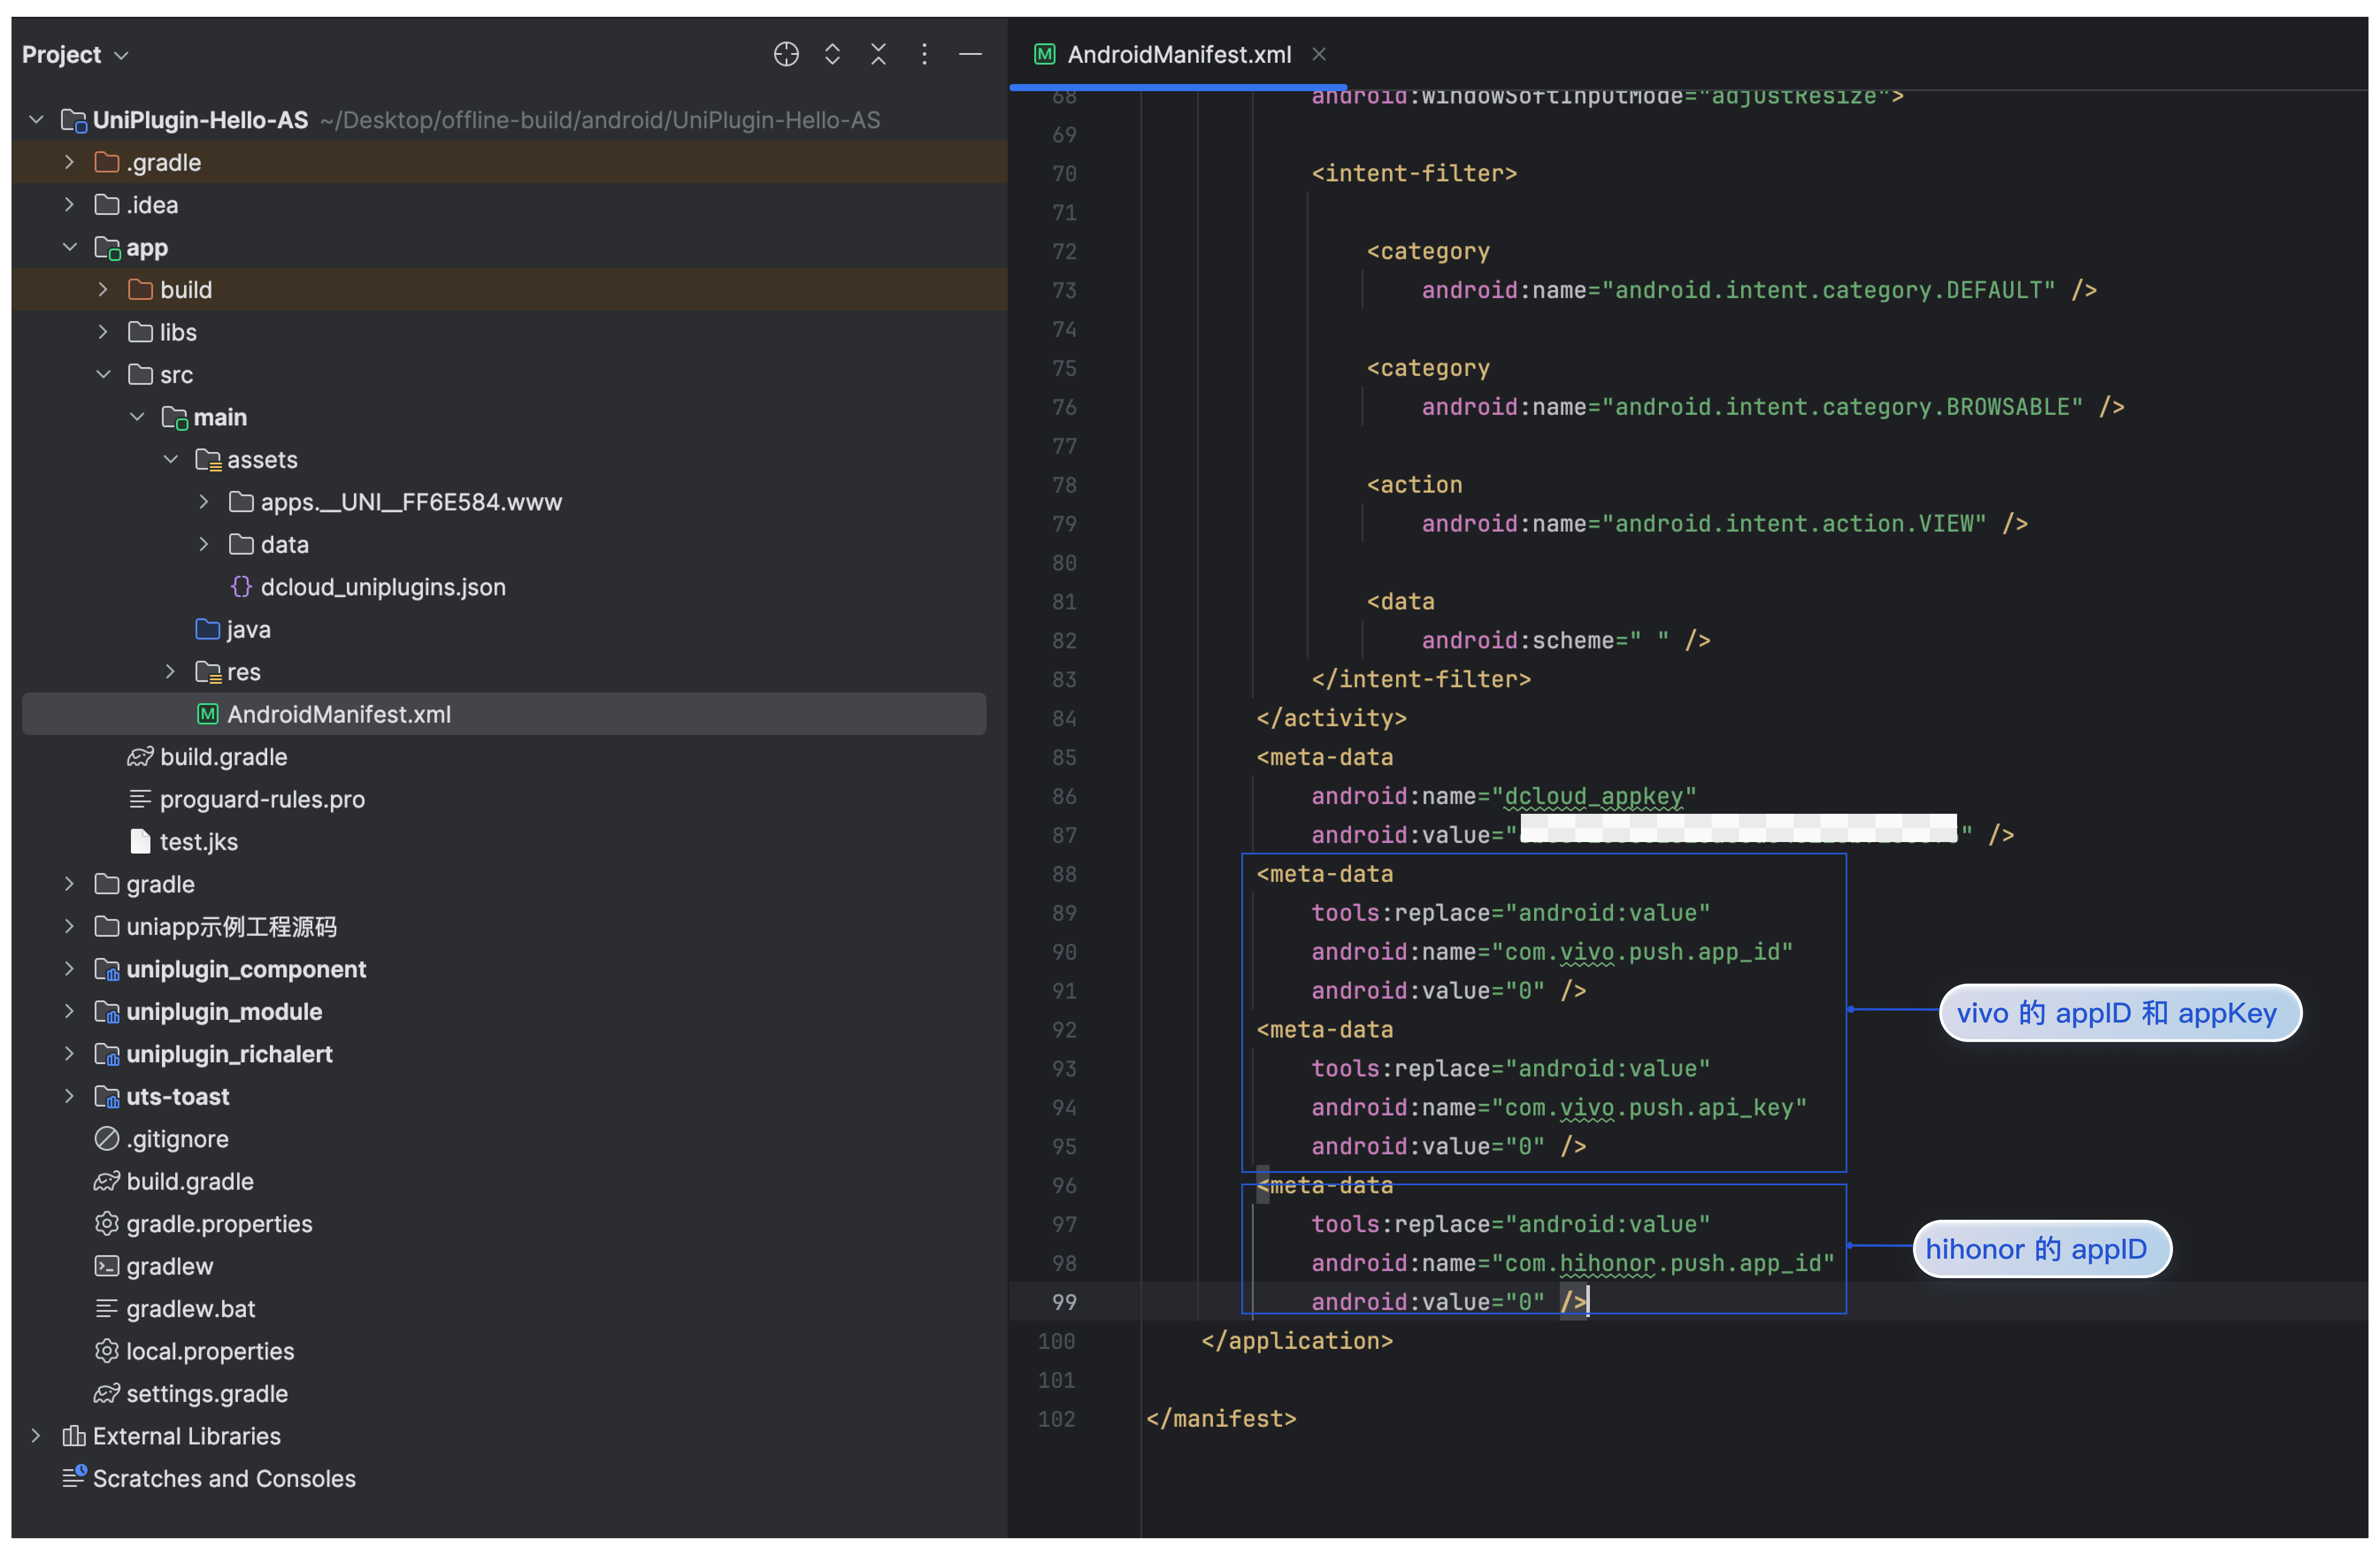
步骤5. 配置 TencentCloud-TIMPush 厂商信息(仅荣耀和 ViVO)。
将 vivo 的 appID 和 appKey 和 hihonor 配置到项目的 /app/src/main/assets/AndroidManifest.xml 中。如图所示:
说明:
1. 使用 vivo 推送必须 AndroidManifest.xml 中配置 appID 和 appKey。
2. 使用 hihonor 推送必须 AndroidManifest.xml 中配置 appID。
<meta-data
    tools:replace="android:value"
    android:name="com.vivo.push.app_id"
    android:value="0" /> <!-- vivo 的 appID -->
<meta-data
    tools:replace="android:value"
    android:name="com.vivo.push.api_key"
    android:value="0" /> <!-- vivo 的 appKey -->
<meta-data
    tools:replace="android:value"
    android:name="com.hihonor.push.app_id"
    android:value="0" />  <!-- hihonor 的 appID -->
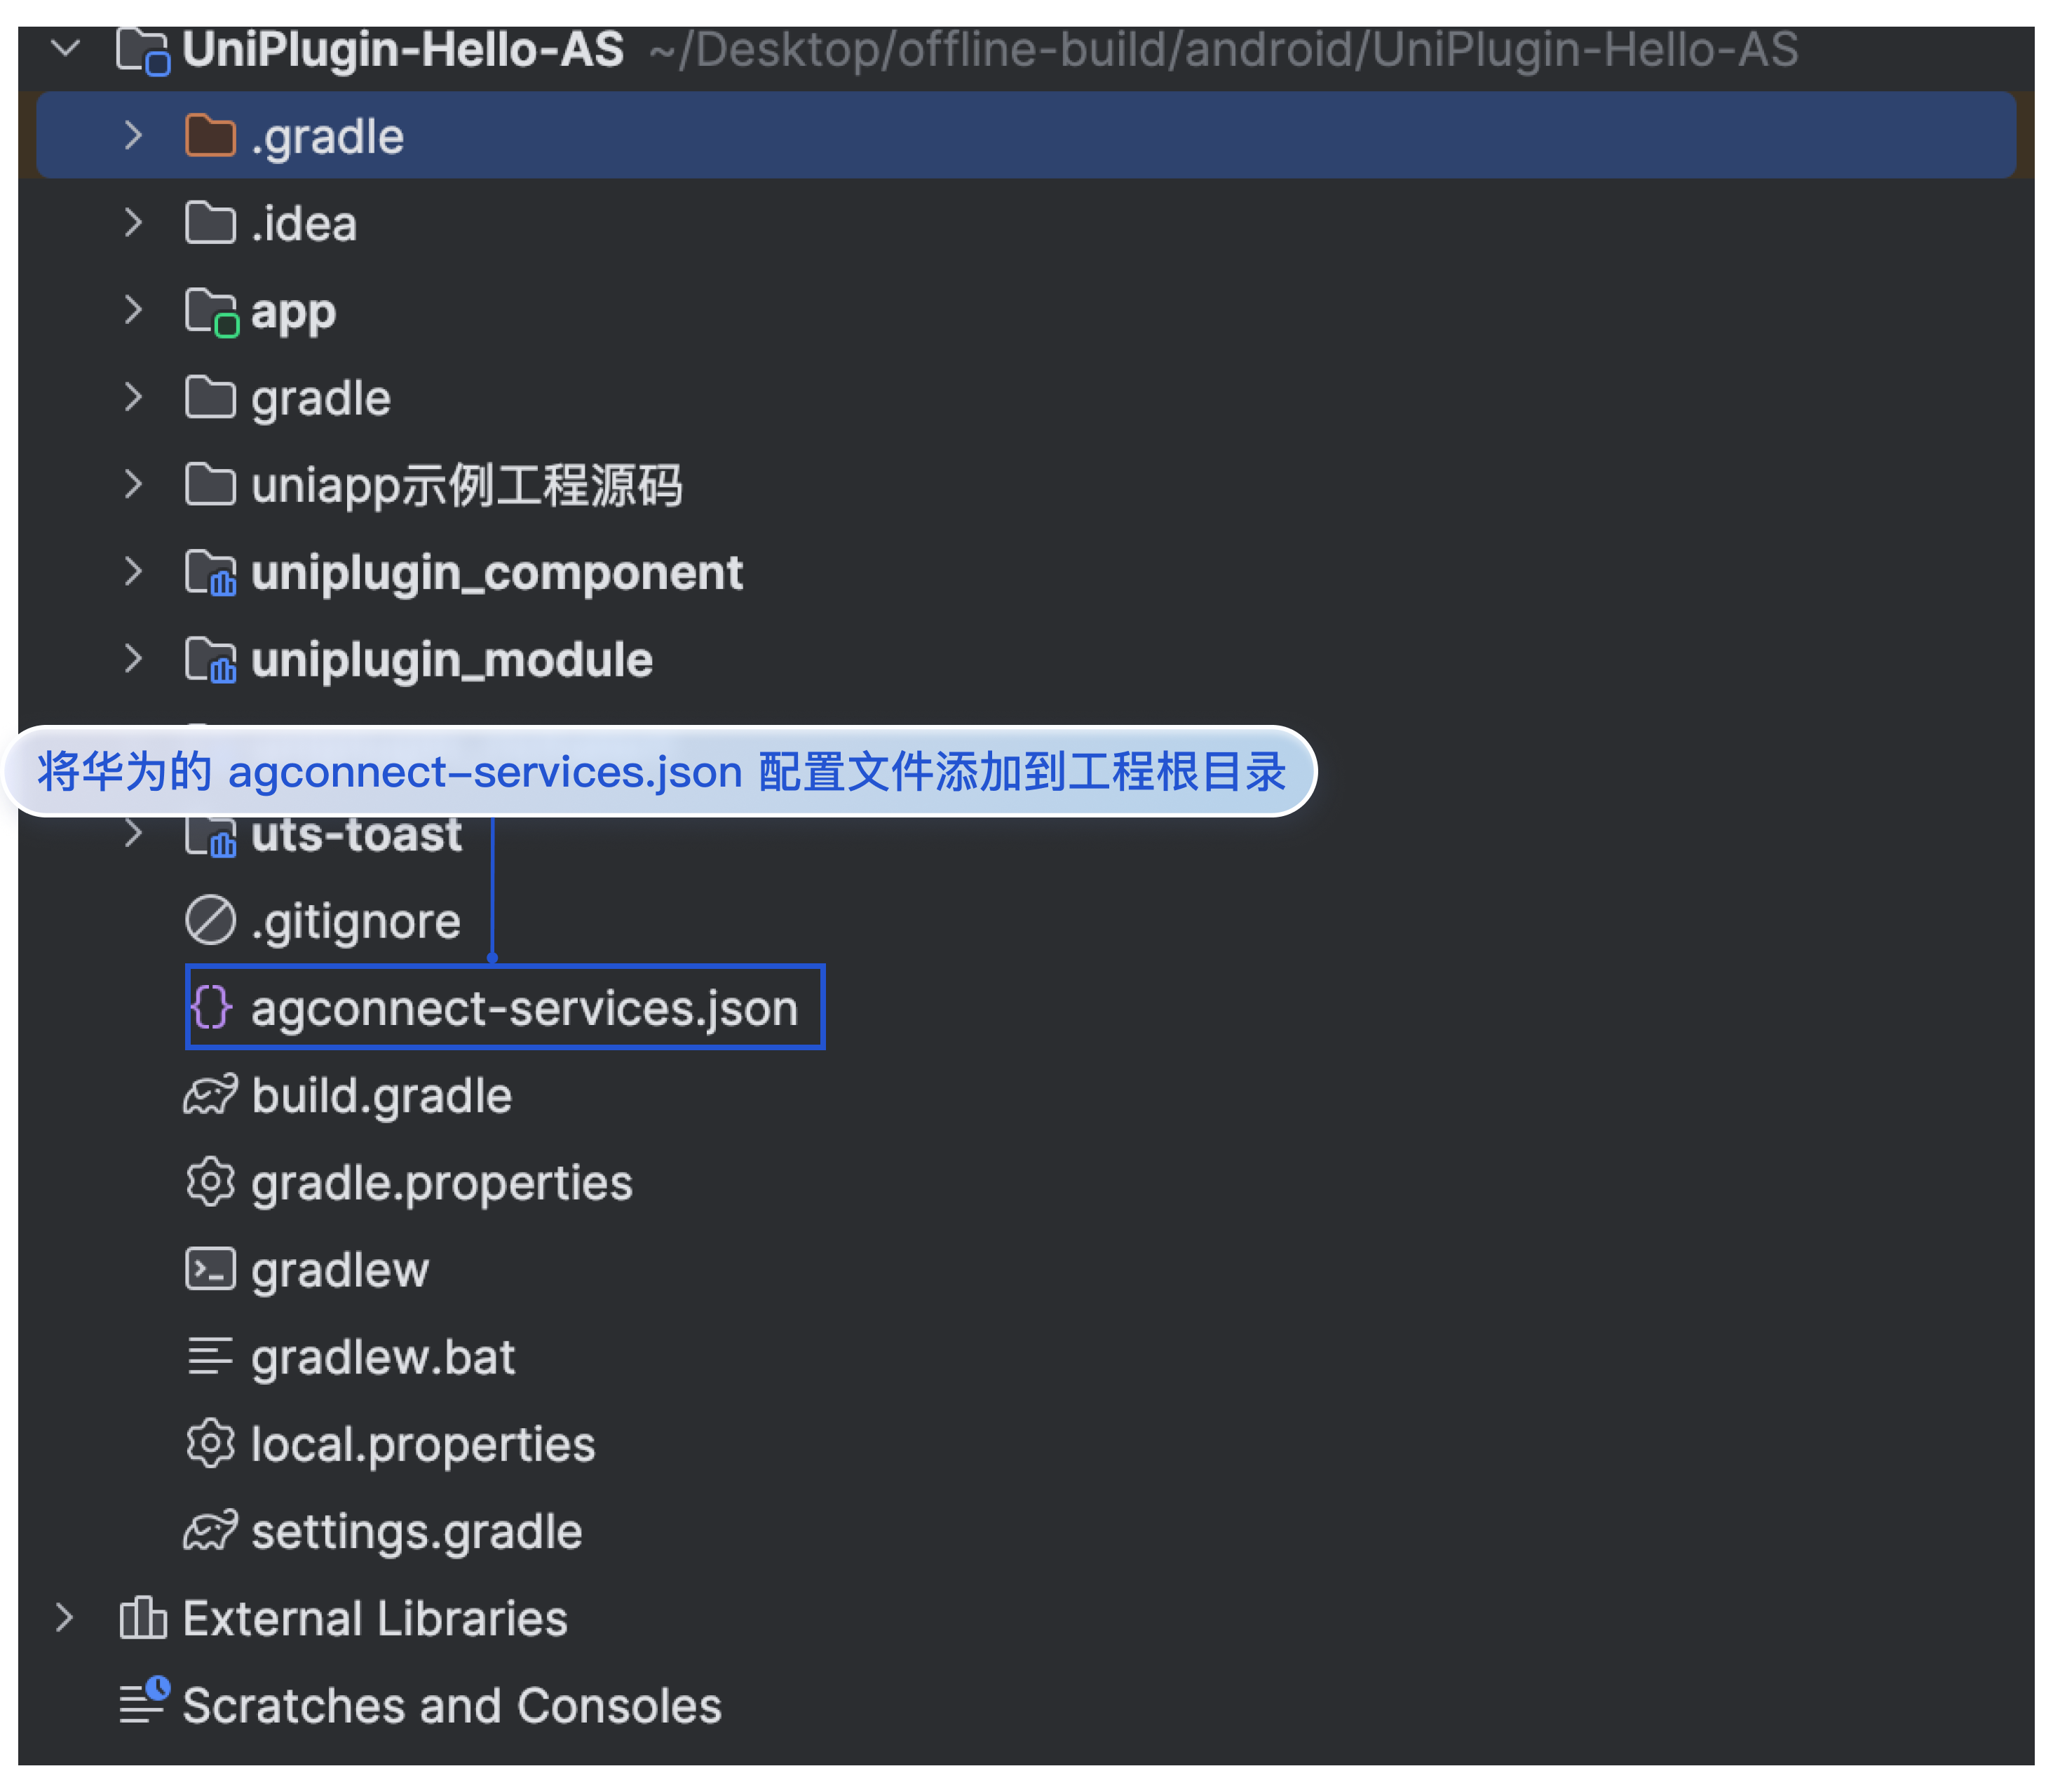
步骤6. 配置华为 agconnect-services.json(仅华为)。
将华为 agconnect-services.json 配置文件添加到工程的根目录,如图所示:
步骤7. 运行并登录项目,确认 TencentCloud-TIMPush 集成成功。
运行时,在 Android Studio 的日志中,确认有
register push successfully 打印,表示 TencentCloud-TIMPush 集成成功,如图所示: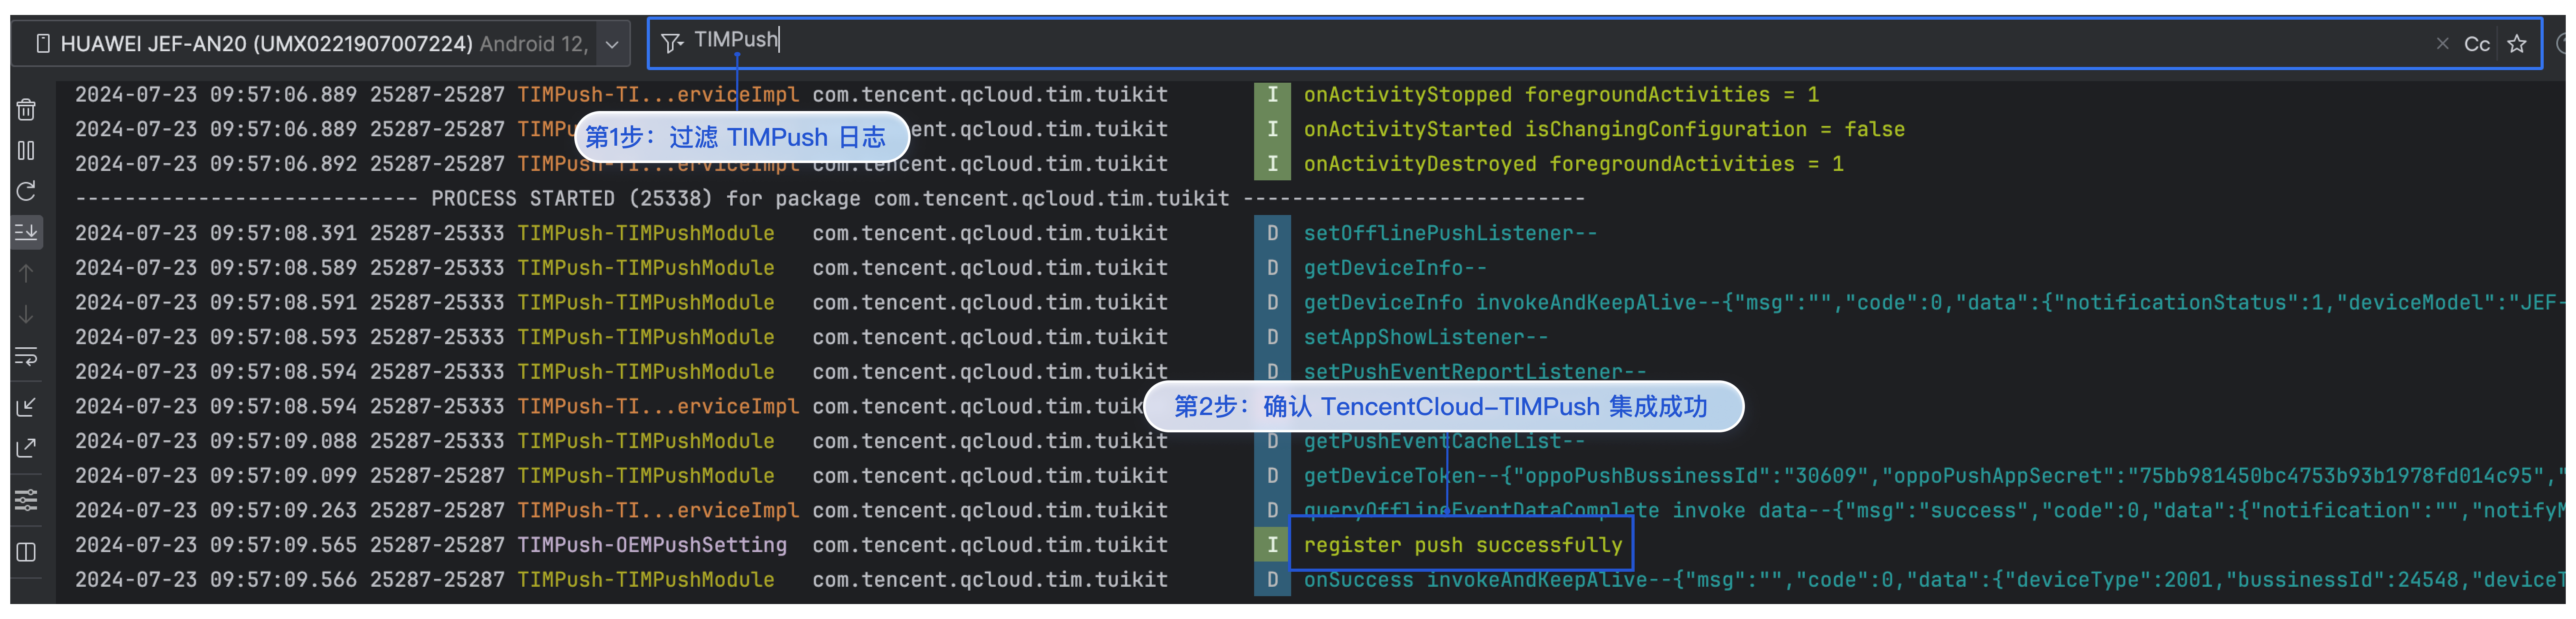
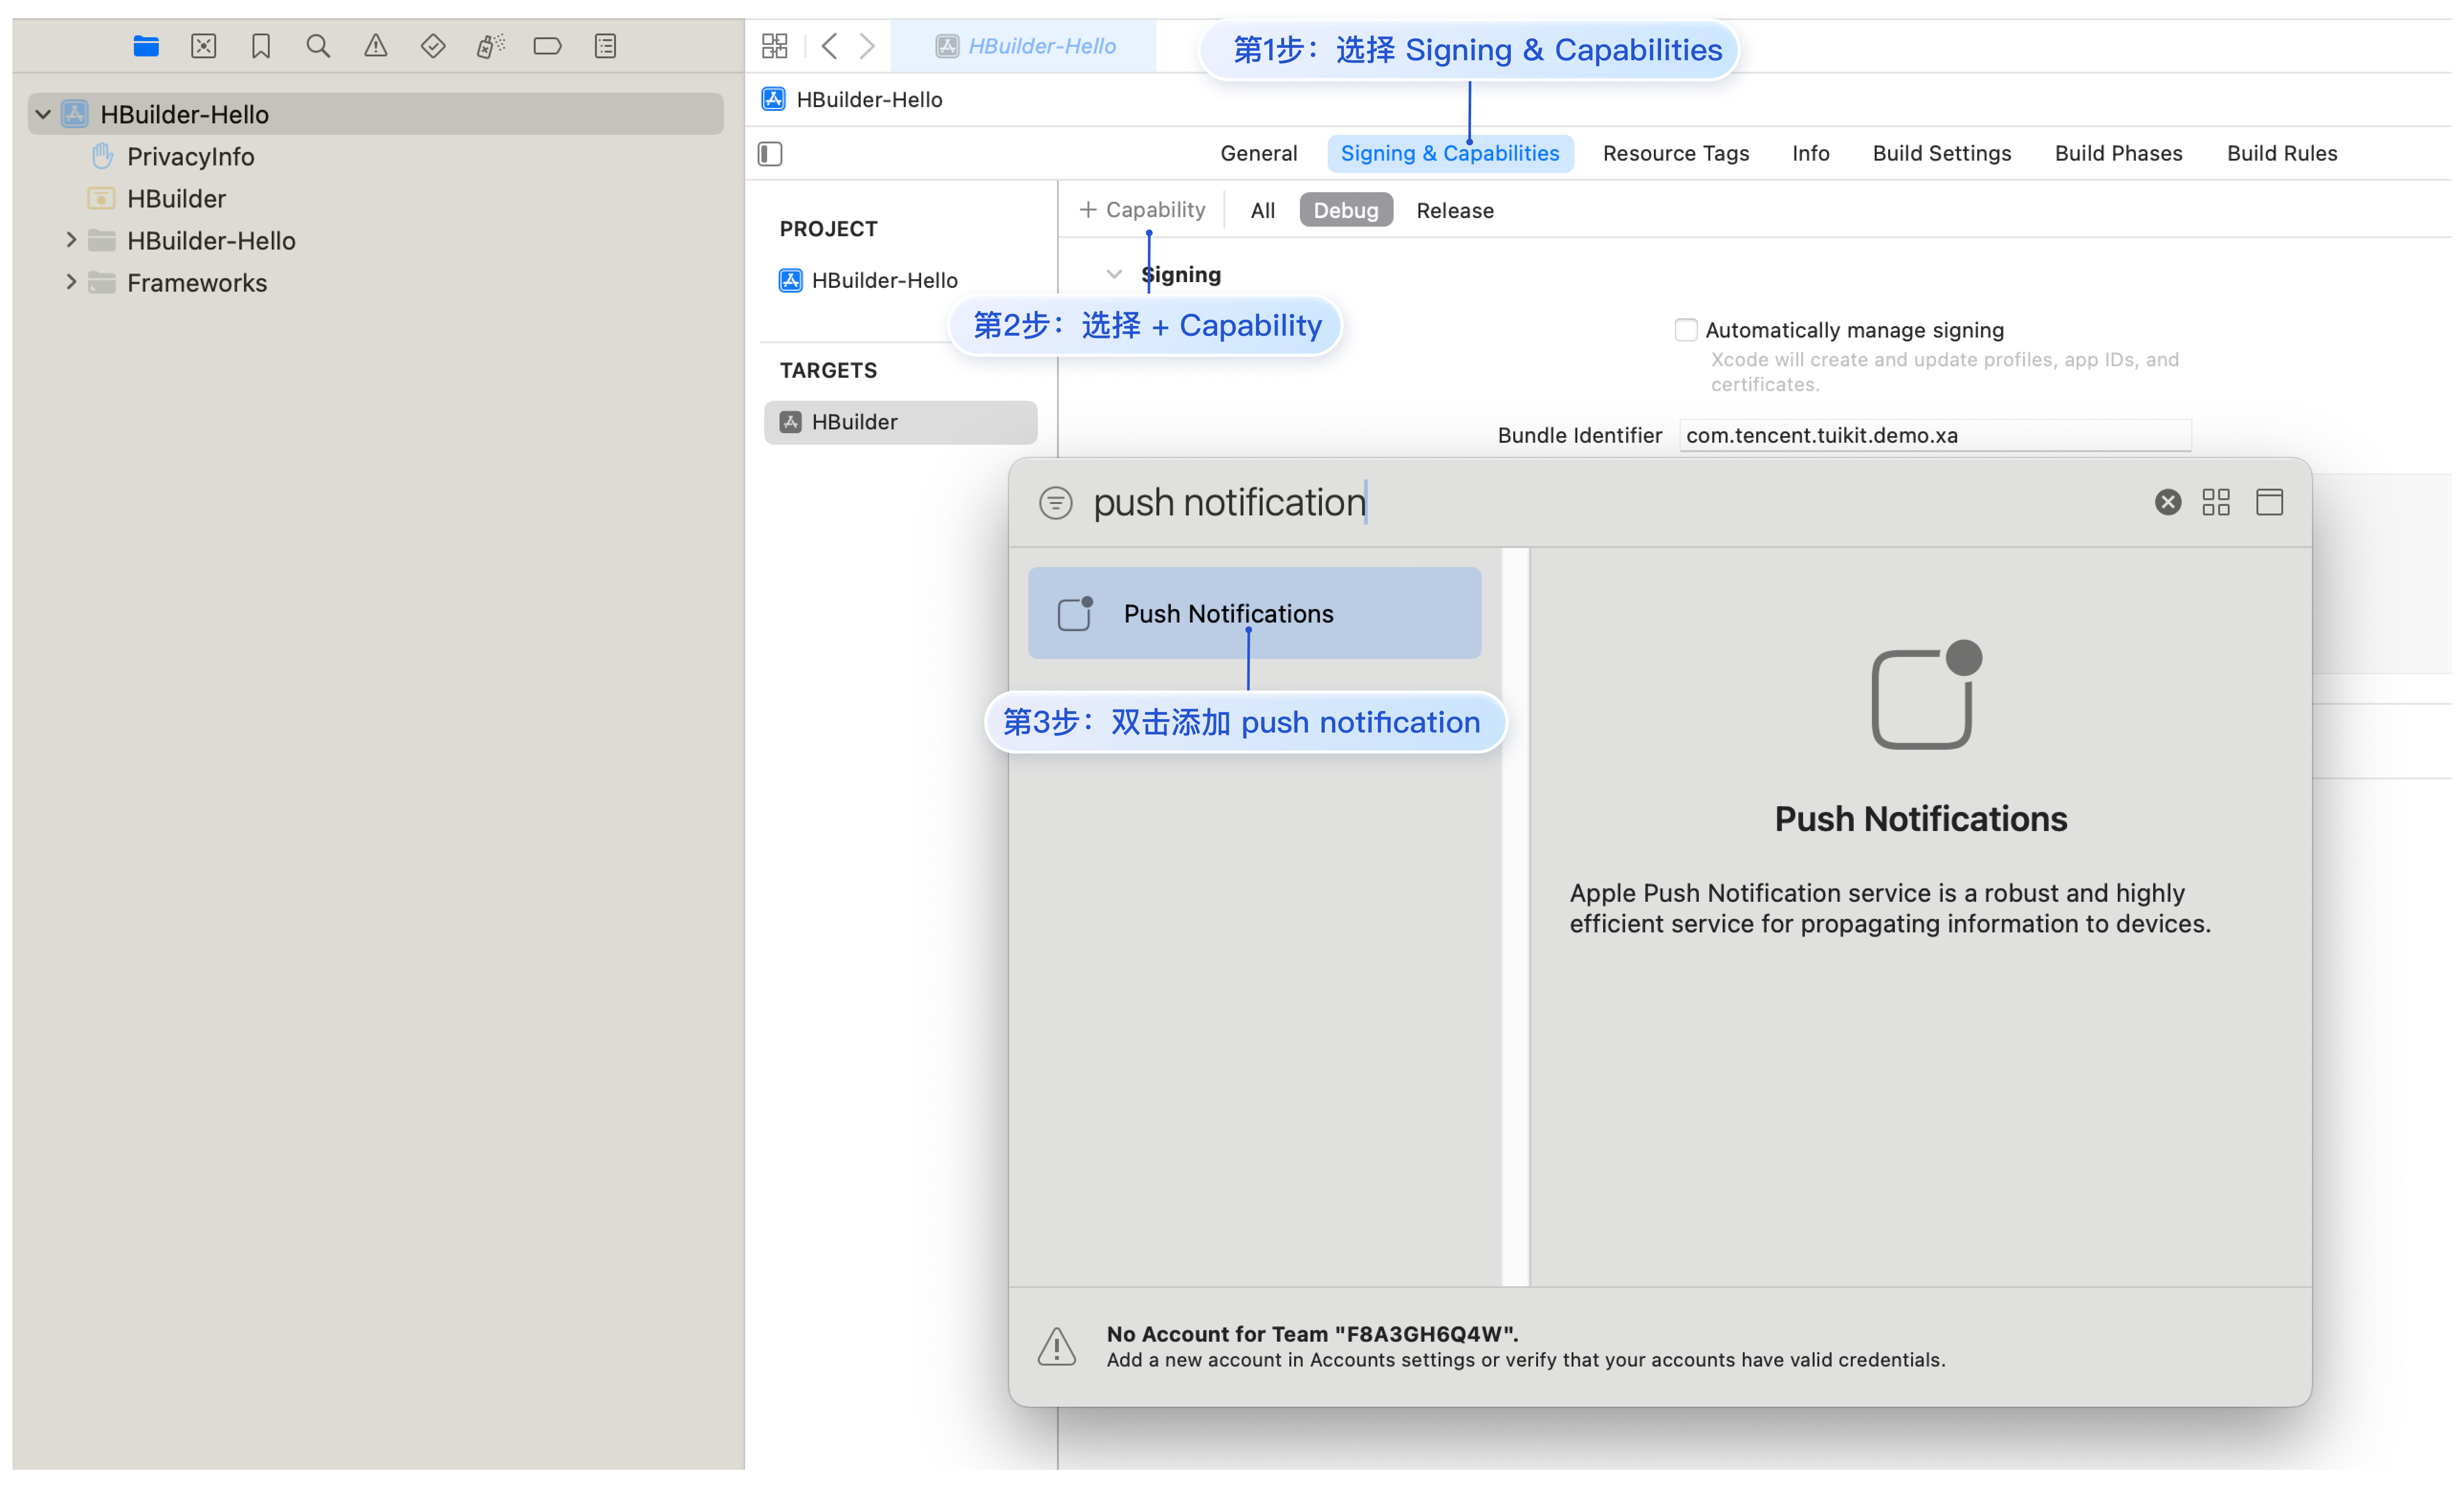
步骤1. 配置 push notification 能力。
在工程的 【Signing & Capabilities】-> 【+ Capability】中搜索 push notification,双击添加 push notification 能力。如图所示:
步骤2. 配置 TencentCloud-TIMPush 插件信息。
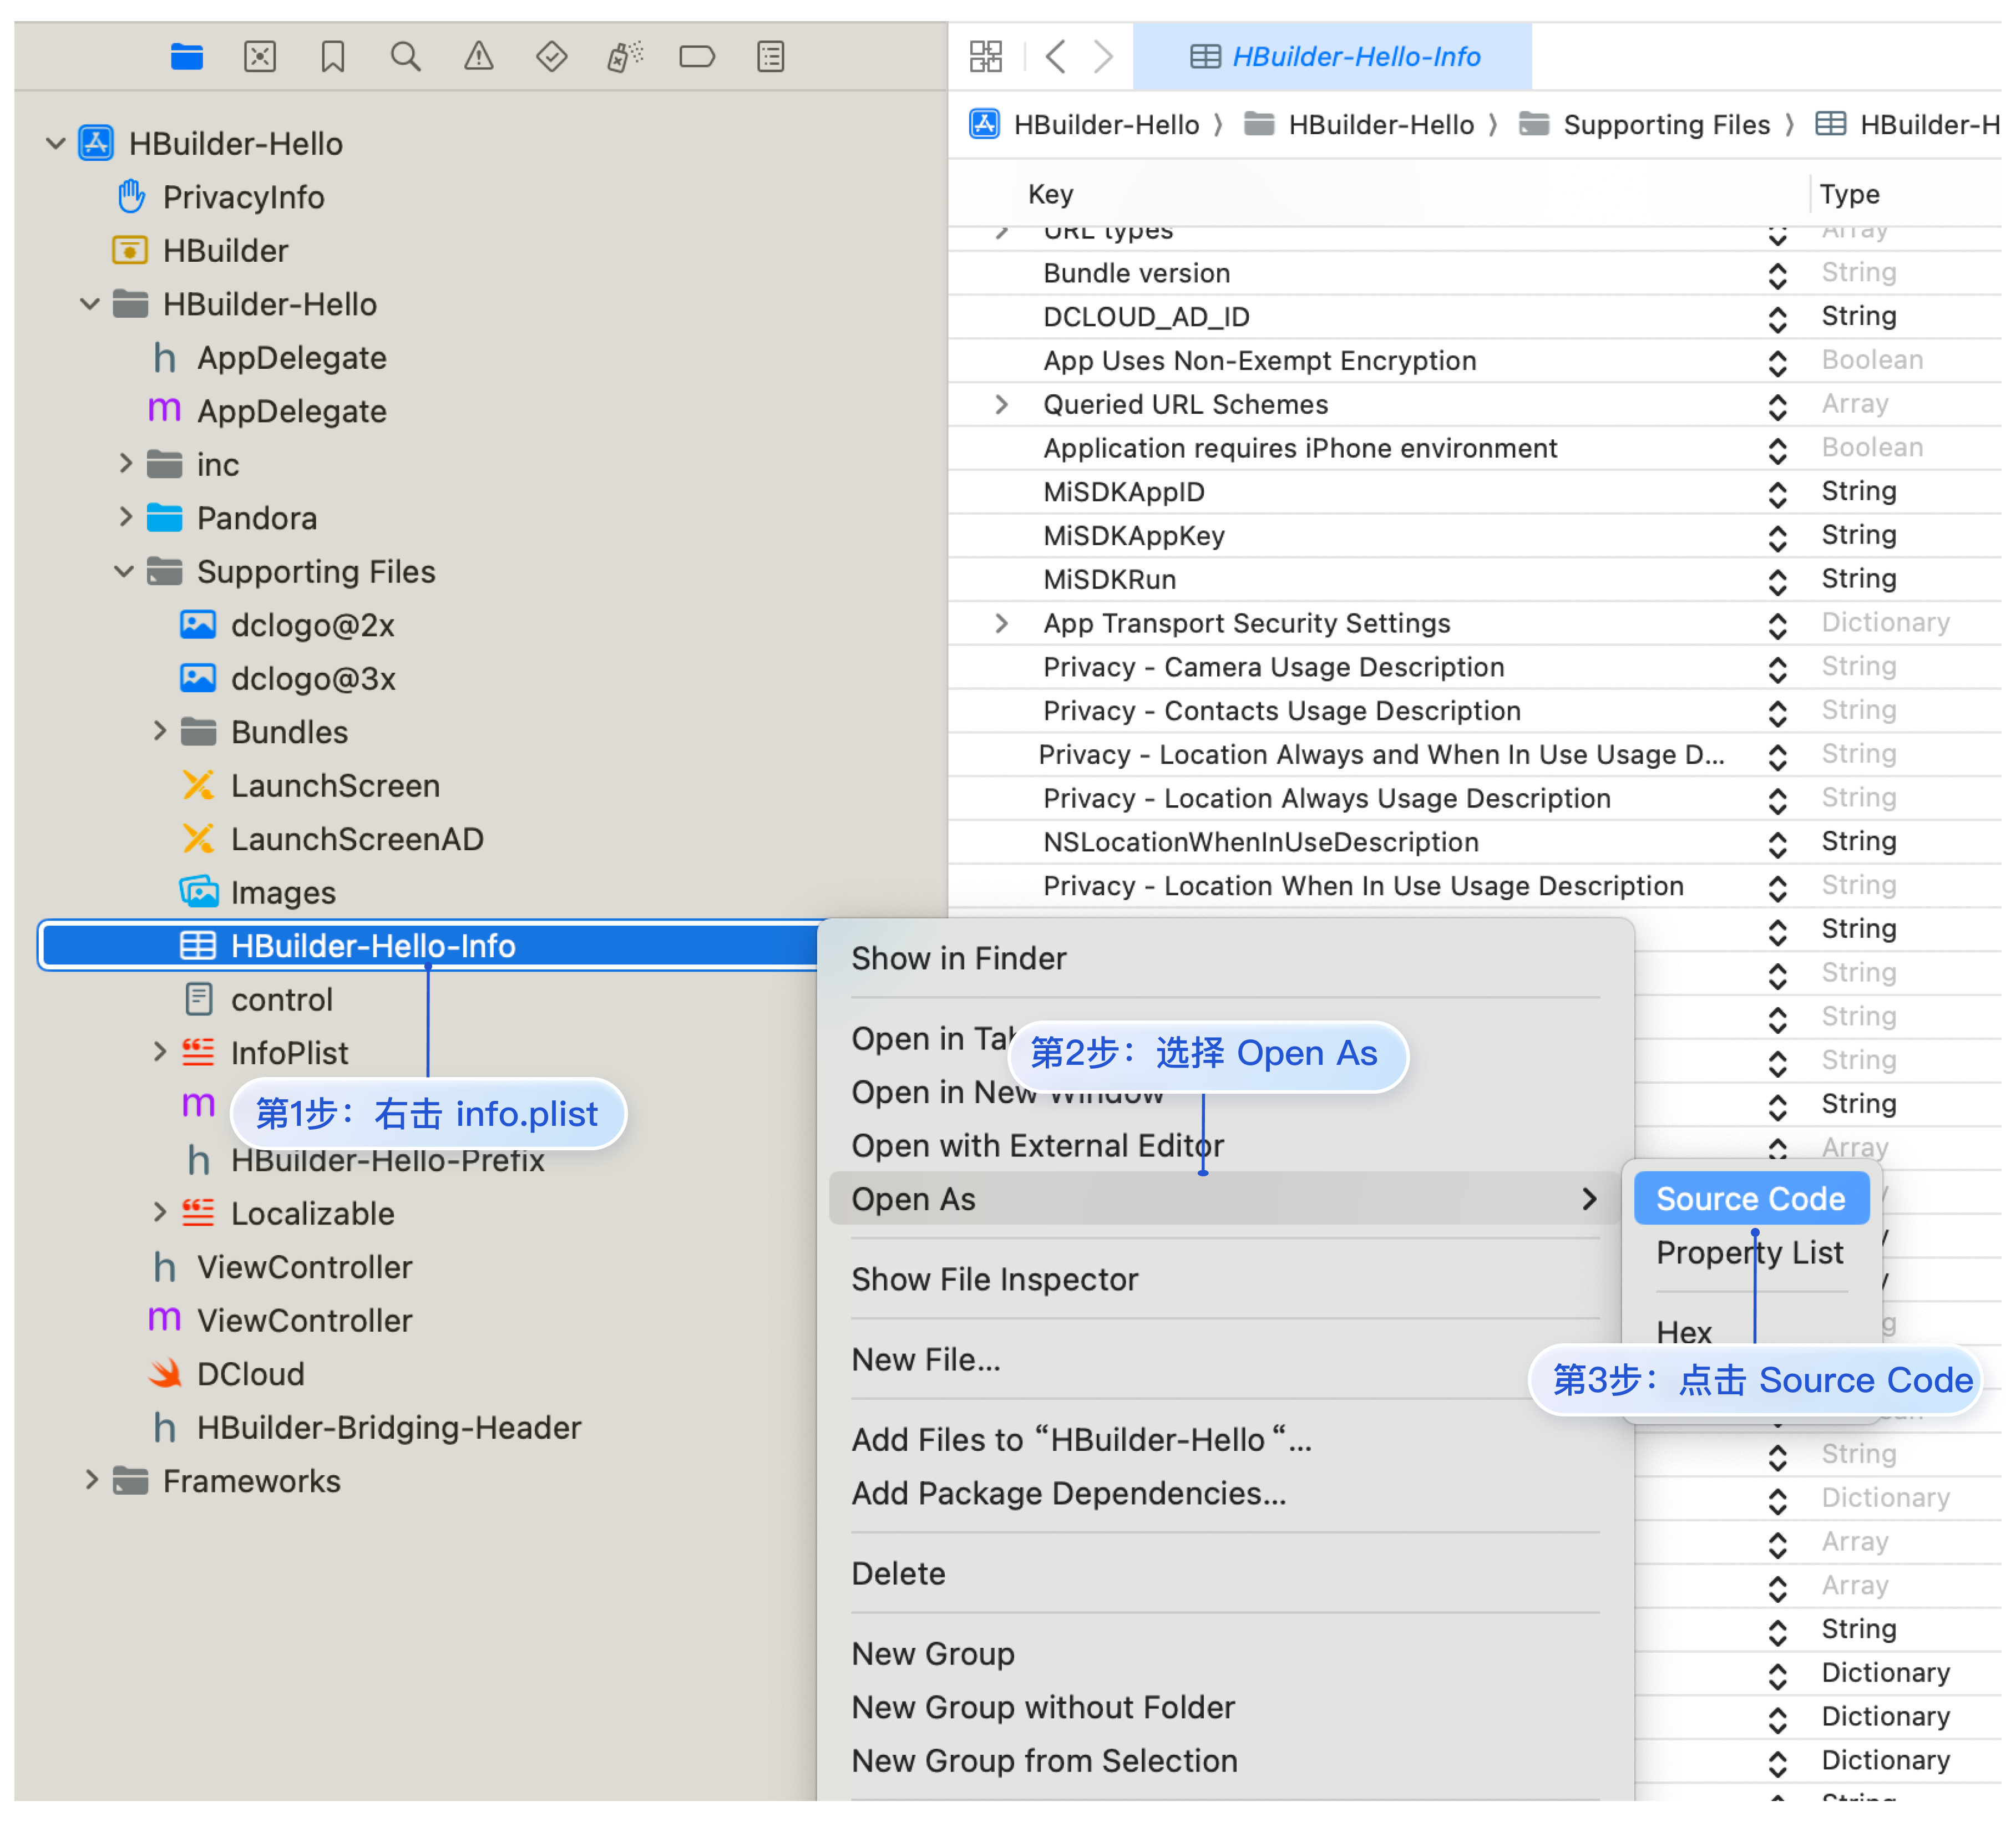
找到原生工程的 info.plist 文件右键选择 【Open As】 -> 【Source Code】 源码查看,添加如下节点信息 Info.plist。如图所示:
注意:
uniapp 离线打包 demo 中 dcloud_uniplugins 节点有可能已存在,替换即可。
<key>dcloud_uniplugins</key><array><dict><key>hooksClass</key><string>TIMPushProxy</string><key>plugins</key><array><dict><key>class</key><string>TIMPushModule</string><key>name</key><string>TencentCloud-TIMPush</string><key>type</key><string>module</string></dict></array></dict></array>

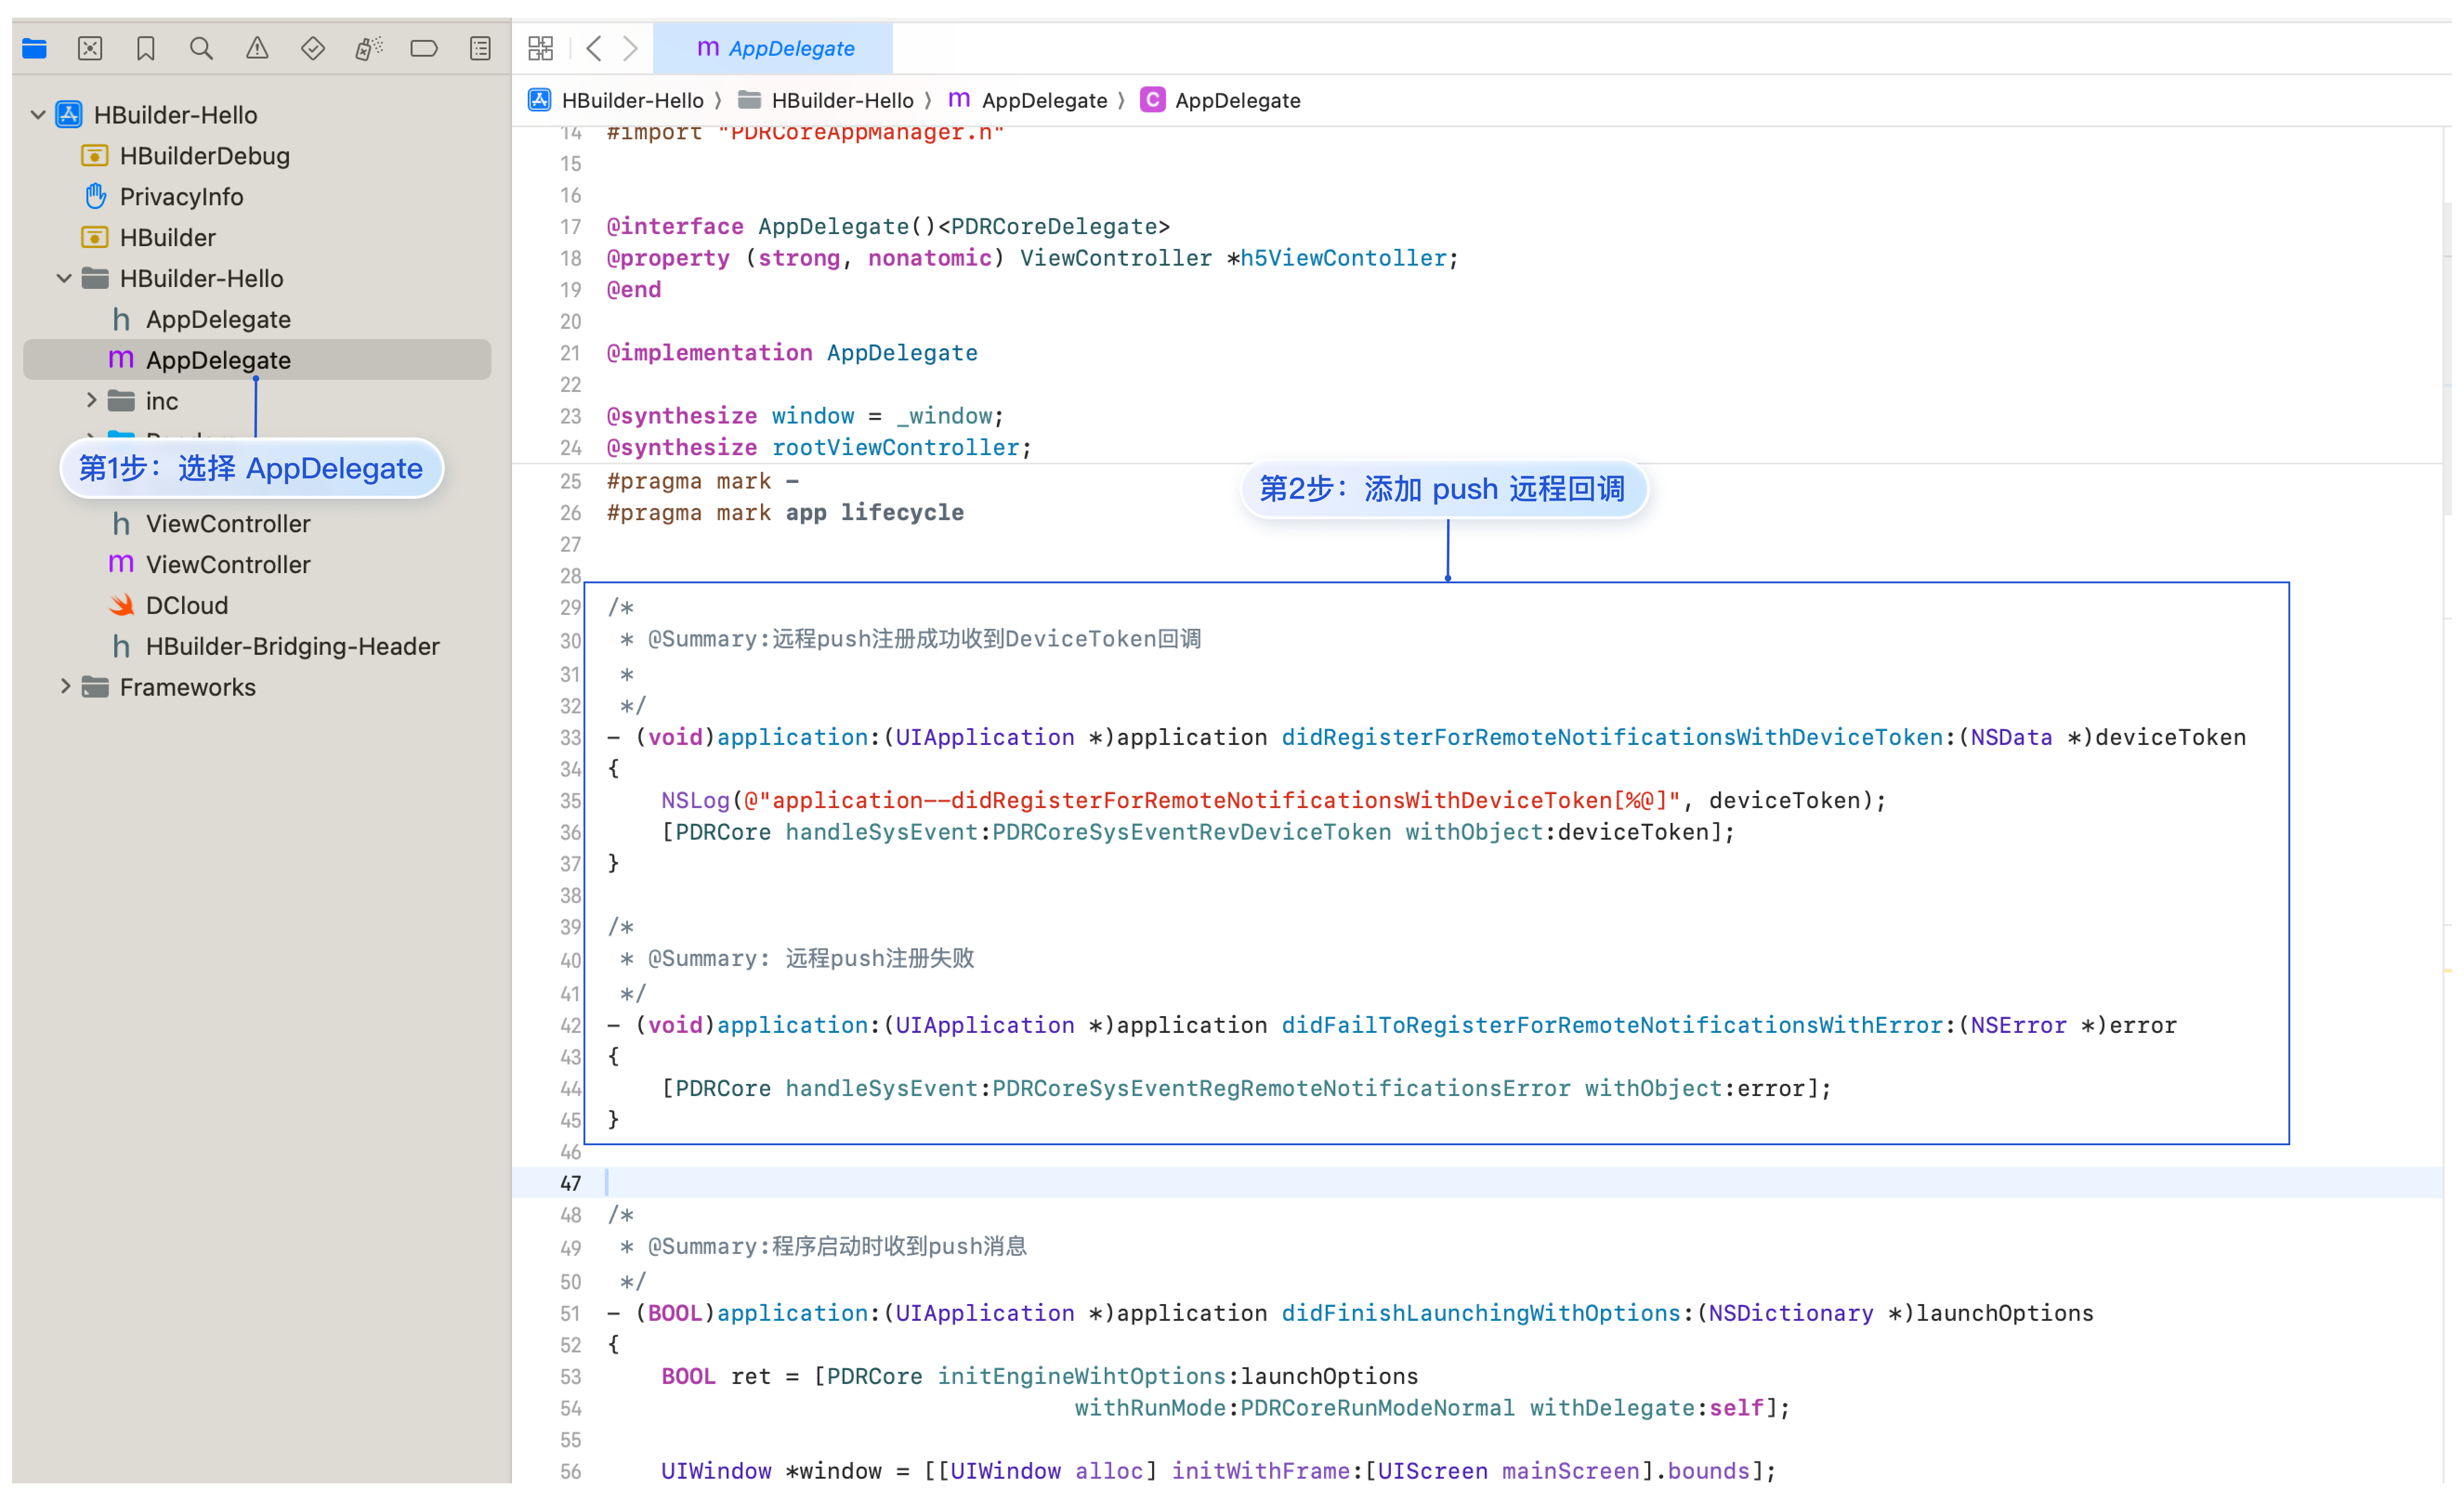
步骤3. 配置 TencentCloud-TIMPush 回调。
在工程 AppDelegate 的 app lifecycle 下配置 push 远程回调。如图所示:
/** @Summary:远程push注册成功收到DeviceToken回调**/- (void)application:(UIApplication *)application didRegisterForRemoteNotificationsWithDeviceToken:(NSData *)deviceToken{NSLog(@"application--didRegisterForRemoteNotificationsWithDeviceToken[%@]", deviceToken);[PDRCore handleSysEvent:PDRCoreSysEventRevDeviceToken withObject:deviceToken];}/** @Summary: 远程push注册失败*/- (void)application:(UIApplication *)application didFailToRegisterForRemoteNotificationsWithError:(NSError *)error{[PDRCore handleSysEvent:PDRCoreSysEventRegRemoteNotificationsError withObject:error];}
步骤4. 运行并登录项目,确认 TencentCloud-TIMPush 集成成功。
运行时,在 XCode 的日志中,确认有
TIMPushModule._setToken ok 打印,表示 TencentCloud-TIMPush 集成成功,如图所示: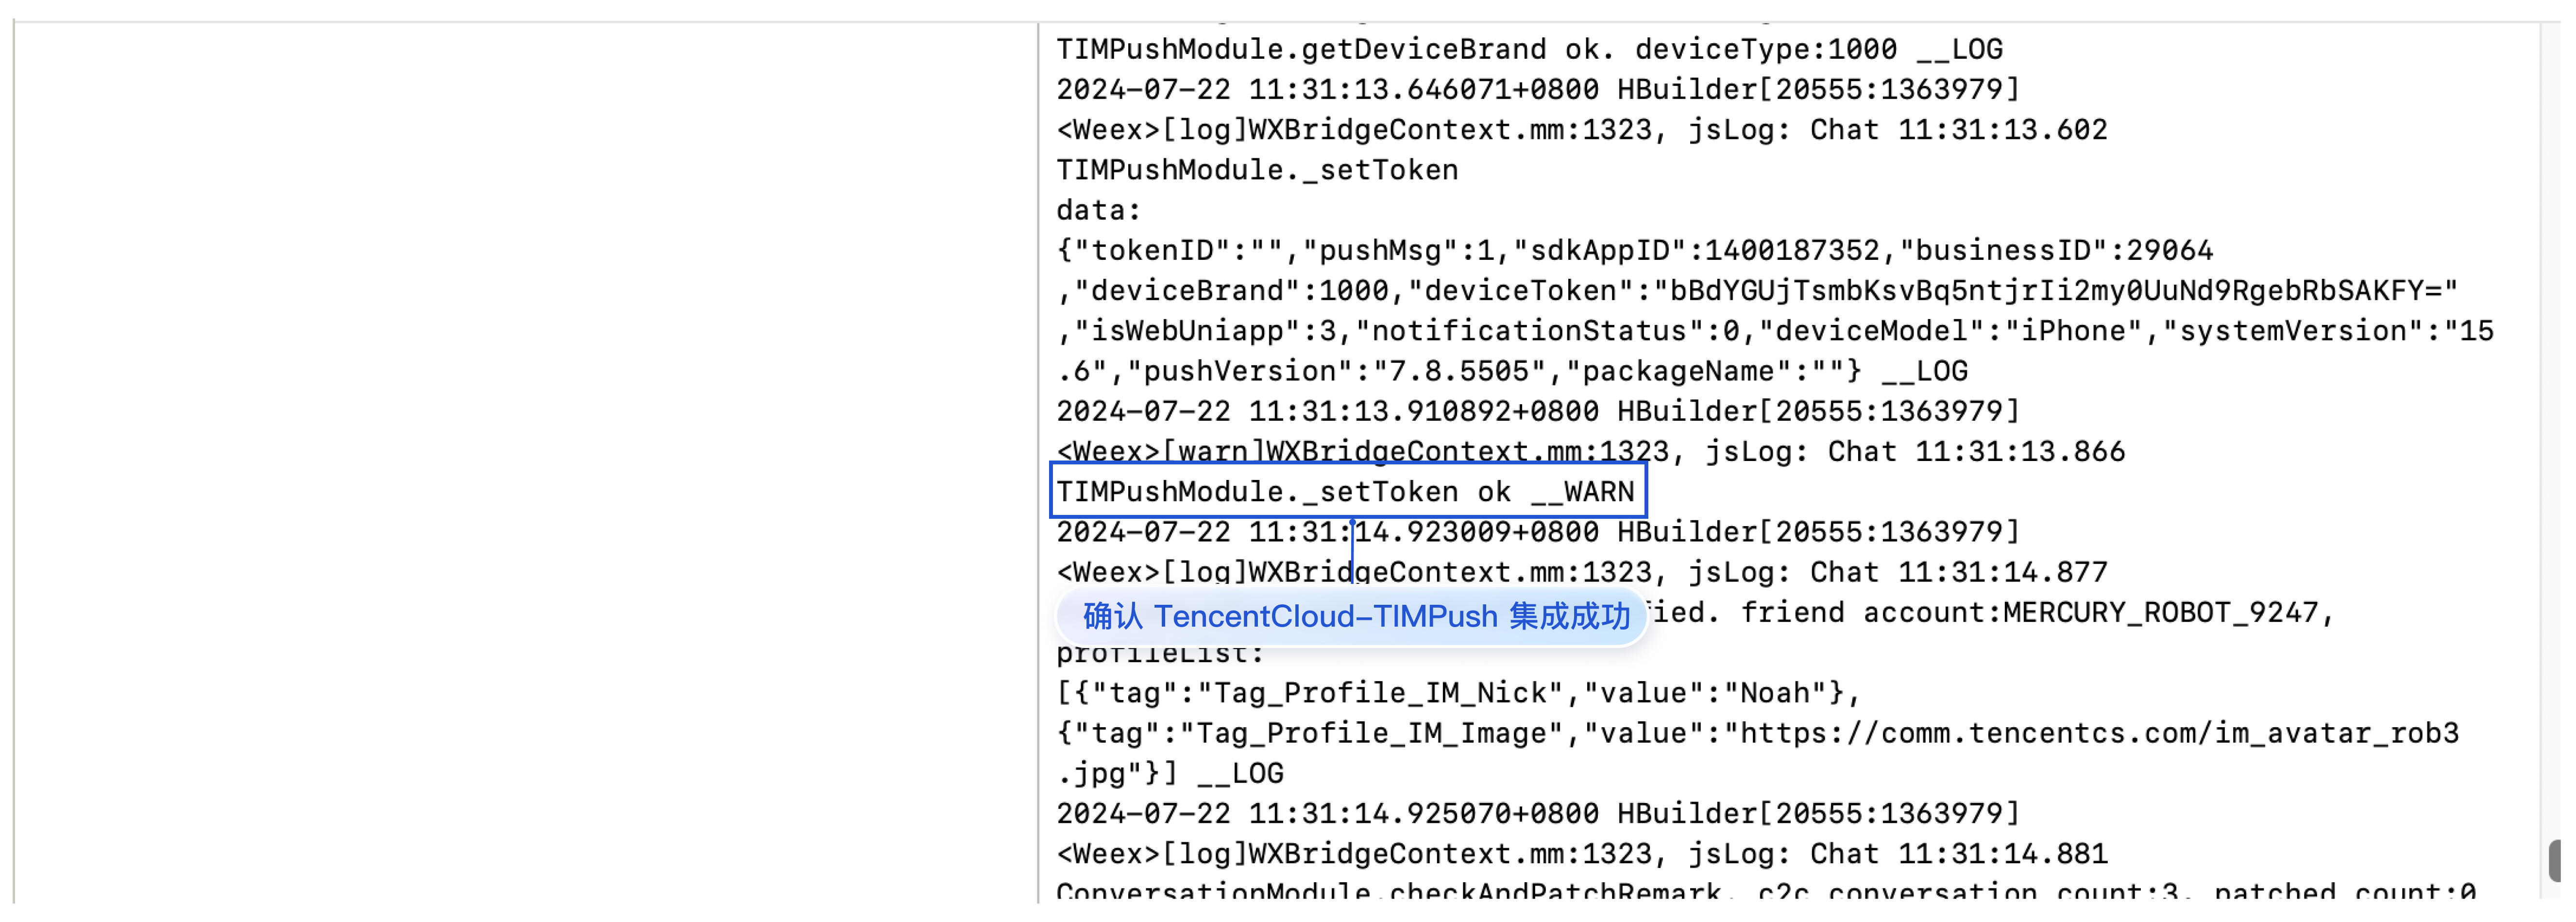
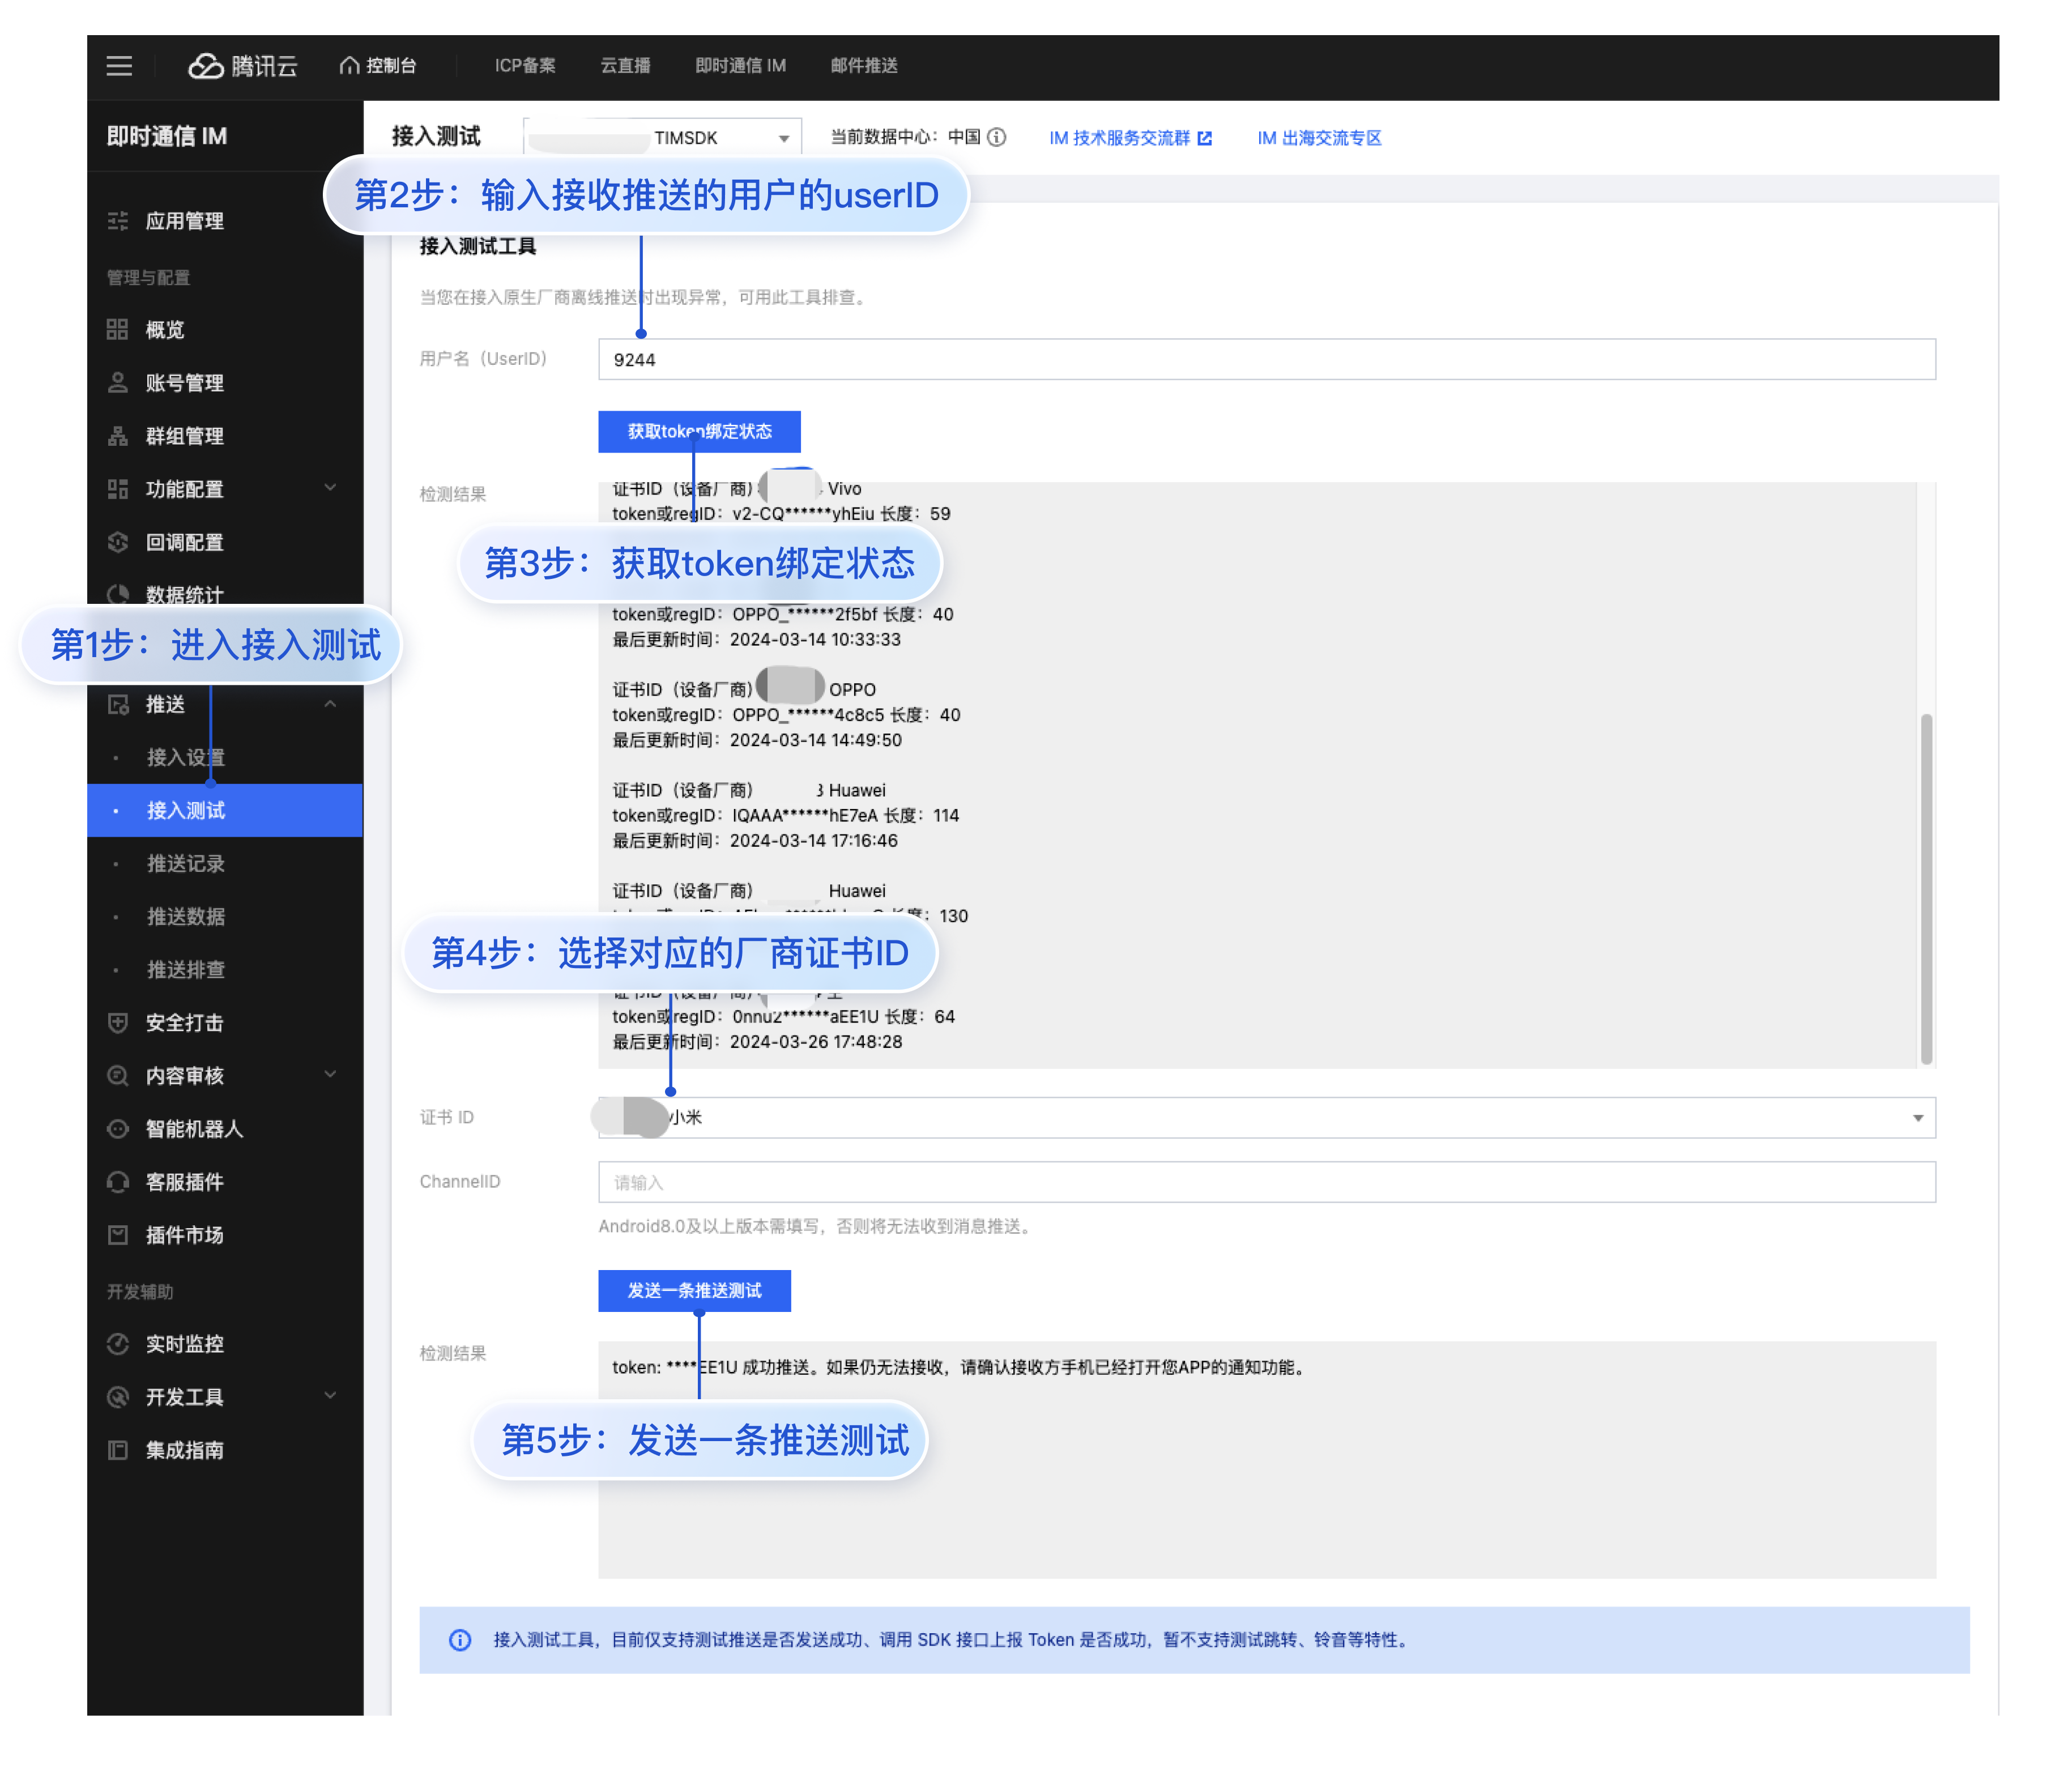
接收您的第一条推送
注意:
1. 接收端的应用必须置于后台,或者结束进程的状态。
2. 直播群不支持离线消息推送。