Step 1: Install Host Security
Log on to the CWPP Console and go to the Security Overview page to check if the Cloud Virtual Machine has Host Security installed.
Description
When purchasing a Tencent CVM or Blackstone Physical Server 1.0 (CPM), you can select "Security Reinforcement" to automatically install the CWPP client.
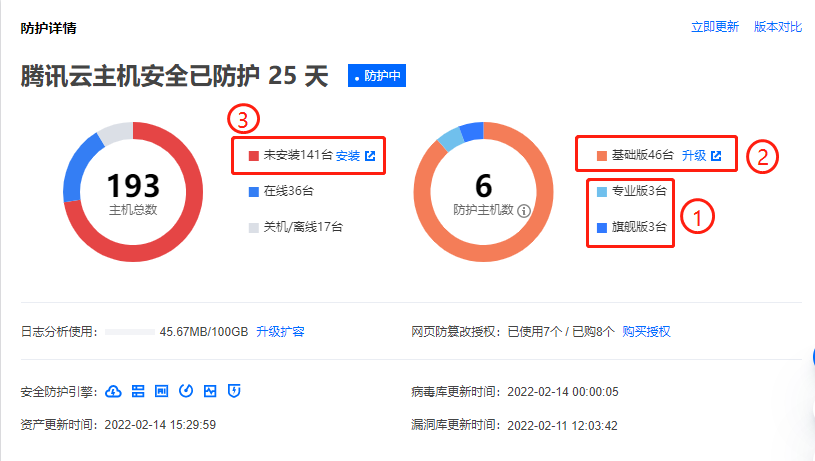
① Cloud Virtual Machines with CWPP installed and professional or flagship protection enabled enjoy comprehensive and multi-dimensional system security provided by CWPP.
② Cloud Virtual Machines with the basic version of Host Security installed can click Upgrade on the right to upgrade to professional protection or flagship protection.
③ Cloud Virtual Machines without the host security client installed can click Install on the right and follow the instructions to install it:
Windows CVM Environment
Supported versions
Currently supported versions:
Windows Server 2008, 2012, 2016, 2019, 2022 (32-bit or 64-bit).
Windows 10, 11 (64bit).
Host security client installation
Server Type | Server Product | Server Architecture | Network Location | Client Download and Installation |
Tencent Cloud | CVMs, Lighthouse servers, blackstone servers, ECMs | x86 | <VPC Network> | Open the cmd command line window, paste and run the following install command:
|
Tencent Cloud | Cloud Virtual Machine | x86 | Basic Network | Open the cmd command line window, paste and run the following install command.
|
Non-Tencent Cloud | / | x86 | Public network, dedicated line |
Due to the validity period limit of the command, please go to the Host list to view the installation instruction and download and install the client. |
Installation instructions
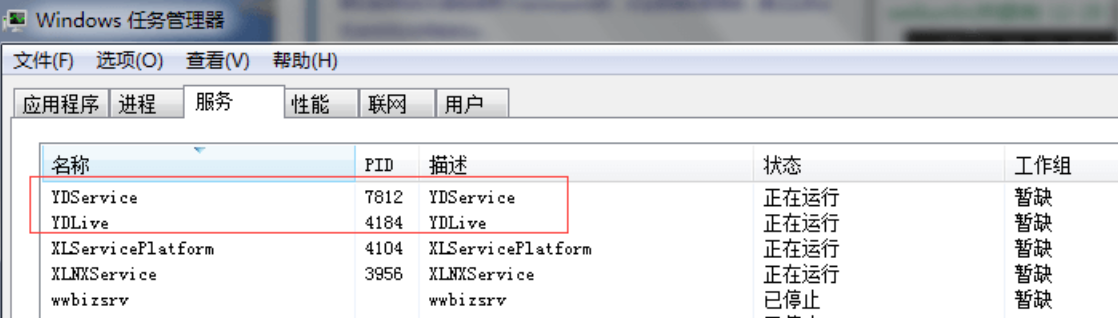
Windows installation status verification: Open the task manager and check whether the YDService and YDLive processes are called. If they are called, the installation is successful.
Linux CVM Environment
Supported versions
Currently supported versions (64bit):
TencentOS Server
Tencent tlinux
CentOS 6 or later versions
Ubuntu 9.10 and above
Debian 6 or later versions
RHEL 6 or later versions
OpenCloudOS
AlmaLinux
openSUSE
Rocky Linux
Red Hat 6 or above
Alibaba Cloud Linux
Amazon Linux
Host security client installation
Server Type | Server Product | Server Architecture | Network Location | Client Download and Installation |
Tencent Cloud | CVMs, Lighthouse servers, blackstone servers, ECMs | x86 | VPC Network |
|
Tencent Cloud | Cloud Virtual Machine | x86 | Basic Network |
|
Tencent Cloud | CVMs, Lighthouse servers, blackstone servers, ECMs | arm | VPC Network |
|
Tencent Cloud | Cloud Virtual Machine | arm | Basic Network |
|
Non-Tencent Cloud | / | x86, arm | Public network, dedicated line |
Due to the command valid period limitation, please go to the host list to view the installation guide and download and install the client.
|
Installation instructions
Execute the command and check whether the YDService and YDLive processes are running. If they are running, the installation is successful.
ps -ef | grep YD

Note: If the processes are not running, you can manually execute the command as the root user to start the programs. The command is:
/usr/local/qcloud/YunJing/startYD.sh
Step 2: Operate Host Security
CWPP can process and display the server security information in real time. With the CWPP agent installed, you can configure it to detect and isolate Trojan files, detect vulnerabilities and suspicious logins, create allowlists, prevent password cracking and set alarms. For details, see Operation Guide.
Step 3: Troubleshooting
If your server is intruded, you can perform troubleshooting by referring to the troubleshooting guide to restore the website or system to normal operation. For details, see Intrusions on Linux or Intrusions on Windows.
Step 4: Uninstall Host Security
If you no longer need Host Security protection, you can uninstall it. There are two ways to uninstall Host Security: from the console or from the system. The detailed steps are as follows:
Uninstalling in the console
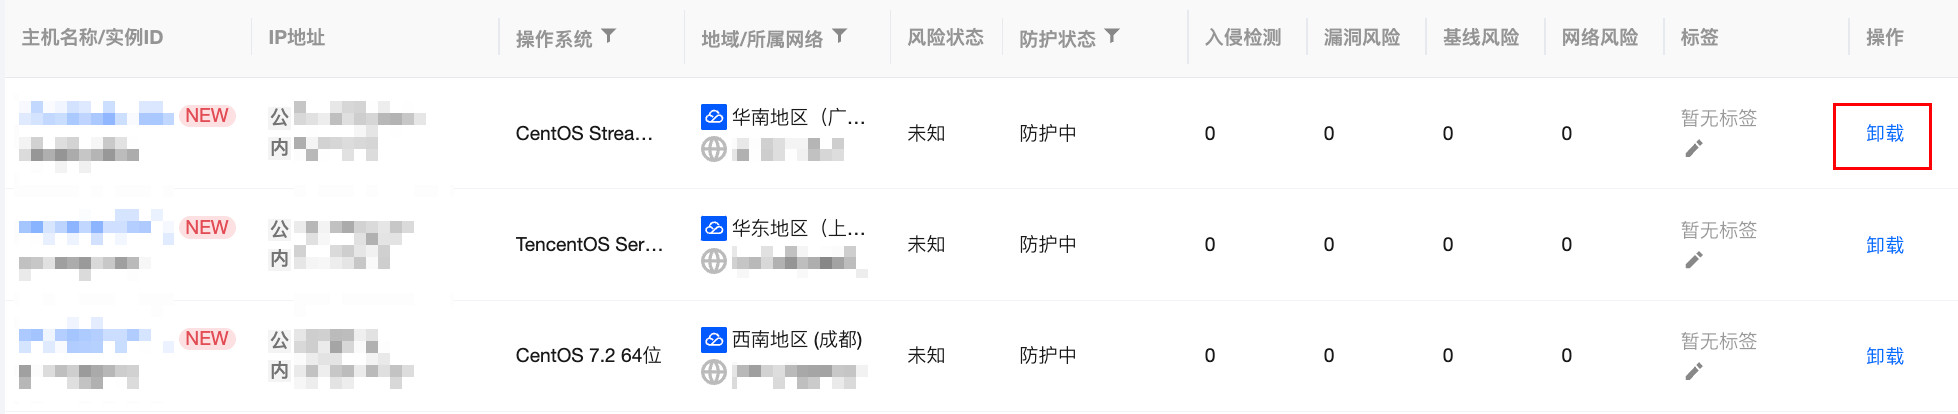
1. Log in to the CWPP Console, select Asset Management > Host list in the left navigation bar to check if your CVM has CWPP installed.
2. In the server list, select the server from which you want to uninstall the host security, and click Uninstall in the action bar on the right.
Uninstalling in the system
Windows system: Follow the path
C:\Program Files\QCloud\YunJing\uninst.exe, find the uninst.exe file, and double-click to uninstall.Linux system: Enter the command
if [ -w '/usr' ]; then /usr/local/qcloud/YunJing/uninst.sh ; else /var/lib/qcloud/YunJing/uninst.sh ; fi to uninstall.FAQs
How To Handle Firewall Interception During Installation?
It is recommended to allow the host security backend server access address in the firewall policy:
VPC network domain name:
s.yd.tencentyun.com, l.yd.tencentyun.com, u.yd.tencentyun.comVPC network IP:
169.254.0.55Basic network domain name:
s.yd.qcloud.com, u.yd.qcloud.com, l.yd.qcloud.comBasic network IP:
10.148.188.202, 10.148.188.201, 11.177.125.116, 11.177.124.86, 11.149.252.57, 11.149.252.62, 11.149.252.51Non-Tencent Cloud public network domain:
sp.yd.qcloud.com, up.yd.qcloud.com, lp.yd.qcloud.comNon-Tencent Cloud public network IP:
120.232.65.223, 157.148.45.20, 183.2.143.163Port:
5574, 8080, 80, 9080 (port 443 also needs to be open for public network)How To Set Up If Not Using the Default DNS?
If you do not use the default DNS, you need to forward all resolutions of the root domains
tencentyun.com and yd.qcloud.com to the default DNS.