Lifecycle Hook

Last updated: 2024-01-18 11:02:24

Use Cases

Within the scaling group, you can configure elastic expansion and contraction activities. If you wish to perform custom operations before officially launching these instances, the lifecycle hook feature can assist you in accomplishing this.
After expanding the scaling group, there is a need to delay for a period before mounting the instances to the CLB, and then providing services externally.
Executing data backup operations when the scaling group releases instances.
Executing user-defined operations during the elastic expansion or contraction of the scaling group.
Note:
The lifecycle hook only takes effect when instances are automatically created or removed; it does not affect other instances within the scaling group.
If an expansion mode is set, it will also take effect when manually adding or removing instances, as well as during power on and off.
Only ten lifecycle hooks can be created within a single scaling group.

Mode of Operation

After a lifecycle hook is created in a scaling group, the associated scaling activity is suspended when the lifecycle hook event occurs, allowing you to perform custom operations during this suspension period. The suspension will terminate when the lifecycle hook times out.

Lifecycle Hook Attributes

Name
Note
Sample
Name
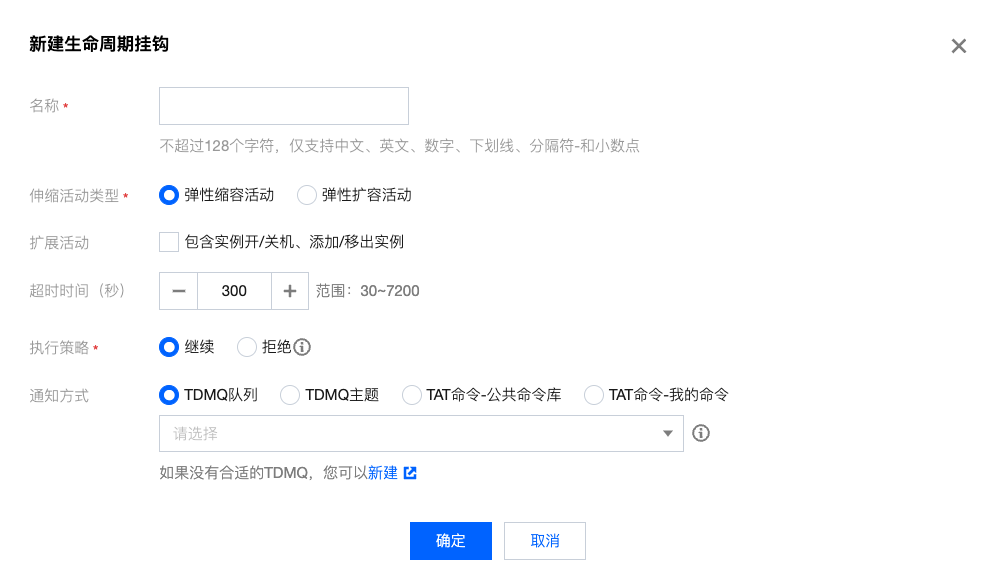
The name of the lifecycle hook, which only supports Chinese, English, numbers, underscores, hyphens, and decimal points.
fehwnl_
Scaling activity type
Elastic contraction activity/Elastic expansion activity
Scale In
Expanded activities
Expansion activities include NORMAL and EXTENSION, with the default value being NORMAL.
NORMAL: Lifecycle hooks are only effective when instances are automatically created or removed.
EXTENSION: Lifecycle hooks will also be effective during manual instance addition, removal, and power cycling.
NORMAL
Timeout period
The default duration for which an instance remains in the waiting state. It must be an integer between 30 and 7200 seconds.
300
Execution policy
The execution policy includes Proceed and Reject.
Proceed Policy: The suspended scaling activity will continue to execute.
Reject Policy: For elastic expansion activities, the created CVM instances will be directly released. There is no impact on elastic contraction activities.
When multiple lifecycle hooks are set for a scaling group, the operations are executed in sequence. However, only the first reject policy is executed, and the reject policies of subsequent lifecycle hooks are not effective.
Deny
Notification method
Notification methods include TDMQ topics, TDMQ queues, and TAT commands. After selecting a notification method, you also need to choose a specific TDMQ topic, TDMQ queue, or TAT command.
CMQ Topic
Notification identifier
Each time Auto Scaling pushes a message to the notification object, it concurrently sends the notification identifier you have pre-specified, facilitating the management and tagging of different categories of notification information.
Notification message

Create Lifecycle Hook

1. Log in to the Auto Scaling Console.
2. Select the scaling group to which you need to bind the lifecycle hook, click on the scaling group ID/name, and enter the details page of that scaling group, as shown in the figure below:

3. Select the Lifecycle Hook tab and click on New.
4. In the pop-up New Lifecycle Hook dialog box, fill in the relevant information about the lifecycle hook, as shown in the figure below:

Note:
When creating a lifecycle, you need to select or create a new TDMQ. This includes creating a TDMQ Topic and a TDMQ Queue.
In the case of setting multiple lifecycle hooks for a single scaling group, they will wait in sequence, but only the first rejection policy will be executed, subsequent lifecycle hooks will not take effect.
If you do not specify a notification method, you will not receive any default notifications.
Within the same scaling group, lifecycle hook names cannot be duplicated.

Modify lifecycle hook

1. Log in to the Auto Scaling Console.
2. Select the scaling group for which you need to modify the lifecycle hook, click on the scaling group ID/name to enter the details page of that scaling group.
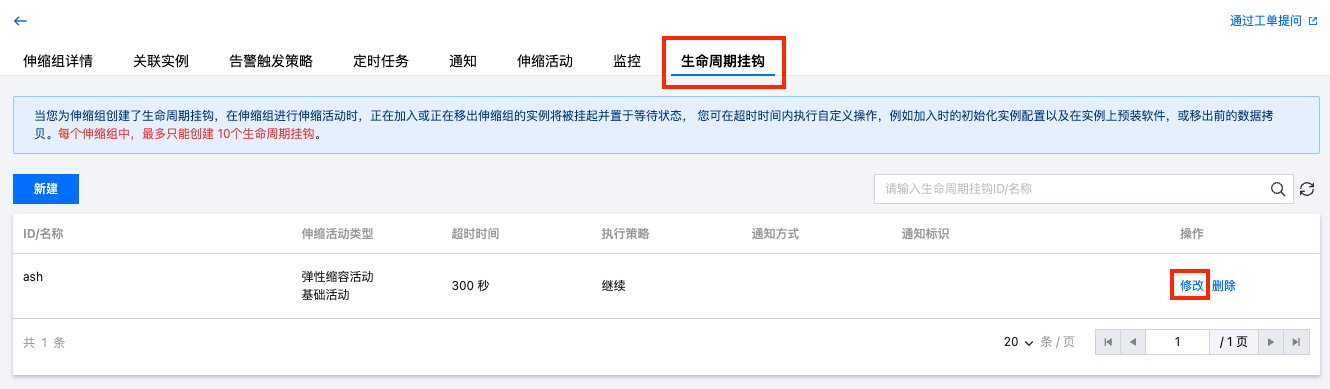
3. Select the Lifecycle Hook tab, in the row where you need to modify the lifecycle hook, click on Modify, as shown in the figure below:

4. In the pop-up Modify Lifecycle Hook window, you can modify the information according to your actual needs.

Delete lifecycle hook

1. Log in to the Auto Scaling Console.
2. Select the scaling group from which you need to delete the lifecycle hook, click on the scaling group ID/name to enter the details page of that scaling group, as depicted in the figure below:

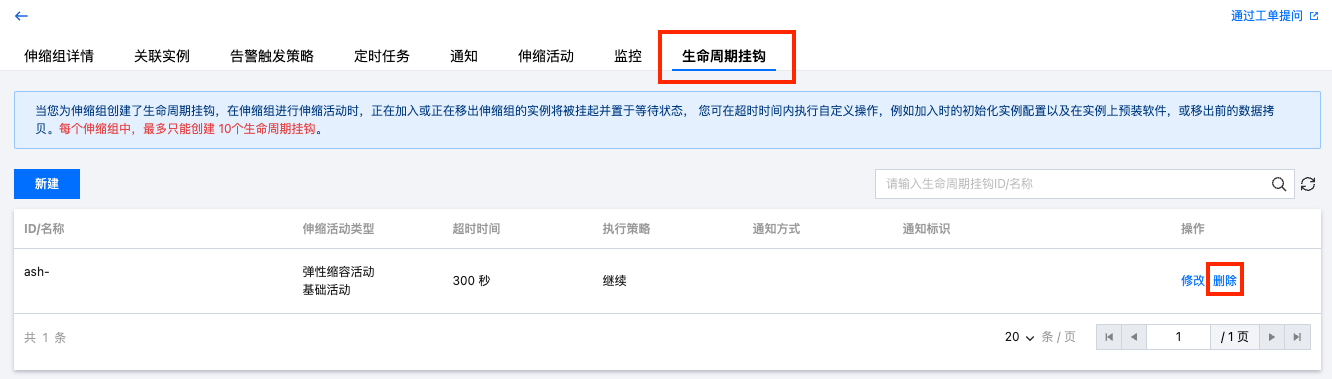
3. Select the Lifecycle Hook tab, in the row where you need to delete the lifecycle hook, click on Delete, as depicted in the figure below:

4. In the pop-up Delete Lifecycle Hook window, simply click on Confirm.