操作场景
腾讯云容器服务 TKE 提供升级 Kubernetes 版本的功能,您可通过此功能对运行中的 Kubernetes 集群进行升级。升级的过程为:升级的前置检查、升级 Master 和升级 Node。
升级须知
升级属于不可逆操作,请谨慎进行。
在升级集群前,确保集群状态均为健康状态。若集群不正常,您可以自行修复,也可以通过 在线咨询 联系我们协助您进行修复。
升级顺序:升级集群时,必须先完成 Master 版本升级,再尽快完成 Node 版本升级,且升级过程中不建议对集群进行任何操作。
仅支持向上升级 TKE 提供的最近 Kubernetes 版本,不支持跨多个版本升级(例如1.8跳过1.10直接升级至1.12),且仅当集群内 Master 版本和 Node 版本一致时才可继续升级下一个版本。
CSI-CFS 插件不兼容问题:关于 CSI 插件 COS CSI 和 CFS CSI,不同 Kubernetes 版本适配的 CSI 插件版本有以下差异,因此建议您:将集群升级到 TKE 1.14及以上版本时,在组件管理页面重新安装 CSI 插件(重建组件不影响已经在使用中的 COS 和 CFS 存储)。
Kubernetes 1.10 和 Kubernetes 1.12 版本适配的 CSI 插件版本是0.3。
Kubernetes 1.14 及以上版本适配的 CSI 插件版本是1.0。
HPA 失效问题:在 Kubernetes 1.18版本之前,HPA 中所引用的 deployment 对象的 apiVersion 可能是
extensions/v1beta1,而 Kubernetes 1.18版本之后,deployment 的 apiVersion 只有 apps/v1,可能导致集群升级到 Kubernetes 1.18之后,HPA 会失效。
如果您使用了 HPA 功能,建议在升级之前,执行如下命令,将 HPA 对象中的 apiVersion 切换到 apps/v1。kubectl patch hpa test -p '{"spec":{"scaleTargetRef":{"apiVersion":"apps/v1"}}}'
Helm 应用失效问题:每个应用支持的 Kubernetes 的版本不太相同,包括通过应用市场安装的应用或是通过第三方安装的应用。建议在升级集群前,查看已安装在集群里的应用列表,确认其支持的集群版本范围。有些应用本身对高版本的 Kubernetes 有适配,此时可能需要升级应用的版本。有些应用可能还没有对高版本的 Kubernetes 适配,此时请谨慎升级集群。
Nginx Ingress 版本问题:extensions/v1beta1 和 networking.k8s.io/v1beta1 API 版本的 Ingress 不在 v1.22 版本中继续提供,详情请 查看文档。您集群里面 Nginx Ingress 的版本可能比较低,在升级 Kubernetes 版本到 v1.22 及以上版本时,在组件管理页面升级 Nginx Ingress 组件。
操作步骤
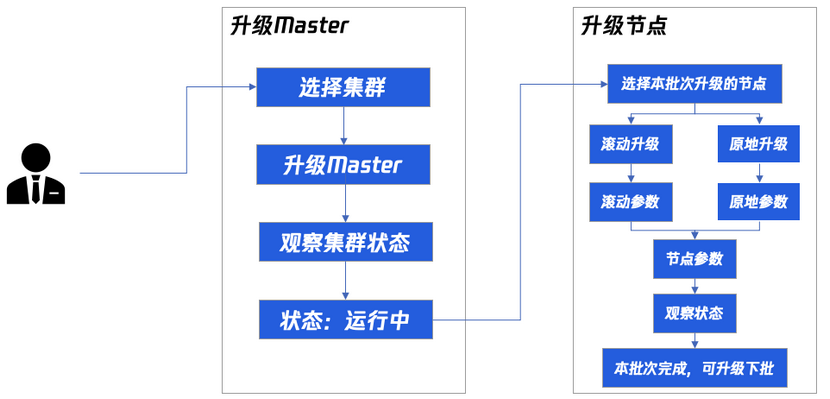
升级 Master Kubernetes 版本
注意:
目前已支持托管集群、独立集群 Master 版本升级,且升级需要花费5 - 10分钟,在此期间您将无法操作您的集群。
Master 大版本与小版本升级说明
目前 Master 升级已支持大版本升级(例如从1.14升级到1.16)、小版本升级(例如从1.14.3升级到1.14.6,或者从v1.18.4-tke.5升级到v1.18.4-tke.6),强烈建议您升级前先查阅对应的功能发布记录:
在升级 Kubernetes 大版本之前,建议您查阅 TKE Kubernetes 大版本更新说明。
在升级 Kubernetes 小版本之前,建议您查阅 TKE Kubernetes Revision 版本历史。
说明:
当大版本升级(例如1.12升级到1.14),若您已设置自定义参数,需要您重新设置新版本的自定义参数。原参数不保留。详情可参见 自定义 Kubernetes 组件启动参数。
当小版本升级时,您已设置的自定义参数会被保留,无需重新设置。
集群 Master 升级后,apiVersion 会更新为当前 Kubernetes 版本支持的最新版本。
注意事项
升级前,请详细阅读 升级须知。
1.7.8版本 TKE 集群,网络模式为 bridge,集群升级不会自动切换网络模式为 cni。
集群升级不会切换 kube-dns 为 core-dns。
创建集群时设置的部分特性(例如支持 ipvs),当集群 Master 版本升级到1.10和1.12后将不支持开通。
存量的集群升级后,若 Master 版本在1.10版本以上,Node 节点版本在1.8版本以下,PVC 功能将不可用。
升级 Master 完成后,建议您尽快升级节点版本。
Master 升级技术原理
Master 节点升级分为3个步骤:前置组件升级、Master 节点组件升级、后置组件升级。
升级前置操作:将会升级前置依赖的组件,例如监控组件等,以防兼容性问题导致组件异常。
Master 节点组件升级:将按组件顺序对所有 Master 的对应组件进行升级,所有 Master 的某个组件升级完成后再进行下一个组件的升级。
TKE 会先升级 kube-apiserver,后升级 kube-controller-manager 和 kube-scheduler,最后升级 kubelet。具体步骤如下:
重新生成 kube-apiserver 组件静态 Pod 对应的 YAML 文件内容。
检查当前 kube-apiserver pod 是否健康,Kubernetes 版本是否正常。
同理,依次升级 kube-controller-manager 和 kube-scheduler。
升级 kubelet,并检查所在 Master 节点是否 ready。
升级后置操作:
按需升级后置依赖组件,如 kube-proxy(并将其滚动更新策略改为 on delete)、cluster-autoscaler 组件等。
执行一些后置依赖组件相关的兼容性操作,防止兼容性问题导致组件异常。
Master 升级操作步骤
1. 登录容器服务控制台,选择左侧导航栏中的 集群。
2. 在集群页面,选择目标集群 ID,进入集群基本信息页。
3. 在基础信息页面的集群信息模块,单击 Master 版本右侧的升级。如下图所示:

4. 在弹出窗口中可修改自定义参数。
5. 单击前置检查,Master 升级前置检查包括检查废弃 API、组件兼容性、集群状态等。
6. 前置检查通过后单击提交,等待升级完成。
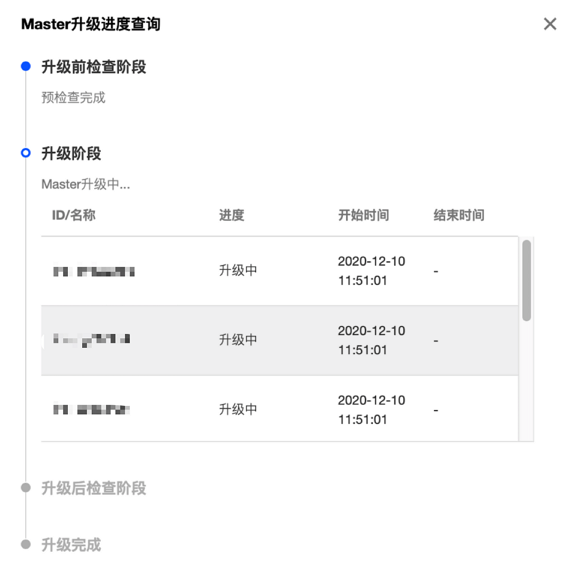
7. 您可以在集群管理页对应的集群状态处查看升级进度,也可以在升级进度弹窗中查看当前升级进展、Master 节点升级进度(托管集群不显示具体 Master 节点列表)、升级持续时间。如下图所示:
8. 该示例集群 Kubernetes 版本升级前 Master 版本为1.10.5,升级完成后为 Master 1.12.4。如下图所示:

升级 Node Kubernetes 版本
集群 Master Kubernetes 版本升级完成后,集群列表页将显示该集群节点有可用升级。如下图所示:

注意事项
升级前,请详细阅读 升级须知。
当 Node 节点处于运行中时,可进行升级操作。
选择升级方式
重装滚动升级:采用重装节点的方式升级节点版本。仅支持大版本升级,例如1.10可升级至1.12。
原地滚动升级:原地不重装,仅替换 kubelet、kube-proxy 等组件。支持大版本、小版本升级,例如1.10可升级至1.12,1.14.3可升级至1.14.8。
重装滚动升级执行原理
基于重装的节点升级采用滚动升级的方式,同一时间只会对一个节点进行升级,只有当前节点升级成功才会进行下个节点的升级。如下图所示:
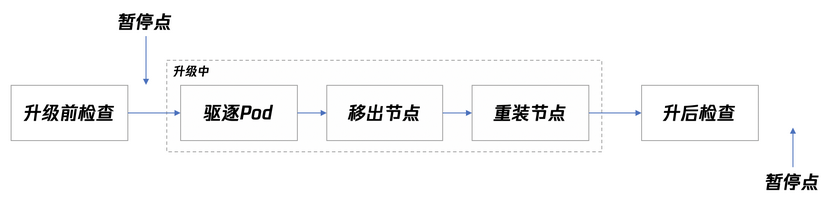
升级前检查:对节点上的 Pod 进行驱逐前的检查。具体的升级前检查项如下:
统计该节点所有工作负载的 Pod 个数,若驱逐节点后,任何工作负载的 Pod 数目变为0 ,则检查不通过,不能进行升级。
以下系统控制面工作负载将被忽略:
l7-lb-controller
cbs-provisioner
hpa-metrics-server
service-controller
cluster-autoscaler
驱逐 Pod:首先将节点标记为不可调度,随后驱逐或者删除节点上所有 Pod。
移出节点:将节点从集群中移除。该步骤只进行基本的清理工作,不会删除节点在集群中的 Node 实例,所以节点的 label、taint 等属性都可保留。
重装节点:重装节点的操作系统,并重新安装新版本 kubelet。
升级后检查:检查节点是否 ready,是否为可调度的,并检查当前不可用 Pod 比例是否超过最大值。
重装滚动升级操作步骤(Node Kubernetes 版本)
1. 登录容器服务控制台,选择左侧导航栏中的 集群。
2. 在集群页面,选择目标集群 ID,进入集群详情页。
3. 在基础信息页面的集群信息模块,单击 Node Kubernetes 版本右侧的升级。如下图所示:

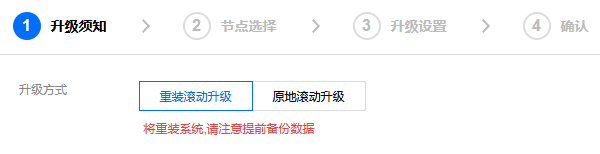
4. 在升级须知步骤中,选择升级方式为重装滚动升级,仔细阅读升级须知。勾选我已阅读并同意上述技术条款,并单击下一步。如下图所示:
注意:
该升级方式将重装系统,原有数据将会被清除,请注意提前备份数据。
5. 在节点选择步骤中,选择本批次需要升级的节点,并单击下一步。
6. 在升级设置步骤中,按需填写节点信息,并单击下一步。
7. 在确认步骤中,确认信息并单击完成即可开始升级。
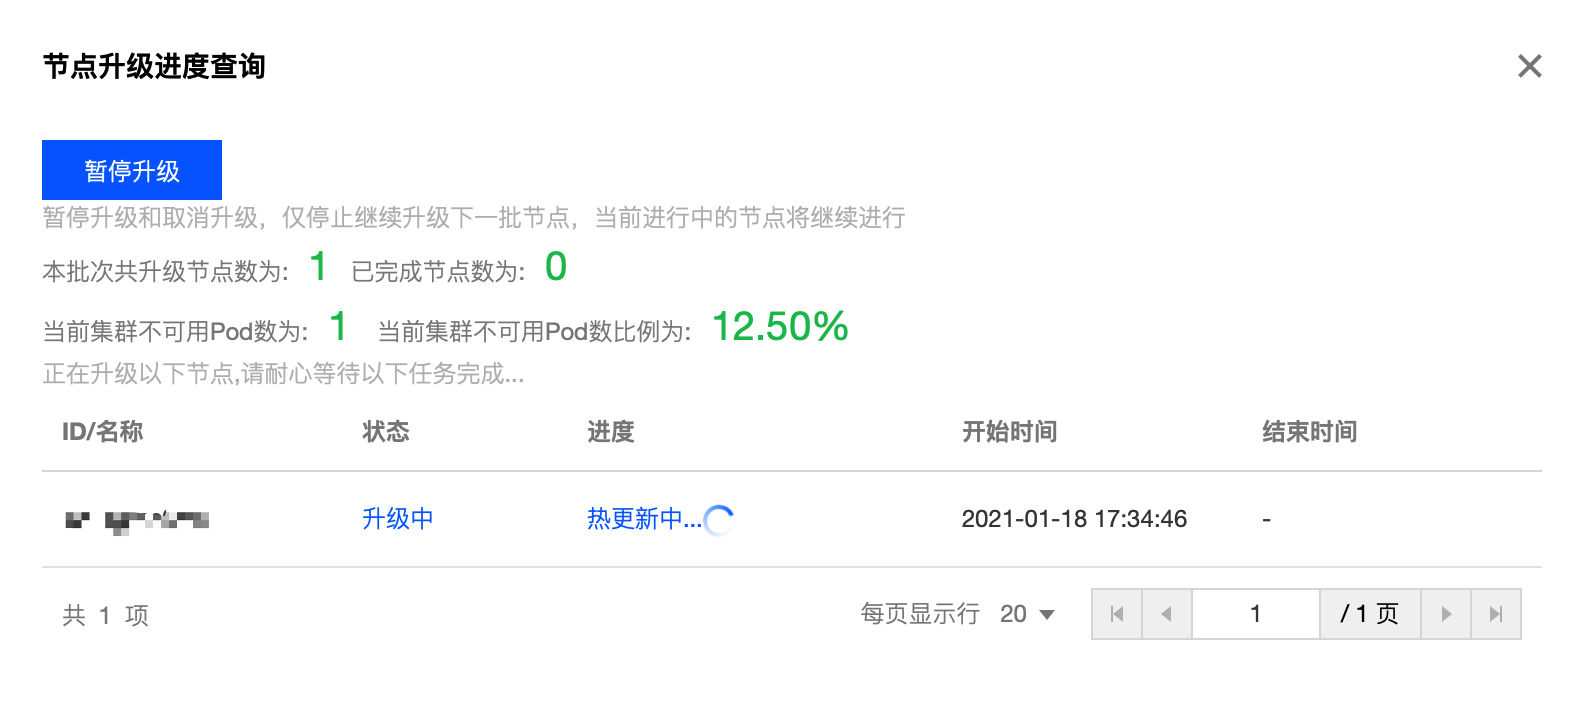
8. 查看节点升级进度, 直至所有节点升级完成。

原地滚动升级执行原理
节点原地升级采用滚动升级的方式,同一时间只会对一个节点进行升级,只有当前节点升级成功才会进行下个节点的升级。原地升级目前已同时支持大版本升级以及大版本的不同小版本升级。如下图所示:
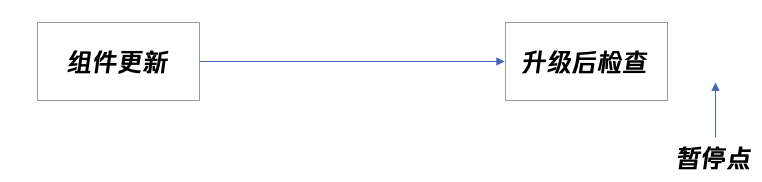
组件更新:替换和重启节点上的 kubelet 和二进制部署的 kube-proxy 组件。
注:以 DaemonSet 形式部署的 kube-proxy 组件,会在节点升级完成后再更新。
升级后检查:检查节点是否 ready,并检查当前不可用 Pod 比例是否超过最大值。
原地滚动升级操作步骤
1. 登录容器服务控制台,选择左侧导航栏中的 集群。
2. 在集群页面,选择目标集群 ID,进入集群详情页。
3. 在基础信息页面的集群信息模块,单击 Node Kubernetes 版本右侧的升级。
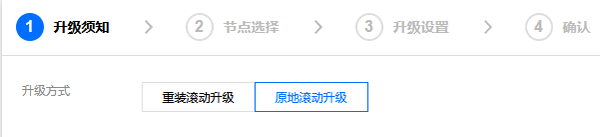
4. 在升级须知中,选择升级方式为“原地滚动升级”,仔细阅读升级须知。勾选我已阅读并同意上述技术条款,并单击下一步。如下图所示:
5. 在节点选择步骤中,选择本批次需要升级的节点,单击下一步。
6. 在确认步骤中,确认信息并单击完成即可开始升级。
7. 查看节点升级进度, 直至所有节点升级完成。