应用场景
在用户业务采用 Kubernetes 标准服务发现机制的情况下,若 CoreDNS 请求的 QPS 过高,可能导致 DNS 查询延迟增加和负载不均,从而对业务性能和稳定性产生不利影响。
针对这种场景,可以通过部署 NodeLocal DNS Cache,降低 CoreDNS 请求压力,提升集群内 DNS 解析性能以及稳定性。本文将详细介绍如何在 TKE 集群安装并使用 NodeLocal DNS Cache。
使用限制
以下场景不支持使用 NodeLocal DNS Cache:
限制场景 | 原因说明 |
部署在超级节点上的 Pod | 超级节点上没有真实的宿主机运行 NodeLocal DNS Cache 服务。新版本会自动忽略 169.254.20.10 这个地址,低版本则可能存在 DNS 解析问题。 |
独占网卡模式( tke-direct-eni)的 Pod | 独占网卡模式下,Pod 的网络流量不经过宿主机网络栈,无法访问运行在宿主机上的 Local DNS 缓存服务(169.254.20.10)。 |
Cilium Overlay 网络模式 | Cilium 网络插件有独立的 DNS 处理机制,与 NodeLocal DNS Cache 不兼容。 |
GR(GlobalRouter)网络模式 | GR 网络模式的集群默认未安装 tke-eni-ip-webhook 组件(该组件是 VPC-CNI 网络模式专用),无法自动注入 DNSConfig。 |
说明:
NodeLocal DNS Cache 当前仅作为 CoreDNS 的缓存代理使用,不支持配置其他插件。如果有需要,请直接配置 CoreDNS。
原理介绍
社区方案
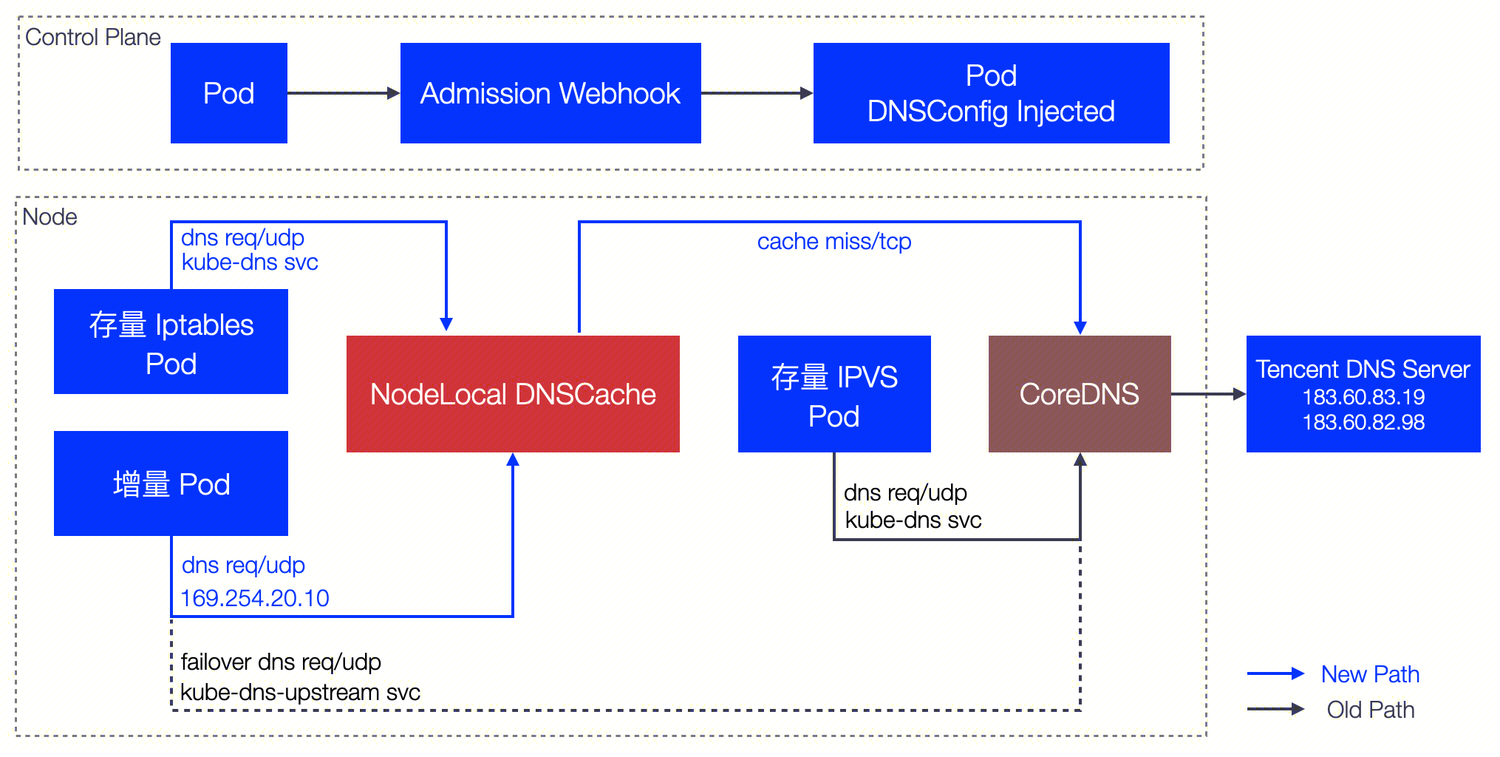
社区版本 NodeLocal DNS Cache 通过 DaemonSet 在集群的每个节点上部署一个 hostNetwork 的 Pod,该 Pod 名称为 node-local-dns,可以缓存本节点上 Pod 的 DNS 请求。如果存在 cache misses,该 Pod 将会通过 TCP 连接请求上游 kube-dns 服务进行获取。原理图如下所示:
在 kube-proxy 采用不同的转发模式下,支持效果有差异。
iptables 模式下,部署 NodeLocal DNS Cache 后,存量 Pod 和增量 Pod 均可以无感自动切换访问本地 DNS Cache。
ipvs 模式下,增量和存量 Pod 均无法实现 DNS Cache 的无感切换。如果在 ipvs 模式下想使用 NodeLocal DNS Cache 服务,可以采用以下两种方式:
方式1:修改 kubelet 参数
--cluster-dns,指向169.254.20.10,然后重启 kubelet 服务。此操作方式存在业务中断的风险。方式2:修改 Pod 的 DNSConfig,指向新的
169.254.20.10地址,使用本地的 DNS Cache 处理 DNS 解析。TKE 中 NodeLocal DNS Cache 方案
TKE 上的 NodeLocal DNS Cache 方案对社区版本在 ipvs 模式下的缺陷进行了增强,针对增量 Pod 会自动配置 DNSConfig,具备本地 DNS 缓存能力。
配置灵活性:TKE 支持三级配置优先级(Pod 级 > Namespace 级 > 集群级),用户可以根据需求灵活控制哪些 Pod 启用 Local DNS 注入。详见下文"三级配置优先级"章节。
存量 Pod 限制:当前仍然无法支持存量 Pod 自动切换,需要用户显式操作(重建 Pod 或手动配置 DNSConfig)。
工作原理:
控制台安装 NodeLocal DNS Cache
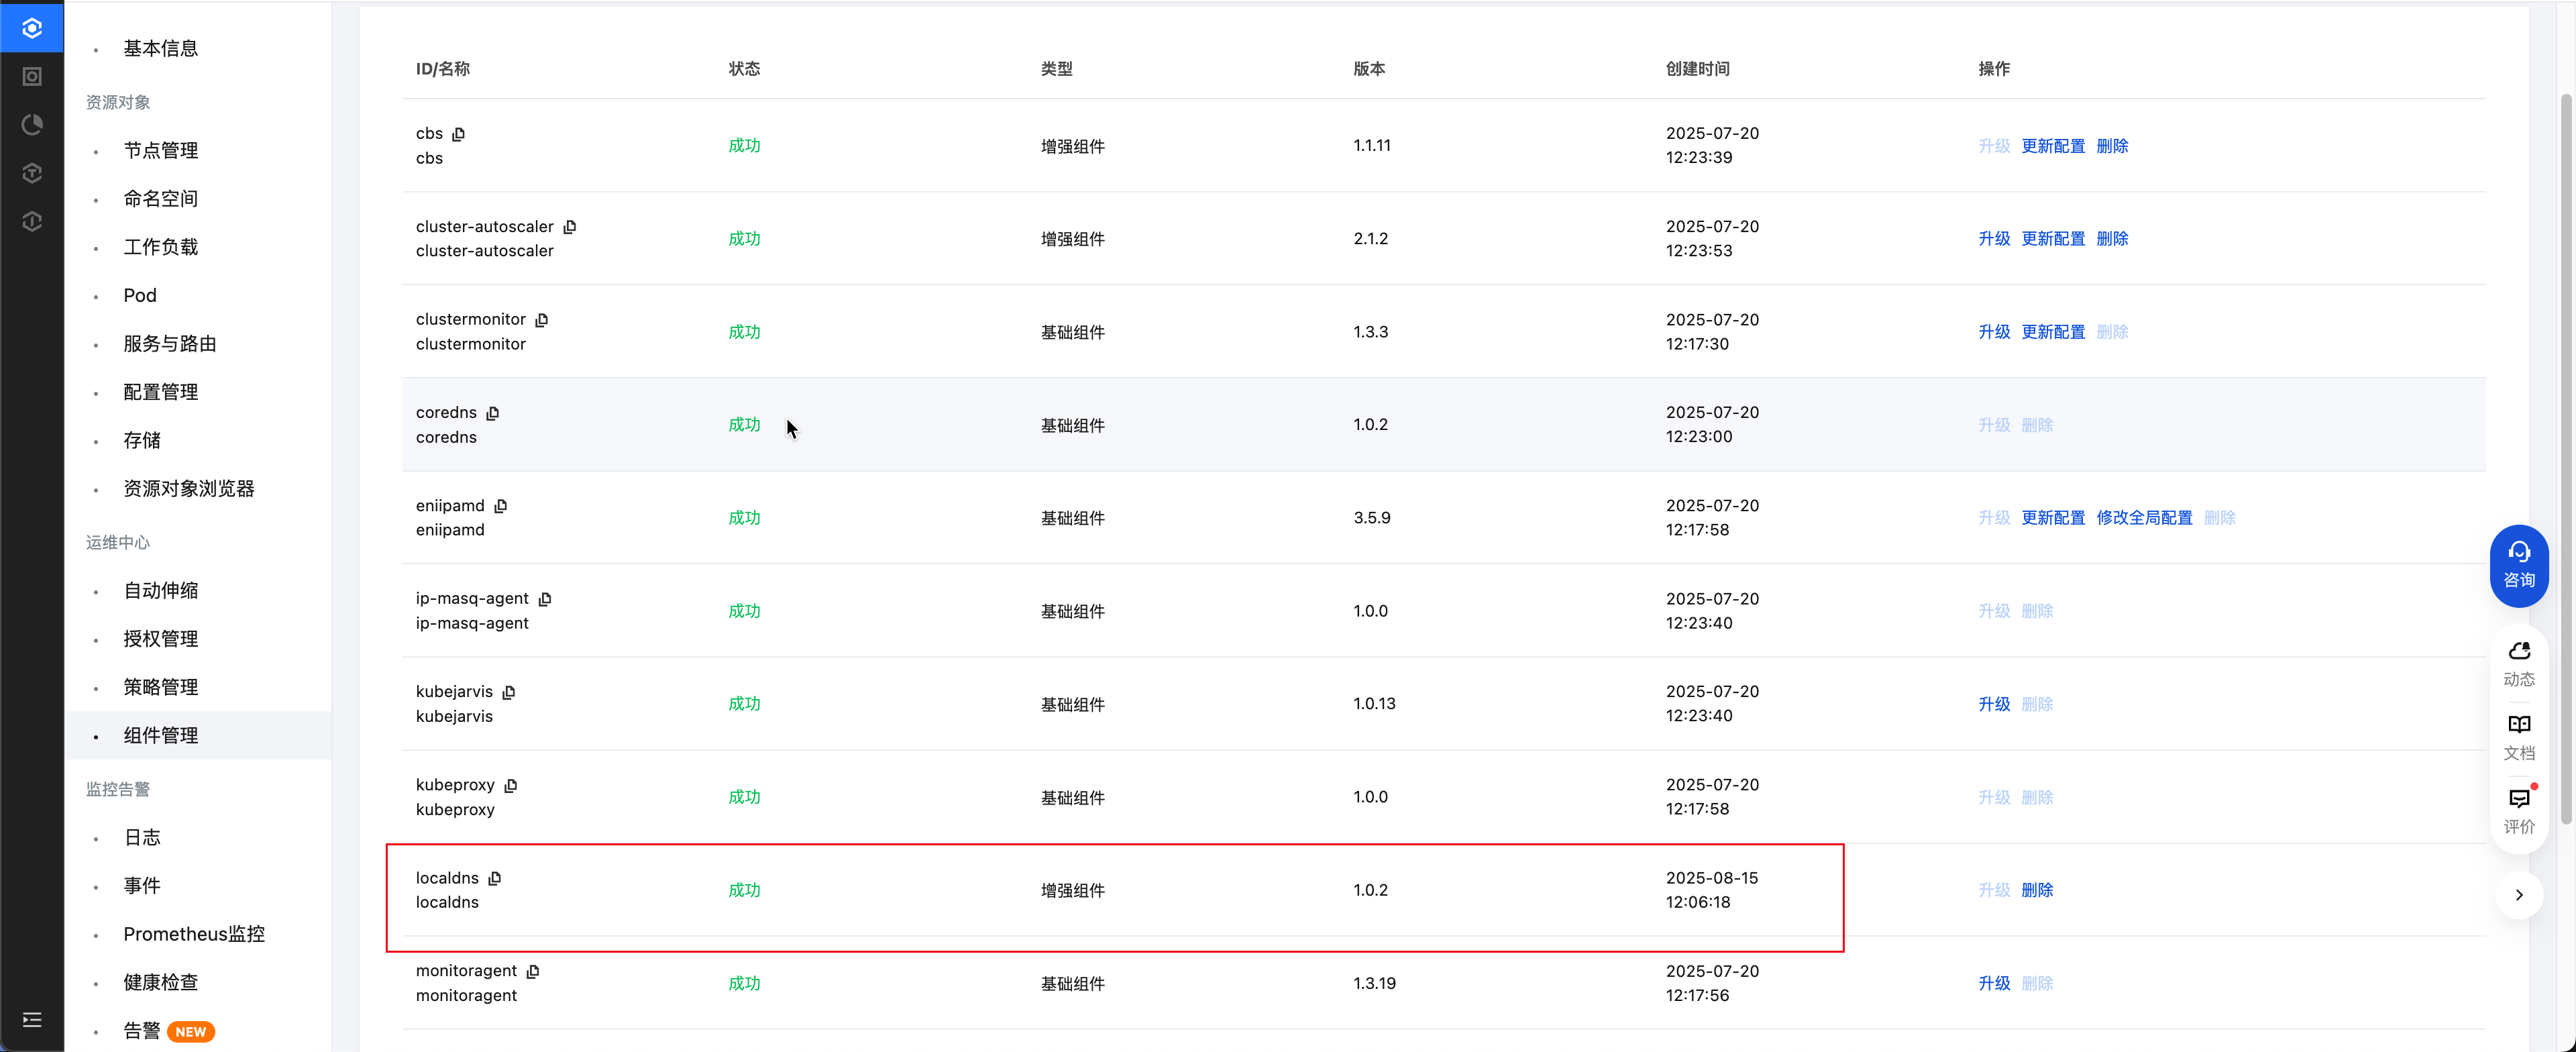
您可以通过 TKE 的组件管理部署安装 Nodelocal DNS Cache,安装完成后,返回组件管理列表页,检查 localdns 组件状态置为成功,如下图所示:
使用 NodeLocal DNS Cache
iptables 集群和 ipvs 集群下,对 NodeLocal DNS Cache 的使用方式不同,具体描述如下:
iptables 集群
存量 Pod:用户无需任何操作,存量 Pod 可以直接使用本地 DNS Cache 能力解析 DNS 请求。
增量 Pod:用户无需任何操作,新建 Pod 可以直接使用本地 DNS Cache 能力解析 DNS 请求。
ipvs 集群
针对 ipvs 集群,TKE 会将 DNSConfig 配置动态注入到新建的 Pod 中,同时会将 dnsPolicy 配置为 None,避免手动配置 Pod YAML。自动注入的配置如下:
dnsConfig:nameservers:- 169.254.20.10- 10.23.1.234options:- name: ndotsvalue: "3"- name: attemptsvalue: "2"- name: timeoutvalue: "1"searches:- <pod所在命名空间>.svc.cluster.local- svc.cluster.local- cluster.localdnsPolicy: None
三级配置优先级
注入决策采用三级配置优先级体系(从高到低):
优先级 | 配置层级 | 配置方式 | 说明 |
最高 | Pod 级 | Pod label localdns-injector=enabled|disabled | 单个 Pod 的精细控制 |
中等 | Namespace 级 | Namespace label localdns-injector=enabled|disabled | 命名空间级别批量控制 |
最低 | 集群级 | 在 TKE 控制台组件管理中配置 tke-eni-ip-webhook 组件的 localdns 参数。 | 集群默认行为(默认值为 false) |
说明:
DNSConfig 自动注入功能由 tke-eni-ip-webhook 组件实现,而非 NodeLocal DNS Cache 组件本身。NodeLocal DNS Cache 组件负责在每个节点上运行 DNS 缓存服务,tke-eni-ip-webhook 则负责在 Pod 创建时自动注入 DNSConfig,使 Pod 能够使用本地 DNS 缓存。因此,集群级的注入开关需要在 tke-eni-ip-webhook 组件中配置。
配置决策流程:
1. 检查 Pod 是否有
localdns-injector label,如有则按 Pod 级配置决定。2. 否则检查 Namespace 是否有
localdns-injector label,如有则按 Namespace 级配置决定。3. 否则按集群级
localdns 参数决定。配置示例
# 场景1: 集群默认禁用(localdns=false),为特定 namespace 启用kubectl label namespace production localdns-injector=enabled# 场景2: 集群默认启用(在组件管理中配置 localdns=true),为特定 namespace 禁用kubectl label namespace sensitive-app localdns-injector=disabled# 场景3: Namespace 启用,为特定 Pod 禁用kubectl run special-pod --image=nginx \\--labels="localdns-injector=disabled"# 场景4: 集群和 Namespace 都禁用,为特定 Pod 启用kubectl run test-pod --image=nginx \\--labels="localdns-injector=enabled"
注入条件
如果您需要相应的 Pod 能够自动注入 DNSConfig,请确保满足以下条件:
1. 配置正确的注入开关。可以通过以下三种方式之一启用注入:
集群级启用:在 TKE 控制台组件管理中,找到 tke-eni-ip-webhook 组件,配置
localdns=true,全集群默认开启注入。Namespace 级启用:为目标 Namespace 添加 label
localdns-injector=enabled。Pod 级启用:为目标 Pod 添加 label
localdns-injector=enabled。例如:如果您需要 default 命名空间中的新建 Pod 自动注入 DNSConfig,请配置:
kubectl label namespace default localdns-injector=enabled
2. DNSPolicy 配置正确。新建 Pod 网络配置非 hostNetwork,需要配置 DNSPolicy 为
ClusterFirst;如果 Pod 网络为 hostNetwork,需要配置 DNSPolicy 为 ClusterFirstWithHostNet。不注入的场景
以下场景的 Pod 不会被注入 DNSConfig(无论上述配置如何):
场景 | 原因说明 |
kube-system 和 kube-public 命名空间的 Pod | 系统命名空间保护,避免影响集群核心组件。 |
独占网卡模式( tke-direct-eni)的 Pod | Pod 网络流量不经过宿主机网络栈,无法访问 169.254.20.10。 |
部署在超级节点上的 Pod | 超级节点无真实宿主机运行 NodeLocal DNS 服务。新版本会自动忽略该地址,低版本可能存在 DNS 解析问题。 |
Pod 添加了 localdns-injector=disabled label | 用户显式禁用注入,此配置优先级高于 Namespace 和集群级配置。 |
DNSPolicy 不兼容的 Pod | hostNetwork Pod 且 DNSPolicy 不是 ClusterFirstWithHostNet,或非 hostNetwork Pod 且 DNSPolicy 不是 ClusterFirst。 |
存量 Pod:存量 Pod 暂时无法做到无感切换。如果需要存量 Pod 使用本地 DNS Cache 代理能力,用户需要重建 Pod。重建后,Pod 会自动注入 DNSConfig,从而使用本地 DNS Cache 能力解析 DNS 请求。
增量 Pod:当满足上述注意事项后,新建 Pod 会自动注入 DNSConfig 配置,访问本节点
169.254.20.10:53,使用本地 DNS Cache 能力解析 DNS 请求。ipvs 集群的注意事项
在 Kubernetes 集群使用 IPVS kube-proxy 模式的网络环境下,由于 IPVS 的四层负载均衡机制特性限制,目前缺乏从 CoreDNS 到 NodeLocal DNS 的透明劫持方案,所以在此场景下必须通过 PodSpec 中的 DNSConfig 显式配置 DNS 服务器列表(不管是自动注入还是用户主动配置)。为了优先使用 NodeLocalDNS,并在其故障时降级到备用 CoreDNS 服务节点。目前推荐的配置方案(包括自动注入)中的 servers 列表如下。
dnsConfig:servers:- "169.254.20.10" # NodeLocal DNS虚拟IP- "10.23.1.234" # CoreDNS ClusterIP(每个集群不同)
客户端解析逻辑。标准 DNS 客户端库(如 glibc)默认采用顺序查询机制。优先向 dnsConfig.servers 列表中的首个 DNS 服务器发起请求。仅在首节点响应超时或返回 SERVFAIL 时,自动切换至列表中的后续服务器。
异常场景下的影响。当 NodeLocal DNS 实例发生故障时,以示例配置为例。客户端将经历单次 DNS 查询超时 1s,然后超时后自动降级到备用 CoreDNS 服务节点。极端情况下可能导致最大延迟接近单个查询超时周期。
验证 NodeLocal DNS Cache
NodeLocal DNS Cache 成功开启后,可以在节点上验证 Pod 访问 CoreDNS 服务是否通过了本地 DNS Cache 进行解析。以下是分别验证 iptables 集群和 ipvs 集群的 NodeLocal DNS Cache 开启效果的方法。
说明:
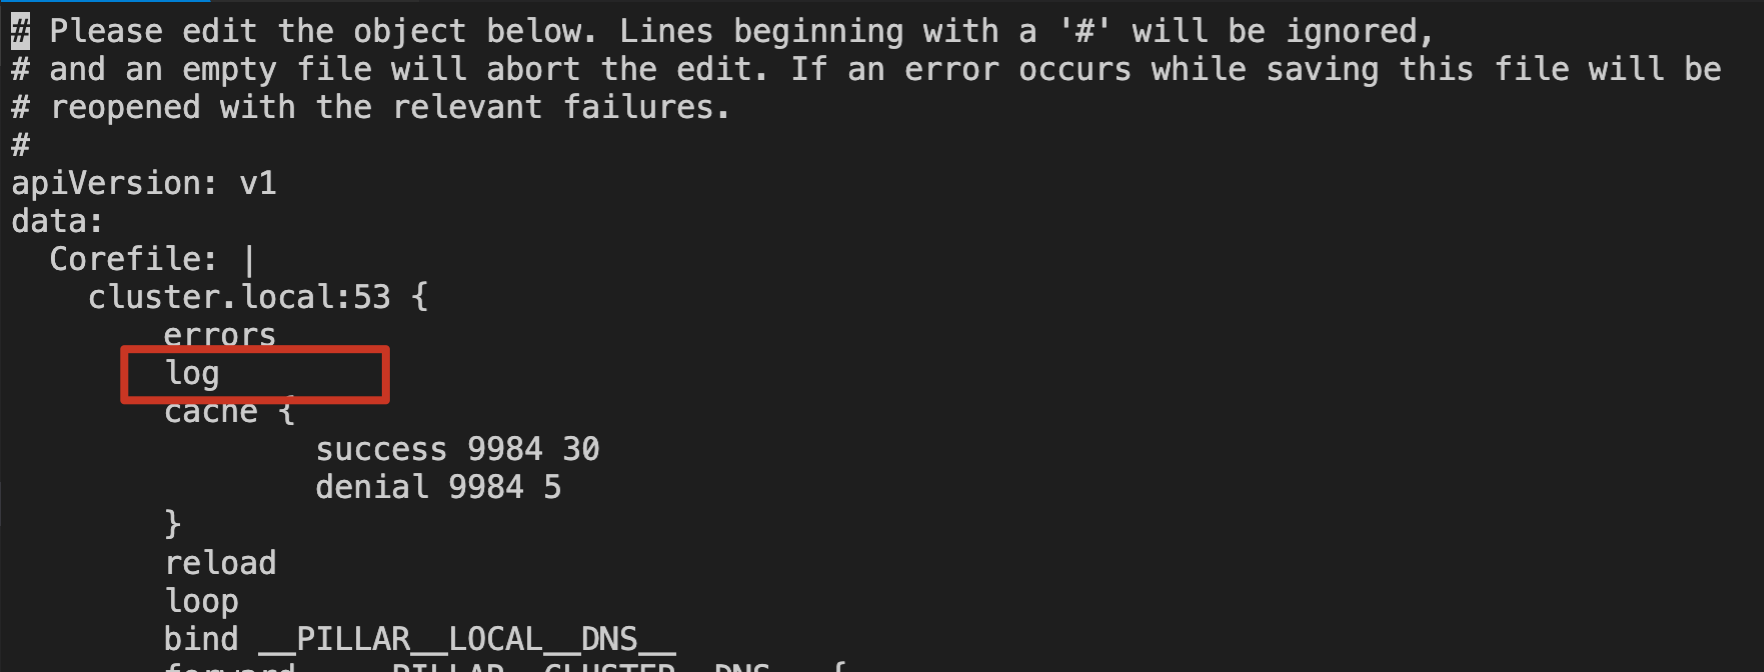
如果您想通过日志验证节点上 NodeLocal DNS Cache 是否代理了本节点的 DNS 请求,需要修改 kube-system 命名空间下 node-local-dns 的 ConfigMap 配置,在对应的 Corefile 配置中添加 log 日志能力。如下图所示:
iptables 集群验证
在 iptables 集群中,需要验证存量 Pod 以及增量 Pod 是否可以自动通过本地 NodeLocal DNS Cache 代理 Pod 的 DNS 请求。
存量 Pod
1. 登录存量 Pod。
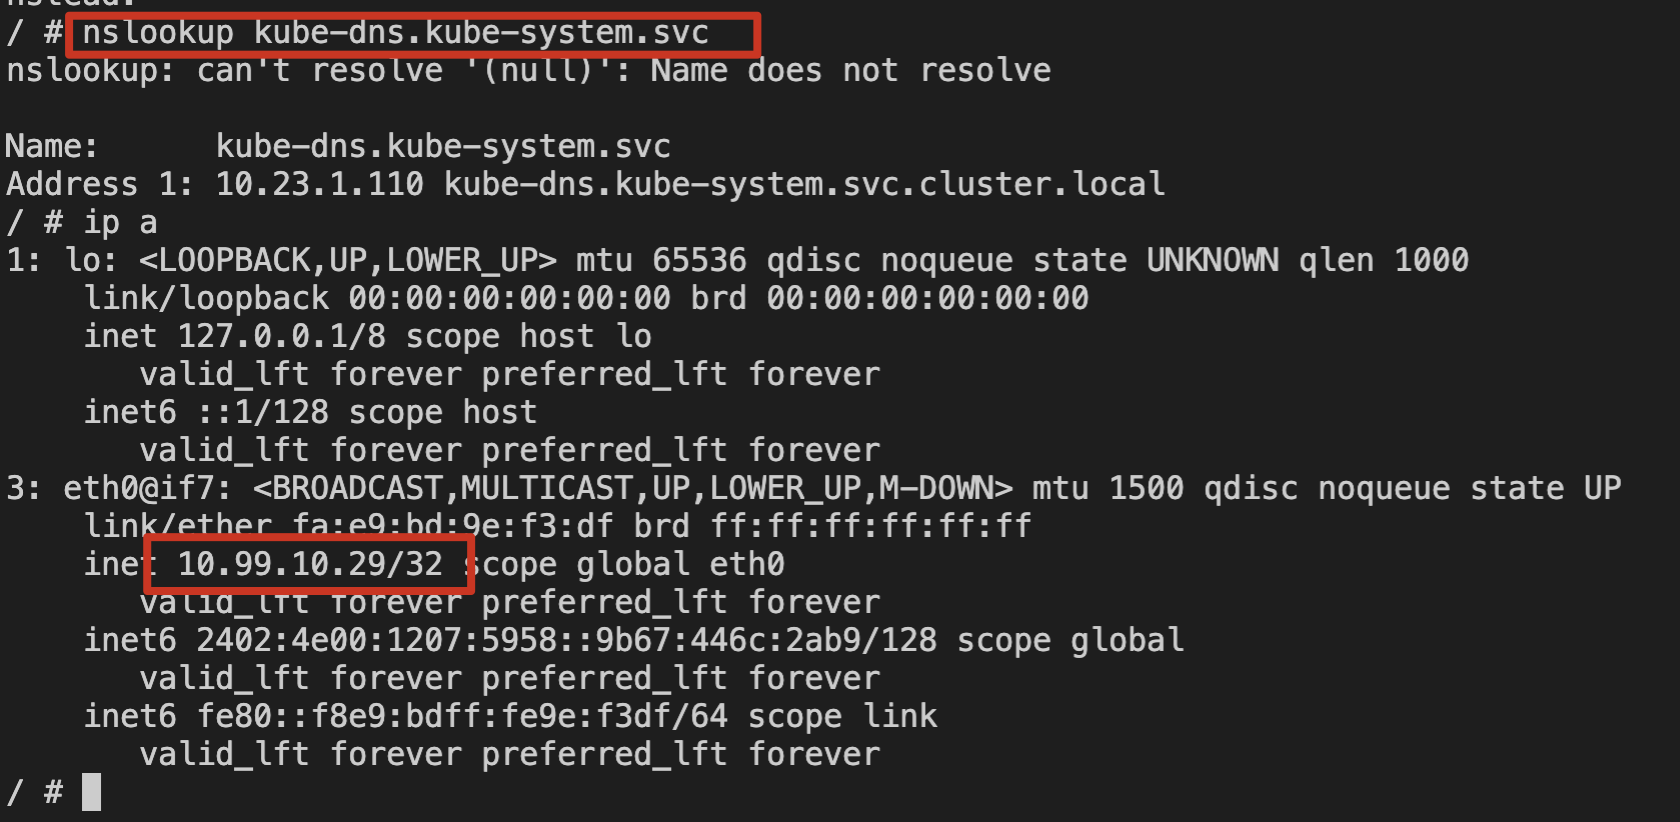
2. 使用 nslookup 命令解析 kube-dns 的 svc。如下图所示:

3. 检查本节点上 node-cache Pod 日志。如下图所示:

可以确认存量 Pod 对 kube-dns 的解析请求通过了本节点上的 NodeLocal DNS Cache 服务。
增量 Pod
1. 登录新建 Pod。
2. 使用 nslookup 命令解析 kube-dns 的 svc。如下图所示:
3. 检查本节点上 node-cache Pod 日志。如下图所示:

可以确认新增 Pod 对 kube-dns 的解析请求通过了本节点上的 NodeLocal DNS Cache 服务。
ipvs 集群验证
在 ipvs 集群中,存量 Pod 暂时无法自动切换使用本地 DNS Cache,需要验证增量 Pod 是否可以自动通过本地 NodeLocal DNS Cache 代理 Pod 的 DNS 请求。操作步骤如下:
1. 确保已启用注入开关(三选一):
集群级:在 TKE 控制台组件管理中配置 tke-eni-ip-webhook 的
localdns=trueNamespace 级:为命名空间添加 label
localdns-injector=enabledPod 级:为 Pod 添加 label
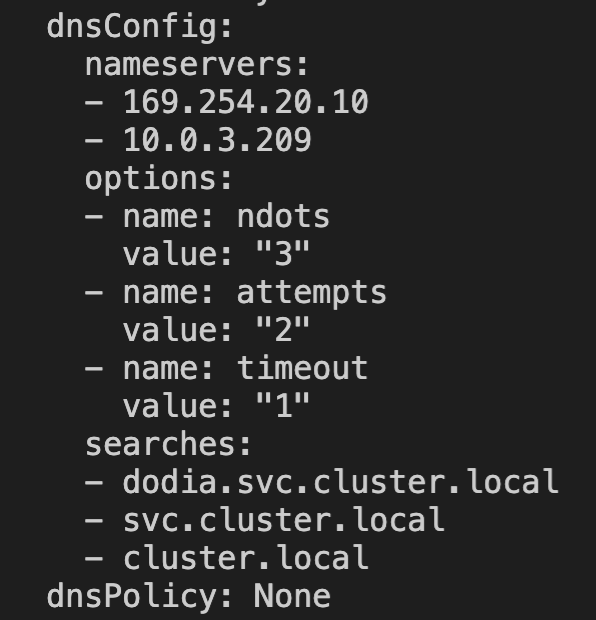
localdns-injector=enabled2. 在需要的命名空间中,新建 Pod,确认 Pod 注入了 DNSConfig 配置。如下图所示:
3. 登录新建 Pod。
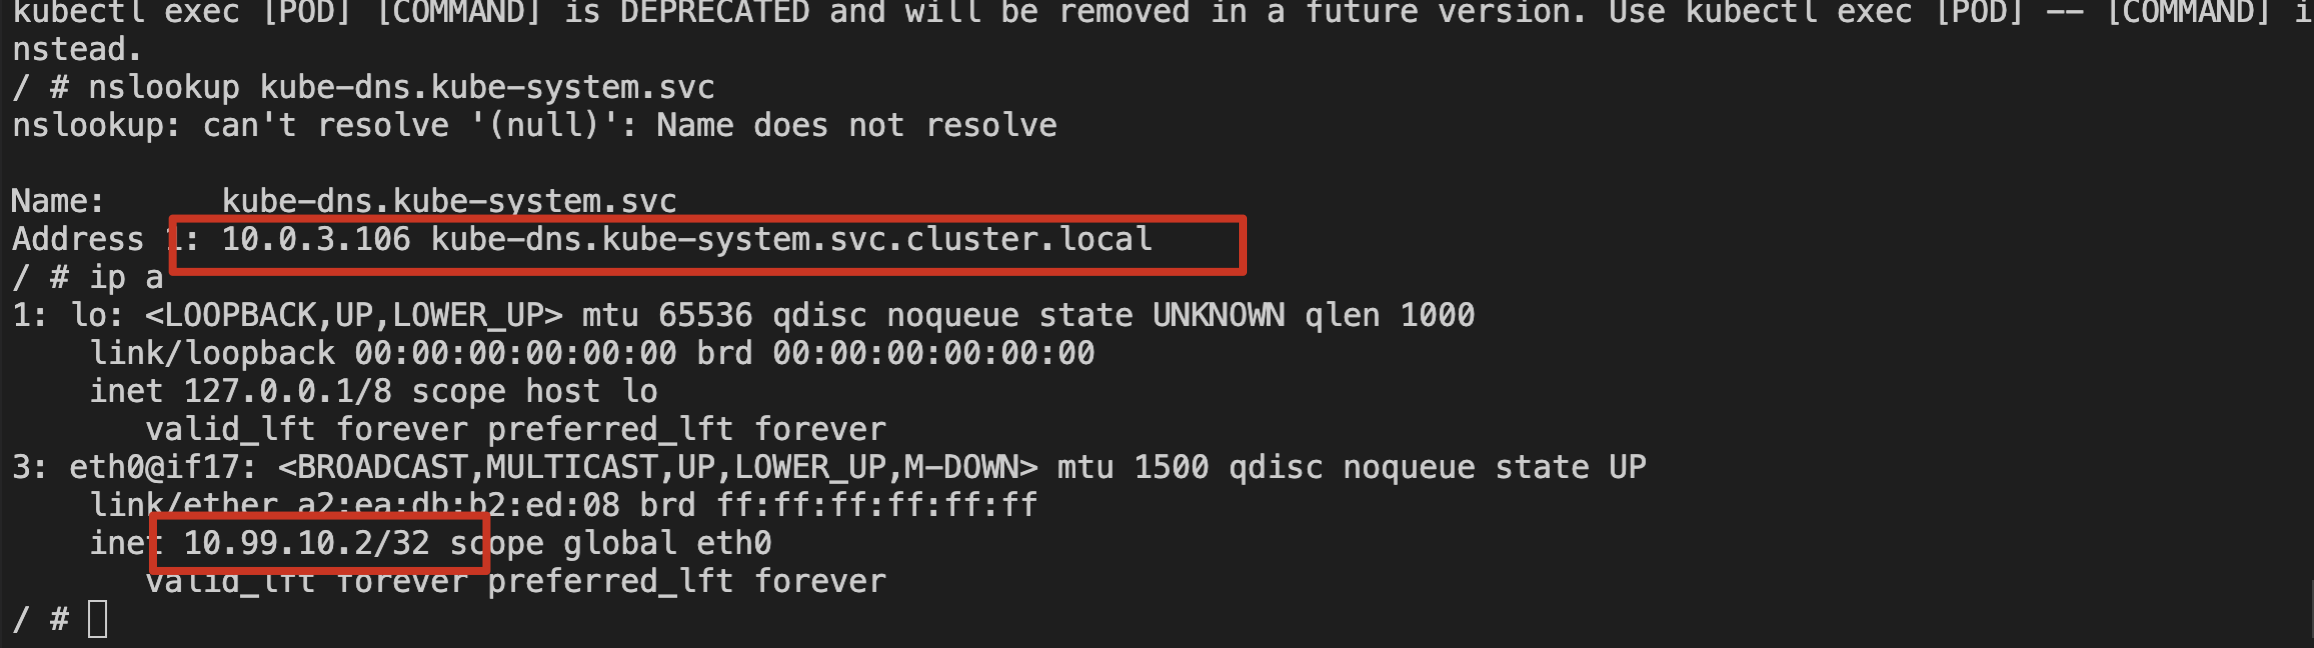
4. 使用 nslookup 命令解析 kube-dns 的 svc。如下图所示:
5. 检查本节点上 node-cache Pod 日志。如下图所示:
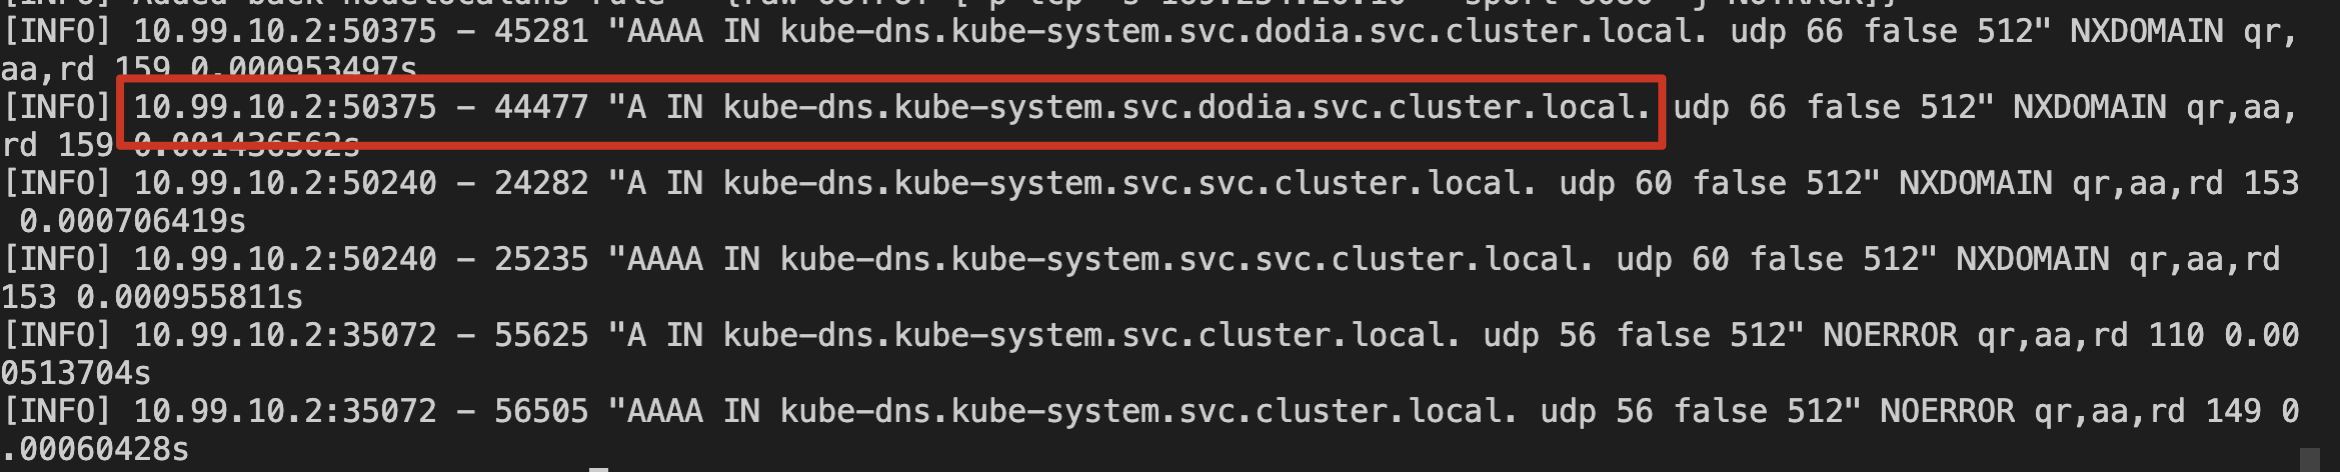
可以确认 ipvs 集群中新增 Pod 对 kube-dns 的解析请求通过了本节点上的 NodeLocal DNS Cache 服务。
卸载 NodeLocal DNS Cache
前置检查
1. 在 NodeLocal DNS 卸载场景下,由于原节点级 DNS 代理流量将直接回退至 CoreDNS 服务端,存在引发 CoreDNS 级联故障的风险。所以需要对 CoreDNS 进行提前扩容,同时尽量在业务低峰期进行 NodeLocalDNS 的卸载操作。
2. 在 IPVS 网络模式下,在卸载之前有一些额外的检查项需要进行。
3. 禁用自动注入机制。根据您当前的配置方式进行清理:
如果使用集群级开关:在 TKE 控制台组件管理中,将 tke-eni-ip-webhook 的
localdns 参数设置为 false如果使用 Namespace 级开关:清理所有命名空间的
localdns-injector=enabled 标签如果使用 Pod 级开关:确保后续新增工作负载不携带
localdns-injector=enabled 标签4. 存量工作负载DNS配置清理。遍历检查所有 Deployment/StatefulSet/DaemonSet 等控制器配置,确保 spec.template.spec.dnsConfig.servers 字段中移除 169.254.20.10 地址。验证 Pod 实例的 /etc/resolv.conf 文件不再包含 NodeLocal DNS 虚拟 IP。
5. 如果存在修改配置 kubelet 的启动参数 --cluster-dns 的情况。则需要更新 kubelet 将 DNS Server 重新指定 CoreDNS 的 ClusterIP 作为集群默认 DNS 服务地址。
控制台卸载
1. 登录 容器服务控制台,在左侧导航栏中选择集群。
2. 在集群列表中,单击目标集群 ID,进入集群详情页。
3. 选择左侧菜单栏中的组件管理,在组件管理页面单击需要删除组件所在行右侧的删除,如下图所示:

命令行卸载
1. 通过保留原有 NodeLocalDNS pod,可以按需控制卸载过程,最小化降低存量风险。
kubectl -n kube-system delete ds node-local-dns --cascade=orphan
2. 最后清理其他相关依赖对象。
相关问题
关于 prefer_udp 相关配置
问题描述
在 TKE 集群中,CoreDNS 使用腾讯云默认的 DNS 服务(183.60.83.19/183.60.82.98)作为上游 DNS。腾讯云默认的 DNS 服务支持在 VPC 内进行私有域解析的 DNS 请求,但目前仅支持 UDP 协议,不支持 TCP 协议。然而,NodeLocal DNS 默认会通过 TCP 方式连接到 CoreDNS。如果 CoreDNS 未配置 prefer_udp,它将默认通过 TCP 方式访问上游的腾讯云默认 DNS 服务,这将导致一定概率的域名解析失败。
解决方案
1. 新创建的 TKE 集群:CoreDNS 已经默认配置了 prefer_udp,用户无需处理。
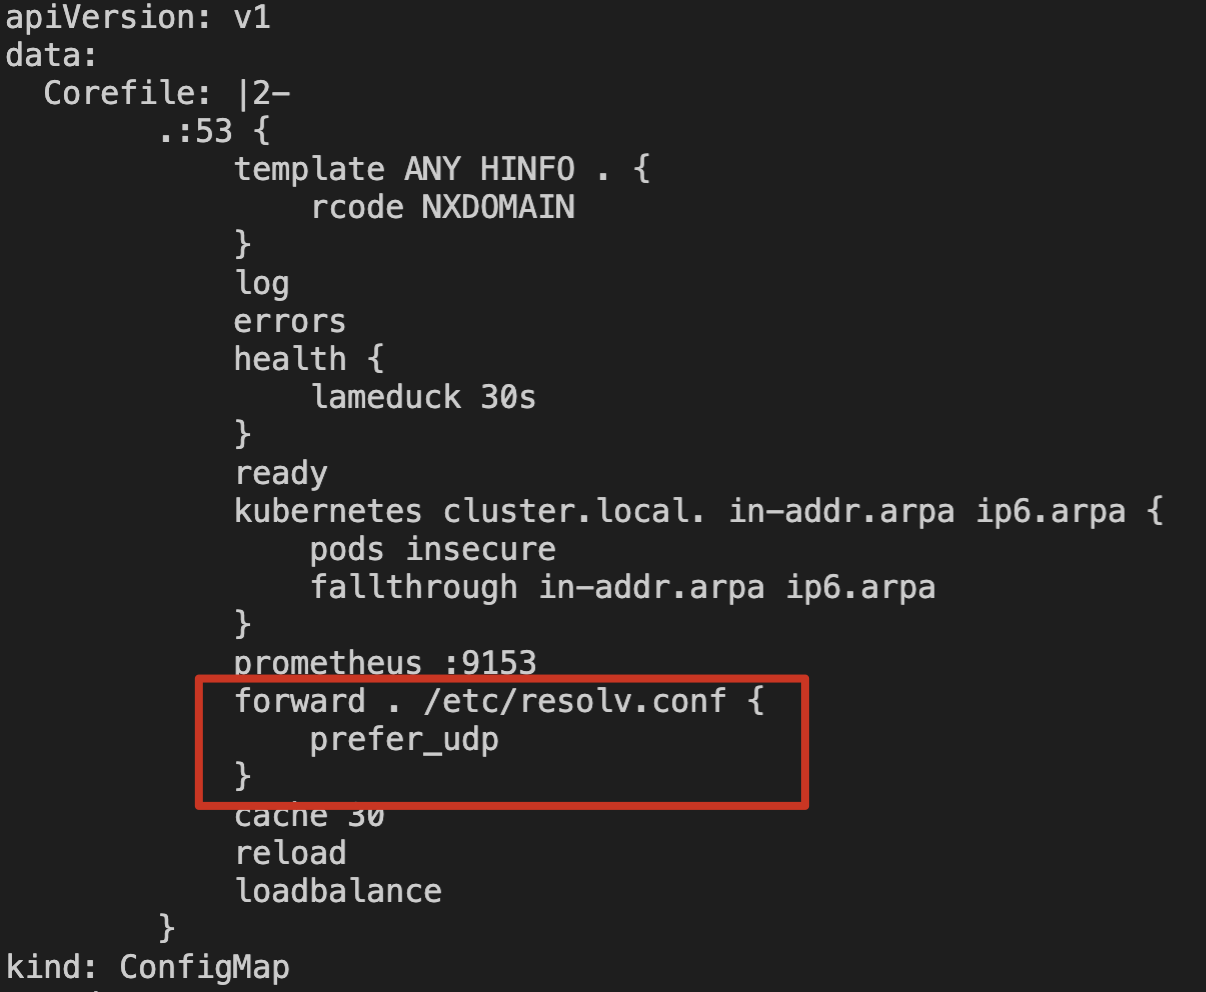
2. 存量集群:如果用户已经部署了 NodeLocal DNS Cache 组件,建议用户配置 CoreDNS 服务的相关 Corefile,添加 prefer_udp 并 reload 配置。示例如下:
3. 未安装 NodeLocal DNS Cache 的集群:在安装 NodeLocal DNS Cache 组件时,会强制判断 CoreDNS Corefile 是否添加了 prefer_udp 配置。用户需要手动配置后,才能继续安装 NodeLocal DNS Cache 组件。
关于 kube-proxy 版本适配问题
问题描述
TKE 集群中低版本的 kube-proxy 存在 iptables(legacy/nftable)多后端问题,触发条件如下:
1. 集群 kube-proxy 代理模式为 iptables。
2. 对应不同版本的 k8s 集群,集群中的 kube-proxy 版本小于下面的版本号。
TKE 集群版本 | 问题修复版本 |
1.24 | 升级 kube-proxy 到 v1.24.4-tke.5 及以上 |
1.22 | 升级 kube-proxy 到 v1.22.5-tke.11 及以上 |
1.20 | 升级 kube-proxy 到 v1.20.6-tke.31 及以上 |
1.18 | 升级 kube-proxy 到 v1.18.4-tke.35 及以上 |
1.16 | 升级 kube-proxy 到 v1.16.3-tke.34 及以上 |
1.14 | 升级 kube-proxy 到 v1.14.3-tke.28 及以上 |
1.12 | 升级 kube-proxy 到 v1.12.4-tke.32 及以上 |
1.10 | 升级 kube-proxy 到 v1.10.5-tke.20 及以上 |
此时,如果客户部署了 NodeLocal DNS Cache 组件,会概率性触发多后端问题,导致集群内 service 服务无法正常访问。
解决方案
1. 如果用户现有集群配置符合上述触发条件,建议用户将 kube-proxy 版本升级到最新版本。
2. 当前 TKE 集群安装 NodeLocal DNS Cache 组件时,会对集群的 kube-proxy 进行判断,如果版本不符合条件,会禁止用户安装组件。此时请主动升级 kube-proxy 版本到最新版本。
关于操作系统版本适配问题
问题描述
NodeLocalDNS 会通过 hostNetwork 的方式部署,在节点创建 dummy 网卡,并绑定固定 IP(169.254.20.10)。NodeLocalDNS 服务进程会直接监听该 dummy 网卡 IP 的53端口,对外提供服务。但是在 Ubuntu 20.04系统中,系统服务 (named) 会占用所有网卡的53端口,导致 NodeLocalDNS 的服务进程因端口占用问题而无法启动。
解决方案
1. 直接通过
sudo service named stop关闭 named 系统服务或者通过 sudo apt purge bind9 移除并通过 systemctl status named 来确保 named 服务被关闭。2. 目前 Ubuntu Server 20.04.1 LTS 64bit | img-22trbn9x 存在该问题,您可以使用其他镜像来规避该问题。
关于 iptables 版本兼容性问题
问题描述
近期,我们发现在部分 TKE 集群中,当节点同时运行特定版本的 NodeLocalDNS 组件和
kube-router 组件时,可能会因底层 iptables 工具版本不兼容,导致 DNS 解析异常。具体表现为 NodeLocalDNS 生成的 iptables 转发规则周期性丢失 --dport 53 参数,造成 DNS 请求处理失败。问题根因
该问题源于开源组件
iptables 在 v1.8.7 和 v1.8.9 版本之间存在兼容性问题,尤其是在使用 nftables 作为后端的场景下。TKE
kube-router 组件:通常使用 iptables v1.8.7。NodeLocalDNS
1.22.25 及以上版本:使用 iptables v1.8.9。当新版 NodeLocalDNS(
iptables v1.8.9)创建的含 --dport 参数的规则,被 kube-router(iptables v1.8.7)进行 iptables-save 和 iptables-restore 操作时,--dport 参数会丢失。NodeLocalDNS 会检测到规则缺失并重新创建,但 kube-router 会再次移除该参数,如此循环导致大量不完整的 iptables 规则累积,最终影响网络服务的稳定性。解决方案与建议
临时方案:重启问题节点
因异常规则数已经积累过多,通过工具删除耗时非常久,建议重启问题节点以清空累积的异常 iptables 规则,作为紧急恢复手段。请注意,这只是临时措施,问题根因未解决,后续仍可能复现。
长期方案:升级至 TKE 官方版本
通过 TKE 控制台安装 NodeLocalDNS 最新版本(>=
1.26.4-tke.1)。如果您使用的是社区或其他非腾讯云官方渠道安装的版本,可能仍存在此风险。我们强烈建议您使用腾讯云官方版本以确保兼容性和稳定性。


