Help & Documentation>Tencent Kubernetes Engine

CFS-CSI

Last updated: 2023-09-26 15:11:45

Feature Overview

Component Description

The Kubernetes-csi-tencentcloud CFS plugin implements the CSI interface, enabling you to use Tencent Cloud File Storage in container clusters.
Note
For 1.12 clusters, modify the kubelet configuration by adding --feature-gates=KubeletPluginsWatcher=false.

Kubernetes objects deployed within a cluster

Kubernetes Object Name
Local Disk Types
Default Resource Consumption
Namespace
csi-provisioner-cfsplugin
StatefulSet
-
kube-system
csi-nodeplugin-cfsplugin
DaemonSet
-
kube-system
csi-provisioner-cfsplugin
Service
1C2G
kube-system

Use Cases

Cloud File Storage (CFS) offers a scalable shared file storage service, which can be seamlessly integrated with Tencent Cloud's CVM, TKE, and BatchCompute services. CFS provides standard NFS and CIFS/SMB file system access protocols, serving as a shared data source for multiple CVM instances or other computing services. It supports elastic capacity and performance scaling, allowing existing applications to be mounted without any modifications. As a highly available and reliable distributed file system, CFS is well-suited for scenarios such as big data analysis, media processing, and content management.
CFS is easy to integrate, eliminating your need to adjust your business structure or make complex configurations. To integrate and use CFS, simply complete three steps: creating a file system, launching a file system client on a server, and mounting the created file system. With the CFS-CSI extension, you can quickly use CFS in container clusters through standard native Kubernetes. For more information, please refer to CFS Use Cases.
Limits

For CFS-specific limitations, refer to CFS System Limitations.
To use CFS in TKE, you need to install this extension component within the cluster, which will consume some system resources.

Instructions

Install and Configure the CFS Add-on

1. Log in to the TKE console and select Cluster in the left sidebar.
2. On the "Cluster Management" page, click the ID of the target cluster to enter the cluster details page.
3. Select Component Management from the left sidebar to access the "Component List" page.
4. On the "Component List" page, select Create and check CFS on the "Create Component" page.
5. Click Done to complete the process.

Creating a CFS-type StorageClass

1. On the "Cluster Management" page, click the ID of the cluster using CFS to enter the cluster details page.
2. In the left navigation bar, select Storage > StorageClass, and click Create to access the "New StorageClass" page.
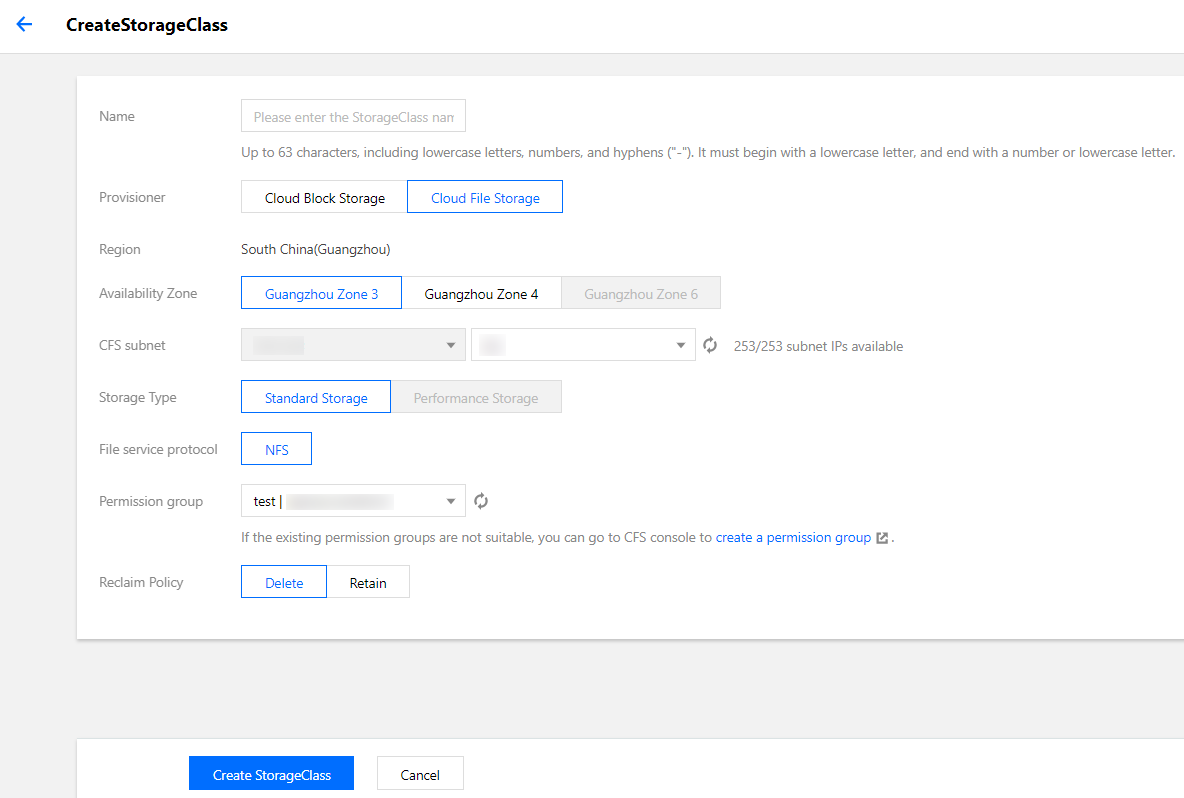
3. Create a CFS-type StorageClass based on your actual requirements, as shown below:


4. Click Create StorageClass to complete the creation.

Create a PersistentVolumeClaim

1. On the "Cluster Management" page, click the ID of the cluster using CFS to enter the cluster details page.
2. In the left navigation bar, select Storage > PersistentVolumeClaim, and click Create to enter the "New PersistentVolumeClaim" page.
3. Based on your actual requirements, create a CFS-type PersistentVolumeClaim and select the StorageClass created in the previous steps.
4. Click Create PersistentVolumeClaim to complete the creation.

Creating a workload

1. On the "Cluster Management" page, click the ID of the cluster using CFS to enter the cluster details page.
2. In the left navigation bar, select Workload > Deployment, and click Create to enter the "New Workload" page.
3. Based on your specific requirements, select Use existing PVC for the volume and choose the previously created PVC.
4. After mounting to the specified container path, click Create Workload to complete the creation.