功能简介
CC 防护对网站进行访问保护,CC 防护2.0全新改版,支持紧急模式 CC 防护和自定义 CC 防护策略。紧急模式 CC 防护,综合源站异常响应情况(超时、响应延迟)和网站历史访问大数据分析,紧急模式决策生成防御策略,实时拦截高频访问请求。自定义 CC 防护可以根据用户访问源 IP 或者 SESSION 频率制定防护规则,对访问进行处置,处置措施包括观察、人机识别、精准人机识别、JS 校验、拦截和精准拦截。
注意:
紧急模式 CC 防护策略和自定义 CC 规则防护策略,不能同时开启。
使用基于 SESSION 的 CC 防护策略,需要先设置 SESSION ,才能设置基于 SESSION 的 CC 防护策略。
慢速攻击防护:Web 应用防火墙在进行流量转发时会聚合清洗慢速请求,具备一定慢速攻击防护能力。
慢速攻击防护
Slowloris、RUDY 等慢速攻击是一种拖慢服务器响应速度的攻击手法,通常通过发送大量慢速请求或者不完整的请求来消耗服务器资源,从而导致正常用户无法访问 Web 应用。
1. Web 应用防火墙在进行流量转发时,默认会聚合清洗慢速请求,具备慢速攻击防护能力,可以清洗类似 Slowloris 类型的慢速攻击。
2. Web 应用防火墙清洗慢速请求时,HTTP 协议类型请求会返回状态码400,TCP 协议类型请求会返回 TCP RST。
操作步骤
示例一:紧急模式 CC 防护设置
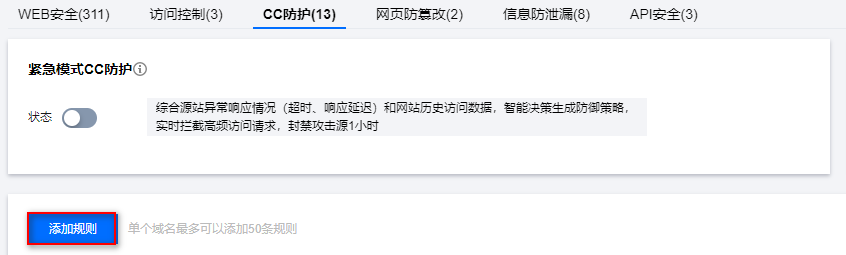
紧急模式 CC 防护默认关闭,开启前请确认自定义 CC 防护规则处于未启用状态。
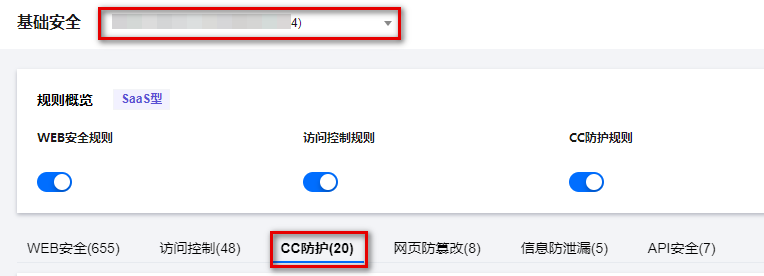
1. 登录 Web 应用防火墙控制台,在左侧导航栏,选择防护策略 > 基础安全。
2. 在基础安全页面,左上角选择需要防护的域名,单击 CC 防护。
3. 单击紧急模式 CC 防护模块的

配置项说明:
状态开关: 当开启紧急模式 CC 防护时,若网站遭大流量 CC 攻击会自动触发防护(网站 QPS 不低于1000QPS),无需人工参与。若无明确的防护路径,建议启用紧急模式 CC 防护,可能会存在一定误报。可以在控制台进入 IP 与封禁查询页面,查看拦截 IP 信息,并及时处理。
说明:
如果有明确的攻击流量特征,建议使用自定义 CC 规则进行防护。
示例二:基于访问源 IP 的 CC 防护设置
基于 IP 的 CC 防护策略,不需要对 SESSION 维度进行设置,直接配置即可。
1. 登录 Web 应用防火墙控制台,在左侧导航栏,选择防护策略 > 基础安全。
2. 在基础安全页面,左上角选择需要防护的域名,单击 CC 防护。
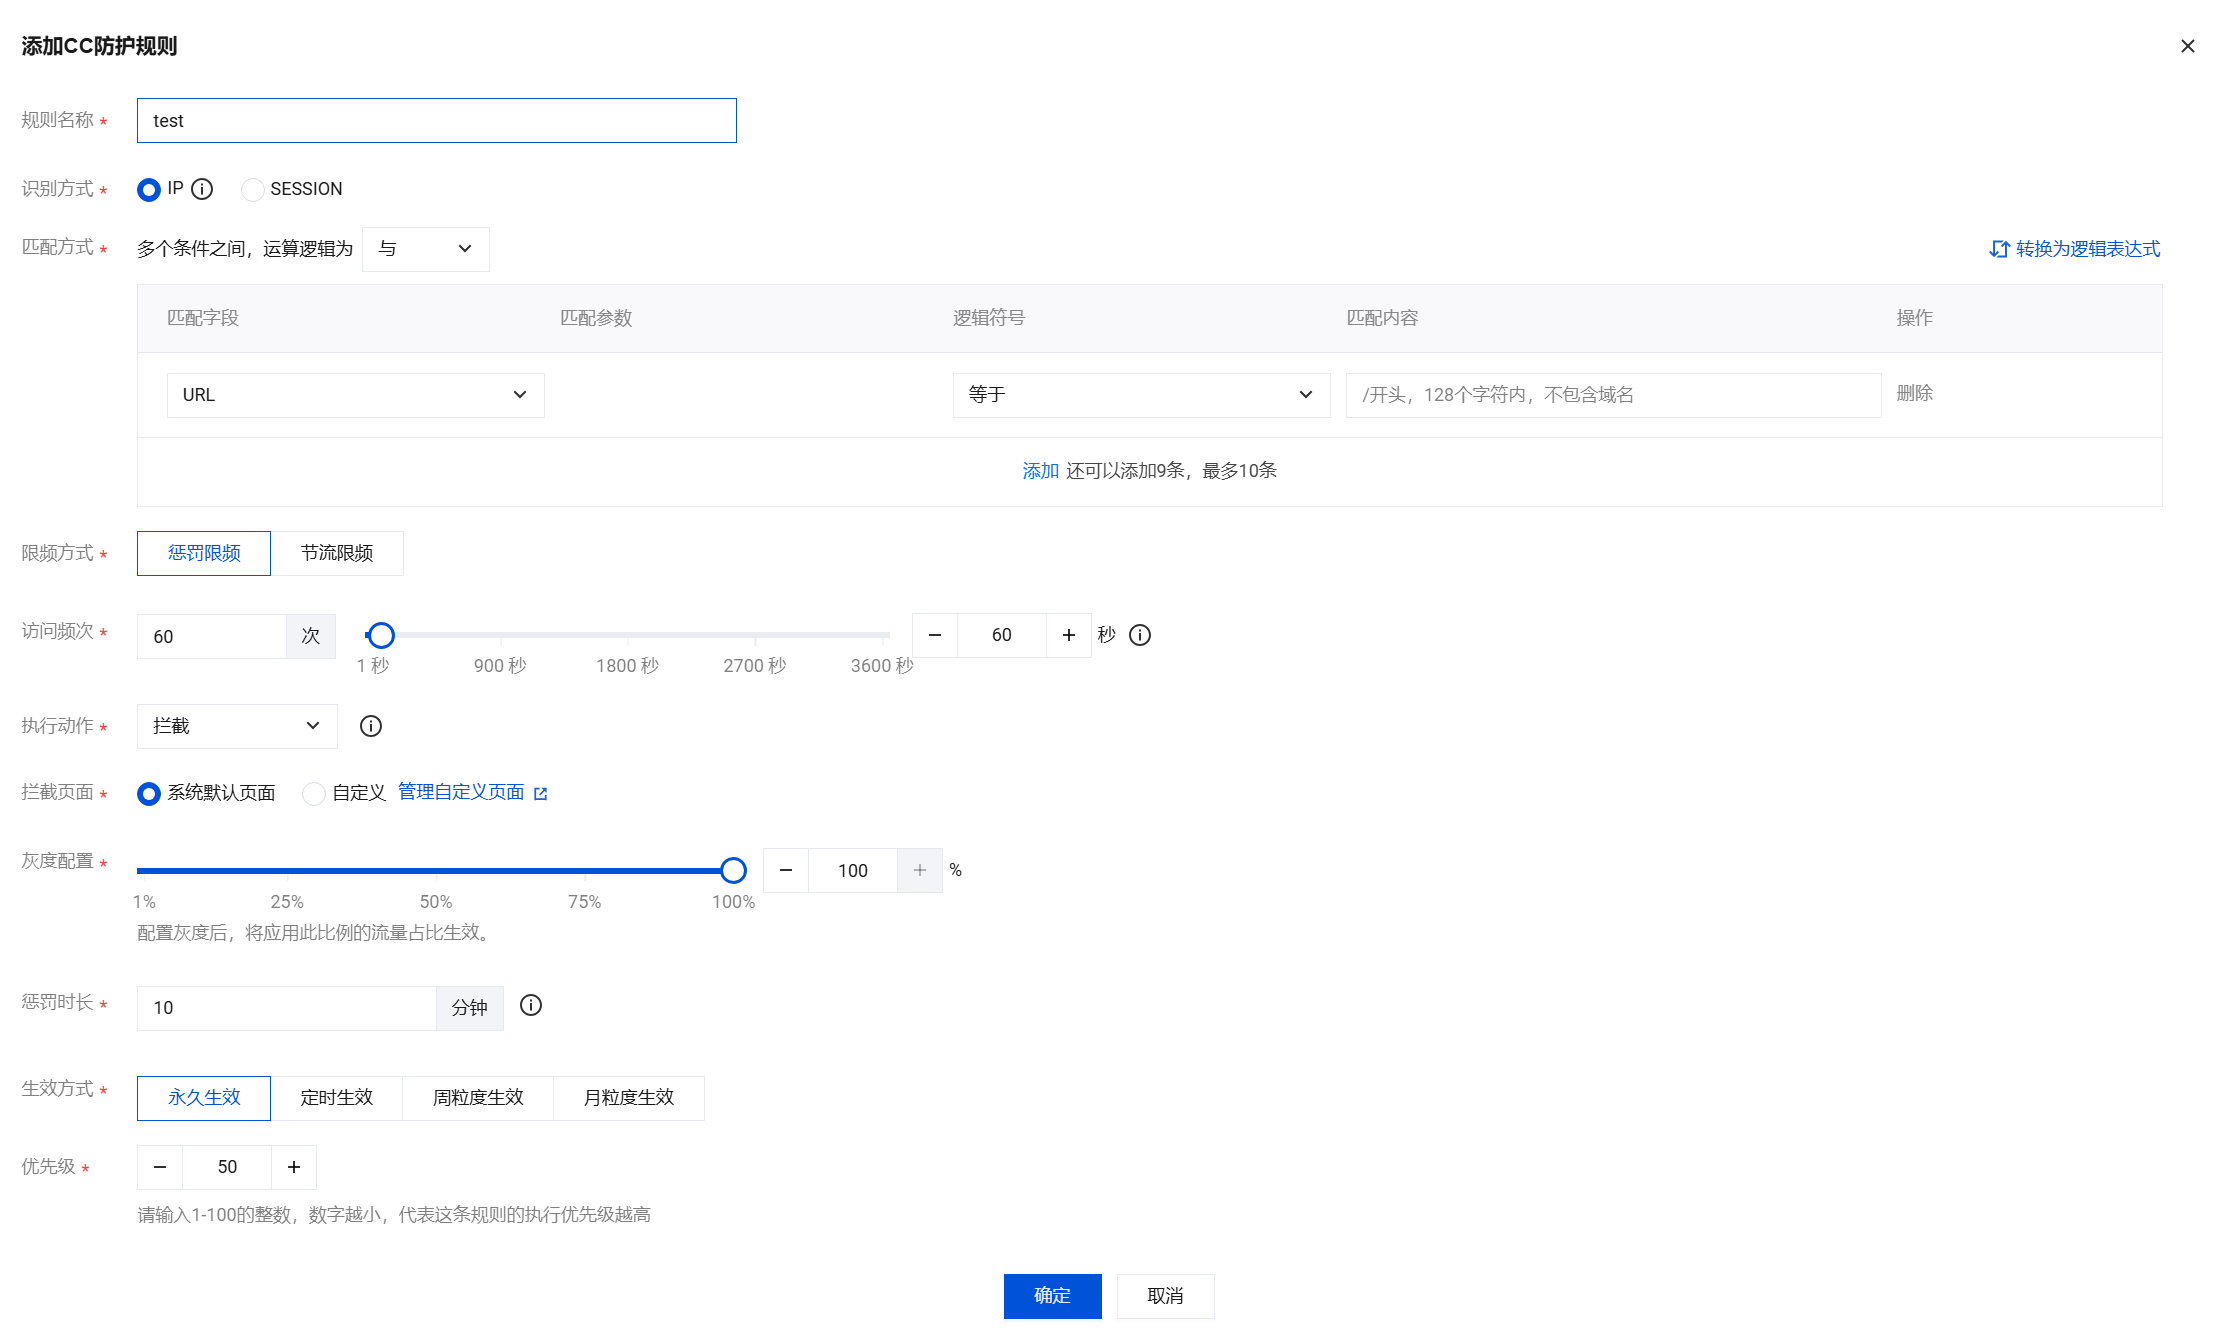
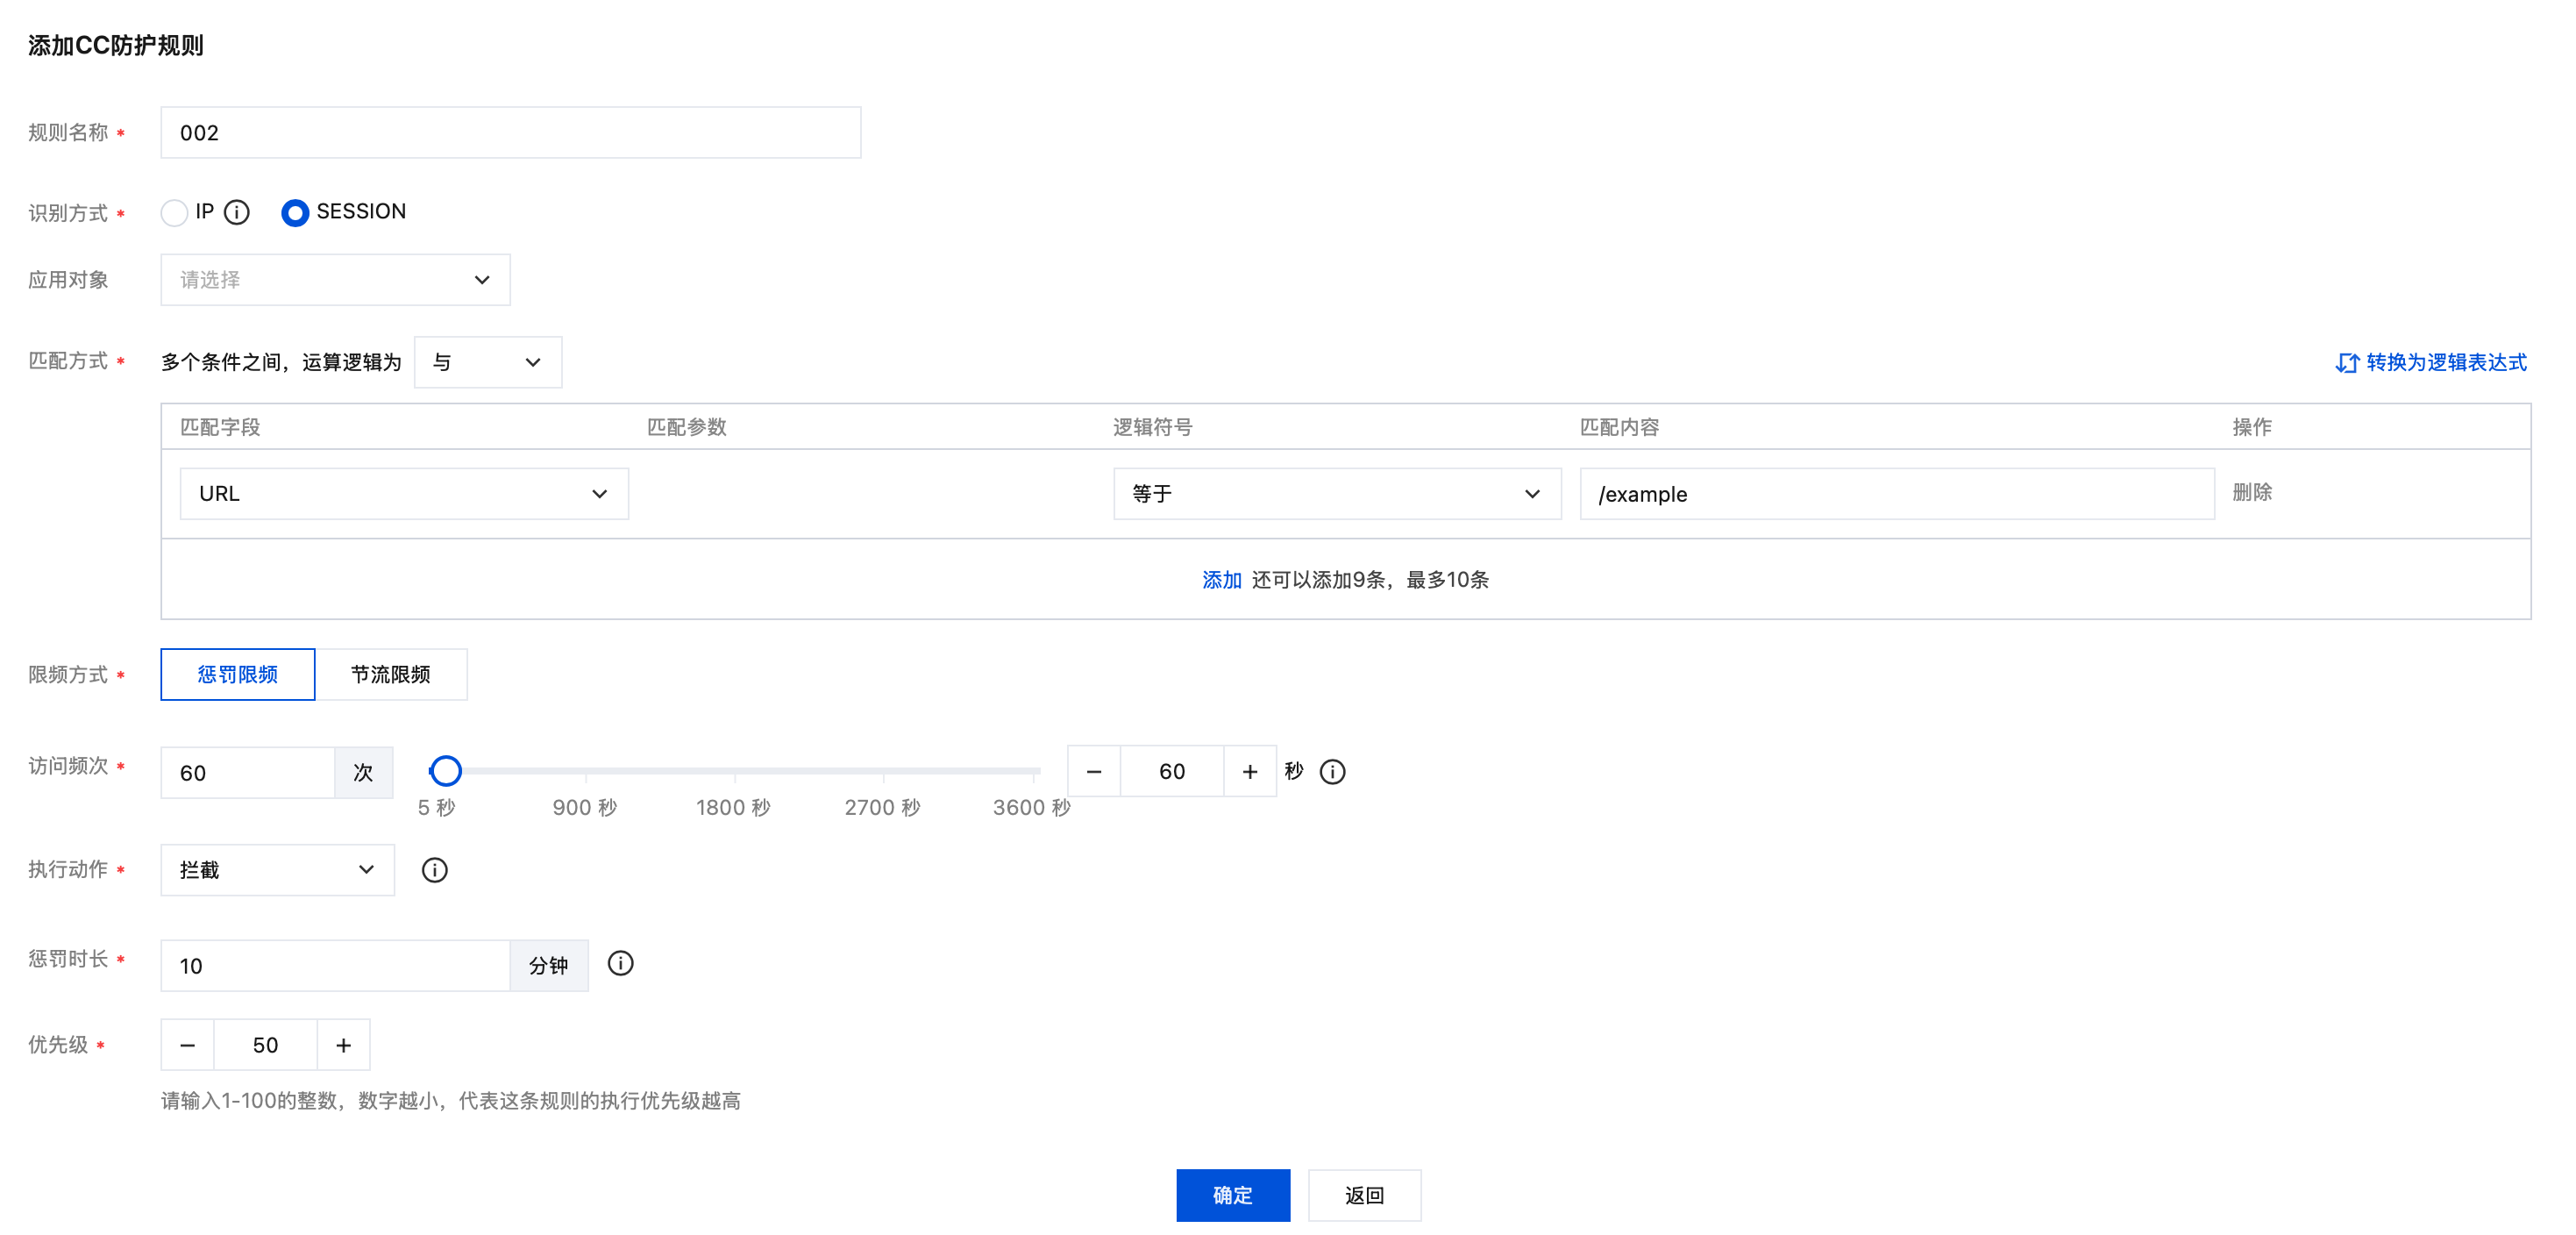
3. 在 CC 防护页面,单击添加规则,弹出添加 CC 防护规则弹窗。
4. 在添加 CC 防护规则弹窗中,填写相应参数,单击确定。
字段说明:
规则名称:CC 防护规则名称,50个字符以内。
识别方式:支持 IP 和 SESSION 识别模式,默认为 IP,SESSION 模式需要提前设置 SESSION 位置信息。
匹配方式:CC 防护规则频率控制匹配条件,默认为 URL。支持设置多个匹配条件,同一规则的多个条件是“与”关系,同时满足才会执行动作,且最多配置10个,详细字段说明请见匹配方式字段说明。
限频方式:可选择惩罚限频和节流限频。
惩罚限频:对触发频次规则的客户端实施自定义时长的处置,根据执行动作处置在设定时间内发起请求。
节流限频:对触发频次规则的客户端进行严格请求数控制,根据执行动作处置其单位时间内的最大请求量。其中,节流限频仅针对购买了 BOT 防护或 API 安全的实例开放。
访问频次:根据业务情况设置访问频次。建议输入正常访问次数的3倍 - 10倍,例如,网站人均访问20次/分钟,可配置为60次/分钟 - 200次/分钟,可依据被攻击严重程度调整。
执行动作:默认为拦截,可根据需要进行设置,各个动作详细说明如下:
动作类型 | 说明 |
观察 | 符合匹配条件的会话请求将会被监控并记录日志。 |
拦截 | 若规则配置的防护路径为根目录(/),则触发时会阻止该 IP 或 Session 对网站所有页面的访问。 若规则配置的防护路径为具体子路径(如 /login),则触发时仅会阻止该 IP 或 Session 对该路径及其子路径的访问。 |
精准拦截 | 符合频率控制条件的请求将触发精准拦截动作,与普通拦截不同,精准拦截仅针对生效范围内命中条件的 IP 或 Session 请求进行拦截,而非对整个网站进行拦截。 |
人机识别 | 仅用于浏览器访问场景,符合匹配条件的会话请求将进行验证码挑战,若挑战失败,执行拦截动作。若挑战成功,惩罚时长内正常访问。验证码记录日志为观察。 |
精准人机识别 | 符合频率控制条件的请求将执行精准人机识别动作,将会针对该 IP 或 Session 对网站的访问请求发起人机识别验证挑战。若挑战失败,执行拦截动作。若挑战成功,惩罚时长内正常访问。验证码记录日志为观察。 |
JS 校验 | 符合匹配条件的请求将被执行 JavaScript 校验并记录日志。 说明: |
拦截页面:可选择系统默认页面和自定义,可在 系统设置 > 自定义页面管理自定义页面。
灰度配置:默认值为100%,可设置为1%至100%之间的任意整数。配置灰度后,将应用此比例的流量占比生效。
惩罚时长:默认为10分钟,最短为1分钟,最长为一周。
生效方式:可选择永久生效、定时生效、周粒度生效、月粒度生效。
优先级:默认为50,可输入1 - 100的整数,数字越小,代表这条规则的执行优先级越高,相同优先级下,创建时间越晚,优先级越高。
5. 规则操作,选择已经创建的规则,可以对规则进行关闭、编辑和删除。
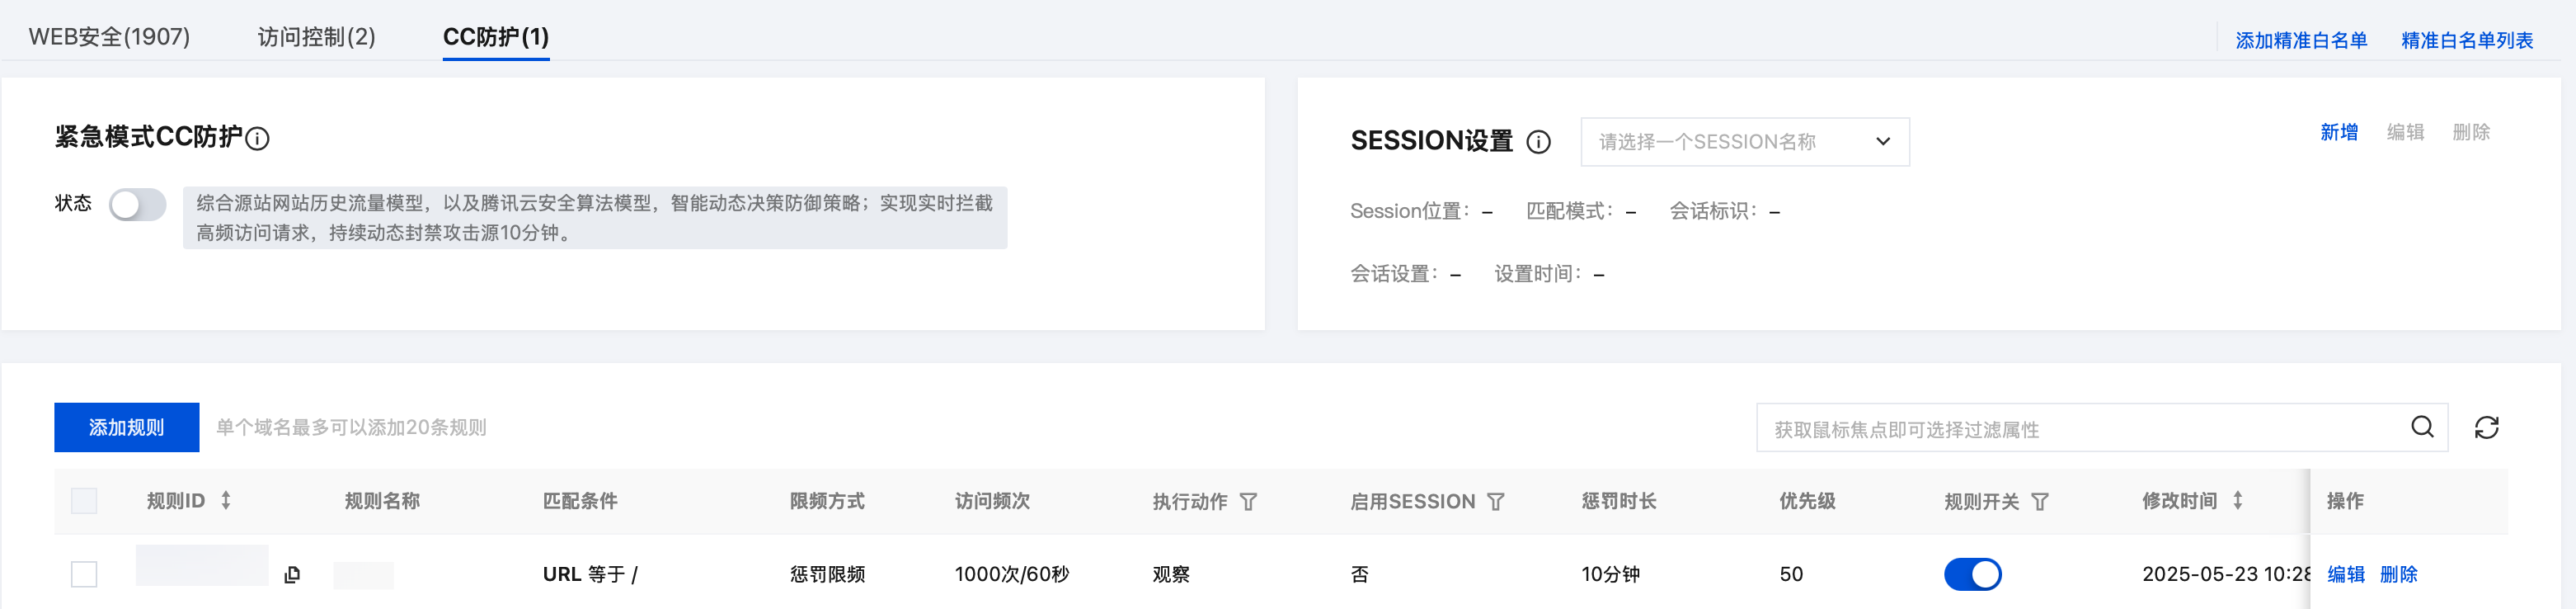
6. 命中规则的请求将执行配置的相应防护动作,观察、拦截和精准拦截的执行结果可在 攻击日志 查看。在 IP 与封禁查询页面,可以实时查看拦截与精准拦截动作所拦截的 IP 信息,并可在 黑白名单页面 对 IP 进行加白或加黑处理。
示例三:基于 SESSION 的 CC 防护设置
基于 SESSION 访问速率的 CC 防护,能够有效解决在办公网、商超和公共 Wi-Fi 场合,用户因使用相同 IP 出口而导致的误拦截问题。
1. 登录 Web 应用防火墙控制台,在左侧导航栏,选择防护策略 > 基础安全。
2. 在基础安全页面,左上角选择需要防护的域名,单击 CC 防护。
3. 单击 SESSION 设置处的新增,弹出新增 SESSION 弹窗。
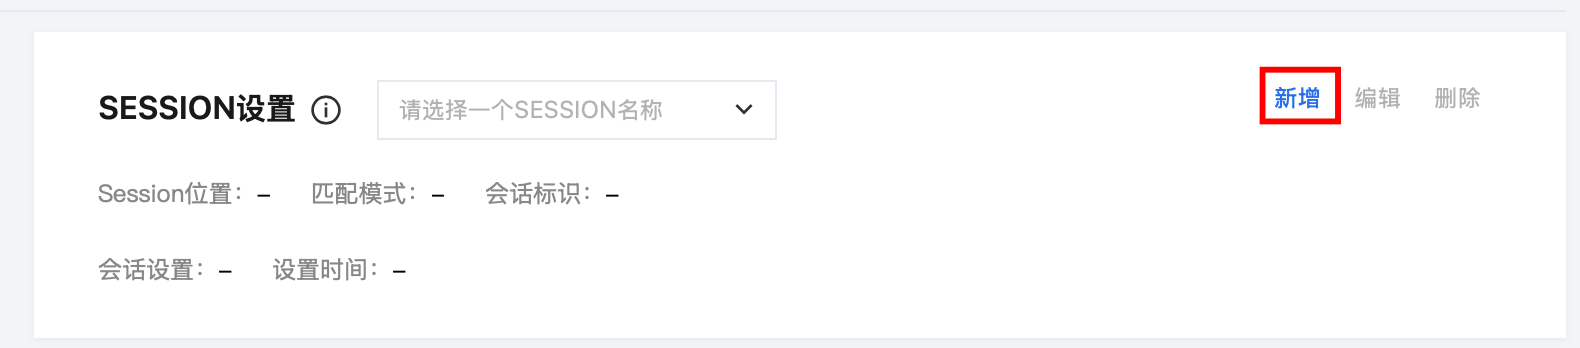
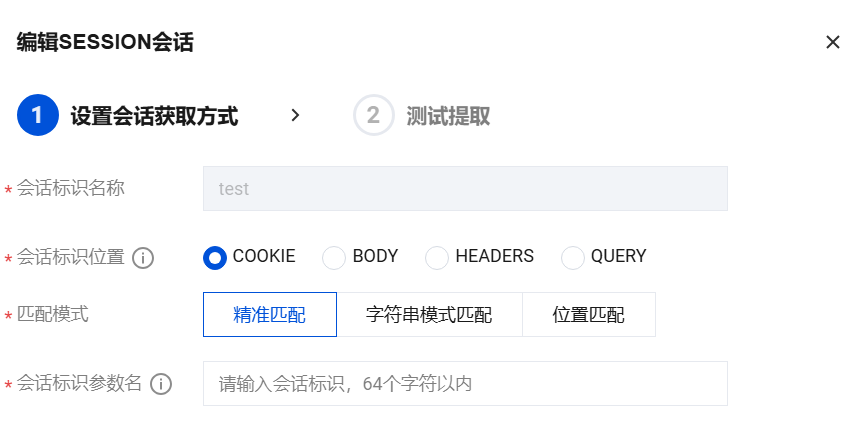
4. 在 SESSION 设置弹窗中,填写相应参数,配置完成后单击下一步。
字段说明:
会话标识名称:自定义会话名称,32个字符以内。
会话标识位置:指定识别特定位置的参数名作为会话标识,以该参数名对应的值作为会话 ID。可选择 COOKIE、GET 、HEADER 或 POST,其中 GET 或 POST 是指 HTTP 请求内容参数,非 HTTP 头部信息。
匹配模式:选择精准匹配、字符串模式匹配或位置匹配。
匹配模式 | 配置项 |
精准匹配 | 会话标识参数名:输入会话标识,64个字符以内。支持以“.”字符区隔各个层级的参数,示例如下: test:识别 JSON 字符串中 test 参数的值为会话 ID test1.test2:识别 JSON 字符串中 test1 包含的 test2 参数的值为会话 ID |
字符串模式匹配 | 会话标识:字符串匹配的起始位置,32个字符以内。 结束标识:字符串匹配的结束位置,32个字符以内。 |
位置匹配 | 会话标识:位置匹配的匹配起始位置,32个字符以内。 会话位置:匹配的范围长度,请输入两个介于0到2048之间的整数。 |
5. 进入 SESSION 测试页面,查看测试结果是否符合预期,单击保存。后续 Web 应用防火墙将把 security 后面10位字符串作为 SESSION 标识,SESSION 信息也可以删除重新配置。
示例说明:如果一条请求的完整参数内容为
key_a=124&key_b=456&key_c=789精准匹配:会话标识参数名为
key_b,则匹配内容为 456字符串模式匹配:会话标识为
key_b=,结束字符为 &,则匹配内容为 456位置匹配:会话标识为
key_b,开始位置为 0,结束位置 2,则匹配内容为 4566. 设置基于 SESSION 的 CC 防护策略,配置过程和示例一保持一致,识别方式选择 SESSION,应用对象按需选择,其他字段说明详见 示例二: 基于访问源 IP 的 CC 防护设置。
7. 配置完成,基于 SESSION 的 CC 防护策略生效。
注意:
使用基于 SESSION 的 CC 防护机制,无法在 IP 封堵状态中查看封堵信息。


