本文将介绍如何接入 TUILiveKit Demo 的主播开播页,指导您将我们提供的开播页面集成到您的项目中,同时介绍如何对直播页面的样式、布局、以及功能进行自定义修改。
集成提示:
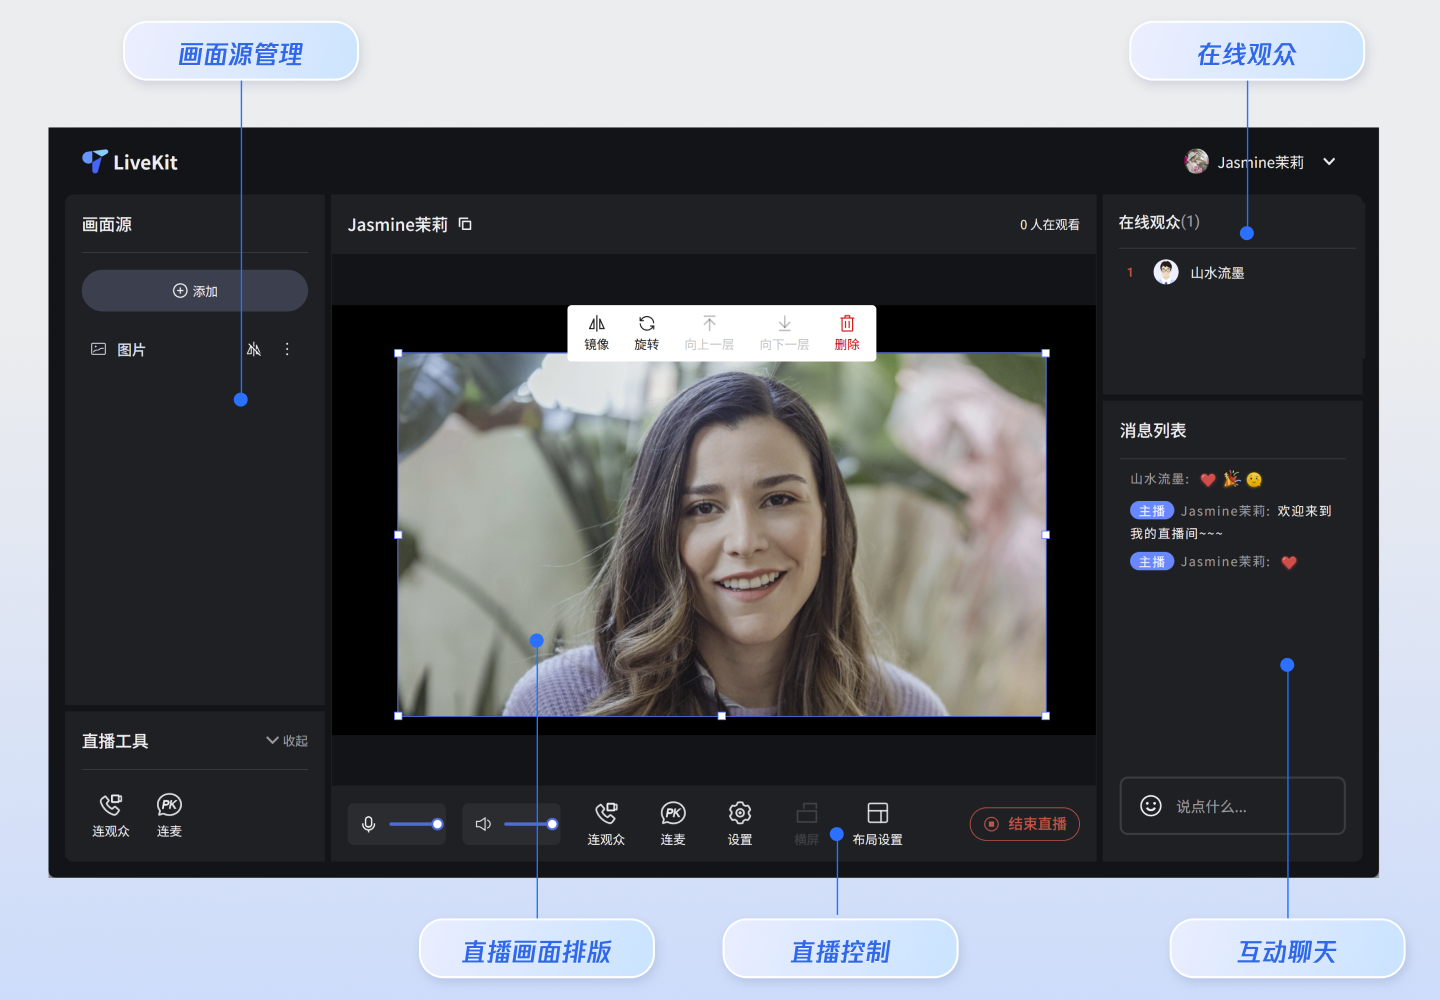
功能展示
横屏开播
竖屏开播
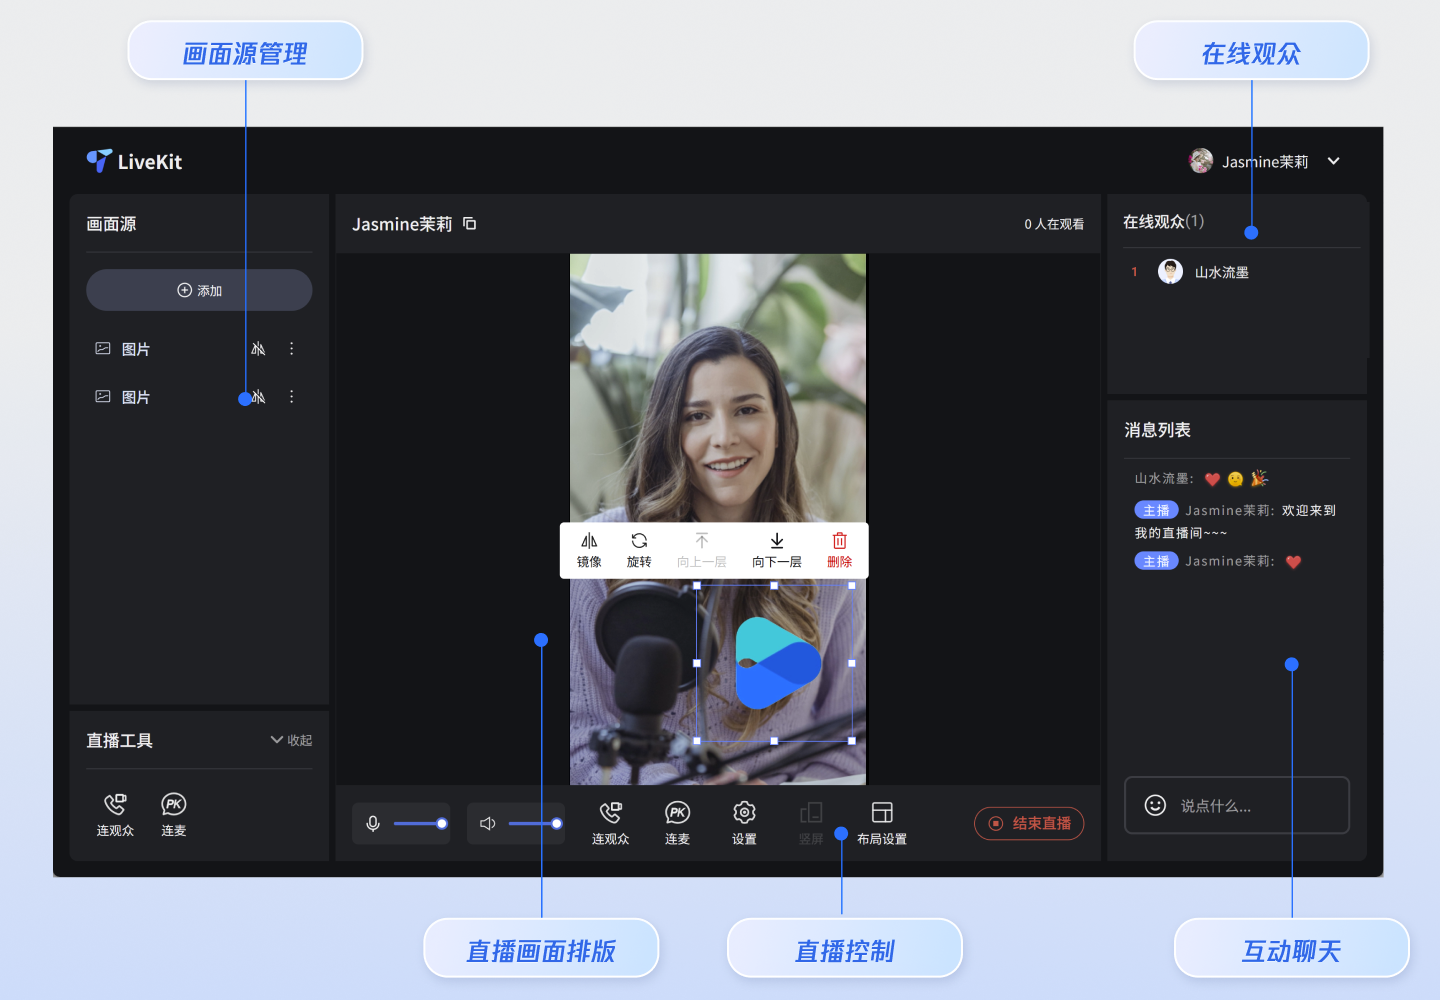
功能概览
画面源管理:支持添加多个摄像头、屏幕分享、窗口分享和本地图片。
直播画面排版:支持对画面源拖拽、缩放,支持通过快捷菜单对画面源设置镜像、旋转和层级调整。
观众连麦:支持房间内观众连麦,内置多种连麦布局。
主播 PK:支持主播跨房连线、PK。
互动聊天:支持收发文字和表情消息,聊天互动。
观众管理:支持对观众禁言、踢出直播间等操作。
快速接入
步骤1:环境配置及开通服务
步骤2: 安装依赖
npm install tuikit-atomicx-vue3 @tencentcloud/uikit-base-component-vue3 --save
pnpm add tuikit-atomicx-vue3 @tencentcloud/uikit-base-component-vue3
yarn add tuikit-atomicx-vue3 @tencentcloud/uikit-base-component-vue3
步骤3:主播开播页面接入
在您的项目下创建
live-pusher.vue 文件,通过复制如下代码至您新建的 live-pusher.vue 文件中集成完整的主播开播页面。注意:
<template><UIKitProvider language="zh-CN" theme="dark"><div class="custom-live-pusher"><!-- 主要内容区 --><div class="main-content"><!-- 左侧:视频源和工具 --><div class="left-panel"><div class="scene-section"><div class="panel-title">画面源</div><LiveScenePanel /></div></div><!-- 中央:直播画面 --><div class="center-panel"><div class="stream-section"><div class="stream-header"><div class="stream-title"><span>{{ liveName }}</span></div><div class="stream-audience">{{ audienceCount }} 人在观看</div></div><StreamMixer /></div><div class="live-controls"><div class="bottom-panel"><!-- <MediaDeviceSetting />// 媒体设置能力请参考本文高级功能集成部分<CoGuestButton /> // 连麦观众能力请参考本文高级功能集成部分<OrientationSwitch /> // 布局设置请参考本文高级功能集成部分<LayoutSwitch /> // 横竖屏推流能力请参考本文高级功能集成部分 --></div><TUIButton type="primary" v-if="!currentLive?.liveId" @click="handleStartLive">开始直播</TUIButton><TUIButton color="red" v-else @click="handleStopLive">停止直播</TUIButton></div></div><!-- 右侧:观众互动 --><div class="right-panel"><div class="audience-section"><div class="panel-title">在线观众({{ audienceCount }})</div><LiveAudienceList /></div><div class="message-section"><div class="panel-title">消息列表</div><BarrageList /><BarrageInput /></div></div></div></div></UIKitProvider></template><script setup lang="ts">import { onMounted } from 'vue';import { UIKitProvider, TUIButton } from '@tencentcloud/uikit-base-component-vue3';import { LiveScenePanel, StreamMixer, LiveAudienceList, BarrageList, BarrageInput, useLiveListState, useLiveAudienceState, useLoginState } from 'tuikit-atomicx-vue3';const { login, setSelfInfo } = useLoginState();const { createLive, currentLive, endLive } = useLiveListState();const { audienceCount } = useLiveAudienceState();const liveName = '我的直播间';const handleStartLive = async () => {// 创建直播间await createLive({liveId: 'my-live-room', // 直播间 IDliveName: liveName, // 直播间名称coverUrl: '', // 直播间封面 URLisPublicVisible: true, // 是否公开可见seatLayoutTemplateId: 600, // 麦位布局模板 ID});// 设置个人信息await setSelfInfo({userName: '我的名字/昵称', // 用户名avatarUrl: '', // 头像 URL 地址});};const handleStopLive = async () => {await endLive();};async function initLogin() {try {await login({sdkAppId: 0, // SDKAppID, 可以参考步骤 1 获取userId: '', // UserID, 可以参考步骤 1 获取userSig: '', // userSig, 可以参考步骤 1 获取});} catch (error) {console.error('登录失败:', error);}}onMounted(async () => {await initLogin();});</script><style>html,body,#app{height:100%;width:100%;margin:0;padding:0}</style><style scoped>.custom-live-pusher,.left-panel{flex-direction:column;display:flex}.custom-live-pusher,.live-title{color:var(--text-color-primary)}.live-controls,.tools-section,.top-controls{backdrop-filter:blur(10px)}*{box-sizing:border-box;margin:0;padding:0}:global(::before){box-sizing:border-box;margin:0;padding:0}.layout-label,.template-options{margin-bottom:16px}:global(body){line-height:1.6;color:var(--text-color-primary);background:var(--bg-color-default)}.custom-live-pusher{height:100vh;width:100vw;background:linear-gradient(135deg,var(--bg-color-default) 0,var(--bg-color-function) 100%);overflow:hidden}.top-controls{display:flex;justify-content:space-between;align-items:center;padding:12px 20px;background:var(--bg-color-operate);border-bottom:1px solid var(--stroke-color-primary);z-index:100;min-height:60px}.live-title{font-size:18px;font-weight:600;text-shadow:0 2px 4px var(--shadow-color)}.audience-count{font-size:14px;color:var(--text-color-error);background:var(--uikit-color-red-1);padding:6px 12px;border-radius:20px;border:1px solid var(--uikit-color-red-3)}.live-controls,.tools-section{background:var(--bg-color-operate)}.main-content{display:flex;flex:1;height:calc(100vh - 60px);gap:16px;padding:16px;overflow:hidden}.left-panel{width:320px;gap:16px;flex-shrink:0}.panel-title{font-size:16px;font-weight:600;color:var(--text-color-primary);margin-bottom:12px;text-align:left}.audience-section,.message-section,.scene-section{display:flex;flex-direction:column;background:var(--bg-color-operate);border-radius:12px;border:1px solid var(--stroke-color-primary);padding:16px;overflow:hidden}.scene-section{flex:1;min-height:0}.message-section{flex:1;min-height:0}.message-section :deep(input),.message-section :deep(textarea){text-align:left}.tools-section{border-radius:12px;padding:16px;border:1px solid var(--stroke-color-primary)}.center-panel{display:flex;flex-direction:column;flex:1;gap:16px;min-width:0}.stream-section{display:flex;flex-direction:column;flex:1;min-height:0;background:var(--bg-color-operate);border-radius:12px;border:1px solid var(--stroke-color-primary);overflow:hidden}.stream-header{display:flex;justify-content:space-between;align-items:center;padding:22px;border-bottom:1px solid var(--stroke-color-primary)}.stream-title{display:flex;align-items:center;gap:8px;font-size:18px;font-weight:500;color:var(--text-color-primary)}.stream-audience{font-size:14px;color:var(--text-color-primary)}.live-controls{display:flex;justify-content:space-between;align-items:center;padding:16px;border-radius:12px;border:1px solid var(--stroke-color-primary);gap:16px}.live-controls button{padding:18px 20px}.right-panel{display:flex;flex-direction:column;width:320px;gap:16px;flex-shrink:0}.center-panel>.live-controls,.left-panel>*,.right-panel>*{background:var(--bg-color-operate);border-radius:12px;border:1px solid var(--stroke-color-primary);overflow:hidden}.left-panel>*{padding:16px}.left-panel>.panel-title,.scene-section>.panel-title,.audience-section>.panel-title,.message-section>.panel-title{padding:0;background:transparent;border:none;border-radius:0}.custom-icon-container,.device-setting{padding:8px 12px;background:var(--bg-color-function)}.stream-section :deep(>*:last-child){flex:1;min-height:300px}.bottom-panel,.device-setting{align-items:center;display:flex}.custom-icon-container:hover,.option-card:hover{border-color:var(--stroke-color-primary);background:var(--list-color-hover)}.bottom-panel{gap:16px;flex:1}.device-setting{gap:8px;border-radius:8px;border:1px solid var(--stroke-color-secondary)}.device-icon{cursor:pointer;color:var(--text-color-primary);transition:color .2s}.device-icon:hover{color:var(--text-color-link)}.device-slider{width:80px}.custom-icon-container{display:flex;align-items:center;gap:6px;border-radius:8px;border:1px solid var(--stroke-color-secondary);cursor:pointer;transition:.2s;position:relative}.custom-icon-container.disabled{opacity:.5;cursor:not-allowed}.custom-icon-container.disabled:hover{background:var(--bg-color-function);border-color:var(--stroke-color-secondary)}.custom-icon{width:16px;height:16px;display:inline-block;background-size:contain;background-repeat:no-repeat;background-position:center}.custom-text{font-size:12px;color:var(--text-color-secondary);white-space:nowrap}.unread-count{position:absolute;top:-4px;right:-4px;background:var(--text-color-error);color:var(--text-color-button);border-radius:10px;padding:2px 6px;font-size:10px;font-weight:600;min-width:16px;text-align:center;line-height:1}.layout-label,.option-info h4{color:var(--text-color-primary)}.layout-dialog{max-width:600px}.layout-label{font-size:16px;font-weight:600}.options-grid{display:grid;grid-template-columns:repeat(auto-fit,minmax(120px,1fr));gap:12px}.option-card{padding:16px;background:var(--bg-color-function);border:2px solid var(--stroke-color-secondary);border-radius:8px;cursor:pointer;transition:.2s;text-align:center}.option-card.active{border-color:var(--text-color-link);background:var(--bg-color-operate)}.option-info h4{margin:8px 0 0;font-size:12px}.option-icon{width:32px;height:32px;margin:0 auto;color:var(--text-color-secondary)}.co-guest-dialog{max-width:500px}.co-guest-panel{min-height:300px}</style>
核心 API 参数说明
createLive
创建一个新的直播间,并设置直播间的基础信息。
参数 | 类型 | 必填 | 说明 |
liveId | String | 是 | 直播间 ID,需保证全局唯一。 |
liveName | String | 是 | 直播间名称,用于界面展示。 |
coverUrl | String | 否 | 直播间封面图片的 URL 地址。 |
isPublicVisible | Boolean | 否 | 是否公开可见。默认为 true,表示公开。 |
seatLayoutTemplateId | Number | 否 |
setSelfInfo
设置用户信息。
参数 | 类型 | 必填 | 说明 |
userName | String | 是 | 用户昵称,将在直播间及聊天区域显示。 |
avatarUrl | String | 否 | 用户头像的 URL 地址。 |
步骤4:开启直播
开启您的第一场直播。
npm run dev
说明:
上述命令执行成功后,请在浏览器地址栏输入本地访问地址(您可以根据项目参考,例如
http://localhost:5173/live-pusher,具体端口号可能因您的项目配置而有所不同),即可看到开播页面。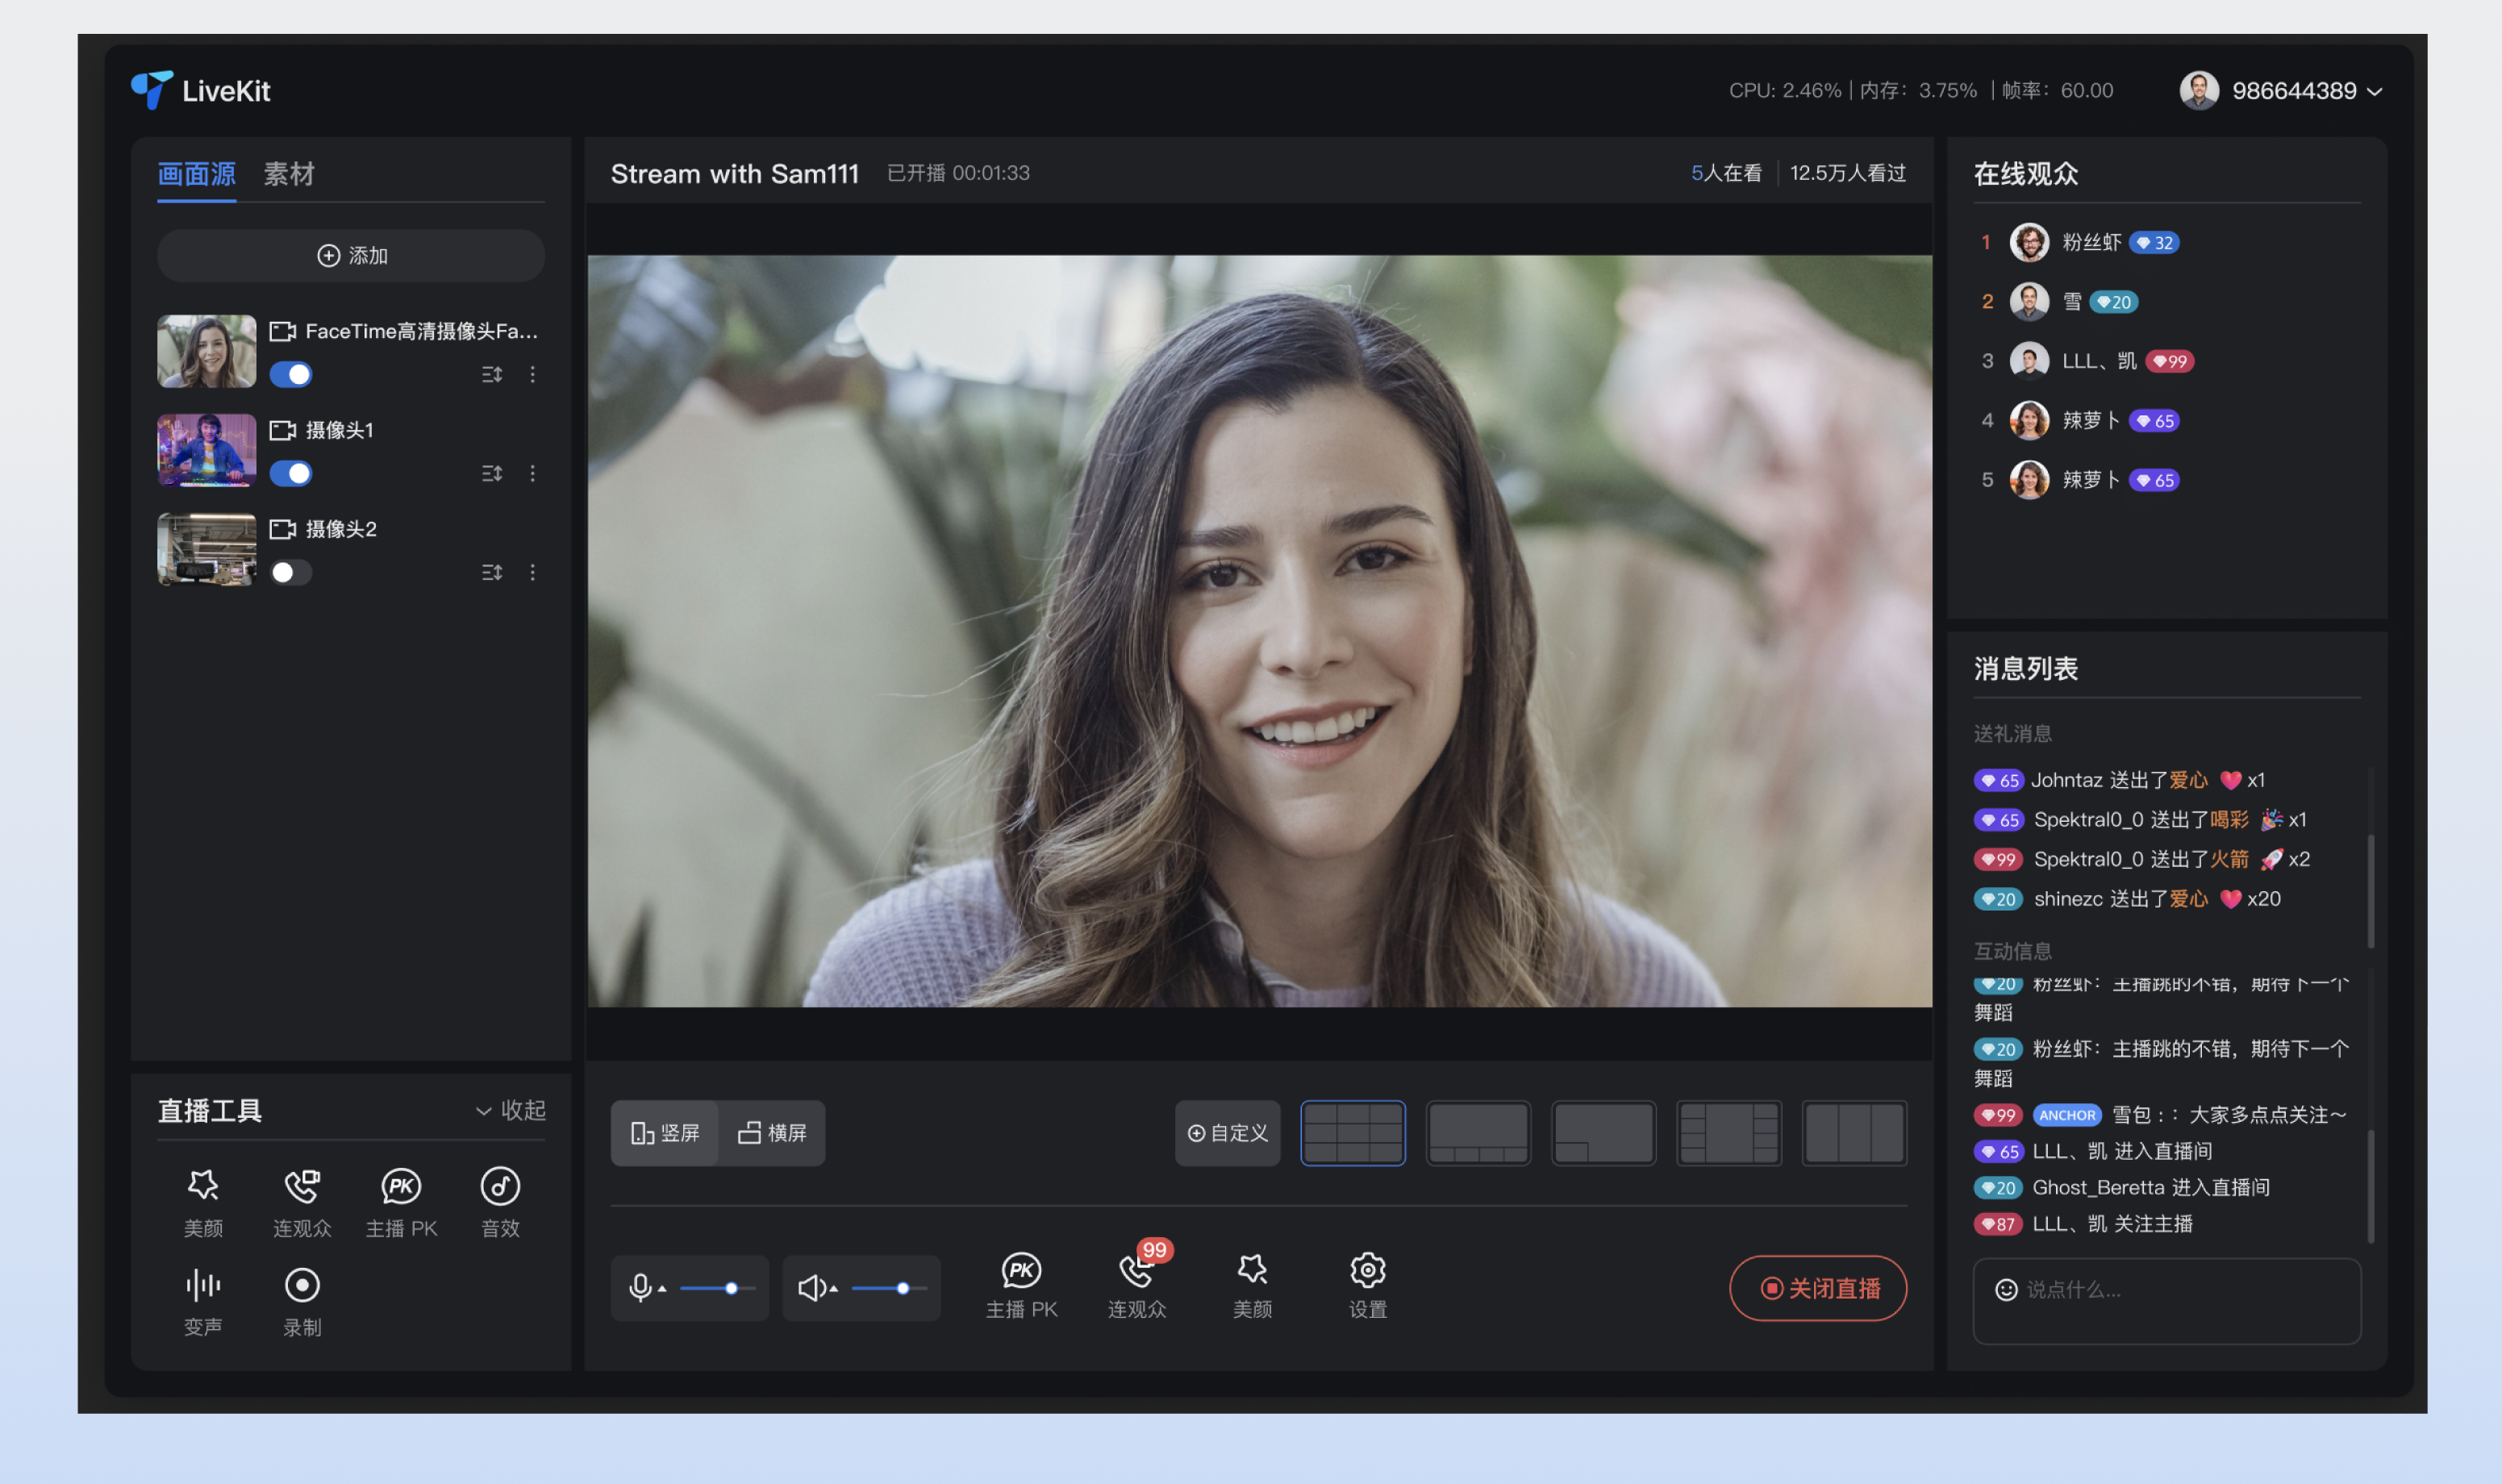
步骤5:观看直播
方式一:(推荐)
方式二:
重要提示:
请使用不同的用户 ID 登录观看: 开播端和观看端必须使用不同的用户 ID,否则后登录的设备会强制先登录的设备下线(即“被踢下线”)。
高级功能集成
注意:
以下高级功能均是基于 步骤 3 中创建的
live-pusher.vue 示例文件进行的扩展。请根据您的业务需求,将下方的代码片段集成到 live-pusher.vue 的对应位置(template 区域或 script 逻辑中),以启用相应的能力。若您需要支持媒体设置能力,包括设置扬声器、麦克风音量大小等内容,请参考如下代码示例复制到
live-pusher.vue 文件中即可。<!-- MediaDeviceSetting 媒体设备设置 --><template><div class="media-device-container"><!-- MicVolumeSetting 麦克风设置 --><div class="device-setting"><TUIIcon class="device-icon" :icon="microphoneIsOn ? IconAudioOpen : IconAudioClose" :size="20" @click="switchMicrophoneStatus" /><TUISlider v-model="microphoneVolume" class="device-slider" :min="0" :max="100" :disabled="!microphoneIsOn" @change="handleMicrophoneVolumeChange" /></div><!-- SpeakerVolumeSetting 扬声器设置 --><div class="device-setting"><TUIIcon class="device-icon" :icon="speakerIsOn ? IconSpeakerOn : IconSpeakerOff" :size="20" @click="switchSpeaker(!speakerIsOn)" /><TUISlider v-model="speakerVolume" class="device-slider" :min="0" :max="100" :disabled="!speakerIsOn" @change="handleSpeakerVolumeChange" /></div></div></template><script lang="ts" setup>import { ref, watch } from 'vue';import { TUIIcon, TUISlider, IconSpeakerOn, IconSpeakerOff, IconAudioOpen, IconAudioClose } from '@tencentcloud/uikit-base-component-vue3';import { useDeviceState } from 'tuikit-atomicx-vue3';const {captureVolume,setCaptureVolume,openLocalMicrophone,closeLocalMicrophone,} = useDeviceState();const { outputVolume, setOutputVolume } = useDeviceState();const microphoneVolume = ref(captureVolume.value);const speakerVolume = ref(outputVolume.value);const microphoneIsOn = ref(true);const speakerIsOn = ref(true);const templateSpeakerVolume = ref(outputVolume.value);const templateMicrophoneVolume = ref(captureVolume.value);const handleMicrophoneVolumeChange = (value: number) => {if (value !== captureVolume.value) {setCaptureVolume(value);}};const switchMicrophoneStatus = () => {microphoneIsOn.value = !microphoneIsOn.value;if (!microphoneIsOn.value) {templateMicrophoneVolume.value = captureVolume.value;closeLocalMicrophone();} else {openLocalMicrophone();setCaptureVolume(templateMicrophoneVolume.value);}};const switchSpeaker = (open: boolean) => {speakerIsOn.value = open;if (!open) {templateSpeakerVolume.value = outputVolume.value;setOutputVolume(0);} else {setOutputVolume(templateSpeakerVolume.value);}};const handleSpeakerVolumeChange = (value: number) => {if (value !== outputVolume.value) {setOutputVolume(value);}};watch(captureVolume, (newVal) => {microphoneVolume.value = newVal;});watch(outputVolume, (newVal) => {speakerVolume.value = newVal;});</script><style scoped>.media-device-container{display:flex;align-items:center;gap:12px}.device-setting{display:flex;align-items:center;gap:8px;padding:12px 16px;background:var(--bg-color-function);border-radius:8px;border:1px solid var(--stroke-color-secondary)}.device-slider{width:100px}.device-icon{cursor:pointer;color:var(--text-color-primary);transition:color .2s}.device-icon:hover{color:var(--text-color-link)}</style>
若您需要支持横竖屏推流能力,包括设置切换横竖屏等内容,请参考如下代码示例复制到
live-pusher.vue 文件中即可。<!-- LayoutSwitch 横竖屏推流设置 --><template><divclass="custom-icon-container":class="{ disabled: currentLive?.liveId }"@click="handleOrientationSwitch"><IconHorizontalModev-if="currentOrientation === LiveOrientation.Landscape"class="custom-icon"/><IconPortraitv-elseclass="custom-icon"/><span class="custom-text co-guest-text">{{currentOrientation === LiveOrientation.Portrait ? t('Portrait') : t('Landscape')}}</span></div></template><script setup lang="ts">import { ref, watch } from 'vue';import { useUIKit, TUIToast, TOAST_TYPE, IconPortrait, IconHorizontalMode } from '@tencentcloud/uikit-base-component-vue3';import { useLiveListState, LiveOrientation } from 'tuikit-atomicx-vue3';const { t } = useUIKit();enum TUISeatLayoutTemplate {LandscapeDynamic_1v3 = 200,PortraitDynamic_Grid9 = 600,PortraitDynamic_1v6 = 601,PortraitFixed_Grid9 = 800,PortraitFixed_1v6 = 801,PortraitFixed_6v6 = 802,}const { currentLive, updateLiveInfo } = useLiveListState();const currentOrientation = ref(LiveOrientation.Portrait);watch(() => currentLive.value?.layoutTemplate,newVal => {if (newVal === TUISeatLayoutTemplate.LandscapeDynamic_1v3) {currentOrientation.value = LiveOrientation.Landscape;} else {currentOrientation.value = LiveOrientation.Portrait;}},{ immediate: true });const handleOrientationSwitch = () => {if (currentLive.value?.liveId) {TUIToast({message: t('Cannot switch orientation during live streaming'),type: TOAST_TYPE.ERROR,});return;}if (currentOrientation.value === LiveOrientation.Portrait) {updateLiveInfo({ layoutTemplate: TUISeatLayoutTemplate.LandscapeDynamic_1v3 });} else {updateLiveInfo({ layoutTemplate: TUISeatLayoutTemplate.PortraitDynamic_Grid9 });}};</script><style scoped>.custom-icon-container{display:flex;flex-direction:column;align-items:center;justify-content:center;gap:4px;width:56px;height:56px;cursor:pointer;color:var(--text-color-primary);border-radius:12px;position:relative}.custom-icon{width:24px;height:24px;background:transparent}.custom-text{font-size:12px}.custom-icon-container:not(.disabled):hover{box-shadow:0 0 10px 0 var(--bg-color-mask)}.custom-icon-container:not(.disabled):hover .custom-icon,.custom-icon-container:not(.disabled):hover .custom-text{color:var(--text-color-link)}.custom-icon-container.disabled{cursor:not-allowed;opacity:.5;color:var(--text-color-secondary)}.custom-icon-container.disabled .custom-icon,.custom-icon-container.disabled .custom-text{color:var(--text-color-secondary);cursor:not-allowed}</style>
若您需要支持观众连麦能力,包括设置连麦申请、连麦管理等内容,请参考如下代码示例复制到
live-pusher.vue 文件中即可。<!-- CoGuestButton 观众连麦设置 --><template><div class="custom-icon-container" :class="{ disabled: disabled }" @click="handleCoGuest"><span v-if="applicants.length > 0" class="unread-count">{{ applicants.length }}</span><IconCoGuest class="custom-icon" /><span class="custom-text co-guest-text">{{ t('CoGuest') }}</span></div><TUIDialog :title="t('CoGuest')" :visible="coGuestPanelVisible" :custom-classes="['co-guest-dialog']" @close="coGuestPanelVisible = false" @confirm="coGuestPanelVisible = false" @cancel="coGuestPanelVisible = false"><CoGuestPanel class="co-guest-panel" /><template #footer><div /></template></TUIDialog></template><script lang="ts" setup>import { computed, ref, watch } from 'vue';import { useUIKit, TUIDialog, TUIToast, TOAST_TYPE, IconCoGuest } from '@tencentcloud/uikit-base-component-vue3';import { CoGuestPanel, CoHostStatus, useCoGuestState, useCoHostState, useLiveListState } from 'tuikit-atomicx-vue3';const { t } = useUIKit();const { applicants } = useCoGuestState();const { currentLive } = useLiveListState();const { coHostStatus } = useCoHostState();const disabled = computed(() => !currentLive.value?.liveId || coHostStatus.value !== CoHostStatus.Disconnected);const coGuestPanelVisible = ref(false);const handleCoGuest = () => {if (disabled.value) {const message = !currentLive.value?.liveId? t('Cannot use co-guest before live starts'): t('Cannot enable audience co-hosting while co-hosting with other hosts');TUIToast({ type: TOAST_TYPE.ERROR, message });return;}coGuestPanelVisible.value = true;};watch(disabled, () => {if (disabled.value) {coGuestPanelVisible.value = false;}});</script><style scoped>.custom-icon-container{display:flex;flex-direction:column;align-items:center;justify-content:center;gap:4px;width:56px;height:56px;cursor:pointer;color:var(--text-color-primary);border-radius:12px;position:relative}.unread-count{position:absolute;top:0;right:0;background-color:var(--text-color-error);border-radius:50%;width:16px;height:16px;display:flex;align-items:center;justify-content:center;font-size:12px}.custom-icon{width:24px;height:24px;background:transparent}.custom-text{font-size:12px}.custom-icon-container:not(.disabled):hover{box-shadow:0 0 10px 0 var(--bg-color-mask)}.custom-icon-container:not(.disabled):hover .custom-icon,.custom-icon-container:not(.disabled):hover .custom-text{color:var(--text-color-link)}.custom-icon-container.disabled{cursor:not-allowed;opacity:.5;color:var(--text-color-secondary)}.custom-icon-container.disabled .custom-icon{cursor:not-allowed}.custom-icon-container.disabled .custom-text{color:var(--text-color-secondary)}.co-guest-panel{height:560px}:deep(.co-guest-dialog){width:520px}</style>
若您需要支持视频流切换布局能力,包括设置动态宫格布局、静态宫格布局、静态小窗布局、浮动小窗布局等内容,请参考如下代码示例复制到
live-pusher.vue 文件中即可。<!-- OrientationSwitch 布局设置 --><template><divclass="custom-icon-container":class="{ 'disabled': disabled }"@click="handleSwitchLayout"><IconLayoutTemplate class="custom-icon" /><span class="custom-text setting-text">{{ t('Layout Settings') }}</span></div><TUIDialog:customClasses="['layout-dialog']":title="t('Layout Settings')":visible="layoutSwitchVisible"@close="handleCancel"@confirm="handleConfirm"@cancel="handleCancel"appendTo="body"><div class="layout-label">{{ t('Audience Layout') }}</div><div class="template-options"><div class="options-grid"><templatev-for="template in layoutOptions":key="template.id"><divclass="option-card":class="{ active: selectedTemplate === template.templateId }"@click="selectTemplate(template.templateId)"><div class="option-info"><component:is="template.icon"v-if="template.icon"class="option-icon"/><h4>{{ template.label }}</h4></div></div></template></div></div></TUIDialog></template><script lang="ts" setup>import { ref, computed, watch, h, defineComponent } from 'vue';import { TUIErrorCode } from '@tencentcloud/tuiroom-engine-js';import { useUIKit, TUIDialog, TUIToast, TOAST_TYPE, IconLayoutTemplate } from '@tencentcloud/uikit-base-component-vue3';import { useLiveListState, useCoHostState, CoHostStatus } from 'tuikit-atomicx-vue3';/*** 直播间麦位排版模板*/enum TUISeatLayoutTemplate {LandscapeDynamic_1v3 = 200,PortraitDynamic_Grid9 = 600,PortraitDynamic_1v6 = 601,PortraitFixed_Grid9 = 800,PortraitFixed_1v6 = 801,PortraitFixed_6v6 = 802,}const createSvgIcon = (pathD: string) => defineComponent({render: () => h('svg', { xmlns: 'http://www.w3.org/2000/svg', viewBox: '0 0 24 24', fill: 'currentColor', width: '24', height: '24' }, [h('path', { d: pathD })])});const Dynamic1v6 = createSvgIcon('M3 3h7v7H3V3zm11 0h7v4h-7V3zm0 6h7v4h-7V9zm0 6h7v6h-7v-6zM3 12h7v9H3v-9z');const DynamicGrid9 = createSvgIcon('M3 3h5v5H3V3zm7 0h4v5h-4V3zm6 0h5v5h-5V3zM3 10h5v4H3v-4zm7 0h4v4h-4v-4zm6 0h5v4h-5v-4zM3 16h5v5H3v-5zm7 0h4v5h-4v-5zm6 0h5v5h-5v-5z');const Fixed1v6 = createSvgIcon('M2 2h9v9H2V2zm11 0h9v4h-9V2zm0 5h9v4h-9V7zm0 5h9v4h-9v-4zm0 5h9v5h-9v-5zM2 13h9v9H2v-9z');const FixedGrid9 = createSvgIcon('M2 2h6v6H2V2zm7 0h6v6H9V2zm7 0h6v6h-6V2zM2 9h6v6H2V9zm7 0h6v6H9V9zm7 0h6v6h-6V9zM2 16h6v6H2v-6zm7 0h6v6H9v-6zm7 0h6v6h-6v-6z');const HorizontalFloat = createSvgIcon('M2 4h20v12H2V4zm3 14h4v2H5v-2zm6 0h4v2h-4v-2zm6 0h4v2h-4v-2z');const { t } = useUIKit();const { currentLive, updateLiveInfo } = useLiveListState();const { coHostStatus } = useCoHostState();const disabled = computed(() => coHostStatus.value === CoHostStatus.Connected);watch(() => currentLive.value?.liveId,(liveId) => {if (!liveId) {updateLiveInfo({ layoutTemplate: TUISeatLayoutTemplate.PortraitDynamic_Grid9 });}},{ immediate: true },);const layoutSwitchVisible = ref(false);const handleSwitchLayout = () => {if (disabled.value) {TUIToast({ type: TOAST_TYPE.ERROR, message: t('Layout switching is not available during co-hosting') });return;}layoutSwitchVisible.value = true;};const portraitLayoutOptions = computed(() => [{id: 'PortraitDynamic_Grid9',icon: DynamicGrid9,templateId: TUISeatLayoutTemplate.PortraitDynamic_Grid9,label: t('Dynamic Grid9 Layout'),},{id: 'PortraitFixed_1v6',icon: Fixed1v6,templateId: TUISeatLayoutTemplate.PortraitFixed_1v6,label: t('Fixed 1v6 Layout'),},{id: 'PortraitFixed_Grid9',icon: FixedGrid9,templateId: TUISeatLayoutTemplate.PortraitFixed_Grid9,label: t('Fixed Grid9 Layout'),},{id: 'PortraitDynamic_1v6',icon: Dynamic1v6,templateId: TUISeatLayoutTemplate.PortraitDynamic_1v6,label: t('Dynamic 1v6 Layout'),},]);const horizontalLayoutOptions = computed(() => [{id: 'LandscapeDynamic_1v3',icon: HorizontalFloat,templateId: TUISeatLayoutTemplate.LandscapeDynamic_1v3,label: t('Landscape Template'),},]);const layoutOptions = computed(() => {if (currentLive.value && currentLive.value?.layoutTemplate >= 200 && currentLive.value?.layoutTemplate <= 599) {return horizontalLayoutOptions.value;}return portraitLayoutOptions.value;});const selectedTemplate = ref<TUISeatLayoutTemplate | null>(currentLive.value?.layoutTemplate ?? null);function selectTemplate(template: TUISeatLayoutTemplate) {selectedTemplate.value = template;}watch(() => currentLive.value?.layoutTemplate, (newVal) => {if (newVal) {selectedTemplate.value = newVal;}});async function handleConfirm() {if (selectedTemplate.value) {try {await updateLiveInfo({ layoutTemplate: selectedTemplate.value });layoutSwitchVisible.value = false;} catch (error: any) {let errorMessage = t('Layout switch failed');if (error.code === TUIErrorCode.ERR_FREQ_LIMIT) {errorMessage = t('Operation too frequent, please try again later');}TUIToast({ type: TOAST_TYPE.ERROR, message: errorMessage });}} else {layoutSwitchVisible.value = false;}}function handleCancel() {selectedTemplate.value = currentLive.value?.layoutTemplate ?? null;layoutSwitchVisible.value = false;}</script><style scoped>.custom-icon-container { display: flex; flex-direction: column; align-items: center; justify-content: center; gap: 4px; width: 56px; height: 56px; cursor: pointer; color: var(--text-color-primary); border-radius: 12px; position: relative; } .custom-icon-container .custom-icon { display: inline-block; width: 24px; height: 24px; background: transparent; } .custom-icon-container .custom-text { font-size: 12px; font-weight: 400; } .custom-icon-container:not(.disabled):hover { box-shadow: 0 0 10px 0 var(--bg-color-mask); } .custom-icon-container:not(.disabled):hover .custom-icon { color: var(--text-color-link); } .custom-icon-container:not(.disabled):hover .custom-text { color: var(--text-color-link); } .custom-icon-container.disabled { cursor: not-allowed; opacity: 0.5; color: var(--text-color-tertiary); } .custom-icon-container.disabled .custom-icon { color: var(--text-color-tertiary); cursor: not-allowed; } .custom-icon-container.disabled .custom-text { color: var(--text-color-tertiary); } :deep(.layout-dialog) { padding: 24px; width: 480px; } :deep(.layout-dialog) .dialog-body { flex-wrap: wrap; } :deep(.layout-dialog) .dialog-footer { padding-top: 32px; } .layout-label { font-size: 14px; font-weight: 400; color: var(--text-color-primary, #ffffff); margin: 4px 0px 16px 0px; } .template-options { width: 100%; height: 100%; overflow: auto; } .template-options .options-grid { display: flex; flex-wrap: wrap; gap: 16px; justify-content: flex-start; } .template-options .options-grid .option-card { box-sizing: border-box; padding: 12px 13px; width: 208px; background: #3a3a3a; border: 2px solid transparent; border-radius: 12px; cursor: pointer; transition: all 0.2s ease; text-align: center; } .template-options .options-grid .option-card:hover { background: #4a4a4a; border-color: #5a5a5a; } .template-options .options-grid .option-card.active { border: 2px solid var(--text-color-link-hover, #2B6AD6); background: var(--list-color-focused, #243047); } .template-options .options-grid .option-card.active .option-info h4 { color: #ffffff; } .template-options .options-grid .option-card .option-info { display: flex; align-items: center; justify-content: flex-start; gap: 8px; } .template-options .options-grid .option-card .option-info .option-icon { width: 24px; height: 24px; } .template-options .options-grid .option-card .option-info h4 { margin: 0; font-size: 14px; font-weight: 600; color: #ffffff; transition: color 0.2s ease; }</style>
自定义您的界面布局
TUILiveKit 支持灵活定制开播页与直播页的功能和样式,您可根据业务需求调整布局、隐藏 / 显示功能模块。横竖屏推流设置
TUILiveKit 支持横屏和竖屏两种推流模式,您可根据直播场景选择合适的推流方向:推流模式 | 适用场景 | 说明 |
竖屏推流 | 秀场直播、电商带货、聊天互动 | 默认模式,适合移动端观看,画面比例为 9:16。 |
横屏推流 | 游戏直播、在线教育、会议直播 | 适合 PC 端观看,画面比例为 16:9。 |
注意:
横竖屏切换必须在开播前进行设置,直播过程中无法切换推流方向。
通过 UI 交互切换
在主播开播页的底部控制栏,点击横屏 / 竖屏按钮即可切换推流方向:
显示竖屏时,当前为竖屏推流模式。
显示横屏时,当前为横屏推流模式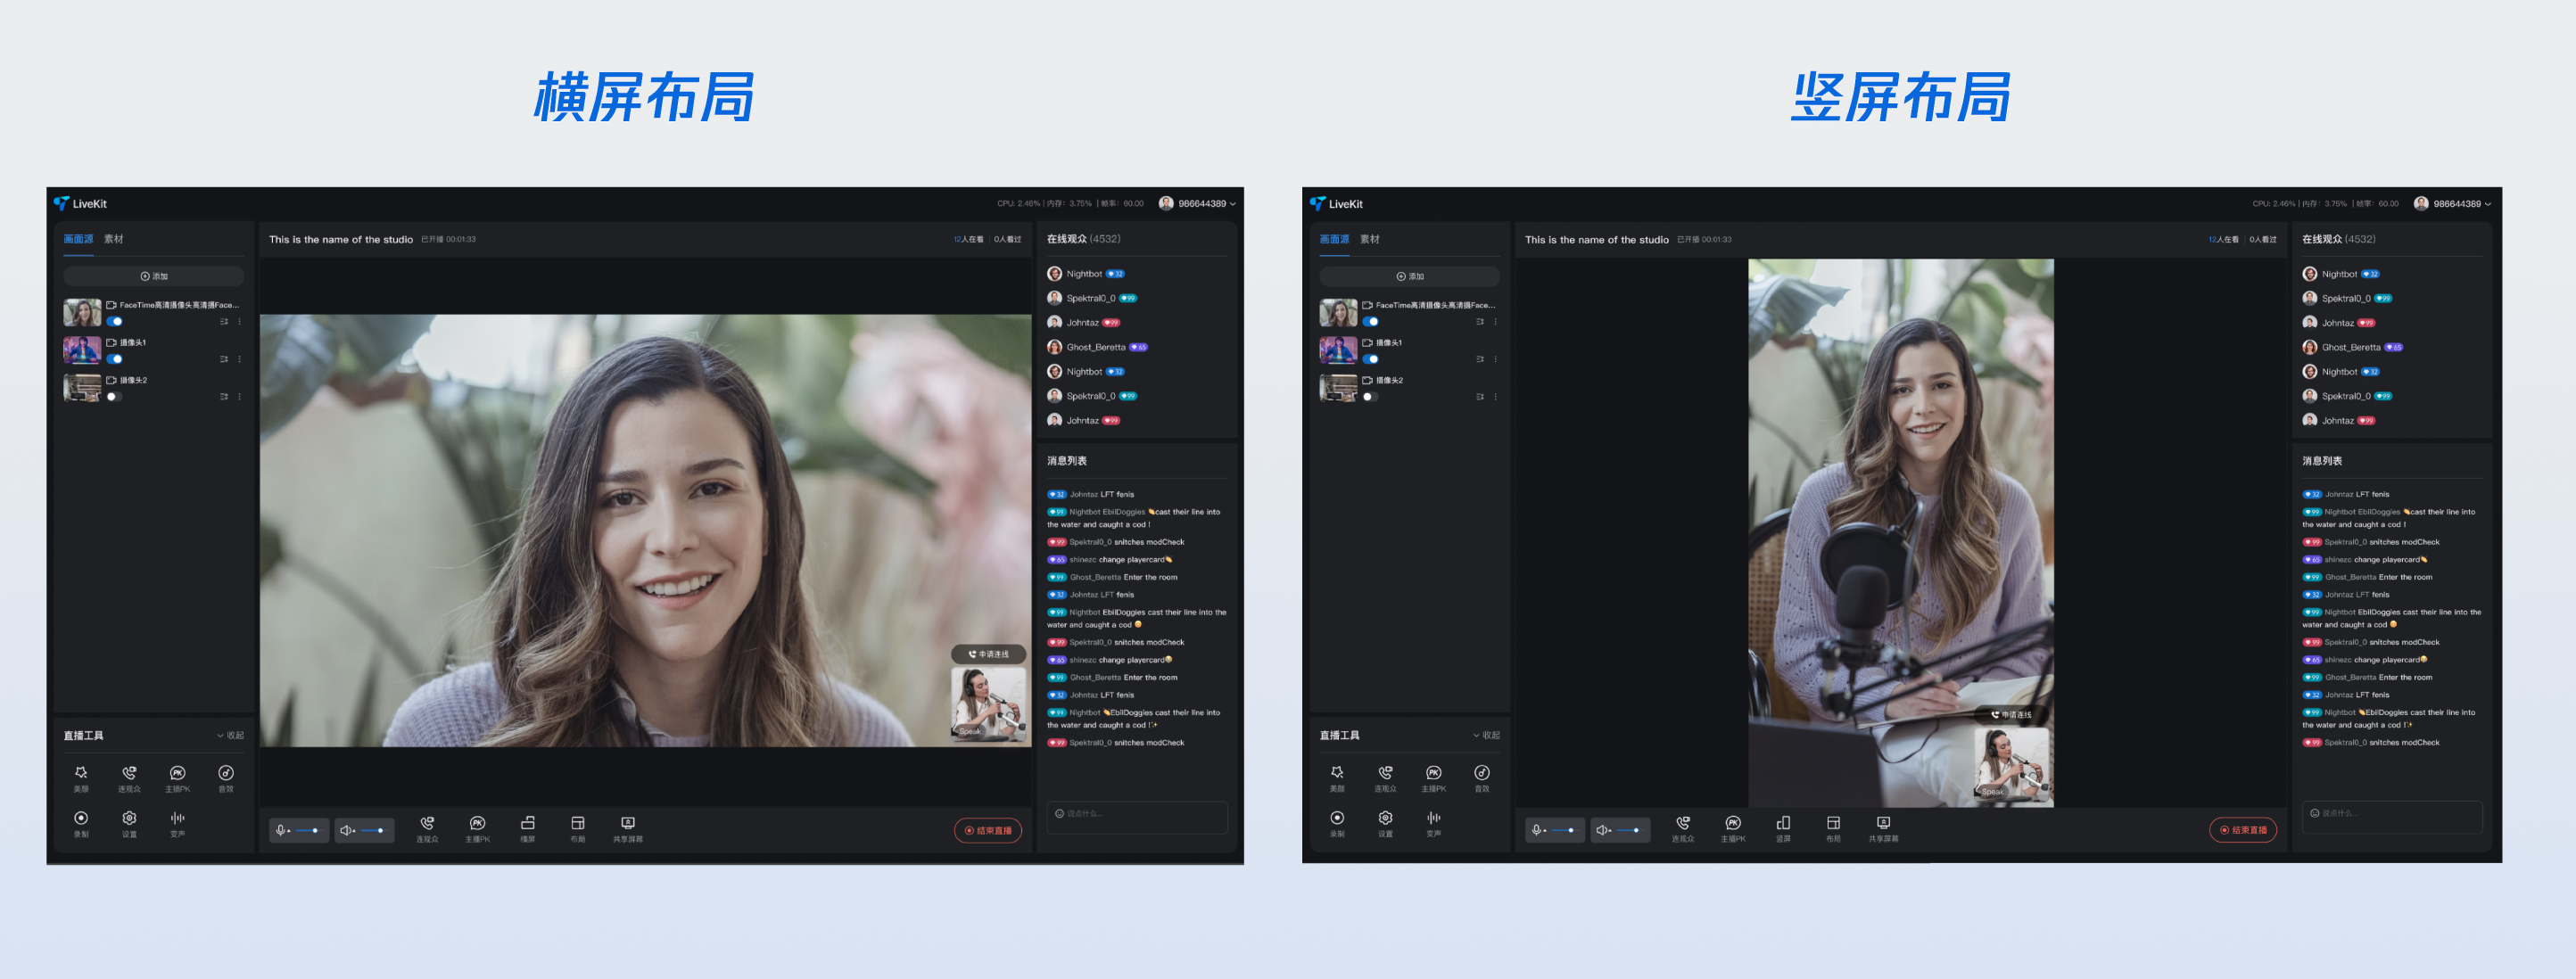
通过代码设置
您也可以通过调用
updateLiveInfo 方法,在代码中设置推流方向:import { useLiveListState } from 'tuikit-atomicx-vue3';const { updateLiveInfo } = useLiveListState();// 切换为横屏模式(模板 ID: 200)updateLiveInfo({ layoutTemplate: 200 });// 切换为竖屏模式(模板 ID: 600)updateLiveInfo({ layoutTemplate: 600 });
说明:
横屏模式对应的布局模板 ID 范围为 200-599,默认使用 200(横屏浮动布局)。
竖屏模式对应的布局模板 ID 范围为 600-899,默认使用 600(动态宫格布局)。
切换横竖屏时,系统会自动切换到对应方向的默认布局模板。
直播布局模板选择
TUILiveKit 提供多种直播布局模板,用于控制主播与连麦嘉宾的画面排列方式。您可在主播开播页的布局设置选择合适样式: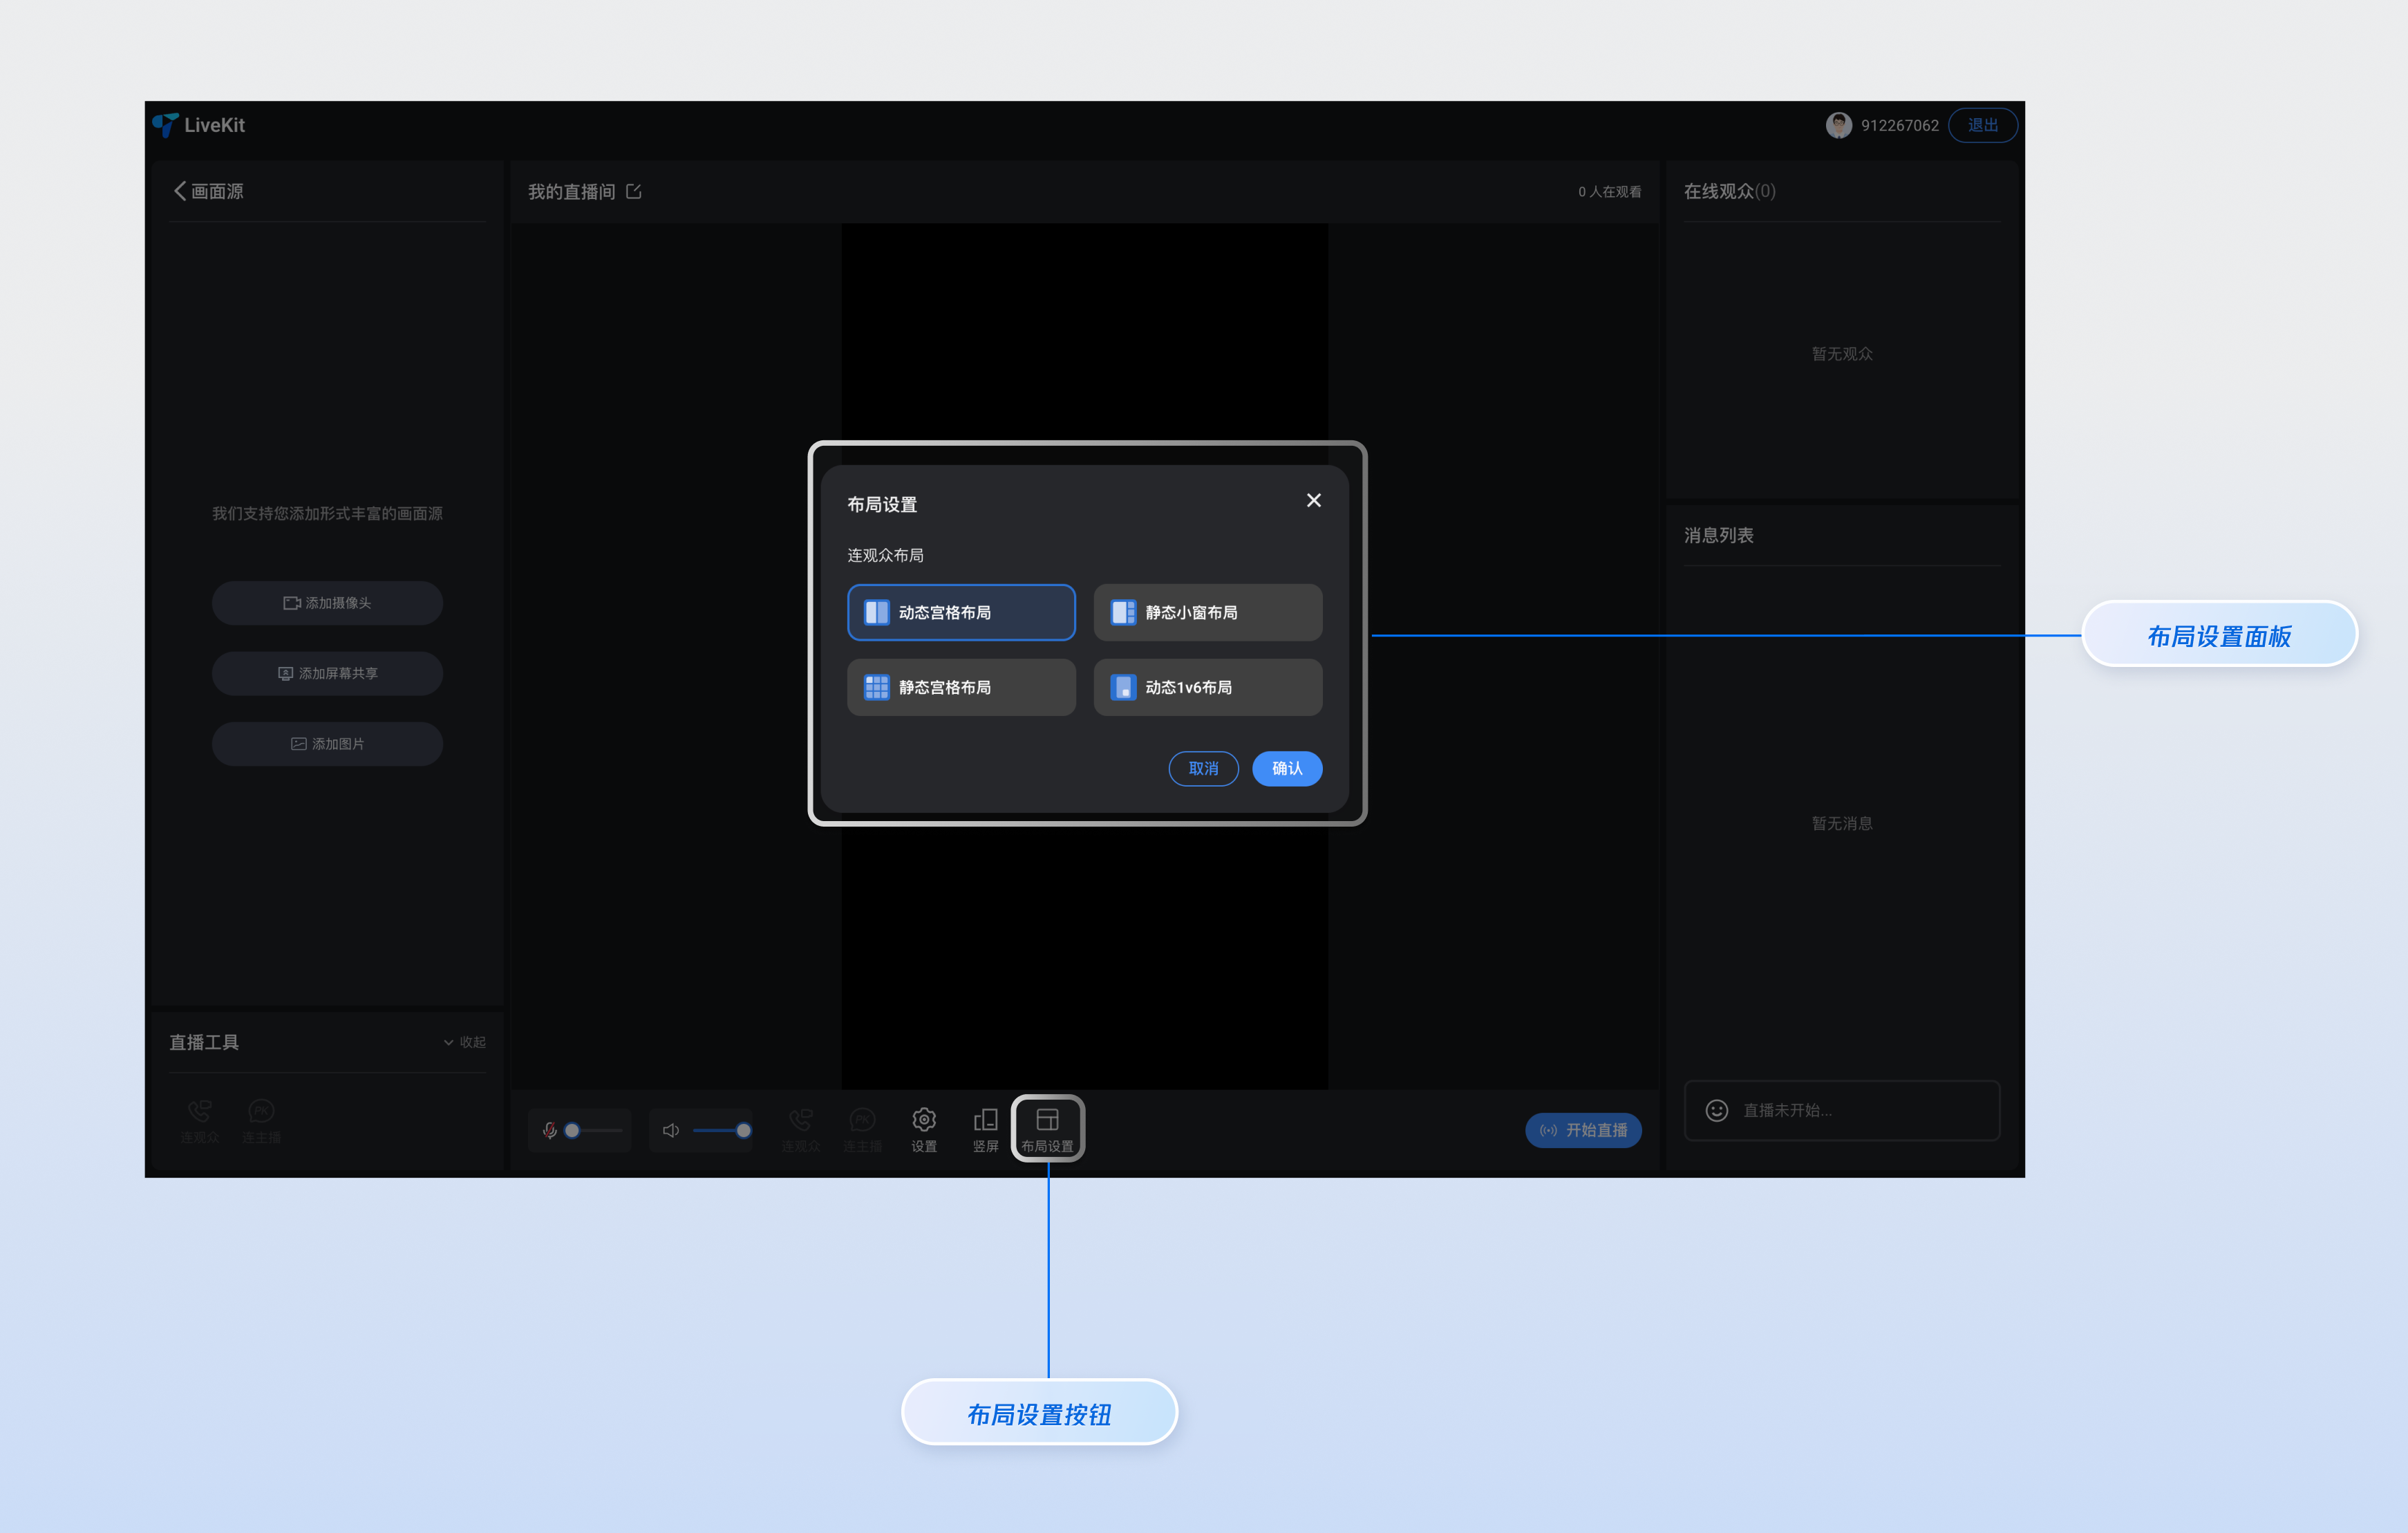
竖屏模式布局模板
竖屏模式下提供 4 种布局模板,适用于秀场直播、电商带货等场景:
名称 | 动态宫格布局 | 动态 1V6 布局 | 静态宫格布局 | 静态小窗布局 |
模板 ID | 600 | 601 | 800 | 801 |
描述 | 默认布局,根据连麦人数动态调整宫格大小,画面自适应填充。 | 主播画面居中大窗显示,连麦嘉宾以浮动小窗形式环绕在主播周围。 | 固定 9 宫格布局,每个嘉宾占据一个固定大小的宫格位置。 | 主播画面全屏显示,连麦嘉宾以固定小窗形式显示在画面边缘。 |
适用场景 | 通用场景,连麦人数不固定。 | 主播为主、嘉宾为辅的互动场景。 | 多人连麦、语音聊天室等固定人数场景。 | 主播全屏展示、嘉宾辅助的场景。 |
横屏模式布局模板
横屏模式下提供 1 种布局模板,适用于游戏直播、在线教育等场景:
名称 | 横屏浮动布局 |
模板 ID | 200 |
描述 | 主播画面全屏显示,连麦嘉宾以浮动小窗形式显示在画面底部。 |
适用场景 | 游戏直播、屏幕分享、在线教育等需要横屏展示的场景。 |
通过代码设置布局模板
您可以通过调用
updateLiveInfo 方法,在代码中设置布局模板:import { useLiveListState } from 'tuikit-atomicx-vue3';const { updateLiveInfo } = useLiveListState();// 设置竖屏动态宫格布局updateLiveInfo({ layoutTemplate: 600 });// 设置竖屏动态 1v6 布局updateLiveInfo({ layoutTemplate: 601 });// 设置竖屏静态宫格布局updateLiveInfo({ layoutTemplate: 800 });// 设置竖屏静态 1v6 布局updateLiveInfo({ layoutTemplate: 801 });// 设置横屏浮动布局updateLiveInfo({ layoutTemplate: 200 });
注意:
布局模板可以在开播前和直播中进行切换。
在主播 PK 连线期间,无法切换布局模板。
切换横竖屏推流方向时,布局模板会自动切换为对应方向的默认模板。
自由定制
颜色主题及语言
通过配置
App.vue 中 UIKitProvider 的入参,修改主题及语言的默认值。UIKitProvider 参数 | 可选值 | 默认值 |
theme | "light" | "dark" | "light" |
language | "zh-CN" | "en-US" | "en-US" |
<UIKitProvider theme="light"><router-view /></UIKitProvider><script setup lang="ts">import { UIKitProvider } from '@tencentcloud/uikit-base-component-vue3';
按钮 Button 和图标 Icon
若您需要对按钮 Button 或图标 Icon 等其他控件进行新增或替换等 UI 定制,您可以通过如下方式实现,以
live-player.vue 文件中的按钮和图标为例,您可以参考下图找到对应按钮或图标的指定位置源码,对当前部分的控件进行增加、删除、替换等 UI 定制操作。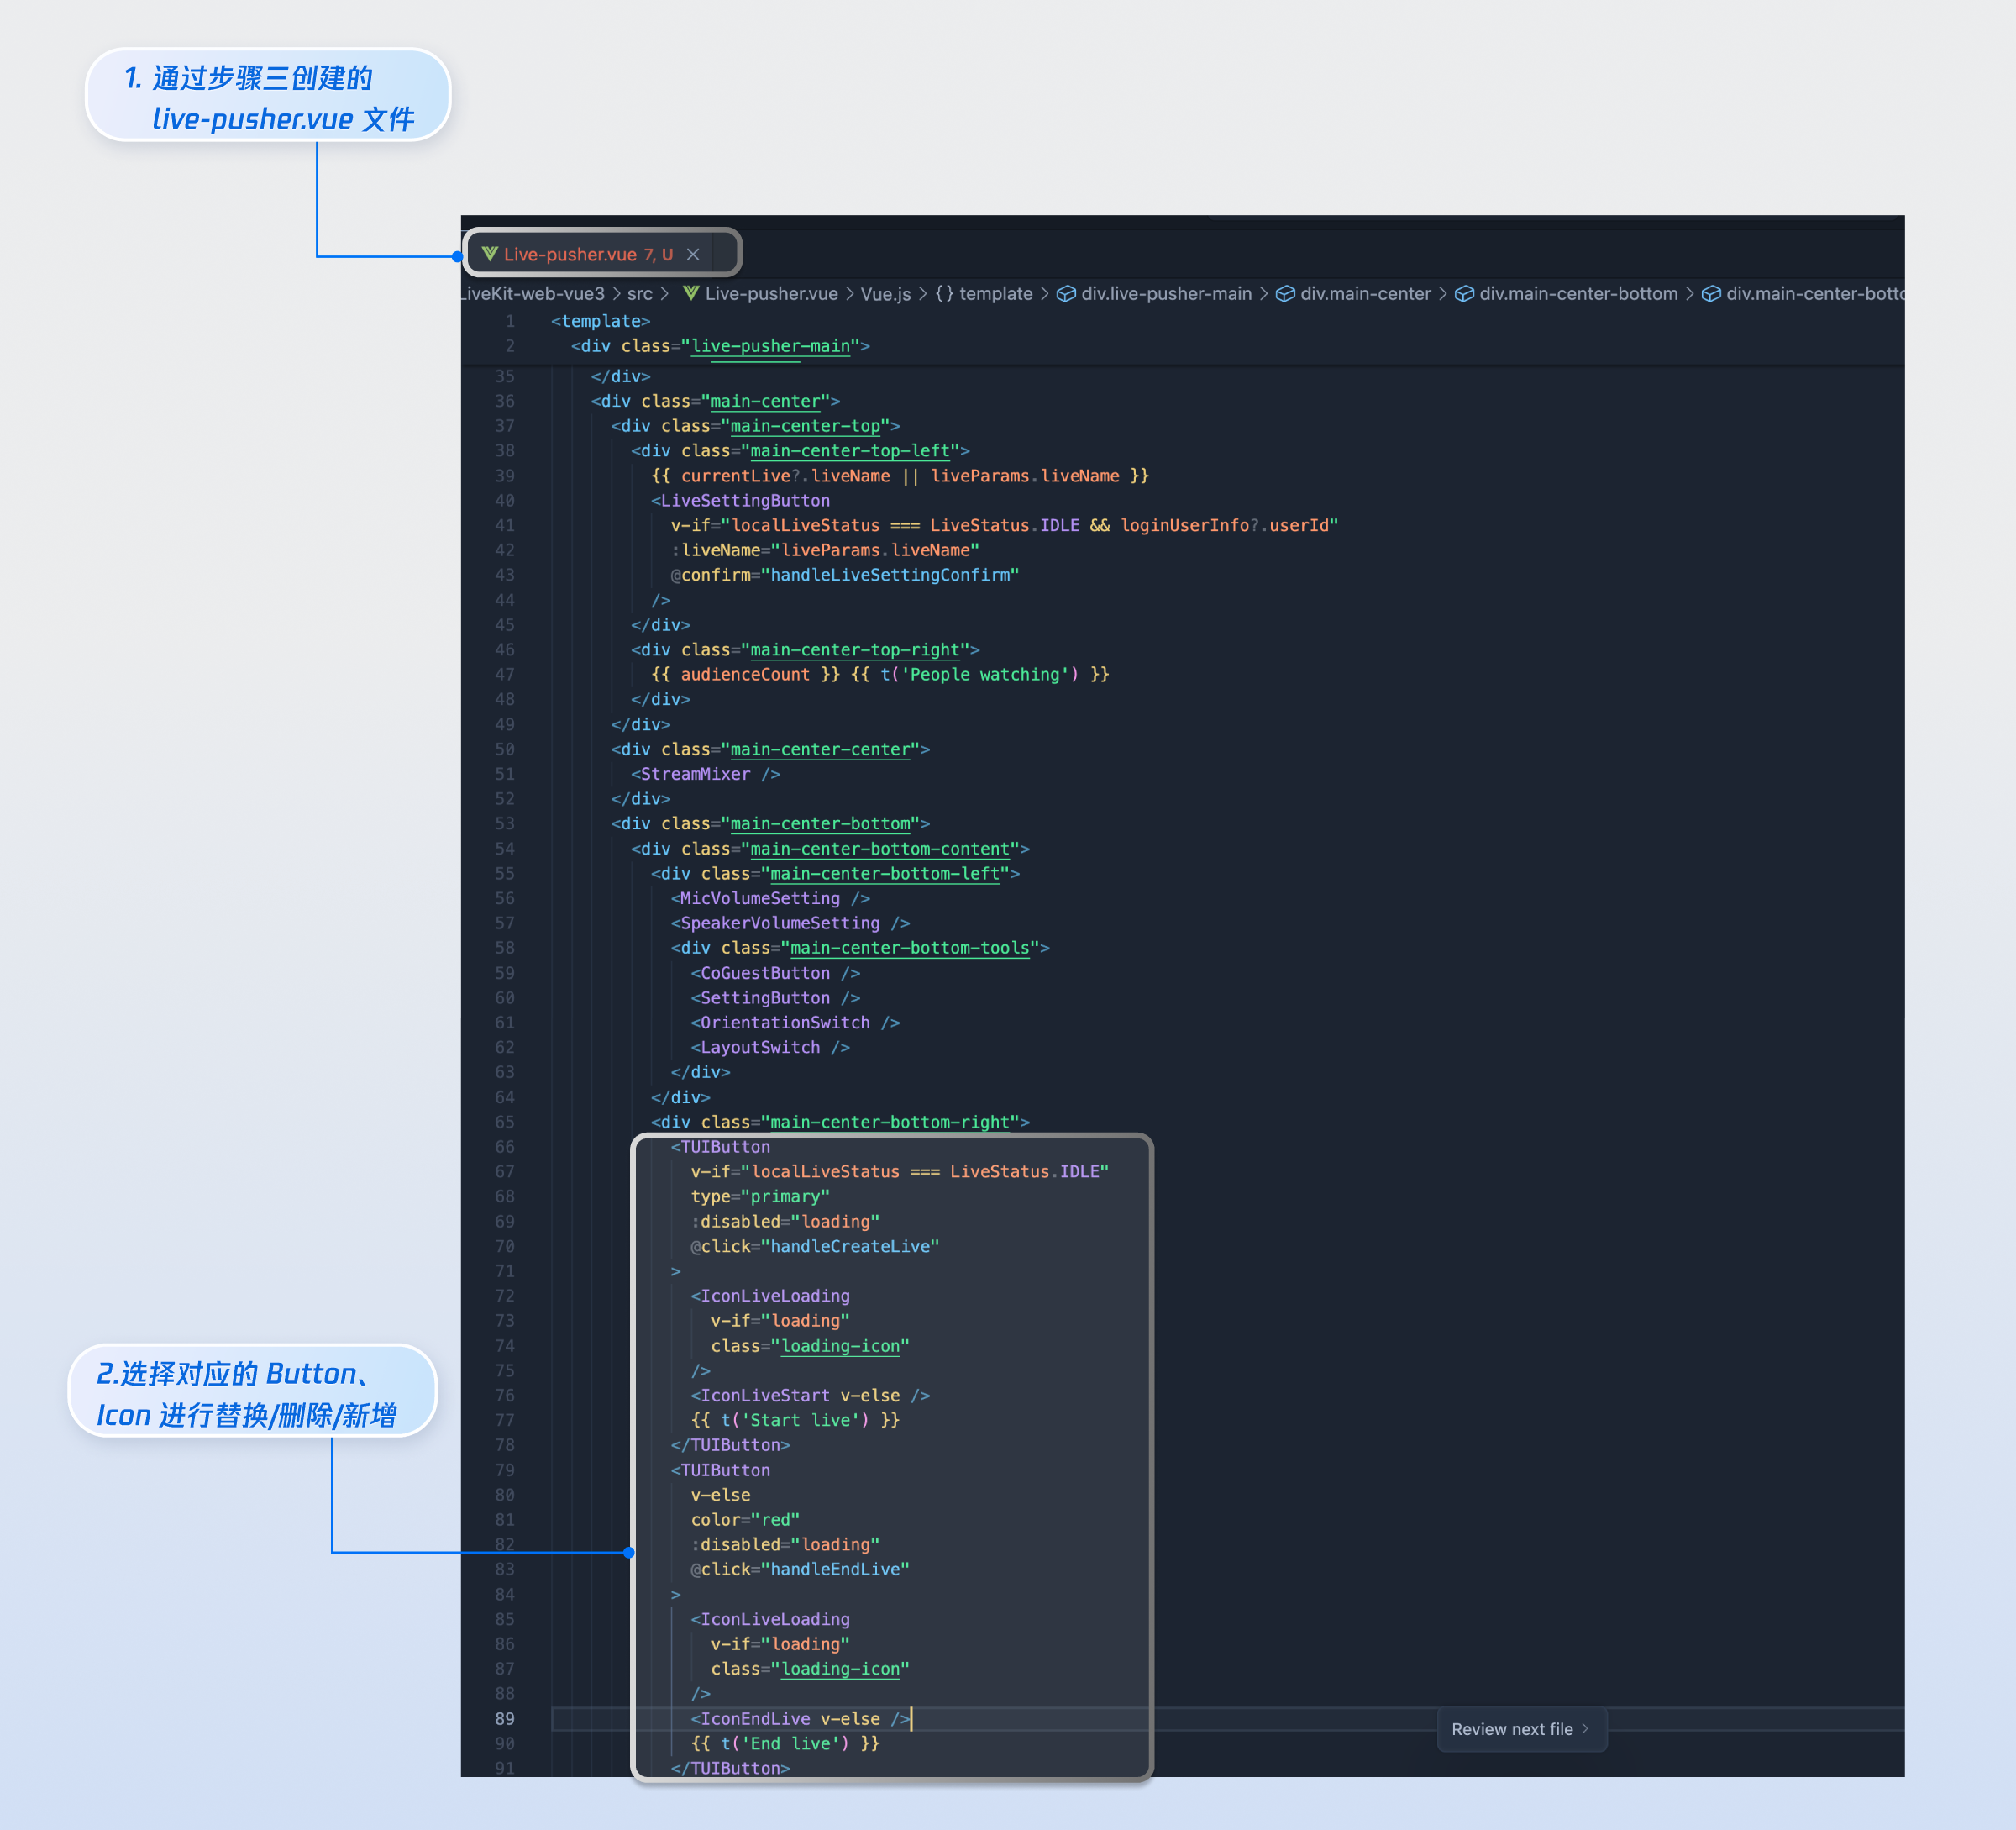
根据上述示例,我们同样支持您根据项目需求对观众观看页面进行 UI 定制的能力。除了页面 UI 布局调整,我们也支持您对颜色主题、字体、圆角、按钮、图标、输入框、弹框等内容进行增加、删除、修改等操作,满足您的 UI 定制需要。
下一步
恭喜您,现在您已经成功集成了主播开播页面 。接下来,您可以实现观众观看页、直播列表页和 UI 自定义等内容,可参考下表:


