背景
当业务使用腾讯云容器服务 TKE 进行部署时,可以通过 filebeat 来采集 TKE 中各个 pod 的日志,写入到下游的 Elasticsearch 集群中,然后在 kibana 上进行日志的查询与分析。本文介绍如何使用 filebeat daemonset 的方式采集容器中的日志。
实战过程
下面以采用运行 containerd 的 TKE 容器集群,以采集 nginx 日志为例,介绍使用 filebeat 采集 nginx pod 上的日志并写入到 ES。
部署 nginx daemonset
部署 filebeat daemonset
1. 创建 ConfigMap
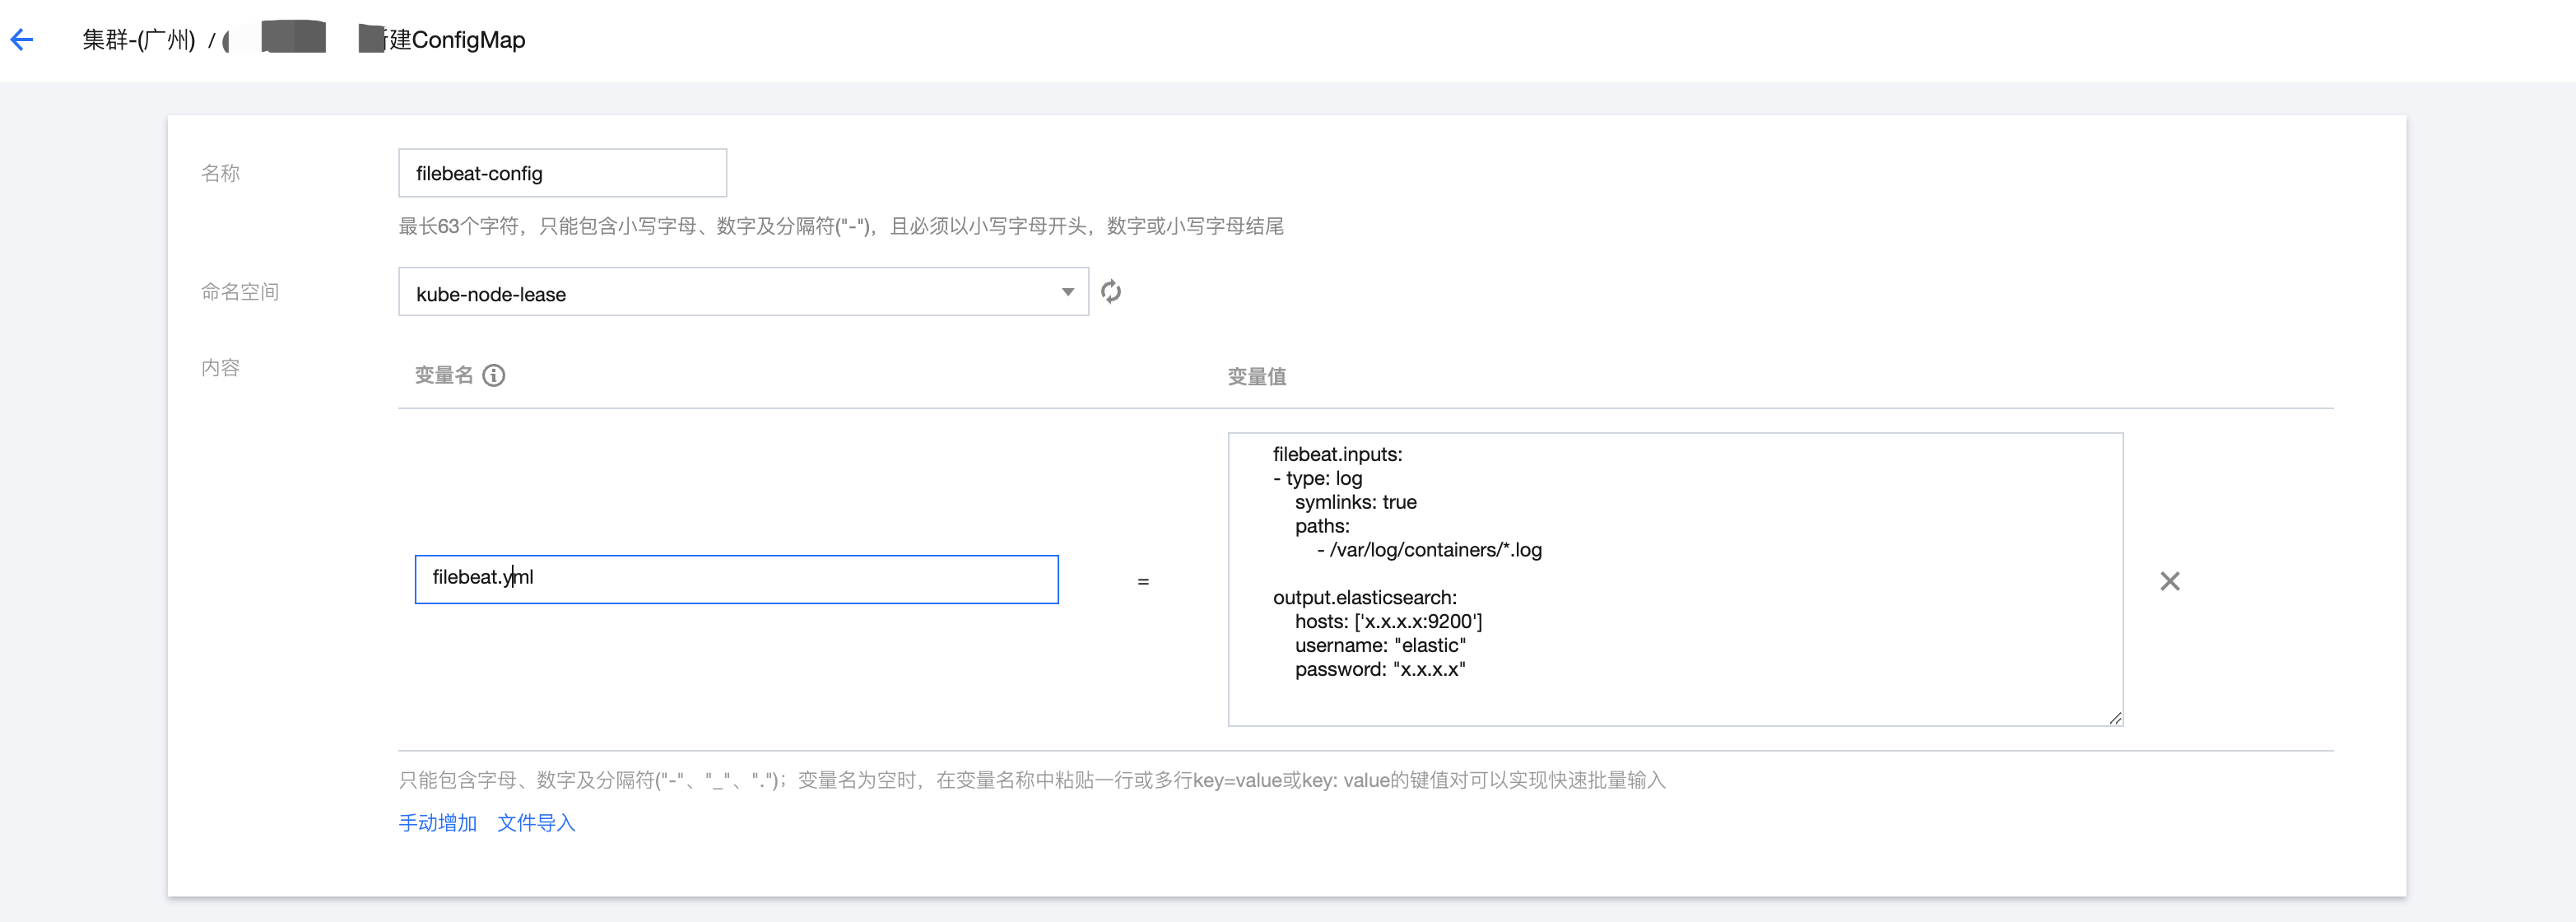
1.1 filebeat 以 filebeat.yml 文件为主配置文件,首先创建一个 filebeat.yml 配置的 ConfigMap。
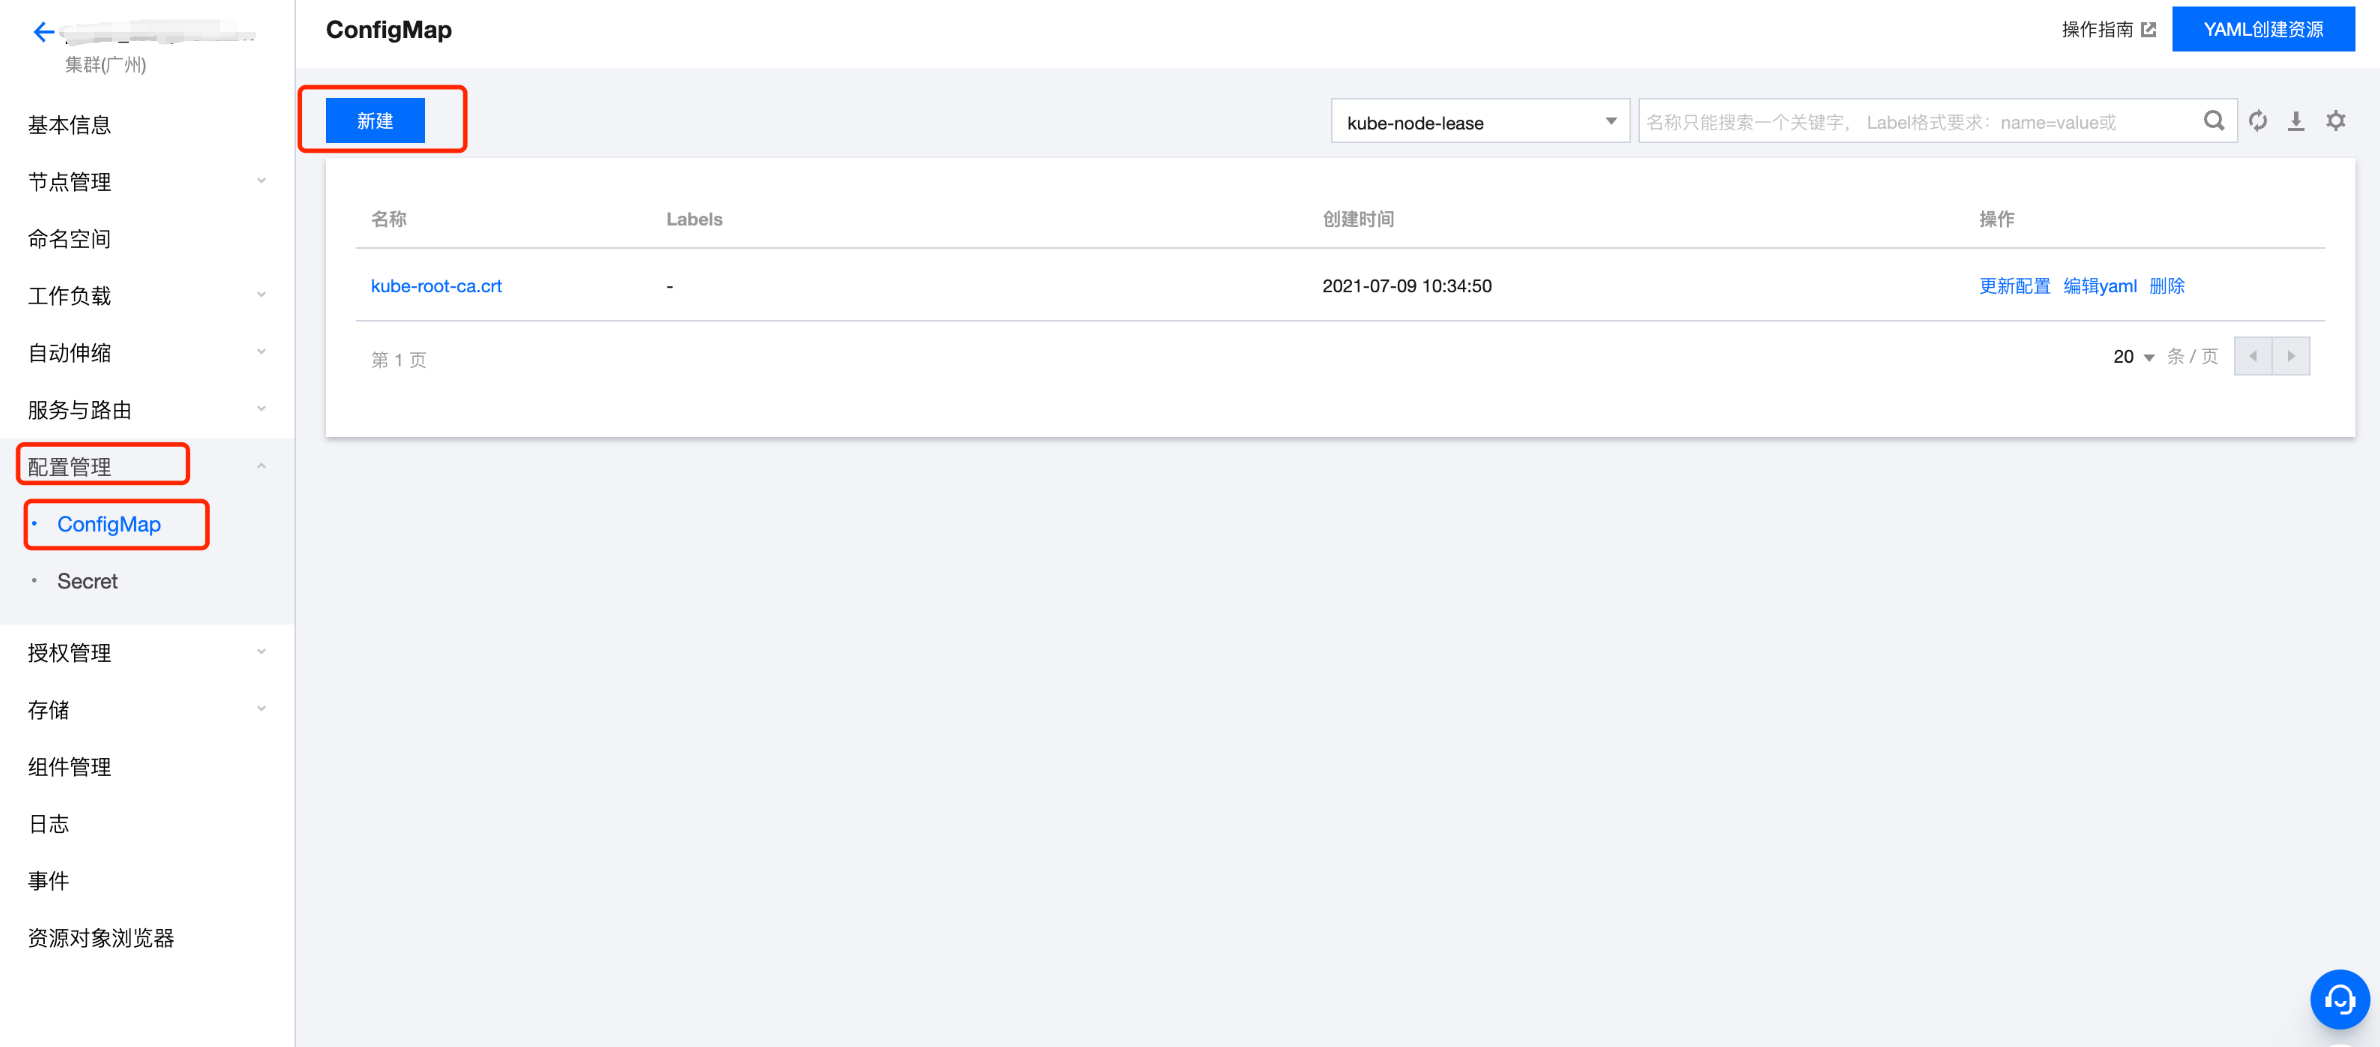
1.2 进入配置管理 > ConfigMap 页面,单击新建。 

1.3 新建的 ConfigMap 中的变量名为 filebeat.yml,内容为具体的配置信息,以下是一个最简单的 filebeat.yml 配置。

filebeat.inputs:- type: logsymlinks: truepaths:- /var/log/containers/*.logoutput.elasticsearch:hosts: ['x.x.x.x:9200']username: "elastic"password: "x.x.x.x"
2. 使用公有镜像库中的 filebeat 镜像,部署 filebeat daemonset。


3. 配置数据卷


4. 配置运行参数


5. 配置挂载点


说明
数据卷和挂载点说明:
1. 使用 ConfigMap 数据卷,使得 filebeat pod 可以读取到自定义的 filebeat.yml 配置。
2. 使用主机路径
/var/log/containers, 使得 filebeat pod 可以读取到其它pod的日志,因为其它 pod 的日志都会打印在宿主机的/var/log/containers 路径下。3. 由于主机路径
/var/log/containers 下的 pod 日志,都是使用软链接,链接到/var/log/pods 目录下的各个 pod 的日志文件,因此需要将主机路径/var/log/containers挂载到 filebeat pod 上。这就是在 filebeat.yml 中要定义 symlinks: true 的原因,因为默认情况下,filebeat 不会读取链接文件。6. 在 kibana 中查看日志
进入到 filebeat.yml 中定义的 ES 集群对应的 kibana 中,查看对应索引是否生成,是否可以正常查看 nginx 日志。


通过以上步骤,即可查看 nginx 的日志可以正常被采集到。但是上述配置采集的是宿主机上所有 pod 的日志,有时需要只采集固定的某几个 pod 的日志,该怎么实现呢?
通过 YML 配置部署一个可以获取到 Pod 元信息的 filebeat daemonSet
在实际的业务场景中,通常需要通过 filebeat 采集部署在相同 host 上的多个 pod 的日志,通常也需要获取到采集到的 pod 的元信息,例如命令空间、pod 名称、标签等信息,以方便进行过滤或者检索。获取到 pod 的元信息需要调用 k8s 的 API, filebeat 内部也实现了这个功能,因此可以直接使用 filebeat 的container input 以及 add_kubernetes_metadata processors 来实现。
1. 在 TKE 控制台上,单击 YML 创建资源按钮,直接使用如下 yml 配置创建 filebeat daemonSet。
---apiVersion: v1kind: ConfigMapmetadata:name: filebeat-confignamespace: defaultlabels:k8s-app: filebeatdata:filebeat.yml: |-filebeat.inputs:- type: containerpaths:- /var/log/containers/*.logprocessors:- add_kubernetes_metadata:host: ${NODE_NAME}matchers:- logs_path:logs_path: "/var/log/containers/"processors:- add_cloud_metadata:- add_host_metadata:output.elasticsearch:hosts: ['${ELASTICSEARCH_HOST:elasticsearch}:${ELASTICSEARCH_PORT:9200}']username: ${ELASTICSEARCH_USERNAME}password: ${ELASTICSEARCH_PASSWORD}---apiVersion: apps/v1kind: DaemonSetmetadata:name: filebeatnamespace: defaultlabels:k8s-app: filebeatspec:selector:matchLabels:k8s-app: filebeattemplate:metadata:labels:k8s-app: filebeatspec:serviceAccountName: filebeatterminationGracePeriodSeconds: 30containers:- name: filebeatimage: ccr.ccs.tencentyun.com/tke-market/filebeat:7.10.1args: ["-c", "/etc/filebeat.yml","-e",]env:- name: ELASTICSEARCH_HOSTvalue: x.x.x.x- name: ELASTICSEARCH_PORTvalue: "9200"- name: ELASTICSEARCH_USERNAMEvalue: elastic- name: ELASTICSEARCH_PASSWORDvalue: Elastic123- name: NODE_NAMEvalueFrom:fieldRef:fieldPath: spec.nodeNamesecurityContext:runAsUser: 0# If using Red Hat OpenShift uncomment this:#privileged: trueresources:limits:memory: 200Mirequests:cpu: 100mmemory: 100MivolumeMounts:- name: configmountPath: /etc/filebeat.ymlreadOnly: truesubPath: filebeat.yml- name: varlibdockercontainersmountPath: /var/lib/docker/containersreadOnly: true- name: varlogmountPath: /var/logreadOnly: true- name: varpodsmountPath: /var/log/podsreadOnly: truevolumes:- name: configconfigMap:defaultMode: 0640name: filebeat-config- name: varlibdockercontainershostPath:path: /var/lib/docker/containers- name: varloghostPath:path: /var/log- name: varpodshostPath:path: /var/log/pods---apiVersion: rbac.authorization.k8s.io/v1kind: ClusterRoleBindingmetadata:name: filebeatsubjects:- kind: ServiceAccountname: filebeatnamespace: defaultroleRef:kind: ClusterRolename: filebeatapiGroup: rbac.authorization.k8s.io---apiVersion: rbac.authorization.k8s.io/v1kind: RoleBindingmetadata:name: filebeatnamespace: defaultsubjects:- kind: ServiceAccountname: filebeatnamespace: defaultroleRef:kind: Rolename: filebeatapiGroup: rbac.authorization.k8s.io---apiVersion: rbac.authorization.k8s.io/v1kind: RoleBindingmetadata:name: filebeat-kubeadm-confignamespace: defaultsubjects:- kind: ServiceAccountname: filebeatnamespace: defaultroleRef:kind: Rolename: filebeat-kubeadm-configapiGroup: rbac.authorization.k8s.io---apiVersion: rbac.authorization.k8s.io/v1kind: ClusterRolemetadata:name: filebeatlabels:k8s-app: filebeatrules:- apiGroups: [""] # "" indicates the core API groupresources:- namespaces- pods- nodesverbs:- get- watch- list- apiGroups: ["apps"]resources:- replicasetsverbs: ["get", "list", "watch"]---apiVersion: rbac.authorization.k8s.io/v1kind: Rolemetadata:name: filebeat# should be the namespace where filebeat is runningnamespace: defaultlabels:k8s-app: filebeatrules:- apiGroups:- coordination.k8s.ioresources:- leasesverbs: ["get", "create", "update"]---apiVersion: rbac.authorization.k8s.io/v1kind: Rolemetadata:name: filebeat-kubeadm-confignamespace: defaultlabels:k8s-app: filebeatrules:- apiGroups: [""]resources:- configmapsresourceNames:- kubeadm-configverbs: ["get"]---apiVersion: v1kind: ServiceAccountmetadata:name: filebeatnamespace: defaultlabels:k8s-app: filebeat---
说明
配置说明:
1. 命令空间为 default,根据需要也可以直接替换。
2. 创建了名为 filebeat 的服务账号,并且授予获取 pods 列表、获取 pod 详情等接口的权限,filebeat 会使用该账号获取到 pods 的元信息。
3. 通过 container input 采集
/var/log/containers/目录下的日志, container input 可采集容器的 stdout 和 stderr。2. 在 kibana 中查看日志,可以看到每条日志中都包含有 kubernetes 字段。


3. 上述配置通过 container input 直接采集到了 filebeat pod 所在的 node 上的所有 pod 的日志,当然,也包括了 filebeat 自身的日志,在真实的业务场景中,通常只需要采集业务关心的 pod 的日志即可。
方式一:通过在 filebeat.yml 中定义processor, 对采集到的所有日志 event 进行过滤,过滤掉不关心的日志 event 即可(例如通过 drop event processor 过滤掉某些不关心的 namespace 和 pod 的日志);
方式二:通过 Autodiscover 定义新的 filebeat.yml 配置文件,通过定义模板只采集固定 pod 的日志,下面是一个简单的 Autodiscover 配置,该配置只采集容器名称为 nginx 的 pod 的日志:
filebeat.autodiscover:providers:- type: kubernetestemplates:- condition:equals:kubernetes.container.name: nginxconfig:- type: containerpaths:- /var/log/containers/${data.kubernetes.pod.name}_*.logprocessors:- add_cloud_metadata:- add_host_metadata:output.elasticsearch:hosts: ['${ELASTICSEARCH_HOST:elasticsearch}:${ELASTICSEARCH_PORT:9200}']username: ${ELASTICSEARCH_USERNAME}password: ${ELASTICSEARCH_PASSWORD}
4. 通过修改名为 filebeat-config 的 ConfigMap,并重新部署 pod,使得新配置生效,在 kibana 中查看日志,可以看到只有 nginx pod 的日志被采集到了。

