React源码学习进阶(三)rootFiber的创建流程
❝本文采用React v16.13.1版本源码进行分析
源码解析
我们调用ReactDOM.render方法进行渲染,其实在Fiber架构下是同步渲染模式,它的入口代码在packages/react-dom/src/client/ReactDOMLegacy.js(从命名上可以看出来,React后续会淘汰这种渲染模式,终于在18版本中默认采用了concurrent):
export function render(
  element: React$Element<any>,
  container: Container,
  callback: ?Function,
) {
  return legacyRenderSubtreeIntoContainer(
    null,
    element,
    container,
    false,
    callback,
  );
}
这个方法调用的是legacyRenderSubtreeIntoContainer方法:
function legacyRenderSubtreeIntoContainer(
  parentComponent: ?React$Component<any, any>,
  children: ReactNodeList,
  container: Container,
  forceHydrate: boolean,
  callback: ?Function,
) {
  let root: RootType = (container._reactRootContainer: any);
  let fiberRoot;
  if (!root) {
    // Initial mount
    root = container._reactRootContainer = legacyCreateRootFromDOMContainer(
      container,
      forceHydrate,
    );
    fiberRoot = root._internalRoot;
    if (typeof callback === 'function') {
      const originalCallback = callback;
      callback = function() {
        const instance = getPublicRootInstance(fiberRoot);
        originalCallback.call(instance);
      };
    }
    // Initial mount should not be batched.
    unbatchedUpdates(() => {
      updateContainer(children, fiberRoot, parentComponent, callback);
    });
  } else {
    fiberRoot = root._internalRoot;
    if (typeof callback === 'function') {
      const originalCallback = callback;
      callback = function() {
        const instance = getPublicRootInstance(fiberRoot);
        originalCallback.call(instance);
      };
    }
    // Update
    updateContainer(children, fiberRoot, parentComponent, callback);
  }
  return getPublicRootInstance(fiberRoot);
}
这个方法的逻辑很清晰,对于初次挂载的场景,它主要做了几件事情:
- 调用
legacyCreateRootFromDOMContainer创建root节点 - 调用
updateContainer启动整个更新流程(挂载流程) - 返回root节点的
instance,这个逻辑可以不用关注,基本上我们不会使用这个返回值来做什么。
root节点的创建流程
接下来我们看一下root节点是怎样被创建出来的,主要入口在legacyCreateRootFromDOMContainer中:
function legacyCreateRootFromDOMContainer(
  container: Container,
  forceHydrate: boolean,
): RootType {
  const shouldHydrate =
    forceHydrate || shouldHydrateDueToLegacyHeuristic(container);
  // First clear any existing content.
  if (!shouldHydrate) {
    let warned = false;
    let rootSibling;
    while ((rootSibling = container.lastChild)) {
      container.removeChild(rootSibling);
    }
  }

  return createLegacyRoot(
    container,
    shouldHydrate
      ? {
          hydrate: true,
        }
      : undefined,
  );
}
这个函数逻辑其实非常简单,清理掉之前挂载过的内容后,调用createLegacyRoot方法。这个方法位于packages/react-dom/src/client/ReactDOMRoot.js中:
export function createLegacyRoot(
  container: Container,
  options?: RootOptions,
): RootType {
  return new ReactDOMBlockingRoot(container, LegacyRoot, options);
}
再看看ReactDOMBlockingRoot:
function ReactDOMBlockingRoot(
  container: Container,
  tag: RootTag,
  options: void | RootOptions,
) {
  this._internalRoot = createRootImpl(container, tag, options);
}
可以看到构造方法里面其实就挂了一个成员变量_internalRoot,这个值也是刚刚在外面判断用的,具体root代码生成是在createRootImpl里:
function createRootImpl(
  container: Container,
  tag: RootTag,
  options: void | RootOptions,
) {
  // Tag is either LegacyRoot or Concurrent Root
  const hydrate = options != null && options.hydrate === true;
  const hydrationCallbacks =
    (options != null && options.hydrationOptions) || null;
  const root = createContainer(container, tag, hydrate, hydrationCallbacks);
  markContainerAsRoot(root.current, container);
  if (hydrate && tag !== LegacyRoot) {
    const doc =
      container.nodeType === DOCUMENT_NODE
        ? container
        : container.ownerDocument;
    eagerlyTrapReplayableEvents(container, doc);
  }
  return root;
}
这里核心就做了两件事:
- 调用
createContainer创建root - 调用
markContainerAsRoot为container打上root标记
对于第二点只是在DOM节点上挂了一个引用,没什么好说的,重点来看看root的实现,位于packages/react-reconciler/src/ReactFiberReconciler.js:
export function createContainer(
  containerInfo: Container,
  tag: RootTag,
  hydrate: boolean,
  hydrationCallbacks: null | SuspenseHydrationCallbacks,
): OpaqueRoot {
  return createFiberRoot(containerInfo, tag, hydrate, hydrationCallbacks);
}
最终它会通过createFiberRoot,位于packages/react-reconciler/src/ReactFiberRoot.js:
export function createFiberRoot(
  containerInfo: any,
  tag: RootTag,
  hydrate: boolean,
  hydrationCallbacks: null | SuspenseHydrationCallbacks,
): FiberRoot {
  const root: FiberRoot = (new FiberRootNode(containerInfo, tag, hydrate): any);
  if (enableSuspenseCallback) {
    root.hydrationCallbacks = hydrationCallbacks;
  }

  // Cyclic construction. This cheats the type system right now because
  // stateNode is any.
  const uninitializedFiber = createHostRootFiber(tag);
  root.current = uninitializedFiber;
  uninitializedFiber.stateNode = root;

  initializeUpdateQueue(uninitializedFiber);

  return root;
}
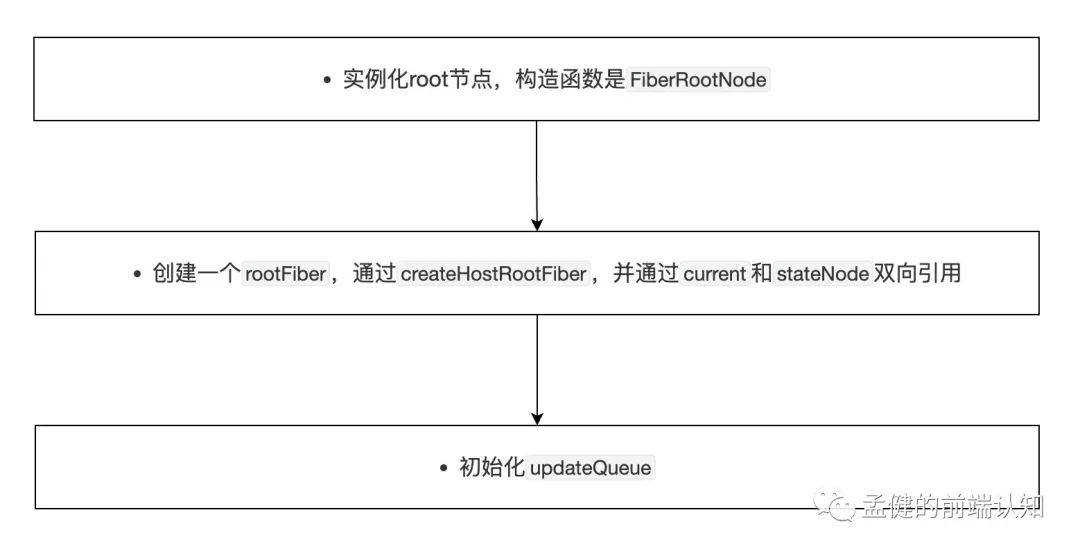
注意这里的几个参数,containerInfo实际上就是DOM节点本身,tag是LegacyRoot,接下来核心就是做了三件事:
- 实例化root节点,构造函数是
FiberRootNode - 创建一个
rootFiber,通过createHostRootFiber,并通过current和stateNode双向引用 - 初始化
updateQueue
首先看一下root的构造函数:
function FiberRootNode(containerInfo, tag, hydrate) {
  this.tag = tag;
  this.current = null;
  this.containerInfo = containerInfo;
  this.pendingChildren = null;
  this.pingCache = null;
  this.finishedExpirationTime = NoWork;
  this.finishedWork = null;
  this.timeoutHandle = noTimeout;
  this.context = null;
  this.pendingContext = null;
  this.hydrate = hydrate;
  this.callbackNode = null;
  this.callbackPriority = NoPriority;
  this.firstPendingTime = NoWork;
  this.firstSuspendedTime = NoWork;
  this.lastSuspendedTime = NoWork;
  this.nextKnownPendingLevel = NoWork;
  this.lastPingedTime = NoWork;
  this.lastExpiredTime = NoWork;

  if (enableSchedulerTracing) {
    this.interactionThreadID = unstable_getThreadID();
    this.memoizedInteractions = new Set();
    this.pendingInteractionMap = new Map();
  }
  if (enableSuspenseCallback) {
    this.hydrationCallbacks = null;
  }
}
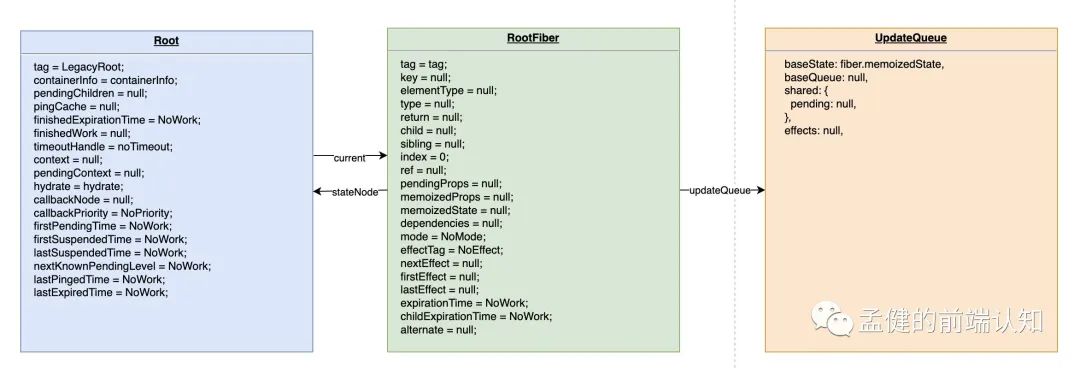
这里大多数参数目前不需要关注,只需要关注root节点自己通过current和stateNode双向链接起来了:

image-20220914220816376
接下来我们看一下createHostRootFiber的逻辑,源码位于packages/react-reconciler/src/ReactFiber.js:
export function createHostRootFiber(tag: RootTag): Fiber {
  let mode;
  if (tag === ConcurrentRoot) {
    mode = ConcurrentMode | BlockingMode | StrictMode;
  } else if (tag === BlockingRoot) {
    mode = BlockingMode | StrictMode;
  } else {
    mode = NoMode;
  }

  if (enableProfilerTimer && isDevToolsPresent) {
    // Always collect profile timings when DevTools are present.
    // This enables DevTools to start capturing timing at any point–
    // Without some nodes in the tree having empty base times.
    mode |= ProfileMode;
  }

  return createFiber(HostRoot, null, null, mode);
}
实际上这段代码就是计算一个mode值,然后调用createFiber创建一个Fiber返回,实际上对于ReactDOM.render来说,这里mode计算出来就是默认的NoMode:
const createFiber = function(
  tag: WorkTag,
  pendingProps: mixed,
  key: null | string,
  mode: TypeOfMode,
): Fiber {
  // $FlowFixMe: the shapes are exact here but Flow doesn't like constructors
  return new FiberNode(tag, pendingProps, key, mode);
};
而FiberNode的构造函数是:
function FiberNode(
  tag: WorkTag,
  pendingProps: mixed,
  key: null | string,
  mode: TypeOfMode,
) {
  // Instance
  this.tag = tag;
  this.key = key;
  this.elementType = null;
  this.type = null;
  this.stateNode = null;

  // Fiber
  this.return = null;
  this.child = null;
  this.sibling = null;
  this.index = 0;

  this.ref = null;

  this.pendingProps = pendingProps;
  this.memoizedProps = null;
  this.updateQueue = null;
  this.memoizedState = null;
  this.dependencies = null;

  this.mode = mode;

  // Effects
  this.effectTag = NoEffect;
  this.nextEffect = null;

  this.firstEffect = null;
  this.lastEffect = null;

  this.expirationTime = NoWork;
  this.childExpirationTime = NoWork;

  this.alternate = null;

  if (enableProfilerTimer) {
    // Note: The following is done to avoid a v8 performance cliff.
    //
    // Initializing the fields below to smis and later updating them with
    // double values will cause Fibers to end up having separate shapes.
    // This behavior/bug has something to do with Object.preventExtension().
    // Fortunately this only impacts DEV builds.
    // Unfortunately it makes React unusably slow for some applications.
    // To work around this, initialize the fields below with doubles.
    //
    // Learn more about this here:
    // https://github.com/facebook/react/issues/14365
    // https://bugs.chromium.org/p/v8/issues/detail?id=8538
    this.actualDuration = Number.NaN;
    this.actualStartTime = Number.NaN;
    this.selfBaseDuration = Number.NaN;
    this.treeBaseDuration = Number.NaN;

    // It's okay to replace the initial doubles with smis after initialization.
    // This won't trigger the performance cliff mentioned above,
    // and it simplifies other profiler code (including DevTools).
    this.actualDuration = 0;
    this.actualStartTime = -1;
    this.selfBaseDuration = 0;
    this.treeBaseDuration = 0;
  }

  // This is normally DEV-only except www when it adds listeners.
  // TODO: remove the User Timing integration in favor of Root Events.
  if (enableUserTimingAPI) {
    this._debugID = debugCounter++;
    this._debugIsCurrentlyTiming = false;
  }
}
其中Fiber的数据结构上篇文章已经讲过,这里不再赘述。
要注意的是这里的stateNode在外面被指向了root。
最后我们来看一下initializeUpdateQueue的逻辑,源码位于packages/react-reconciler/src/ReactUpdateQueue.js:
export function initializeUpdateQueue<State>(fiber: Fiber): void {
  const queue: UpdateQueue<State> = {
    baseState: fiber.memoizedState,
    baseQueue: null,
    shared: {
      pending: null,
    },
    effects: null,
  };
  fiber.updateQueue = queue;
}
可以看到它就是一个初始的queue结构,而这个结构将用于服务后续我们更新state的流程。
至此,我们的root节点就已经创建完毕了。
小结一下
实际上root和rootFiber的创建流程还是比较简单的,它们在创建过程中主要就做了三件事:

image-20220914222253261
我们需要注意的是root和rootFiber本身的数据结构,以及它们作为双向链表的起点自身的链接关系:

image-20220914223300841
整个root结构实际上是挂载和更新的起点,React Fiber通过整个root结构的创建和更新来完成后续整个更新操作链路。