【约束布局】ConstraintLayout 屏障 Barrier 约束 ( 简介 | 屏障适用场景 | 位置说明 | 相关属性 | 可视化操作 | 代码示例 | 总结 )
【约束布局】ConstraintLayout 屏障 Barrier 约束 ( 简介 | 屏障适用场景 | 位置说明 | 相关属性 | 可视化操作 | 代码示例 | 总结 )

韩曙亮
发布于 2023-03-27 20:04:56
发布于 2023-03-27 20:04:56
文章目录
I . 屏障 Barrier 约束 简介
屏障 Barrier 简介 :
① 屏障 Barrier 概念 : 屏障 Barrier 中 , 包含了多个组件 , 基于这些组件在某个方向 ( 如 : 上,下,左,右 ) 上创建的一条虚拟的线 , 屏障线的位置是其指定方向的最外侧的位置 ; 如
个组件的右屏障位置是 , 最右侧组件的右边缘位置 ;
② 本质 : Barrier ( 屏障 ) 是一条隐藏的线 , 注意是
条线 , 不是
条 ;
③ 可见性 : Barrier ( 屏障 ) 是不可见的 , 仅用于约束视图组件 ;
④ 位置 : Barrier ( 屏障 ) 没有位置定义 , 其位置由组成屏障的多个组件的位置确定 , 如果某个组件的位置改变 , 其 Barrier 的位置也有可能随之改变 ; ( 不是一定改变 )
⑤ 作用 : 其作用与 Guideline 引导线一样 , 只是 屏障线 Barrier 生成方式与 Guideline 不一样 , Guideline 是指定好位置 , Barrier 是通过多个组件生成的位置 ;
II . 屏障线 Barrier 与 引导线 Guideline 对比
1 . 屏障线 Barrier 与 引导线 Guideline 区别 : 主要是生成方式不一样 , 用于约束其它组件的方式基本一致 ;
① 屏障线 : 如多个组件某个方向 ( 右侧 ) 的线 是屏障线 , 如果其中最右边的组件 , 向右移动 , 屏障线会随着该组件向右移动 ;
② 引导线 : 引导线的位置是定死的 , 是相对于父容器边缘的位置 ;
2 . 屏障线 Barrier 与 引导线 Guideline 联系 : 二者用于约束其它组件的方式基本一样 ;
① 垂直方向的 屏障线 与 引导线 : 用于组件的水平方向的约束 ;
② 水平方向的 屏障线 与 引导线 : 用于组件的垂直方向的约束 ;
III . 屏障 Barrier 适用场景
1 . 屏障 Barrier 适用场景 : 被约束组件 , 在某个方向上 , 被多个组件约束的情况 ;
① 单个组件约束 : 某个组件被单个组件约束 , 没有必要使用 屏障 , 直接使用该单个组件约束另外一个组件就可以 ;
② 多个组件约束 : 某个组件被多个组件约束 , 此时非常适合使用屏障 ;
2 . 示例 : 组件
, 在水平方向上 ,
组件的左侧必须在
两个组件的右侧 ;
① 屏障线 : 中间的白色虚线是屏障线 ;
② 屏障组件 : 该屏障 Barrier 包含
两个视图 ;
③ 屏障方向 : 该屏障的方向是右侧 , 其屏障线的位置是
两个组件中 , 最右侧的组件的右边缘位置 ;
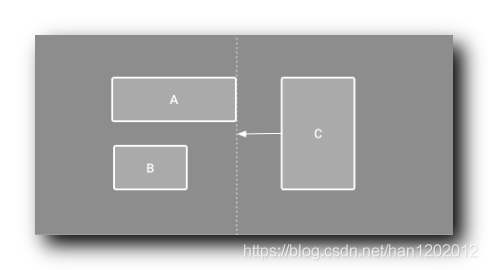
3 . 屏障 Barrier 线条数 : 每个 Barrier 组件 , 代表一个方向的屏障 , 如果要使用屏障将多个组件包裹起来 , 需要创建
个 Barrier 组件 , 分别设置
个不同的方向 ;
4 . 注意 : 一个屏障 Barrier 只能在一个方向上起作用 , 如果想要在
个方向同时建立屏障 , 需要创建
个 Barrier , 分别设置 左 ( LEFT ) , 上 ( TOP ) , 右 ( RIGHT ) , 下 ( BOTTOM ) , 四个方向的属性 ;
IV . 屏障 Barrier 位置说明
1 . 屏障的位置 : 是根据其 包含的组件 在某个方向 最远的边缘 确定 ;
示例 : 如下图 屏障 包含组件
, 屏障的方向是右侧 , 那么屏障位置就是
两个组件最右边的边缘位置 ; 如下图所示 , 组件
的右侧边缘就是屏障线位置 ;

2 . 屏障线 移动 : 如果 屏障 包含的组件
的右侧位置 , 发生了改变 , 那么 右侧方向的 屏障线 也会随之进行变化 ;
示例 : 如下图所示 , 下图中的 组件
的右侧边缘改变 ,
组件的右侧突出 , 屏障位置是两个组件的最右侧边缘 , 那么此时屏障线就变为
组件最右侧 ;
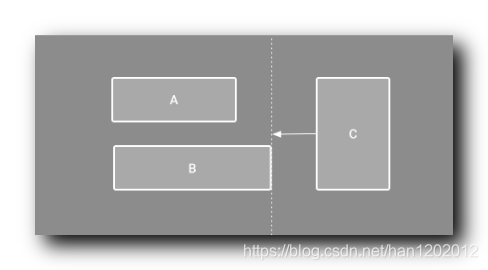
V . 屏障 Barrier 相关属性
1 . Barrier ( 屏障 ) 组件 : 设置该 屏障 是哪几个组件的屏障 ; 属性值是组件的 id , 如果有多个 id , 使用逗号隔开 ;
app:constraint_referenced_ids="button2,button1"2 . Barrier ( 屏障 ) 方向 : 设置该 屏障线 , 是这些组件哪个方向的屏障 , 可以选择四个方向 , 分别是 上 , 下 , 左 , 右 , 四个方向 ;
可选属性值 : left ( start ) , right ( end ) , top , bottom ;
app:barrierDirection="top"VI . 屏障 Barrier 可视化操作
1 . 添加屏障线 : 如下图所示 , 选择 “Add Vertical Barrier” 选项 , 可以添加垂直方向的屏障 ; 选择 “Add Horizontal Barier” 选项 , 可以添加水平方向的屏障 ;
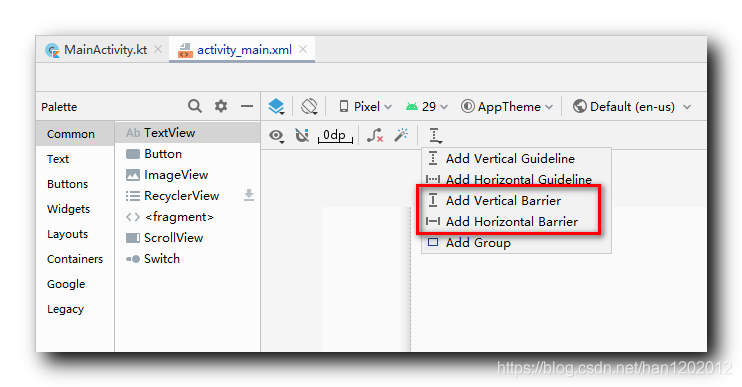
2 . 为屏障配置包含的组件 : 在 Component Tree 面板中 , 鼠标左键按住左键 , 拖动到 Barrier 中 , 即可为 Barrier 屏障 添加包含的组件 ;
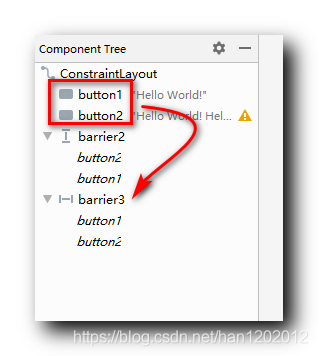
3 . 设置屏障方向 : 选中要编辑的 屏障 Barrier 组件 , 在 Attributes 面板中的 Common Attributes 选项卡中的 barrierDirection 中选择
个方向 ;

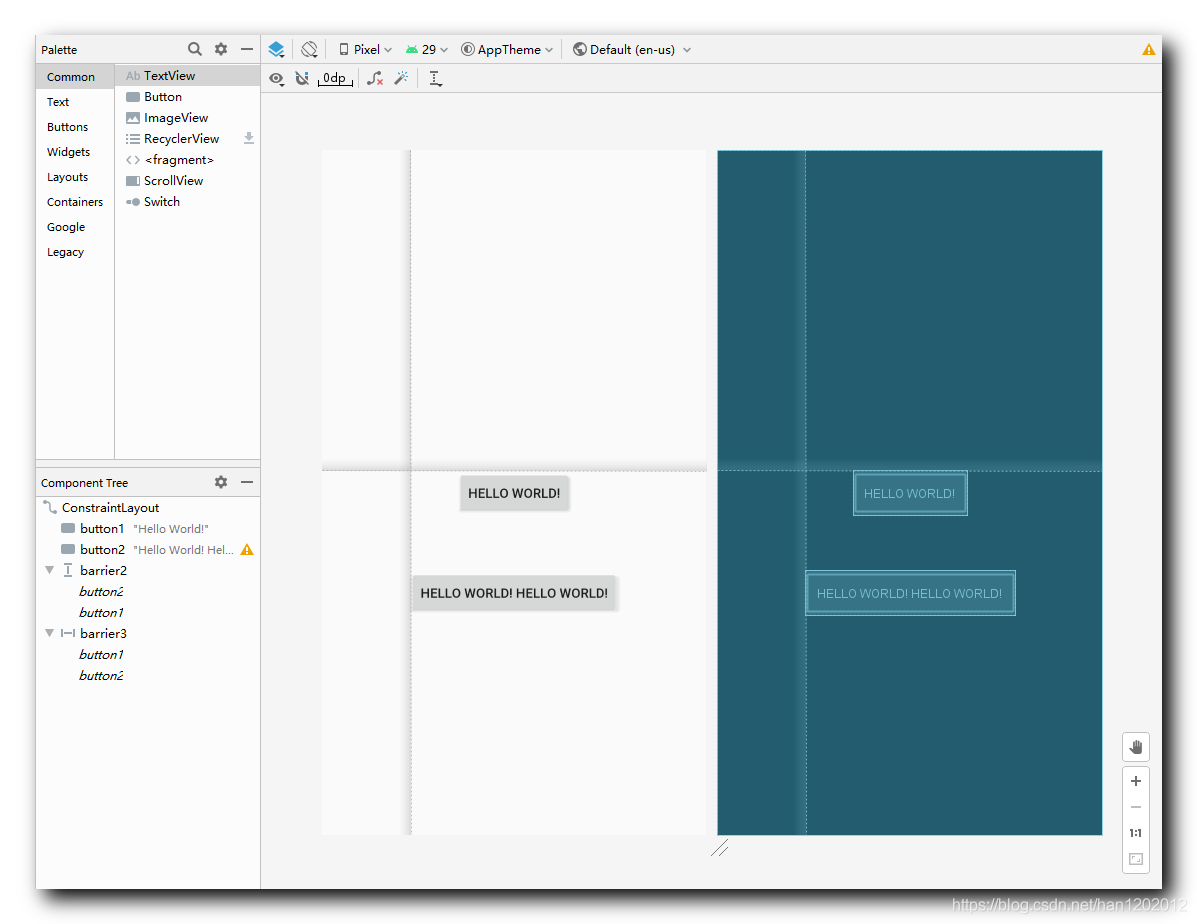
VII . 屏障 Barrier 代码示例
1 . 代码示例 :
<?xml version="1.0" encoding="utf-8"?>
<androidx.constraintlayout.widget.ConstraintLayout
    xmlns:android="http://schemas.android.com/apk/res/android"
    xmlns:app="http://schemas.android.com/apk/res-auto"
    xmlns:tools="http://schemas.android.com/tools"
    android:layout_width="match_parent"
    android:layout_height="match_parent"
    tools:context=".MainActivity">

    <!-- 屏障中较小的组件 -->
    <Button
        android:id="@+id/button1"
        android:layout_width="wrap_content"
        android:layout_height="wrap_content"
        android:text="Hello World!"
        app:layout_constraintBottom_toBottomOf="parent"
        app:layout_constraintLeft_toLeftOf="parent"
        app:layout_constraintRight_toRightOf="parent"
        app:layout_constraintTop_toTopOf="parent" />

    <!-- 屏障中较大的组件 -->
    <Button
        android:id="@+id/button2"
        android:layout_width="wrap_content"
        android:layout_height="wrap_content"
        android:text="Hello World! Hello World!"
        app:layout_constraintBottom_toBottomOf="parent"
        app:layout_constraintLeft_toLeftOf="parent"
        app:layout_constraintRight_toRightOf="parent"
        app:layout_constraintTop_toBottomOf="@id/button1"
        app:layout_constraintVertical_bias="0.2" />

    <!-- 左侧屏障 -->
    <androidx.constraintlayout.widget.Barrier
        android:id="@+id/barrier2"
        android:layout_width="wrap_content"
        android:layout_height="wrap_content"
        app:barrierDirection="left"
        app:constraint_referenced_ids="button2,button1" />

    <!-- 顶部屏障 -->
    <androidx.constraintlayout.widget.Barrier
        android:id="@+id/barrier3"
        android:layout_width="wrap_content"
        android:layout_height="wrap_content"
        app:barrierDirection="top"
        app:constraint_referenced_ids="button1,button2" />

</androidx.constraintlayout.widget.ConstraintLayout>
2 . 效果展示 :
VIII . 屏障 Barrier 总结
屏障 Barrier 总结 :
① 设置组件包含 : app:constraint_referenced_ids=“button2,button1” ; 组件 ID 之间使用逗号隔开 ;
② 设置方向 : app:barrierDirection=“top” ; 可选属性值 left ( start ) , right ( end ) , top , bottom ;
本文参与 腾讯云自媒体同步曝光计划,分享自作者个人站点/博客。
原始发表:2020-05-08,如有侵权请联系 cloudcommunity@tencent.com 删除
评论
登录后参与评论
推荐阅读
目录

