centos7通过kubeadm安装k8s1.27.1版本
原创
centos7通过kubeadm安装k8s1.27.1版本
原创
dgds
修改于 2023-05-19 13:42:36
修改于 2023-05-19 13:42:36
1.准备机器
主机 | 说明 |
|---|---|
10.0.0.120 | master节点,能连外网,官网最低要求2核2G |
10.0.0.121 | master节点,能连外网,官网最低要求2核2G |
10.0.0.123 | master节点,能连外网,官网最低要求2核2G |
2、服务器环境配置
2.1 关闭防火墙(所有节点)
关闭防火墙并设置开机不启动
systemctl stop firewalld
systemctl disable firewalld
2.3 关闭swap分区(所有节点)
修改后重启服务器生效
swapoff -a
vim /etc/fstab						#永久禁用swap,删除或注释掉/etc/fstab里的swap设备的挂载命令即可
#/dev/mapper/centos-swap swap                    swap    defaults        0 0
2.4 Centos7内核升级(所有节点)
CentOS 7.x 系统自带的 3.10.x 内核存在一些 Bugs,导致运行的 Docker、Kubernetes 不稳定,还有会造成kube-proxy不能转发流量
#查看现在的内核版本
uname -a
Linux worker01 3.10.0-1160.el7.x86_64 #1 SMP Mon Oct 19 16:18:59 UTC 2020 x86_64 x86_64 x86_64 GNU/Linux

#查看 yum 中可升级的内核版本
yum list kernel --showduplicates
#如果list中有需要的版本可以直接执行 update 升级,多数是没有的,所以要按以下步骤操作

#导入ELRepo软件仓库的公共秘钥
rpm --import https://www.elrepo.org/RPM-GPG-KEY-elrepo.org

#Centos7系统安装ELRepo
yum install https://www.elrepo.org/elrepo-release-7.el7.elrepo.noarch.rpm
#Centos8系统安装ELRepo
yum install https://www.elrepo.org/elrepo-release-8.el8.elrepo.noarch.rpm

#查看ELRepo提供的内核版本
yum --disablerepo="*" --enablerepo="elrepo-kernel" list available


#kernel-lt:表示longterm,即长期支持的内核
#kernel-ml:表示mainline,即当前主线的内核
#安装主线内核(32位安装kernek-ml)
yum --enablerepo=elrepo-kernel install kernel-ml.x86_64

#查看系统可用内核,并设置启动项
[root@k8s-master ~]# sudo awk -F\' '$1=="menuentry " {print i++ " : " $2}' /etc/grub2.cfg
0 : CentOS Linux (6.3.1-1.el7.elrepo.x86_64) 7 (Core)
1 : CentOS Linux (3.10.0-1160.el7.x86_64) 7 (Core)
2 : CentOS Linux (0-rescue-1d061b0b4b1e459f9b75c5ee5d8153c9) 7 (Core)


#指定开机启动内核版本
grub2-set-default 0 或者 grub2-set-default 'CentOS Linux (6.3.1-1.el7.elrepo.x86_64) 7 (Core)'

#生成 grub 配置文件
grub2-mkconfig -o /boot/grub2/grub.cfg

#重启系统,验证
[root@k8s-master ~]# uname -a
Linux k8s-master 6.3.1-1.el7.elrepo.x86_64 #1 SMP PREEMPT_DYNAMIC Sat Apr 29 09:07:33 EDT 2023 x86_64 x86_64 x86_64 GNU/Linux
2.5 设置主机名(所有节点)
[root@k8s-master ~]# cat /etc/hosts
10.0.0.120 k8s-master
10.0.0.121 k8s-node1
10.0.0.122 k8s-node2
2.6 时间同步(所有节点)
2.7配制iptables规则
iptables -F && iptables -X && iptables -F -t nat && iptables -X -t nat && iptables -P FORWARD ACCEPT

设置系统参数
cat <<EOF >  /etc/sysctl.d/k8s.conf
net.bridge.bridge-nf-call-ip6tables = 1
net.bridge.bridge-nf-call-iptables = 1
EOF

sysctl --system
3、安装docker(所有节点)
1.具体步骤可以参考来安装docker-ce
请大家自行上网上寻找国内的docker-ce下载源2.配制镜像加速和cgroup
#没有则自己创建文件
[root@k8s-master ~]# cat /etc/docker/daemon.json
{
    "registry-mirrors": ["https://zd6lf0p4.mirror.aliyuncs.com"],
    "exec-opts": ["native.cgroupdriver=systemd"]
}
#"exec-opts": ["native.cgroupdriver=systemd"]为docker使用cgroup的方式,k8s使用方式也是systemd,两边要一致

#加载配制
systemctl restart docker
systemctl enable docker
4、安装cri-dockerd(所有节点)
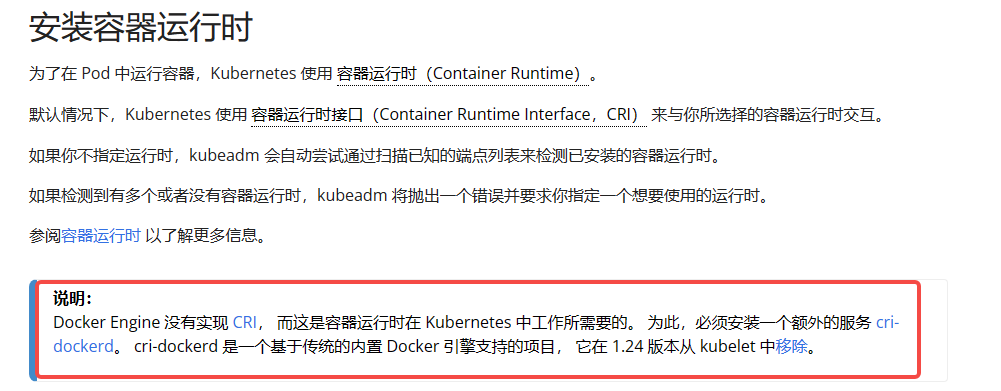
k8s官方表示1.24版本以上以不安装cir,这里需要手动安装
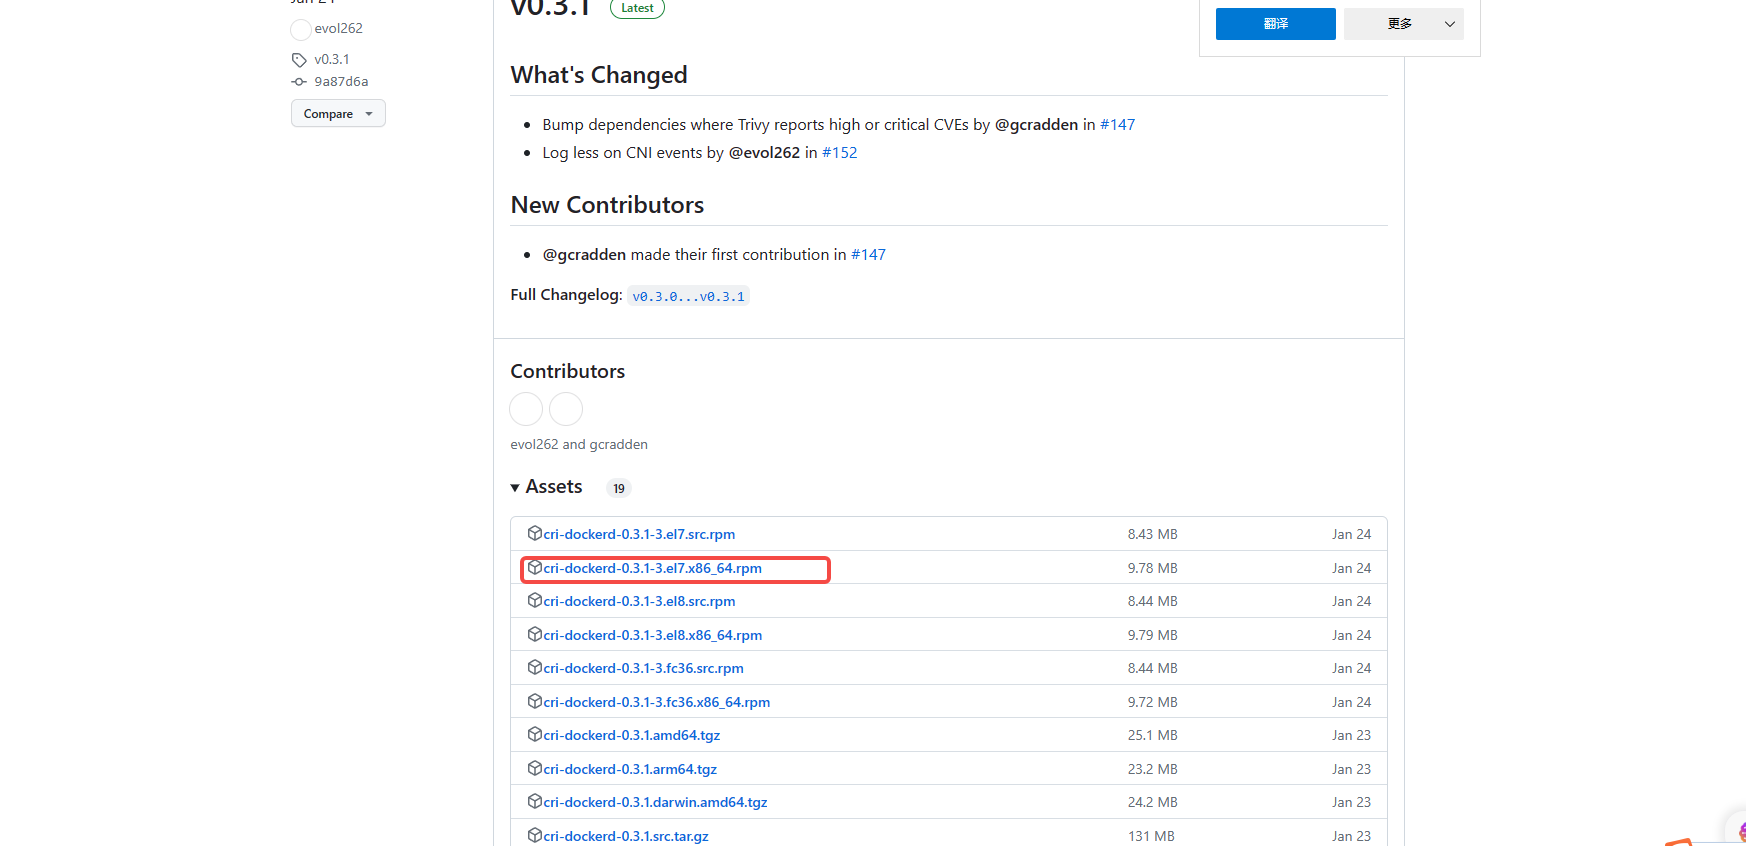
#从https://github.com/Mirantis/cri-dockerd/releases中下载最新的rpm包,手动下载后上传到服务器里
rpm -ivh cri-dockerd-0.3.1-3.el7.x86_64.rpm

#修改/usr/lib/systemd/system/cri-docker.service文件中的ExecStart配置
vim /usr/lib/systemd/system/cri-docker.service
ExecStart=/usr/bin/cri-dockerd --network-plugin=cni --pod-infra-container-image=registry.aliyuncs.com/google_containers/pause:3.7

systemctl daemon-reload
systemctl enable --now cri-docker
5.yum安装kubeadm、kubelet、kubectl(所有节点)
这也是,大家自行找国内的源自行下载


# 将 SELinux 设置为 permissive 模式
sudo setenforce 0
sudo sed -i 's/^SELINUX=enforcing$/SELINUX=permissive/' /etc/selinux/config

#查看kubeadm有什么版本
yum list --showduplicates | grep  kubeadm

#不指定版本默认为最新版本,当前最新版本为1.27.1
sudo yum install -y kubelet kubeadm kubectl

sudo systemctl enable --now kubelet
6.初始化master节点的控制面板(master节点)
# kubeadm init --help可以查看命令的具体参数用法

#在master节点执行初始化(node节点不用执行)
#apiserver-advertise-address  指定apiserver的IP,即master节点的IP
#image-repository  设置镜像仓库为国内镜像仓库
#kubernetes-version  设置k8s的版本,跟步骤三的kubeadm版本一致
#service-cidr  这是设置node节点的网络的,暂时这样设置
#pod-network-cidr  这是设置node节点的网络的,暂时这样设置
#cri-socket  设置cri使用cri-dockerd

kubeadm init \
--apiserver-advertise-address=10.0.0.120 \
--image-repository registry.aliyuncs.com/google_containers \
--kubernetes-version v1.27.1 \
--service-cidr=10.96.0.0/12 \
--pod-network-cidr=10.244.0.0/16 \
--cri-socket unix:///var/run/cri-dockerd.sock \
--ignore-preflight-errors=allYour Kubernetes control-plane has initialized successfully!
To start using your cluster, you need to run the following as a regular user:
mkdir -p $HOME/.kube
sudo cp -i /etc/kubernetes/admin.conf $HOME/.kube/config
sudo chown $(id -u):$(id -g) $HOME/.kube/config
Alternatively, if you are the root user, you can run:
export KUBECONFIG=/etc/kubernetes/admin.conf
You should now deploy a pod network to the cluster.
Run "kubectl apply -f [podnetwork].yaml" with one of the options listed at:
https://kubernetes.io/docs/concepts/cluster-administration/addons/
Then you can join any number of worker nodes by running the following on each as root:
kubeadm join 10.0.0.120:6443 --token 4eozgp.xm7tfip7tigsz42y \
--discovery-token-ca-cert-hash sha256:66bfe627596368ef3facd6840c98ac68cbc927e86789a9e4e8183365ded688a1 提示以上信息证明你初始化成功
#还是根据上面的提示来添加节点,下面的命令是在你要加入的节点上执行,master节点不用执行
kubeadm join 10.0.0.120:6443 --token 4eozgp.xm7tfip7tigsz42y \
	--discovery-token-ca-cert-hash sha256:66bfe627596368ef3facd6840c98ac68cbc927e86789a9e4e8183365ded688a1 \
	--cri-socket unix:///var/run/cri-dockerd.sock

#在master节点检查
[root@k8s-master ~]# kubectl get node
NAME         STATUS     ROLES           AGE   VERSION
k8s-master   NotReady   control-plane   16h   v1.27.1
k8s-node1    NotReady   <none>          15h   v1.27.1
k8s-node2    NotReady   <none>          15h   v1.27.1
添加自动补全功能
yum install -y bash-completion
source /usr/share/bash-completion/bash_completion
source <(kubectl completion bash)
echo "source <(kubectl completion bash)" >> ~/.bashrc
7.安装网络插件(flannel)
或者直接复制下面的配置文件
#记得更改network地址,是初始化时的pod地址范围
apiVersion: v1
kind: Namespace
metadata:
  labels:
    k8s-app: flannel
    pod-security.kubernetes.io/enforce: privileged
  name: kube-flannel
---
apiVersion: v1
kind: ServiceAccount
metadata:
  labels:
    k8s-app: flannel
  name: flannel
  namespace: kube-flannel
---
apiVersion: rbac.authorization.k8s.io/v1
kind: ClusterRole
metadata:
  labels:
    k8s-app: flannel
  name: flannel
rules:
- apiGroups:
  - ""
  resources:
  - pods
  verbs:
  - get
- apiGroups:
  - ""
  resources:
  - nodes
  verbs:
  - get
  - list
  - watch
- apiGroups:
  - ""
  resources:
  - nodes/status
  verbs:
  - patch
- apiGroups:
  - networking.k8s.io
  resources:
  - clustercidrs
  verbs:
  - list
  - watch
---
apiVersion: rbac.authorization.k8s.io/v1
kind: ClusterRoleBinding
metadata:
  labels:
    k8s-app: flannel
  name: flannel
roleRef:
  apiGroup: rbac.authorization.k8s.io
  kind: ClusterRole
  name: flannel
subjects:
- kind: ServiceAccount
  name: flannel
  namespace: kube-flannel
---
apiVersion: v1
data:
  cni-conf.json: |
    {
      "name": "cbr0",
      "cniVersion": "0.3.1",
      "plugins": [
        {
          "type": "flannel",
          "delegate": {
            "hairpinMode": true,
            "isDefaultGateway": true
          }
        },
        {
          "type": "portmap",
          "capabilities": {
            "portMappings": true
          }
        }
      ]
    }
  net-conf.json: |
    {
      "Network": "10.244.0.0/16",              #更改为初始化pod的地址范围
      "Backend": {
        "Type": "vxlan"
      }
    }
kind: ConfigMap
metadata:
  labels:
    app: flannel
    k8s-app: flannel
    tier: node
  name: kube-flannel-cfg
  namespace: kube-flannel
---
apiVersion: apps/v1
kind: DaemonSet
metadata:
  labels:
    app: flannel
    k8s-app: flannel
    tier: node
  name: kube-flannel-ds
  namespace: kube-flannel
spec:
  selector:
    matchLabels:
      app: flannel
      k8s-app: flannel
  template:
    metadata:
      labels:
        app: flannel
        k8s-app: flannel
        tier: node
    spec:
      affinity:
        nodeAffinity:
          requiredDuringSchedulingIgnoredDuringExecution:
            nodeSelectorTerms:
            - matchExpressions:
              - key: kubernetes.io/os
                operator: In
                values:
                - linux
      containers:
      - args:
        - --ip-masq
        - --kube-subnet-mgr
        command:
        - /opt/bin/flanneld
        env:
        - name: POD_NAME
          valueFrom:
            fieldRef:
              fieldPath: metadata.name
        - name: POD_NAMESPACE
          valueFrom:
            fieldRef:
              fieldPath: metadata.namespace
        - name: EVENT_QUEUE_DEPTH
          value: "5000"
        image: docker.io/flannel/flannel:v0.21.5
        name: kube-flannel
        resources:
          requests:
            cpu: 100m
            memory: 50Mi
        securityContext:
          capabilities:
            add:
            - NET_ADMIN
            - NET_RAW
          privileged: false
        volumeMounts:
        - mountPath: /run/flannel
          name: run
        - mountPath: /etc/kube-flannel/
          name: flannel-cfg
        - mountPath: /run/xtables.lock
          name: xtables-lock
      hostNetwork: true
      initContainers:
      - args:
        - -f
        - /flannel
        - /opt/cni/bin/flannel
        command:
        - cp
        image: docker.io/flannel/flannel-cni-plugin:v1.1.2
        name: install-cni-plugin
        volumeMounts:
        - mountPath: /opt/cni/bin
          name: cni-plugin
      - args:
        - -f
        - /etc/kube-flannel/cni-conf.json
        - /etc/cni/net.d/10-flannel.conflist
        command:
        - cp
        image: docker.io/flannel/flannel:v0.21.5
        name: install-cni
        volumeMounts:
        - mountPath: /etc/cni/net.d
          name: cni
        - mountPath: /etc/kube-flannel/
          name: flannel-cfg
      priorityClassName: system-node-critical
      serviceAccountName: flannel
      tolerations:
      - effect: NoSchedule
        operator: Exists
      volumes:
      - hostPath:
          path: /run/flannel
        name: run
      - hostPath:
          path: /opt/cni/bin
        name: cni-plugin
      - hostPath:
          path: /etc/cni/net.d
        name: cni
      - configMap:
          name: kube-flannel-cfg
        name: flannel-cfg
      - hostPath:
          path: /run/xtables.lock
          type: FileOrCreate
name: xtables-lock[root@k8s-master /data/flannel]# kubectl get pod -A
NAMESPACE NAME READY STATUS RESTARTS AGE
kube-flannel kube-flannel-ds-bc69g 1/1 Running 0 15m
kube-flannel kube-flannel-ds-pcw4b 1/1 Running 0 15m
kube-flannel kube-flannel-ds-qqdp5 1/1 Running 0 15m
kube-system coredns-7bdc4cb885-r8krv 1/1 Running 0 16h
kube-system coredns-7bdc4cb885-vtp4q 1/1 Running 0 16h
kube-system etcd-k8s-master 1/1 Running 0 17h
kube-system kube-apiserver-k8s-master 1/1 Running 0 17h
kube-system kube-controller-manager-k8s-master 1/1 Running 0 17h
kube-system kube-proxy-btbk8 1/1 Running 0 16h
kube-system kube-proxy-jjhpm 1/1 Running 0 16h
kube-system kube-proxy-x4cxd 1/1 Running 0 16h
kube-system kube-scheduler-k8s-master 1/1 Running 0 17h
#检查节点
#status为ready就表示集群可以正常运行了
[root@k8s-master /data/flannel]# kubectl get node
NAME STATUS ROLES AGE VERSION
k8s-master Ready control-plane 17h v1.27.1
k8s-node1 Ready <none> 16h v1.27.1
k8s-node2 Ready <none> 16h v1.27.1测试
可以进行一个简单的测试
[root@k8s-master /data/yaml]# cat nginx.yaml
apiVersion: apps/v1
kind: Deployment
metadata:
  name: nginx-deploy
  labels:
    app: ceshi
spec:
  replicas: 3
  selector:
    matchLabels:
      school: qinghua
  template:
    metadata:
      name: nginx-pod
      labels:
        school: qinghua
    spec:
      containers:
      - name: nginx-web
        image: nginx:1.20.2
        ports:
        - containerPort: 80

---
apiVersion: v1
kind: Service
metadata:
  name: nginx-service
  labels:
    role: leader
spec:
  type: NodePort
  ports:
  - port: 8888
    targetPort: 80
    nodePort: 30000
  selector:
school: qinghuakubectl apply -f nginx.yaml
[root@k8s-master /data/yaml]# kubectl get pods
NAME READY STATUS RESTARTS AGE
nginx-deploy-6659dbd7c4-kldxj 1/1 Running 0 79m
nginx-deploy-6659dbd7c4-qgr4v 1/1 Running 0 79m
nginx-deploy-6659dbd7c4-tkmcs 1/1 Running 0 79m
这里由于是第一次下载镜像会很慢,等一段时间running就代表完成了
#查看service状态
Endpoint有ip应该就没问题了
[root@k8s-master /data/yaml]# kubectl describe svc nginx-service
Name: nginx-service
Namespace: default
Labels: role=leader
Annotations: <none>
Selector: school=qinghua
Type: NodePort
IP Family Policy: SingleStack
IP Families: IPv4
IP: 10.103.245.219
IPs: 10.103.245.219
Port: <unset> 8888/TCP
TargetPort: 80/TCP
NodePort: <unset> 30000/TCP
Endpoints: 10.244.1.12:80,10.244.1.13:80,10.244.2.11:80
Session Affinity: None
External Traffic Policy: Cluster
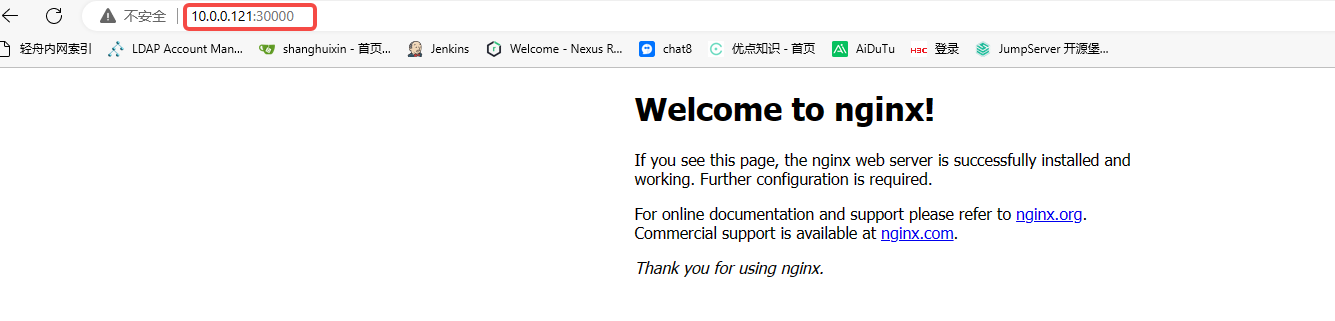
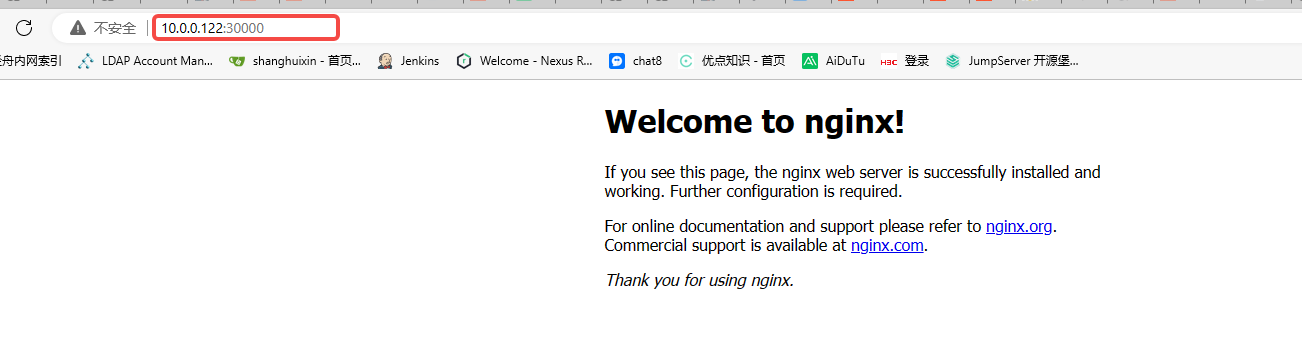
Events: <none>注意:k8s1.24版本以后nodeport(使用宿主机端口)在node宿主机不会显示端口,如ss -lntup,直接浏览器nodeip加端口的方式访问给就可以
原创声明:本文系作者授权腾讯云开发者社区发表,未经许可,不得转载。
如有侵权,请联系 cloudcommunity@tencent.com 删除。
原创声明:本文系作者授权腾讯云开发者社区发表,未经许可,不得转载。
如有侵权,请联系 cloudcommunity@tencent.com 删除。
评论
登录后参与评论
推荐阅读
目录
腾讯云开发者

Copyright © 2013 - 2026 Tencent Cloud. All Rights Reserved. 腾讯云 版权所有
深圳市腾讯计算机系统有限公司 ICP备案/许可证号:粤B2-20090059 ![]() 粤公网安备44030502008569号
粤公网安备44030502008569号
腾讯云计算(北京)有限责任公司 京ICP证150476号 | 京ICP备11018762号