学习 Vue 3 全家桶 - 动画
学习 Vue 3 全家桶 - 动画

Cellinlab
发布于 2023-05-17 16:59:57
发布于 2023-05-17 16:59:57
# transition 和 animation
- transition
<template>
  <div class="box" :style="{width: width+'px'}">z</div>
  <button @click="change">click</button>
</template>

<script setup>
import { ref } from 'vue';

let width = ref(100);
function change() {
  width.value += 100;
}
</script>

<style scoped>
.box {
  background-color: red;
  height: 100px;
  transition: width 1s linear;
}
</style>
- animation
<template>
  <div class="box" :style="{width: width+'px'}">z</div>
  <button @click="change">click</button>
</template>

<script setup>
import { ref } from 'vue';

let width = ref(100);
function change() {
  width.value += 100;
}
</script>

<style scoped>
.box {
  background-color: red;
  height: 30px;
  width: 30px;
  position: relative;
  animation: move 2s linear infinite;
}
@keyframes move {
  0% {
    left: 0;
  }
  50% {
    left: 200px;
  }
  100% {
    left: 0;
  }
}
</style>
# Vue 3 的动画
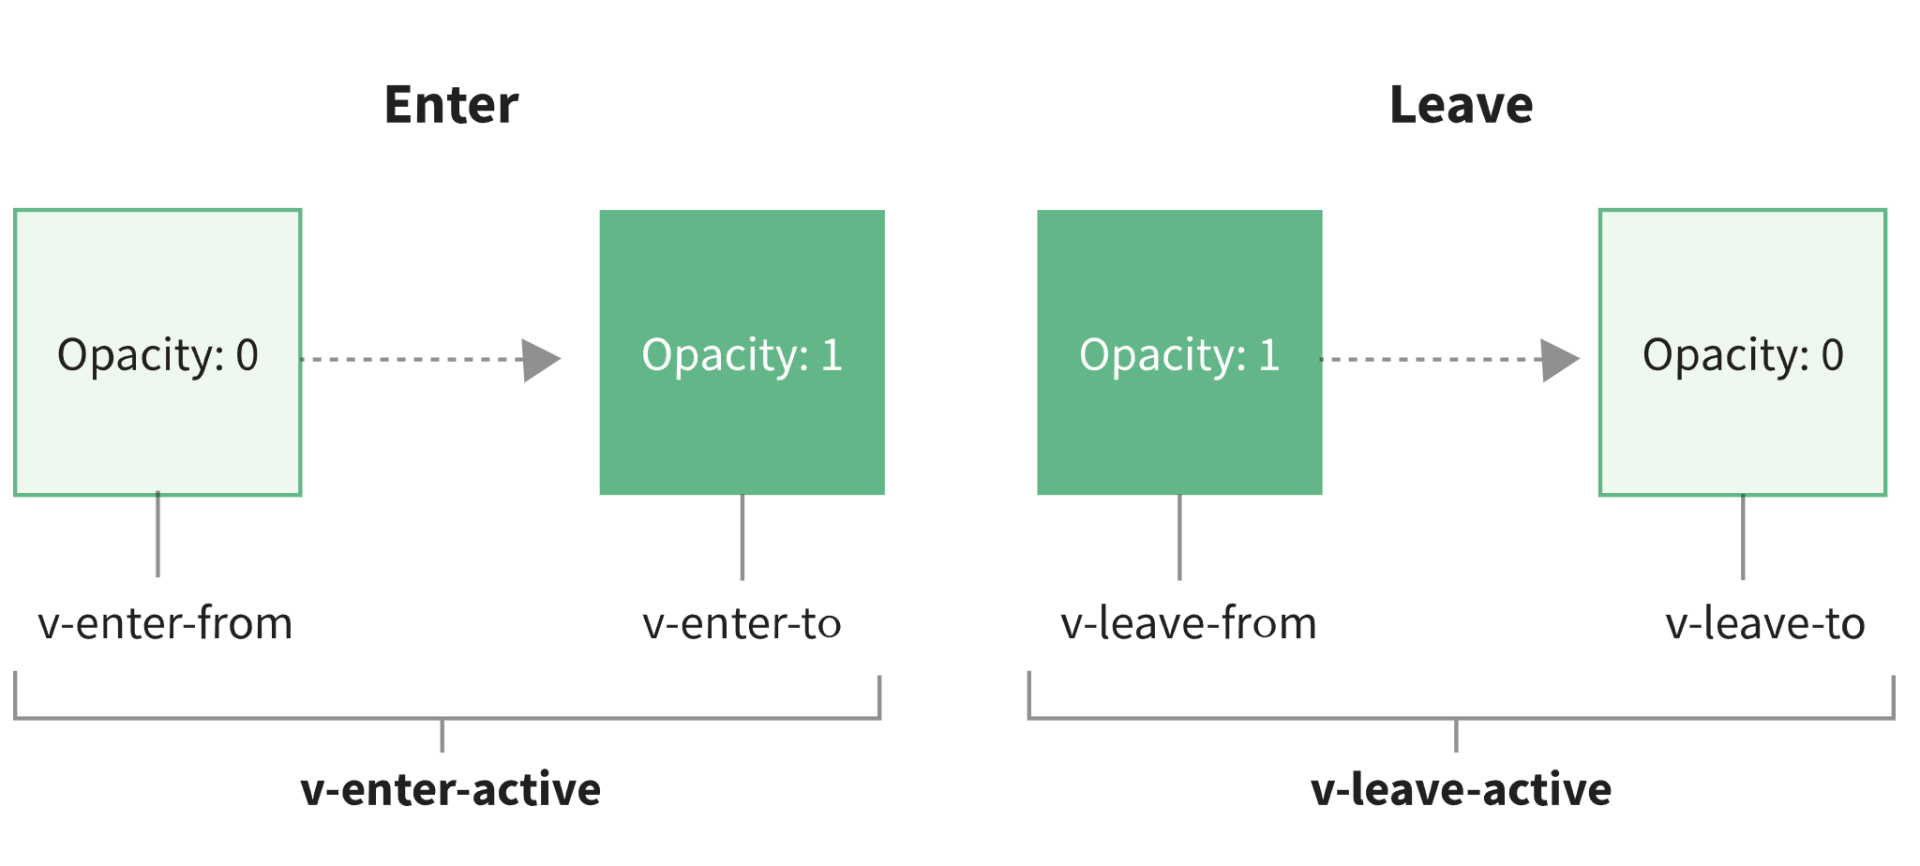
Vue 3 中提供了一些动画的封装,使用内置的 traisition 组件来控制组件的动画。
<template>
  <button @click="toggle">show text</button>
  <transition name="fade">
    <h1 v-if="showText">Hello Vue Transition</h1>
  </transition>
</template>

<script setup>
import { ref } from 'vue';

let showText = ref(false);
function toggle() {
  showText.value = !showText.value;
}
</script>

<style scoped>
.fade-enter-active,
.fade-leave-active {
  transition: opacity .5s linear;
}
.fade-enter-from,
.fade-leave-to {
  opacity: 0;
}
</style>
Vue 会在 h1 标签显示和隐藏的过程中去设置标签的 class,可以根据这些 class 去实现想要的动效。
# 实战:TodoList 优化
对输入校验,并弹窗提示:
<template>
  <!-- ... -->
  <transition name="modal">
    <div class="info-wrapper" v-if="showModal">
      <div class="info">Nothing!</div>
    </div>
  </transition>
</template>

<script setup>
  // ...
  let showModal = ref(false);

  function addTodo() {
    if (!title.value) {
      showModal.value = true;
      setTimeout(() => {
        showModal.value = false;
      }, 1500);
      return;
    }
    todolist.value.push({
      title: title.value,
      done: false
    });
    title.value = '';
  }
  // ...
</script>

<style scoped>
.info-wrapper {
  position: fixed;
  top: 20px;
  width: 200px;
}
.info {
  padding: 20px;
  color: white;
  background-color: #d88986;
}
.modal-enter-from {
  opacity: 0;
  transform: translateY(-60px);
}
.modal-enter-active {
  transition: all 0.3s ease;
}
.modal-leave-to {
  opacity: 0;
  transform: translateY(-60px);
}
.modal-leave-active {
  transition: all 0.3s ease;
}
</style>
效果如下:

# 实战:列表动画
因为 transition 组件会把子元素作为一个整体同时去过渡,在 v-for 渲染列表的场景中,可以使用 transition-group 组件去包裹元素,通过 tag 属性去指定渲染一个元素。
transition-group 组件还有一个特殊之处——不仅可以进入和离开动画,还可以改变定位。
<template>
  <ul v-if="todolist.length">
    <transition-group name="flip-list" tag="ul">
      <li v-for="todo in todolist" :key="todo.title">
        <input type="checkbox" v-model="todo.done" />
        <span :class="{ done: todo.done }">{{ todo.title }}</span>
      </li>
    </transition-group>
  </ul>
</template>

<style scoped>
.flip-list-move {
  transition: transform 0.8s ease;
}
.flip-list-enter-active,
.flip-list-leave-active {
  transition: all 1s ease;
}
.flip-list-enter-from,
.flip-list-leave-to {
  opacity: 0;
  transform: translateX(30px);
}
</style>
# 实战:页面切换动画
页面切换这个动画切换场景的核心原理和弹窗动画是一样的,都是通过 transition 标签控制页面进入和离开的 class。
现在默认是在 vue-router 的模式下,使用 router-view 组件进行动态的组件渲染。在路由发生变化的时候,计算出对应匹配的组件去填充 router-view。
如果要在路由组件上使用转场,并且对导航进行动画处理,需要使用 v-slot API。router-view 通过 v-slot 获取渲染的组件并且赋值给 Component,然后使用 transition 包裹需要渲染的组件,并且通过内置组件 component 的 is 属性动态渲染组件。
<router-view v-slot="{component}">
  <transition name="route" mode="out-in">
    <component :is="component"></component>
  </transition>
</router-view>
# JavaScript 动画
在前端的大部分交互场景中,动画的主要目的是提高交互体验,CSS 动画足以应对大部分场景。但如果碰见比较复杂的动画场景,就需要用 JavaScript 来实现,比如购物车、地图等场景。
本文参与 腾讯云自媒体分享计划,分享自作者个人站点/博客。
原始发表:2022/2/5,如有侵权请联系 cloudcommunity@tencent.com 删除
评论
登录后参与评论
推荐阅读
目录