Android Ble蓝牙App(四)UI优化和描述符

Android Ble蓝牙App(四)UI优化和描述符

晨曦_LLW
发布于 2023-08-15 08:10:43
发布于 2023-08-15 08:10:43
Ble蓝牙App(四)UI优化和描述符
前言
上一篇中了解了特性和属性,同时显示设备蓝牙服务下的特性和属性,本文中就需要来使用这些特性和属性来完成一些功能。
正文
在进行具体的功能开发之前,对于UI的优化也是必不可少的,就拿主页面来说,目前是比较奇怪的,如果你是第一次使用这个App的话,可能就会很疑惑,要怎么使用?基于这个点我们增加一个布局,优化以下主页面的提示。
一、UI优化
① 主页面提示优化
首先在layout下新建一个lay_empty_ble.xml,里面的代码如下所示:
<?xml version="1.0" encoding="utf-8"?>
<LinearLayout xmlns:android="http://schemas.android.com/apk/res/android"
xmlns:app="http://schemas.android.com/apk/res-auto"
xmlns:tools="http://schemas.android.com/tools"
android:layout_width="match_parent"
android:layout_height="match_parent"
android:gravity="center"
android:orientation="vertical"
tools:ignore="UseCompoundDrawables">
<ImageView
android:id="@+id/imageView"
android:layout_width="100dp"
android:layout_height="100dp"
app:srcCompat="@drawable/ic_empty_ble" />
<TextView
android:id="@+id/textView2"
android:layout_width="wrap_content"
android:layout_height="wrap_content"
android:gravity="center"
android:padding="24dp"
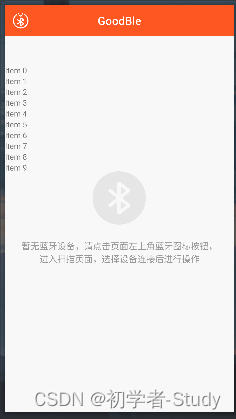
android:text="暂无蓝牙设备,请点击页面左上角蓝牙图标按钮,进入扫描页面,选择设备连接后进行操作"
android:textColor="@color/gray"
android:textSize="16sp" />
</LinearLayout>这里使用到了一个图标,ic_empty_ble.xml,代码如下所示:
<vector xmlns:android="http://schemas.android.com/apk/res/android"
    android:width="100dp"
    android:height="100dp"
    android:viewportWidth="1024"
    android:viewportHeight="1024">
    <path
        android:fillColor="#e6e6e6"
        android:pathData="M997.9,516.6a488.4,488.4 0,0 1,-489.5 488.2,488.4 488.4,0 0,1 -489.5,-490.8C19.9,242.3 240.1,23.8 511,25.8a488.4,488.4 0,0 1,486.9 490.8zM534.7,726l99.2,-74.9 -99.2,-78.7v153.7zM633.9,379.4l-98.9,-73.2v151.8L633.9,379.4zM561.3,515.2l130.3,-103.6c29.2,-23.3 29.8,-42.8 0.8,-64.7 -54.2,-40.9 -108.3,-81.8 -163.8,-120.9 -10.2,-7.3 -29.4,-12.1 -39.1,-7.3 -9.6,4.9 -17.1,23.1 -17.5,35.7 -1.8,54.8 -0.8,109.7 -0.9,164.6 0,6.7 -1,13.3 -1.9,23.9L339.3,341l-37.4,46.4 160.3,127.8c-40.6,32.3 -79.9,62.5 -118,94.1 -45.2,37.4 -52.4,22.8 -6.9,77.9 0.9,1 2.9,1.1 4.4,1.6l129.5,-101.2c0,69 -0.9,131.3 0.9,193.4 0.3,11.8 8.7,27.9 18.4,33.6 7.8,4.6 25.6,0.3 34.7,-6.2a7693.4,7693.4 0,0 0,167.1 -124.8c29.3,-22.3 28.8,-41.2 -0.7,-64.8 -42.6,-34.2 -85.4,-68.1 -130.2,-103.7z" />
</vector>
然后在activity_main.xml中使用它,修改代码如下所示:
<?xml version="1.0" encoding="utf-8"?>
<androidx.constraintlayout.widget.ConstraintLayout xmlns:android="http://schemas.android.com/apk/res/android"
    xmlns:app="http://schemas.android.com/apk/res-auto"
    xmlns:tools="http://schemas.android.com/tools"
    android:layout_width="match_parent"
    android:layout_height="match_parent"
    tools:context=".MainActivity">

    <com.google.android.material.appbar.MaterialToolbar
        android:id="@+id/toolbar"
        android:layout_width="match_parent"
        android:layout_height="?attr/actionBarSize"
        android:background="@color/orange"
        app:layout_constraintEnd_toEndOf="parent"
        app:layout_constraintStart_toStartOf="parent"
        app:layout_constraintTop_toTopOf="parent"
        app:navigationIcon="@drawable/ic_scan_ble"
        app:title="GoodBle"
        app:titleCentered="true"
        app:titleTextColor="@color/white">

        <TextView
            android:id="@+id/tv_disconnect"
            android:layout_width="wrap_content"
            android:layout_height="wrap_content"
            android:layout_gravity="end"
            android:layout_marginEnd="8dp"
            android:padding="8dp"
            android:text="断开连接"
            android:textColor="@color/white"
            android:visibility="gone" />
    </com.google.android.material.appbar.MaterialToolbar>

    <TextView
        android:id="@+id/tv_device_info"
        android:layout_width="0dp"
        android:layout_height="wrap_content"
        android:padding="16dp"
        app:layout_constraintEnd_toEndOf="parent"
        app:layout_constraintStart_toStartOf="parent"
        app:layout_constraintTop_toBottomOf="@+id/toolbar" />

    <include
        android:id="@+id/empty_ble_lay"
        layout="@layout/lay_empty_ble"
        android:layout_width="match_parent"
        android:layout_height="0dp"
        android:layout_below="@id/toolbar"
        app:layout_constraintBottom_toBottomOf="parent"
        app:layout_constraintTop_toBottomOf="@+id/toolbar" />

    <androidx.recyclerview.widget.RecyclerView
        android:id="@+id/rv_service"
        android:layout_width="match_parent"
        android:layout_height="0dp"
        app:layout_constraintBottom_toBottomOf="parent"
        app:layout_constraintEnd_toEndOf="parent"
        app:layout_constraintStart_toStartOf="parent"
        app:layout_constraintTop_toBottomOf="@+id/tv_device_info" />

</androidx.constraintlayout.widget.ConstraintLayout>
预览的效果如下图所示:
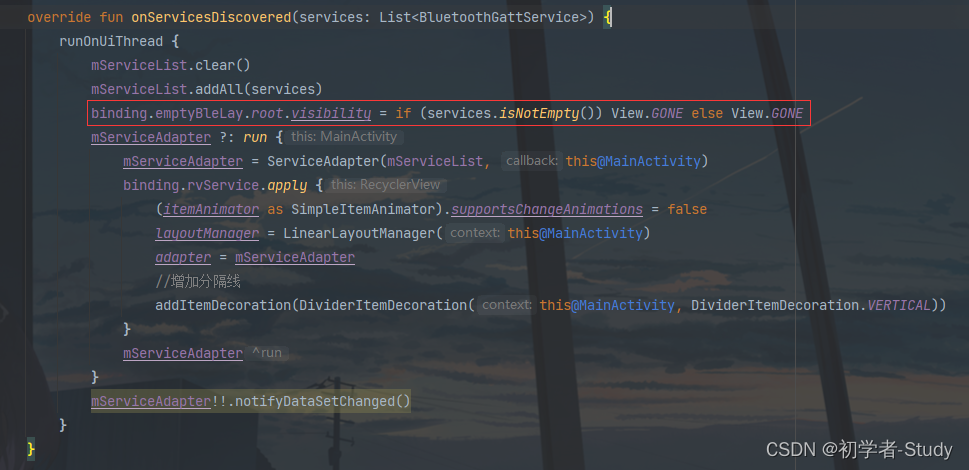
服务列表在没有数据的时候就是空白的,那么下面我们修改MainActivity中的代码,因为默认是显示的,所以可以在连接蓝牙设备发现服务之后就隐藏这个布局,修改如下图所示:
然后就是在断开连接的回调时,显示空内容布局,再清空服务列表,刷新适配器,修改代码如下所示:
    override fun onConnectionStateChange(state: Boolean) {
        runOnUiThread {
            if (state) binding.tvDisconnect.visibility = View.VISIBLE
            else {
                binding.emptyBleLay.root.visibility = View.VISIBLE
                mServiceList.clear()
                mServiceAdapter?.notifyDataSetChanged()
            }
        }
    }
下面运行一下:
② UUID显示优化
这样看起来主页面在没有设备信息的时候不会显得单调,那么还有一个小细节就是,当设备的蓝牙服务和特性不属于SIG定义的,是厂商自定义时,我们最好就显示完成的UUID,为了方便使用,在ble包下新建一个BleConstant类,代码如下所示:
object BleConstant {

    const val APP_NAME = "GoodBle"

    const val UNKNOWN_DEVICE = "Unknown device"

    const val UNKNOWN_SERVICE = "Unknown Service"

    const val UNKNOWN_CHARACTERISTICS = "Unknown Characteristics"

    const val UNKNOWN_DESCRIPTOR = "Unknown Descriptor"

    const val BROADCAST = "Broadcast"

    const val READ = "Read"

    const val WRITE_NO_RESPONSE = "Write No Response"

    const val WRITE = "Write"

    const val NOTIFY = "Notify"

    const val INDICATE = "Indicate"

    const val AUTHENTICATED_SIGNED_WRITES = "Authenticated Signed Writes"

    const val EXTENDED_PROPERTIES = "Extended Properties"
}这里定义了一些常量,包括未知服务、未知特性,和一些其他的属性,这样做在修改的时候修改一个常量就可以了。下面我们分别修改一下BleUtils中的getServiceName()和getCharacteristicsName()函数的else的值为常量中的常量名,剩下的就可以在服务适配器和特性适配器中去修改了,首先是服务适配器,修改
    override fun onBindViewHolder(holder: ViewHolder, position: Int) {
        val serviceName = BleUtils.getServiceName(services[position].uuid)
        holder.binding.tvServiceName.text = serviceName
        holder.binding.tvServiceUuid.text = if (serviceName != UNKNOWN_SERVICE) BleUtils.getShortUUID(services[position].uuid) else services[position].uuid.toString()
        ...
}services[position].uuid.toString()就是服务完整的uuid,默认是小写的,你也可以改成大写。
那么同样特性适配器也改一下:
    override fun onBindViewHolder(holder: ViewHolder, position: Int) {
        val characteristicName = BleUtils.getCharacteristicsName(characteristics[position].uuid)
        holder.binding.tvCharacterName.text = characteristicName
        holder.binding.tvCharacterUuid.text = if (characteristicName != UNKNOWN_CHARACTERISTICS) BleUtils.getShortUUID(characteristics[position].uuid) else characteristics[position].uuid.toString()
        ...
    }
再运行一下,对于未知设备服务和特性的UUID就会显示完成的值。
③ 设备信息优化
当前连接设备之后我们可以看到设备的服务信息,但是却不知道是那个设备,没有一个地方显示设备的信息,最重要的当然就是设备的名称和Mac地址了,这里我们可以优化一下,首先修改一下activity_main.xml中的MaterialToolbar控件的内容,因为我想把设备名称作为标题,设备Mac地址作为子标题,所以增加两个子标题的属性值:
    <com.google.android.material.appbar.MaterialToolbar
        ...
        app:subtitleCentered="true"
        app:subtitleTextColor="@color/white">
这里就分别设置子标题的显示位置和文字颜色,下面要做的就是获取设备,在BleCore中增加一个函数,代码如下所示:
fun getDevice() = mGatt?.device然后回到MainActivity中,只需要修改连接状态的回调函数中的代码即可,如下所示:
    @SuppressLint("MissingPermission")
    override fun onConnectionStateChange(state: Boolean) {
        runOnUiThread {
            if (state) {
                binding.tvDisconnect.visibility = View.VISIBLE
                bleCore.getDevice()?.apply {
                    binding.toolbar.title = name ?: UNKNOWN_DEVICE
                    binding.toolbar.subtitle = address
                }
            }
            else {
                binding.toolbar.title = APP_NAME
                binding.toolbar.subtitle = ""
                binding.tvDeviceInfo.text = ""
                binding.emptyBleLay.root.visibility = View.VISIBLE
                mServiceList.clear()
                mServiceAdapter?.notifyDataSetChanged()
            }
        }
    }
下面运行一下看看:
二、描述
在上一篇中提到了特性和属性,特性有那些功能是属性决定的,那么描述又是做什么的呢?
① 概念
在蓝牙低功耗(BLE)中,Descriptor(描述符)是用于提供有关特征值的额外信息的数据结构。Descriptor 提供了特定特征的更详细描述和配置选项。Descriptor 是特征(Characteristics)的子项,用于描述特征的特定属性或行为。每个特征可以有一个或多个 Descriptor。
以下是一些常见的 BLE Descriptor 类型及其含义:
- 声明 Descriptor:这个 Descriptor 用于描述特征的声明信息,包括特征的唯一标识符、权限、值的格式和其他标志。它提供了特征的基本信息供其他设备了解。
- 用户描述(User Description)Descriptor:用于提供特征的人类可读描述信息。这个描述可以是特征的名称、标签或其他有关特征的说明性文字。
- 配置 Descriptor:用于描述特征的配置选项。这个 Descriptor 可以包含特征的可选设置,例如采样率、测量单位或阈值等。
- 通知 Descriptor:用于配置特征是否支持通知功能。这个 Descriptor 可以用于使设备可以接收特征值变化的通知。
- 线性区间 Descriptor:用于描述特征值的线性关系,例如数值范围和步长等。
- 客户端配置 Descriptor:用于允许远程设备(例如中心设备)订阅特征值的变化通知,这个很重要。 这些只是一些常见的 BLE Descriptor 类型和其含义的示例,实际上可以根据应用需求定义自定义的 Descriptor。 Descriptor 提供了对特征更详细的描述和配置,它们可以通过蓝牙协议进行传输和访问。在 BLE 应用中,Descriptor 充当了配置和元数据信息的重要角色,帮助设备之间准确地交换和理解数据。
那么现在你已经了解了描述符的作用了,而我们目前的特性下还没有描述符的,注意不是每一个特性都有描述符,下面我们就来把描述符写出来了。首先我们在item_characteristic.xml中增加一个描述的列表控件,代码如下所示:
<?xml version="1.0" encoding="utf-8"?>
<androidx.constraintlayout.widget.ConstraintLayout xmlns:android="http://schemas.android.com/apk/res/android"
xmlns:app="http://schemas.android.com/apk/res-auto"
xmlns:tools="http://schemas.android.com/tools"
android:layout_width="match_parent"
android:layout_height="wrap_content"
android:foreground="?attr/selectableItemBackground"
android:paddingStart="16dp">
<TextView
android:id="@+id/tv_character_name"
android:layout_width="wrap_content"
android:layout_height="wrap_content"
android:layout_marginTop="8dp"
android:text="特性"
android:textColor="@color/black"
android:textSize="16sp"
android:textStyle="bold"
app:layout_constraintStart_toStartOf="parent"
app:layout_constraintTop_toTopOf="parent" />
<TextView
android:id="@+id/tv_uuid_title"
android:layout_width="wrap_content"
android:layout_height="wrap_content"
android:text="UUID:"
app:layout_constraintStart_toStartOf="@+id/tv_character_name"
app:layout_constraintTop_toBottomOf="@+id/tv_character_name" />
<TextView
android:id="@+id/tv_character_uuid"
android:layout_width="wrap_content"
android:layout_height="wrap_content"
android:text="UUID"
android:textColor="@color/black"
app:layout_constraintBottom_toBottomOf="@+id/tv_uuid_title"
app:layout_constraintStart_toEndOf="@+id/tv_uuid_title"
app:layout_constraintTop_toTopOf="@+id/tv_uuid_title" />
<TextView
android:id="@+id/tv_property_title"
android:layout_width="wrap_content"
android:layout_height="wrap_content"
android:layout_marginBottom="8dp"
android:text="Properties:"
app:layout_constraintStart_toStartOf="@+id/tv_character_name"
app:layout_constraintTop_toBottomOf="@+id/tv_uuid_title" />
<androidx.recyclerview.widget.RecyclerView
android:id="@+id/rv_property"
android:layout_width="wrap_content"
android:layout_height="wrap_content"
app:layout_constraintBottom_toBottomOf="@+id/tv_property_title"
app:layout_constraintStart_toEndOf="@+id/tv_property_title"
app:layout_constraintTop_toTopOf="@+id/tv_property_title" />
<LinearLayout
android:id="@+id/lay_descriptors"
android:layout_width="match_parent"
android:layout_height="wrap_content"
android:layout_marginBottom="8dp"
android:orientation="vertical"
app:layout_constraintBottom_toBottomOf="parent"
app:layout_constraintTop_toBottomOf="@+id/tv_property_title"
tools:layout_editor_absoluteX="16dp">
<TextView
android:layout_width="wrap_content"
android:layout_height="wrap_content"
android:text="Descriptors:"
android:textColor="@color/black"
android:textStyle="bold" />
<androidx.recyclerview.widget.RecyclerView
android:id="@+id/rv_descriptor"
android:layout_width="match_parent"
android:layout_height="wrap_content" />
</LinearLayout>
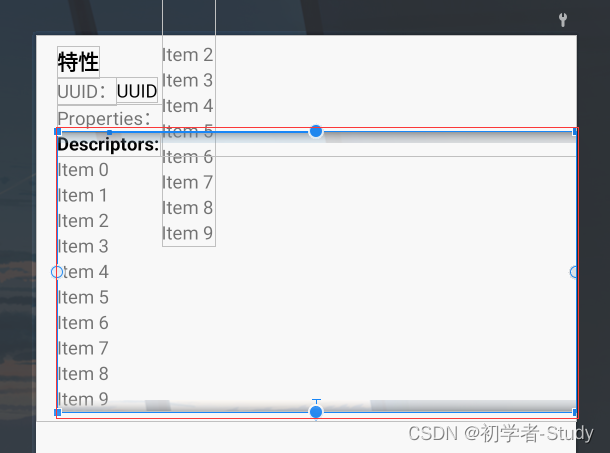
</androidx.constraintlayout.widget.ConstraintLayout>通过预览图得知,实际上就是这一块内容。
下面我们就可以正式去写描述符的适配器了。
② 描述适配器
首先在layout下增加一个item_descriptor.xml,代码如下所示:
<?xml version="1.0" encoding="utf-8"?>
<androidx.constraintlayout.widget.ConstraintLayout xmlns:android="http://schemas.android.com/apk/res/android"
    xmlns:app="http://schemas.android.com/apk/res-auto"
    android:layout_width="match_parent"
    android:layout_height="wrap_content">

    <TextView
        android:id="@+id/tv_descriptor_name"
        android:layout_width="wrap_content"
        android:layout_height="wrap_content"
        android:text="描述"
        android:textColor="@color/black"
        app:layout_constraintStart_toStartOf="parent"
        app:layout_constraintTop_toTopOf="parent" />

    <TextView
        android:id="@+id/tv_uuid_title"
        android:layout_width="wrap_content"
        android:layout_height="wrap_content"
        android:text="UUID:"
        app:layout_constraintStart_toStartOf="@+id/tv_descriptor_name"
        app:layout_constraintTop_toBottomOf="@+id/tv_descriptor_name" />

    <TextView
        android:id="@+id/tv_descriptor_uuid"
        android:layout_width="wrap_content"
        android:layout_height="wrap_content"
        android:text="UUID"
        android:textColor="@color/black"
        app:layout_constraintBottom_toBottomOf="@+id/tv_uuid_title"
        app:layout_constraintStart_toEndOf="@+id/tv_uuid_title"
        app:layout_constraintTop_toTopOf="@+id/tv_uuid_title" />
</androidx.constraintlayout.widget.ConstraintLayout>
然后关于描述符的名称,我们可以在BleUtils中写一个函数,代码如下所示:
    fun getDescriptorName(uuid: UUID) =
        when ("0x${uuid.toString().substring(4, 8).uppercase(Locale.getDefault())}") {
            "0x2900" -> "Characteristic Extended Properties"
            "0x2901" -> "Characteristic User Description"
            "0x2902" -> "Client Characteristic Configuration"
            "0x2903" -> "Server Characteristic Configuration"
            "0x2904" -> "Characteristic Presentation Format"
            "0x2905" -> "Characteristic Aggregate Format"
            "0x2906" -> "Valid Range"
            "0x2907" -> "External Report Reference"
            "0x2908" -> "Report Reference"
            "0x2909" -> "Number of Digitals"
            "0x290A" -> "Value Trigger Setting"
            "0x290B" -> "Environmental Sensing Configuration"
            "0x290C" -> "Environmental Sensing Measurement"
            "0x290D" -> "Environmental Sensing Trigger Setting"
            "0x290E" -> "Time Trigger Setting"
            "0x290F" -> "Complete BR-EDR Transport Block Data"
            "0x2910" -> "Observation Schedule"
            "0x2911" -> "Valid Range and Accuracy"
            else -> BleConstant.UNKNOWN_DESCRIPTOR
}下面我们写描述符适配器,在adapter包下新建一个DescriptorAdapter类,代码如下所示:
class DescriptorAdapter(
    private val descriptors: List<BluetoothGattDescriptor>
) : RecyclerView.Adapter<DescriptorAdapter.ViewHolder>() {

    override fun onCreateViewHolder(parent: ViewGroup, viewType: Int): ViewHolder {
        return ViewHolder(ItemDescriptorBinding.inflate(LayoutInflater.from(parent.context), parent, false))
    }

    override fun onBindViewHolder(holder: ViewHolder, position: Int) {
        val descriptorName = BleUtils.getDescriptorName(descriptors[position].uuid)
        holder.binding.tvDescriptorName.text = descriptorName
        holder.binding.tvDescriptorUuid.text = if (descriptorName != BleConstant.UNKNOWN_DESCRIPTOR) BleUtils.getShortUUID(descriptors[position].uuid) else descriptors[position].uuid.toString()
    }

    override fun getItemCount() = descriptors.size

    class ViewHolder(itemView: ItemDescriptorBinding) : RecyclerView.ViewHolder(itemView.root) {
        var binding: ItemDescriptorBinding

        init {
            binding = itemView
        }
    }
}
这里的代码同样对于自定义UUID展示完整数据,对于SIG的展示短UUID。
③ 显示描述符
接下来就是在特性适配器中去加载显示描述符数据,修改CharacteristicAdapter中的onBindViewHolder()函数,在里面增加如下所示代码:
    override fun onBindViewHolder(holder: ViewHolder, position: Int) {
        ...
        //加载特性下的描述
        if (characteristics[position].descriptors.isEmpty()) {
            holder.binding.layDescriptors.visibility = View.GONE
            return
        }
        holder.binding.rvDescriptor.apply {
            layoutManager = LinearLayoutManager(context)
            adapter = DescriptorAdapter(characteristics[position].descriptors)
        }
}这里的isEmpty()函数很重要,因为不是每一个特性都有描述符,这个前面已经说过了,没有的我们就直接隐藏对应的描述符布局,否则就加载描述符数据,下面运行看一下。
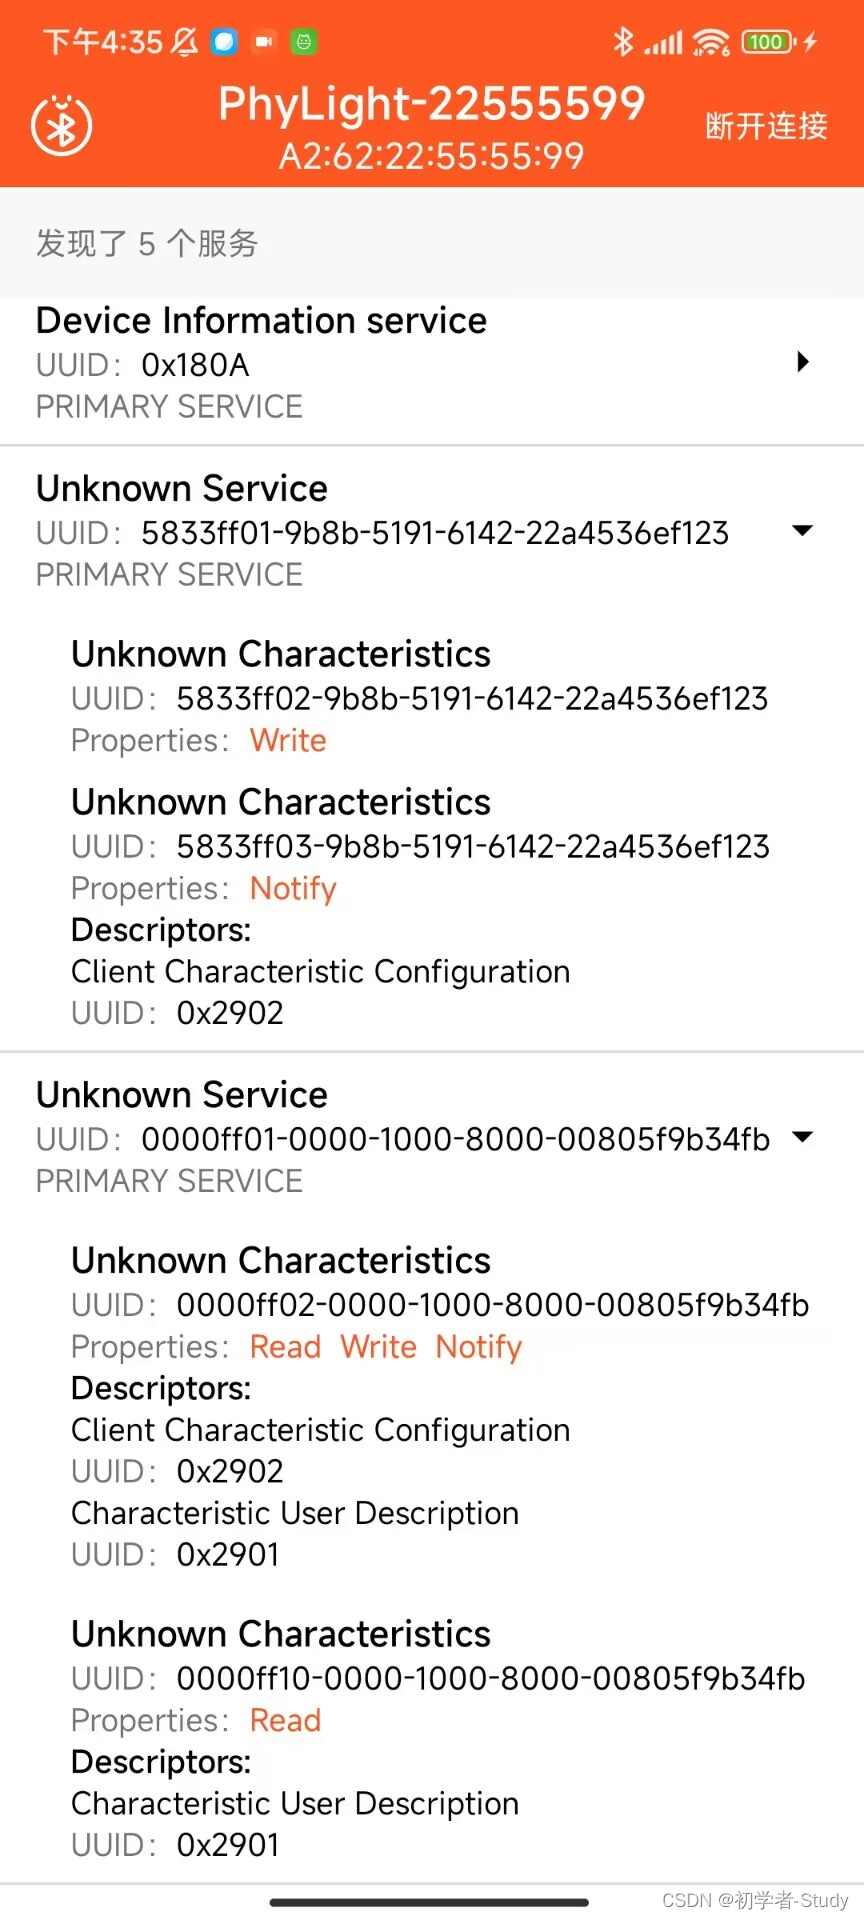
通过这个图就可以清晰的的看到特性下的描述符,本文就到这里了。
三、源码
如果对你有所帮助的话,不妨 Star 或 Fork,山高水长,后会有期~
源码地址:GoodBle
本文参与 腾讯云自媒体同步曝光计划,分享自作者个人站点/博客。
原始发表:2023-08-14,如有侵权请联系 cloudcommunity@tencent.com 删除
评论
登录后参与评论
推荐阅读
目录
腾讯云开发者

Copyright © 2013 - 2026 Tencent Cloud. All Rights Reserved. 腾讯云 版权所有
深圳市腾讯计算机系统有限公司 ICP备案/许可证号:粤B2-20090059 ![]() 粤公网安备44030502008569号
粤公网安备44030502008569号
腾讯云计算(北京)有限责任公司 京ICP证150476号 | 京ICP备11018762号