AIIB23——纤维化肺病的气道树分割和基于定量 CT成像生物标志物的死亡率预测docker部署
AIIB23——纤维化肺病的气道树分割和基于定量 CT成像生物标志物的死亡率预测docker部署
今天将分享纤维化肺病的气道树分割和基于定量 CT成像生物标志物的死亡率预测docker部署完整实现版本,为了方便大家学习理解整个流程,将整个流程步骤进行了整理,并给出详细的步骤结果。感兴趣的朋友赶紧动手试一试吧。
一、AIIB23介绍
气道相关定量成像生物标志物 (QIB) 对于肺部疾病的检查、诊断和预后至关重要,而手动描绘气道结构过于繁重。已经做出多项努力来提高自动气道建模的性能;然而,目前的数据集只关注气管变化较小的疾病,不包括复杂的肺部疾病。例如,纤维化肺病患者肺组织内的蜂窝结构使得注释更加复杂且容易出错。
尽管尚未建立进行性纤维化肺病的正式定义和评估标准,但一年时间的用力肺活量 (FVC) 下降是疾病进展监测的常用测量指标。然而,FVC的直接测量对实验室敏感,增加了跨国界临床研究的难度。因此,定量成像生物标志物 (QIB) 是FVC等肺生理学测量的有吸引力的替代方法,气道的微观变化是IPF进展评估的高度决定性标志物。QIB已成为疾病诊断、表征和预后的关键特征。但是现在没有用于肺纤维化诊断的通用QIB。在这一挑战中,基于AI的特征提取器引入了IPF研究界,期望调查QIB与死亡率预测之间的潜在相关性。这一挑战的主要目标是开发先进的人工智能 (AI) 模型,该模型可以根据从 CT 扫描中提取的信息准确预测肺纤维化患者的死亡率状况。CT 扫描提供肺部的详细图像,允许识别可能指示疾病进展和患者预后的相关的细微模式和特征。
二、AIIB23任务
任务1、从复杂的纤维化肺病中自动提取气道。
任务2、预测肺纤维化患者在固定观察时间内的生存率的二元分类。
三、AIIB23数据集
从多中心收集了312例病例(262例来自纤维化肺病患者,50 例来自 COVID-19 患者)并纳入了这项挑战。气道结构由三位经验丰富的放射科医生精心注释。训练集120例,验证集52例,测试集140例
从多中心收集了237 例病例包含患者的 CT 扫描以及 CT 扫描后 63 周后记录的相应死亡率状态,0 代表在 63 周内死亡的患者,1 代表存活的患者。训练集95例,其中36例是死亡,59例是存活,验证集53例,测试集90例
任务1指标:IoU,DLR(检测长度比。根据专家注释的总长度(根据气道中心线计算)正确检测到的分支的长度),DBR(检测到的分支比。正确检测到的分支占总分支的比率),Precision(体素精度),leakages(总假阳性体积与金标准体积的比例),总分 = (IoU+Precision+DBR+DLR)* 0.25 * 0.7 + ( 1 -leakages)* 0.3
任务2指标:准确性:衡量预测的整体正确性;AUC(曲线下面积):评估模型区分已故患者和活着患者的能力;灵敏度:衡量模型正确识别已故患者的能力;特异性:评估模型正确识别存活患者的能力;F1 score:结合精确率和召回率来评估模型的整体性能。
四、Docker部署气道树分割模型和预测肺纤维化生存率分类模型
气道树分割和肺纤维化生存率分类模型实现参考这篇文章AIIB23——纤维化肺病的气道树分割和基于定量 CT成像生物标志物的死亡率预测。
1、在window下先安装docker安装程序,如果出现安装错误可以网上找一下解决方法,一般是安装补丁即可解决。

2、docker build的配置文件
2.1、编写Dockerfile
ARG PYTORCH="1.12.1"
ARG CUDA="11.3"
ARG CUDNN="8"

FROM python:3.8.3

# Pull the docker image | 拉取镜像
FROM pytorch/pytorch:${PYTORCH}-cuda${CUDA}-cudnn${CUDNN}-devel

RUN apt-get update && apt-get install -y \
    build-essential \
    cmake \
    git \
    wget \
    unzip \
    yasm \
    pkg-config \
    libswscale-dev \
    libtbb2 \
    libjpeg-dev \
    libpng-dev \
    libtiff-dev \
    libavformat-dev \
    libpq-dev \
    python3-pip \
    libgl1-mesa-dev

## Copy requirements
COPY ./requirements.txt .

## Install Python packages in Docker image
RUN pip3 install -r requirements.txt -i https://pypi.tuna.tsinghua.edu.cn/simple

## Copy all files
COPY ./ ./

## Execute the inference command
CMD ["./predict_task1.py"]
ENTRYPOINT ["python3"]
2.2、编写requirements.txt
# ===================================================================
# Do not change these packages !!!
# Since you are using a Docker image that already has the PyTorch library installed, there is no need to reinstall Torch.
# ===================================================================
arrow==1.2.3
binaryornot==0.4.4
build==0.10.0
certifi==2022.12.7
chardet==5.1.0
charset-normalizer==3.1.0
click==8.1.3
cookiecutter==2.1.1
idna==3.4
imageio[tifffile]==2.27.0
jinja2==3.1.2
jinja2-time==0.2.0
joblib==1.2.0
markupsafe==2.1.2
numpy==1.21.6
packaging==23.1
pandas==1.3.5
pillow==9.5.0
pip-tools==6.13.0
pyproject-hooks==1.0.0
python-dateutil==2.8.2
python-slugify==8.0.1
pytz==2023.3
pyyaml==6.0
requests==2.28.2
scikit-learn==1.0.2
scipy==1.7.3
simpleitk==2.2.1
six==1.16.0
text-unidecode==1.3
threadpoolctl==3.1.0
tifffile==2021.11.2
tomli==2.0.1
tzdata==2023.3
urllib3==1.26.15
wheel==0.40.0
scikit-image==0.19.3
evalutils==0.3.1
opencv-python==4.7.0.68
# ===================================================================
# If you have other additional dependencies, please list them below.
# ===================================================================
3、将运行脚本predict_task1.py与requirements.txt和Dockerfile放在同一目录下
#!/usr/bin/env python3
# -*- coding: utf-8 -*-
import SimpleITK as sitk
import os
from inferencemodel import getbodyroi, GetLargestConnectedCompont, GetLargestConnectedCompontBoundingbox, \
    lungsegmentation
from inferencemodel import BinaryVNet3dModel
import numpy as np

input_dir = '/input/'
path_img = os.path.join(input_dir, '{}.nii.gz')
path_pred = '/output/{}.nii.gz'

list_case = [k.split('.')[0] for k in os.listdir(input_dir)]
newSpacing = (0.5, 0.5, 0.5)
for case in list_case:
    src = sitk.ReadImage(path_img.format(case))
    minmaxenhancevalue = sitk.MinimumMaximumImageFilter()
    minmaxenhancevalue.Execute(src)
    min_value = minmaxenhancevalue.GetMinimum()
    if min_value < 0:
        # step1.get body and lung roi
        binary_body_src = getbodyroi(src)
        binary_body_src = GetLargestConnectedCompont(binary_body_src)
        body_boundingbox = GetLargestConnectedCompontBoundingbox(binary_body_src)
        binary_lung_src = lungsegmentation(src)
        binary_lung_src = GetLargestConnectedCompont(binary_lung_src)
        lung_boundingbox = GetLargestConnectedCompontBoundingbox(binary_lung_src)
        body_height = body_boundingbox[3]
        body_width = body_boundingbox[4]
        body_depth = body_boundingbox[5]
        lung_height = lung_boundingbox[3]
        lung_width = lung_boundingbox[4]
        lung_depth = lung_boundingbox[5]
        # step2.keep body and lung roi,if lung too small using body
        if lung_height / body_height > 0.5 and lung_width / body_width > 0.5 and lung_depth / body_depth > 0.5:
            # print(boundingbox)  # (x,y,z,xlength,ylength,zlength)
            boundingbox = lung_boundingbox
        else:
            boundingbox = body_boundingbox
        x1, y1, z1, x2, y2, z2 = boundingbox[0], boundingbox[1], boundingbox[2], boundingbox[0] + boundingbox[
            3], boundingbox[1] + boundingbox[4], boundingbox[2] + boundingbox[5]
        src_array = sitk.GetArrayFromImage(src)
        roi_src_array = src_array[z1:z2, y1:y2, x1:x2]
        roi_src = sitk.GetImageFromArray(roi_src_array)
        roi_src.SetSpacing(src.GetSpacing())
        roi_src.SetDirection(src.GetDirection())
        roi_src.SetOrigin(src.GetOrigin())
        # step3.segmentation
        vnet3d = BinaryVNet3dModel(image_depth=256, image_height=240, image_width=256, image_channel=1, numclass=1,
                                   batch_size=1, model_path=r"BinaryVNet3d.pth", use_cuda=False)
        sitk_mask = vnet3d.inference_patch(roi_src, newSpacing)
        vnet3d.clear_GPU_cache()
        roi_binary_array = sitk.GetArrayFromImage(sitk_mask)
        binary_array = np.zeros_like(src_array)
        binary_array[z1:z2, y1:y2, x1:x2] = roi_binary_array[:, :, :]
        binary_vessels = sitk.GetImageFromArray(binary_array)
        binary_vessels.SetSpacing(src.GetSpacing())
        binary_vessels.SetDirection(src.GetDirection())
        binary_vessels.SetOrigin(src.GetOrigin())
        binary_vessels = GetLargestConnectedCompont(binary_vessels)
        # save the segmentation mask
        sitk.WriteImage(binary_vessels, path_pred.format(case))
4、在命令行里运行如下命令
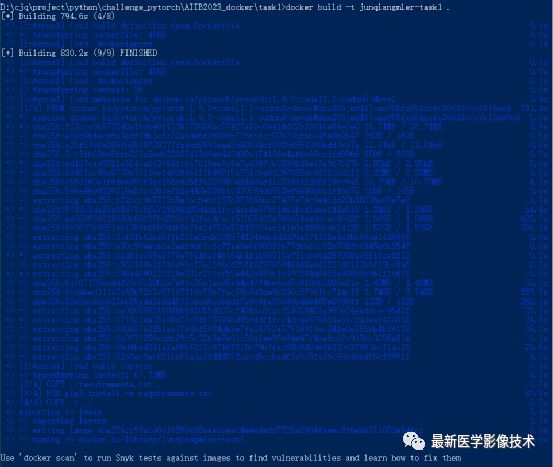
docker build -t junqiangmler-task1 .
5、保存模型,加载模型
docker save -o junqiangmler-task1.tar junqiangmler-task1
docker load junqiangmler-task1.tar
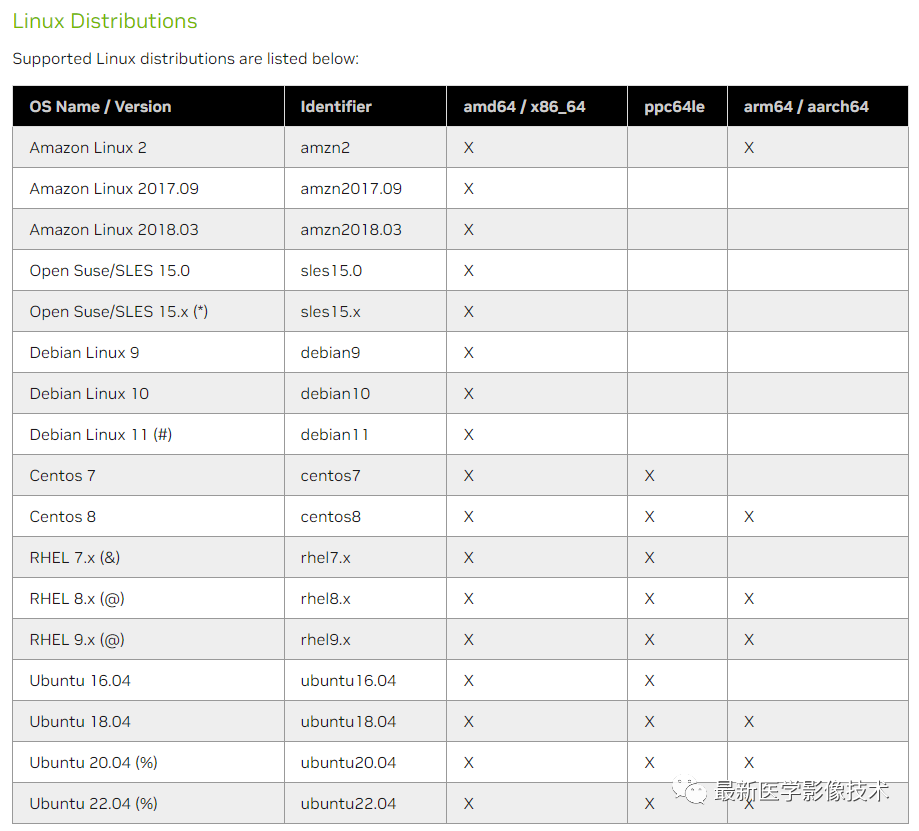
6、运行模型,在window下只支持cpu版pytorch模型运行,gpu版pytorch模型运行,需要结合docker和NvidiaDocker(是一个Docker和NVIDIA驱动程序之间的桥梁,可以在Docker容器中访问GPU资源)一起使用,https://github.com/NVIDIA/nvidia-docker,目前只能在linux系统下使用。

docker run --rm -v D:\cjq\project\python\challenge_pytorch\AIIB2023_docker\input:/input -v D:\cjq\project\python\challenge_pytorch\AIIB2023_docker\output:/output -it junqiangmler-task1
docker run --rm -v D:\cjq\project\python\challenge_pytorch\AIIB2023_docker\input:/input_image -v D:\cjq\project\python\challenge_pytorch\AIIB2023_docker\output:/output -it junqiangmler-task2
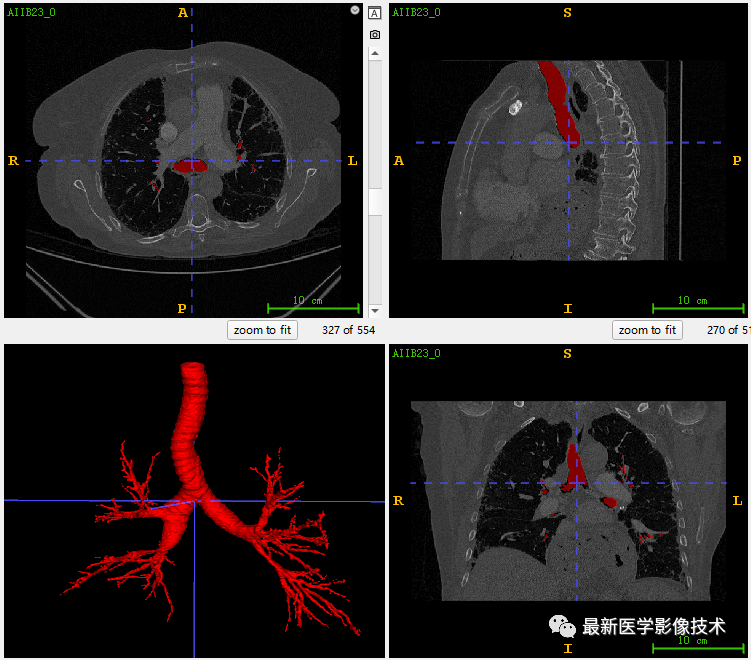
7、运行结果


如果大家觉得这个项目还不错,希望大家给个Star并Fork,可以让更多的人学习。如果有任何问题,随时给我留言我会及时回复的。