python 将图片转换为txt
python 将图片转换为txt

安装方法:命令行输入:
pip3 install opencv-python-
import cv2 -
image = cv2.imread('E:/young.jpg') -
print(image) -
print(type(image)) -
print(image.shape)
得到:
[[[112 108 84] [118 114 90] [114 110 86] ... [128 126 115] [126 126 114] [127 127 115]] [[110 106 82] [114 110 86] [112 108 84] ... [126 124 113] [121 121 109] [123 123 111]] [[113 109 85] [115 111 87] [113 109 85] ... [122 120 110] [125 124 114] [120 119 109]] ... [[ 66 67 47] [142 143 123] [114 116 94] ... [121 119 95] [115 113 89] [114 112 88]] [[ 48 50 28] [ 99 101 79] [105 107 85] ... [100 98 74] [107 105 81] [108 106 82]] [[ 47 49 27] [104 106 84] [107 109 87] ... [ 97 95 71] [111 109 85] [108 106 82]]] <class 'numpy.ndarray'> (4000, 3000, 3)
PIL
from PIL import Image a = Image.open('E:/young.jpg') print(a)
运行结果:
<PIL.JpegImagePlugin.JpegImageFile image mode=RGB size=3000x4000 at 0x21292EF7AC8>转换成array形式:
from PIL import Image
import numpy as np
a = Image.open('E:/young.jpg')
print(a)
b = np.array(a)
print(b)
print(type(b))
将图片转换成简单txt
from PIL import Image
import numpy as np
if __name__ == "__main__":
image_file = 'E:/young.jpg'
height = 100
img = Image.open(image_file)
img_width, img_height = img.size
width = int(1.8 * height * img_width//img_height) #嘉定字符的高度是宽度的
img = img.resize((width,height),Image.ANTIALIAS)
pixels = np.array(img.convert('L'))
print('type(pixels) = ', type(pixels))
print(pixels.shape)
print(pixels)
chars = 'MNHQ$OC?&>!:-;.'
N = len(chars)
step = 256//N
print(N)
result = ''
for i in range(height):
for j in range(width):
result += chars[pixels[i][j] // step]
result += '\n'
with open('E:/text.txt', mode = 'w') as f:
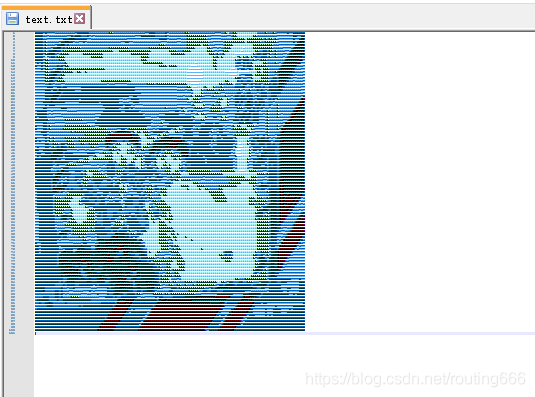
f.write(result)得到的text.txt缩小之后:
腾讯云开发者
