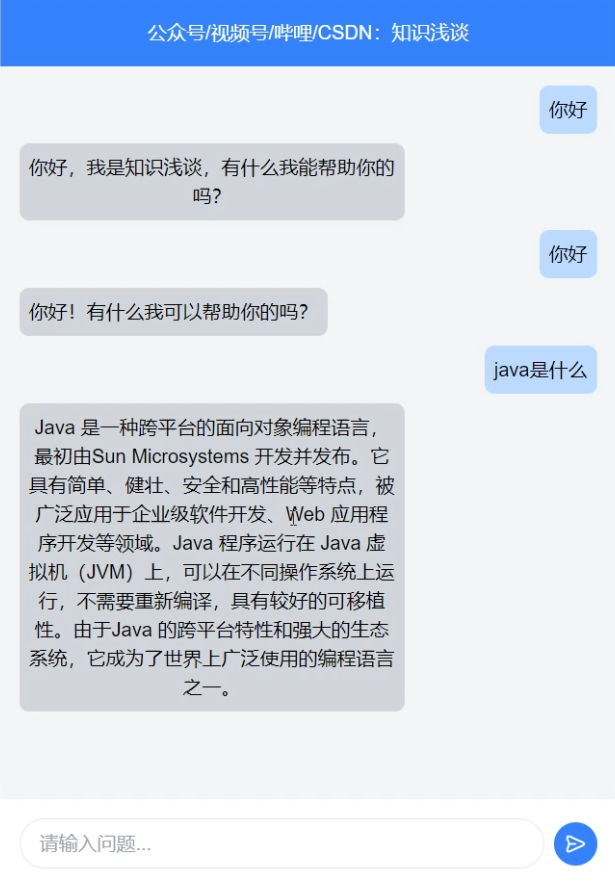
实现免费ChatGPT前后端SpringBoot&Vue
🤞实现免费ChatGPT前后端SpringBoot&Vue🤞

应用的技术有:
- SpringBoot
- Vue
- Reactive
- WebFlux
- fetchEventSource api key 的获取方式如下:
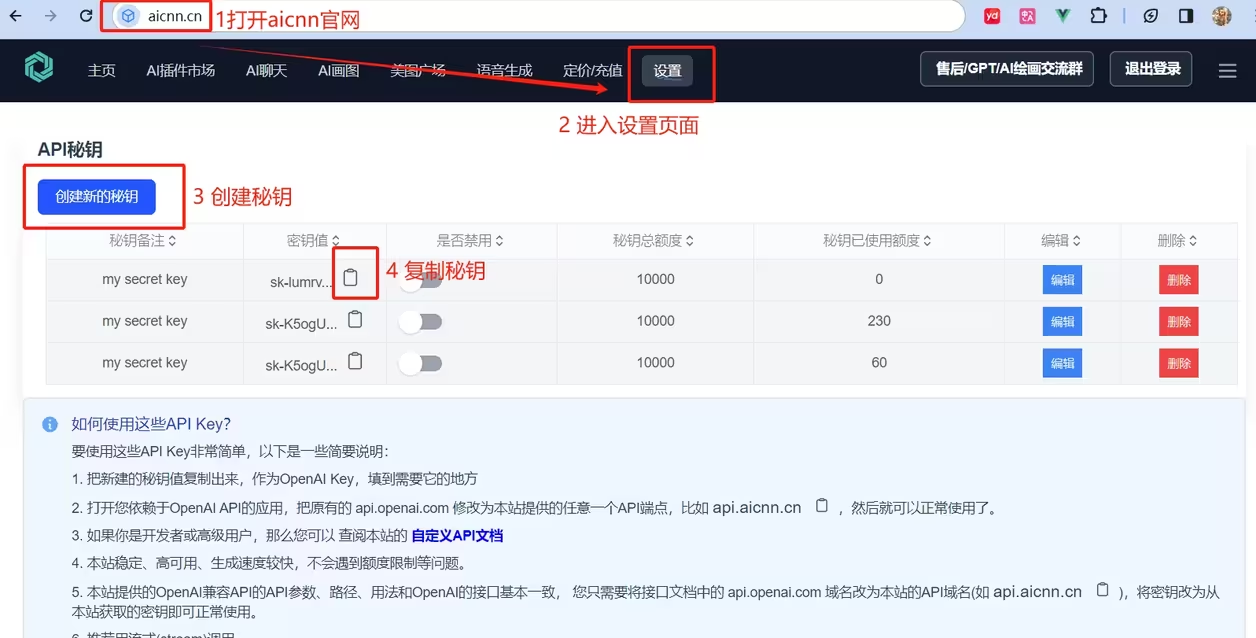
key获取方式

第一步:打开aicnn.cn
第二步:进入设置页面
第三步:点击创建新的秘钥
第四步:复制密钥值,替换上面代码中的sk-*******,替换后的代码如下所示:.header(“Authorization”, “Bearer sk-1234567890123456789”)
前端代码
前端项目采用vue3实现
在项目中,使用如下命令运行项目,即可运行前端: yarn install yarn serve
前端主要代码
<template>
  <div class="bg-gray-100 h-screen flex flex-col max-w-lg mx-auto">
    <div class="bg-blue-500 p-4 text-white">
      <span>公众号/视频号/哔哩/CSDN:知识浅谈</span>
    </div>

    <div class="flex-1 overflow-y-auto p-4">
      <div class="flex flex-col space-y-2">
        <div v-for="(message, index) in messages" :key="index" class="flex" :class="{'justify-end': message.isMine}">
          <div :class="{'bg-blue-200': message.isMine, 'bg-gray-300': !message.isMine}" class="text-black p-2 rounded-lg max-w-xs">
            {{ message.text }}
          </div>
        </div>
      </div>
    </div>

    <div class="bg-white p-4 flex items-center">
      <input type="text" v-model="this.inputText" placeholder="请输入问题..." class="flex-1 border rounded-full px-4 py-2 focus:outline-none" @keyup.enter="sendSSEMessage">
      <button class="bg-blue-500 text-white rounded-full p-2 ml-2 hover:bg-blue-600 focus:outline-none" @click="sendSSEMessage">
        <svg width="20px" height="20px" viewBox="0 0 24 24" fill="none" xmlns="http://www.w3.org/2000/svg" stroke="#ffffff"><g id="SVGRepo_bgCarrier" stroke-width="0"></g><g id="SVGRepo_tracerCarrier" stroke-linecap="round" stroke-linejoin="round"></g><g id="SVGRepo_iconCarrier"> <path d="M11.5003 12H5.41872M5.24634 12.7972L4.24158 15.7986C3.69128 " stroke="#ffffff" stroke-width="2" stroke-linecap="round" stroke-linejoin="round"></path> </g></svg>
      </button>
    </div>

  </div>
</template>
<script>
import {fetchEventSource} from '@microsoft/fetch-event-source';  //  EventSource
export default {
  name: 'Home',
  data() {
    return {
      inputText: null,//要发送的问题
      // 对话数组
      messages: [
        { text: "你好", isMine: true },
        { text: "你好,我是知识浅谈,有什么我能帮助你的吗?", isMine: false },
      ],
      responseFirst: true, // 对话第一次回复
      eventSource: null,
    };
  },
  beforeUnmount() {
    if (this.eventSource) {
      this.eventSource.close();
    }
  },
  methods:{
    sendSSEMessage() {
      // 只有当eventSource不存在时才创建新的EventSource连接
      // if (!this.eventSource) {
        // console.log("if");
        this.messages.push({text: this.inputText, isMine: true});
        this.messages.push({text: "", isMine: false});
        const that=this;
        // 对话请求
        const abortController = new AbortController();
        this.eventSource = fetchEventSource('http://127.0.0.1:8091/completions?messages='+that.inputText,
          {
            method: "GET",
            signal: abortController.signal,
            onmessage(event) {
              const data = JSON.parse(event.data);
              console.log(data)
              that.messages[that.messages.length - 1].text += data.choices[0].delta.content;
            },
            onclose() {
              abortController.abort();
              that.eventSource.close();
              that.eventSource = null; // 重置eventSource变量,允许重建连接
            },
            onerror(event){
              console.log("EventSource failed:", event);
              abortController.abort();
              // console.log("error");
              that.eventSource.close(); // 关闭出错的连接
              that.eventSource = null; // 重置eventSource变量,允许重建连接
            }
          }
        );
        this.inputText='';
    }
  }
}
</script>
<style scoped>
</style>
后端代码
引入依赖
<dependency>
            <groupId>org.springframework.boot</groupId>
            <artifactId>spring-boot-starter-web</artifactId>
</dependency>

<dependency>
            <groupId>org.springframework.boot</groupId>
            <artifactId>spring-boot-starter-webflux</artifactId>
</dependency>
然后需要在Controller中创建一个方法来返回Flux实例。这个方法将被映射到特定的URL,客户端将使用这个URL来接收事件。
import cn.aicnn.chatssespringboot.dto.AIAnswerDTO;
import cn.aicnn.chatssespringboot.service.GptServiceImpl;
import org.springframework.http.MediaType;
import org.springframework.http.codec.ServerSentEvent;
import org.springframework.web.bind.annotation.*;
import reactor.core.publisher.Flux;

import javax.annotation.Resource;


@RestController
public class ChatController {

    //用于流式请求第三方的实现类
    @Resource
    GptServiceImpl gptService;

    //通过stream返回流式数据
    @GetMapping(value = "/completions", produces = MediaType.TEXT_EVENT_STREAM_VALUE)
    public Flux<ServerSentEvent<AIAnswerDTO>> getStream(@RequestParam("messages")String messages) {
        return gptService.doChatGPTStream(messages)//实现类发送消息并获取返回结果
                .map(aiAnswerDTO -> ServerSentEvent.<AIAnswerDTO>builder()//进行结果的封装,再返回给前端
                        .data(aiAnswerDTO)
                        .build()
                )
                .onErrorResume(e -> Flux.empty());//发生异常时发送空对象
    }

}
处理连接和事件 一旦有客户端连接到这个URL,可以通过调用GptServiceImpl实例的doChatGPTStream方法来发送事件。这些事件可以是简单的字符串消息,也可以是更复杂的数据结构,如JSON对象。记住,SSE的设计初衷是轻量级和简单,所以你发送的每个事件都应当是独立的和自包含的。
GptServiceImpl的实现方式如下,也是springboot后端实现的重点
import cn.aicnn.chatssespringboot.dto.AIAnswerDTO;
import cn.aicnn.chatssespringboot.dto.ChatRequestDTO;
import cn.hutool.core.collection.CollUtil;
import cn.hutool.core.util.StrUtil;
import cn.hutool.json.JSONUtil;
import com.fasterxml.jackson.databind.JsonNode;
import com.fasterxml.jackson.databind.ObjectMapper;
import org.springframework.http.HttpHeaders;
import org.springframework.http.MediaType;
import org.springframework.stereotype.Service;
import org.springframework.web.reactive.function.BodyInserters;
import org.springframework.web.reactive.function.client.WebClient;
import reactor.core.publisher.Flux;

import javax.annotation.PostConstruct;
import java.util.*;


/**
 * @author aicnn.cn
 * @date 2023/2/13
 * @description: aicnn.cn
 **/
@Service
public class GptServiceImpl {
    //webflux的client
    private WebClient webClient;

    //用于读取第三方的返回结果
    private ObjectMapper objectMapper = new ObjectMapper();

    @PostConstruct
    public void postConstruct() {
        this.webClient = WebClient.builder()//创建webflux的client
                .baseUrl("https://api.aicnn.cn/v1")//填写对应的api地址
                .defaultHeader("Content-Type", "application/json")//设置默认请求类型
                .build();
    }

    //请求stream的主题
    public Flux<AIAnswerDTO> doChatGPTStream(String requestQuestion) {

        //构建请求对象
        ChatRequestDTO chatRequestDTO = new ChatRequestDTO();
        chatRequestDTO.setModel("gpt-3.5-turbo");//设置模型
        chatRequestDTO.setStream(true);//设置流式返回

        ChatRequestDTO.ReqMessage message = new ChatRequestDTO.ReqMessage();//设置请求消息,在此可以加入自己的prompt
        message.setRole("user");//用户消息
        message.setContent(requestQuestion);//用户请求内容
        ArrayList<ChatRequestDTO.ReqMessage> messages = new ArrayList<>();
        messages.add(message);
        chatRequestDTO.setMessages(messages);//设置请求消息


        //构建请求json
        String paramJson = JSONUtil.toJsonStr(chatRequestDTO);;

        //使用webClient发送消息
        return this.webClient.post()
                .uri("/chat/completions")//请求uri
                .header("Authorization", "Bearer sk-**************")//设置成自己的key,获得key的方式可以在下文查看
                .header(HttpHeaders.ACCEPT, MediaType.TEXT_EVENT_STREAM_VALUE)//设置流式响应
                .contentType(MediaType.APPLICATION_JSON)
                .body(BodyInserters.fromValue(paramJson))
                .retrieve()
                .bodyToFlux(String.class)
                .flatMap(result -> handleWebClientResponse(result));//接收到消息的处理方法
    }

    private Flux<AIAnswerDTO> handleWebClientResponse(String resp) {
        if (StrUtil.equals("[DONE]",resp)){//[DONE]是消息结束标识
            return Flux.empty();
        }

        try {
            JsonNode jsonNode = objectMapper.readTree(resp);
            AIAnswerDTO result = objectMapper.treeToValue(jsonNode, AIAnswerDTO.class);//将获得的结果转成对象
            if (CollUtil.size(result.getChoices())  > 0 && !Objects.isNull(result.getChoices().get(0)) &&
                    !StrUtil.isBlank(result.getChoices().get(0).delta.getError())){//判断是否有异常
                throw new RuntimeException(result.getChoices().get(0).delta.getError());
            }
            return Flux.just(result);//返回获得的结果
        } catch (Exception e) {
            throw new RuntimeException(e.getMessage());
        }
    }
}
在这里,我们请求的api地址设置为https://api.aicnn.cn/v1,并且设置从aicnn.cn获取的api key即可。
🍚总结
大功告成,撒花致谢🎆🎇🌟,关注我不迷路,带你起飞带你富。
本文参与 腾讯云自媒体同步曝光计划,分享自作者个人站点/博客。
原始发表:2024-03-24,如有侵权请联系 cloudcommunity@tencent.com 删除
评论
登录后参与评论
推荐阅读
目录

