如何在wxWidgets中创建与Window (OS)控件按钮完全相同的控制按钮?
我想要创建控制按钮(最小化,最大化和关闭)精确像Windows。
最后的目标是创建类似Microsoft标题栏的内容。

我知道如何创建一个wxButton,也知道如何为它设置一个图标。然而,我不知道如何使用本机OS图标或主题。
wxButton* closeButton = new wxButton(this, wxID_ANY, "x"); // how to tell that be like OS close button!在WinAPI中,有一个名为DrawThemeBackground的函数,我可以在WP_CLOSEBUTTON中使用它,但我不知道wxWidgets中的等效函数是什么。
更新:在大家的帮助下,这是在Windows中绘制本机按钮的示例代码(在其他操作系统中不起作用)。不幸的是,结果不是我想要的。它看起来像是Win XP图标。wxNativeRenderer似乎不能正常工作。有谁知道要修正这段代码吗?(是的,我添加了"wx.rc“资源文件,我不使用任何清单)

// wxWidgets "Hello World" Program
// For compilers that support precompilation, includes "wx/wx.h".
#include <wx/wxprec.h>
#ifndef WX_PRECOMP
#include <wx/wx.h>
#endif
#include <wx/renderer.h>
#include <wx/artprov.h>
class MyApp: public wxApp
{
public:
  virtual bool OnInit();
};

class MyFrame: public wxFrame
{
public:
  MyFrame();
private:
};
wxIMPLEMENT_APP( MyApp );
bool MyApp::OnInit()
{
  MyFrame* frame = new MyFrame();
  frame->Show( true );
  return true;
}

wxBitmap getButtonBitmap( wxWindow* win, wxTitleBarButton type, const wxColour& bg, int flags = 0 )
{
  const wxSize sizeBmp = wxArtProvider::GetSizeHint( wxART_BUTTON );
  wxBitmap bmp( sizeBmp );
  wxMemoryDC dc( bmp );
  dc.SetBackground( bg );
  dc.Clear();
  wxRendererNative::Get().DrawTitleBarBitmap( win, dc, sizeBmp, type, flags );
  return bmp;
}

MyFrame::MyFrame()
  : wxFrame( NULL, wxID_ANY, "Hello World" )
{
  wxWindow* win = this;
  wxColour color = win->GetBackgroundColour();
  // minimize button
  wxBitmapButton* minimizeButton = new wxBitmapButton( win, wxID_ANY,
   getButtonBitmap( win, wxTITLEBAR_BUTTON_ICONIZE, color ),
   wxPoint( 0, 0 ), wxDefaultSize, wxBORDER_NONE );
  minimizeButton->SetBitmapPressed( getButtonBitmap( win, wxTITLEBAR_BUTTON_ICONIZE, color, wxCONTROL_PRESSED ) );
  minimizeButton->SetBitmapCurrent( getButtonBitmap( win, wxTITLEBAR_BUTTON_ICONIZE, color, wxCONTROL_CURRENT ) );
  // maximize button
  wxBitmapButton* maximizeButton = new wxBitmapButton( win, wxID_ANY,
   getButtonBitmap( win, wxTITLEBAR_BUTTON_MAXIMIZE, color ),
   wxPoint( 30, 0 ), wxDefaultSize, wxBORDER_NONE );
  maximizeButton->SetBitmapPressed( getButtonBitmap( win, wxTITLEBAR_BUTTON_MAXIMIZE, color, wxCONTROL_PRESSED ) );
  maximizeButton->SetBitmapCurrent( getButtonBitmap( win, wxTITLEBAR_BUTTON_MAXIMIZE, color, wxCONTROL_CURRENT ) );
  // close Button
  wxBitmapButton* closeButton = new wxBitmapButton( win, wxID_ANY,
   getButtonBitmap( win, wxTITLEBAR_BUTTON_CLOSE, color ),
   wxPoint( 60, 0 ), wxDefaultSize, wxBORDER_NONE );
  closeButton->SetBitmapPressed( getButtonBitmap( win, wxTITLEBAR_BUTTON_CLOSE, color, wxCONTROL_PRESSED ) );
  closeButton->SetBitmapCurrent( getButtonBitmap( win, wxTITLEBAR_BUTTON_CLOSE, color, wxCONTROL_CURRENT ) );
}回答 2
Stack Overflow用户
发布于 2021-10-11 20:51:33
使用DrawThemeBackground函数绘制类似标题栏上的按钮的过程要复杂一些。下面是一个演示,部分展示了如何使用wxWidgets实现此操作:
#include "wx/wx.h"

#include <wx/dcclient.h>
#include <wx/mstream.h>
#include <wx/dcmemory.h>
#include <wx/rawbmp.h>

#include <wx/msw/wrapwin.h>
#include <uxtheme.h>
#include <Vssym32.h>

#include <map>

// Helper data types
struct BGInfo
{
    wxRect BgRect;
    wxRect SizingMargins;
    wxRect ContentMargins;
    int    TotalStates;
};

struct ButtonInfo
{
    wxRect ButtonRect;
    int    TotalStates;
};

enum class DPI
{
    dpi96 = 0,
    dpi120,
    dpi144,
    dpi196
};

enum class Button
{
    Close = 0,
    Min,
    Max,
    Restore,
    Help
};

// Helper functions
void MarginsToRect(const MARGINS& m, wxRect& r)
{
    r.SetLeft(m.cxLeftWidth);
    r.SetRight(m.cxRightWidth);
    r.SetTop(m.cyTopHeight);
    r.SetBottom(m.cyBottomHeight);
}

void RectTowxRect(const RECT & r, wxRect& r2)
{
    r2.SetLeft(r.left);
    r2.SetTop(r.top);
    r2.SetRight(r.right-1);
    r2.SetBottom(r.bottom-1);
}

wxBitmap ExtractAtlas(const wxBitmap& atlas, int total, int loc)
{

    int bgheight = atlas.GetHeight();
    int individualHeight = bgheight/total;
    int bgWidth = atlas.GetWidth();
    int atlasOffset = individualHeight*loc;
    wxRect bgRect = wxRect(wxPoint(0,atlasOffset),
                           wxSize(bgWidth,individualHeight));
    return atlas.GetSubBitmap(bgRect);
}

void TileBitmap(const wxBitmap& bmp, wxDC& dc, const wxRect& r)
{
    dc.SetClippingRegion(r);

    for ( int y = 0 ; y < r.GetHeight() ; y += bmp.GetHeight() )
    {
        for ( int x = 0 ; x < r.GetWidth() ; x += bmp.GetWidth() )
        {
            dc.DrawBitmap(bmp, r.GetLeft() + x, r.GetTop() + y, true);
        }
    }

    dc.DestroyClippingRegion();
}

void TileTo(const wxBitmap& in, const wxRect& margins, wxBitmap& out, int w, int h)
{
    // Theoretically we're supposed to split the bitmap into 9 pieces based on
    // the sizing margins and leave the 8 outside pieces as unchanged as
    // possible and the fill the remainder with the center piece. However doing
    // that doesn't look actual control buttons.  So I'm going to just tile
    // the center bitmap to fill the whole space.
    int ml = margins.GetLeft();
    int mr = margins.GetRight();
    int mt = margins.GetTop();
    int mb = margins.GetBottom();

    int bw = in.GetWidth();
    int bh = in.GetHeight();

    wxBitmap center = in.GetSubBitmap(wxRect(wxPoint(   ml,mt),wxSize(bw-ml-mr,bh-mb-mt)));

    // Create and initially transparent bitmap.
    unsigned char* data = reinterpret_cast<unsigned char*>(malloc(3*w*h));
    unsigned char* alpha = reinterpret_cast<unsigned char*>(malloc(w*h));
    memset(alpha, 0, w*h);

    wxImage im(w, h, data, alpha);
    wxBitmap bmp(im);

    wxMemoryDC dc(bmp);
    TileBitmap(center, dc, wxRect(wxPoint(0,0),wxSize(w,h)));
    dc.SelectObject(wxNullBitmap);

    out = bmp;
}


class MyFrame: public wxFrame
{
public:
    MyFrame();

private:
    void OnPaintImagePanel(wxPaintEvent&);
    void OnListSelection(wxCommandEvent&);

    void BuildItemToDraw();
    void LoadThemeData();

    wxListBox* m_typeBox, *m_dpiBox, *m_stateBox;
    wxPanel* m_imagePanel;
    wxBitmap m_fullAtlas;
    wxBitmap m_itemToDraw;

    BGInfo m_closeInfo;
    BGInfo m_otherInfo;
    std::map<std::pair<DPI,Button>,ButtonInfo> m_themeMap;
};

MyFrame::MyFrame():wxFrame(NULL, wxID_ANY, "Windows Control Button Demo", wxDefaultPosition,
                           wxSize(400, 300))
{
    // Start all the image handlers.  Only the PNG handler is actually needed.
    ::wxInitAllImageHandlers();

    // Build the UI.
    wxPanel* bg = new wxPanel(this, wxID_ANY);
    wxStaticText* typeText = new wxStaticText(bg,wxID_ANY,"Type:");
    m_typeBox = new wxListBox(bg,wxID_ANY);
    wxStaticText* dpiText = new wxStaticText(bg,wxID_ANY,"dpi:");
    m_dpiBox = new wxListBox(bg,wxID_ANY);
    wxStaticText* stateText = new wxStaticText(bg,wxID_ANY,"State:");
    m_stateBox = new wxListBox(bg,wxID_ANY);
    m_imagePanel = new wxPanel(bg,wxID_ANY);

    wxBoxSizer* mainSzr = new wxBoxSizer(wxVERTICAL);
    wxBoxSizer* boxSzr = new wxBoxSizer(wxHORIZONTAL);
    boxSzr->Add(typeText, wxSizerFlags().Border(wxALL));
    boxSzr->Add(m_typeBox, wxSizerFlags().Border(wxTOP|wxRIGHT|wxBOTTOM));
    boxSzr->Add(dpiText, wxSizerFlags().Border(wxALL));
    boxSzr->Add(m_dpiBox, wxSizerFlags().Border(wxTOP|wxRIGHT|wxBOTTOM));
    boxSzr->Add(stateText, wxSizerFlags().Border(wxALL));
    boxSzr->Add(m_stateBox, wxSizerFlags().Border(wxTOP|wxRIGHT|wxBOTTOM));

    mainSzr->Add(boxSzr,wxSizerFlags());
    mainSzr->Add(m_imagePanel,wxSizerFlags(1).Expand().Border(wxLEFT|wxRIGHT|wxBOTTOM));

    bg->SetSizer(mainSzr);

    // Set the needed event handlers for the controls.
    m_imagePanel->Bind(wxEVT_PAINT, &MyFrame::OnPaintImagePanel, this);
    m_typeBox->Bind(wxEVT_LISTBOX, &MyFrame::OnListSelection, this);
    m_dpiBox->Bind(wxEVT_LISTBOX, &MyFrame::OnListSelection, this);
    m_stateBox->Bind(wxEVT_LISTBOX, &MyFrame::OnListSelection, this);

    // Concigure the controls.
    m_typeBox->Append("Close");
    m_typeBox->Append("Help");
    m_typeBox->Append("Max");
    m_typeBox->Append("Min");
    m_typeBox->Append("Restore");

    m_dpiBox->Append("96");
    m_dpiBox->Append("120");
    m_dpiBox->Append("144");
    m_dpiBox->Append("192");

    m_stateBox->Append("Normal");
    m_stateBox->Append("Hot");
    m_stateBox->Append("Pressed");
    m_stateBox->Append("Inactive");

    m_typeBox->Select(0);
    m_dpiBox->Select(0);
    m_stateBox->Select(0);

    // Load the theme data and finish setting up.
    LoadThemeData();
    BuildItemToDraw();
}

void MyFrame::LoadThemeData()
{
    HINSTANCE handle = LoadLibraryEx(L"C:\\Windows\\Resources\\Themes\\aero\\aero.msstyles",
                                     0, LOAD_LIBRARY_AS_DATAFILE);

    if ( handle == NULL )
    {
        return;
    }

    HTHEME theme = OpenThemeData(reinterpret_cast<HWND>(this->GetHandle()),L"DWMWindow");

    VOID* PBuf = NULL;
    DWORD BufSize = 0;

    GetThemeStream(theme, 0,0, TMT_DISKSTREAM, &PBuf, &BufSize, handle);

    wxMemoryInputStream mis(PBuf,static_cast<int>(BufSize));
    wxImage im(mis, wxBITMAP_TYPE_PNG);

    if ( !im.IsOk() )
    {
        return;
    }

    wxBitmap b2(im);
    m_fullAtlas = wxBitmap(im);;

    MARGINS m;
    RECT r;

    int BUTTONACTIVECAPTION = 3;
    int BUTTONACTIVECLOSE = 7;
    int BUTTONCLOSEGLYPH96 = 11;
    int BUTTONRESTOREGLYPH192 = 30;

    // Store some of the theme info for the parts BUTTONACTIVECAPTION
    // and BUTTONACTIVECLOSE.
    GetThemeRect(theme, BUTTONACTIVECAPTION, 0, TMT_ATLASRECT, &r);
    RectTowxRect(r,m_otherInfo.BgRect);
    GetThemeMargins(theme,NULL, BUTTONACTIVECAPTION,0, TMT_CONTENTMARGINS,NULL, &m);
    MarginsToRect(m,m_otherInfo.ContentMargins);
    GetThemeMargins(theme,NULL, BUTTONACTIVECAPTION,0, TMT_SIZINGMARGINS,NULL, &m);
    MarginsToRect(m,m_otherInfo.SizingMargins);
    GetThemeInt(theme, BUTTONACTIVECAPTION, 0, TMT_IMAGECOUNT, &(m_otherInfo.TotalStates));

    GetThemeRect(theme, BUTTONACTIVECLOSE, 0, TMT_ATLASRECT, &r);
    RectTowxRect(r,m_closeInfo.BgRect);
    GetThemeMargins(theme,NULL, BUTTONACTIVECLOSE,0, TMT_CONTENTMARGINS,NULL, &m);
    MarginsToRect(m,m_closeInfo.ContentMargins);
    GetThemeMargins(theme,NULL, BUTTONACTIVECLOSE,0, TMT_SIZINGMARGINS,NULL, &m);
    MarginsToRect(m,m_closeInfo.SizingMargins);
    GetThemeInt(theme, BUTTONACTIVECLOSE, 0, TMT_IMAGECOUNT, &(m_closeInfo.TotalStates));

    // Since the part numbers for BUTTONCLOSEGLYPH96..BUTTONRESTOREGLYPH192
    // are all sequential and the dpis all run from 96 to 192 in the same
    // order, we can use a for loop to store
    for ( int i = BUTTONCLOSEGLYPH96 ; i <= BUTTONRESTOREGLYPH192 ; ++i )
    {
        int j = i-BUTTONCLOSEGLYPH96;

        Button b = static_cast<Button>(j/4);
        DPI dpi = static_cast<DPI>(j%4);
        std::pair<DPI,Button> item;
        ButtonInfo info;

        item = std::make_pair(dpi,b);

        GetThemeRect(theme, i, 0, TMT_ATLASRECT, &r);
        RectTowxRect(r,info.ButtonRect);
        GetThemeInt(theme, i, 0, TMT_IMAGECOUNT, &(info.TotalStates));
        m_themeMap.insert(std::make_pair(item,info));
    }

    CloseThemeData(theme);
    FreeLibrary(handle);
}

void MyFrame::OnPaintImagePanel(wxPaintEvent&)
{
    wxPaintDC dc(m_imagePanel);
    dc.Clear();

    if ( m_itemToDraw.IsOk() )
    {
        dc.DrawBitmap(m_itemToDraw,0,0,true);
    }
}

void MyFrame::OnListSelection(wxCommandEvent&)
{
    BuildItemToDraw();
}

void MyFrame::BuildItemToDraw()
{
    BGInfo bginfo;
    Button b = static_cast<Button>(m_typeBox->GetSelection());
    DPI dpi = static_cast<DPI>(m_dpiBox->GetSelection());
    int state = m_stateBox->GetSelection();

    if ( b == Button::Close )
    {
        bginfo = m_closeInfo;
    }
    else
    {
        bginfo = m_otherInfo;
    }

    wxBitmap bgAtlas = m_fullAtlas.GetSubBitmap(bginfo.BgRect);
    int totalbgs = bginfo.TotalStates;
    wxBitmap bg = ExtractAtlas(bgAtlas, totalbgs, state);
    std::pair<DPI,Button> item = std::make_pair(dpi,b);

    auto it = m_themeMap.find(item);

    if ( it != m_themeMap.end() )
    {
        ButtonInfo info = it->second;

        wxBitmap itemAtlas = m_fullAtlas.GetSubBitmap(info.ButtonRect);

        wxBitmap item = ExtractAtlas(itemAtlas, info.TotalStates, state);

        wxRect contentmargins = bginfo.ContentMargins;
        wxRect Sizingmargins = bginfo.SizingMargins;
        int width = item.GetWidth() + contentmargins.GetLeft() + contentmargins.GetRight();
        int height = item.GetHeight() + contentmargins.GetTop() + contentmargins.GetBottom();

        if ( bg.GetWidth() > width )
        {
            width = bg.GetWidth();
        }

        if ( bg.GetHeight() > height )
        {
            height = bg.GetHeight();
        }

        wxBitmap bmp(width,height,32);
        TileTo(bg,Sizingmargins, bmp, width, height);

        wxMemoryDC dc(bmp);
        int leftOffset = (width-item.GetWidth())/2;
        int topOffset = (height - item.GetHeight())/2;

        dc.DrawBitmap(item,leftOffset,topOffset, true);
        dc.SelectObject(wxNullBitmap);

        m_itemToDraw = bmp;
    }

    m_imagePanel->Refresh();
    m_imagePanel->Update();
}


class MyApp : public wxApp
{
    public:
        virtual bool OnInit()
        {
            MyFrame* frame = new MyFrame();
            frame->Show();
            return true;
        }
};

wxIMPLEMENT_APP(MyApp);
这只是部分答案,因为,
- 这与数字有关,像
BUTTONACTIVECAPTION这样的数字,我只是简单地输入了代码。这些数字最终是从Aero.msstyles文件中提取出来的,理论上说,如果微软更改该文件,代码中的数字可能是错误的。一个完整的答案将查看该文件并从中提取正确的数字,这样它就可以始终确保它使用的是正确的数字。但这样做超出了这个答案的范围。 - 我不知道怎么能买到这么大尺寸的布托。在我的系统中,关闭按钮的宽度为45像素,高度为29像素。但我在任何主题数据中都没有看到这些数字。
绘制这些按钮的诀窍是,首先必须以dll的形式打开主题文件。可以使用条目HKEY_LOCAL_MACHINE\SOFTWARE\Microsoft\Windows\CurrentVersion\ThemeManager\DllName从注册表中提取主题文件的名称。在上面的代码中,我只是将其硬编码为"C:\Windows\Resources\Themes\aero\aero.msstyles",,但可能最好从注册表中提取它,而不是硬编码文件名。
一旦主题打开,特别的诀窍就是调用GetThemeStream函数。这将返回内存中的png文件。它的第一部分看起来如下:
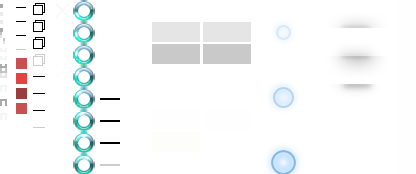
如您所见,此png包含一组控件按钮的png。我们需要使用GetThemeRect函数来学习这个png中的矩形,这些矩形对应于我们想要绘制的部分。
但现在我们遇到了一个问题。我们需要使用的主题类是"DWMWindow“。这个类是完全没有文档的,学习它的部分的唯一方法是使用像msstyleEditor这样的程序来查看主题文件。
运行这个程序就像这样,
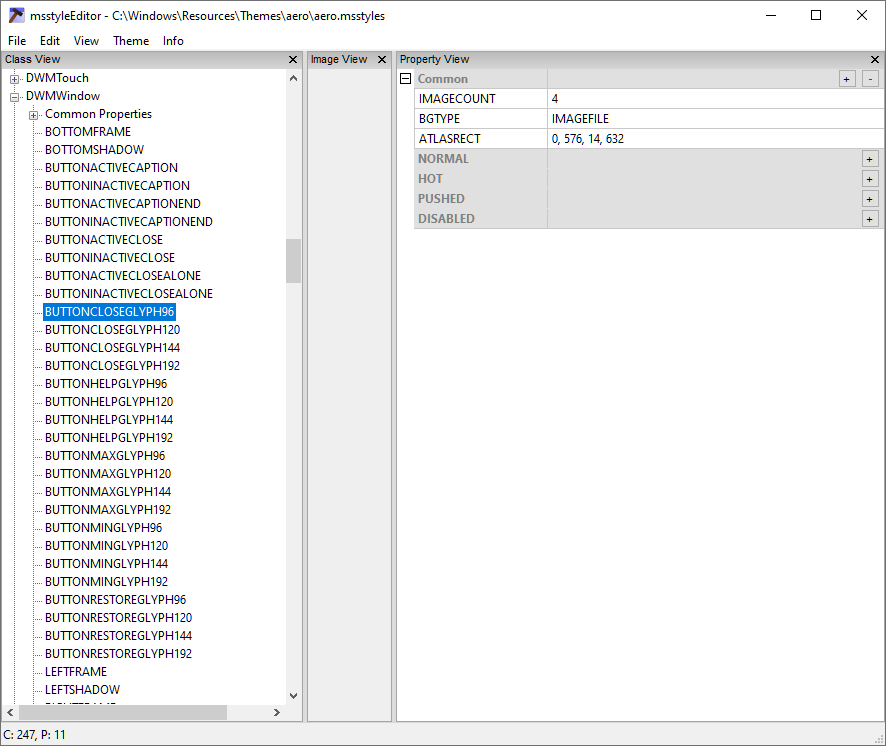
。
从这个程序中,我们可以看到我们感兴趣的零件编号是:
int BUTTONACTIVECAPTION = 3;
int BUTTONACTIVECLOSE = 7;

int BUTTONCLOSEGLYPH96 = 11;
int BUTTONCLOSEGLYPH120 = 12;
int BUTTONCLOSEGLYPH144 = 13;
int BUTTONCLOSEGLYPH192 = 14;

int BUTTONHELPGLYPH96 = 15;
int BUTTONHELPGLYPH120 = 16;
int BUTTONHELPGLYPH144 = 17;
int BUTTONHELPGLYPH192 = 18;

int BUTTONMAXGLYPH96 = 19;
int BUTTONMAXGLYPH120 = 20;
int BUTTONMAXGLYPH144 = 21;
int BUTTONMAXGLYPH192 = 22;

int BUTTONMINGLYPH96 = 23;
int BUTTONMINGLYPH120 = 24;
int BUTTONMINGLYPH144 = 25;
int BUTTONMINGLYPH192 = 26;

int BUTTONRESTOREGLYPH96 = 27;
int BUTTONRESTOREGLYPH120 = 28;
int BUTTONRESTOREGLYPH144 = 29;
int BUTTONRESTOREGLYPH192 = 30;有了这些部件编号,我们就可以使用GetThemeRect函数知道要为要绘制的项使用png的哪些部分。
还有一些最后的问题。GetThemeRect为部件BUTTONCLOSEGLYPH96 = 11返回的矩形如下所示:

这被称为地图集,该子矩形中的4块对应于正常、热、推和禁用的状态。但是,由于该类没有文档化,了解它的唯一方法是查看来自msstyleEditor的输出或从主题获取输出,这是另一种方式。幸运的是,我们可以使用带有GetThemeInt属性标识符的TMT_IMAGECOUNT来获取地图集中的图像数量,因此至少我们知道要将其切割成多少块。
我们可以从主题数据中提取更多的信息。带有GetThemeMargins属性id的TMT_SIZINGMARGINS应该告诉我们如何将背景图像平铺成更大的大小。然而,在我的实验中,来自这些边际的数据似乎并没有带来好的结果。因此,在上面的代码中,我只是平铺中间部分来填充整个背景。此外,使用TMT_CONTENTMARGINS属性id应该告诉我们在背景中放置符号的位置。但是,在我的实验中,这些位置看起来不太好。所以在上面的代码中,我只是在背景上对字形进行居中。
把所有这些放在一起,我们最终可以画出关闭,最小,最大和恢复按钮,因为他们出现在标题栏上。
Stack Overflow用户
发布于 2021-10-11 02:12:28
您应该能够用这些按钮的本地外观绘制位图。然后在wxButton上使用这些位图。
有一些限制,但是Windows应该对它们有最好的支持。参见wxRendererNative::DrawTitleBarBitmap()。
https://stackoverflow.com/questions/69524059
复制相似问题
腾讯云开发者
