文档转码 接入流程(主动轮询方式)
准备工作
存储桶配置 (文档转码后的资源文件存储依赖对象存储 COS,使用文档转码功能前,请先进行 存储桶配置)
注意:
由于文档转码存在转码耗时和排队耗时,建议使用服务端 API 提前转码,客户端直接使用转码结果。不建议直接在客户端调用互动白板 SDK 的转码接口
applyFileTranscode,避免长时间的等待,影响产品体验。交互流程(主动轮询方式):
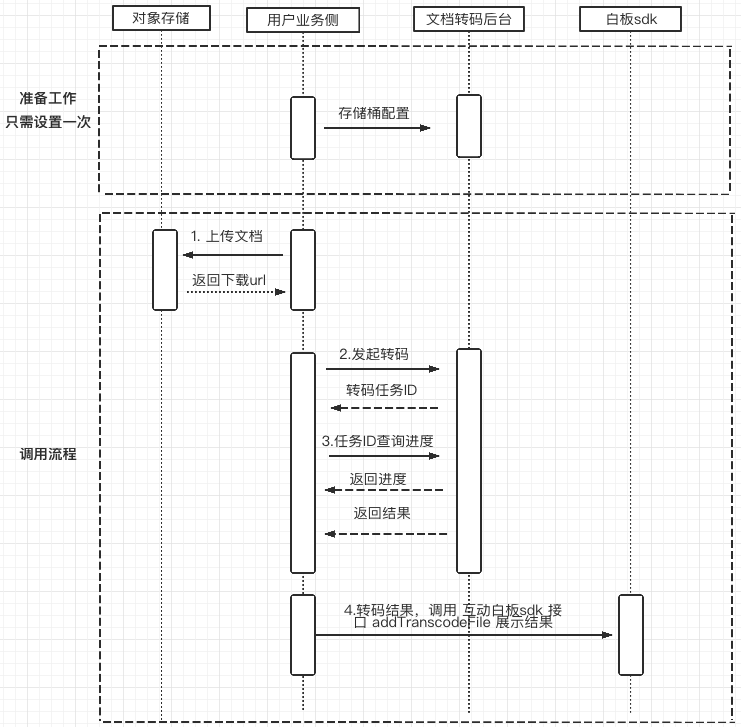
接入步骤
1. 上传文档(以上传到 腾讯云 COS 为例)
为了能让腾讯云转码服务器获取到您待转的课件,您需要提供可以供转码服务器下载课件的 URL 地址。
说明:
1. 这里推荐使用腾讯云的 COS 服务来提供下载地址,当然也可以上传到其他存储服务器 或者 其他方式上传。
2. 此处以上传到腾讯云 cos golang 语言 为例,更多语言实现,请参考 腾讯云 COS。
示例代码:
package mainimport ("context""fmt""log""net/http""net/url""github.com/tencentyun/cos-go-sdk-v5""os")func main() {// 初始化 cos 资源 TODO:将 examplebucket-1250000000 和 COS_REGION 修改为真实的信息domain := "https://examplebucket-1250000000.cos.COS_REGION.myqcloud.com"u, _ := url.Parse(domain)b := &cos.BaseURL{BucketURL: u}cosClient := cos.NewClient(b, &http.Client{Transport: &cos.AuthorizationTransport{// TODO:COS_SECRETID 需要替换成用户真实的 SECRETID, COS_SECRETKEY 需要替换成用户真实的 SECRETKEYSecretID: "COS_SECRETID",SecretKey: "COS_SECRETKEY",},})// TODO:上传到 cos 的对象键 名称keyName := "test/objectPut.go"// 本地文件路径localFilePath := "test/objectPut.go"// 获取文件大小file_info, err := os.Stat(localFilePath)if err != nil {panic(err)}opt := &cos.ObjectPutOptions{}opt.ObjectPutHeaderOptions = &cos.ObjectPutHeaderOptions{}opt.ObjectPutHeaderOptions.ContentLength = int64(file_info.Size())// 对象键(Key)是对象在存储桶中的唯一标识。// 例如,在对象的访问域名 `examplebucket-1250000000.cos.COS_REGION.myqcloud.com/test/objectPut.go` 中,对象键为 test/objectPut.go// 开始上传_, err = cosClient.Object.PutFromFile(context.Background(), keyName, localFilePath, nil)if err != nil {// 上传失败panic(err)}// 上传成功,组装 resultUrlresultUrl := fmt.Sprintf("%s/%s", domain, keyName)log.Printf("upload successful! resultUrl[]%s", resultUrl)}
2. 发起转码
由于动态转码存在转码耗时和排队耗时,建议使用服务端 API 提前转码,客户端直接使用转码结果。不建议直接在客户端调用转码接口
addTranscodeFile,避免长时间的等待,影响产品体验。示例代码(golang 为例):
package mainimport ("fmt""github.com/tencentcloud/tencentcloud-sdk-go/tencentcloud/common""github.com/tencentcloud/tencentcloud-sdk-go/tencentcloud/common/errors""github.com/tencentcloud/tencentcloud-sdk-go/tencentcloud/common/profile"tiw "github.com/tencentcloud/tencentcloud-sdk-go/tencentcloud/tiw/v20190919")func main() {// "SECRETID" 和 "SECRETKEY" 需要从控制台的 API 密钥管理 中获取credential := common.NewCredential("SECRETID","SECRETKEY",)cpf := profile.NewClientProfile()cpf.HttpProfile.Endpoint = "tiw.tencentcloudapi.com"client, _ := tiw.NewClient(credential, "ap-guangzhou", cpf)request := tiw.NewCreateTranscodeRequest()// SdkAppId 为用户自己的互动白板应用ID Url 为上传文档后,得到的下载地址params := "{\\"SdkAppId\\":\\"xxxxxxxxx\\",\\"Url\\":\\"https://board-sdk-1259648581.file.myqcloud.com/TIC/1590997573551/欢迎新同学.pptx\\"}"err := request.FromJsonString(params)if err != nil {panic(err)}response, err := client.CreateTranscode(request)if _, ok := err.(*errors.TencentCloudSDKError); ok {fmt.Printf("An API error has returned: %s", err)return}if err != nil {panic(err)}fmt.Printf("%s", response.ToJsonString())}
3. 任务 ID 查询进度
使用第2步返回的任务 ID,查询当前的任务的进度。
示例代码(golang 为例):
package mainimport ("fmt""time""github.com/tencentcloud/tencentcloud-sdk-go/tencentcloud/common""github.com/tencentcloud/tencentcloud-sdk-go/tencentcloud/common/errors""github.com/tencentcloud/tencentcloud-sdk-go/tencentcloud/common/profile"tiw "github.com/tencentcloud/tencentcloud-sdk-go/tencentcloud/tiw/v20190919")const (// 文档转码状态StatusQueued = "QUEUED" // 正在排队等待转换StatusProcessing = "PROCESSING" // 转换中StatusFinished = "FINISHED" // 转换完成)func main() {// "SECRETID" 和 "SECRETKEY" 需要从控制台的 API 密钥管理 中获取credential := common.NewCredential("SECRETID","SECRETKEY",)cpf := profile.NewClientProfile()cpf.HttpProfile.Endpoint = "tiw.tencentcloudapi.com"client, _ := tiw.NewClient(credential, "ap-guangzhou", cpf)//for {request := tiw.NewDescribeTranscodeRequest()// SdkAppId 为用户自己的互动白板应用ID TaskId 为发起转码任务时,转码服务器返回的任务 IDparams := "{\\"SdkAppId\\":xxxxxxx,\\"TaskId\\":\\"07lt80iij017uhjp12sb\\"}"err := request.FromJsonString(params)if err != nil {panic(err)}response, err := client.DescribeTranscode(request)if _, ok := err.(*errors.TencentCloudSDKError); ok {fmt.Printf("An API error has returned: %s", err)return}if err != nil {panic(err)}// 查询成功fmt.Printf("%s", response.ToJsonString())if nil == response.Response {panic(fmt.Errorf("response.Response is nil!"))}// 处理查询的结果if StatusQueued == *response.Response.Status {// 任务在队列中fmt.Printf("transcode task status is [%s]", *response.Response.Status)} else if StatusProcessing == *response.Response.Status {// 任务转码中fmt.Printf("transcode task status is [%s] progress [%d]", *response.Response.Status, *response.Response.Progress)} else if StatusFinished == *response.Response.Status {resultUrl := *response.Response.ResultUrl// 转码成功fmt.Printf("transcode successful! resultUrl[%s]", resultUrl)}time.Sleep(1 * time.Second)}}
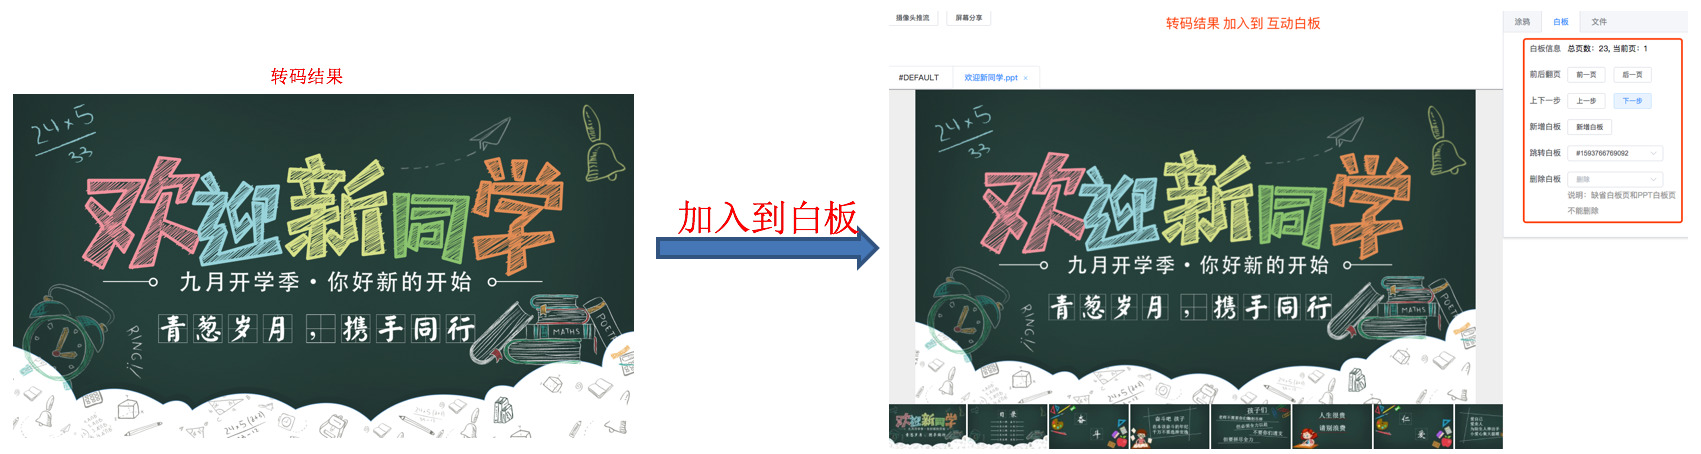
4. 使用转码结果
客户端将转码结果,设置到互动白板 ,即可实现文档的 上/下一步、上/下一页等功能。
代码示例(js 为例):
// 客户端 根据 文档转码 返回的结果,组装参数let config = {url: response.Response.ResultUrl,title: response.Response.Title,pages: response.Response.Pages,resolution: response.Response.Resolution}// 将 文档转码 的结果,加入到白板this.teduBoard.addTranscodeFile(config);
效果展示: