产品定位
腾讯云点播的媒资 AIGC 能力,旨在作为一体化音视频解决方案的核心 AI 引擎,推动客户的媒资管理从传统的“被动存储”模式,向 AI 时代的“主动赋能”模式转型。其核心是通过融合大模型与生成式 AI 技术,为音视频业务提供从智能理解管理到创意内容生产的全链路智能化支持。
产品架构
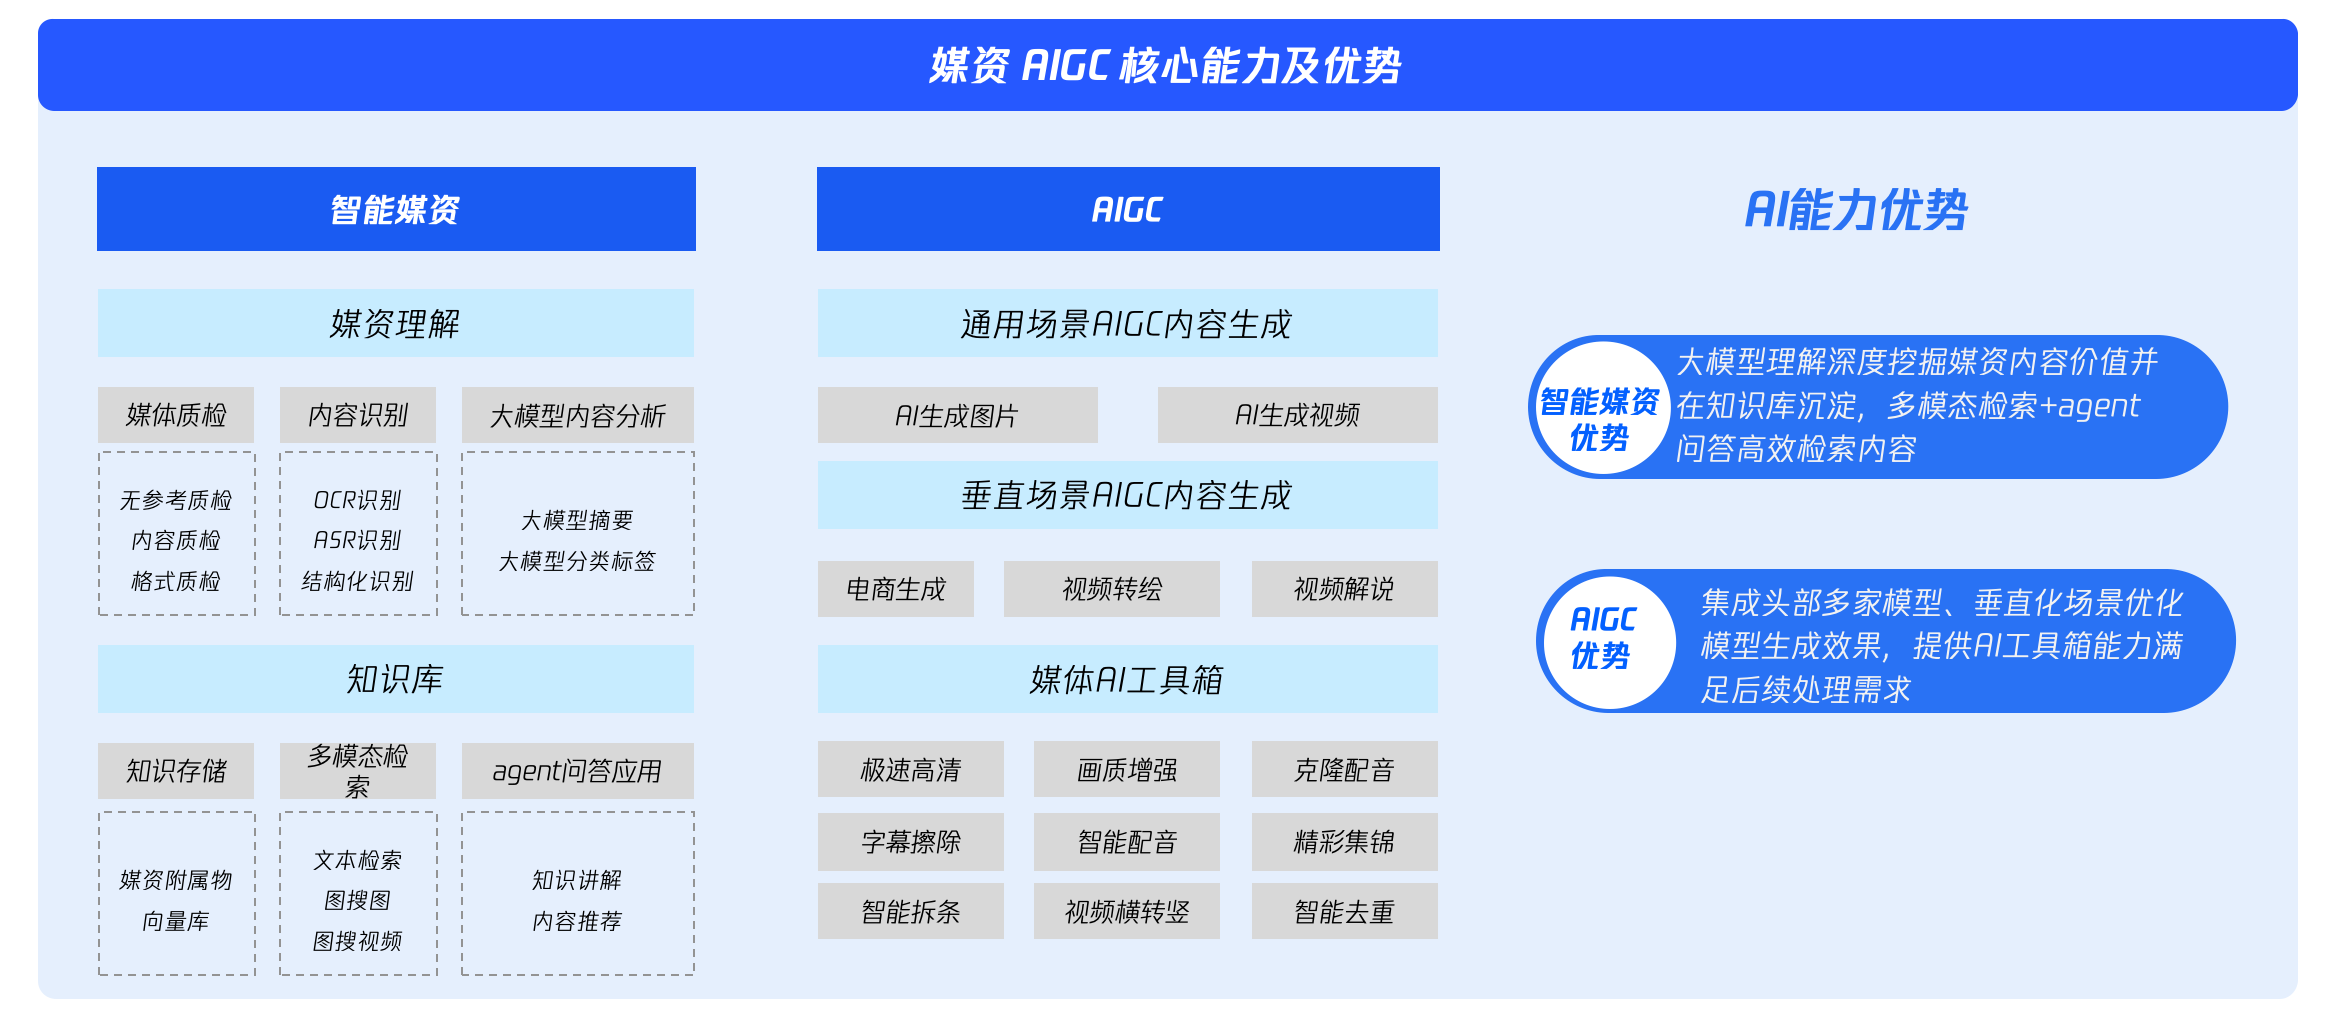
云点播媒资 AIGC 聚焦智能媒资与 AIGC 双引擎:智能媒资以媒资理解与知识库,实现媒资价值深度挖掘与高效检索;AIGC 整合多场景内容生成及媒体 AI 工具箱,集成头部模型并优化垂直场景,为音视频业务提供从智能管理到创意生产的智能化支持。
产品功能
点播智能媒资
智能媒资作为点播一体化音视频解决方案的“数据智能基座”,旨在通过对海量非结构化音视频内容进行深度理解、结构化解析与知识化重组,解决“内容沉睡”难题,激活存量媒资的深层价值,为高效检索、精准运营与二次创作提供核心数据支撑。
产品模块 | 产品功能 | 功能概括 |
媒资理解 | 自动检测视频的画质、格式及内容合规性问题,并提供修复建议。 | |
| 自动识别视频中的文字(OCR)、语音(ASR)、以及人物、场景、物体等结构化信息。 | |
| 基于多模态信息,由大模型深度理解内容,自动生成视频摘要、标题和分类标签。 | |
知识库 | 知识存储 | 将大模型分析后的结构化信息(描述、字幕等)进行向量化,存入数据库构建可检索知识库。 |
多模态检索 | 多模态检索 | 支持通过文本、图片等多种形式进行跨模态检索,快速定位目标图片或视频片段。 |
Agent 问答 | Agent 问答 | 用户通过自然语言对话提问,系统自动从知识库中检索并返回相关的视频片段地址。 |
点播 AIGC
AIGC 作为点播一体化音视频解决方案的“创意生产引擎”,旨在通过集成头部生成模型与提供场景化工具链,显著降低高质量、高创意音视频内容的生产门槛与周期,赋能营销、电商、短剧、娱乐等业务的快速创新。
产品模块 | 产品子功能 | 功能概括 |
通用 AIGC | 集成混元、可灵等多家头部模型,支持通过文本描述或参考图片生成高质量图像。 | |
| 集成混元、Vidu、可灵等多家头部模型,支持通过文本描述或参考图片生成短视频。 | |
垂直场景 AIGC | 利用图生图等技术,将指定服装“穿”到模特身上,快速生成电商营销素材。 | |
| 将真人短剧转绘成漫画风格形式,用于内容创意生成与二次投放。 | |
媒体 AI 工具 | 运用智能编码技术,在保持高画质的同时大幅降低视频码率,节省带宽与存储成本。 | |
| 通过超分辨率、细节增强、视频插帧等 AI 算法,提升视频的清晰度、细节与流畅度。 | |
| 提供字幕擦除、多语言字幕翻译、以及 AI 配音(支持音色克隆)的一站式解决方案。 | |
创作 SaaS 平台 | 打通云点播存储,在 SaaS 端上进行文件管理、协同审片及视频剪辑创作。 | |
| 提供阅文漫剧助手,在 SaaS 端上完成漫剧全流程的创作,并提供精品 IP 授权。 | |
产品优势
智能媒资
1. AI 驱动的结构化编目
自动对视频进行智能打标、内容解析、语音识别(ASR)、人脸识别、场景分类,将非结构化视频转为可检索的结构化数据。
支持自然语言跨模态检索(如 “找视频中3分钟处的产品演示片段”),检索准确率高、速度快。
2. 高效的资产复用与运营
提供智能拆条、精彩片段提取、自动生成封面 / 摘要,快速产出二次创作素材。
分级存储与智能降冷,结合 DRM 版权保护,在安全前提下最大化素材复用率。
3. 全链路媒体处理能力
集成智能转码、画质增强、音视频修复、智能字幕生成等工具,一站式完成内容生产与优化。
支持智能审核(涉黄、暴恐、政治敏感),大幅降低人工审核成本与风险。
AIGC
全链路内容生成能力
文生图/文生视频:输入文字描述,自动生成海报、短视频、动画。
AI 剧本/文案:自动生成短视频脚本、直播话术、商品介绍。
智能配音/配乐:多语种、多音色 AI 配音,自动匹配背景音乐。
视频转绘/智能成片:对现有视频进行风格化转换,一键生成成片。
出色的效率与成本优势
传统视频制作以 “天/月” 计,AIGC 可实现分钟级产出。
大幅降低对专业团队(编剧、拍摄、后期)的依赖,成本下降90%+。
灵活的场景化适配
针对短剧、电商、教育等垂直场景优化,提供行业化模板与提示词。
支持多语言本地化(翻译、配音、字幕),助力内容出海。
与云点播无缝集成
生成内容直接存入云点播媒资库,实现创作-存储-分发闭环。


