通过前面步骤的学习,我们已经将所有的原始数据同步到了 EMR 集群的 Hive 表中。
但是,这些数据均为原始数据结构,无法直接提供给业务使用。
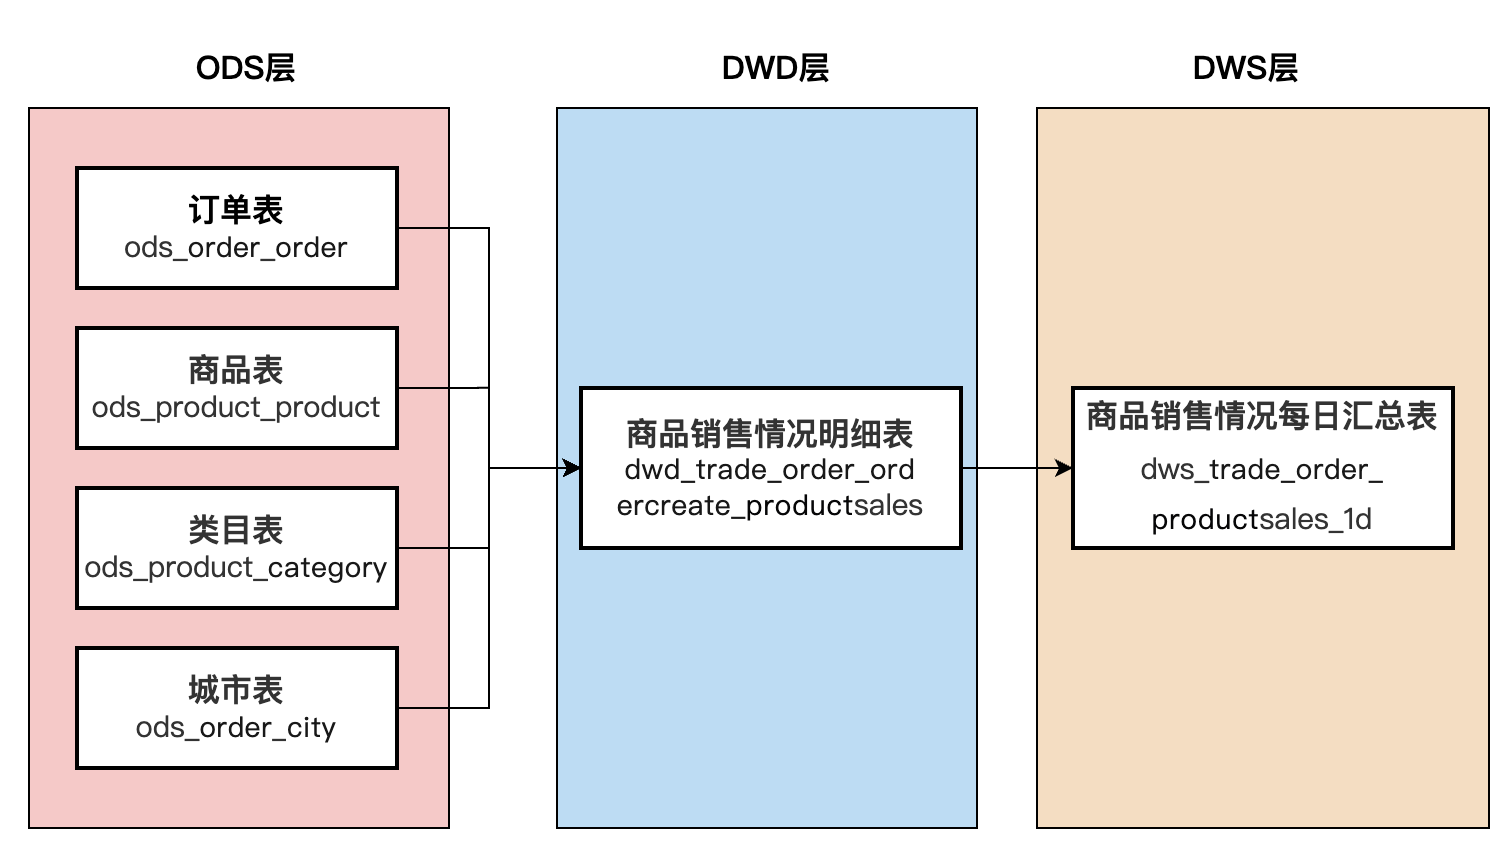
结合数据表结构设计步骤中的内容,我们已经对业务需求进行了分析,并且对数仓层级进行了划分。
下面我们将通过数据开发,完成明细表与汇总表的生成与数据处理。
离线开发任务设计
离线开发任务开发
明细表开发
完成明细表开发主要包括以下4步:
创建商城明细表
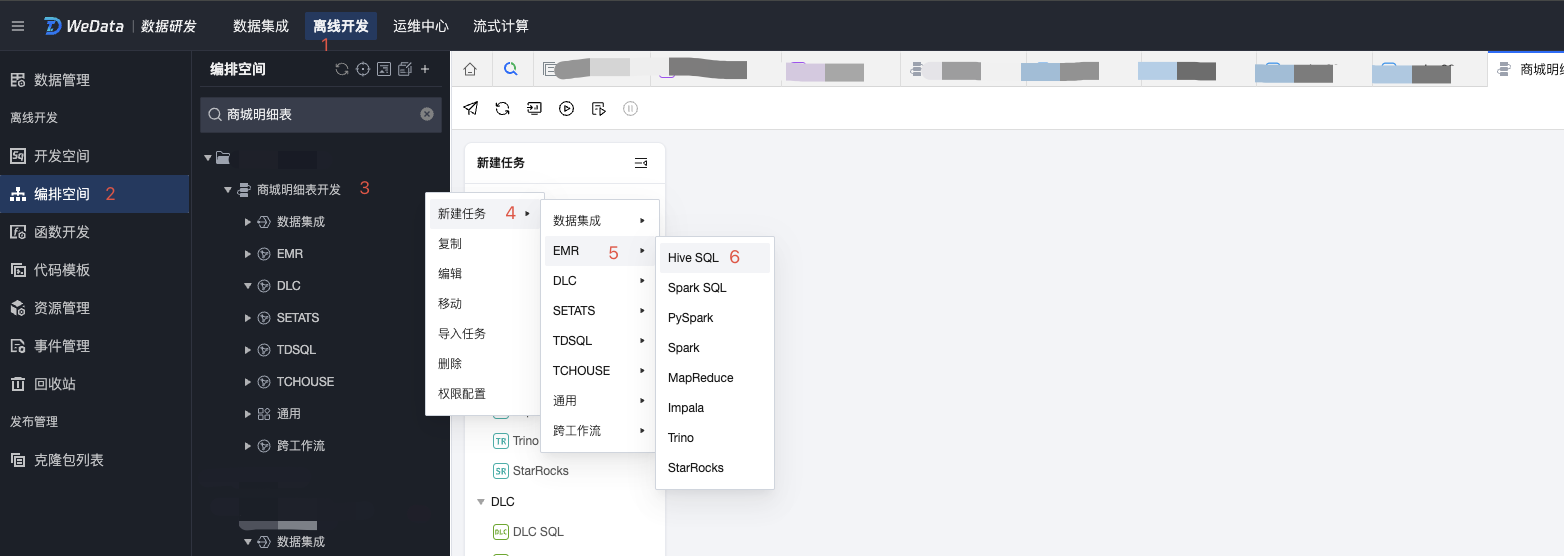
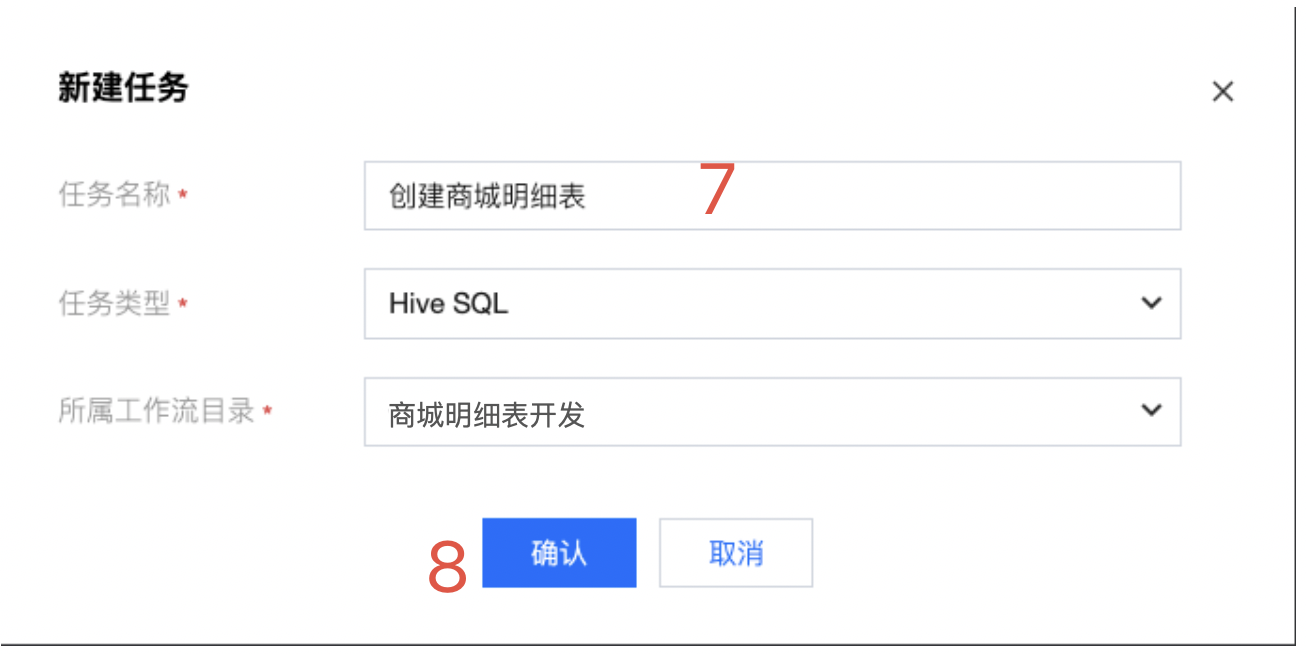
1. 在编排空间模块,选择需要完成明细表开发的文件夹,在文件夹下的商城明细表开发工作流目录下(这里我们以在上一篇文档 数据集成 中创建的工作流为示例),通过新建任务或直接单击EMR下的 Hive SQL 图标,可以新建一个 Hive SQL 任务,任务名称为创建商城明细表,单击确认完成创建。
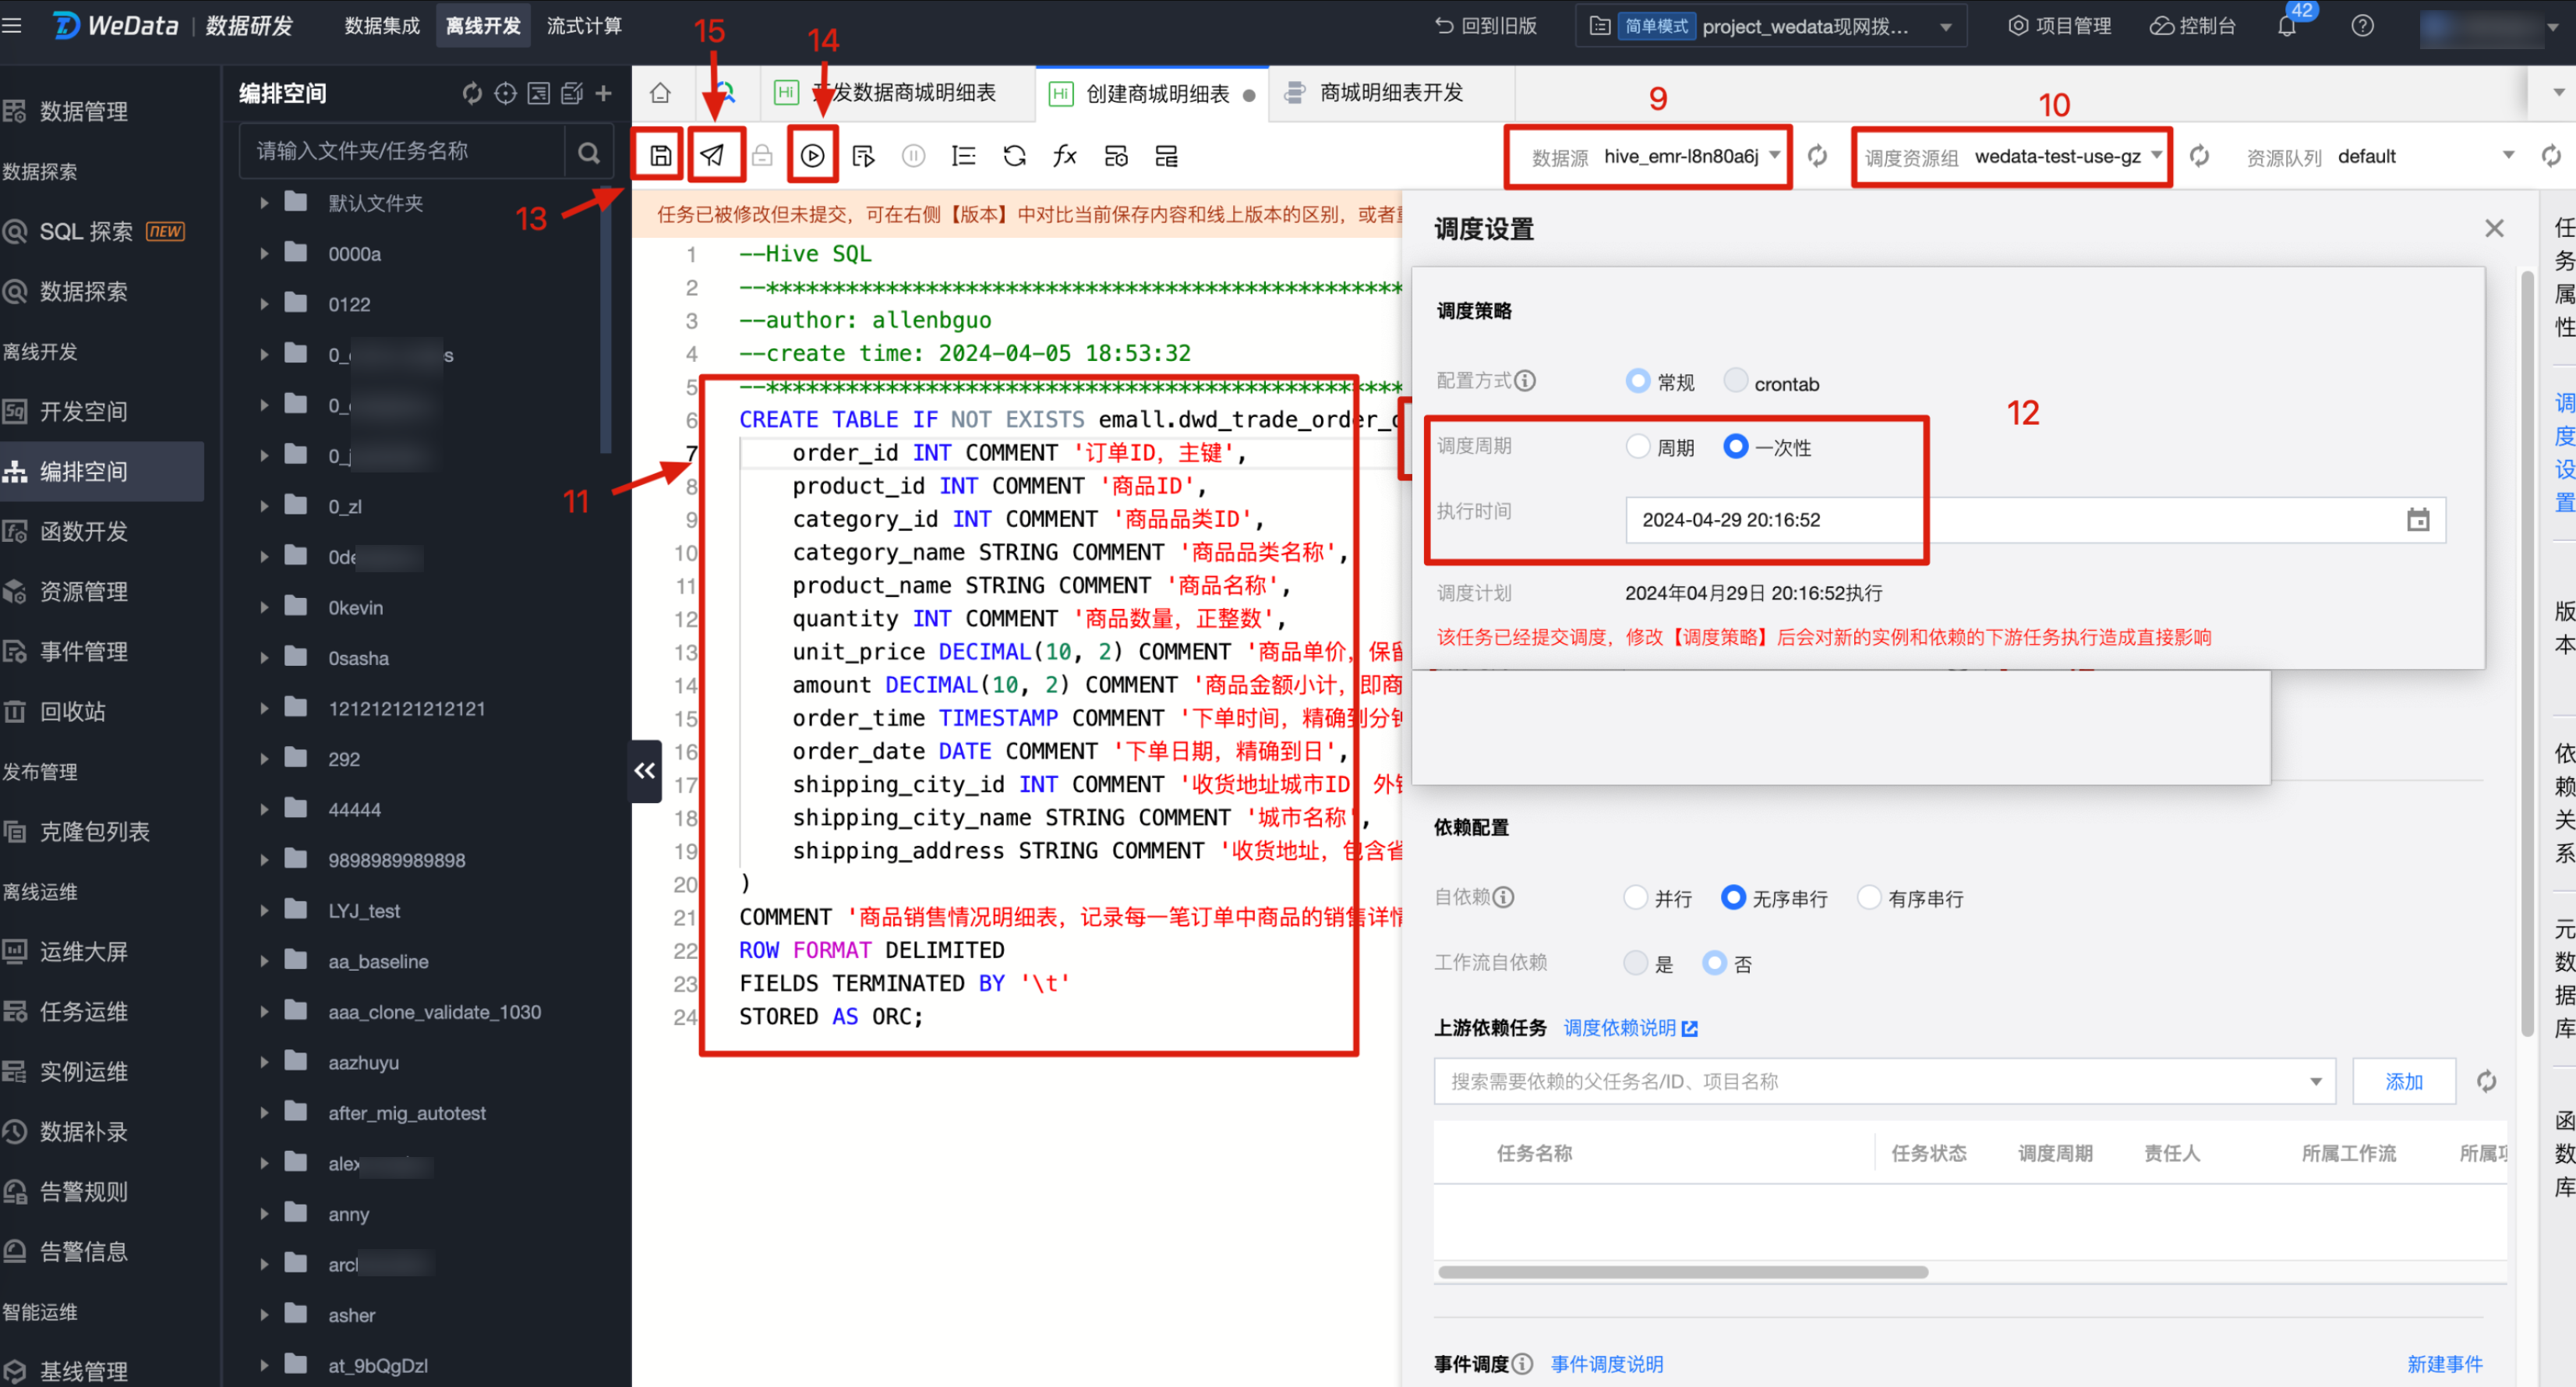
2. 确认完成后,会弹出 Hive SQL 开发脚本页面,按以下步骤顺序完成 Hive SQL 开发任务。
数据源:选择 hive_emr-XXX。
调度资源组:选择我们购买的资源组,建议同网域。
开发脚本:在脚本页面中编写好商城明细表的建表 SQL 语句。
调度设置:在右侧任务栏里,单击调度设置,选择调度周期为一次性,执行时间默认即可。
一次性:该 Hive SQL 根据执行时间只执行一次。
周期:该 Hive SQL 根据执行时间定时执行。
单击保存按钮:保存该 Hive SQL 任务。
单击运行按钮:执行一次该任务,可校验脚本任务正确性。
单击提交按钮:正式提交该任务到调度资源服务器,到达指定时间后即可根据调度周期执行任务。
3. 创建商城明细表 HiveQL 语句:
--创建明细表HiveQL语句 CREATE TABLE IF NOT EXISTS emall.dwd_trade_order_ordercreate_productsales ( order_id INT COMMENT '订单ID,主键', product_id INT COMMENT '商品ID',product_name STRING COMMENT '商品名称', category_id INT COMMENT '商品品类ID', category_name STRING COMMENT '商品品类名称', quantity INT COMMENT '商品数量,正整数', unit_price DECIMAL(10, 2) COMMENT '商品单价,保留两位小数', amount DECIMAL(10, 2) COMMENT '商品金额小计,即商品数量乘以单价', order_time TIMESTAMP COMMENT '下单时间,精确到分钟', shipping_city_id INT COMMENT '收货地址城市ID,外键', shipping_city_name STRING COMMENT '城市名称', shipping_address STRING COMMENT '收货地址,包含省、市、区、详细地址' ) COMMENT '商品销售情况明细表,记录每一笔订单中商品的销售详情' PARTITIONED BY (pt_date STRING) row format delimited fields terminated by '\\t' STORED AS PARQUET;
通过完成7 - 15步骤,您已经完成了在 EMR 集群中的 Hive 数据源中创建了一个 Hive 表。
向明细表中写入数据
下面我们将开始向明细表中写入数据:
请重复操作步骤7 - 15,其中注意点:
注意:
以下步骤均为配图里标明的步骤序号。
在同一个工作流中,新建 HiveQL 节点;
步骤7:命名为:插入数据到明细表;
步骤9、10:这两个步骤比较容易忽略;
步骤11:HiveQL语句如下;
步骤12:
调度周期改为:周期;执行时间设置为:01:00。
说明:此任务需要每天运行1次。
步骤14:无论有多熟悉操作,请记得在提交前后试运行一次,保证任务运行准确。
插入数据到明细表 HiveQL 语句:
--插入数据到明细表HiveQL语句
SET hive.exec.dynamic.partition.mode=nonstrict;
INSERT INTO TABLE emall.dwd_trade_order_ordercreate_productsales PARTITION (pt_date)
SELECT
    o.order_id,
    o.product_id,
    p.product_name,
    p.category_id,
    ca.category_name,
    o.quantity,
    o.unit_price,
    o.amount,
    o.order_time,
    o.shipping_city_id,
    ci.city_name,
    o.shipping_address,
    o.pt_date
FROM
    emall.ods_order_order o
JOIN
    emall.ods_product_product p ON o.product_id = p.product_id
JOIN
    emall.ods_product_category ca ON p.category_id = ca.category_id
JOIN
    emall.ods_order_city ci ON o.shipping_city_id = ci.city_id
WHERE o.pt_date = '${yyyy-MM-dd-1d}';
以上我们完成了明细表的开发任务,每日凌晨待数据从原始表同步到 Hive 集群中后,系统将自动关联四张表,将数据汇总到明细表中。
说明:
此时明细表中冗余了一些字段,仅为了加工汇总表时少一些关联,提高计算效率。
汇总表开发
创建商城汇总表
接下来我们将开始开发汇总表。
重复步骤7 - 15,创建汇总表,其中注意点:
注意:
以下步骤均为配图里标明的步骤序号
在同一个工作流中,新建HiveQL节点;
步骤7:命名为:创建商城汇总表;
步骤9、10:这两个步骤比较容易忽略;
步骤11:建表SQL语句如下;
步骤12:
调度周期改为:一次性
执行时间设置为:默认即可
说明:此任务只需要运行1次
步骤14:无论有多熟悉操作,请记得在提交前后试运行一次,保证任务运行准确。
创建商城汇总表 HiveQL 语句:
--创建汇总表HiveQL语句 CREATE TABLE IF NOT EXISTS emall.dws_trade_order_productsales_1d ( order_date DATE COMMENT '统计日期,主键', city_id INT COMMENT '城市ID',city_name STRING COMMENT '城市名称', category_id INT COMMENT '商品品类ID', category_name STRING COMMENT '商品品类名称', quantity INT COMMENT '商品总销量,正整数', amount DECIMAL(10, 2) COMMENT '商品总销售额,保留两位小数' ) COMMENT '商品销售情况每日汇总表' PARTITIONED BY (pt_date STRING) row format delimited fields terminated by '\\t' STORED AS PARQUET;
向汇总表写入数据
接下来重复步骤7 - 15,向汇总表插入数据,其中注意点:
注意:
以下步骤均为配图里标明的步骤序号
在同一个工作流中,新建HiveQL节点;
步骤7:命名为:插入数据到汇总表;
步骤9、10:这两个步骤比较容易忽略;
步骤11:HiveQL语句如下;
步骤12:
调度周期改为:周期
执行时间设置为:01:00
说明:此任务需要每天运行1次
步骤14:无论有多熟悉操作,请记得在提交前后试运行一次,保证任务运行准确。
插入数据到汇总表 HiveQL 语句:
--插入数据到汇总表HiveQL语句 SET hive.exec.dynamic.partition.mode=nonstrict; INSERT INTO TABLE emall.dws_trade_order_productsales_1d PARTITION (pt_date) SELECT p.pt_date AS order_date, p.shipping_city_id,p.shipping_city_name, p.category_id, p.category_name, SUM(p.quantity) AS quantity, SUM(p.amount) AS amount, p.pt_date FROM emall.dwd_trade_order_ordercreate_productsales p WHERE p.pt_date = '${yyyy-MM-dd-1d}' GROUP BY p.pt_date, p.shipping_city_id,p.shipping_city_name, p.category_id, p.category_name;
以上我们已经完成了明细表和汇总表的离线开发任务,每日凌晨,WeData将自动进行明细表与汇总表的计算任务。
建立依赖并提交
1. 双击商城数据开发工作流,会弹出工作流画布,显示该工作流下所有任务,依次建立工作流之间的依赖关系,完成后单击提交按钮。
依次建立依赖关系:
商城_同步商品类目 → 商城_同步订单数据。
商城_同步城市信息 → 商城_同步订单数据。
商城_同步商品信息 → 商城_同步订单数据。
商城_同步订单数据 → 插入数据到明细表。
创建商城明细表 → 插入数据到明细表。
插入数据到明细表 → 插入数据到汇总表。
创建商城汇总表 → 插入数据到汇总表。
最后提交工作流,任务将按照设置的依赖关系有序运转。

离线开发任务运维
您可在运维中心>任务运维中,查看工作流或离线任务的运行状态。


