The content of this page has been automatically translated by AI. If you encounter any problems while reading, you can view the corresponding content in Chinese.
Users can use the DLC console or API to execute DDL statements to create databases.
Creating Data Table
Method 1: Creating a Data Table in Data Exploration
1. Log in to the DLC console and select the region where the service is located. The logged-in user must have the permission to create data tables.
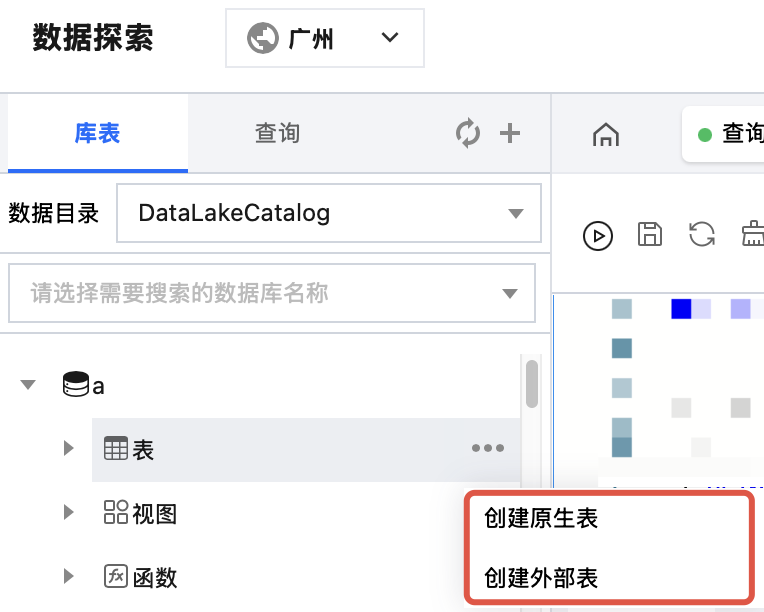
2. Go to the Data Exploration module. In the list on the left, click an existing database, hover over a table row, then click the
icon. Click Create Native Table or Create External Table.
Note:
A native table refers to a table on DLC managed storage. You do not need to focus on the underlying Iceberg storage format for native tables, and they have capabilities such as data optimization. To use native tables, you must first enable managed storage. For details, see Managed Storage Configuration.
The underlying data of an external table resides in your own COS. To create an external table, you must specify the data path.
3. After you click Create Native Table/Create External Table, the system automatically generates an SQL template for creating a data table. You can modify the SQL template to create the data table. After you click the Run button, the SQL statement for creating the data table is executed to complete the creation.
Method 2: Creating a Data Table in Data Management
The Data Management module supports managing native tables and external tables that are stored on DLC managed storage.
1. Log in to the DLC console and select the region where the service is located. The logged-in user must have the permission to create data tables.
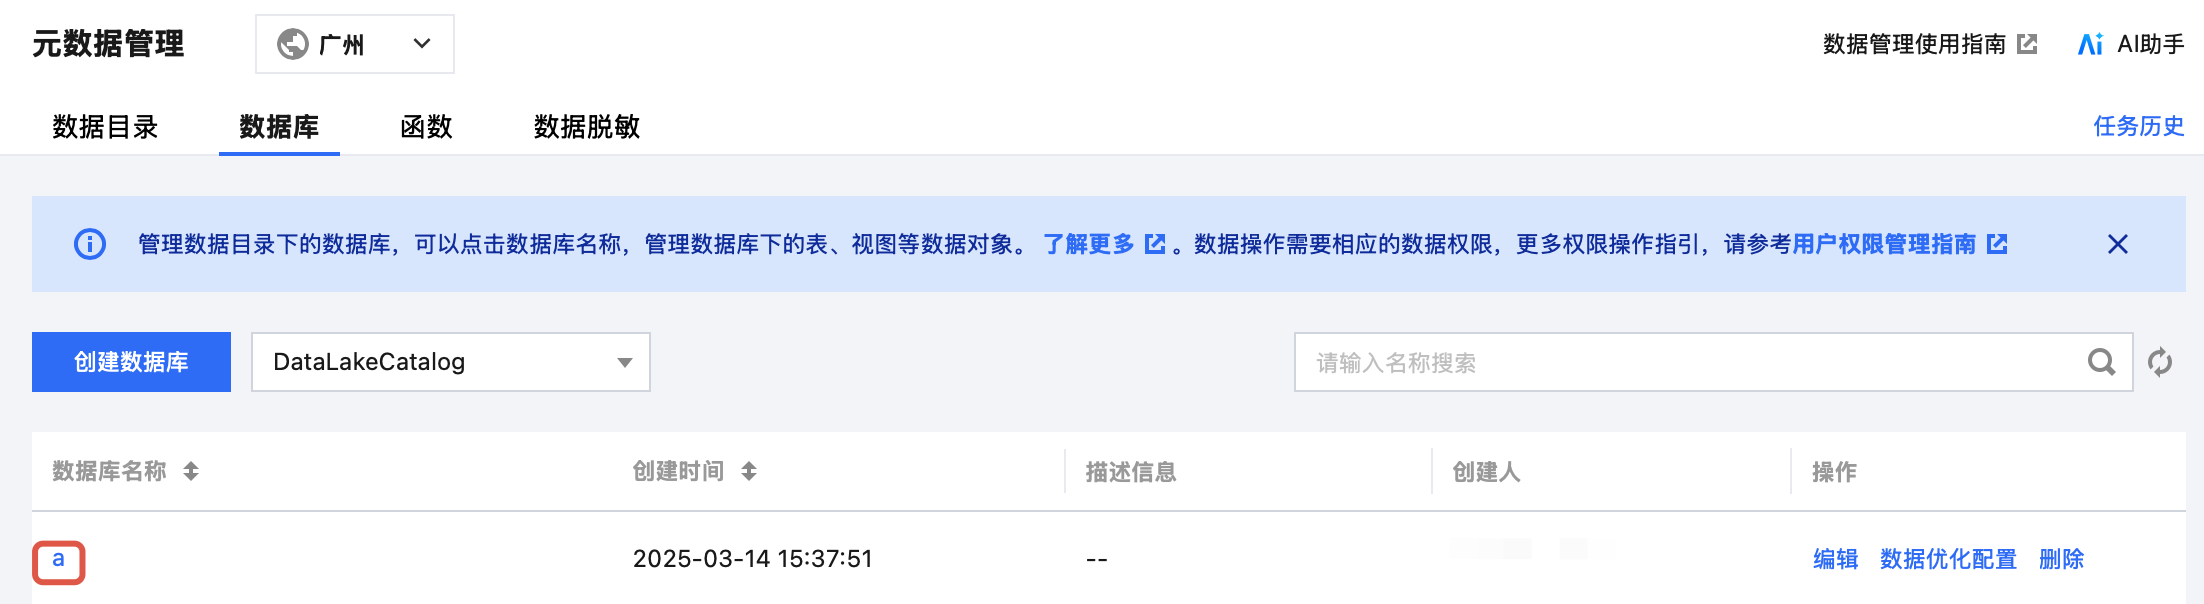
2. Go to Metadata Management via the left sidebar, enter Database, click the name of the database where the data table resides, and go to the DMC page.
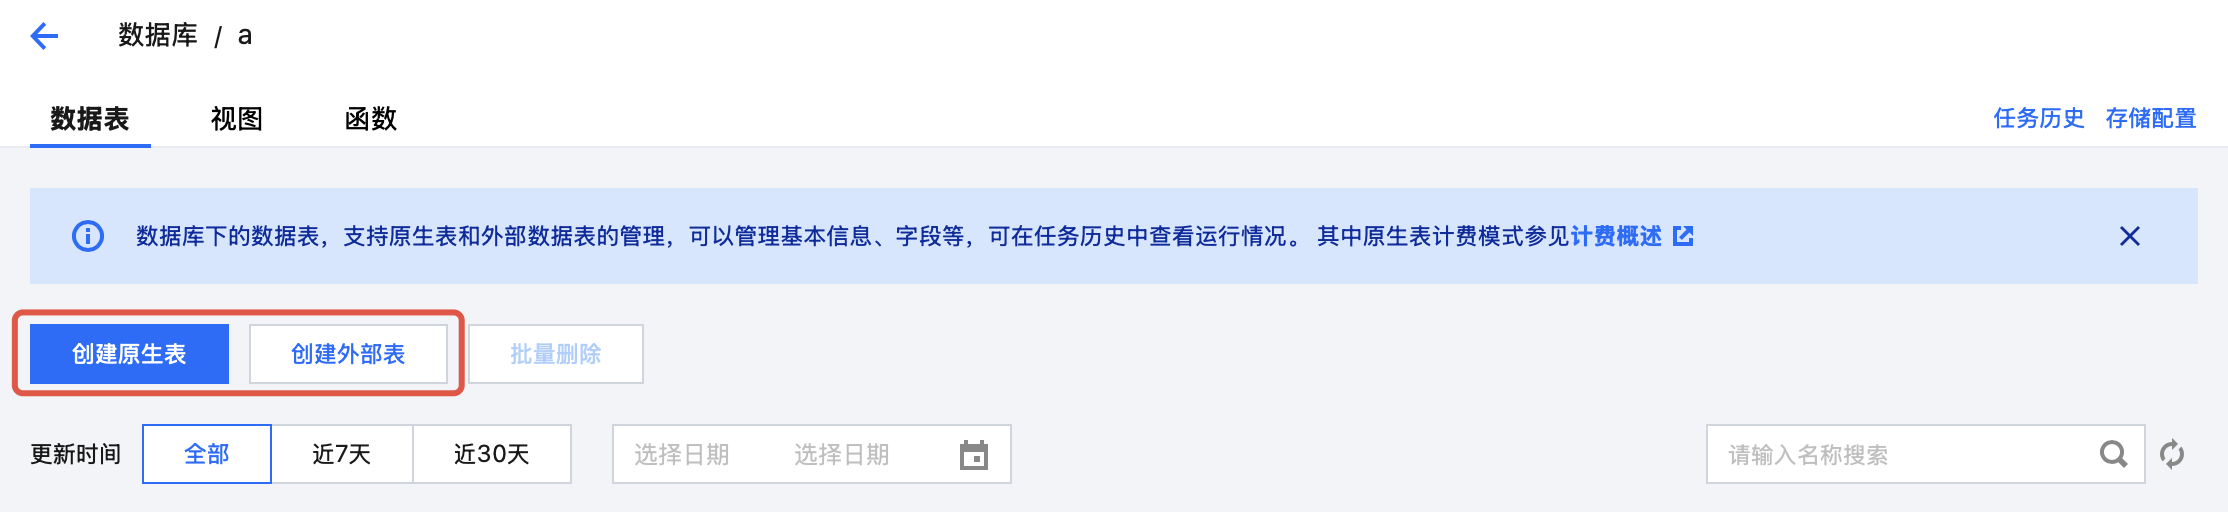
3. Click the Create Native Table or Create External Table button to go to the Data Table Configuration page.
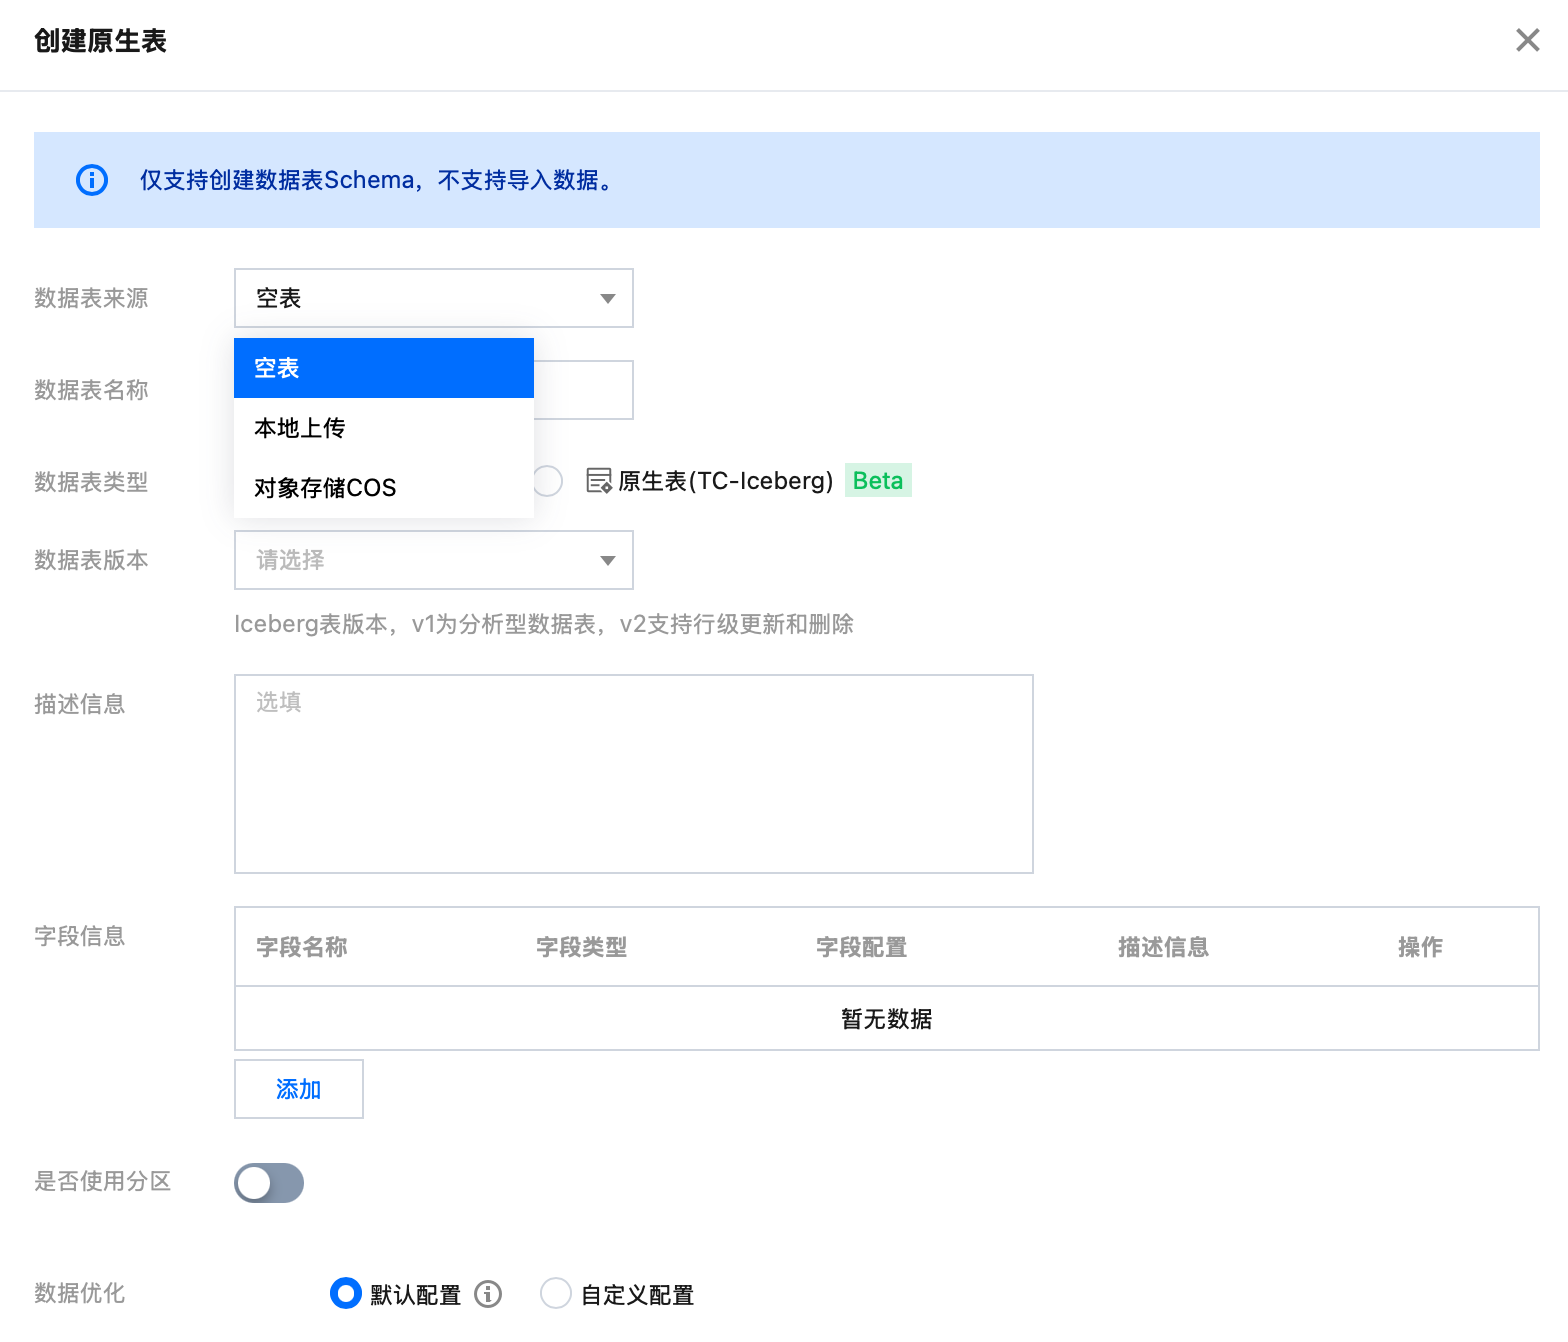
4. Native tables support three different data source types: empty tables, local uploads, and COS. Selecting a different data source corresponds to a different creation process. Native tables provide capabilities such as data optimization. You can choose to inherit library governance rules or enable/disable them individually.
4.1 Create an empty table: Create an empty table that contains no records.
Data table name: It cannot start with a digit, can contain uppercase and lowercase letters, digits, and underscores, and can contain a maximum of 128 characters.
Supports entering description information for the data table.
You can manually add and enter column names and field types. It supports the configuration of three complex field types: array/map/struct.
4.2 Local upload: Upload a local form file to DLC to create a data table. It supports files smaller than 100 MB.
CSV: It supports visually configuring CSV parsing rules, including compression format, column delimiter, and field delimiter. It also supports automatically inferring the Schema of data files and parsing the first row as column names.
Json: DLC identifies only the first level of Json as columns. It supports automatically inferring the Schema of Json files, and the system identifies the first-level Json fields as column names.
It supports data files in common big data formats such as Parquet, ORC, and AVRO.
You can manually add and enter column names and field types.
If you select automatic structure inference, DLC automatically populates the identified columns, column names, and field types. If they are incorrect, modify them manually.
4.3 Create a data table through COS.
Create a data table by reading the COS data bucket under the current account.
CSV: It supports visually configuring CSV parsing rules, including compression format, column delimiter, and field delimiter. It also supports automatically inferring the Schema of data files and parsing the first row as column names.
Json: DLC identifies only the first level of Json as columns. It supports automatically inferring the Schema of Json files, and the system identifies the first-level Json fields as column names.
It supports data files in common big data formats such as Parquet, ORC, and AVRO.
You can manually add and enter column names and field types.
If you select automatic structure inference, DLC automatically populates the identified columns, column names, and field types. If they are incorrect, modify them manually.
5. Data partitioning is typically performed on tables with large data volumes to improve query performance. DLC supports querying data based on partitions, and users need to add partition information at this step. By partitioning your data, you can limit the amount of data scanned per query, thereby improving query performance and reducing usage costs. DLC adheres to Apache Hive's partitioning rules.
A partition column corresponds to a subdirectory under the COS path of the table. The naming rule for the directory is partition_column_name=partition_column_value.
Example:
Note:
The example code is for reference only and should be modified based on the actual business scenario. For example, replace "bucket_name" with your bucket name.
ROW FORMAT SERDE 'org.apache.hadoop.hive.serde2.OpenCSVSerde'
WITH SERDEPROPERTIES ('separatorChar'=',','quoteChar'='"')
STORED AS TEXTFILE
LOCATION 'cosn://bucket_name/folder_name/';
Querying Basic Information of a Data Table
Method 1: Querying in Data Exploration
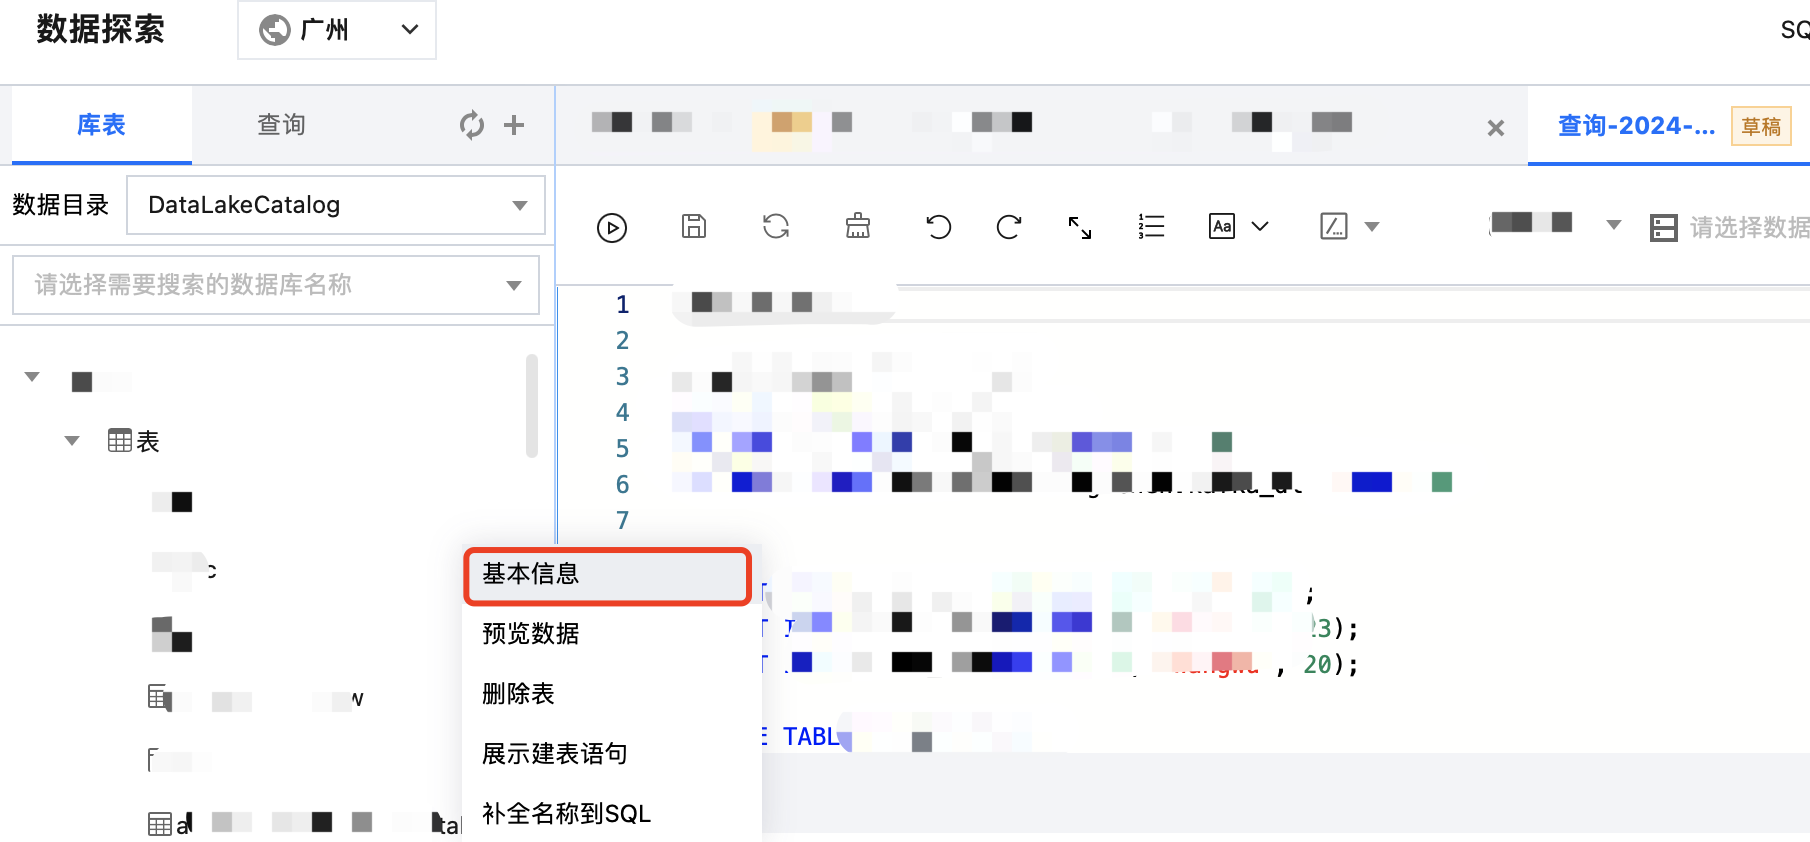
In the Data Table project, hover the pointer over the Data Table Name row, click the
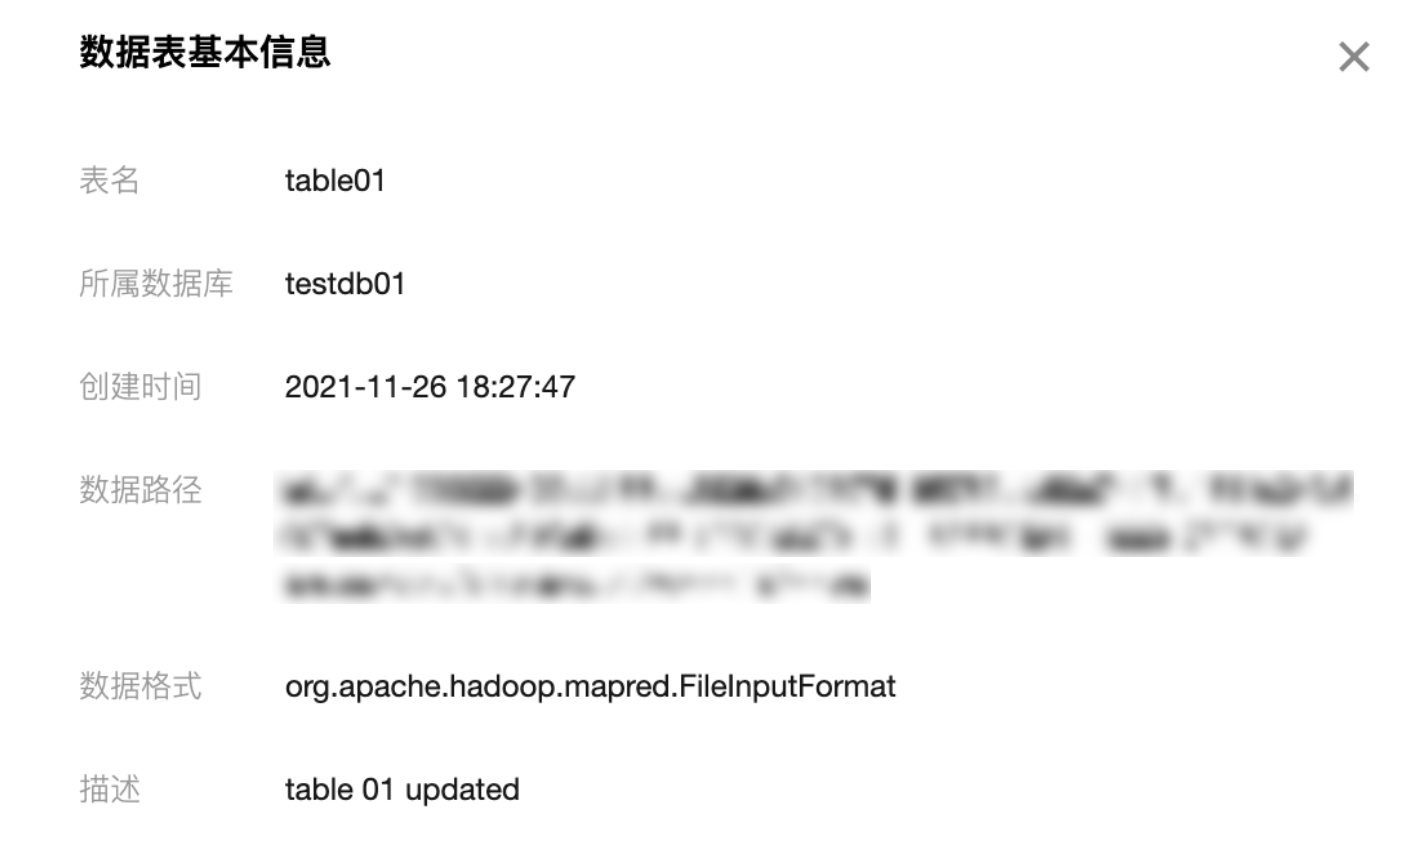
icon, select Basic Info from the drop-down menu, and you can view the basic information of the created data table.
The basic information of the data table is as follows:
Method 2: Viewing in Data Management
1. Log in to the DLC console, select the region where the service is located. The logged-in user must have the permission to view data tables.
2. Go to the Metadata Management module via the left-side menu. On the Database page, click the database name where the data table resides to enter the Database Management page. This page supports querying information such as the number of rows, storage space, creator, fields, and partitions of the data table.
Self-Service Querying for Data Table Partition Information
Note:
Replace the database name and table name in the example below according to your actual business scenario.
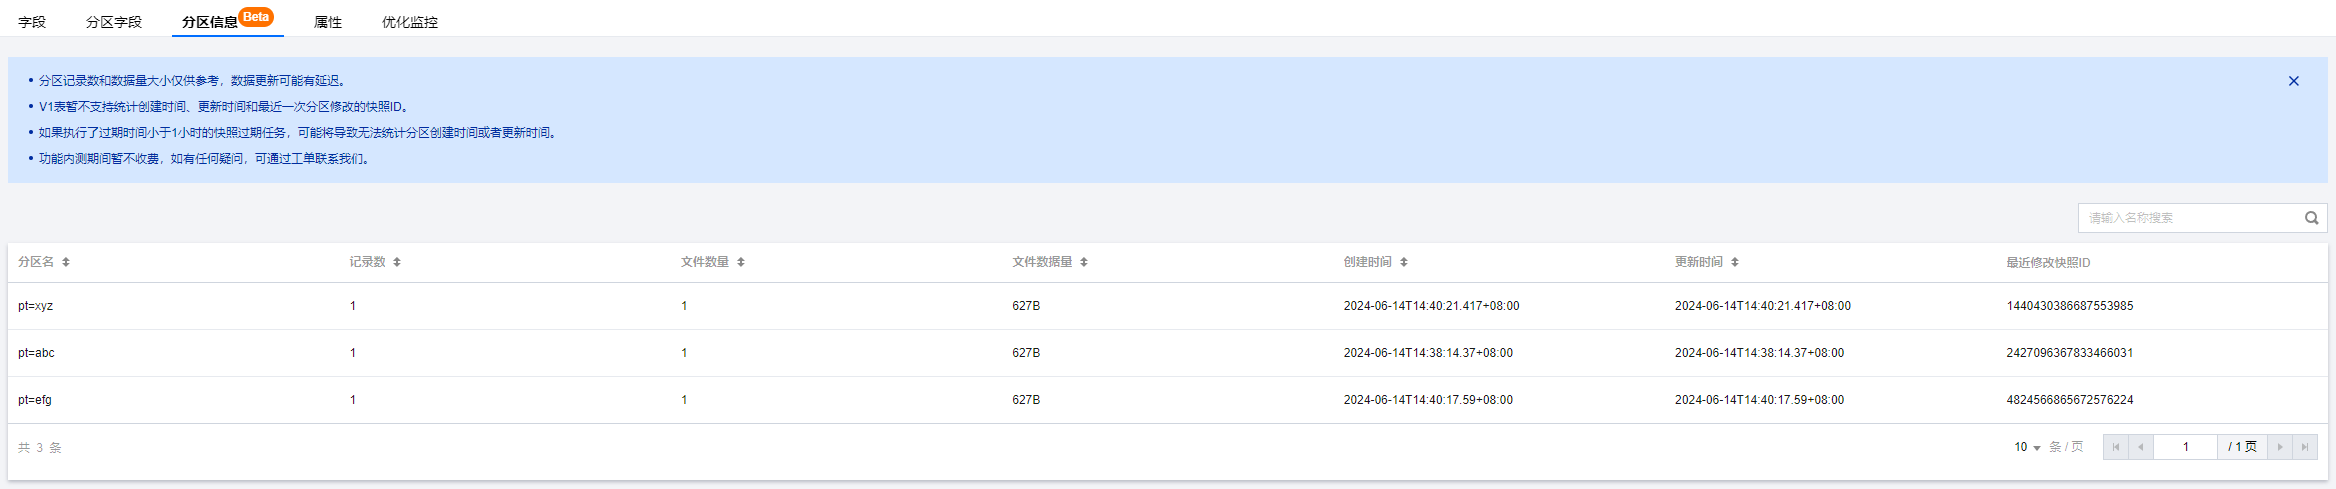
Data table management supports querying partition information related to data tables. With the partition information, users can view details, including record quantity, file quantity, data storage capacity, and update time for each partition of the table.
1. Log in to the DLC console and select the region where the service is located. The logged-in user must have the permission to view data tables.
2. Go to Metadata Management via the left sidebar, enter the Database, and click the name of the database where the data table resides to access the Database Management page.
3. Select Database to go to the Data Table management page. Select and click the Data Table, and then select Partition Information to go to the Partition Information page.
The data partition page displays partition information of the table in paginated form. You can query partition details through sorting partitions by fields, including names, record quantity, file data size, and file storage. For example, to view a certain fixed partition, enter the partition name to search.
Note:
1. Partition information statistics are currently only available for DLC native tables.
2. Partition information statistics are currently in the Beta testing phase. To enable the partition information statistics, you may contact us.
Note:
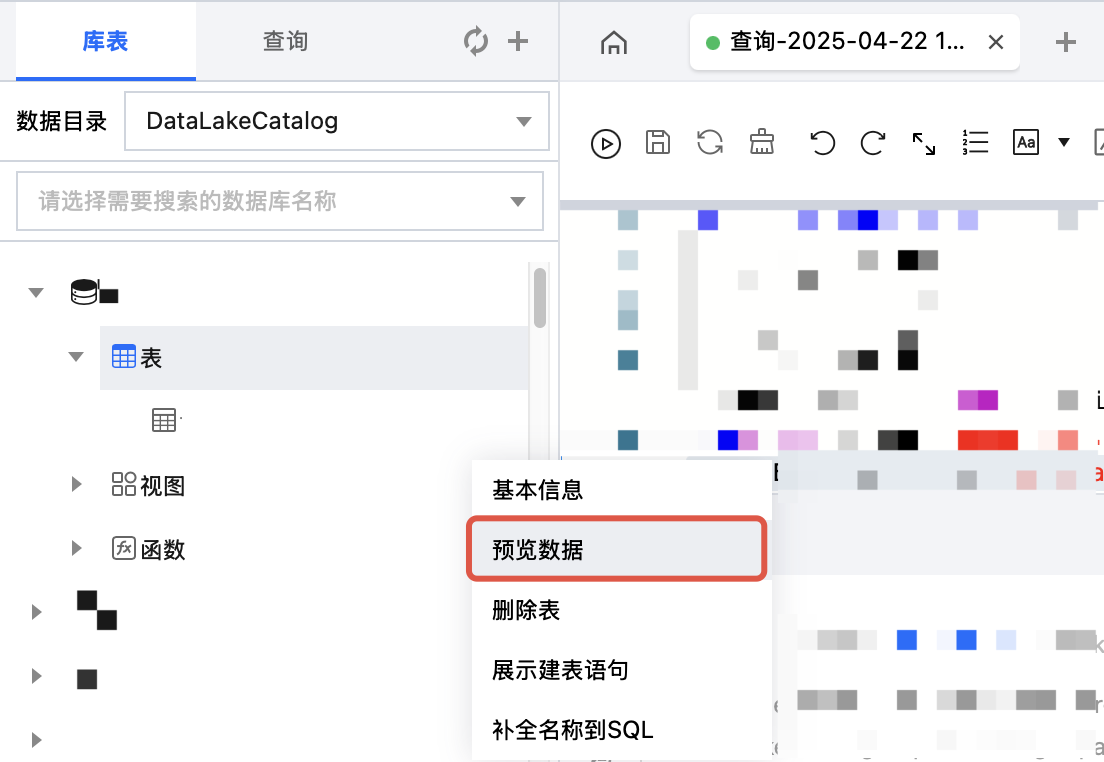
In the data table project, hover the pointer over the data table name row, click the
icon, and then click Preview Data in the drop-down menu. DLC automatically generates an SQL statement to preview 10 data records and executes it to query the first 10 rows of the data table.
The data preview feature displays the first 100 data records by default.
Note:
You can edit the description information of a data table in the Data Management module.
1. Log in to the DLC console and select the region where the service is located. The logged-in user must have the permission to edit data tables.
2. Go to the Metadata Management > Database page via the left sidebar, click the name of the database where the data table resides, and go to the DMC page.
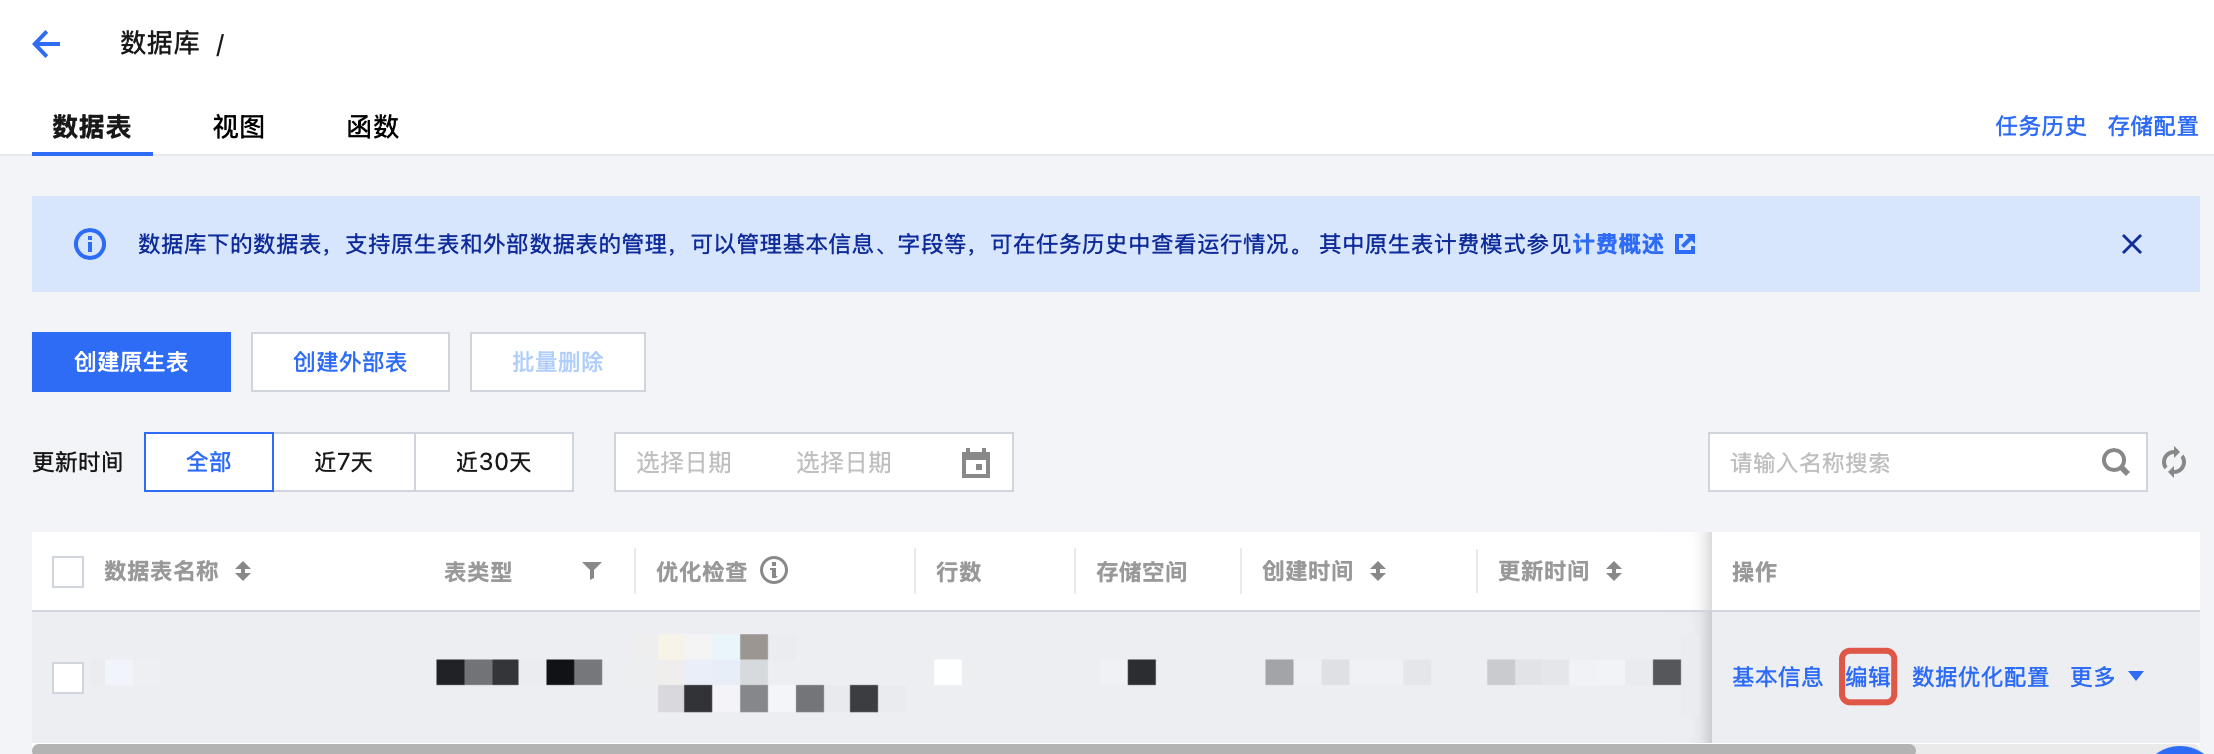
3. Locate the data to be edited, and click the Edit button on the right to edit it.
4. After making modifications, click the OK button to complete the editing.
Delete Data Table
Method 1: Deleting in Data Exploration
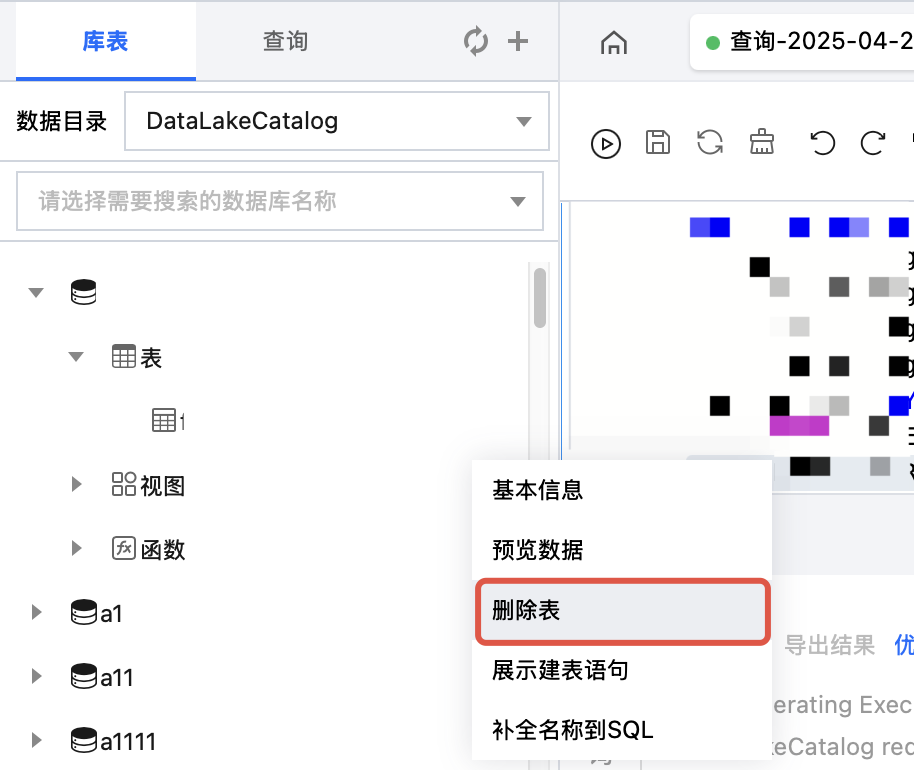
In the data table project, hover the pointer over the data table name row, click the
icon, and then click Delete Table in the drop-down menu. DLC automatically generates an SQL statement to delete the data table and executes it to delete the table.
Deleting an external table or a data table only removes the metadata information stored in DLC and does not affect the data source files.
Deleting a data table under the DataLakeCatalog directory will clear all data of that table. Please proceed with caution.
Method 2: Deleting in Data Management
Currently, Data Management only supports managing database tables that are hosted and stored in DLC. For external tables, please use Method 1 to delete them.
1. Log in to the DLC console and select the region where the service is located. The logged-in user must have the permission to delete data tables.
2. Go to Metadata Management > Database via the left sidebar, click the database name where the data table resides, and go to the DMC page.
3. Click the Delete button to the right of the data table you want to delete. After a secondary confirmation, the corresponding data table can be deleted, and its data will be cleared simultaneously.
Displaying the CREATE TABLE Statement
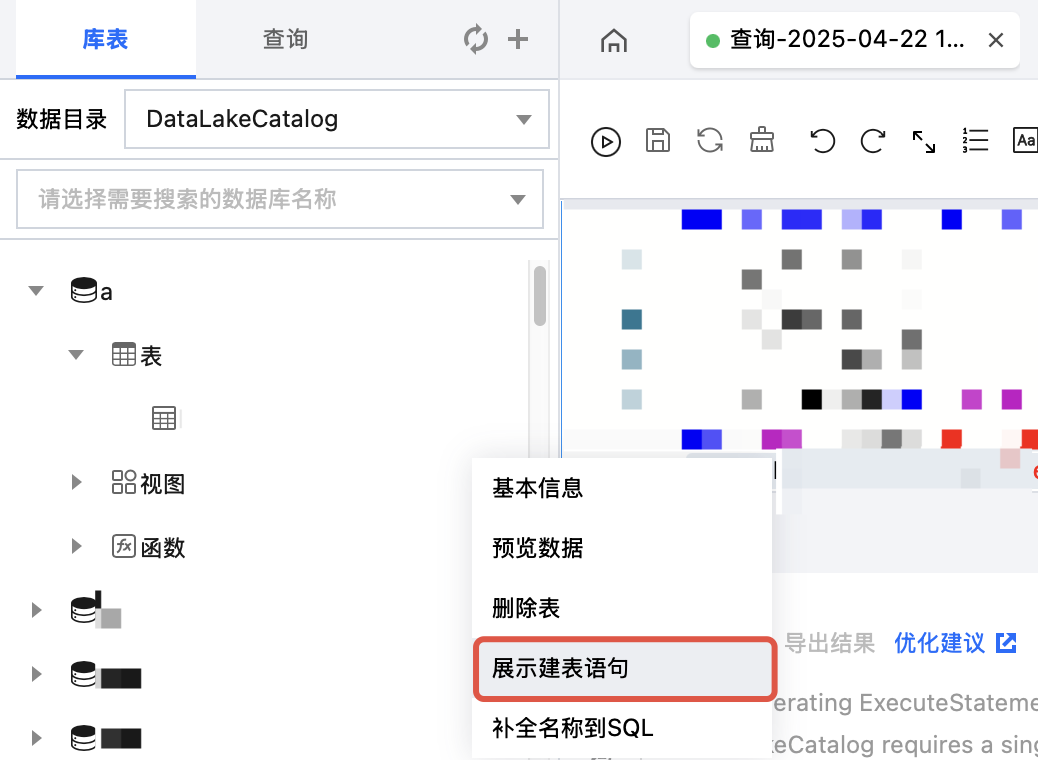
In the data table project, hover the pointer over the data table name row, click the
icon, and then click Show CREATE TABLE Statement in the drop-down menu. DLC automatically generates an SQL statement to view the CREATE TABLE statement for that data table and executes it to query the statement.
System Constraints
DLC allows a maximum of 4,096 data tables per database. Each data table supports up to 100,000 partitions, and each data table can have a maximum of 4,096 attribute columns.
DLC identifies data files under the same COS path as belonging to the same table. Please ensure that data for individual tables is kept in separate folder hierarchies.
DLC does not support COS multi-version data and can only query the latest version of data in a COS bucket.
All tables created on DLC are external tables. The SQL statement for creating a table must include the EXTERNAL keyword.
Table names must be unique within the same database.
A table name is case-insensitive, can only contain English letters, numbers, and underscores (_), and has a maximum length of 128 characters.
If a table is a partitioned table, you must manually execute an ADD PARTITION or MSCK statement to add partition information before you can query the data in that partition. For details, see Querying Partitioned Tables.
When you create a table using a CSV file, DLC converts all field types to string by default. This does not affect the calculation and querying of the original data fields.