操作场景
本文以调用 C++ SDK 为例介绍通过开源 SDK 实现消息收发的操作过程,帮助您更好地理解消息收发的完整过程。
前提条件
已参考 SDK 概述,获取相关的客户端连接参数
安装支持 C++11 的编译套件
如果使用 cmake 编译,需要提前安装 grpc,推荐安装 1.46.3 版本,较高版本与 SDK 存在不兼容。
下载 Demo
操作步骤
步骤1:安装 C++ SDK
安装 SDK。
注意:
步骤2:生产消息
#include <algorithm>#include <atomic>#include <iostream>#include <memory>#include <random>#include <string>#include <system_error>#include "rocketmq/CredentialsProvider.h"#include "rocketmq/Logger.h"#include "rocketmq/Message.h"#include "rocketmq/Producer.h"using namespace ROCKETMQ_NAMESPACE;const std::string &alphaNumeric() {static std::string alpha_numeric("0123456789abcdefghijklmnopqrstuvwxyzABCDEFGHIJKLMNOPQRSTUVWXYZ");return alpha_numeric;}std::string randomString(std::string::size_type len) {std::string result;result.reserve(len);std::random_device rd;std::mt19937 generator(rd());std::string source(alphaNumeric());std::string::size_type generated = 0;while (generated < len) {std::shuffle(source.begin(), source.end(), generator);std::string::size_type delta = std::min({len - generated, source.length()});result.append(source.substr(0, delta));generated += delta;}return result;}static const std::string topic = "xxx";// 填写腾讯云提供的接入地址static const std::string access_point = "rmq-xxx.rocketmq.xxxtencenttdmq.com:8081";// 添加配置的ak和skstatic const std::string access_key = "xxx";static const std::string access_secret = "xxx";static const uint32_t total = 32;static const int32_t message_body_size = 128;int main(int argc, char *argv[]) {CredentialsProviderPtr credentials_provider;if (!access_key.empty() && !access_secret.empty()) {credentials_provider = std::make_shared<StaticCredentialsProvider>(access_key, access_secret);}// In most case, you don't need to create too many producers, singletion pattern is recommended.auto producer = Producer::newBuilder().withConfiguration(Configuration::newBuilder().withEndpoints(access_point).withCredentialsProvider(credentials_provider).withSsl(false).build()).withTopics({topic}).build();std::atomic_bool stopped;std::atomic_long count(0);auto stats_lambda = [&] {while (!stopped.load(std::memory_order_relaxed)) {long cnt = count.load(std::memory_order_relaxed);while (count.compare_exchange_weak(cnt, 0)) {break;}std::this_thread::sleep_for(std::chrono::seconds(1));std::cout << "QPS: " << cnt << std::endl;}};std::thread stats_thread(stats_lambda);std::string body = randomString(message_body_size);try {for (std::size_t i = 0; i < total; ++i) {auto message = Message::newBuilder().withTopic(topic).withTag("TagA").withKeys({"Key-" + std::to_string(i)}).withBody(body).build();std::error_code ec;SendReceipt send_receipt = producer.send(std::move(message), ec);if (ec) {std::cerr << "Failed to publish message to " << topic << ". Cause: " << ec.message() << std::endl;} else {std::cout << "Publish message to " << topic << " OK. Message-ID: " << send_receipt.message_id<< std::endl;count++;}}} catch (...) {std::cerr << "Ah...No!!!" << std::endl;}stopped.store(true, std::memory_order_relaxed);if (stats_thread.joinable()) {stats_thread.join();}return EXIT_SUCCESS;}
参数 | 说明 |
access_key | 角色密钥,在控制台的集群权限页面 AccessKey 列复制。  |
access_secret | 角色名称,在控制台的集群权限页面 SecretKey 列复制。 |
access_point | 集群接入地址,在控制台集群基本信息页面的接入信息模块获取。 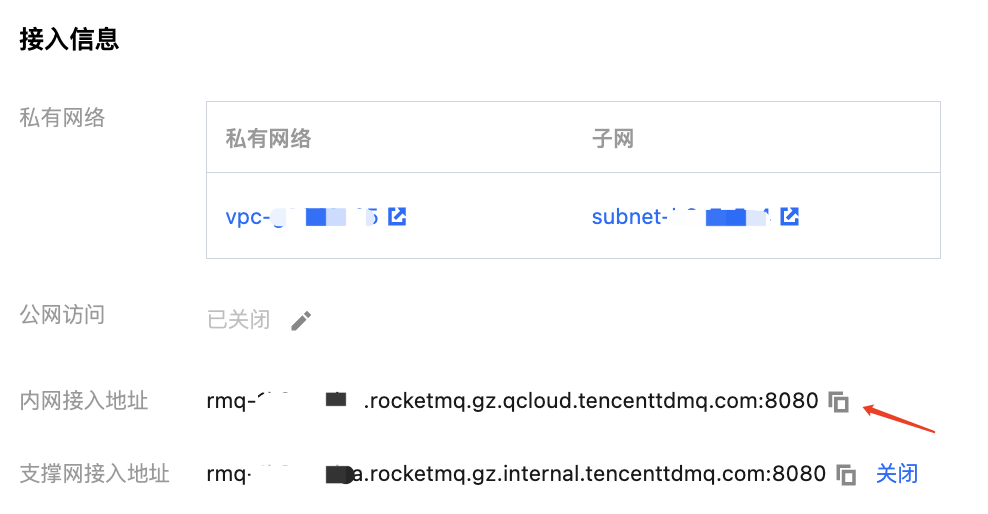 |
topic | Topic 的名称,在控制台 Topic 管理页面复制。  |
步骤3:消费消息
腾讯云消息队列 TDMQ RocketMQ 版 5.x 系列支持两种类型的客户端,分别为 Push Consumer 和 Simple Consumer。
以下代码示例以 Push Consumer 为例:
#include <chrono>#include <iostream>#include <mutex>#include <thread>#include "rocketmq/Logger.h"#include "rocketmq/PushConsumer.h"using namespace ROCKETMQ_NAMESPACE;static const std::string topic = "xxx";// 填写腾讯云提供的接入地址static const std::string access_point = "rmq-xxx.rocketmq.xxxtencenttdmq.com:8081";// 添加配置的ak和skstatic const std::string access_key = "xxx";static const std::string access_secret = "xxx";static const std::string group = "group-xxx";int main(int argc, char *argv[]) {auto &logger = getLogger();logger.setConsoleLevel(Level::Info);logger.setLevel(Level::Info);logger.init();std::string tag = "*";auto listener = [](const Message &message) {std::cout << "Received a message[topic=" << message.topic() << ", MsgId=" << message.id() << "]" << std::endl;return ConsumeResult::SUCCESS;};CredentialsProviderPtr credentials_provider;if (!access_key.empty() && !access_secret.empty()) {credentials_provider = std::make_shared<StaticCredentialsProvider>(access_key, access_secret);}// In most case, you don't need to create too many consumers, singletion pattern is recommended.auto push_consumer = PushConsumer::newBuilder().withGroup(group).withConfiguration(Configuration::newBuilder().withEndpoints(access_point).withRequestTimeout(std::chrono::seconds(3)).withCredentialsProvider(credentials_provider).withSsl(false).build()).withConsumeThreads(4).withListener(listener).subscribe(topic, tag).build();std::this_thread::sleep_for(std::chrono::minutes(30));return EXIT_SUCCESS;}
参数 | 说明 |
access_key | 角色密钥,在控制台的集群权限页面 AccessKey 列复制。 |
access_secret | 角色名称,在控制台的集群权限页面 SecretKey 列复制。 |
access_point | 集群接入地址,在控制台集群基本信息页面的接入信息模块获取。 |
group | 消费者组名称,在控制台 Group 管理页面复制。  |
topic | Topic 的名称,在控制台 Topic 管理页面复制。 |
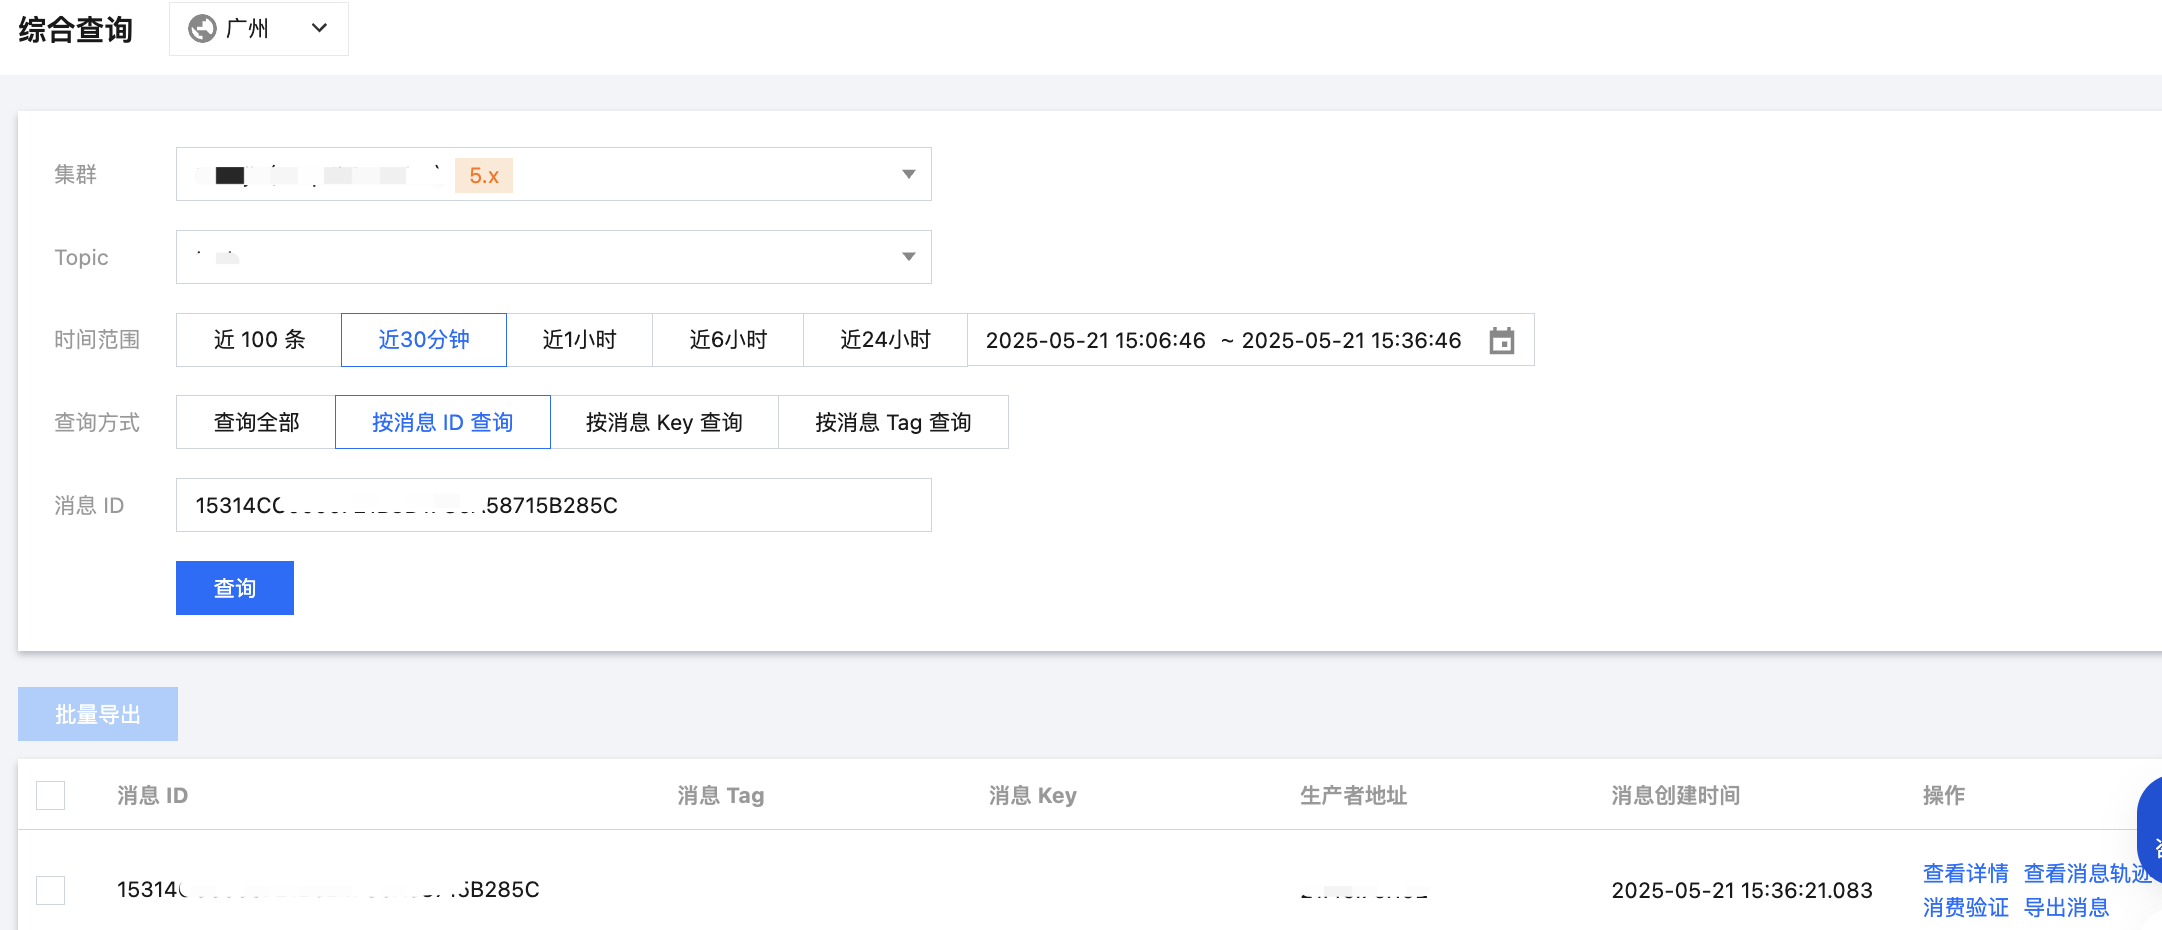
步骤4:查看消息详情
发送完成消息后会得到一个消息 ID (messageID),您可以在控制台的消息查询 > 综合查询页面查询刚刚发送的消息,以及该消息的详情和轨迹等信息。