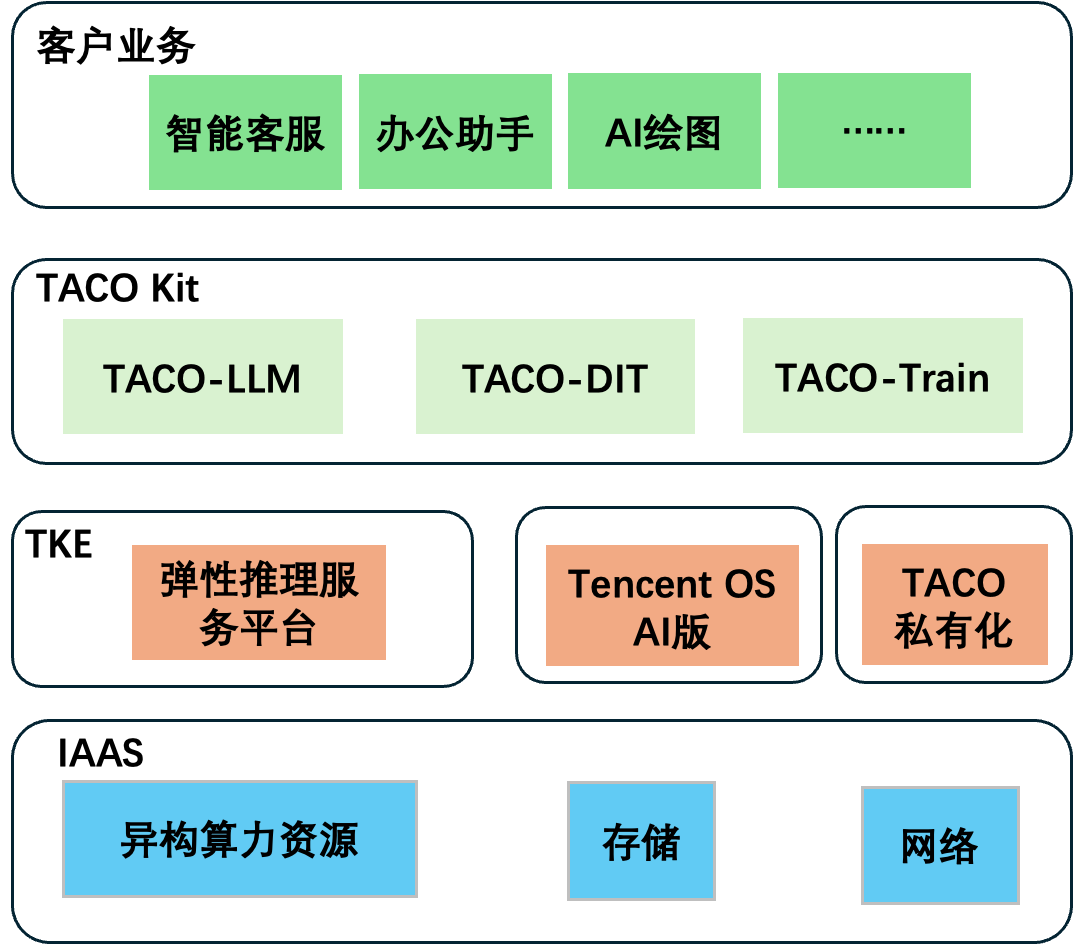
文档中心>计算加速套件 TACO Kit>实践教程>AIGC 场景>TACO Infer 优化 Stable Diffusion 系列模型

TACO Infer 优化 Stable Diffusion 系列模型

最近更新时间:2024-06-05 10:25:31

我的收藏

操作场景

本文将演示如何使用 GPU 云服务器优化 AI 绘画模型,模型范围包括以 Stable Diffusion 1.5为基础的系列模型,您可以使用 Lora 结合模型使用,支持ControlNet。TACO Infer 的加速能力优化后,端到端时延可减少约30%~50%。

操作步骤

购买 GPU 云服务器

购买实例,其中实例、存储及镜像请参见以下信息选择,其余配置请参见 通过购买页创建实例 按需选择。
实例:选择 计算型 PNV4
系统盘:配置容量不小于500GB的云硬盘。
镜像:建议选择公共镜像
操作系统使用 CentOS 7.9。
选择公共镜像后请勾选后台自动安装 GPU 驱动,实例将在系统启动后预装对应版本驱动。如下图所示:

注意:
当前优化版本仅支持 A10、A100、V100 GPU 机型,请检查您的实例配置。
优化过程会有中间状态文件产生,建议您系统盘容量不小于500GB。

安装 docker 和 NVIDIA docker

2. 执行以下命令,安装 docker。
curl -s -L http://mirrors.tencent.com/install/GPU/taco/get-docker.sh | sudo bash
若您无法通过该命令安装,请尝试多次执行命令,或参见 Docker 官方文档 Install Docker Engine 进行安装。
3. 执行以下命令,安装 nvidia-docker2。
curl -s -L http://mirrors.tencent.com/install/GPU/taco/get-nvidia-docker2.sh | sudo bash
若您无法通过该命令安装,请尝试多次执行命令,或参见 NVIDIA 官方文档 Installation Guide & mdash 进行安装。

下载并启动 docker 镜像

docker pull xxxxxxxx
docker run -it --rm --gpus=all --network=host xxxxxxxx
演示需要的所有数据和运行环境全部打包在 docker 镜像中,支持优化的镜像获取请 联系我们,审核通过后会联系您。
说明:
docker 镜像近作为优化模型步骤演示,部署在生产环境中需要您自制镜像,TACO Infer 提供软件安装包。

环境准备

1. 进入/root/sd_webui_demo/stable-diffusion-webui 目录中,执行:
bash webui.sh
脚本会自动构建 python virtualenv 环境,安装 stable-diffusion-webui 所有相关依赖,完成后您可以退出进程。
2. 进入 /root/sd_webui_demo 目录中,执行以下令安装 TACO Infer,下载模型权重:
source env.sh
说明:
env.sh 文件中提供示例模型下载,如果您需要下载自己模型,需要修改脚本中下载路径。
如果您重新进入容器,可以执行 source /root/sd_webui_demo/stable-diffusion-webui/venv/bin/activate 激活虚拟环境。

(可选)合并LoRA到模型中

1. 进入 /root/sd_webui_demo/stable-diffusion-v1-5 目录中,使用 git clone https://github.com/kohya-ss/sd-scripts 命令,下载合并 LoRA 与基础模型的脚本库。
2. 进入 /root/sd_webui_demo/stable-diffusion-v1-5/sd-scripts 目录,配置环境变量:
export PYTHONPATH=/root/sd_webui_demo/stable-diffusion-v1-5/sd-scripts
3. 参见以下命令合并 LoRA 与基础模型:
python networks/merge_lora.py --sd_model ../v1-5-pruned-emaonly.safetensors --save_to ../lora-v1-5-pruned-emaonly.safetensors --models <LoRA文件目录> --ratios 0.8

模型导出

1. 执行 python export_model.py,用 diffusers 加载模型权重,并导出为 torchscript,原文件内容如下,注意修改相应的部分:
import torch
import functools
from diffusers import StableDiffusionPipeline


def get_unet(device="cuda:0"):
    # change to your model path
    model_path = "./stable-diffusion-v1-5"
# change if your model merged with LoRA
# model_path = "./stable-diffusion-v1-5/lora-v1-5-pruned-emaonly.safetensors"
# pipe = StableDiffusionPipeline.from_ckpt(model_path).to(device)
pipe = StableDiffusionPipeline.from_pretrained(model_path).to(device)
unet = pipe.unet
unet.eval()
unet.to(memory_format=torch.channels_last) # use channels_last memory format
unet.forward = functools.partial(unet.forward, return_dict=False) # set return_dict=False as default
return unet


def get_sample_input(batch_size, latent_height, latent_width, device="cuda:0"):
dtype = torch.float32
text_maxlen = 77
embedding_dim = 768
return (
torch.randn(2*batch_size, 4, latent_height, latent_width, dtype=dtype, device=device),
torch.tensor([1.]*batch_size, dtype=dtype, device=device),
torch.randn(2*batch_size, text_maxlen, embedding_dim, dtype=dtype, device=device)
)


model = get_unet()
# change according to your image (1, h/8, w/8)
test_data = get_sample_input(1, 64, 64)
script_model = torch.jit.trace(model, test_data, strict=False)
script_model.save("origin_model/trace_module.pt")
注意:
如果是单文件格式(ckpt 或 safetensors)或您使用合并 LoRA 后的模型,请修改 pipe = StableDiffusionPipeline.from_pretrained(model_path).to(device) 为 pipe = StableDiffusionPipeline.from_ckpt(model_path).to(device)。
2. 进入 origin_model 目录下可以查看导出的模型:
[root@vm-0-46-centos demo]# ll origin_model/
total 3358720
-rw-r--r-- 1 500 500 3439324538 Mar 13 16:56 trace_module.pt

模型优化

1. 执行 python demo.py 命令即可启动 TACO Infer 对导出的 UNetModel 进行性能优化,注意参见注释修改 demo.py 文件:
A10、A100优化代码
V100 优化代码
import torch

from taco import optimize_gpu, ModelConfig, OptimizeConfig


def gen_test_data(batch_size=1):
    # change according to your image (1, h/8, w/8)
x = torch.randn(batch_size, 4, 64, 64)
timesteps = torch.tensor([1]*batch_size)
    # change according to your model hidden size
context = torch.randn(batch_size, 77, 768)
return (x, timesteps, context)


input_model = "origin_model/trace_module.pt"
output_model_dir = "./optimized_model"
optimize_config = OptimizeConfig()

optimize_config.pytorch.trt.enable_fp16 = True
optimize_config.pytorch.profiling.subproc = False
optimize_config.profiling.num_run = 50
optimize_config.profiling.num_warmup = 10

model_config = ModelConfig()
model_config.pytorch.large_model=True

# change according to your image (h/8, w/8)
# change according to your model hidden size
model_config.pytorch.inputs_shape_range = [
{"min": (1, 4, 64, 64), "opt": (2, 4, 64, 64), "max": (32, 4, 64, 64)},
{"min": (1,), "opt": (2,), "max": (32,)},
{"min": (1, 77, 768), "opt": (2, 77, 768), "max": (32, 77, 768)},
]

report = optimize_gpu(
input_model,
output_model_dir,
test_data=gen_test_data(batch_size=2),
optimize_config = optimize_config,
model_config = model_config
)
docker 镜像内默认优化代码是 A10 的优化代码,如果您在 V100 机型上使用,请使用以下代码进行优化:
import os
import torch

from taco import optimize_gpu, ModelConfig, OptimizeConfig

def gen_test_data(batch_size=1):
    dtype = torch.float16
    device = "cuda:0"
# change according to your image (1, h/8, w/8)
    x = torch.randn(batch_size, 4, 64, 64, dtype=dtype)
    timesteps = torch.tensor([1]*batch_size, dtype=dtype)
# change according to your model hidden size
    context = torch.randn(batch_size, 77, 768, dtype=dtype)
 
    return (
        x,
        timesteps,
        context,
        torch.randn(batch_size, 1280, 8, 8, dtype=dtype),   # control net mid_residual
        torch.randn(batch_size, 320, 64, 64, dtype=dtype),  # control net down_residual0
        torch.randn(batch_size, 320, 64, 64, dtype=dtype),  # control net down_residual1
        torch.randn(batch_size, 320, 64, 64, dtype=dtype),  # control net down_residual2
        torch.randn(batch_size, 320, 32, 32, dtype=dtype),  # control net down_residual3
        torch.randn(batch_size, 640, 32, 32, dtype=dtype),  # control net down_residual4
        torch.randn(batch_size, 640, 32, 32, dtype=dtype),  # control net down_residual5
        torch.randn(batch_size, 640, 16, 16, dtype=dtype),  # control net down_residual6
        torch.randn(batch_size, 1280, 16, 16, dtype=dtype), # control net down_residual7
        torch.randn(batch_size, 1280, 16, 16, dtype=dtype), # control net down_residual8
        torch.randn(batch_size, 1280, 8, 8, dtype=dtype),   # control net down_residual9
        torch.randn(batch_size, 1280, 8, 8, dtype=dtype),   # control net down_residual10
        torch.randn(batch_size, 1280, 8, 8, dtype=dtype),   # control net down_residual10
)

input_model = "origin_model/trace_module.pt"
output_model_dir = "./optimized_model"
optimize_config = OptimizeConfig()

optimize_config.pytorch.tidy.enable = False
optimize_config.pytorch.trt.enable_fp16 = True
optimize_config.pytorch.profiling.subproc = False
optimize_config.profiling.num_run = 50
optimize_config.profiling.num_warmup = 10

os.environ["TORCHTRT_DISABLE_FMHA"] = "1"
os.environ["TORCHTRT_DISABLE_FMHCA"] = "1"
model_config = ModelConfig()
model_config.pytorch.large_model=True

# change according to your image (h/8, w/8)
# change according to your model hidden size
model_config.pytorch.inputs_shape_range = [
    {"min": (1, 4, 64, 64), "opt": (2, 4, 64, 64), "max": (8, 4, 64, 64)},
    {"min": (1,), "opt": (2,), "max": (8,)},
    {"min": (1, 77, 768), "opt": (2, 77, 768), "max": (8, 77, 768)},
    {"min": (1, 1280, 8, 8), "opt": (2, 1280, 8, 8), "max": (8, 1280, 8, 8)},
    {"min": (1, 320, 64, 64), "opt": (2, 320, 64, 64), "max": (8, 320, 64, 64)},
    {"min": (1, 320, 64, 64), "opt": (2, 320, 64, 64), "max": (8, 320, 64, 64)},
    {"min": (1, 320, 64, 64), "opt": (2, 320, 64, 64), "max": (8, 320, 64, 64)},
    {"min": (1, 320, 32, 32), "opt": (2, 320, 32, 32), "max": (8, 320, 32, 32)},
    {"min": (1, 640, 32, 32), "opt": (2, 640, 32, 32), "max": (8, 640, 32, 32)},
    {"min": (1, 640, 32, 32), "opt": (2, 640, 32, 32), "max": (8, 640, 32, 32)},
    {"min": (1, 640, 16, 16), "opt": (2, 640, 16, 16), "max": (8, 640, 16, 16)},
    {"min": (1, 1280, 16, 16), "opt": (2, 1280, 16, 16), "max": (8, 1280, 16, 16)},
    {"min": (1, 1280, 16, 16), "opt": (2, 1280, 16, 16), "max": (8, 1280, 16, 16)},
    {"min": (1, 1280, 8, 8), "opt": (2, 1280, 8, 8), "max": (8, 1280, 8, 8)},
    {"min": (1, 1280, 8, 8), "opt": (2, 1280, 8, 8), "max": (8, 1280, 8, 8)},
    {"min": (1, 1280, 8, 8), "opt": (2, 1280, 8, 8), "max": (8, 1280, 8, 8)},
]


report = optimize_gpu(
    input_model,
    output_model_dir,
    test_data=gen_test_data(batch_size=2),
    optimize_config = optimize_config,
    model_config = model_config

)


说明:
优化过程中“ [INFO] ERROR: [Torch-TensorRT TorchScript Conversion Context] - 2: [virtualMemoryBuffer.cpp::resizePhysical::145] Error Code 2: OutOfMemory (no further information)”提示可忽略。
2. 优化完成后,会输出性能优化报告,格式如下:
{
"hardware": {
"device": "NVIDIA A10, driver: 470.82.01",
"driver": "470.82.01",
"num_gpus": "1",
"cpu": "AMD EPYC 7K83 64-Core Processor, family '25', model '1'"
},
"software": {
"taco version": "0.2.33",
"framework": "pytorch",
"framework version": "1.12.1+cu113",
"torch device": "NVIDIA A10"
},
"summary": {
"working directory": "/root/sd_webui_demo",
"input model path": "origin_model/trace_module.pt",
"output model folder": "./optimized_model",
"input model format": "torch.jit saved (traced or scripted) model",
"status": "satisfactory",
"baseline latency": "191ms 393us",
"accelerated latency": "40ms 707us",
"speedup": "4.70",
"optimization time": "19min 39s 416ms",
"env": "{}"
}
}
在 optimized_model 目录中查看优化后的模型:
[root@4e302835766c /root/demo]#ll optimized_model/
total 1.8G
drwxr-xr-x 2 500 500 4.0K Mar 3 14:38 ./
-rw-r--r-- 1 500 500 1.8G Mar 13 16:46 optimized_recursive_script_module.pt
drwxr-xr-x 7 500 500 4.0K Mar 13 16:47 ../

(可选)模型验证

经过以上步骤,得到优化后的模型文件之后,您可以使用 torch.jit.load 接口加载该模型,验证其性能和正确性。加载模型运行的示例代码如下所示:
import torch
import taco
import os

taco_path = os.path.dirname(taco.__file__)
torch.ops.load_library(os.path.join(taco_path, "torch_tensorrt/lib/libtorchtrt.so"))
optimized_model = torch.jit.load("optimized_recursive_script_module.pt")

pic = torch.rand(1, 4, 64, 64).cuda() // picture
timesteps = torch.tensor([1]*1) // timesteps
context = torch.randn(1, 77, 768) // text embedding

with torch.no_grad():
output = optimized_model(pic, timesteps, context)
print(output)
需要注意的是,由于优化后的模型包含经过高度优化的 TACO Kit 自定义算子,因此运行模型之前,需要执行import taco加载包含自定义算子的动态链接库。
您根据自己的输出模型目录调整好相关参数之后,运行以上代码,即可加载优化后的模型进行推理计算。

启动优化后的模型

修改 webui-user.sh 脚本后,使用 bash webui.sh 命令启动 webUI 服务,将会自动加载 TACO Infer 优化后模型:
# edit webui-user.sh
# Uncomment to enable TACO opt UNetModel
export TACO_OPT_UNET="/root/sd_webui_demo/optimized_model/optimized_recursive_script_module.pt"

bash webui.sh


可以看到使用 TACO Infer 优化后,单张 A10 卡生成一张512 × 512图片时间仅为1秒左右。

总结

本文基于腾讯云 GPU 云服务器评测优化了 Stable diffusion 模型,通过TACO Infer的优化,在模型耗时主体结构 Unet 上获得了超过 4 倍的性能提升,端到端时延减少一半,助力业务性能大幅提升,吞吐率翻倍。