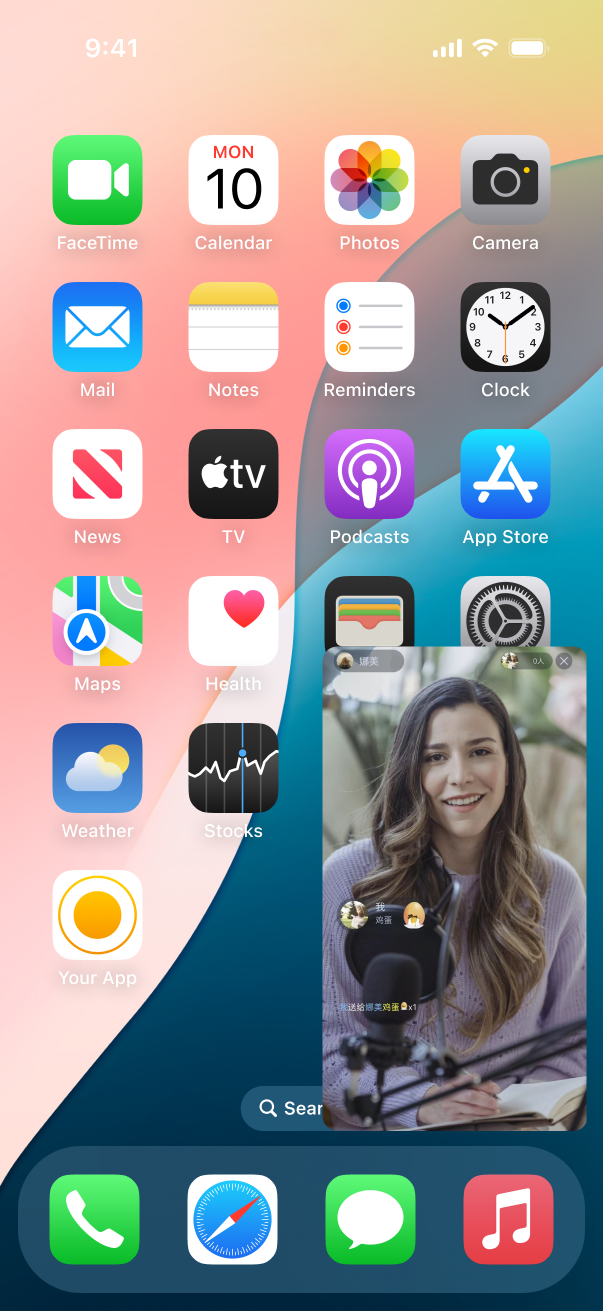
在互动直播等视频场景中,移动端设备观众在长时间观看主播画面时,存在需要临时操作其他 App 的场景,此时如果能够不中断主播的画面,同时操作其他 App,会给观众带来更好的用户体验。视频画中画就是针对此场景的解决方案,实现效果如下图。本文将分别对 iOS、Android 和 Flutter 端画中画的实现进行介绍。
画中画是依赖 iOS 和 Android 提供的系统能力实现的,可分为主播端(需要采集摄像头和上行数据)和观众端(仅需下行数据) 。由于 iOS 系统对权限管控比较严格,因此 iOS 端只提供观众端画中画实现,Android 端提供主播和观众端的画中画实现。对于视频播放,一般有使用 TRTC 播放和直播播放两种方案,画中画方案中也分别对这两种情况进行说明。
iOS 端观众画中画实现
开启对应权限
需要在 iOS 工程的 Signing & Capabilities 处开启以下权限:

调用 SDK 实现
iOS 端 SDK 提供了接口来实现画中画的功能,通过调用 API 可以方便的开启画中画(相关 API 见下面的示例代码),但 SDK 只提供观看单个主播的画中画能力,如果需要支持观看多个主播 PK 画中画的能力,需要调用系统的 API 来实现,详情请参见 调用系统 API 实现。
TRTC 播放
说明:
需要 TRTC 的 SDK 在12.1及以上版本。
在观众端调用如下接口开启。
NSDictionary *param = @{@"api" : @"enablePictureInPictureFloatingWindow",@"params" : @{@"enable" : @(true)}};NSError *err = nil;NSData *jsonData = [NSJSONSerialization dataWithJSONObject:param options:0 error:&err];if (err) {NSLog(@"error: %@", err);}NSString *paramJsonString = [[NSString alloc] initWithData:jsonData encoding:NSUTF8StringEncoding];[self.trtcCloud callExperimentalAPI:paramJsonString];
let param: [String : Any] = ["api": "enablePictureInPictureFloatingWindow", "params": ["enable":true]]if let jsonData = try? JSONSerialization.data(withJSONObject: param, options: .fragmentsAllowed) {let paramJsonString = String.init(data: jsonData, encoding: .utf8) ?? ""trtcCloud.callExperimentalAPI(paramJsonString)}
如果需要关闭,在对应参数位置传入 false 即可。
直播播放
在观众端调用如下接口开启。
[self.livePlayer enablePictureInPicture:true];
player.enablePicture(inPicture: true);
如果需要关闭,在对应参数位置传入 false 即可。
调用系统 API 实现
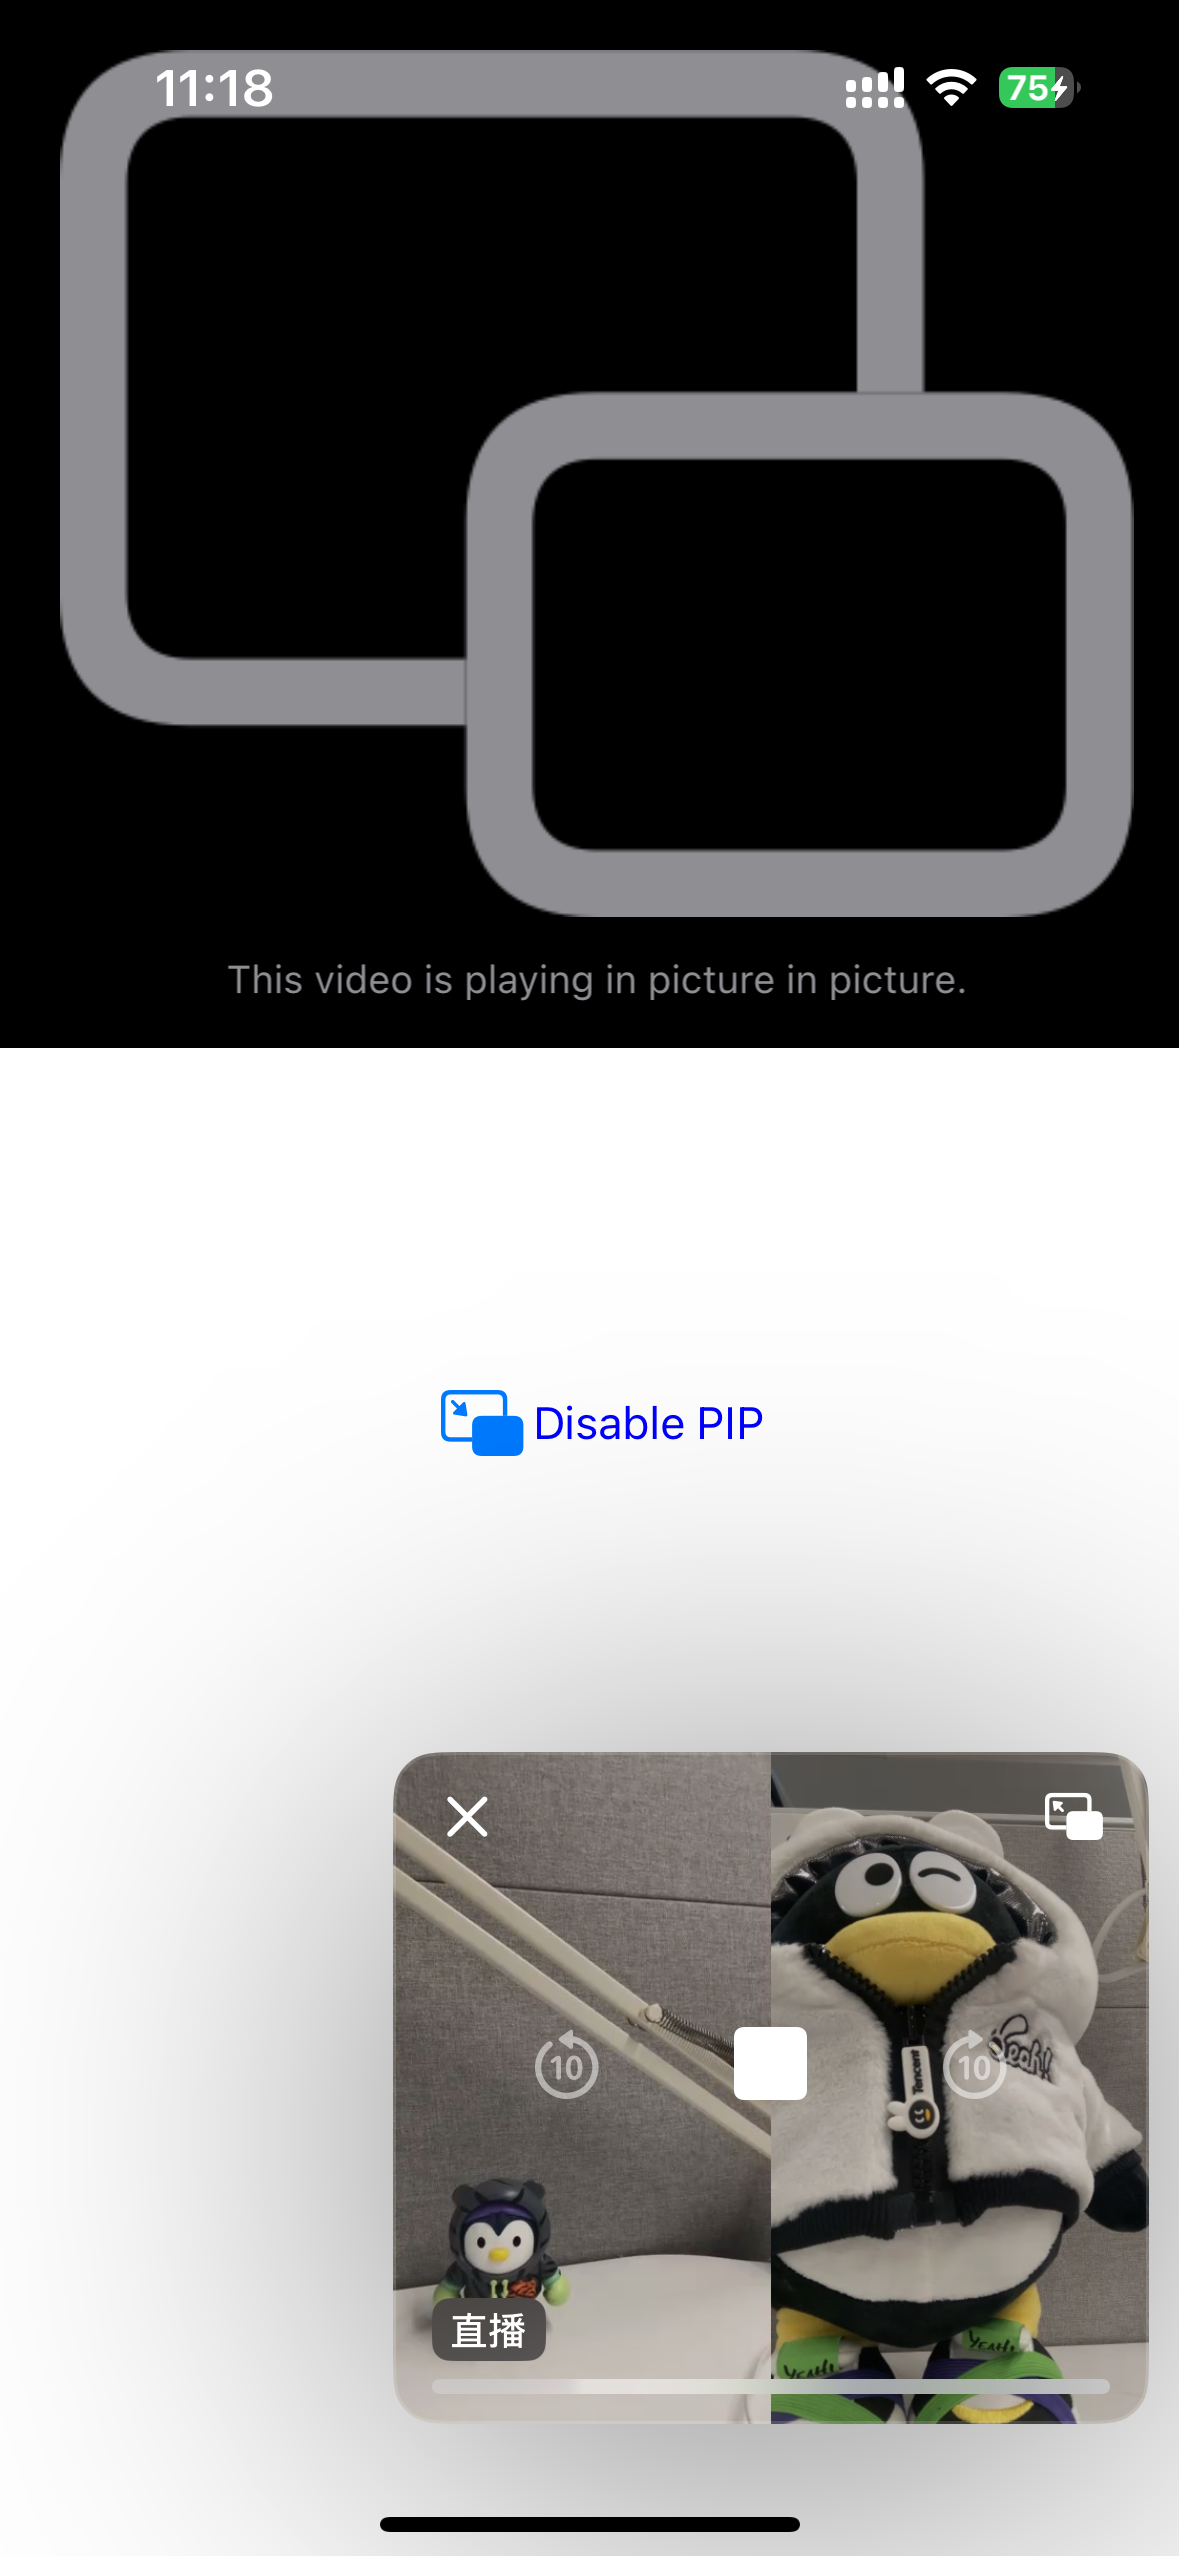
画中画是 iOS 系统提供的能力,通过调用系统 API 能实现复杂场景的画中画能力。iOS 虽然支持画中画能力,但对该特性有较多的限制,无法直接使用渲染视频的 UIView 来实现画中画,需要使用自定义渲染,将需要展示在画中画的视频渲染到符合要求的组件上。下面以2个主播 PK 画中画的场景为例,介绍调用系统 API 对画中画的实现。
说明:
实现单个主播或多于2个主播画中画依旧可以参考如下方案实现,这里仅对2个主播 PK 的场景进行说明。
1. 定义画中画需要的组件。
因为 iOS 系统要求只能特定的组件才能渲染到画中画中,这里使用 AVSampleBufferDisplayLayer,并且需要该组件直接渲染对应视频,所以定义一个 combinedPixelBuffer 用于合并2个主播的视频数据。
import UIKitimport AVKitimport CoreFoundationimport TXLiteAVSDK_Professionalclass PipVC: UIViewController {let trtcCloud = TRTCCloud()var pipController: AVPictureInPictureController?var combinedPixelBuffer: CVPixelBuffer?let pixelBufferLock = DispatchQueue(label: "com.demo.pip")var pipDisplayLayer: AVSampleBufferDisplayLayer!}
2. 进入 TRTC 房间。
func enterTrtcRoom() {let params = TRTCParams()params.sdkAppId = UInt32(SDKAppID)params.roomId = UInt32(roomId)params.userId = userIdparams.role = .audienceparams.userSig = GenerateTestUserSig.genTestUserSig(identifier: userId) as StringtrtcCloud.addDelegate(self)trtcCloud.enterRoom(params, appScene: .LIVE)}
3. 设置音频并开启后台解码。
func setupAudioSession() {do {try AVAudioSession.sharedInstance().setCategory(.playback)} catch let error {print("+> error: \\(error)")return}do {try AVAudioSession.sharedInstance().setActive(true)} catch let error {print("+> error: \\(error)")return}}func enableBGDecode() {let param: [String : Any] = ["api": "enableBackgroundDecoding","params": ["enable":true]]if let jsonData = try? JSONSerialization.data(withJSONObject: param, options: .fragmentsAllowed) {let paramJsonString = String.init(data: jsonData, encoding: .utf8) ?? ""trtcCloud.callExperimentalAPI(paramJsonString)}}
4. 初始化画中画组件。
func setupPipController() {let screenWidth = UIScreen.main.bounds.widthlet videoHeight = screenWidth / 2 / 9 * 16pipDisplayLayer = AVSampleBufferDisplayLayer()pipDisplayLayer.frame = CGRect(x: 0, y: 0, width: screenWidth, height: videoHeight) // Adjust size as neededpipDisplayLayer.videoGravity = .resizeAspectpipDisplayLayer.isOpaque = truepipDisplayLayer.backgroundColor = CGColor(red: 0, green: 0, blue: 0, alpha: 1)view.layer.addSublayer(pipDisplayLayer)if AVPictureInPictureController.isPictureInPictureSupported() {let contentSource = AVPictureInPictureController.ContentSource(sampleBufferDisplayLayer: pipDisplayLayer,playbackDelegate: self)pipController = AVPictureInPictureController(contentSource: contentSource)pipController?.delegate = selfpipController?.canStartPictureInPictureAutomaticallyFromInline = true} else {print("+> error")}}
5. 开启自定义渲染。
注意:
开启自定义渲染时指定的格式
._NV12和步骤6:拼接左右两个画面中的方法是相关的,不同的格式需要不同的方法来拼接,该示例仅展示 ._NV12格式的左右拼接。extension PipVC: TRTCCloudDelegate {func onUserVideoAvailable(_ userId: String, available: Bool) {if available {trtcCloud.startRemoteView(userId, streamType: .big, view: nil)trtcCloud.setRemoteVideoRenderDelegate(userId, delegate: self, pixelFormat: ._NV12, bufferType: .pixelBuffer);}else{trtcCloud.stopRemoteView(userId, streamType: .big)}}}
6. 拼接左右2个画面。
在拼接两个主播的视频数据时,因为 SDK 回调出视频数据的时间不同步,所以需要在每次收到单个主播的视频数据时去更新对应的数据,并加锁,如果需要实现多个主播的情况,也需要按照类似的方法操作。以下代码是按照左右2个主播各占一半的方法布局,如果需要其他布局,需要业务上根据需要进行实现,这里不涉及 SDK。
func createCombinedPixelBuffer(from sourceBuffer: CVPixelBuffer) {let width = CVPixelBufferGetWidth(sourceBuffer) * 2let height = CVPixelBufferGetHeight(sourceBuffer)let pixelFormat = CVPixelBufferGetPixelFormatType(sourceBuffer)let attributes: [CFString: Any] = [kCVPixelBufferWidthKey: width,kCVPixelBufferHeightKey: height,kCVPixelBufferPixelFormatTypeKey: pixelFormat,kCVPixelBufferIOSurfacePropertiesKey: [:]]CVPixelBufferCreate(kCFAllocatorDefault, width, height, pixelFormat, attributes as CFDictionary, &combinedPixelBuffer)}func updateCombinedPixelBuffer(with sourceBuffer: CVPixelBuffer, forLeft: Bool) {guard let combinedBuffer = combinedPixelBuffer else { print("+> error"); return}CVPixelBufferLockBaseAddress(combinedBuffer, [])CVPixelBufferLockBaseAddress(sourceBuffer, [])// Plane 0: Y/luma planelet combinedLumaBaseAddress = CVPixelBufferGetBaseAddressOfPlane(combinedBuffer, 0)!let sourceLumaBaseAddress = CVPixelBufferGetBaseAddressOfPlane(sourceBuffer, 0)!let combinedLumaBytesPerRow = CVPixelBufferGetBytesPerRowOfPlane(combinedBuffer, 0)let sourceLumaBytesPerRow = CVPixelBufferGetBytesPerRowOfPlane(sourceBuffer, 0)let widthLuma = CVPixelBufferGetWidthOfPlane(sourceBuffer, 0)let heightLuma = CVPixelBufferGetHeightOfPlane(sourceBuffer, 0)// Plane 1: UV/chroma planelet combinedChromaBaseAddress = CVPixelBufferGetBaseAddressOfPlane(combinedBuffer, 1)!let sourceChromaBaseAddress = CVPixelBufferGetBaseAddressOfPlane(sourceBuffer, 1)!let combinedChromaBytesPerRow = CVPixelBufferGetBytesPerRowOfPlane(combinedBuffer, 1)let sourceChromaBytesPerRow = CVPixelBufferGetBytesPerRowOfPlane(sourceBuffer, 1)let widthChroma = CVPixelBufferGetWidthOfPlane(sourceBuffer, 1)let heightChroma = CVPixelBufferGetHeightOfPlane(sourceBuffer, 1)for row in 0..<heightLuma {let combinedRow = combinedLumaBaseAddress.advanced(by: row * combinedLumaBytesPerRow + (forLeft ? 0 : widthLuma))let sourceRow = sourceLumaBaseAddress.advanced(by: row * sourceLumaBytesPerRow)memcpy(combinedRow, sourceRow, widthLuma)}// ._nv12 the chroma plane is subsampled 2:1 horizontally and verticallyfor row in 0..<heightChroma {let combinedRow = combinedChromaBaseAddress.advanced(by: row * combinedChromaBytesPerRow + (forLeft ? 0 : 2 * widthChroma))let sourceRow = sourceChromaBaseAddress.advanced(by: row * sourceChromaBytesPerRow)memcpy(combinedRow, sourceRow, 2 * widthChroma)}CVPixelBufferUnlockBaseAddress(sourceBuffer, [])CVPixelBufferUnlockBaseAddress(combinedBuffer, [])}
7. 将合并后的画面渲染到对应的组件上。
func displayPixelBuffer(_ pixelBuffer: CVPixelBuffer, in layer: AVSampleBufferDisplayLayer) {var timing = CMSampleTimingInfo.init(duration: .invalid,presentationTimeStamp: .invalid,decodeTimeStamp: .invalid)var videoInfo: CMVideoFormatDescription? = nilvar result = CMVideoFormatDescriptionCreateForImageBuffer(allocator: nil,imageBuffer: pixelBuffer,formatDescriptionOut: &videoInfo)if result != 0 {return}guard let videoInfo = videoInfo else {return}var sampleBuffer: CMSampleBuffer? = nilresult = CMSampleBufferCreateForImageBuffer(allocator: kCFAllocatorDefault,imageBuffer: pixelBuffer,dataReady: true,makeDataReadyCallback: nil,refcon: nil,formatDescription: videoInfo,sampleTiming: &timing,sampleBufferOut: &sampleBuffer)if result != 0 {return}guard let sampleBuffer = sampleBuffer else {return}guard let attachments = CMSampleBufferGetSampleAttachmentsArray(sampleBuffer,createIfNecessary: true) else {return}CFDictionarySetValue(unsafeBitCast(CFArrayGetValueAtIndex(attachments, 0), to: CFMutableDictionary.self),Unmanaged.passUnretained(kCMSampleAttachmentKey_DisplayImmediately).toOpaque(),Unmanaged.passUnretained(kCFBooleanTrue).toOpaque())layer.enqueue(sampleBuffer)if layer.status == .failed {if let error = layer.error as? NSError {if error.code == -11847 {print("+> error")}}}}
8. 拿到远端用户的视频数据,拼接后渲染到指定的组件。
示例中使用 left 标识显示在左边的主播 ID,实际业务中需要根据业务需要进行修改。
extension PipVC: TRTCVideoRenderDelegate {func onRenderVideoFrame(_ frame: TRTCVideoFrame, userId: String?, streamType: TRTCVideoStreamType) {guard let newPixelBuffer = frame.pixelBuffer else { print("+> error"); return}pixelBufferLock.sync {if combinedPixelBuffer == nil {createCombinedPixelBuffer(from: newPixelBuffer)}if userId == "left" {updateCombinedPixelBuffer(with: newPixelBuffer, forLeft: true)} else {updateCombinedPixelBuffer(with: newPixelBuffer, forLeft: false)}}if let combinedBuffer = combinedPixelBuffer {DispatchQueue.main.async {self.displayPixelBuffer(combinedBuffer, in: self.pipDisplayLayer)}}}}
9. 实现相关协议。
extension PipVC: AVPictureInPictureControllerDelegate {func pictureInPictureControllerWillStartPictureInPicture(_ pictureInPictureController: AVPictureInPictureController) {}func pictureInPictureControllerDidStartPictureInPicture(_ pictureInPictureController: AVPictureInPictureController) {}func pictureInPictureControllerDidStopPictureInPicture(_ pictureInPictureController: AVPictureInPictureController) {}func pictureInPictureController(_ pictureInPictureController: AVPictureInPictureController, restoreUserInterfaceForPictureInPictureStopWithCompletionHandler completionHandler: @escaping (Bool) -> Void) {completionHandler(true)}func pictureInPictureController(_ pictureInPictureController: AVPictureInPictureController, failedToStartPictureInPictureWithError error: any Error) {}}extension PipVC: AVPictureInPictureSampleBufferPlaybackDelegate {func pictureInPictureControllerTimeRangeForPlayback(_ pictureInPictureController: AVPictureInPictureController) -> CMTimeRange {return CMTimeRange.init(start: .zero, duration: .positiveInfinity)}func pictureInPictureControllerIsPlaybackPaused(_ pictureInPictureController: AVPictureInPictureController) -> Bool {return false}func pictureInPictureController(_ pictureInPictureController: AVPictureInPictureController, setPlaying playing: Bool) {}func pictureInPictureController(_ pictureInPictureController: AVPictureInPictureController, didTransitionToRenderSize newRenderSize: CMVideoDimensions) {}func pictureInPictureController(_ pictureInPictureController: AVPictureInPictureController, skipByInterval skipInterval: CMTime) async {}}
10. 开启/关闭画中画。
// 关闭画中画pipController?.stopPictureInPicture()// 开启画中画pipController?.startPictureInPicture()
注意:
这里仅对实现方案进行说明,实际业务中还需要对各种可能的异常情况进行处理。
对于画中画上层控制按钮的处理是 iOS 系统相关能力,不涉及到 SDK,这里不做说明,需要业务根据实际需要进行处理。
Android 端画中画的实现
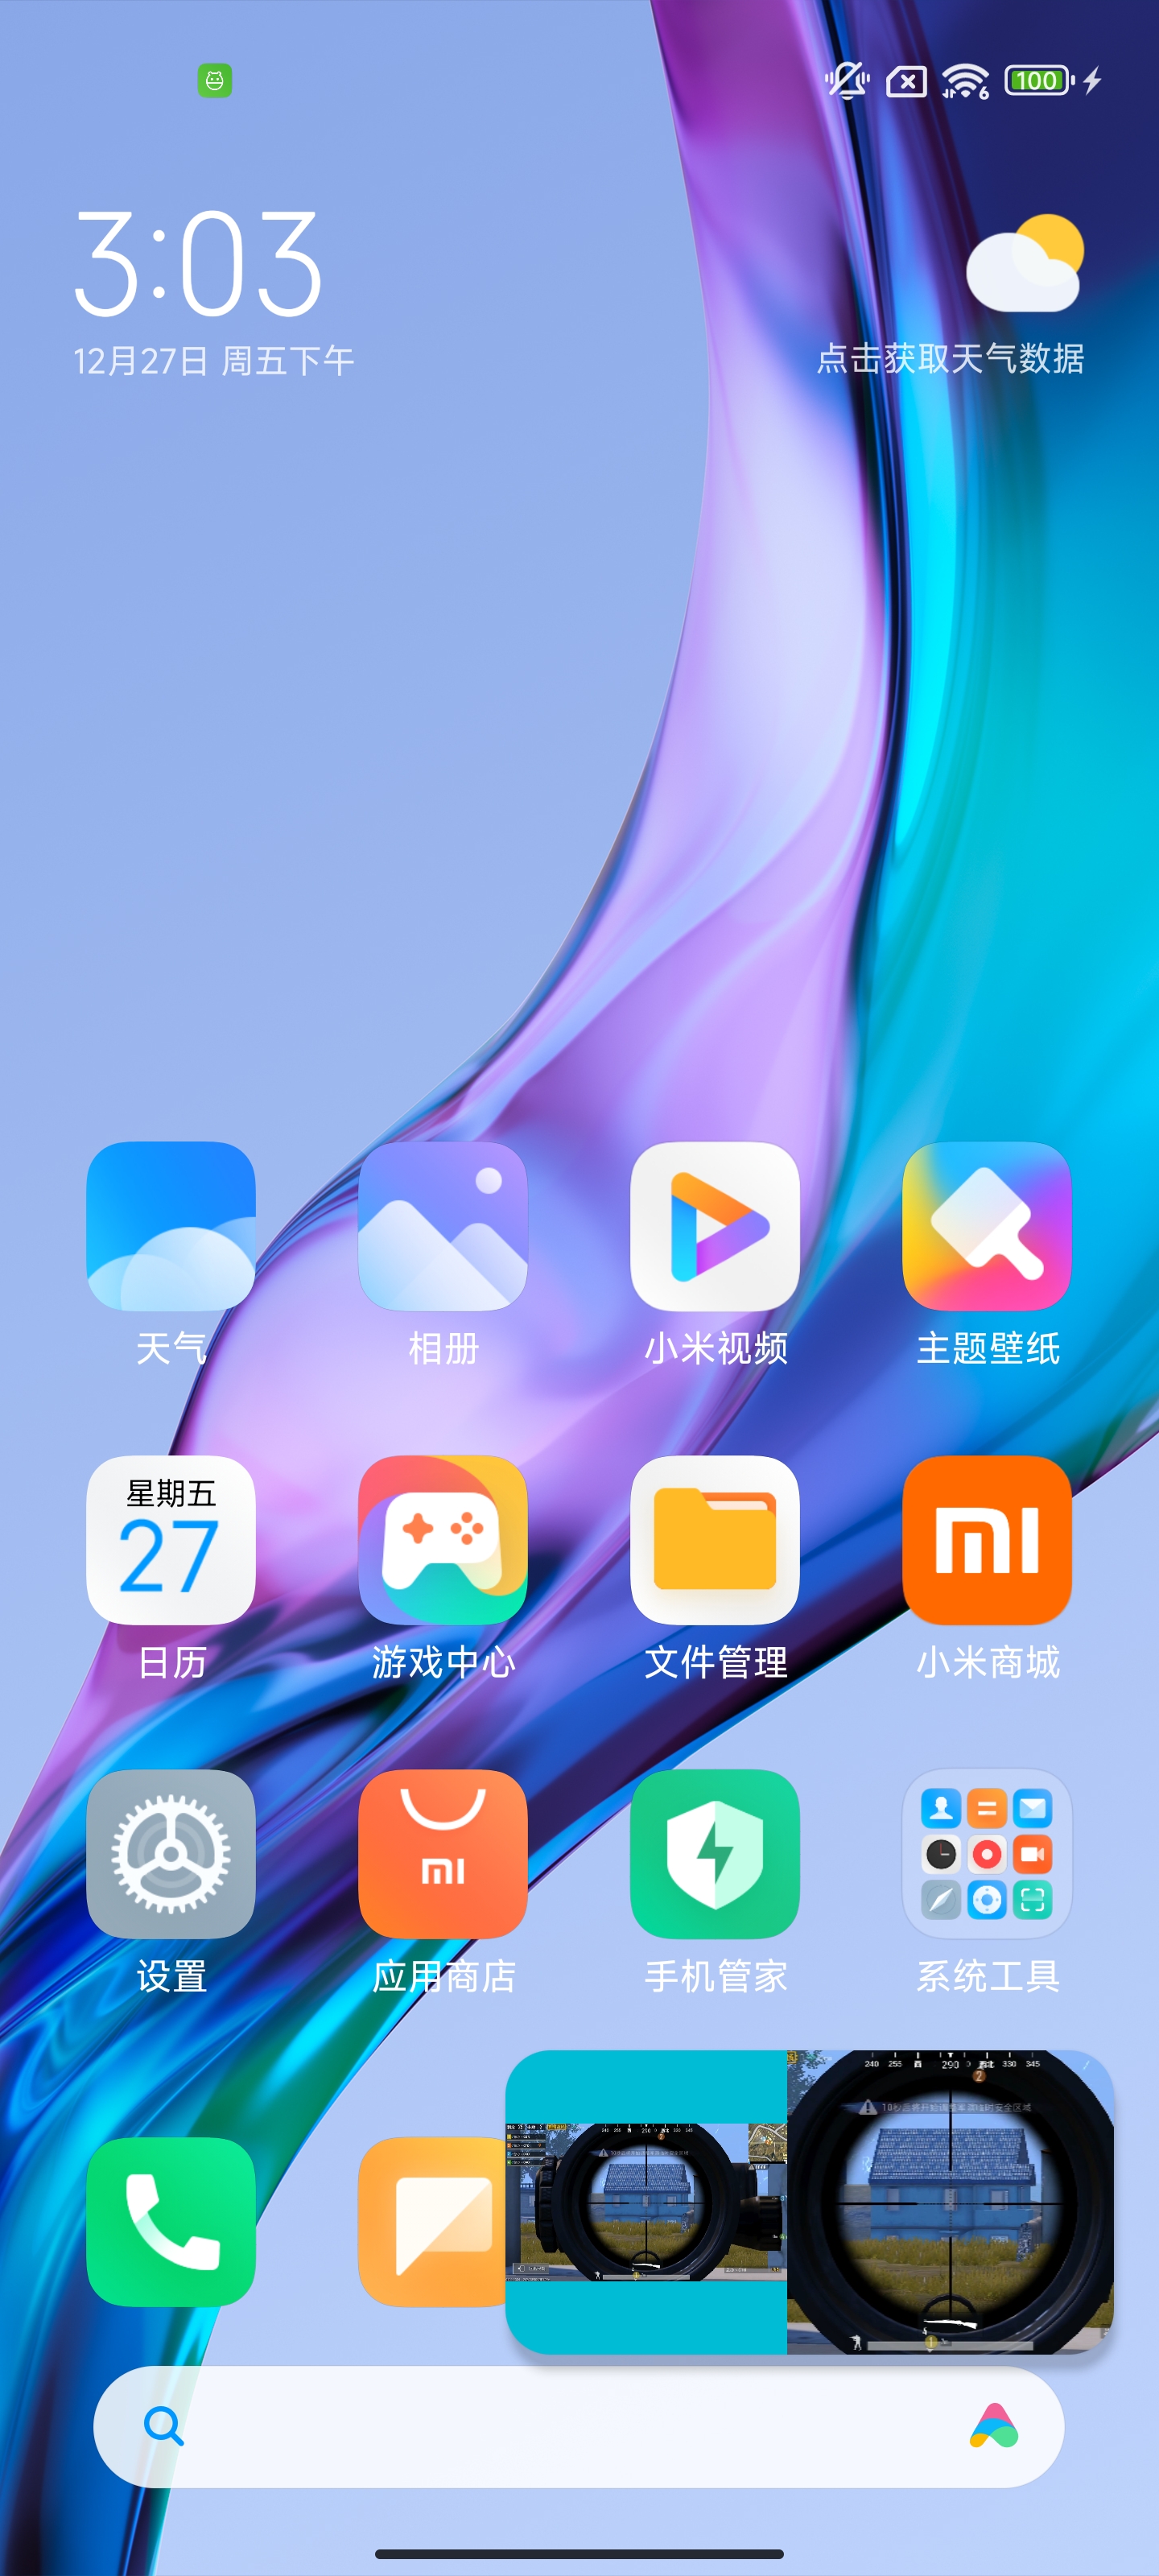
从 Android 8.0(API 级别26)开始,Android 允许以画中画(PIP)模式启动 activity。画中画是一种特殊类型的多窗口模式,最常用于视频播放。使用该模式,用户可以通过固定到屏幕一角的小窗口观看视频,同时在应用之间进行导航或浏览主屏幕上的内容。TRTC SDK、直播 SDK 没有对 Android 画中画 API 进一步封装,TRTC Demo、云直播 Demo 画中画的功能是直接调用 Android API 实现的。如需了解更多信息,请参见 Android 文档 使用画中画(PIP)功能添加视频。
Android 端在进入画中画时,会根据 XML 的布局规则,以画中画的窗口大小,重新进行 measure、layout。所以主播端和观众端都可按照此规则实现画中画。
画中画的实现
下载 MLVB-API-Example 工程后, 画中画的功能代码会在
MLVB-API-Example/Advanced/PictureInPicture 路径下。1. 在 AndroidManifest.xml 中对<activity>声明画中画属性。
<activityandroid:name="com.tencent.mlvb.pictureinpicture.PictureInPictureActivity"android:theme="@style/Theme.AppCompat.Light.NoActionBar"android:configChanges="screenSize|smallestScreenSize|screenLayout|orientation"android:supportsPictureInPicture="true"
android:supportsPictureInPicture="true" 表示声明支持画中画。在画中画模式转换期间出现布局更改,如果不希望 activity 重启动,需要配置 android:configChanges 属性的对应值。
2. 进入画中画。
private void startPictureInPicture() {if (Build.VERSION.SDK_INT >= Build.VERSION_CODES.O) {PictureInPictureParams.Builder pictureInPictureBuilder = new PictureInPictureParams.Builder();Rational aspectRatio = new Rational(mVideoView.getWidth(), mVideoView.getHeight());pictureInPictureBuilder.setAspectRatio(aspectRatio);//进入画中画enterPictureInPictureMode(pictureInPictureBuilder.build());} else {Toast.makeText(this, R.string.picture_in_picture_not_supported, Toast.LENGTH_SHORT).show();}}
pictureInPictureBuilder.setAspectRatio(aspectRatio); 设置画中画的宽高比,此处设置为播放视频 View 的宽高比。enterPictureInPictureMode(pictureInPictureBuilder.build()); 进入画中画。3. 进出画中画的回调。
@Overridepublic void onPictureInPictureModeChanged(boolean isInPictureInPictureMode, Configuration configuration) {super.onPictureInPictureModeChanged(isInPictureInPictureMode, configuration);if (isInPictureInPictureMode) {//进入画中画后,需要隐藏的view} else{//退出画中画后,需要显示的view}}
在画中画中显示多个视频画面
想要显示多个视频画面,可以在进入画中画时,对 View A 设置固定的宽高,其他 View 会根据布局规则来显示或者设置百分比布局。
说明:
在画中画显示多个视频画面方式不是 Android 的规定用法,且当前可在 Android 12上使用,后续可能会随着 Android 系统的更新而变化,需要在发布前测试各版本系统的兼容性。
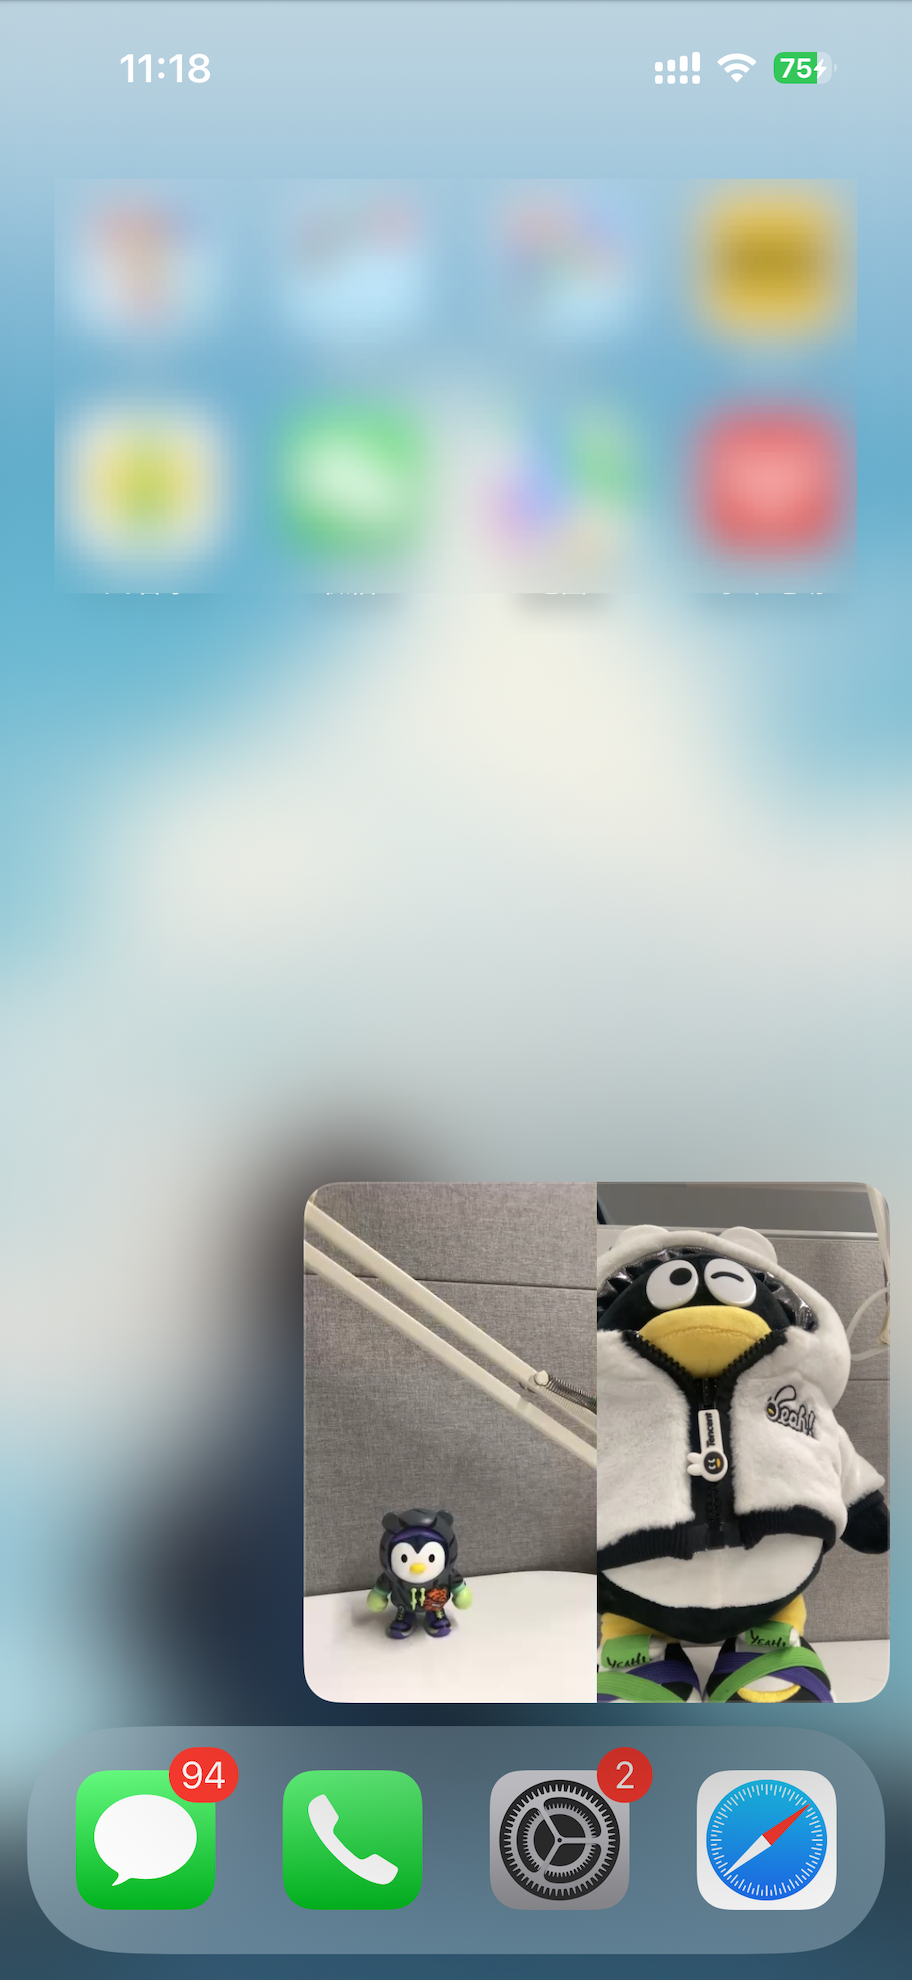
效果展示
// mLivePlayer 对应左边的视频View(TXCloudVideoView),设置了V2TXLiveFillModeFitmLivePlayer.startLivePlay(PLAY_URL);mLivePlayer.setRenderFillMode(V2TXLiveDef.V2TXLiveFillMode.V2TXLiveFillModeFit);// mLivePlayer2 对应右边的视频View(TXCloudVideoView)mLivePlayer2.startLivePlay(PLAY_URL);
进入画中画后的布局,可以计算并手动设置 TXCloudVideoView 的宽高,或者设置填充方式,来保障视频画面的完整显示。调用 mLivePlayer(V2TXLivePlayer 对象)的 setRenderFillMode 方法,来设置视频画面的填充方式。
画中画左边 TXCloudVideoView 是设置了 V2TXLiveFillModeFit 的效果。
画中画右边 TXCloudVideoView 是设置了 V2TXLiveFillModeFill 的效果。
此示例中,只有两个视频画面(TXCloudVideoView),对左边的 TXCloudVideoView 设置宽高,右边的 TXCloudVideoView 会根据布局规则来显示。如果您有多个 TXCloudVideoView,可以合理设计布局,达到目标效果。
实现步骤
1. 在 activity_picture_in_picture.xml 中添加一个 TXCloudVideoView,两个 TXCloudVideoView 并排显示。
<com.tencent.rtmp.ui.TXCloudVideoViewandroid:id="@+id/video_view"android:layout_width="192dp"android:layout_height="108dp"android:layout_alignParentStart="true"android:background="#00BCD4"/><com.tencent.rtmp.ui.TXCloudVideoViewandroid:id="@+id/video_view2"android:layout_width="192dp"android:layout_height="108dp"android:layout_alignTop="@+id/video_view"android:layout_toEndOf="@+id/video_view"android:background="#3F51B5"/>
2. 在进入和退出画中画的时候,设置 video_view 的宽高。
@Overridepublic void onPictureInPictureModeChanged(boolean isInPictureInPictureMode, Configuration configuration) {super.onPictureInPictureModeChanged(isInPictureInPictureMode, configuration);if (isInPictureInPictureMode) {// 设置mVideoView 的宽为 100dpRelativeLayout.LayoutParams layoutParams = (RelativeLayout.LayoutParams) mVideoView.getLayoutParams();layoutParams.width = (int) TypedValue.applyDimension(TypedValue.COMPLEX_UNIT_DIP, 100, getResources().getDisplayMetrics());} else {// 退出画中画,还原video_view的宽度RelativeLayout.LayoutParams layoutParams = (RelativeLayout.LayoutParams) mVideoView.getLayoutParams();layoutParams.width = (int) TypedValue.applyDimension(TypedValue.COMPLEX_UNIT_DIP, 192, getResources().getDisplayMetrics());}}
Flutter 端观众画中画实现
Flutter 端开启画中画在不同平台有不同的实现,下面分别对 iOS 和 Android 平台进行说明。
发布到 iOS 设备
调用 SDK 实现
Flutter端同样可以通过调用 SDK 提供的 API 方便的开启画中画,和原生 iOS 端一样,SDK 只提供观看单个主播的画中画能力,如果需要画中画中显示多个主播的视频,请参见 调用系统 API 实现。
注意:
TRTC 播放
Flutter SDK 需要2.9.1版本及以后,在观众端调用如下接口实现。
trtcCloud.callExperimentalAPI(jsonEncode({"api": "enablePictureInPictureFloatingWindow","params": {"enable": true}}));
如果需要关闭,在对应参数位置传入 false 即可。
直播播放
在观众端调用如下接口开启。
var pipCode = await _livePlayer!.enablePictureInPicture(true);if (pipCode != V2TXLIVE_OK) {print("error: $pipCode");}
如果需要关闭,在对应参数位置传入 false 即可。
调用系统 API 实现
如果需要实现复杂的画中画能力,例如在画中画中显示多个主播的视频,需要调用 iOS 系统提供的 API 来实现,请参见 iOS 端观众画中画实现-调用系统 API 实现 部分。下面对 Flutter 端调用 iOS 系统 API 部分进行说明。
1. Flutter 端使用 methodChannel 发消息到 iOS 原生端。
final channel = MethodChannel('flutter_ios_pip_demo');await channel.invokeMethod('enablePip', {'marginTop': appBarHeight + topSafeAreaHeight,'pkLeft': pkLeftUserId,'pkRight': pkRightUserId,});
2. 在 Flutter 打包出的 iOS 工程中,接收对应的消息,并做相应处理。
Flutter 调用系统 API 实现多主播 PK 画中画时,实际上是调用 iOS 系统 API,使用自定义采集重新绘制2个主播 PK 的画面,并显示在 Flutter 层之上,所以需要在调用 iOS 系统 API 绘制的窗口大小和位置和 Flutter 端一致,可以在 methodChannel 中传递相应的布局参数和主播 ID。
var channel: FlutterMethodChannel?let pipListener = PipRender()guard let controller = window?.rootViewController as? FlutterViewController else {fatalError("Invalid root view controller")}channel = FlutterMethodChannel(name: "flutter_ios_pip_demo", binaryMessenger: controller.binaryMessenger)channel?.setMethodCallHandler({ [weak self] call, result inguard let self = self else { return }switch (call.method) {case "enablePip":if let arg = call.arguments as? [String: Any] {let marginTop = arg["marginTop"] as? CGFloat ?? 0let pkLeft = arg["pkLeft"] as? String ?? ""let pkRight = arg["pkRight"] as? String ?? ""pipListener.enablePip(mainView: vc.view, mt: mt, pkLeft: pkLeft, pkRight: pkRight)}result(nil)breakcase "disablePip":pipListener.disablePip()result(nil)breakdefault:break}})
3. 定义处理画中画的类。
在开启画中画时,将对应主播的流改为自定义渲染,并将渲染后的画面插入到根视图中,用于显示。
import UIKitimport AVKitimport TXLiteAVSDK_Professionalclass PipRender: NSObject {// 其余变量参考iOS原生端调用系统API实现的部分var mainView: UIView?var mt: CGFloat?// 因为trtcCloud是单实例的,可以在代码中这样获取let trtcCloud = TRTCCloud.sharedInstance()func disablePip() {pipDisplayLayer?.removeFromSuperlayer()pipController?.stopPictureInPicture()}func enablePip(mainView: UIView, mt: CGFloat, pkLeft: String, pkRight: String) {self.mainView = mainViewself.mt = mttrtcCloud.addDelegate(self)enableBGDecode()setupAudioSession()setupPipController()pipController?.startPictureInPicture()if pkLeft.count > 0 {trtcCloud.startRemoteView(pkLeft, streamType: .big, view: nil)trtcCloud.setRemoteVideoRenderDelegate(pkLeft, delegate: self, pixelFormat: ._NV12, bufferType: .pixelBuffer);}if pkRight.count > 0 {trtcCloud.startRemoteView(pkRight, streamType: .big, view: nil)trtcCloud.setRemoteVideoRenderDelegate(pkRight, delegate: self, pixelFormat: ._NV12, bufferType: .pixelBuffer);}}// 该方法需要根据业务需要,调整画中画显示的位置,保证和Flutter端显示的位置一致func setupPipController() {let screenWidth = UIScreen.main.bounds.widthlet videoHeight = screenWidth / 2 / 9 * 16pipDisplayLayer = AVSampleBufferDisplayLayer()// 这里根据实际需要,调整画中画显示的位置let tsa = self.mainView?.safeAreaInsets.top ??let vmt = tsa + (self.mt ?? 0)pipDisplayLayer.frame = CGRect(x: 0, y: vmt, width: screenWidth, height: videoHeight) // Adjust size as neededpipDisplayLayer.videoGravity = .resizeAspectpipDisplayLayer.isOpaque = truepipDisplayLayer.backgroundColor = CGColor(red: 0, green: 0, blue: 0, alpha: 1)// 这里使用enablePip传递进来的mainView添加画中画的画面mainView?.layer.addSublayer(pipDisplayLayer)if AVPictureInPictureController.isPictureInPictureSupported() {let contentSource = AVPictureInPictureController.ContentSource(sampleBufferDisplayLayer: pipDisplayLayer,playbackDelegate: self)pipController = AVPictureInPictureController(contentSource: contentSource)pipController?.delegate = selfpipController?.canStartPictureInPictureAutomaticallyFromInline = true} else {print("+> PiP not supported")}}// 其余的方法,和iOS原生端调用系统API实现的部分一致}
4. Flutter 端在停止画中画时需要重新拉对应的主播的流,恢复 Flutter 端的渲染。
// 业务上触发停止画中画时trtcCloud.startRemoteView(pkLeftUserId, TRTCCloudDef.TRTC_VIDEO_STREAM_TYPE_BIG, pkLeftId);trtcCloud.startRemoteView(pkRightUserId, TRTCCloudDef.TRTC_VIDEO_STREAM_TYPE_BIG, pkRightId);await channel.invokeMethod('disablePip');
5. Flutter 端在销毁当前页面时需要停止画中画。
因为开始画中画后,实际是调用 iOS 系统 API 重新绘制一个视图,覆盖在 Flutter 的视图之上,所以在销毁当前页面时,需要停止画中画,将对应的视图从根视图中移除。
@overridedispose() {channel.invokeMethod('disablePip');super.dispose();}
在 Android 上通过 Flutter 实现画中画
在 Flutter 中实现画中画,也是需要调用 Android 画中画的 API。进入画中画后,Flutter UI 会按照已有的 Widget 布局规则进行显示,可以根据自己的业务规则,在进入画中画后,隐藏部分 Widget,合理设置视频 Widget 的宽高。
1. Flutter 客户端的代码:使用通道名"samples.flutter.dev" 调用通道方法"pictureInPicture",这个方法的具体实现在 Android 宿主端。
MethodChannel _channel = MethodChannel('samples.flutter.dev');final int? result = await _channel.invokeMethod('pictureInPicture');
2. Android 宿主端的代码。
2.1 在继承了 FlutterActivity 的 Activity 中实现:
private void startPictureInPicture() {if (Build.VERSION.SDK_INT >= Build.VERSION_CODES.O) {PictureInPictureParams.Builder pictureInPictureBuilder = new PictureInPictureParams.Builder();//根据具体的业务需求,设置指定的画中画大小Rational aspectRatio = new Rational(100, 100);pictureInPictureBuilder.setAspectRatio(aspectRatio);//进入画中画enterPictureInPictureMode(pictureInPictureBuilder.build());} else {Toast.makeText(this, R.string.picture_in_picture_not_supported, Toast.LENGTH_SHORT).show();}}@Overridepublic void configureFlutterEngine(@NonNull FlutterEngine flutterEngine) {super.configureFlutterEngine(flutterEngine);MethodChannel channel = new MethodChannel(flutterEngine.getDartExecutor().getBinaryMessenger(), "samples.flutter.dev");channel.setMethodCallHandler((call, result) -> {if (call.method.equals("pictureInPicture")) {startPictureInPicture();} else {result.notImplemented();}});}
2.2 在 AndroidManifest.xml 中对 activity 配置画中画参数
android:supportsPictureInPicture="true",如下:<activityandroid:name="example.android.app.src.main.java.com.tencent.live.example.MainActivity"android:supportsPictureInPicture="true"android:configChanges="orientation|keyboardHidden|keyboard|screenSize|smallestScreenSize|locale|layoutDirection|fontScale|screenLayout|density|uiMode">...</activity>
想要在画中画中显示两个视频画面,例如主播 PK,可以通过合理设置布局规则和大小来实现。


