数据通常会存储在很多个不同的数据存储系统中,通常情况下需要从这些数据源中提取和转换数据后并将其加载到一个或多个目标。云数据库 SQL Server Integration Services(SSIS)支持平面文件的使用,如果 SSIS 项目中有涉及平面文件,在 SSIS 项目部署之前,您需要先将平面文件部署到商业智能服务器中。
注意
如果 SSIS 项目中不涉及平面文件,则该步骤(将平面文件部署到商业智能服务器中)无需操作。
本文为您介绍如何通过商业智能服务器 SSIS 管理功能添加、部署平面文件,以便于对数据更好的使用和管理。
操作步骤
1. 登录 SQL Server 控制台。
2. 在实例列表,找到需要的商业智能服务器实例,单击其实例 ID 或操作列的管理,进入实例管理页。

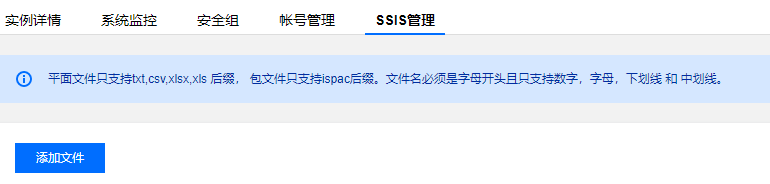
3. 在实例管理页,选择 SSIS管理 > 添加文件。
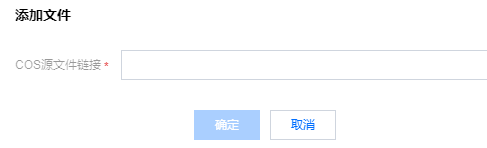
4. 在添加文件窗口,粘贴 COS 源文件链接,单击确定。
说明
平面文件需要上传到对象存储 COS 上,才可获取要上传的 COS 源文件链接,将平面文件部署至商业智能服务器中。
使用腾讯云对象存储 COS,可获取到 COS 源文件链接,注意对象存储的对象访问权限需要设置为公有读私有写,否则平面文件将不能部署成功,操作指引请参见 附录1。
平面文件只支持 txt、csv、xlsx、xls 后缀。文件名必须是字母开头且只支持数字、字母、下划线和中划线。
5. 添加平面文件成功后,您可在列表查询文件信息,包含文件名称、文件大小、文件路径、状态、操作(删除、复制 MD5)。
文件名称:用于展示平面文件的名称。
文件大小:用于展示平面文件的大小。平面文件会占用商业智能服务器的磁盘空间。
文件路径:用于展示平面文件的路径,路径固定为“D:\\SSIS\\平面文件名”,在部署 SSIS 项目时需要填写。
状态:用于展示平面文件的部署状态,包括部署成功、部署中、部署失败。如果部署成功,则表示平面文件已成功部署至商业智能服务器中,可进行部署包含该平面文件的 SSIS 项目。如果部署失败,请检查对象存储的对象访问权限是否已设置为公有读私有写。
操作(删除):用于删除已上传至商业智能服务器中的平面文件。
操作(复制 MD5):用于校验已上传到商业智能服务器中的平面文件与本地平面文件中内容是否一致,单击复制 MD5,即可获取文件密码,与本地文件进行比较。

附录1
以下为您介绍如何将平面文件(txt、csv、xlsx、xls 后缀)上传至对象存储 COS,然后获取 COS 源文件链接。
步骤1:创建存储桶
1. 登录 对象存储控制台。
2. 在左侧导航中,单击存储桶列表,进入存储桶列表页面。
3. 单击创建存储桶。
4. 在弹出的创建存储桶对话框中,根据实际需要完成对应配置,确认信息无误后,单击创建,即可创建存储桶。
步骤2:上传对象
1. 登录 对象存储控制台。
2. 在左侧导航栏中,单击存储桶列表,进入存储桶列表页面。
3. 单击需要存储对象的存储桶,进入存储桶的文件列表页面。
4. 在文件列表中,单击上传文件。
5. 在弹出的窗口中,单击选择文件或选择文件夹,根据实际需求,选择单个或多个本地文件(或文件夹),然后设置对象属性,注意访问权限选择公有读私有写,最后单击上传。
说明
部分浏览器不支持多文件上传,建议使用 IE10以上、Firefox、Chrome 等主流浏览器。

步骤3:获取 COS 源文件链接
1. 登录 对象存储控制台。
2. 在左侧导航栏中,单击存储桶列表,进入存储桶列表页面。
3. 单击存放了目标文件的存储桶,进入存储桶的文件列表页面。
4. 找到需要获取 COS 源文件链接的文件,单击其操作列的详情。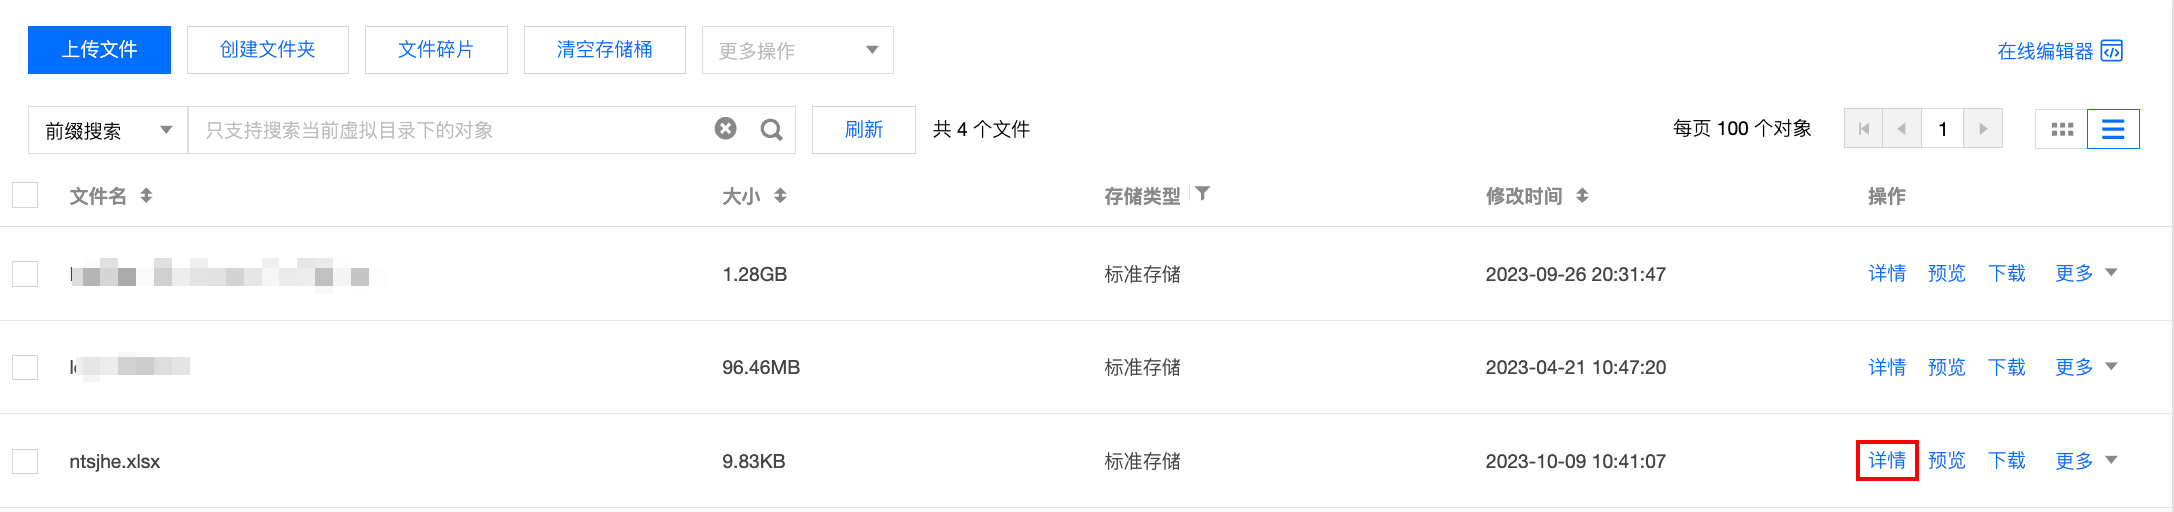
5. 在基本信息,对象地址后,单击复制图标即可获取该文件的 COS 源文件链接。


