背景
自愈机制目的:帮助业务提升稳定性,实现异常的快速恢复。
故障自愈场景
自愈场景 | 自愈的 checklist |
ping 不可达快速恢复 | 检测机器 ping 不可达告警/服务器重启等 检测机器恢复正常 调用脚本检查机器状态,恢复机器业务进程 |
其他事件相关场景 连接数超限导致丢包 外网出带宽超限导致丢包 磁盘只读 内核故障 内存 oom 实例已重启 ping 不可达 机器重启 | 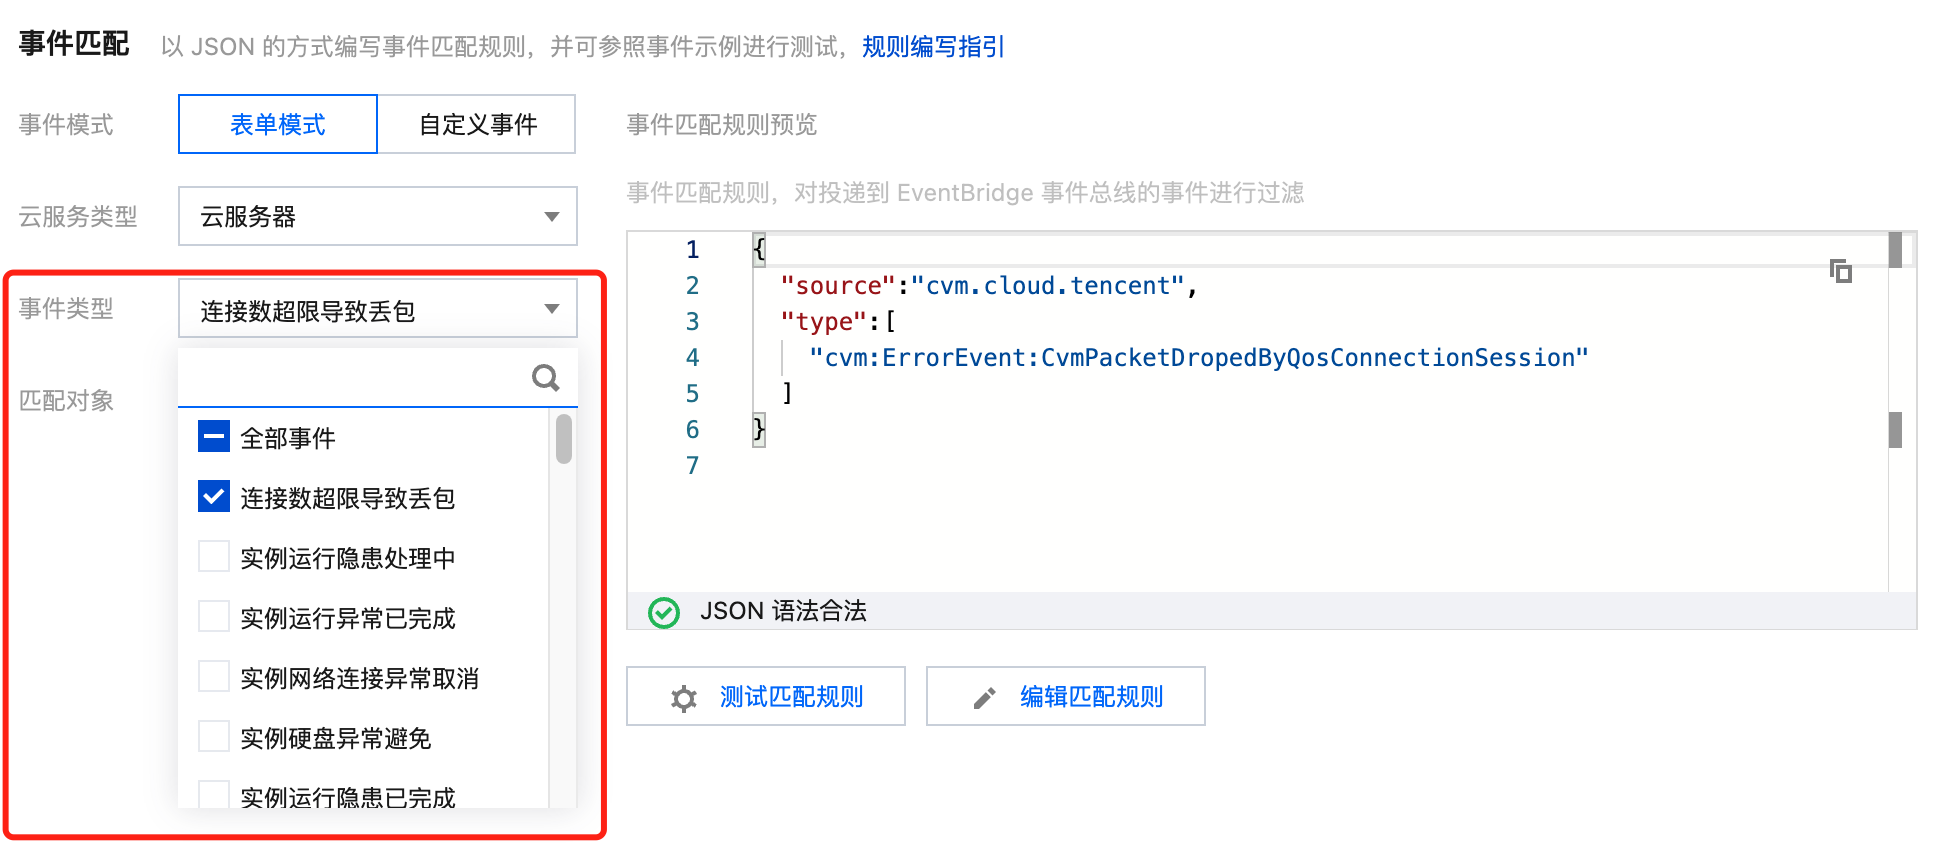 |
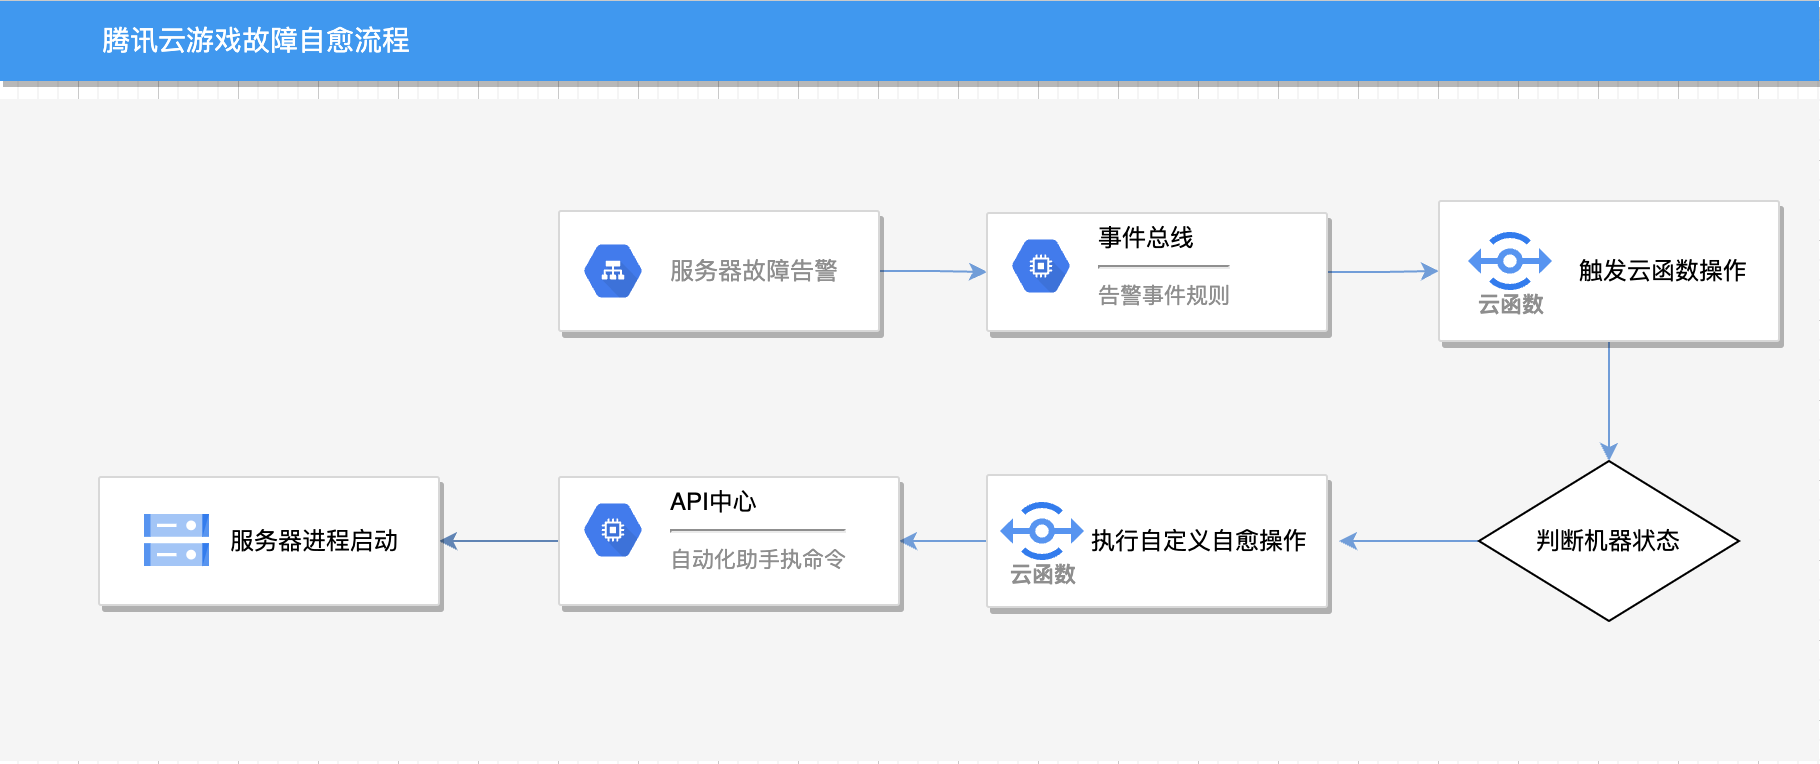
故障自愈流程
自愈云函数和告警事件自动配置
步骤1:自愈配置参数
文件名:config.json
{"//": "云函数和事件规则的name可保持默认值得不修改","scf_Name": "game_auto_recovery","RuleName": "game_auto_recovery","//": "云上自愈配置主账户uin","uin": 2159973417,"//": "执行脚本的密钥id和key","secretID": "xxxxxxxx","secretKey": "xxxxxxxxx","//": "自愈命令工作的目录","work_Directory": "/data/home/user00","//": "自愈命令执行用户名","work_User": "user00","//": "要执行的自愈命令","run_Command": "nohup /home/user00/my_program.sh >/home/user00/my_test.log 2>&1 &","//": "自愈的服务器","cvm_List": "ins-k2xxx,ins-4q9xxx"}
步骤2:执行故障自愈配置脚本
在 config.json 同目录下,插入如下脚本内容,可以命名为 create_auto_recovery.py。
# -*- coding: utf8 -*-import hashlib, hmac, json, os, sys, time, base64from datetime import datetime, timedeltaif sys.version_info[0] <= 2:from httplib import HTTPSConnectionelse:from http.client import HTTPSConnection# 计算签名摘要函数def sign(key, msg):return hmac.new(key, msg.encode("utf-8"), hashlib.sha256).digest()# 计算签名信息def authen_content(timestamp, date, secret_id, secret_key, payload, service, host, algorithm, action, params):# ************* 步骤 1:拼接规范请求串 *************http_request_method = "POST"canonical_uri = "/"canonical_querystring = ""ct = "application/json; charset=utf-8"canonical_headers = "content-type:%s\\nhost:%s\\nx-tc-action:%s\\n" % (ct, host, action.lower())signed_headers = "content-type;host;x-tc-action"hashed_request_payload = hashlib.sha256(payload.encode("utf-8")).hexdigest()canonical_request = (http_request_method + "\\n" +canonical_uri + "\\n" +canonical_querystring + "\\n" +canonical_headers + "\\n" +signed_headers + "\\n" +hashed_request_payload)# ************* 步骤 2:拼接待签名字符串 *************credential_scope = date + "/" + service + "/" + "tc3_request"hashed_canonical_request = hashlib.sha256(canonical_request.encode("utf-8")).hexdigest()string_to_sign = (algorithm + "\\n" +str(timestamp) + "\\n" +credential_scope + "\\n" +hashed_canonical_request)# ************* 步骤 3:计算签名 *************secret_date = sign(("TC3" + secret_key).encode("utf-8"), date)secret_service = sign(secret_date, service)secret_signing = sign(secret_service, "tc3_request")signature = hmac.new(secret_signing, string_to_sign.encode("utf-8"), hashlib.sha256).hexdigest()# ************* 步骤 4:拼接 Authorization *************authorization = (algorithm + " " +"Credential=" + secret_id + "/" + credential_scope + ", " +"SignedHeaders=" + signed_headers + ", " +"Signature=" + signature)return(authorization)# 创建云函数def CreateFunction(timestamp, date, secretID, secretKey, scf_Name, work_Directory, work_User, run_Command):token = ""service = "scf"host = "%s.tencentcloudapi.com" % serviceendpoint = "https://" + hostregion = "ap-guangzhou"version = "2018-04-16"action = "CreateFunction"payload = "{\\"FunctionName\\":\\"%s\\",\\"Code\\":{\\"DemoId\\":\\"demo-951rub7u\\"},\\"Handler\\":\\"index.main_handler\\",\\"Description\\":\\"故障自愈\\",\\"MemorySize\\":256,\\"Timeout\\":100,\\"Environment\\":{\\"Variables\\":[{\\"Key\\":\\"secretID\\",\\"Value\\":\\"%s\\"},{\\"Key\\":\\"secretKey\\",\\"Value\\":\\"%s\\"},{\\"Key\\":\\"work_Directory\\",\\"Value\\":\\"%s\\"},{\\"Key\\":\\"work_User\\",\\"Value\\":\\"%s\\"},{\\"Key\\":\\"run_Command\\",\\"Value\\":\\"%s\\"}]},\\"Runtime\\":\\"Python3.6\\",\\"Namespace\\":\\"default\\"}" % (scf_Name, secretID, secretKey,work_Directory, work_User, run_Command)params = json.loads(payload)algorithm = "TC3-HMAC-SHA256"authorization = authen_content(timestamp, date, secretID, secretKey, payload, service, host, algorithm, action, params)headers = {"Authorization": authorization,"Content-Type": "application/json; charset=utf-8","Host": host,"X-TC-Action": action,"X-TC-Timestamp": timestamp,"X-TC-Version": version}if region:headers["X-TC-Region"] = regionif token:headers["X-TC-Token"] = tokentry:req = HTTPSConnection(host)req.request("POST", "/", headers=headers, body=payload.encode("utf-8"))resp = req.getresponse()return(resp.read())except Exception as err:print(err)# 创建规则def CreateRule(timestamp, date, secretID, secretKey, RuleName, cvm_List):token = ""service = "eb"host = "%s.tencentcloudapi.com" % serviceendpoint = "https://" + hostregion = "ap-guangzhou"version = "2021-04-16"action = "CreateRule"cvmlist = ''cvmlists = cvm_List.split(',')params = {"Enable": True, "Description": "故障自愈","EventPattern": "{\\n \\"source\\": \\"cvm.cloud.tencent\\",\\n \\"type\\": [\\n \\"cvm:ErrorEvent:GuestReboot\\",\\n \\"cvm:ErrorEvent:PingUnreachable\\"\\n ]\\n}","EventBusId": "eb-df1713l8", "RuleName": "%s" % RuleName}if cvm_List != "":for i in range(len(cvmlists)):if i < len(cvmlists)-1:cvmlist = cvmlist + "\\n \\"%s\\"" % cvmlists[i] + ","else:cvmlist = cvmlist + "\\n \\"%s\\"" % cvmlists[i]params = {"Enable": True, "Description": "故障自愈","EventPattern": "{\\n \\"source\\": \\"cvm.cloud.tencent\\",\\n \\"type\\": [\\n \\"cvm:ErrorEvent:GuestReboot\\",\\n \\"cvm:ErrorEvent:PingUnreachable\\"\\n ],\\n \\"subject\\": [%s\\n ]\\n}" % cvmlist,"EventBusId": "eb-df1713l8", "RuleName": "%s" % RuleName}payload = json.dumps(params)algorithm = "TC3-HMAC-SHA256"authorization = authen_content(timestamp, date, secretID, secretKey, payload, service, host, algorithm, action, params)headers = {"Authorization": authorization,"Content-Type": "application/json; charset=utf-8","Host": host,"X-TC-Action": action,"X-TC-Timestamp": timestamp,"X-TC-Version": version}if region:headers["X-TC-Region"] = regionif token:headers["X-TC-Token"] = tokentry:req = HTTPSConnection(host)req.request("POST", "/", headers=headers, body=payload.encode("utf-8"))resp = req.getresponse()return(resp.read())except Exception as err:print(err)# 创建规则目标def CreateTarget(timestamp, date, secretID, secretKey, uin, scf_Name, RuleId):token = ""service = "eb"host = "%s.tencentcloudapi.com" % serviceendpoint = "https://" + hostregion = "ap-guangzhou"version = "2021-04-16"action = "CreateTarget"payload = "{\\"EventBusId\\":\\"eb-df1713l8\\",\\"Type\\":\\"scf\\",\\"TargetDescription\\":{\\"ResourceDescription\\":\\"qcs::scf:ap-guangzhou:uin/%s:namespace/default/function/%s/$LATEST\\"},\\"RuleId\\":\\"%s\\"}" % (uin, scf_Name, RuleId)params = json.loads(payload)algorithm = "TC3-HMAC-SHA256"authorization = authen_content(timestamp, date, secretID, secretKey, payload, service, host, algorithm, action, params)headers = {"Authorization": authorization,"Content-Type": "application/json; charset=utf-8","Host": host,"X-TC-Action": action,"X-TC-Timestamp": timestamp,"X-TC-Version": version}if region:headers["X-TC-Region"] = regionif token:headers["X-TC-Token"] = tokentry:req = HTTPSConnection(host)req.request("POST", "/", headers=headers, body=payload.encode("utf-8"))resp = req.getresponse()return(resp.read())except Exception as err:print(err)if __name__ == '__main__':print("开始为您配置故障自愈.......")timestamp = int(time.time())date = datetime.utcfromtimestamp(timestamp).strftime("%Y-%m-%d")# load configwith open('config.json') as file:config = json.load(file)uin = config['uin']secretID = config['secretID']secretKey = config['secretKey']work_Directory = config['work_Directory']work_User = config['work_User']run_Command = config['run_Command']scf_Name = config['scf_Name']RuleName = config['RuleName']cvm_List = config['cvm_List']# 创建云函数result_func = CreateFunction(timestamp, date, secretID, secretKey, scf_Name, work_Directory, work_User, run_Command)if 'Error' not in result_func.decode('utf-8'):print("故障自愈云函数初始化中,预计需要60s.")time.sleep(60)# 创建事件规则RuleNameGet = CreateRule(timestamp, date, secretID, secretKey, RuleName, cvm_List)RuleNameGet_dec = RuleNameGet.decode('utf-8')if 'Error' not in RuleNameGet_dec:RuleId = json.loads(RuleNameGet_dec)['Response']['RuleId']print("服务器事件规则配置中,预计需要10s.")# 创建事件规则目标result_target = CreateTarget(timestamp, date, secretID, secretKey, uin, scf_Name, RuleId)if 'Error' not in result_target.decode('utf-8'):print("您的故障自愈已配置完成,自定义配置请参考文档https://cloud.tencent.com/document/product/248/109573。")
步骤3:执行脚本创建自愈配置
找一台 CVM 服务器,将 config.json 和自愈脚本(命名为 create_auto_recovery.py)放在相同目录下,执行 create_auto_recovery.py 自动创建自愈配置。

自愈云函数和告警事件手动配置
步骤1:云函数配置
1. 登录 云函数 > 函数服务。
2. 选择函数服务的区域以及命名空间,例如选择广州区域,命名空间 default,然后单击新建。
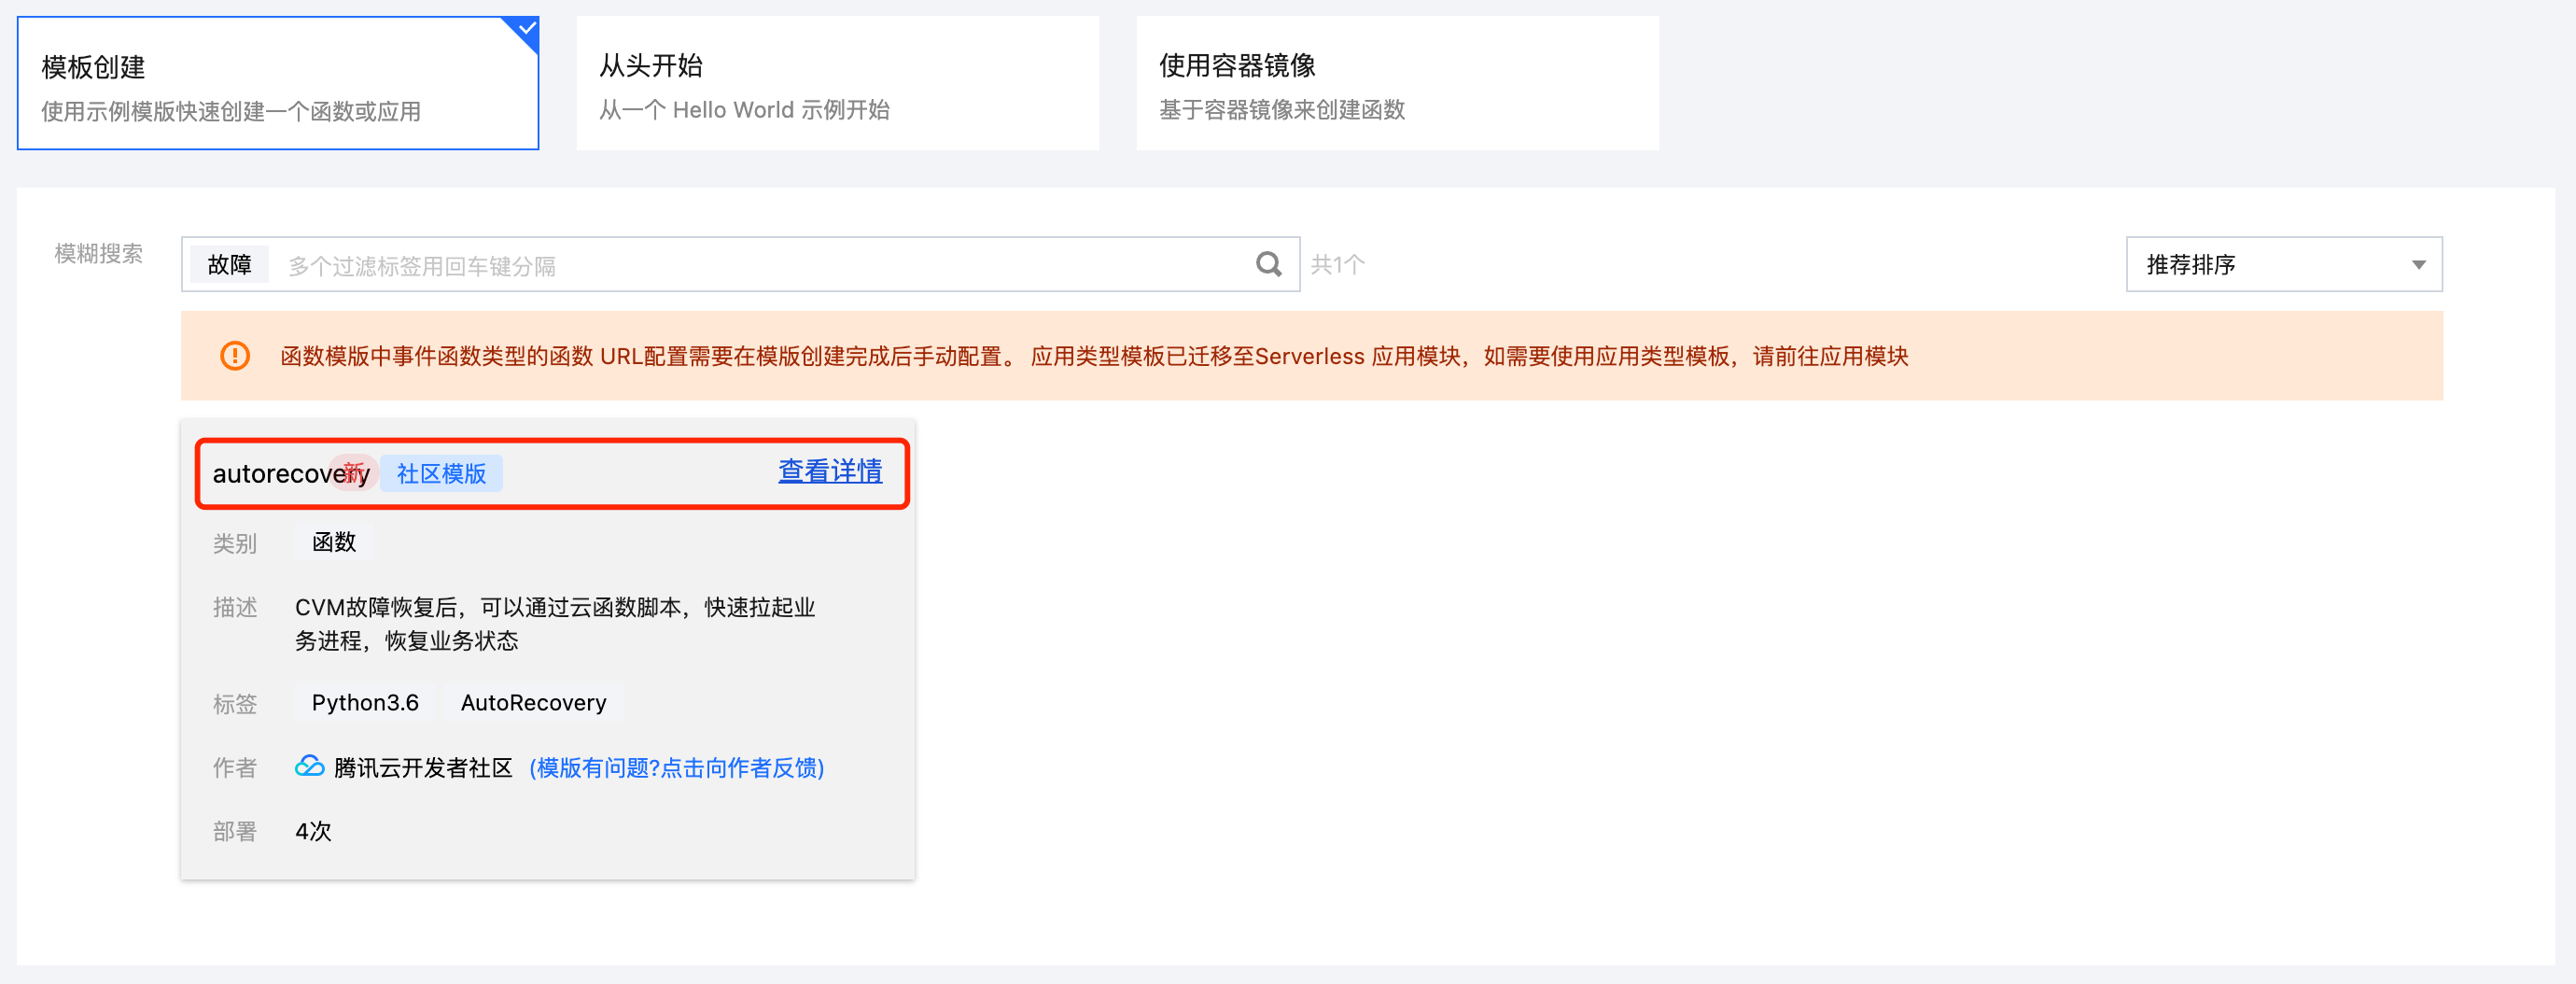
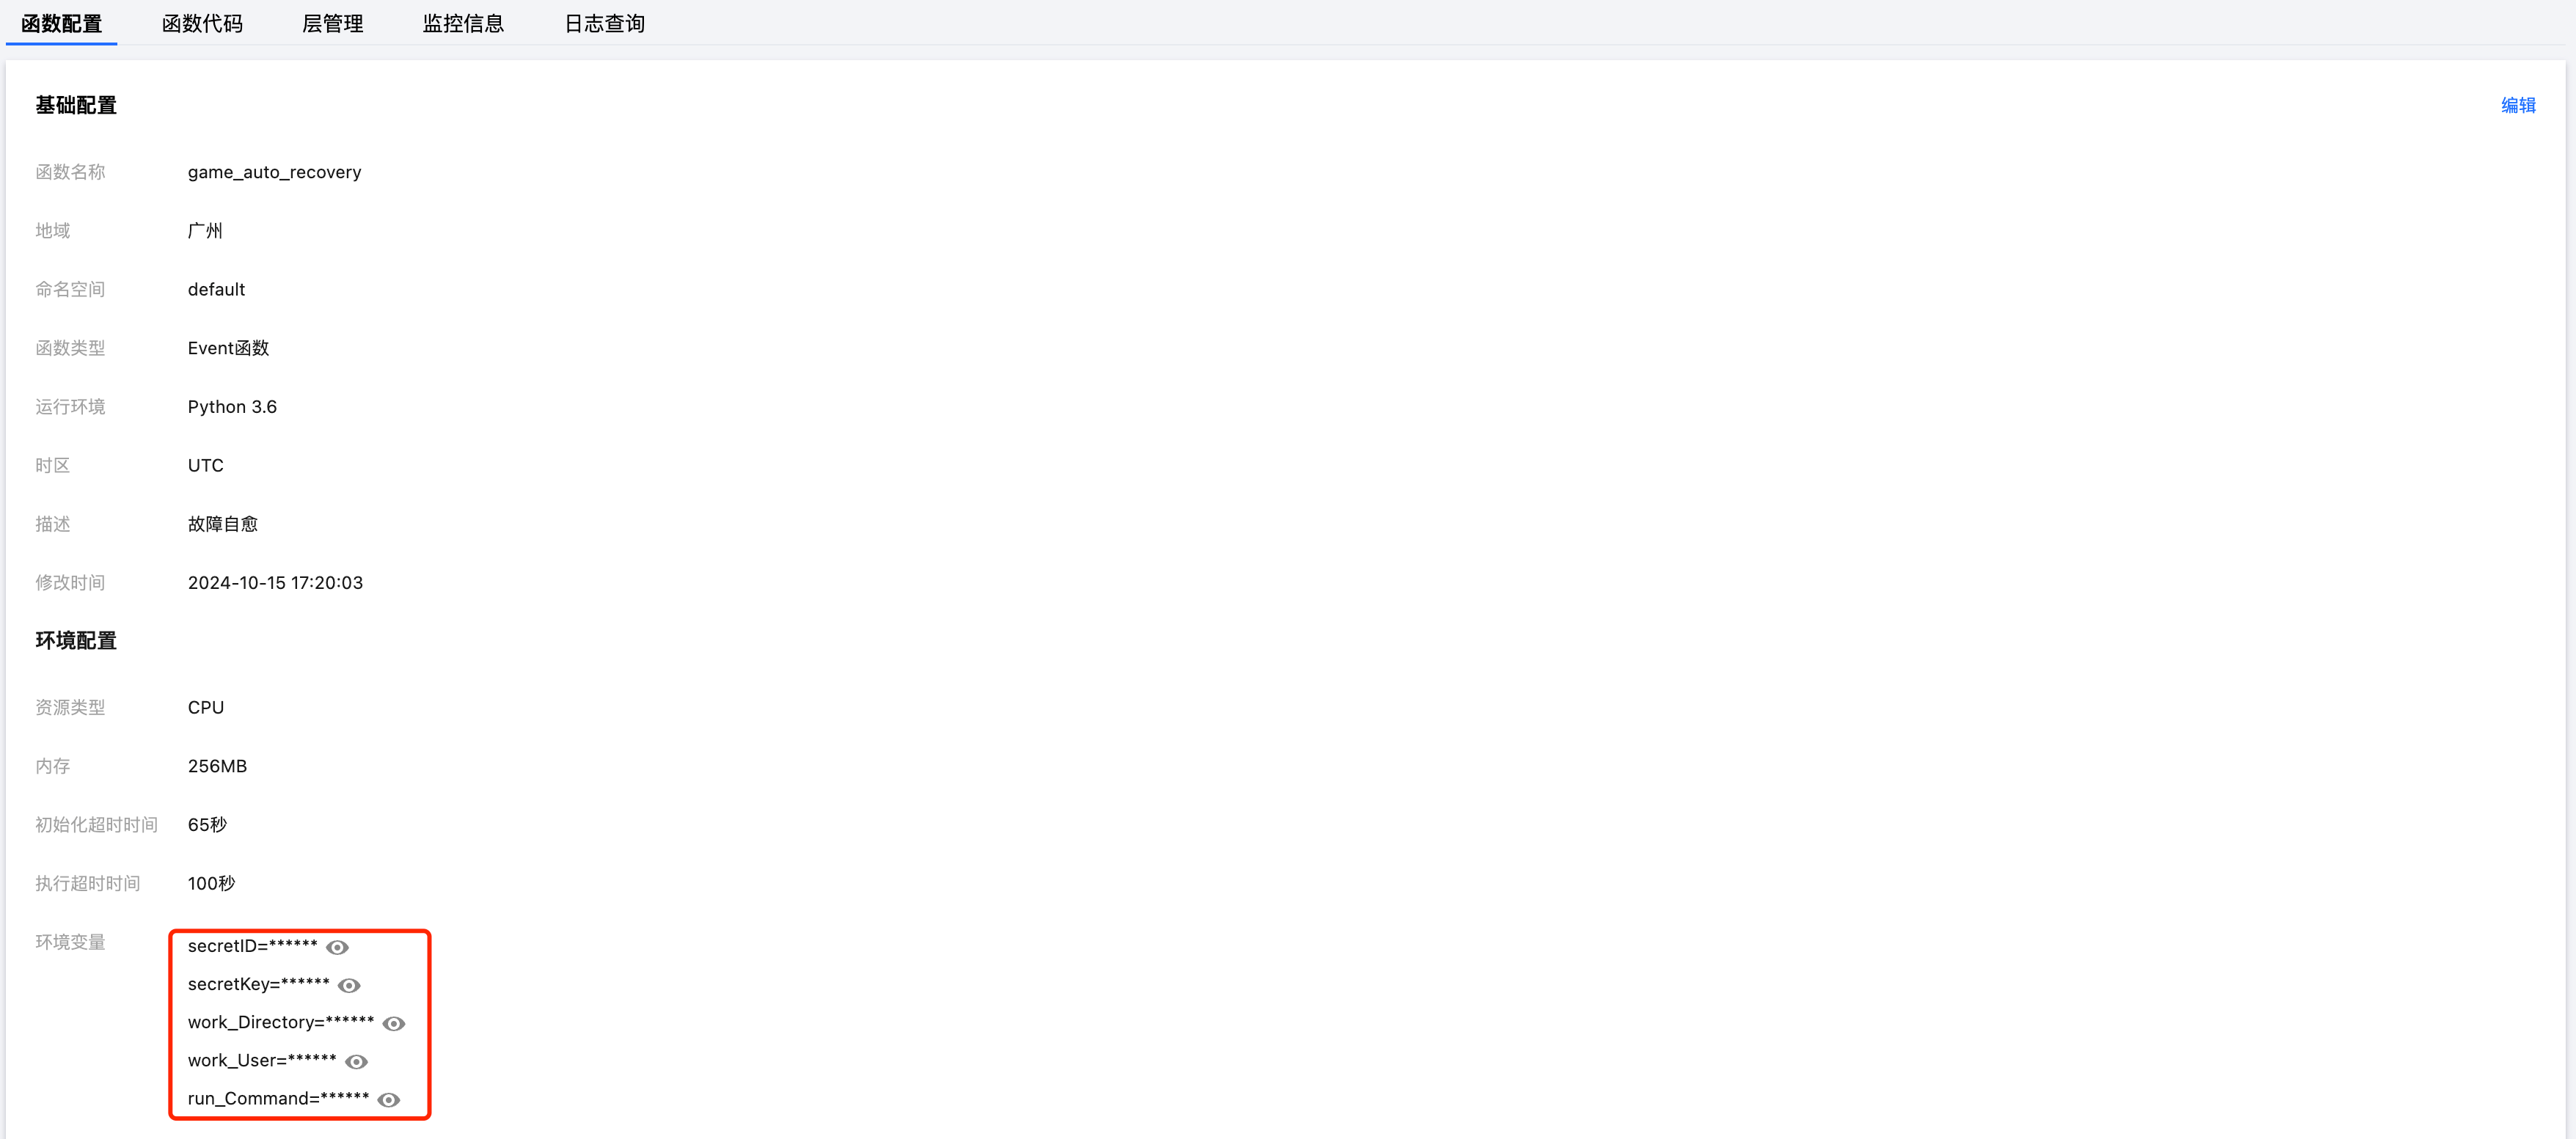
3. 新建函数。选择模板创建,搜索“故障”即可找到云函数模板,详情可参见 创建函数。具体参数参考下图:
4. 设置云函数超时时间。进入函数管理 > 函数配置页面,单击编辑,在环境配置中设置云函数超时时间。
5. 云函数有4个环境变量,请设置为您需要传递的值。
步骤2:配置告警事件规则
1. 进入 腾讯云可观测平台 > 事件总线 > 事件规则 页面。
2. 选择事件集归属与地域,例如地域广州,事件集 default。
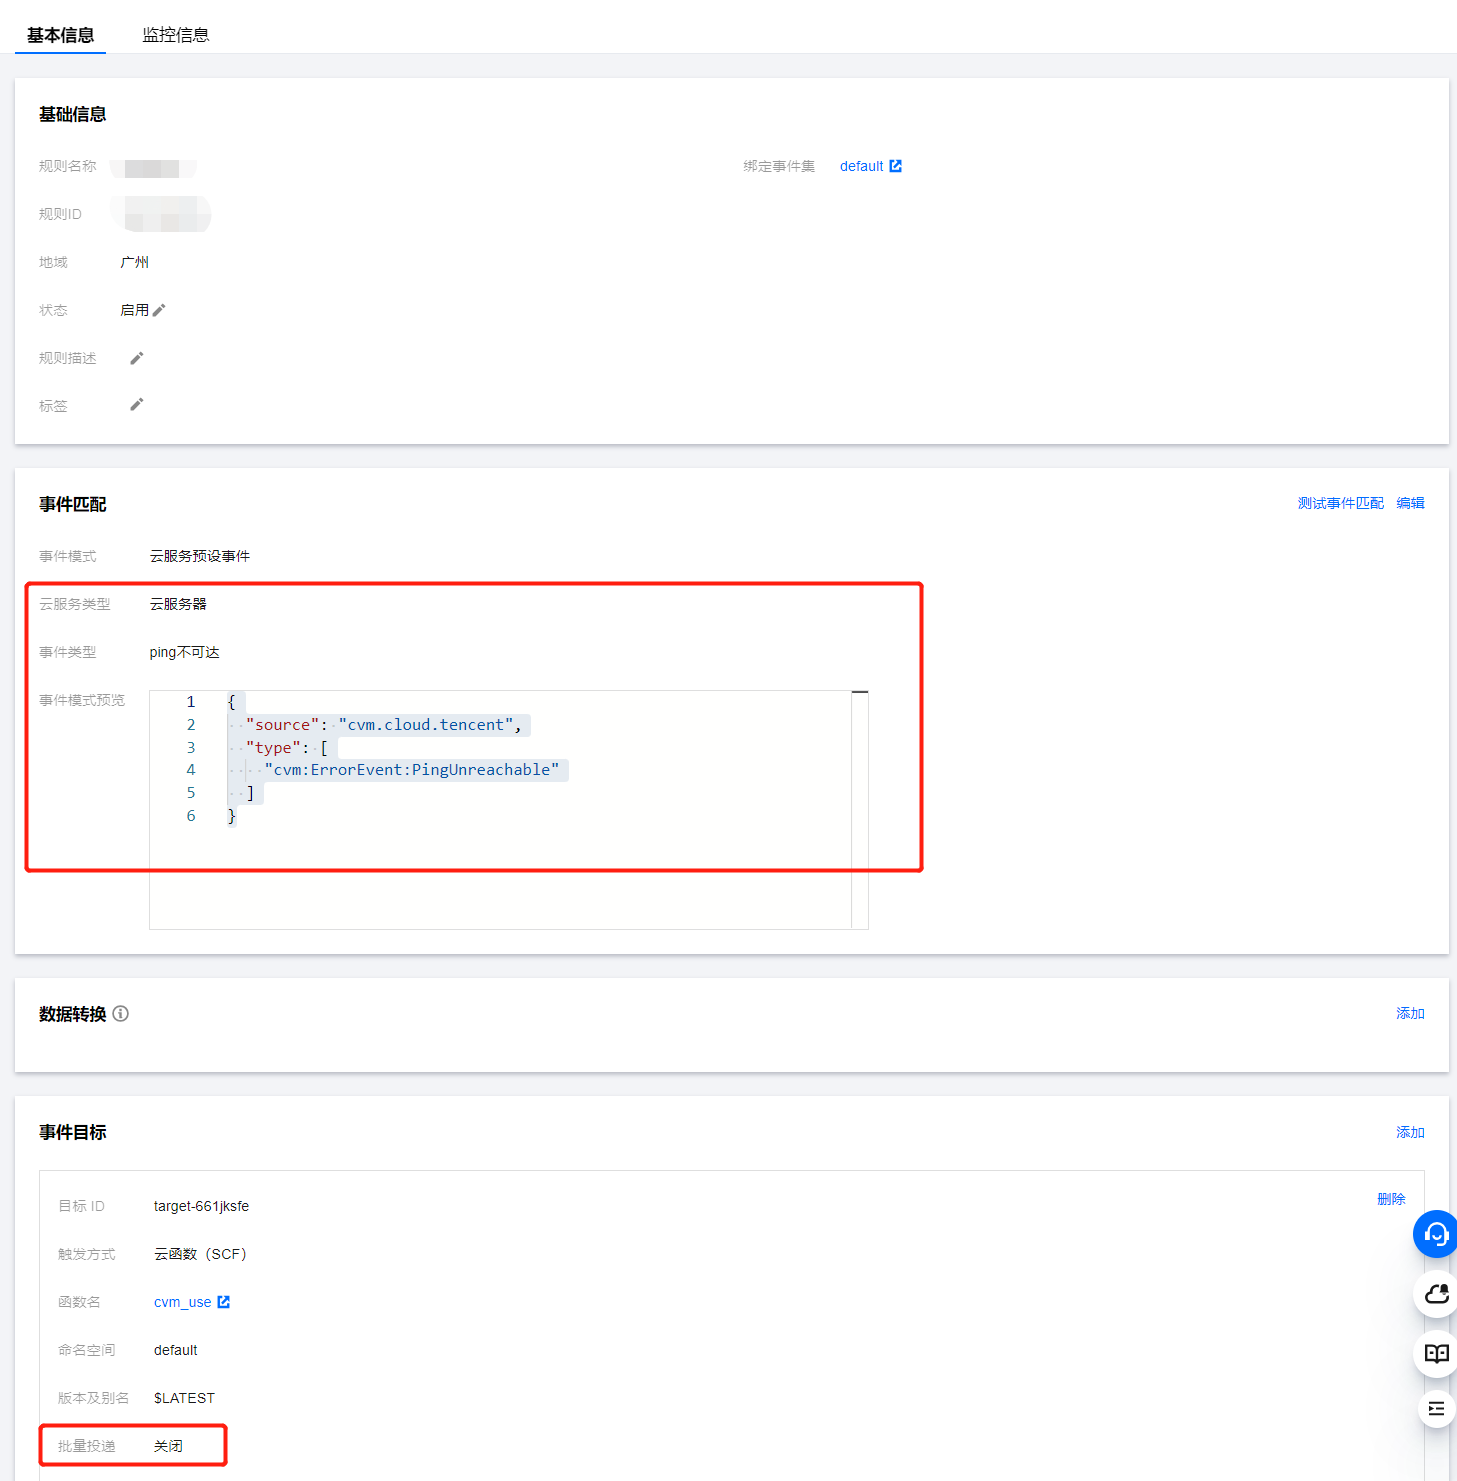
3. 单击新建,根据页面提示填写相关信息,如下图所示。操作步骤可参见 创建事件规则。
事件匹配:云服务类型选择云服务器,事件类型选择 ping 不可达。
事件目标:触发方式选择云函数,然后选择自己配置的目标云函数。
触发方式:选择云函数(SCF)。
命名空间:选择云函数创建的空间,默认为 default。
版本及别名:选择您命名的云函数版本,默认为“$LATEST”。
批量投递:选择关闭。
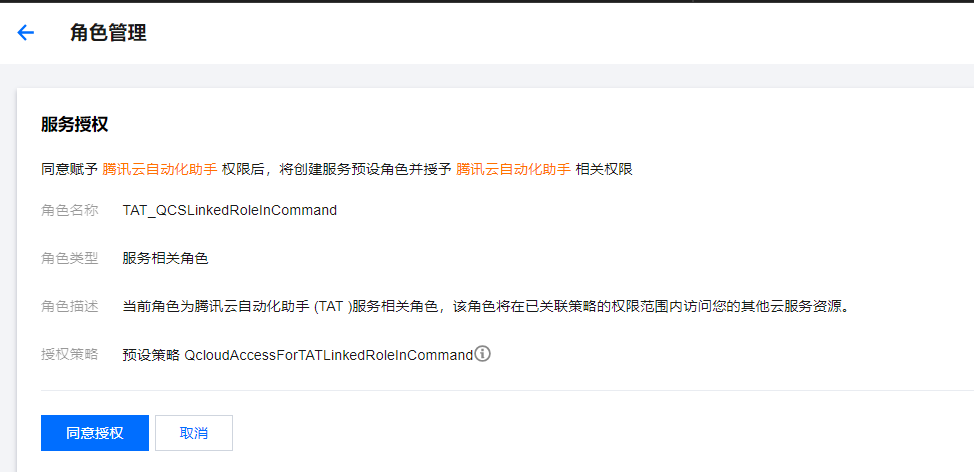
步骤3:账号权限配置
如果账号提示如下报错信息,则表示当前账号没有权限,需要添加权限。
"Error": {"Code": "ResourceNotFound.RoleNotFound", "Message": "The specified role `TAT_QCSLinkedRoleInCommand` is not found, please add the role for your account."}
说明:
故障自愈演练的过程
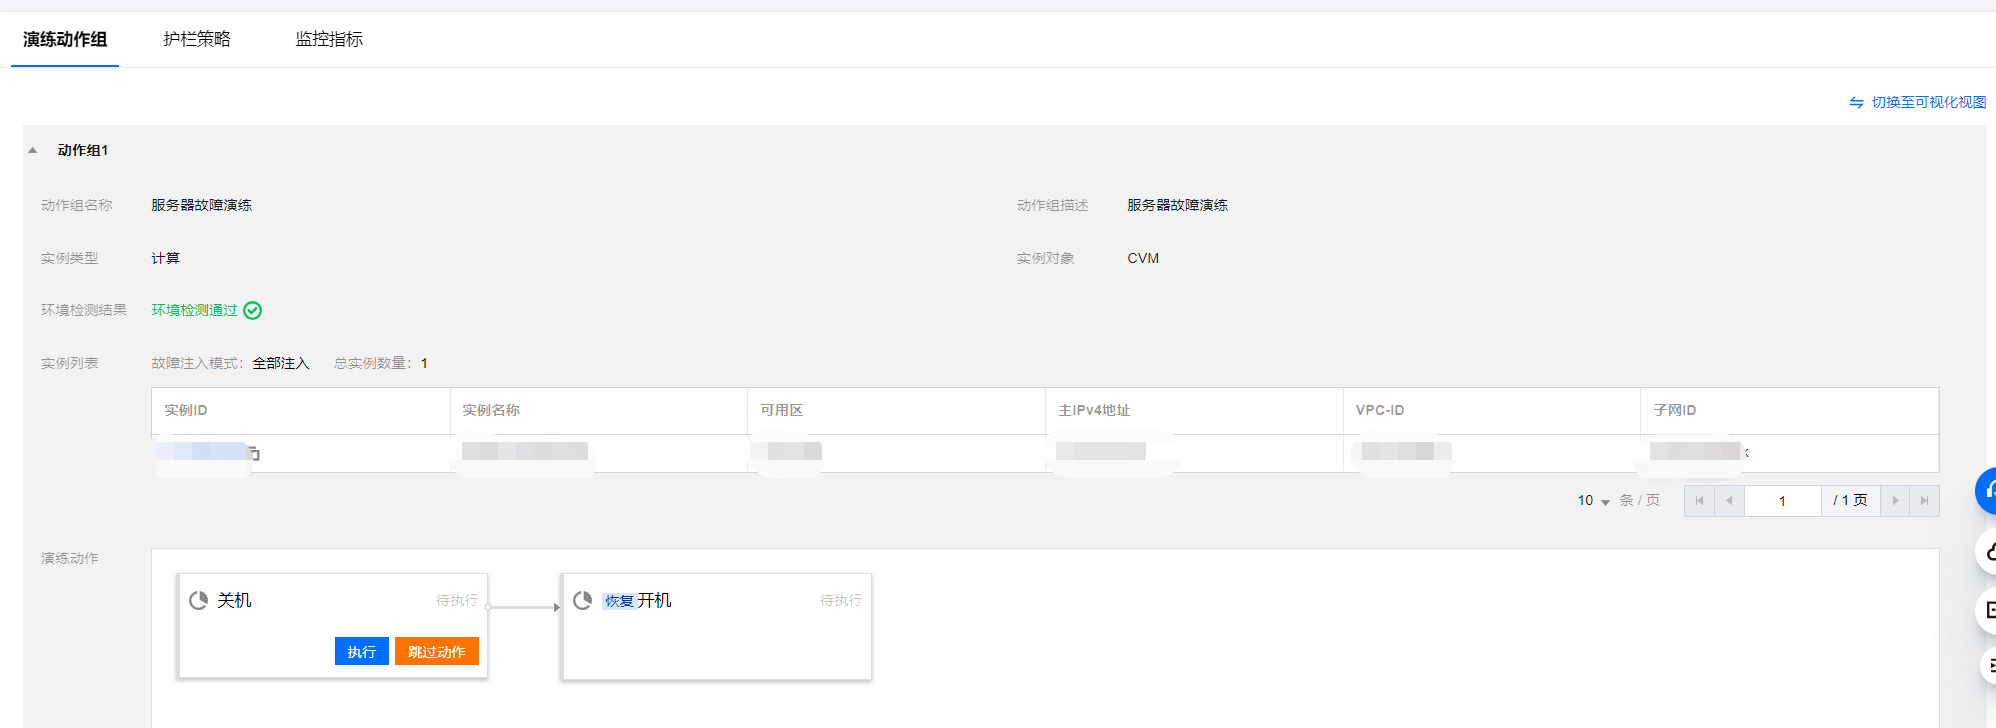
1. 进入 云顾问 > 混沌演练 > 演练管理 页面,新增服务器关机故障动作,创建步骤可参见 控制台快速上手。
2. 执行服务器故障演练,模拟服务群宕机和重启的过程。
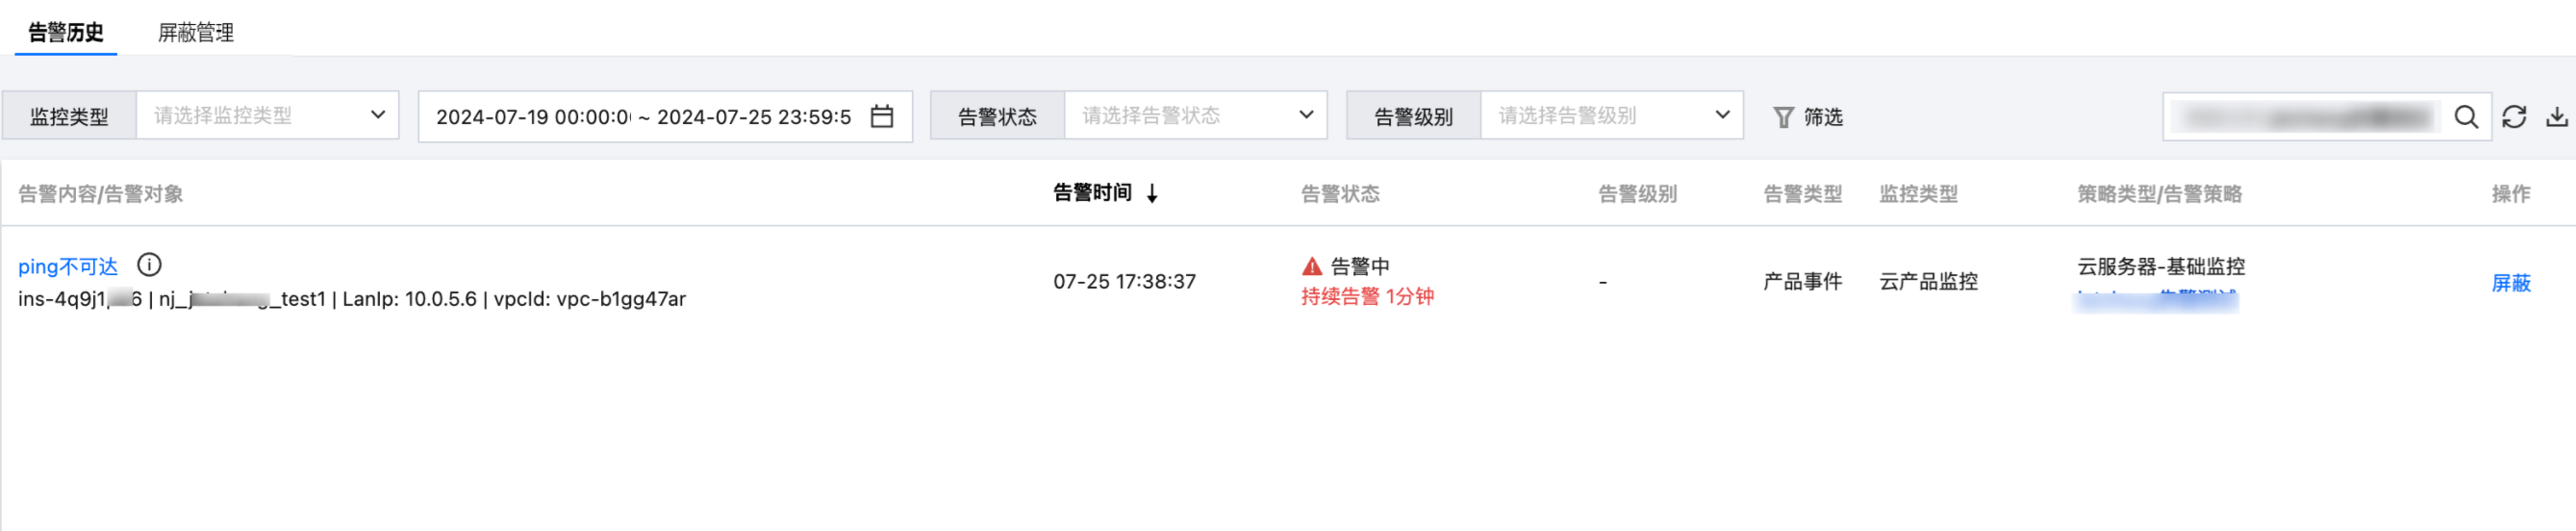
3. 故障演练告警和事件触发。
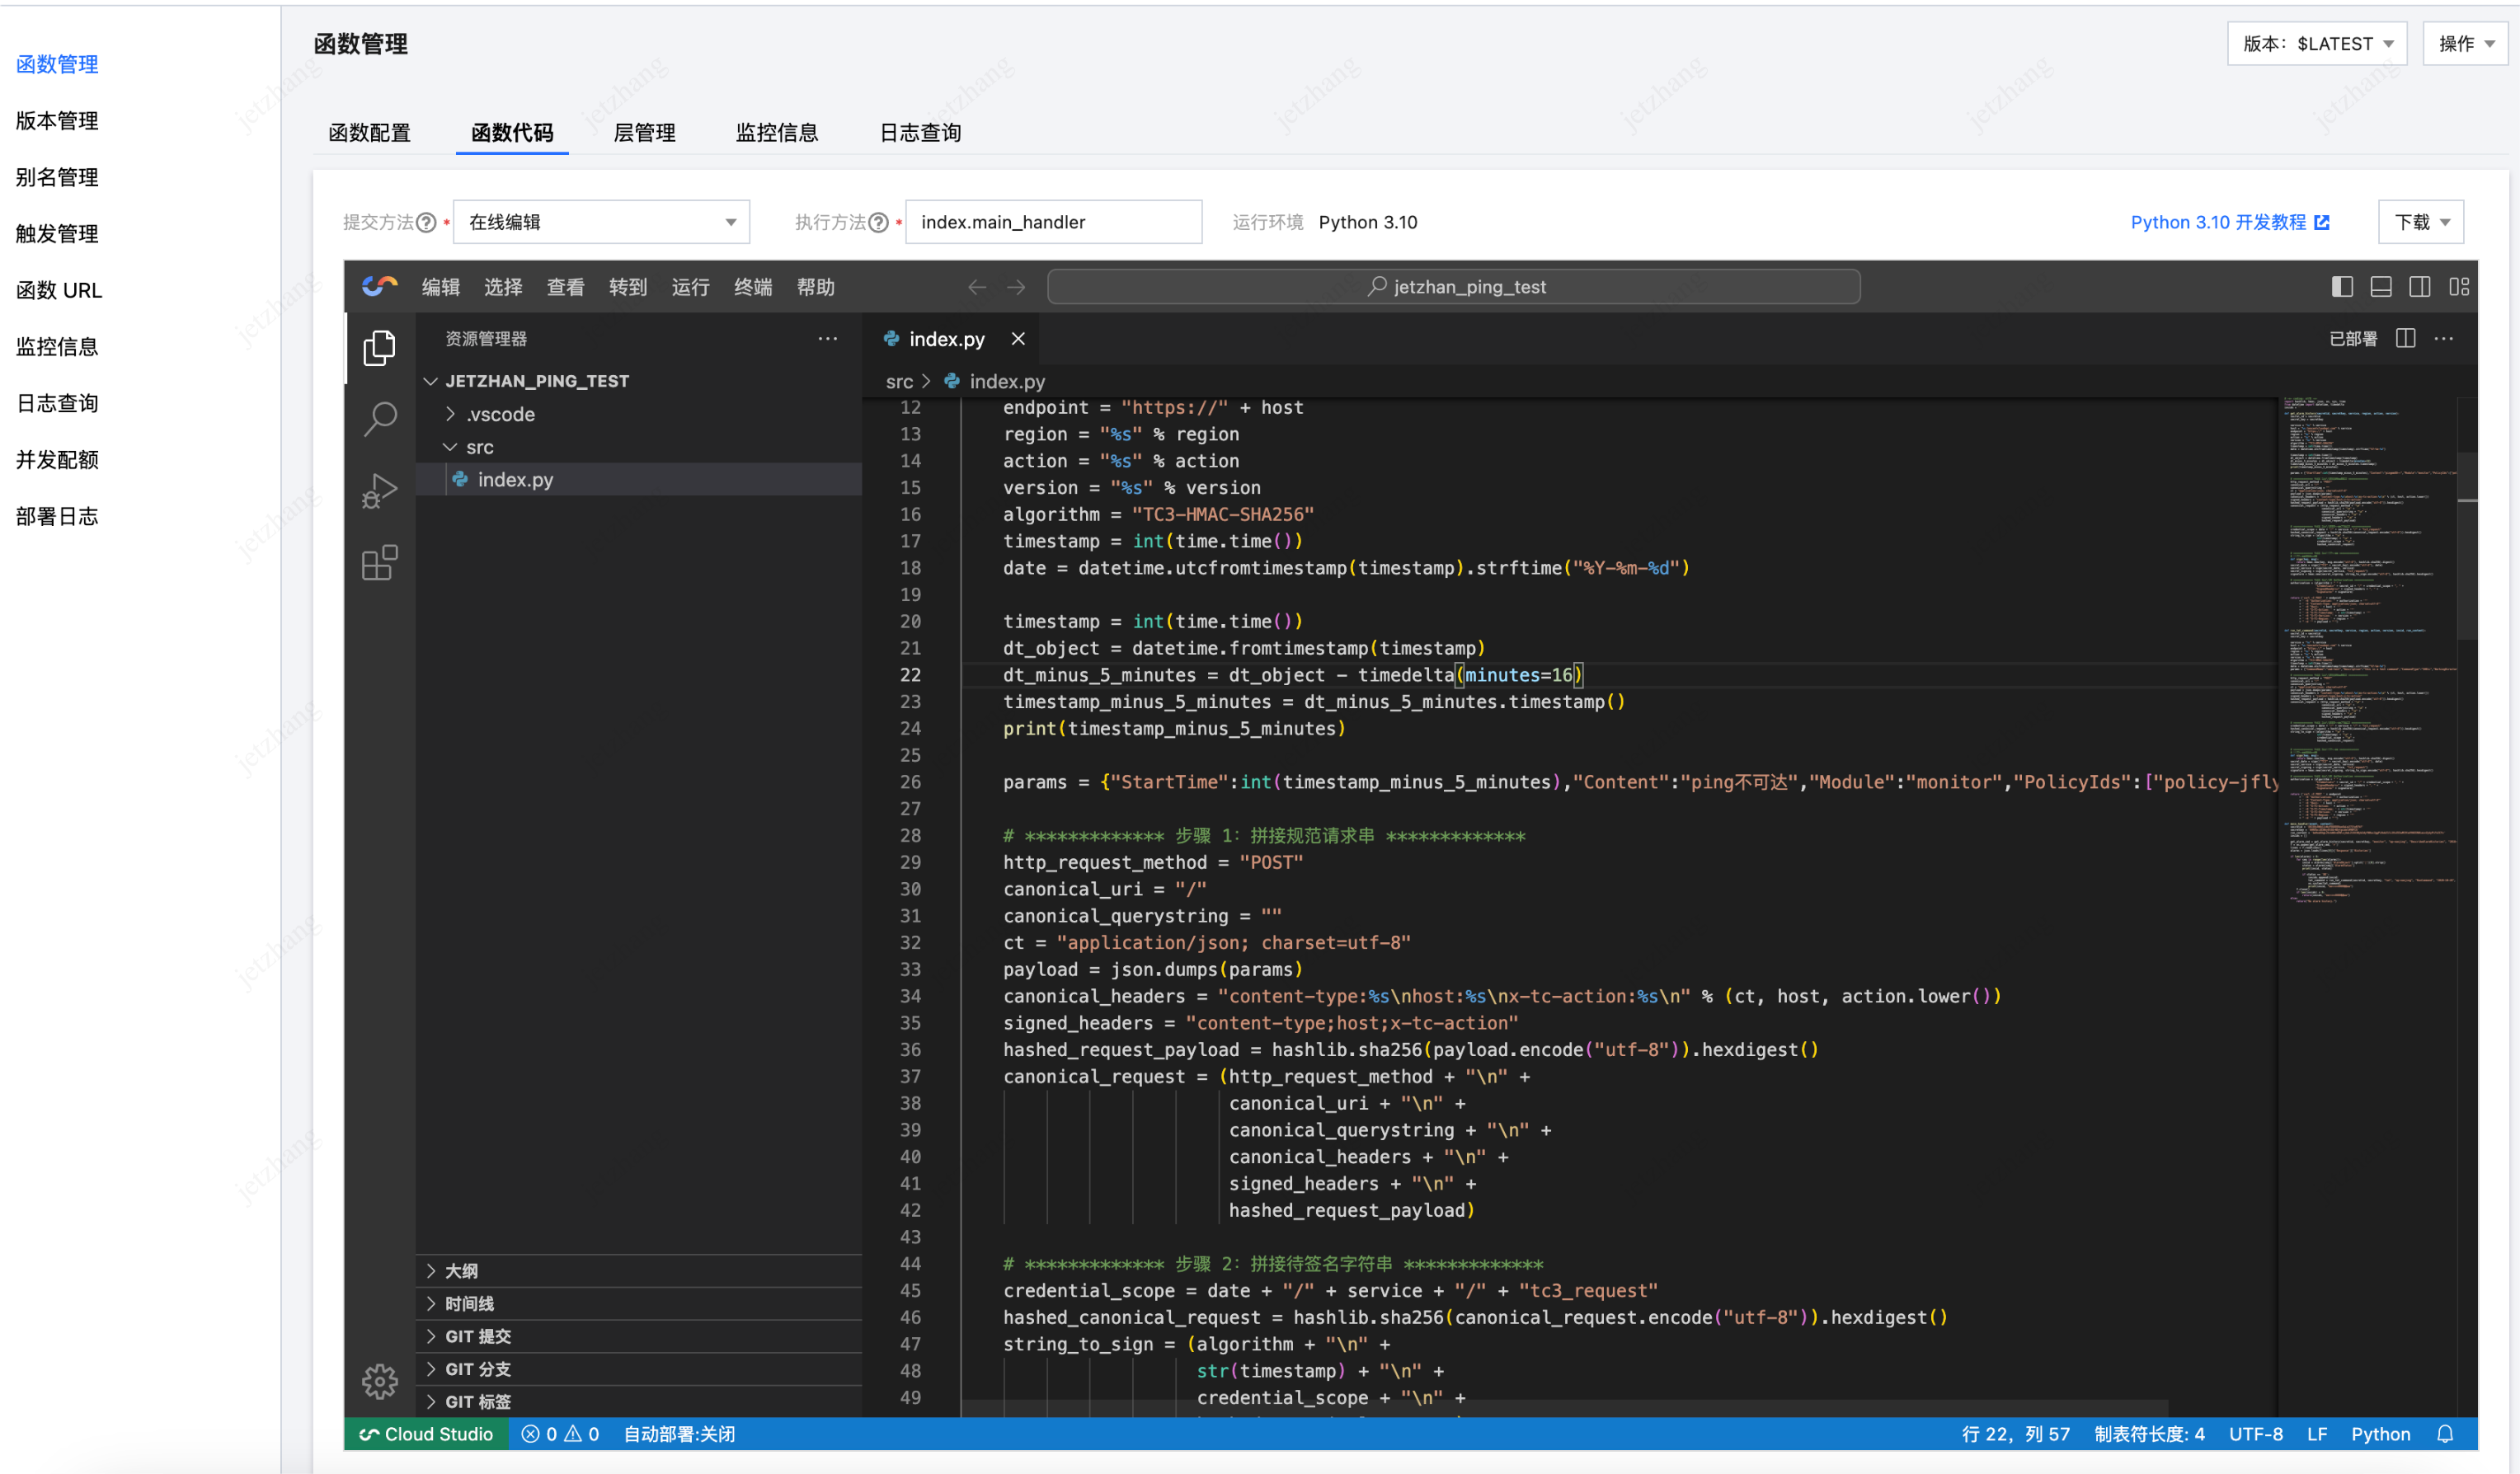
4. 云函数部署效果。登录 Serverless > 函数服务 页面,进入 步骤一新建的函数 中,在函数代码中查看效果。
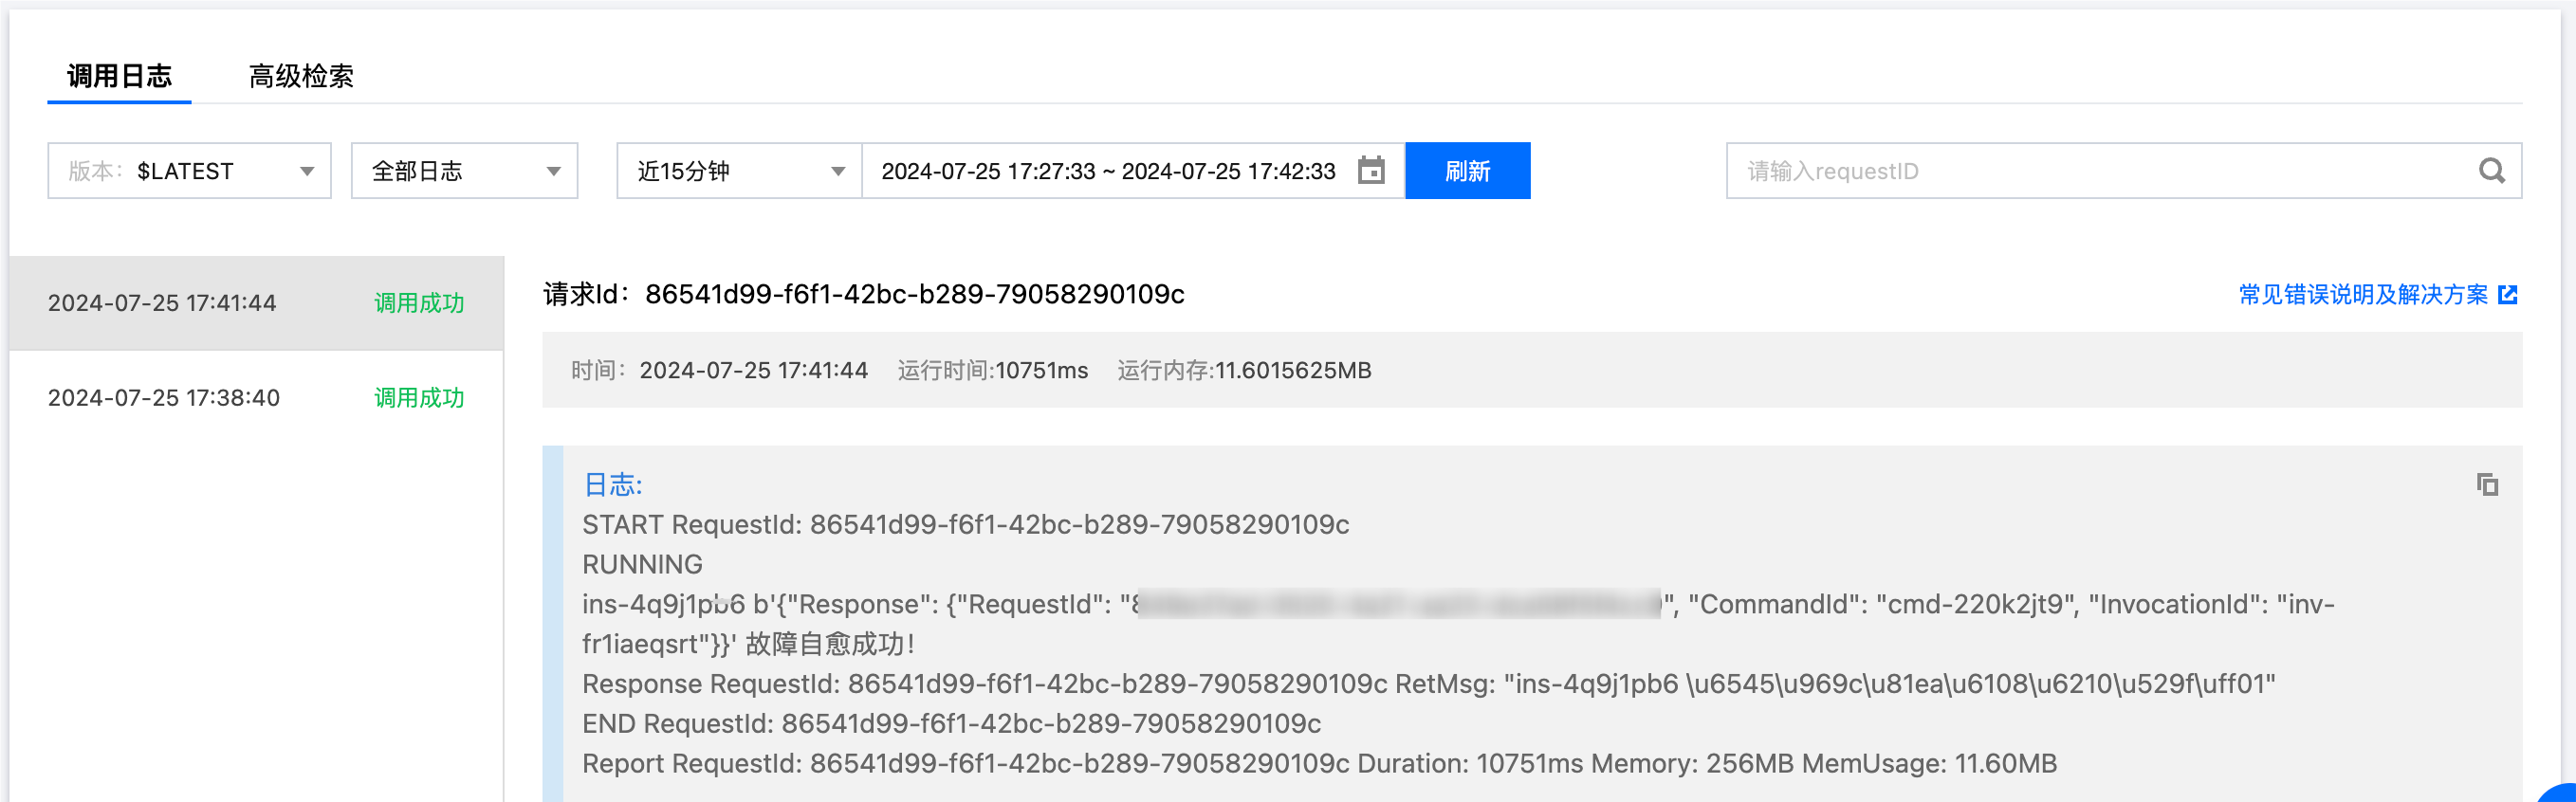
5. 云函数定时执行故障效果。在日志查询中查看函数运行日志。
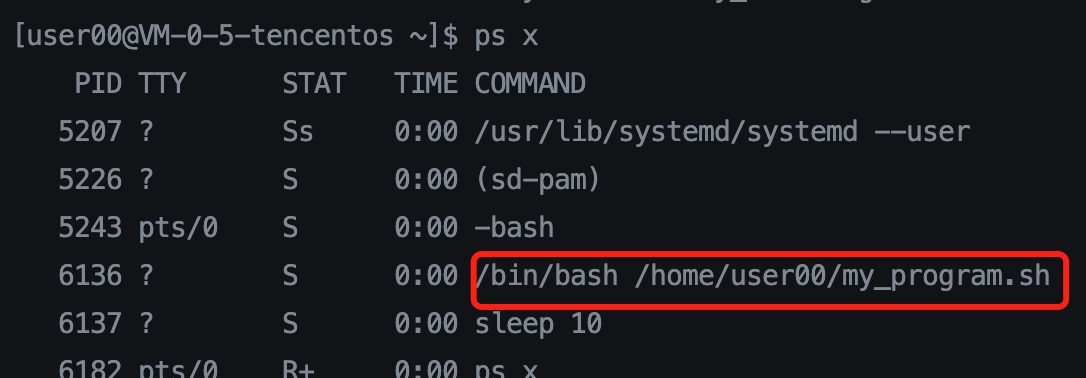
6. 服务器实际自愈的效果。服务器启动后,脚本被自动拉起。
预期收益
操作内容 | 预计时间 | 提升效率 |
服务器异常事件 > 使用运维工具/手动启动游戏进程 > 检查进程状态 | 20 ~ 30 分钟 | 节省时间 75%左右 |
服务器异常事件 > 自动拉起进程和检查 | 5 分钟 | |
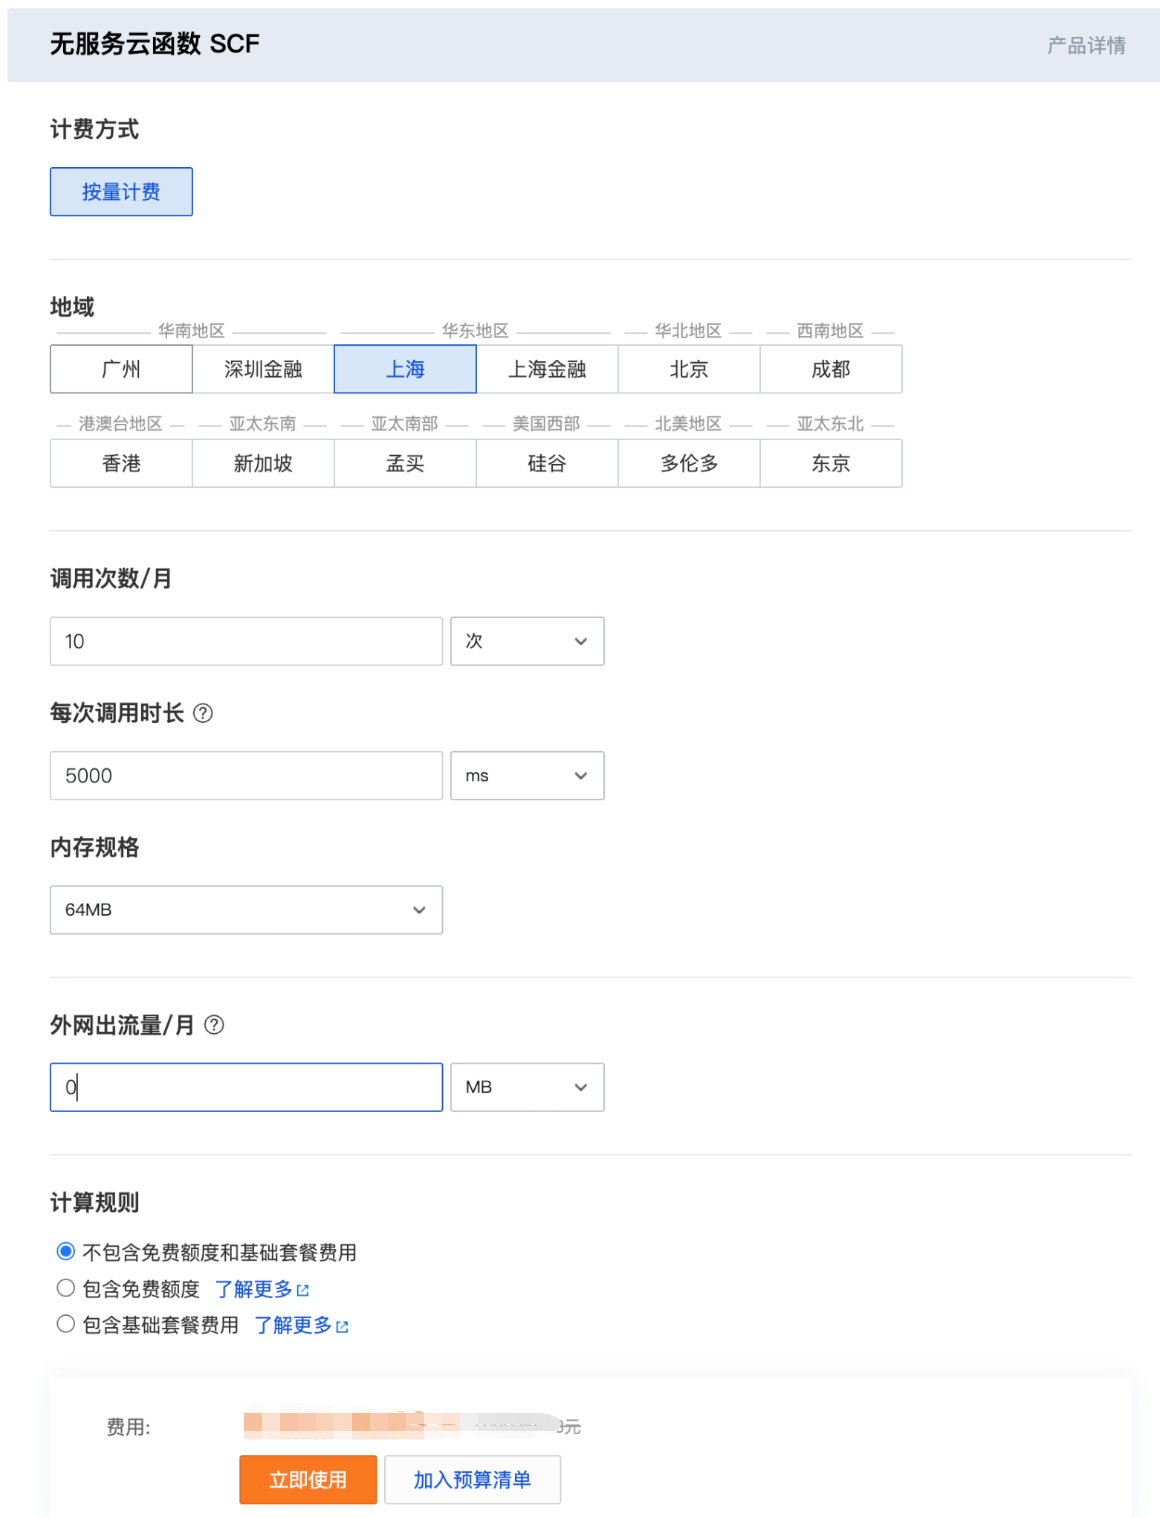
费用计算
云函数按量计费标准可参见 云函数基本能力产品定价。
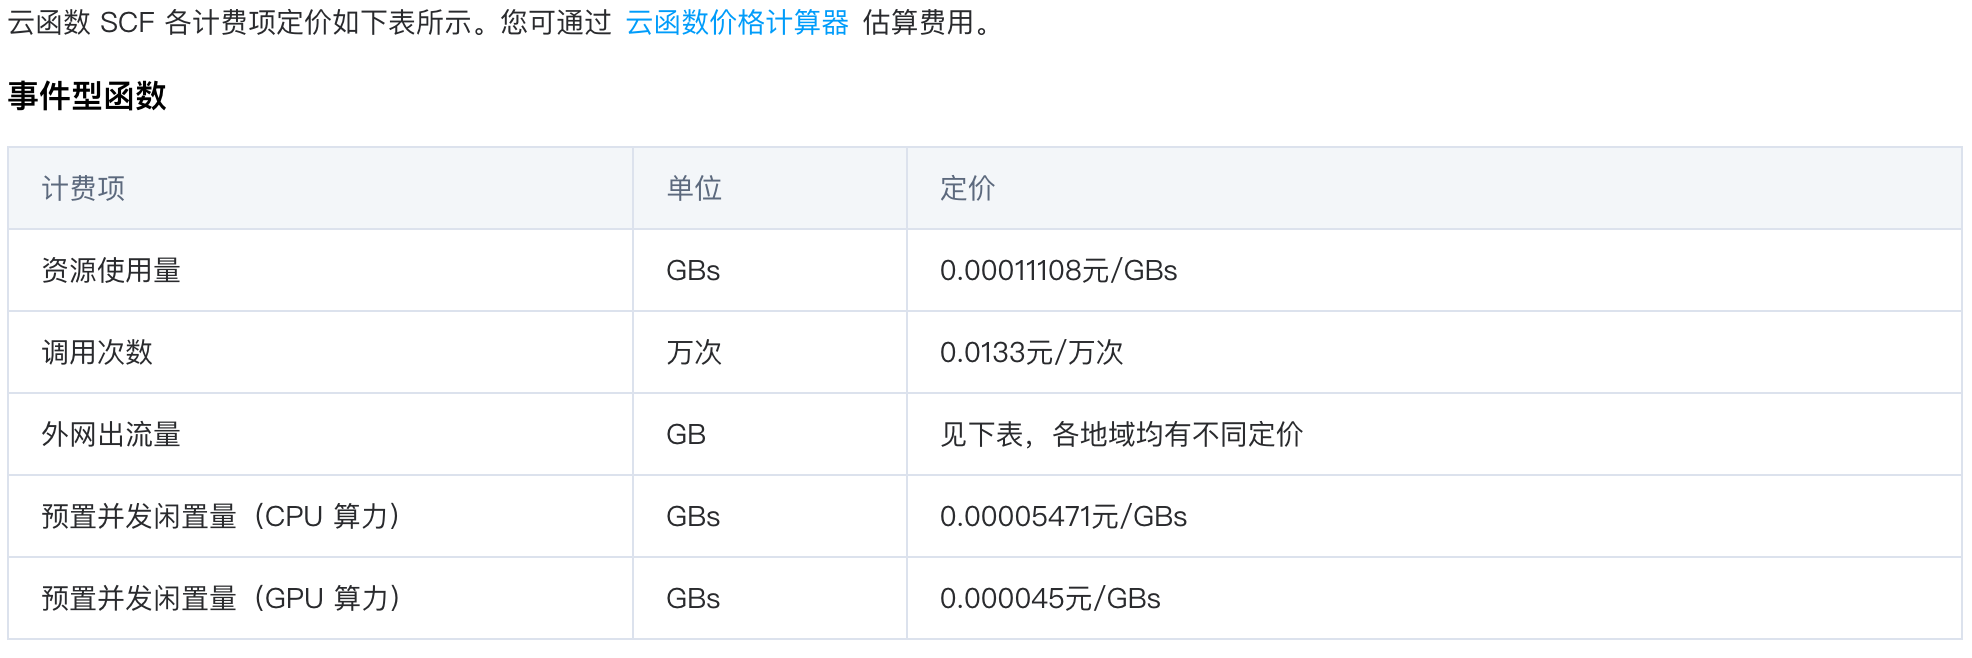
实际费用计算。您可根据自身业务需求预估计费项的用量,通过 价格计算器 进行计算。