TUIKit SwiftUI 是基于腾讯云 IM SDK 的一套 SwiftUI UI 组件库,提供了聊天、会话列表、联系人管理等即时通信功能的完整解决方案。本文介绍如何手动集成该组件并实现核心功能。
关键概念
TUIKit SwiftUI 提供了一套完整的即时通信 UI 组件,向下依赖 AtomicXCore 数据层,向上可构建各种功能性 Page。
Page 层:基于 TUIKit SwiftUI 组件封装的完整功能页面:ChatPage、ContactsPage、ConversationsPage,您可以直接使用。
TUIKit SwiftUI (UI 组件层):基于 AtomicXCore 构建的 SwiftUI UI 组件,您可将其嵌套到自己已有的 App 页面中。
AtomicXCore(数据层):提供数据管理和业务逻辑,包含各种 Store 和 Manager。
前提条件
Xcode 12.0 及以上版本
iOS 14.0 及以上系统版本
Swift 5 及以上版本
一个有效的腾讯云账号及 Chat 应用。可参见 开通服务 从控制台获取以下信息:
SDKAppID:App 在控制台获取的 Chat 应用的 ID,为应用的唯一标识
SDKSecretKey:应用的密钥
说明:
本项目目前仅支持手动集成,暂不支持通过 CocoaPods、SPM 等包管理器集成。
集成并引入组件
下载源码
git clone https://github.com/Tencent-RTC/TUIKit_iOS_SwiftUI.git
项目目录结构说明:
atomic-x/├── Sources/ # UI 组件源码(必需集成)│ ├── MessageList/ # 消息列表组件│ ├── MessageInput/ # 消息输入组件│ ├── ConversationList/ # 会话列表组件│ ├── ContactList/ # 联系人列表组件│ ├── BaseComponent/ # 基础组件│ └── ... # 其他UI组件├── Resources/ # 资源文件(必需集成)│ ├── assets/ # 图片资源│ └── strings/ # 本地化字符串文件chat/├── uikit/ # Page 组件(参考实现)│ ├── ChatPage.swift│ ├── ContactsPage.swift│ └── ConversationsPage.swift└── demo/ # 示例应用(可选参考)
集成组件
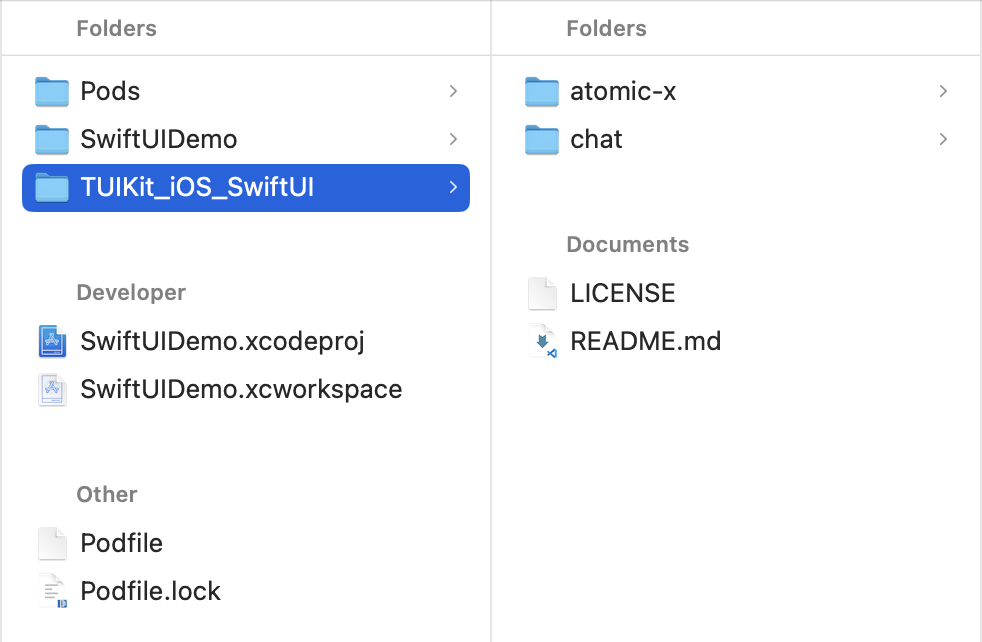
1. 将组件目录完整复制到您的 Xcode 项目中,如下图所示,其中 SwiftUIDemo 是示例项目,TUIKit_iOS_SwiftUI 是从 GitHub 上下载的组件源码:
2. 修改您 Podfile 中每个组件的本地路径。path 是 TUIKit_iOS_SwiftUI 文件夹相对于您工程 Podfile 文件的位置,常见的有:
TUIKit_iOS_SwiftUI 文件夹位于您工程 Podfile 文件父目录:
pod 'AtomicX/Chat', :path => '../TUIKit_iOS_SwiftUI/atomic-x/AtomicX.podspec'TUIKit_iOS_SwiftUI 文件夹位于您工程 Podfile 文件当前目录:
pod 'AtomicX/Chat', :path => './TUIKit_iOS_SwiftUI/atomic-x/AtomicX.podspec'TUIKit_iOS_SwiftUI 文件夹位于您工程 Podfile 文件子目录:
pod 'AtomicX/Chat', :path => '/TUIKit_iOS_SwiftUI/atomic-x/AtomicX.podspec'以 Podfile 跟 TUIKit_iOS_SwiftUI 是同级目录为例,Podfile 中添加:
platform :ios, '14.0'target 'Demo' douse_frameworks! :linkage => :staticpod 'AtomicX/Chat', :path => './TUIKit_iOS_SwiftUI/atomic-x/AtomicX.podspec'pod 'ChatUIKit', :path => './TUIKit_iOS_SwiftUI/chat/uikit/ChatUIKit.podspec'pod 'AtomicXCore', '3.4.0'end#Pods configpost_install do |installer|installer.pods_project.targets.each do |target|target.build_configurations.each do |config|config.build_settings['SWIFT_VERSION'] = '5.0'#Do not strip Swift symbolsconfig.build_settings['STRIP_SWIFT_SYMBOLS'] = 'NO'config.build_settings['DEBUG_INFORMATION_FORMAT'] = 'dwarf-with-dsym'#Fix Xcode14 Bundle target errorconfig.build_settings['EXPANDED_CODE_SIGN_IDENTITY'] = ""config.build_settings['CODE_SIGNING_REQUIRED'] = "NO"config.build_settings['CODE_SIGNING_ALLOWED'] = "NO"config.build_settings['ENABLE_BITCODE'] = "NO"config.build_settings['IPHONEOS_DEPLOYMENT_TARGET'] = "14.0"endendend
3. Podfile 修改完毕后,执行以下命令,安装本地 TUIKit SwiftUI 组件。示例:
pod install
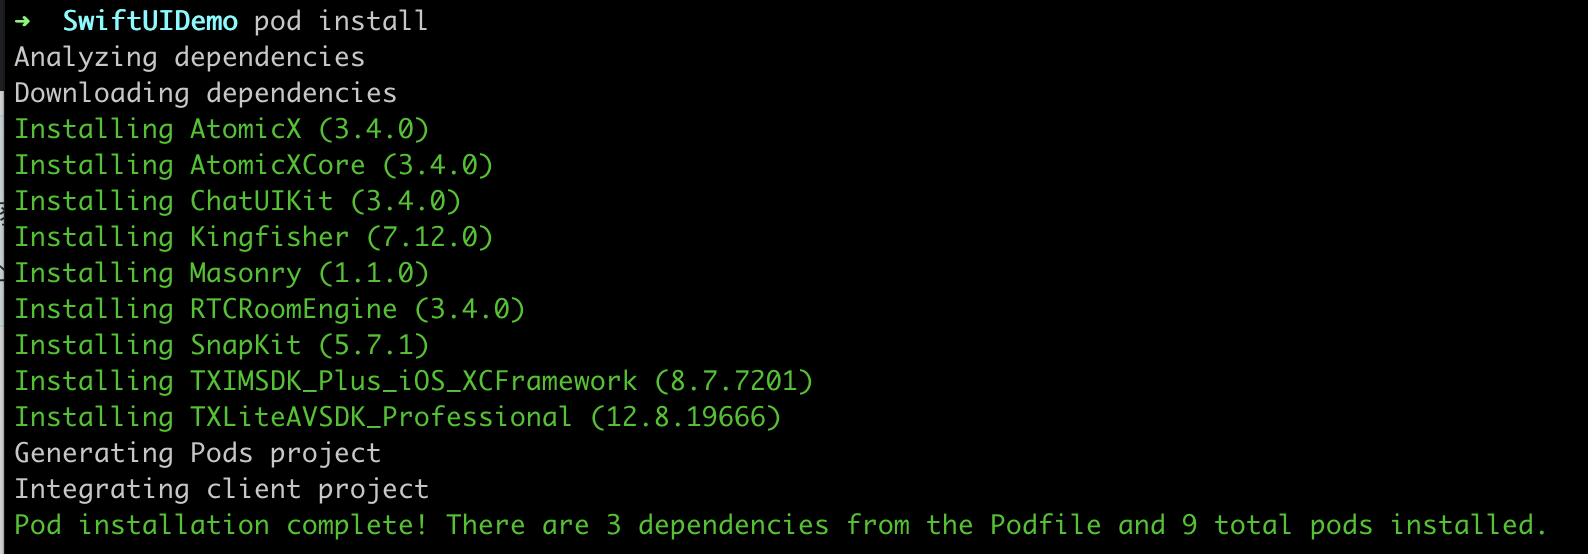
pod install 会自动安装所需的依赖库:
注意:
使用本地集成方案时,如需升级时需要从 GitHub 获取最新的组件代码,覆盖您本地项目的 TUIKit SwiftUI 目录。
当私有化修改和远端有冲突时,需要手动合并,处理冲突。
配置项目
1. 配置 Build Settings
在项目的 Build Settings 中添加以下配置:
Swift Language Version: Swift 5
iOS Deployment Target: 14.0 或更高
2. 配置 Info.plist
添加必要的权限配置:
<key>NSCameraUsageDescription</key><string>App需要访问相机来拍摄照片和视频</string><key>NSMicrophoneUsageDescription</key><string>App需要访问麦克风来录制音频</string><key>NSPhotoLibraryUsageDescription</key><string>App需要访问相册来选择图片和视频</string>
接入步骤
步骤1:配置用户鉴权
步骤2:用户登录
登录组件后才能正常使用组件的功能。用户在 App 上点击登录时,您可以调用 AtomicXCore 中的 LoginStore 登录 TUIKit SwiftUI 组件。
示例代码如下所示:
import AtomicXCore// 用户登录LoginStore.shared.login(sdkAppID: sdkAppID, userID: userID, userSig: userSig, completion: { [weak self] result inguard let self = self else { return }switch result {case .success:// 登录成功,可跳转聊天或会话页case .failure(let error):// 登录失败,可弹框报错}})
步骤3:构建会话列表界面
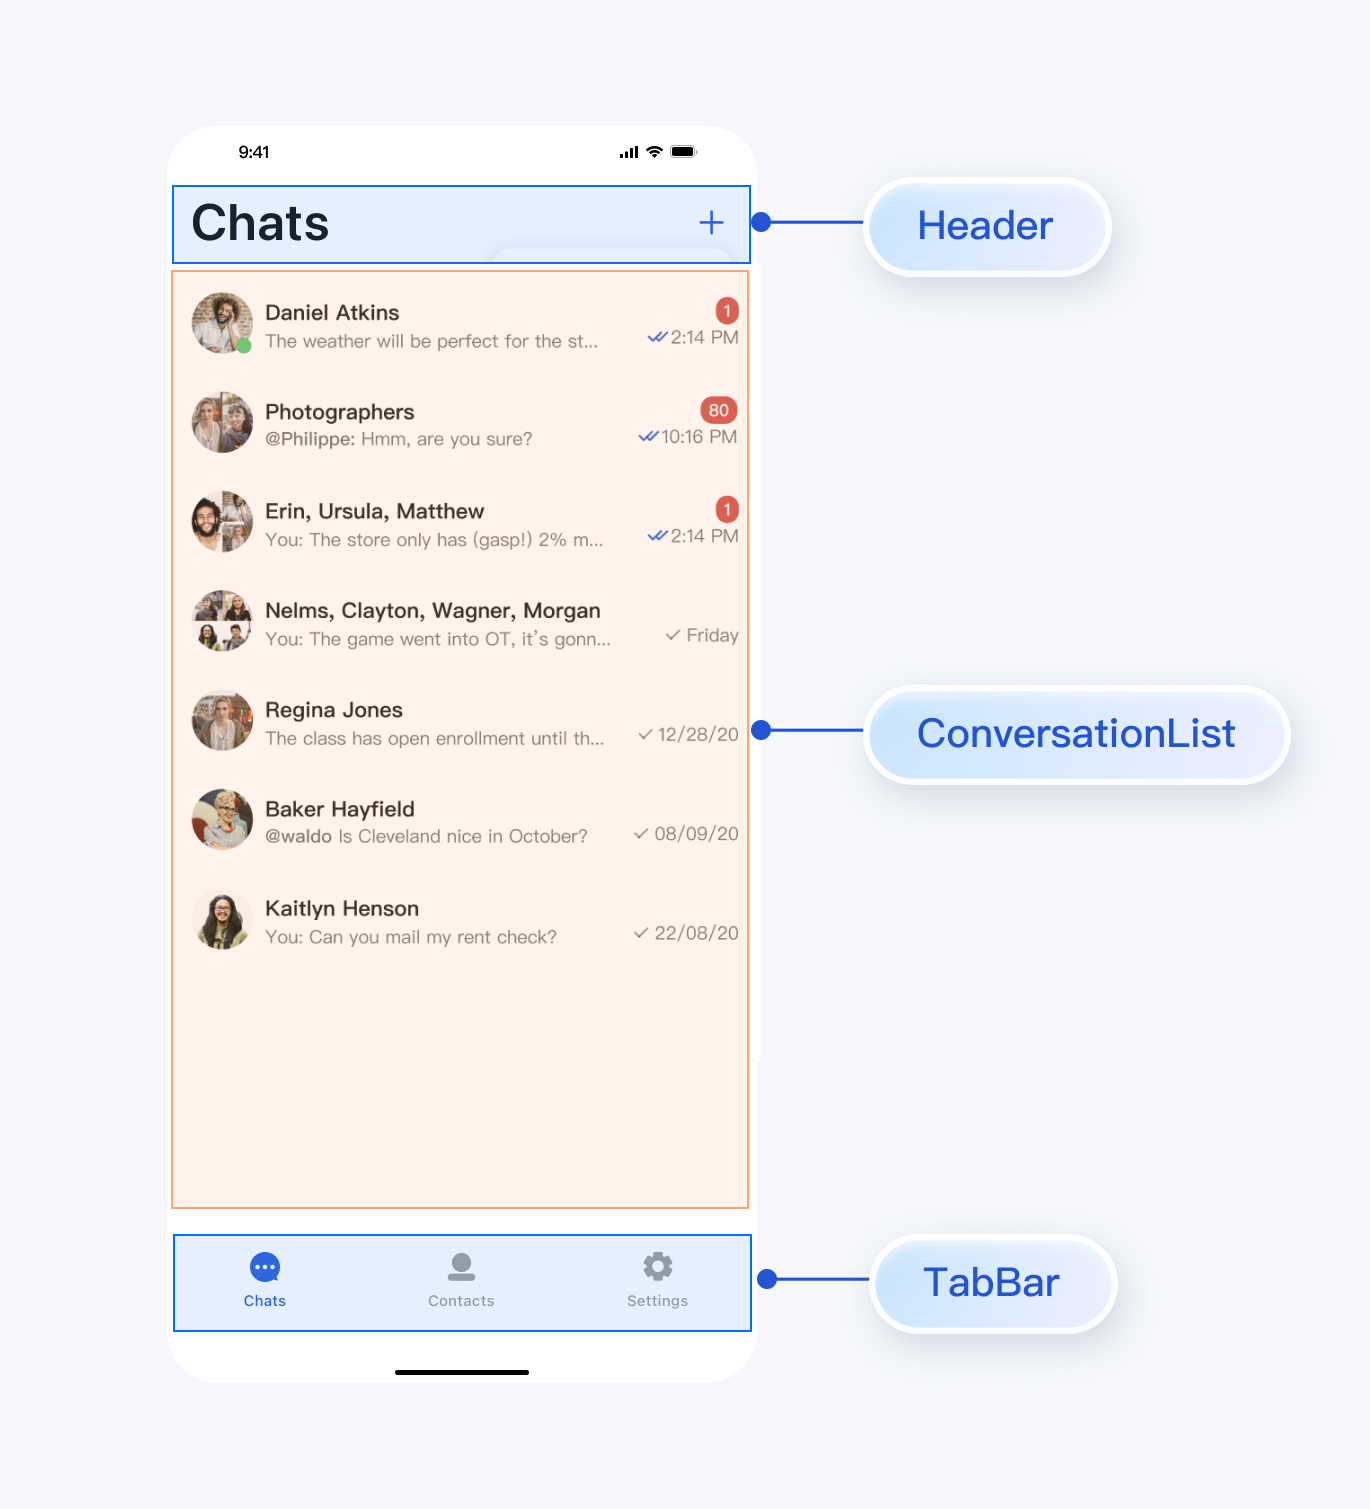
您可以基于 TUIKit SwiftUI 中的 ConversationList 组件,构建一个会话列表页面。ConversationList 内建的功能是:
展示用户的会话列表,包含单聊和群聊会话。
支持用户操作单个会话:置顶、删除、清空会话消息等。
您可以将 ConversationList 直接集成到现有的 App 页面中,也可以新构建一个完整的会话列表页,组装后的一种 UI 效果如下图所示:
将 ConversationList 封装为会话列表页,可参考
chat/uikit/ConversationsPage.swift 文件里的实现,ConversationsPage 主要做了以下工作:1. 在 ConversationList 上方添加了 headerView。
2. 实现点击会话列表 cell 事件。
3. 支持创建会话和群组功能:
3.1 点击右上角 "+" 按钮可以创建新会话或群组
3.2 支持从联系人列表选择好友创建单聊
3.3 支持选择多个好友创建群聊
核心示例代码如下所示:
import AtomicXimport AtomicXCoreimport SwiftUIpublic struct ConversationsPage: View {...public var body: some View {VStack(spacing: 0) {headerViewConversationList(onConversationClick: { conversation in// Customize onConversationClick eventonShowMessage?(NavigationInfo(conversation: conversation))}).environmentObject(themeState)}.onReceive(contactListStore.state.subscribe(StatePublisherSelector(keyPath: \\ContactListState.friendList))) { friendList inif self.friendList != friendList {self.friendList = friendList}}.onAppear {contactListStore.fetchFriendList(completion: { _ in })}.overlay(// Click + to show this menu.ChatsMenuOverlay(showChatsMenu: $showChatsMenu,showStartConversation: $showStartConversation,showUserPicker: $showUserPicker))...}...}private var headerView: some View {HStack {Text(LocalizedChatString("TabChats")).font(.system(size: 34, weight: .semibold)).tracking(0.3).foregroundColor(themeState.colors.textColorPrimary).background(themeState.colors.listColorDefault).padding(.leading, 16)Spacer()if AppBuilderConfig.shared.enableCreateConversation {Button(action: {showChatsMenu.toggle()}) {Image(systemName: "plus").font(.system(size: 20)).foregroundColor(themeState.colors.buttonColorPrimaryDefault).frame(width: 28, height: 28).cornerRadius(14)}.padding(.trailing, 16)}}.padding(.top, 12).padding(.bottom, 16)}
步骤4:构建聊天界面
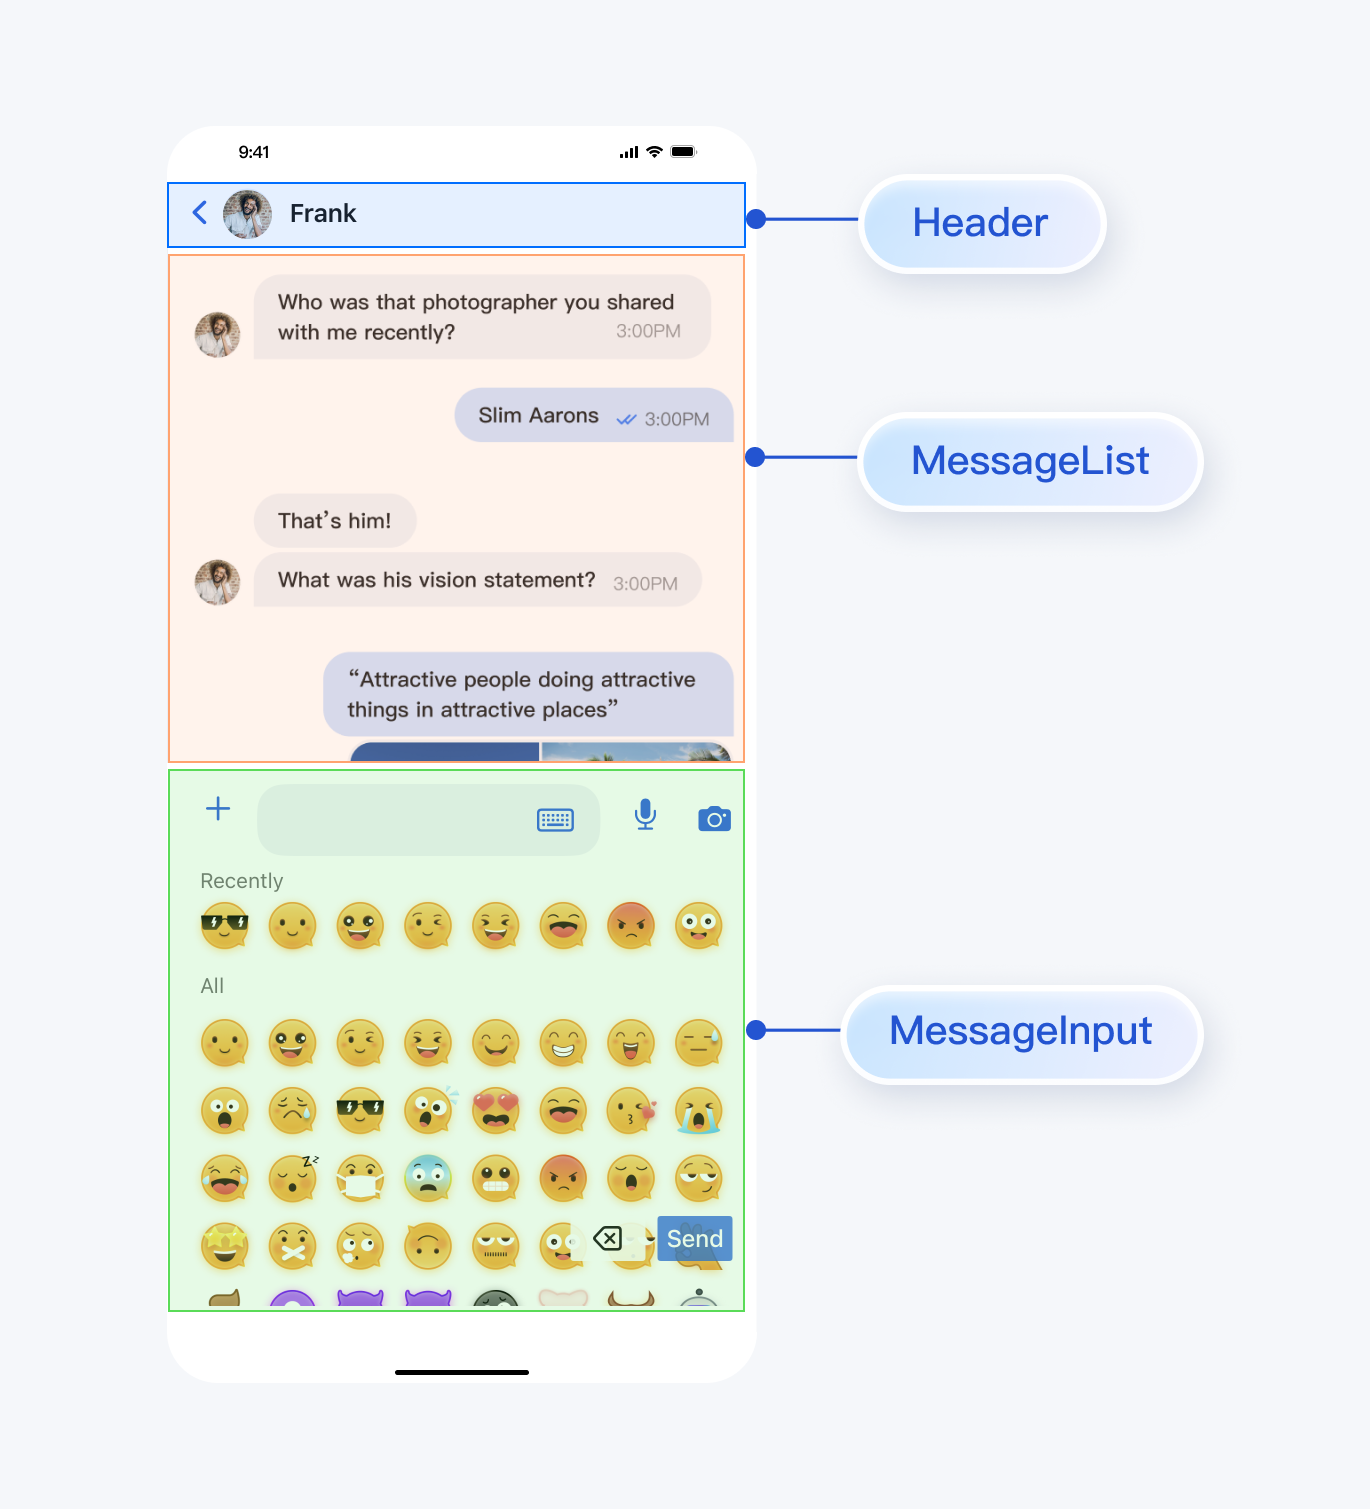
您可以基于 TUIKit SwiftUI 中的 MessageList、MessageInput 组件,构建一个聊天页面。
MessageList 内建的功能是:
展示单聊或群聊消息列表
支持对单条消息操作:查看图片消息大图、播放视频或语音消息、复制文本消息、撤回消息、删除消息等
MessageInput 内建的功能是:
支持用户组建并发送多种类型的消息:文本、表情、图片、语音、视频、文件等
您可以将 MessageList 和 MessageInput 直接集成到现有的 App 页面中,也可以新构建一个完整的聊天页,组装后的一种 UI 效果如下图所示:
将 MessageList 和 MessageInput 组装为聊天页,可参考
chat/uikit/ChatPage.swift 文件里的实现,ChatPage 主要做了以下工作:1. 在最上方添加了 headerView,展示会话的名称。
2. 按照移动端用户使用习惯,上下拼接 MessageList 和 MessageInput。
核心示例代码如下所示:
import AtomicXimport AtomicXCoreimport SwiftUIpublic struct ChatPage: View {...public var body: some View {return VStack(spacing: 0) {self.navigationBarViewDivider().background(self.themeState.colors.strokeColorPrimary)VStack(spacing: 0) {MessageList(conversationID: self.conversation.id,listStyle: self.listStyle,locateMessage: self.locateMessage,onUserClick: { userID inonUserAvatarClick?(userID)})self.messageInputAreaView}.ignoresSafeArea(.keyboard)}.toast(toast)}// Headerprivate var navigationBarView: some View {HStack {Button(action: {onBack?()}) {Image(systemName: "chevron.left").font(.system(size: 18, weight: .semibold)).foregroundColor(themeState.colors.textColorLink)}.padding(.leading, 16)Button(action: {onNavigationAvatarClick?()}) {HStack(spacing: 12) {Avatar(url: conversation.avatarURL,name: conversation.title ?? conversation.conversationID,size: .s)VStack(alignment: .leading, spacing: 2) {Text(conversation.title ?? conversation.conversationID).font(.system(size: 17, weight: .semibold)).foregroundColor(themeState.colors.textColorPrimary).lineLimit(1)if conversation.type == .group {Text("Group Chat").font(.system(size: 12)).foregroundColor(themeState.colors.textColorSecondary)}}}}.buttonStyle(PlainButtonStyle())Spacer()}.frame(height: 44)}// MessageInputprivate var messageInputAreaView: some View {VStack(spacing: 0) {MessageInput(text: $messageText,conversationID: conversation.id,style: inputStyle,onHeightChange: { height inself.inputAreaHeight = height}).padding(.bottom, 8)}}...}
步骤5:构建联系人界面
您可以基于 TUIKit SwiftUI 中的 ContactList 组件,构建一个联系人页面。ContactList 内建的功能是:
查看好友申请列表
查看已加入的群列表
处理群组邀请和申请
管理黑名单列表
查看好友
您可以将 ContactList 直接集成到现有的 App 中,也可以新构建一个完整的联系人列表页,组装后的一种 UI 效果如下图所示:
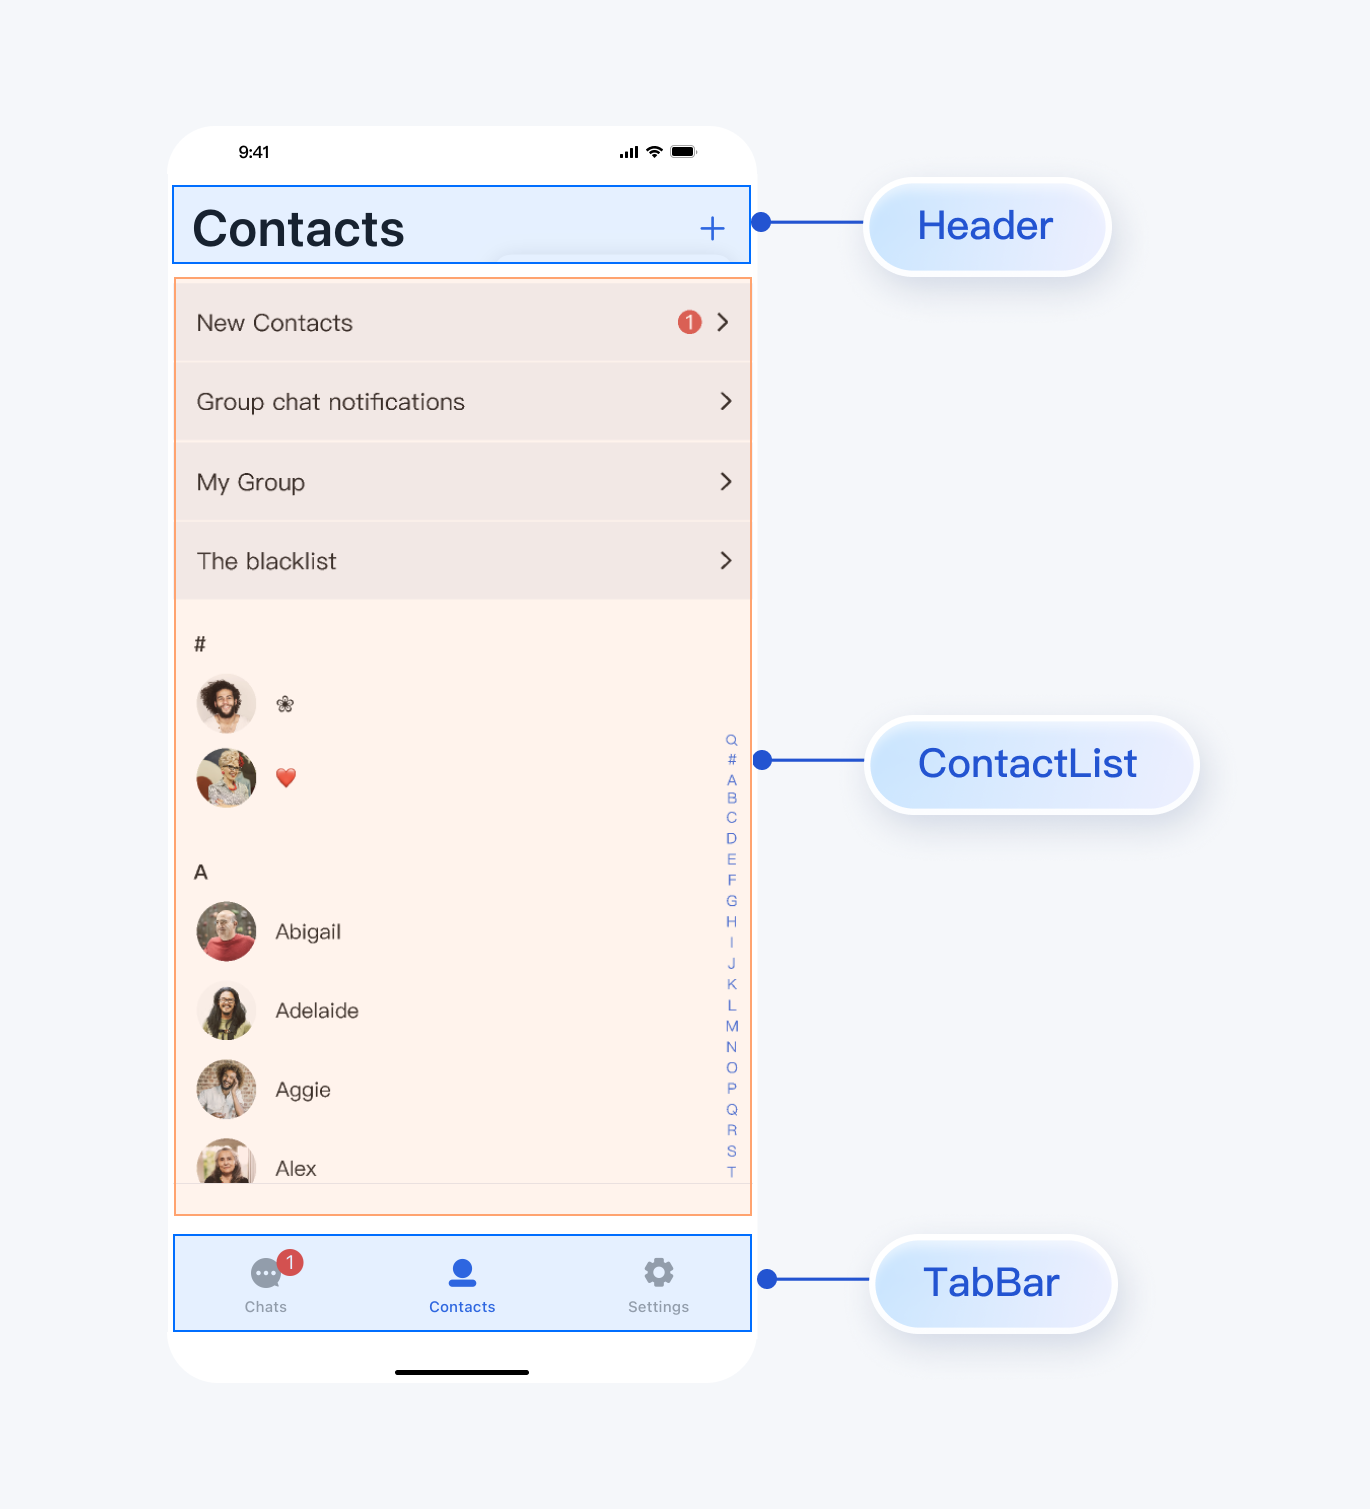
将 ContactList 封装为联系人列表页,可参考
chat/uikit/ContactsPage.swift 文件里的实现,ContactsPage 主要做了以下工作:1. 在 ContactList 上方添加了 headerView
2. 实现点击联系人列表 cell 事件。
3. 支持添加联系人和添加群组:
3.1 点击右上角 "+" 按钮可以添加联系人或群组
3.2 支持根据 UserID 搜索目标联系人
3.3 支持根据 GroupID 搜索目标群组
核心示例代码如下所示:
import AtomicXimport AtomicXCoreimport SwiftUIpublic struct ContactsPage: View {...public var body: some View {VStack(spacing: 0) {headerViewContactList(contactStore: contactStore,onShowMessage: onShowMessage,onContactClick: onContactClick,onGroupClick: onGroupClick,onNewFriendsClick: onNewFriendsClick,onGroupApplicationsClick: onGroupApplicationsClick,onGroupListClick: onGroupListClick,onBlackListClick: onBlackListClick)}.overlay(Group {if showAddContactMenu {VStack {HStack {Spacer()AddContactPopView(onDismiss: {showAddContactMenu = false},onShowAddFriend: {showAddFriend = true},onShowJoinGroup: {showJoinGroup = true}).padding(.trailing, 16).padding(.top, 50)}Spacer()}.background(Color.clear.contentShape(Rectangle()).onTapGesture {showAddContactMenu = false}).animation(.easeInOut(duration: 0.2), value: showAddContactMenu)}}).sheet(isPresented: $showAddFriend) {AddFriendView(contactStore: contactStore)}.sheet(isPresented: $showJoinGroup) {JoinGroupView(contactStore: contactStore)}}private var headerView: some View {HStack {Text(LocalizedChatString("TabContacts")).font(.system(size: 34, weight: .semibold)).tracking(0.3).foregroundColor(themeState.colors.textColorPrimary).padding(.leading, 16)Spacer()Button(action: {showAddContactMenu = true}) {Image(systemName: "plus").font(.system(size: 20)).foregroundColor(themeState.colors.buttonColorPrimaryDefault).frame(width: 28, height: 28).cornerRadius(14)}.padding(.trailing, 16)}.padding(.top, 12).padding(.bottom, 16)}...}
步骤6:完善界面间的跳转逻辑
ConversationsPage、ChatPage、ContactsPage 中暴露了一些用户点击事件,您可以自定义事件来实现页面间的交互:
Page | 回调 | 建议跳转逻辑 |
ConversationsPage | onConversationClick: ((NavigationInfo) -> Void)? | 点击会话列表中的会话时触发,建议跳转到聊天页面(ChatPage)。 |
ContactsPage | onShowMessage: ((ConversationInfo) -> Void)? | 点击联系人信息页"发送消息"时触发,建议跳转到聊天页面(ChatPage)。 |
| onContactClick: ((AZOrderedListItem) -> Void)? | 点击联系人 cell 时触发,建议跳转联系人详情页面(C2CChatSetting)。 |
| onGroupClick: ((AZOrderedListItem) -> Void)? | 点击群组 cell 时触发,建议跳转群聊页面(ChatPage)。 |
| onNewFriendsClick: (() -> Void)? | 点击"新的好友"时触发,建议展示好友申请视图( FriendApplicationListView)。 |
| onGroupApplicationsClick: (() -> Void)? | 点击"加群申请"条目时触发,建议展示群组申请视图( GroupApplicationListView)。 |
| onGroupListClick: (() -> Void)? | 点击"群聊"条目时触发,建议展示群组列表视图( GroupListView)。 |
| onBlackListClick: (() -> Void)? | 点击"黑名单"条目时触发,建议展示黑名单管理视图( BlackListView)。 |
ChatPage | onBack: (() -> Void)? | 点击返回按钮时触发,建议返回上一级页面。 |
| onUserAvatarClick: ((String) -> Void)? | 点击消息中的用户头像时触发,建议跳转用户信息页(C2CChatSetting)。 |
| onNavigationAvatarClick: (() -> Void)? | 点击导航栏中的头像时触发,建议跳转用户信息页(C2CChatSetting)或群聊信息页(GroupChatSetting) |
chat/demo/ChatDemo/Pages/HomePage.swift 作为上述 Page 的粘合层,实现了各个 Page 的回调事件,核心示例代码如下:
// 点击会话列表 cell 跳转ConversationsPage(onShowMessage: { navigationInfo inshowChatPage(conversation: navigationInfo.conversation, locateMessage: navigationInfo.locateMessage)})// 点击联系人页面跳转ContactsPage(onShowMessage: { conversation inshowChatPage(conversation: conversation)},onContactClick: { user inshowContactDetail(user)},onGroupClick: { group inlet conversation = createConversationFromGroup(group)showChatPage(conversation: conversation)},onNewFriendsClick: {showNewFriendsPage()},onGroupApplicationsClick: {showGroupApplicationsPage()},onGroupListClick: {showGroupListPage()},onBlackListClick: {showBlackListPage()})// ChatPageWithNavigation 是对 ChatPage 外层封装了导航栏的页面// onUserAvatarClick 和 onNavigationAvatarClick 的实现会透传到 ChatPageChatPageWithNavigation(conversation: conversation,locateMessage: currentLocateMessage,onBack: {dismissChatPage()},onUserAvatarClick: { userID inshowC2CChatSettingPage(userID: userID)},onNavigationAvatarClick: {if conversation.type == .c2c {if let userID = ChatUtil.getUserID(conversation.conversationID) {showC2CChatSettingPage(userID: userID, needNavigateToChat: false)}} else if conversation.type == .group {if let groupID = ChatUtil.getGroupID(conversation.conversationID) {showGroupChatSettingPage(groupID: groupID, needNavigateToChat: false)}}}
您可以参考上述回调说明及参考代码,实现 Page 之间交互逻辑。
常见问题
功能常见问题
登录失败,提示签名错误怎么办?
请检查 SDKAppID 和 UserSig 是否正确,UserSig 是否已过期。可以参考上文“配置用户鉴权”重新生成 UserSig。
联系我们