TUIKit 是基于 IM SDK 的一款 UI 组件库,可通过 UI 组件快速实现聊天、会话、搜索、关系链、群组等功能。本文介绍如何快速集成 TUIKit 并实现核心功能。
关键概念
经典版 UI:从 5.7.1435 版本开始,TUIKit 支持模块化集成,支持了经典版 UI(类微信 UI)。
简约版 UI:从 6.9.3557 版本开始,TUIKit 新增了全新的简约版 UI(类 WhatsApp UI)。
注意:
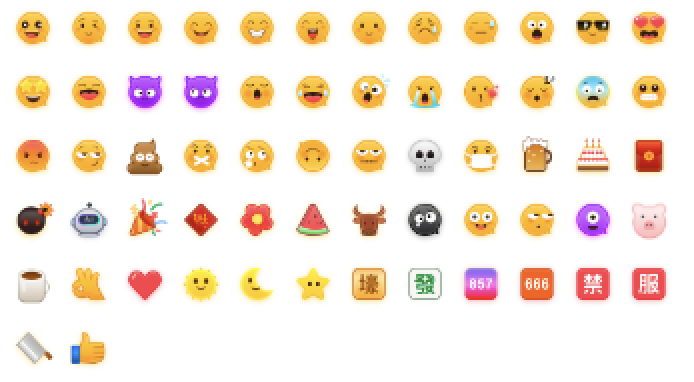
为了尊重版权,IM Demo/TUIKit 工程中默认不包含大表情元素切图。正式上线商用前请您替换为自己设计或拥有版权的其他表情包。下图所示默认的小黄脸表情包版权归腾讯云所有,可有偿授权使用,如需获得授权,您可以通过升级至 IM 企业版套餐 免费使用该表情包。

前提条件
Xcode 10 及以上
iOS 9.0 及以上
一个有效的腾讯云账号及 Chat 应用。可参考 开通服务 从控制台获取以下信息:
SDKAppID:App 在控制台获取的 Chat 应用的 ID,为应用的唯一标识。
SDKSecretKey:应用的密钥。
CocoaPods 集成
1. 安装 CocoaPods。
在终端窗口中输入如下命令(需要提前在 Mac 中安装 Ruby 环境):
sudo gem install cocoapods
2. 创建 Podfile 文件。
进入项目所在路径输入以下命令行,之后项目路径下会出现一个 Podfile 文件。
pod init
3. 根据业务需求在 Podfile 中添加对应的 TUIKit 组件。组件之间相互独立,添加或删除均不影响工程编译。您可以按需选择不同的 Podfile 集成方式:
远程 CocoaPods 集成。
DevelopmentPods 本地集成。
上面两种集成方式的优缺点如下表所示:
集成方式 | 适合场景 | 优点 | 缺点 |
远程 CocoaPods 集成 | 适合无源码修改时的集成。 | 当 TUIKit 有版本更新时,您只需再次 Pod update 即可完成更新。 | 当您有源码修改,使用 Pod update 更新时,新版本的 TUIKit 会覆盖您的修改。 |
本地 DevelopmentPods 集成 | 适合有涉及源码自定义修改的客户。 | 当您有自己的 git 仓库时,可以跟踪修改。修改源码后,使用 Pod update 更新其他远程 Pod 库时,不会覆盖您的修改。 | 您需要手动将 TUIKit 源码覆盖您本地 TUIKit 文件夹进行更新。 |
远程 CocoaPods 集成
您可以在 Podfile 中按需添加组件库:
注意:
从 8.5.6870 版本开始,TUIKit 支持 Swift 语言组件。
# Uncomment the next line to define a global platform for your projectsource 'https://github.com/CocoaPods/Specs.git'platform :ios, '13.0'# 防止 TUIKit 组件里的 *.xcassets 与您项目里面冲突。install! 'cocoapods', :disable_input_output_paths => true# 请使用您的真实项目名称替换 your_project_nametarget 'your_project_name' douse_frameworks!use_modular_headers!# 集成聊天功能pod 'TUIChat_Swift/UI_Classic'# 集成会话功能pod 'TUIConversation_Swift/UI_Classic'# 集成关系链功能pod 'TUIContact_Swift/UI_Classic'# 集成搜索功能(需要购买旗舰版或企业版套餐)pod 'TUISearch_Swift/UI_Classic'# 集成音视频通话功能pod 'TUICallKit_Swift'# 集成投票插件pod 'TUIPollPlugin_Swift'# 集成群接龙插件pod 'TUIGroupNotePlugin_Swift'# 集成翻译插件(需开通增值功能,请联系腾讯云商务开通)pod 'TUITranslationPlugin_Swift'# 集成会话分组插件pod 'TUIConversationGroupPlugin_Swift'# 集成会话标记插件pod 'TUIConversationMarkPlugin_Swift'# 集成语音转文字插件pod 'TUIVoiceToTextPlugin_Swift'end#Pods configpost_install do |installer|installer.pods_project.targets.each do |target|target.build_configurations.each do |config|#Fix Xcode14 Bundle target errorconfig.build_settings['EXPANDED_CODE_SIGN_IDENTITY'] = ""config.build_settings['CODE_SIGNING_REQUIRED'] = "NO"config.build_settings['CODE_SIGNING_ALLOWED'] = "NO"config.build_settings['ENABLE_BITCODE'] = "NO"config.build_settings['IPHONEOS_DEPLOYMENT_TARGET'] = "13.0"#Fix Xcode15 other links flag -ld64xcode_version = `xcrun xcodebuild -version | grep Xcode | cut -d' ' -f2`.to_fif xcode_version >= 15xcconfig_path = config.base_configuration_reference.real_pathxcconfig = File.read(xcconfig_path)if xcconfig.include?("OTHER_LDFLAGS") == falsexcconfig = xcconfig + "\\n" + 'OTHER_LDFLAGS = $(inherited) "-ld64"'elseif xcconfig.include?("OTHER_LDFLAGS = $(inherited)") == falsexcconfig = xcconfig.sub("OTHER_LDFLAGS", "OTHER_LDFLAGS = $(inherited)")endif xcconfig.include?("-ld64") == falsexcconfig = xcconfig.sub("OTHER_LDFLAGS = $(inherited)", 'OTHER_LDFLAGS = $(inherited) "-ld64"')endendFile.open(xcconfig_path, "w") { |file| file << xcconfig }endendendend
# Uncomment the next line to define a global platform for your projectsource 'https://github.com/CocoaPods/Specs.git'platform :ios, '13.0'# 防止 TUIKit 组件里的 *.xcassets 与您项目里面冲突。install! 'cocoapods', :disable_input_output_paths => true# 请使用您的真实项目名称替换 your_project_nametarget 'your_project_name' do# 从 7.1 版本开始,新增了 TUIKit 插件(TUIXXXPlugin),TUIKit 插件是动态库依赖,需要开启此设置。# 如果您不依赖 TUIKit 插件,该设置可以保持关闭。use_frameworks!# 请按需开启 modular headers,开启后 Pod 模块才能使用 @import 导入,简化 Swift 引用 OC 的方式。# use_modular_headers!# 集成聊天功能pod 'TUIChat/UI_Classic'# 集成会话功能pod 'TUIConversation/UI_Classic'# 集成关系链功能pod 'TUIContact/UI_Classic'# 集成搜索功能(需要购买旗舰版或企业版套餐)pod 'TUISearch/UI_Classic'# 集成音视频通话功能pod 'TUICallKit_Swift'# 集成快速会议pod 'TUIRoomKit'# 集成投票插件,从 7.1 版本开始支持pod 'TUIPollPlugin'# 集成群接龙插件,从 7.1 版本开始支持pod 'TUIGroupNotePlugin'# 集成翻译插件,从 7.2 版本开始支持(需开通增值功能,请联系腾讯云商务开通)pod 'TUITranslationPlugin'# 集成会话分组插件,从 7.3 版本开始支持pod 'TUIConversationGroupPlugin'# 集成会话标记插件,从 7.3 版本开始支持pod 'TUIConversationMarkPlugin'# 集成语音转文字插件,从 7.5 版本开始支持pod 'TUIVoiceToTextPlugin'# 集成消息推送插件,从 7.6 版本开始支持pod 'TIMPush'end#Pods configpost_install do |installer|installer.pods_project.targets.each do |target|target.build_configurations.each do |config|#Fix Xcode14 Bundle target errorconfig.build_settings['EXPANDED_CODE_SIGN_IDENTITY'] = ""config.build_settings['CODE_SIGNING_REQUIRED'] = "NO"config.build_settings['CODE_SIGNING_ALLOWED'] = "NO"config.build_settings['ENABLE_BITCODE'] = "NO"config.build_settings['IPHONEOS_DEPLOYMENT_TARGET'] = "13.0"#Fix Xcode15 other links flag -ld64xcode_version = `xcrun xcodebuild -version | grep Xcode | cut -d' ' -f2`.to_fif xcode_version >= 15xcconfig_path = config.base_configuration_reference.real_pathxcconfig = File.read(xcconfig_path)if xcconfig.include?("OTHER_LDFLAGS") == falsexcconfig = xcconfig + "\\n" + 'OTHER_LDFLAGS = $(inherited) "-ld64"'elseif xcconfig.include?("OTHER_LDFLAGS = $(inherited)") == falsexcconfig = xcconfig.sub("OTHER_LDFLAGS", "OTHER_LDFLAGS = $(inherited)")endif xcconfig.include?("-ld64") == falsexcconfig = xcconfig.sub("OTHER_LDFLAGS = $(inherited)", 'OTHER_LDFLAGS = $(inherited) "-ld64"')endendFile.open(xcconfig_path, "w") { |file| file << xcconfig }endendendend
# Uncomment the next line to define a global platform for your projectsource 'https://github.com/CocoaPods/Specs.git'platform :ios, '13.0'# 防止 TUIKit 组件里的 *.xcassets 与您项目里面冲突。install! 'cocoapods', :disable_input_output_paths => true# 请使用您的真实项目名称替换 your_project_nametarget 'your_project_name' douse_frameworks!use_modular_headers!# 集成聊天功能pod 'TUIChat_Swift/UI_Minimalist'# 集成会话功能pod 'TUIConversation_Swift/UI_Minimalist'# 集成关系链功能pod 'TUIContact_Swift/UI_Minimalist'# 集成搜索功能(需要购买旗舰版或企业版、套餐)pod 'TUISearch_Swift/UI_Minimalist'# 集成音视频通话功能pod 'TUICallKit_Swift'# 集成翻译插件(需单独购买翻译插件)pod 'TUITranslationPlugin_Swift'# 集成语音转文字插件pod 'TUIVoiceToTextPlugin_Swift'# 集成表情回应插件pod 'TUIEmojiPlugin_Swift'end#Pods configpost_install do |installer|installer.pods_project.targets.each do |target|target.build_configurations.each do |config|#Fix Xcode14 Bundle target errorconfig.build_settings['EXPANDED_CODE_SIGN_IDENTITY'] = ""config.build_settings['CODE_SIGNING_REQUIRED'] = "NO"config.build_settings['CODE_SIGNING_ALLOWED'] = "NO"config.build_settings['ENABLE_BITCODE'] = "NO"config.build_settings['IPHONEOS_DEPLOYMENT_TARGET'] = "13.0"#Fix Xcode15 other links flag -ld64xcode_version = `xcrun xcodebuild -version | grep Xcode | cut -d' ' -f2`.to_fif xcode_version >= 15xcconfig_path = config.base_configuration_reference.real_pathxcconfig = File.read(xcconfig_path)if xcconfig.include?("OTHER_LDFLAGS") == falsexcconfig = xcconfig + "\\n" + 'OTHER_LDFLAGS = $(inherited) "-ld64"'elseif xcconfig.include?("OTHER_LDFLAGS = $(inherited)") == falsexcconfig = xcconfig.sub("OTHER_LDFLAGS", "OTHER_LDFLAGS = $(inherited)")endif xcconfig.include?("-ld64") == falsexcconfig = xcconfig.sub("OTHER_LDFLAGS = $(inherited)", 'OTHER_LDFLAGS = $(inherited) "-ld64"')endendFile.open(xcconfig_path, "w") { |file| file << xcconfig }endendendend
# Uncomment the next line to define a global platform for your projectsource 'https://github.com/CocoaPods/Specs.git'platform :ios, '13.0'# 防止 TUIKit 组件里的 *.xcassets 与您项目里面冲突。install! 'cocoapods', :disable_input_output_paths => true# 请使用您的真实项目名称替换 your_project_nametarget 'your_project_name' do# 从 7.1 版本开始,新增了 TUIKit 插件(TUIXXXPlugin),TUIKit 插件是动态库依赖,需要开启此设置。# 如果您不依赖 TUIKit 插件,该设置可以保持关闭。use_frameworks!# 请按需开启 modular headers,开启后 Pod 模块才能使用 @import 导入,简化 Swift 引用 OC 的方式。# use_modular_headers!# 集成聊天功能pod 'TUIChat/UI_Minimalist'# 集成会话功能pod 'TUIConversation/UI_Minimalist'# 集成关系链功能pod 'TUIContact/UI_Minimalist'# 集成搜索功能(需要购买旗舰版或企业版、套餐)pod 'TUISearch/UI_Minimalist'# 集成音视频通话功能pod 'TUICallKit_Swift'# 集成翻译插件,从 7.2 版本开始支持(需单独购买翻译插件)pod 'TUITranslationPlugin'# 集成语音转文字插件,从 7.5 版本开始支持pod 'TUIVoiceToTextPlugin'# 集成消息推送插件,从 7.6 版本开始支持pod 'TIMPush'# 集成表情回应插件,从 7.8 版本开始支持pod 'TUIEmojiPlugin'end#Pods configpost_install do |installer|installer.pods_project.targets.each do |target|target.build_configurations.each do |config|#Fix Xcode14 Bundle target errorconfig.build_settings['EXPANDED_CODE_SIGN_IDENTITY'] = ""config.build_settings['CODE_SIGNING_REQUIRED'] = "NO"config.build_settings['CODE_SIGNING_ALLOWED'] = "NO"config.build_settings['ENABLE_BITCODE'] = "NO"config.build_settings['IPHONEOS_DEPLOYMENT_TARGET'] = "13.0"#Fix Xcode15 other links flag -ld64xcode_version = `xcrun xcodebuild -version | grep Xcode | cut -d' ' -f2`.to_fif xcode_version >= 15xcconfig_path = config.base_configuration_reference.real_pathxcconfig = File.read(xcconfig_path)if xcconfig.include?("OTHER_LDFLAGS") == falsexcconfig = xcconfig + "\\n" + 'OTHER_LDFLAGS = $(inherited) "-ld64"'elseif xcconfig.include?("OTHER_LDFLAGS = $(inherited)") == falsexcconfig = xcconfig.sub("OTHER_LDFLAGS", "OTHER_LDFLAGS = $(inherited)")endif xcconfig.include?("-ld64") == falsexcconfig = xcconfig.sub("OTHER_LDFLAGS = $(inherited)", 'OTHER_LDFLAGS = $(inherited) "-ld64"')endendFile.open(xcconfig_path, "w") { |file| file << xcconfig }endendendend
说明:
1. 如果您直接
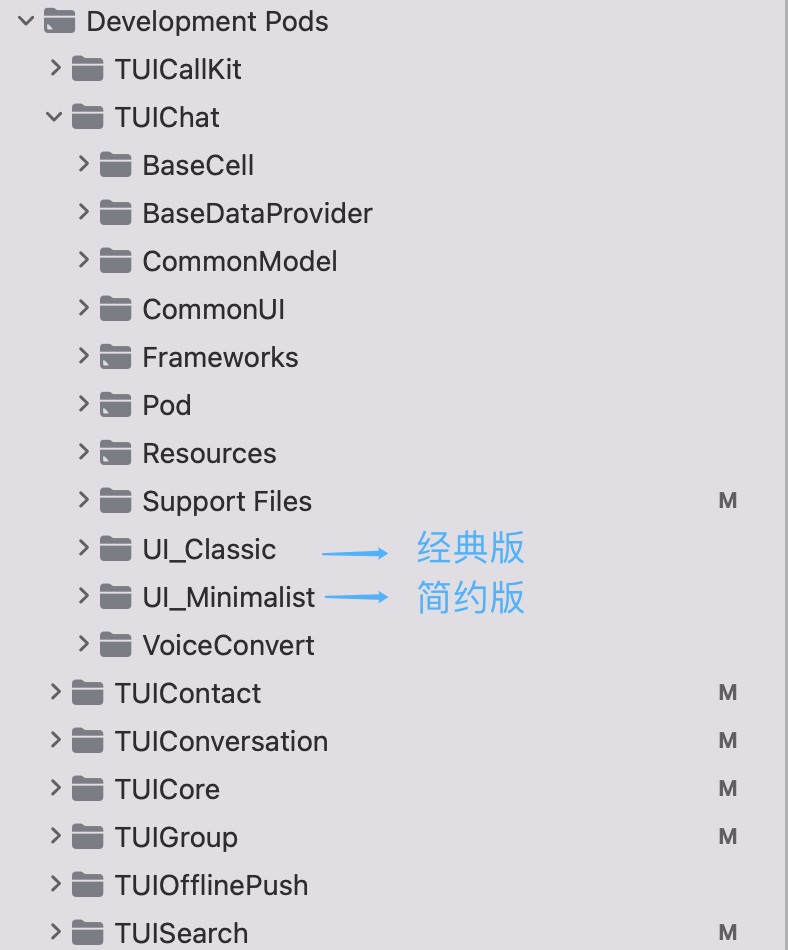
pod 'TUIChat',不指定经典版或简约版,默认会集成两套版本 UI 组件。 2. 经典版和简约版 UI 不能混用,集成多个组件时,您必须同时全部选择经典版 UI 或简约版 UI。例如,经典版
TUIChat 组件必须与经典版 TUIConversation、TUIContact 组件搭配使用。同理,简约版 TUIChat 组件必须与简约版 TUIConversation、TUIContact 组件搭配使用。3. 如果您使用的是 Swift,请开启
use_modular_headers! ,并将头文件引用改成 @import 模块名形式引用。Podfile 修改完毕后,执行以下命令,安装 TUIKit 组件。
pod install
如果无法安装 TUIKit 最新版本,执行以下命令更新本地的 CocoaPods 仓库列表。
pod repo update
之后执行以下命令,更新组件库的Pod版本。
pod update
集成全部的 TUIKit 组件后的项目结构:
本地 DevelopmentPods 源码集成
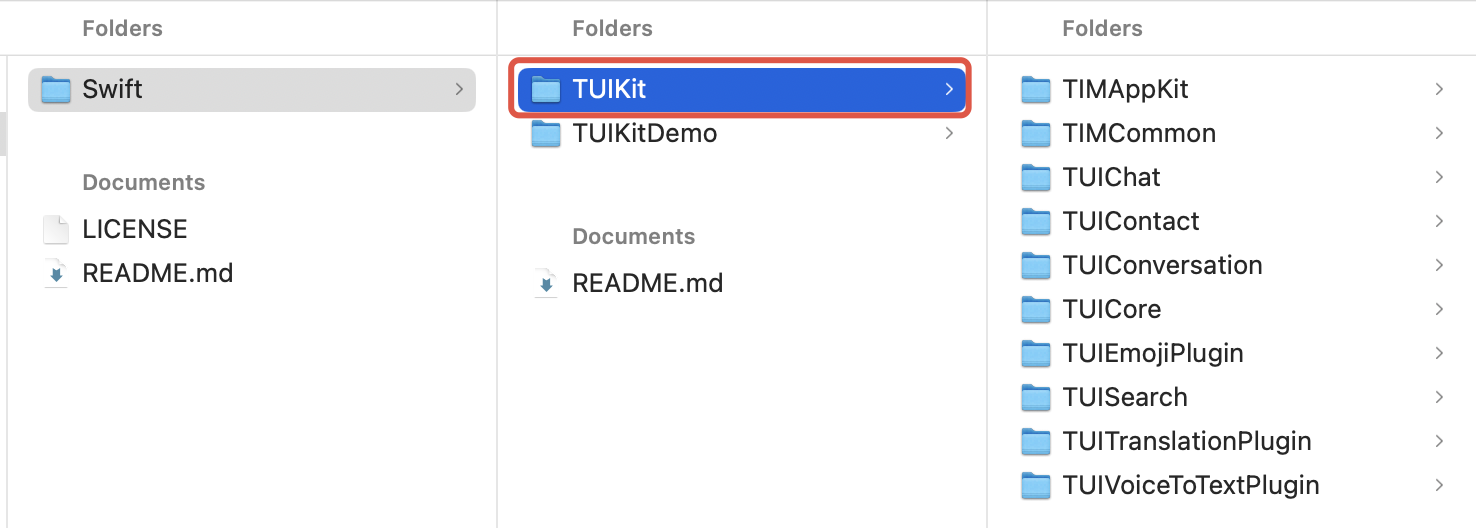
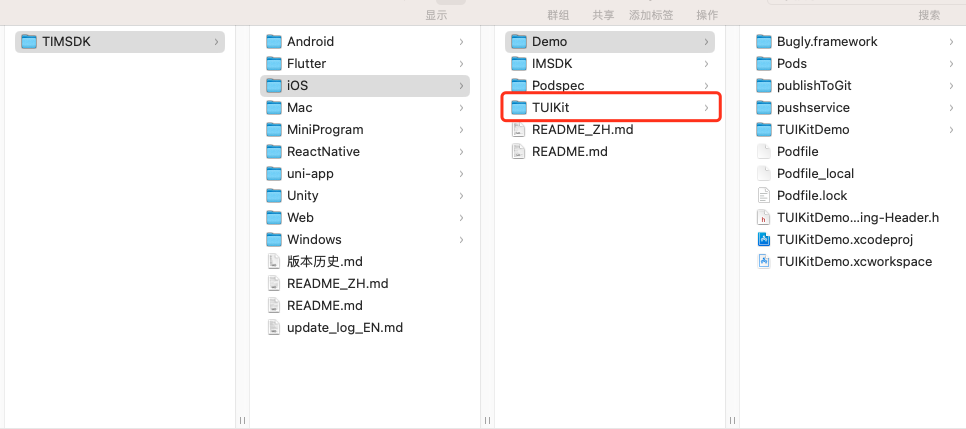
1. 从 GitHub 下载 TUIKit 源码,将 TUIKit 目录直接拖入您的工程目录下:
2. 修改您 Podfile 中每个组件的本地路径。path 是 TUIKit 文件夹相对于您工程 Podfile 文件的位置,常见的有:
TUIKit 文件夹位于您工程 Podfile 文件父目录:
pod 'TUICore', :path => "../TUIKit/TUICore"TUIKit 文件夹位于您工程 Podfile 文件当前目录:
pod 'TUICore', :path => "./TUIKit/TUICore"TUIKit 文件夹位于您工程 Podfile 文件子目录:
pod 'TUICore', :path => "/TUIKit/TUICore"以 TUIKit 文件夹位于您工程 Podfile 文件父目录为例:
# Uncomment the next line to define a global platform for your projectsource 'https://github.com/CocoaPods/Specs.git'platform :ios, '13.0'install! 'cocoapods', :disable_input_output_paths => true# 请使用您的真实项目名称替换 your_project_nametarget 'your_project_name' do# Uncomment the next line if you're using Swift or would like to use dynamic frameworksuse_frameworks!use_modular_headers!# 集成基础库(必选)pod 'TUICore', :path => "../TUIKit/TUICore"pod 'TIMCommon_Swift', :path => "../TUIKit/TIMCommon"# 集成TUIKit组件(可选)# 集成聊天功能pod 'TUIChat_Swift', :path => "../TUIKit/TUIChat"# 集成会话功能pod 'TUIConversation_Swift', :path => "../TUIKit/TUIConversation"# 集成关系链功能pod 'TUIContact_Swift', :path => "../TUIKit/TUIContact"# 集成搜索功能(需要购买旗舰版或企业版套餐)pod 'TUISearch_Swift', :path => "../TUIKit/TUISearch"# 集成音视频通话功能pod 'TUICallKit_Swift'# 集成 TUIKitPlugin 插件 (可选)# 集成翻译插件(需单独购买插件)pod 'TUITranslationPlugin_Swift'# 集成语音转文字插件(需单独购买插件)pod 'TUIVoiceToTextPlugin_Swift'# 其他 Podpod 'MJRefresh'pod 'SnapKit'end#Pods configpost_install do |installer|installer.pods_project.targets.each do |target|target.build_configurations.each do |config|#Fix Xcode14 Bundle target errorconfig.build_settings['EXPANDED_CODE_SIGN_IDENTITY'] = ""config.build_settings['CODE_SIGNING_REQUIRED'] = "NO"config.build_settings['CODE_SIGNING_ALLOWED'] = "NO"config.build_settings['ENABLE_BITCODE'] = "NO"config.build_settings['IPHONEOS_DEPLOYMENT_TARGET'] = "13.0"#Fix Xcode15 other links flag -ld64xcode_version = `xcrun xcodebuild -version | grep Xcode | cut -d' ' -f2`.to_fif xcode_version >= 15xcconfig_path = config.base_configuration_reference.real_pathxcconfig = File.read(xcconfig_path)if xcconfig.include?("OTHER_LDFLAGS") == falsexcconfig = xcconfig + "\\n" + 'OTHER_LDFLAGS = $(inherited) "-ld64"'elseif xcconfig.include?("OTHER_LDFLAGS = $(inherited)") == falsexcconfig = xcconfig.sub("OTHER_LDFLAGS", "OTHER_LDFLAGS = $(inherited)")endif xcconfig.include?("-ld64") == falsexcconfig = xcconfig.sub("OTHER_LDFLAGS = $(inherited)", 'OTHER_LDFLAGS = $(inherited) "-ld64"')endendFile.open(xcconfig_path, "w") { |file| file << xcconfig }endendendend
# Uncomment the next line to define a global platform for your projectsource 'https://github.com/CocoaPods/Specs.git'platform :ios, '13.0'install! 'cocoapods', :disable_input_output_paths => true# 请使用您的真实项目名称替换 your_project_nametarget 'your_project_name' do# Uncomment the next line if you're using Swift or would like to use dynamic frameworksuse_frameworks!use_modular_headers!# 集成基础库(必选)pod 'TUICore', :path => "../TUIKit/TUICore"pod 'TIMCommon', :path => "../TUIKit/TIMCommon"# 集成TUIKit组件(可选)# 集成聊天功能pod 'TUIChat', :path => "../TUIKit/TUIChat"# 集成会话功能pod 'TUIConversation', :path => "../TUIKit/TUIConversation"# 集成关系链功能pod 'TUIContact', :path => "../TUIKit/TUIContact"# 集成搜索功能(需要购买旗舰版或企业版套餐)pod 'TUISearch', :path => "../TUIKit/TUISearch"# 集成音视频通话功能pod 'TUICallKit_Swift'# 集成快速会议pod 'TUIRoomKit'# 集成TUIKitPlugin插件 (可选)# 集成翻译插件,从 7.2 版本开始支持(需单独购买翻译插件)pod 'TUITranslationPlugin'# 集成推送插件pod 'TIMPush'# 其他 Podpod 'MJRefresh'pod 'Masonry'end#Pods configpost_install do |installer|installer.pods_project.targets.each do |target|target.build_configurations.each do |config|#Fix Xcode14 Bundle target errorconfig.build_settings['EXPANDED_CODE_SIGN_IDENTITY'] = ""config.build_settings['CODE_SIGNING_REQUIRED'] = "NO"config.build_settings['CODE_SIGNING_ALLOWED'] = "NO"config.build_settings['ENABLE_BITCODE'] = "NO"config.build_settings['IPHONEOS_DEPLOYMENT_TARGET'] = "13.0"#Fix Xcode15 other links flag -ld64xcode_version = `xcrun xcodebuild -version | grep Xcode | cut -d' ' -f2`.to_fif xcode_version >= 15xcconfig_path = config.base_configuration_reference.real_pathxcconfig = File.read(xcconfig_path)if xcconfig.include?("OTHER_LDFLAGS") == falsexcconfig = xcconfig + "\\n" + 'OTHER_LDFLAGS = $(inherited) "-ld64"'elseif xcconfig.include?("OTHER_LDFLAGS = $(inherited)") == falsexcconfig = xcconfig.sub("OTHER_LDFLAGS", "OTHER_LDFLAGS = $(inherited)")endif xcconfig.include?("-ld64") == falsexcconfig = xcconfig.sub("OTHER_LDFLAGS = $(inherited)", 'OTHER_LDFLAGS = $(inherited) "-ld64"')endendFile.open(xcconfig_path, "w") { |file| file << xcconfig }endendendend
3. Podfile 修改完毕后,执行以下命令,安装本地 TUIKit 组件。示例:
pod install
注意:
1. 使用本地集成方案时,如需升级时需要从 GitHub 获取最新的组件代码,覆盖您本地项目的 TUIKit 目录。
2. 当私有化修改和远端有冲突时,需要手动合并,处理冲突。
3. TUIKit 插件需要依赖 TUICore 的版本,请确保插件版本和 "../TUIKit/TUICore/TUICore.spec" 中的 spec.version 一致。
第三方库依赖
TUIKit 依赖的第三方库的最低版本如下,如果您的版本较低,请升级到最新版本。
- MJExtension (3.4.1)- MJRefresh (3.7.5)- SnapKit (5.7.1)- SSZipArchive (2.4.3)- SDWebImage (5.18.11)
- Masonry (1.1.0)- MJExtension (3.4.1)- MJRefresh (3.7.5)- ReactiveObjC (3.1.1)- SDWebImage (5.18.11):- SDWebImage/Core (= 5.18.11)- SDWebImage/Core (5.18.11)- SnapKit (5.6.0)- SSZipArchive (2.4.3)
接入步骤
常用的聊天软件都是由会话列表、聊天窗口、好友列表、音视频通话等几个基本的界面组成,参考下面步骤,您仅需几行代码即可在项目中快速搭建这些 UI 界面。 实操教学(Objective-C 组件版本)视频请参见:极速集成 TUIKit(iOS)。
步骤1:配置用户鉴权
步骤2:用户登录
登录组件后才能正常使用组件的功能。用户在 App 上点击登录时,您可以登录 TUIKit 组件。
示例代码如下所示:
import TUICore@objc func loginSDK(_ userID: String, userSig: String, succ: TSucc?, fail: TFail?) {TUILogin.login(Int32(SDKAPPID), userID: userID, userSig: userSig, config: loginConfig, succ: {// update UIsucc?()}, fail: { code, msg in// update UIfail?(code, msg)})}
#import "TUILogin.h"- (void)loginSDK:(NSString *)userID userSig:(NSString *)sig succ:(TSucc)succ fail:(TFail)fail {[TUILogin login:SDKAppID userID:userID userSig:sig succ:^{NSLog(@"登录成功");} fail:^(int code, NSString *msg) {NSLog(@"登录失败");}];}
步骤3:构建会话列表界面
会话列表只需要创建
TUIConversationListController 对象即可。会话列表会从数据库中读取最近联系人,当用户点击联系人时,TUIConversationListController 将事件 didSelectConversation 回调给上层。示例代码如下所示:
import UIKitimport TUICoreimport ImSDK_Plusimport TIMCommonimport TUIConversation// ConversationController 为您自己的 ViewControllerpublic class ConversationController: UIViewController, V2TIMSDKListener, TUIPopViewDelegate {private var conv: TUIConversationListController?override public func viewDidLoad() {super.viewDidLoad()setupNavigation()conv = TUIConversationListController()if let conv = conv {addChild(conv)view.addSubview(conv.view)}}}// 会话列表点击事件,可自定义,通常是打开聊天界面public protocol TUIConversationListControllerListener: AnyObject {func conversationListController(_ conversationController: UIViewController, didSelectConversation conversation: TUIConversationCellData) -> Bool}
#import "TUIConversationListController.h"// ConversationController 为您自己的 ViewController@implementation ConversationController- (void)viewDidLoad {[super viewDidLoad];// TUIConversationListControllerTUIConversationListController *vc = [[TUIConversationListController alloc] init];vc.delegate = self;// 把 TUIConversationListController 添加到自己的 ViewController[self addChildViewController:vc];[self.view addSubview:vc.view];}- (void)conversationListController:(UIViewController *)conversationControllerdidSelectConversation:(TUIConversationCellData *)conversation {// 会话列表点击事件,可自定义,通常是打开聊天界面}@end
// ConversationController 为您自己的 ViewControllerpublic class ConversationController: UIViewController, V2TIMSDKListener, TUIPopViewDelegate {override public func viewDidLoad() {super.viewDidLoad()setupNavigation()conv = TUIConversationListController_Minimalist()if let conv = conv {addChild(conv)view.addSubview(conv.view)}}}// 会话列表点击事件,可自定义,通常是打开聊天界面public protocol TUIConversationListControllerListener: AnyObject {func conversationListController(_ conversationController: UIViewController, didSelectConversation conversation: TUIConversationCellData) -> Bool}
#import "TUIConversationListController_Minimalist.h"// ConversationController 为您自己的 ViewController@implementation ConversationController- (void)viewDidLoad {[super viewDidLoad];// TUIConversationListController_MinimalistTUIConversationListController_Minimalist *vc = [[TUIConversationListController_Minimalist alloc] init];vc.delegate = self;// 把 TUIConversationListController_Minimalist 添加到自己的 ViewController[self addChildViewController:vc];[self.view addSubview:vc.view];}- (void)conversationListController:(TUIConversationListController_Minimalist *)conversationControllerdidSelectConversation:(TUIConversationCell *)conversation{// 会话列表点击事件,通常是打开聊天界面}@end
步骤4:构建聊天界面
初始化聊天界面时,需要上层传入当前聊天界面对应的会话信息。
示例代码如下所示:
import UIKitimport TUICoreimport TIMCommonimport TUIChatlet conversationData = TUIChatConversationModel()conversationData.userID = userID ?? ""conversationData.groupID = groupID ?? ""if let chatVC = getChatViewController(conversationData) {navigationController?.pushViewController(chatVC, animated: true)}private func getChatViewController(_ model: TUIChatConversationModel) -> TUIBaseChatViewController? {var chat: TUIBaseChatViewController?if let userID = model.userID, !userID.isEmpty {chat = TUIC2CChatViewController()} else if let groupID = model.groupID, !groupID.isEmpty {chat = TUIGroupChatViewController()}chat?.conversationData = modelreturn chat}
#import "TUIC2CChatViewController.h"// ChatViewController 为您自己的 ViewController@implementation ChatViewController- (void)viewDidLoad {// 创建会话信息TUIChatConversationModel *data = [[TUIChatConversationModel alloc] init];data.userID = @"userID";// TUIC2CChatViewControllerTUIC2CChatViewController *vc = [[TUIC2CChatViewController alloc] init];[vc setConversationData:data];// 把 TUIC2CChatViewController 添加到自己的 ViewController[self addChildViewController:vc];[self.view addSubview:vc.view];}@end
说明:
TUIC2CChatViewController 会自动拉取该用户的历史消息并展示出来。let conversationData = TUIChatConversationModel()conversationData.userID = userID ?? ""conversationData.groupID = groupID ?? ""if let chatVC = getChatViewController(conversationData) {navigationController?.pushViewController(chatVC, animated: true)}private func getChatViewController(_ model: TUIChatConversationModel) -> TUIBaseChatViewController_Minimalist? {var chat: TUIBaseChatViewController_Minimalist?if let userID = model.userID, !userID.isEmpty {chat = TUIC2CChatViewController_Minimalist()} else if let groupID = model.groupID, !groupID.isEmpty {chat = TUIGroupChatViewController_Minimalist()}chat?.conversationData = modelreturn chat}
#import "TUIC2CChatViewController_Minimalist.h"// ChatViewController 为您自己的 ViewController@implementation ChatViewController- (void)viewDidLoad {// 创建会话信息TUIChatConversationModel *data = [[TUIChatConversationModel alloc] init];data.userID = @"userID";// 创建 TUIC2CChatViewController_MinimalistTUIC2CChatViewController_Minimalist *vc = [[TUIC2CChatViewController_Minimalist alloc] init];[vc setConversationData:data];// 把 TUIC2CChatViewController 添加到自己的 ViewController[self addChildViewController:vc];[self.view addSubview:vc.view];}@end
说明
TUIC2CChatViewController_Minimalist 会自动拉取该用户的历史消息并展示出来。步骤5:构建联系人界面
联系人列表界面不需要其它依赖,只需创建对象并显示出来即可。
import UIKitimport TUICoreimport TIMCommonimport TUIContact// ContactController 为您自己的 ViewControllerpublic class ContactsController: UIViewController, TUIPopViewDelegate {var contactVC: TUIContactController?override public func viewDidLoad() {super.viewDidLoad()contactVC = TUIContactController()if let contactVC = contactVC {addChild(contactVC)view.addSubview(contactVC.view)}}}
#import "TUIContactController.h"// ContactController 为您自己的 ViewController@implementation ContactController- (void)viewDidLoad {// 创建 TUIContactControllerTUIContactController *vc = [[TUIContactController alloc] init];// 把 TUIContactController 添加到自己的 ViewController[self addChildViewController:vc];[self.view addSubview:vc.view];}@end
注意,上面代码只能将
TUIContactController 初始化并展示出来,其中的点击行为(例如点击好友、添加好友等),TUIKit 会通过 TUIContactControllerListener 抛给上层处理:import TUIContactprotocol TUIContactControllerListener: NSObjectProtocol {func onSelectFriend(_ cell: TUICommonContactCell) -> Boolfunc onAddNewFriend(_ cell: TUICommonTableViewCell) -> Boolfunc onGroupConversation(_ cell: TUICommonTableViewCell) -> Bool}
#import “TUIContactController.h”@protocol TUIContactControllerListener <NSObject>@optional- (void)onSelectFriend:(TUICommonContactCell *)cell;- (void)onAddNewFriend:(TUICommonTableViewCell *)cell;- (void)onGroupConversation:(TUICommonTableViewCell *)cell;@end
// ContactController 为您自己的 ViewControllerpublic class ContactsController: UIViewController, TUIPopViewDelegate {override public func viewDidLoad() {super.viewDidLoad()contactVC = TUIContactController_Minimalist()if let contactVC = contactVC {addChild(contactVC)view.addSubview(contactVC.view)}}}
#import "TUIContactController_Minimalist.h"// ContactController 为您自己的 ViewController@implementation ContactController- (void)viewDidLoad {// 创建 TUIContactController_MinimalistTUIContactController_Minimalist *vc = [[TUIContactController_Minimalist alloc] init];// 把 TUIContactController_Minimalist 添加到自己的 ViewController[self addChildViewController:vc];[self.view addSubview:vc.view];}@end
注意,上面代码只能将
TUIContactController_Minimalist 初始化并展示出来,其中的点击行为(例如点击好友、添加好友等),TUIKit 会通过 TUIContactControllerListener_Minimalist 抛给上层处理:protocol TUIContactControllerListener_Minimalist: AnyObject {func onSelectFriend(_ cell: TUICommonContactCell_Minimalist) -> Boolfunc onAddNewFriend(_ cell: TUICommonTableViewCell) -> Boolfunc onGroupConversation(_ cell: TUICommonTableViewCell) -> Bool}
@protocol TUIContactControllerListener_Minimalist <NSObject>@optional- (void)onSelectFriend:(TUICommonContactCell *)cell;- (void)onAddNewFriend:(TUICommonTableViewCell *)cell;- (void)onGroupConversation:(TUICommonTableViewCell *)cell;@end
例如单击好友后,您可以将好友信息页展示出来:
import TIMCommonimport TUICoreimport UIKit@objc private func onSelectFriend(_ cell: TUICommonContactCell) {if let delegate = delegate {if delegate.onSelectFriend(cell) { return }}let data = cell.contactDatalet vc = TUIFriendProfileController(style: .grouped)vc.friendProfile = data?.friendProfilenavigationController?.pushViewController(vc, animated: true)}
#import "TUIFriendProfileController.h"- (void)onSelectFriend:(TUICommonContactCell *)cell{TUICommonContactCellData *data = cell.contactData;// 创建好友资料 vcTUIFriendProfileController *vc = [[TUIFriendProfileController alloc] init];vc.friendProfile = data.friendProfile;// 展示好友资料 vc[self.navigationController pushViewController:(UIViewController *)vc animated:YES];}
@objc func onSelectFriend(_ cell: TUICommonContactCell_Minimalist) {if let delegate = delegate {if delegate.onSelectFriend(cell) { return }}let data = cell.contactDatalet vc = TUIFriendProfileController_Minimalist()vc.friendProfile = data?.friendProfilenavigationController?.pushViewController(vc, animated: true)}
#import "TUIFriendProfileController_Minimalist.h"- (void)onSelectFriend:(TUICommonContactCell *)cell{TUICommonContactCellData *data = cell.contactData;// 创建好友资料 vcTUIFriendProfileController_Minimalist *vc = [[TUIFriendProfileController_Minimalist alloc] init];vc.friendProfile = data.friendProfile;// 展示好友资料 vc[self.navigationController pushViewController:(UIViewController *)vc animated:YES];}
步骤6:构建音视频通话功能
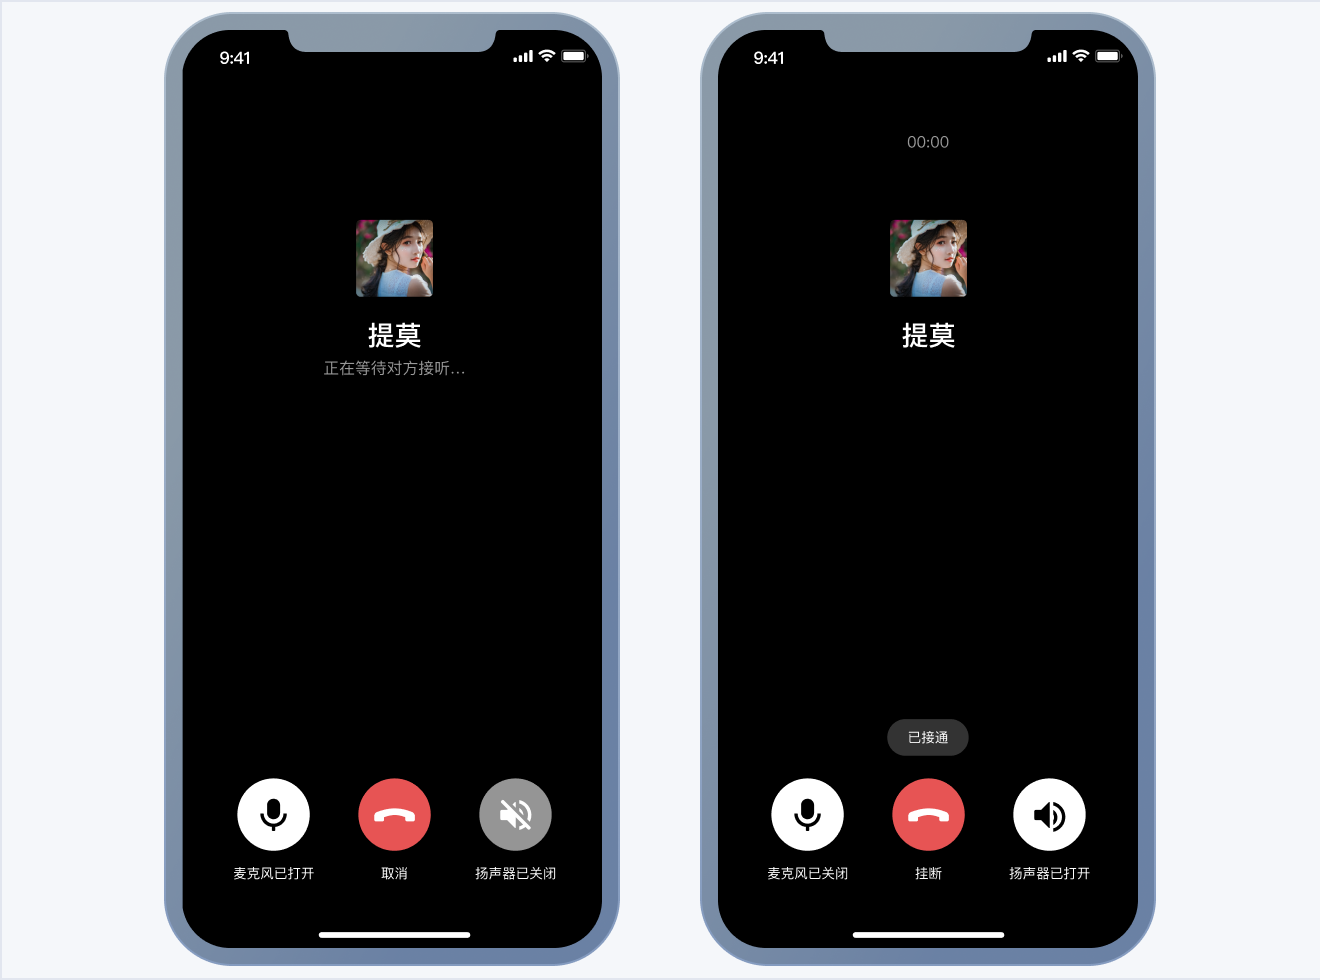
TUI 组件支持在聊天界面对用户发起音视频通话,仅需要简单几步就可以快速集成:
视频通话 | 语音通话 |
 |  |
1. 开通音视频服务。
2. 登录 即时通信 IM 控制台 ,单击目标应用卡片,进入应用的基础配置页面。
3. 在开通腾讯实时音视频服务功能区,单击免费体验即可开通 TUICallKit 的 7 天免费试用服务。
4. 在弹出的开通实时音视频 TRTC 服务对话框中,单击确认,系统将为您在 实时音视频控制台 创建一个与当前 IM 应用相同 SDKAppID 的实时音视频应用,二者账号与鉴权可复用。
5. 集成 TUICallKit 组件。
在 podfile 文件中添加以下内容。
// 集成音视频通话组件pod 'TUICallKit_Swift'
6. 使用音视频功能,需要授权摄像头和麦克风的使用权限,请根据实际项目需要,设置项目所需权限。
在 Xcode 中,选择 TARGETS > Info > Custom iOS Target Properties 菜单。
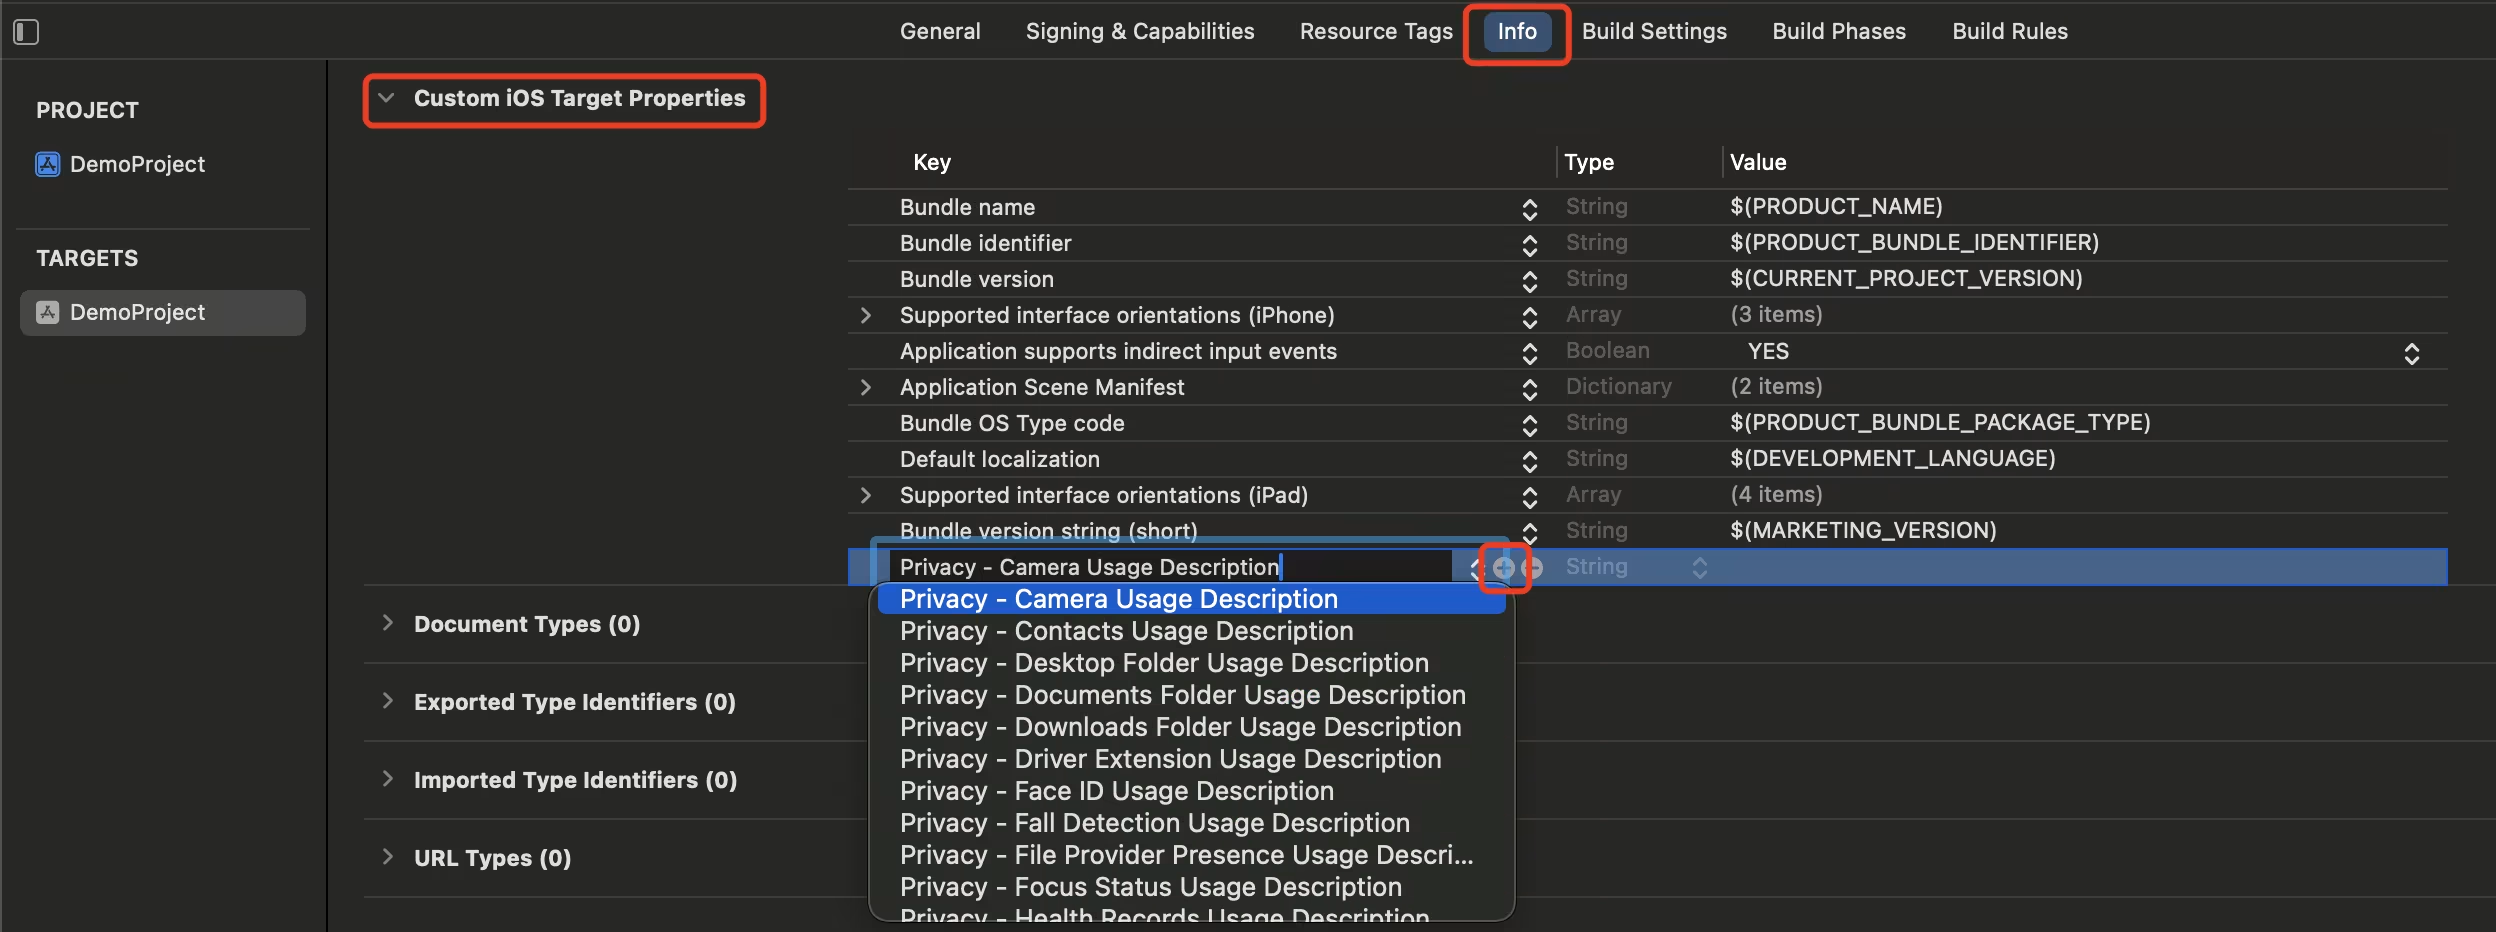
单击 +,添加摄像头和麦克风权限:
Privacy - Camera Usage Description
Privacy - Microphone Usage Description

7. 发起和接收视频或语音通话。
消息页发起通话 | 联系人页发起通话 |
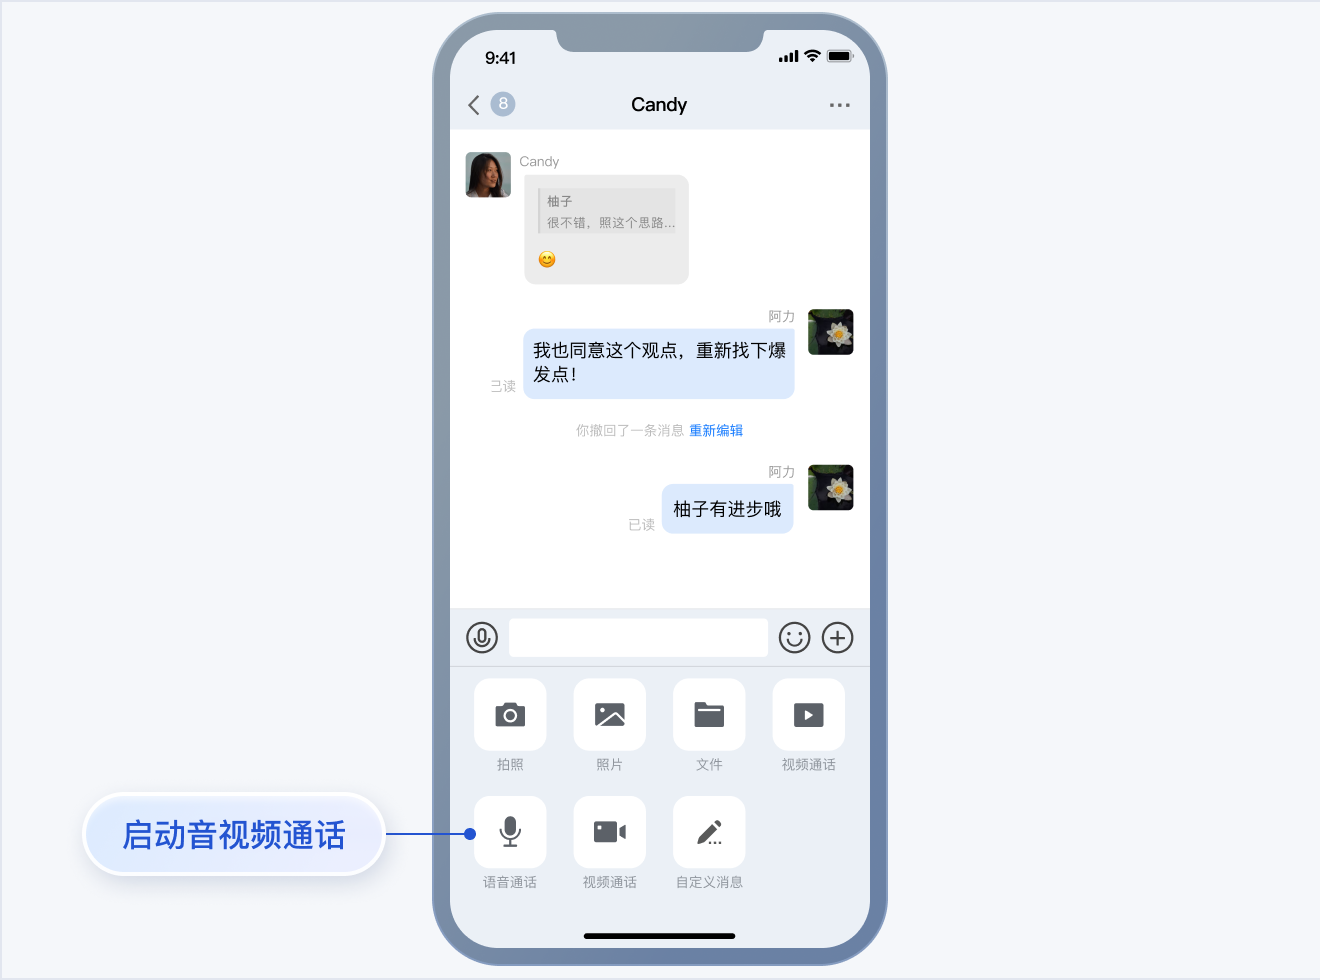 | 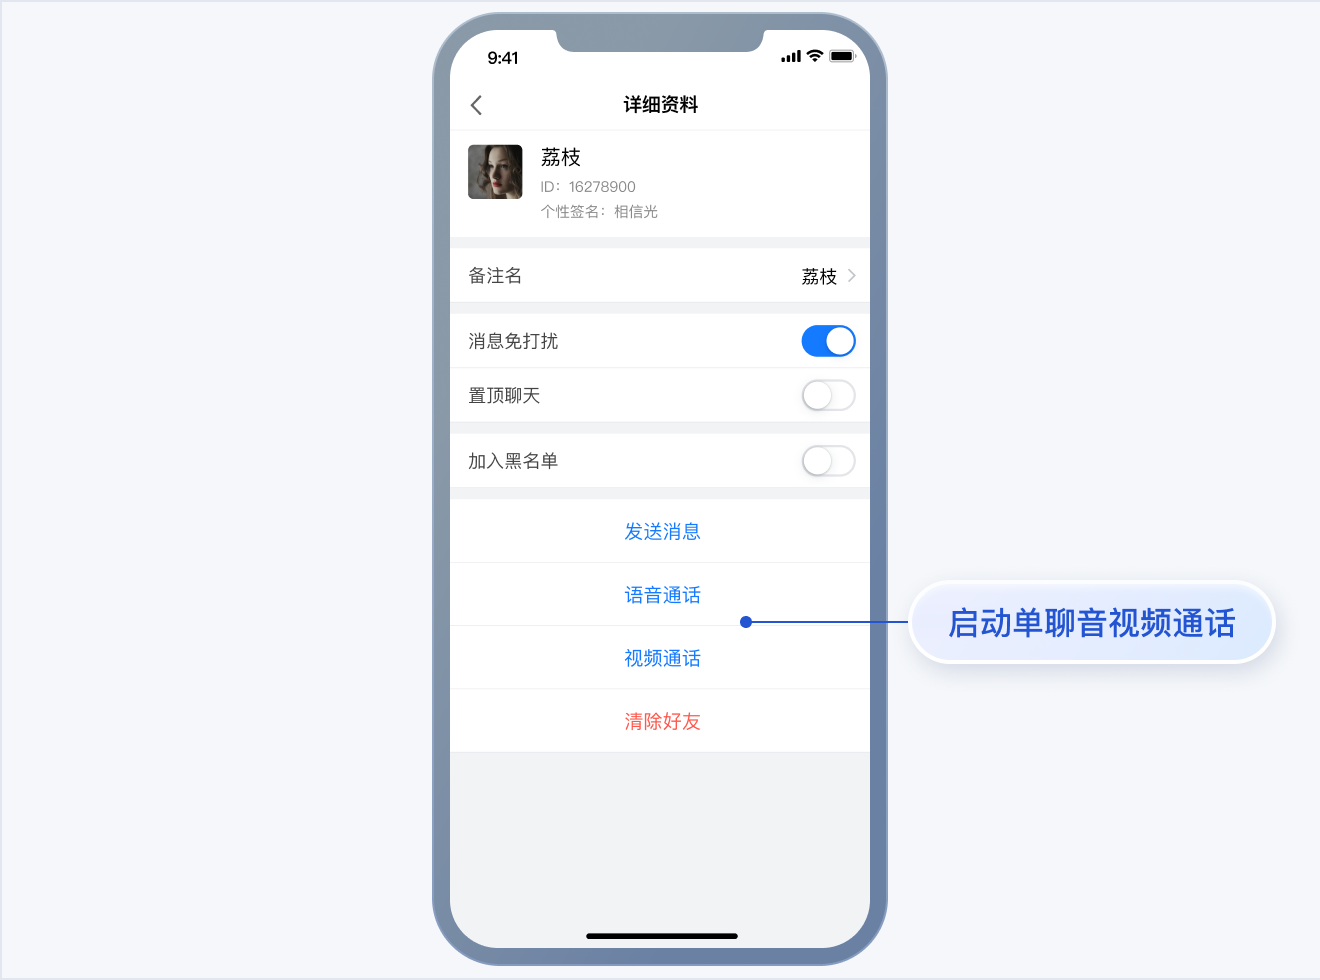 |
集成 TUICallKit 组件后,聊天界面和联系人资料界面默认会出现 “视频通话” 和 “语音通话” 两个按钮,当用户点击按钮时,TUIKit 会自动展示通话邀请 UI,并给对方发起通话邀请请求。
当用户在线收到通话邀请时,TUIKit 会自动展示通话接收 UI,用户可以选择同意或者拒绝通话。
当用户离线收到通话邀请时,如果需要唤起 App 通话,就要使用到离线推送能力,离线推送的实现请参见 添加离线推送。
8. 添加离线推送。
在使用离线推送之前,您需要开通 IM 离线推送 服务。
9. 关于 App 的配置,您可以参见文档:集成推送服务(Push)跑通离线推送功能。
说明:
配置完成后,当单击接收到的音视频通话离线推送通知时, TUICallKit 会自动拉起音视频通话邀请界面。
10. 附加增值能力
集成 TUIChat 和 TUICallKit 的组件后,在聊天界面发送语音消息时,即可录制带 AI 降噪和自动增益的语音消息。该功能需要购买 音视频通话能力 进阶版及以上套餐,仅 IMSDK 7.0 及以上版本支持。当套餐过期后,录制语音消息会切换到系统 API 进行录音。
下面是使用两台华为 P10 同时录制的语音消息对比:
步骤7. 构建多人音视频功能
TUI 组件支持在聊天界面对用户发起多人音视频,仅需要简单几步就可以快速集成:

1. 开通音视频服务。
2. 登录 即时通信 IM 控制台,单击目标应用卡片,进入应用的基础配置页面。
3. 找到含 UI 低代码场景方案功能区,单击卡片下方的多人音视频(TUIRoomKit) > 免费体验。
4. 在弹窗中单击免费试用 7 天,即可成功开通多人音视频免费体验版。开通完成后即可参见 集成指引 进行集成。
5. 集成 TUIRoomKit 组件。在 podfile 文件中添加以下内容。
// 集成多人音视频组件pod 'TUIRoomKit'
6. 发起多人音视频会议
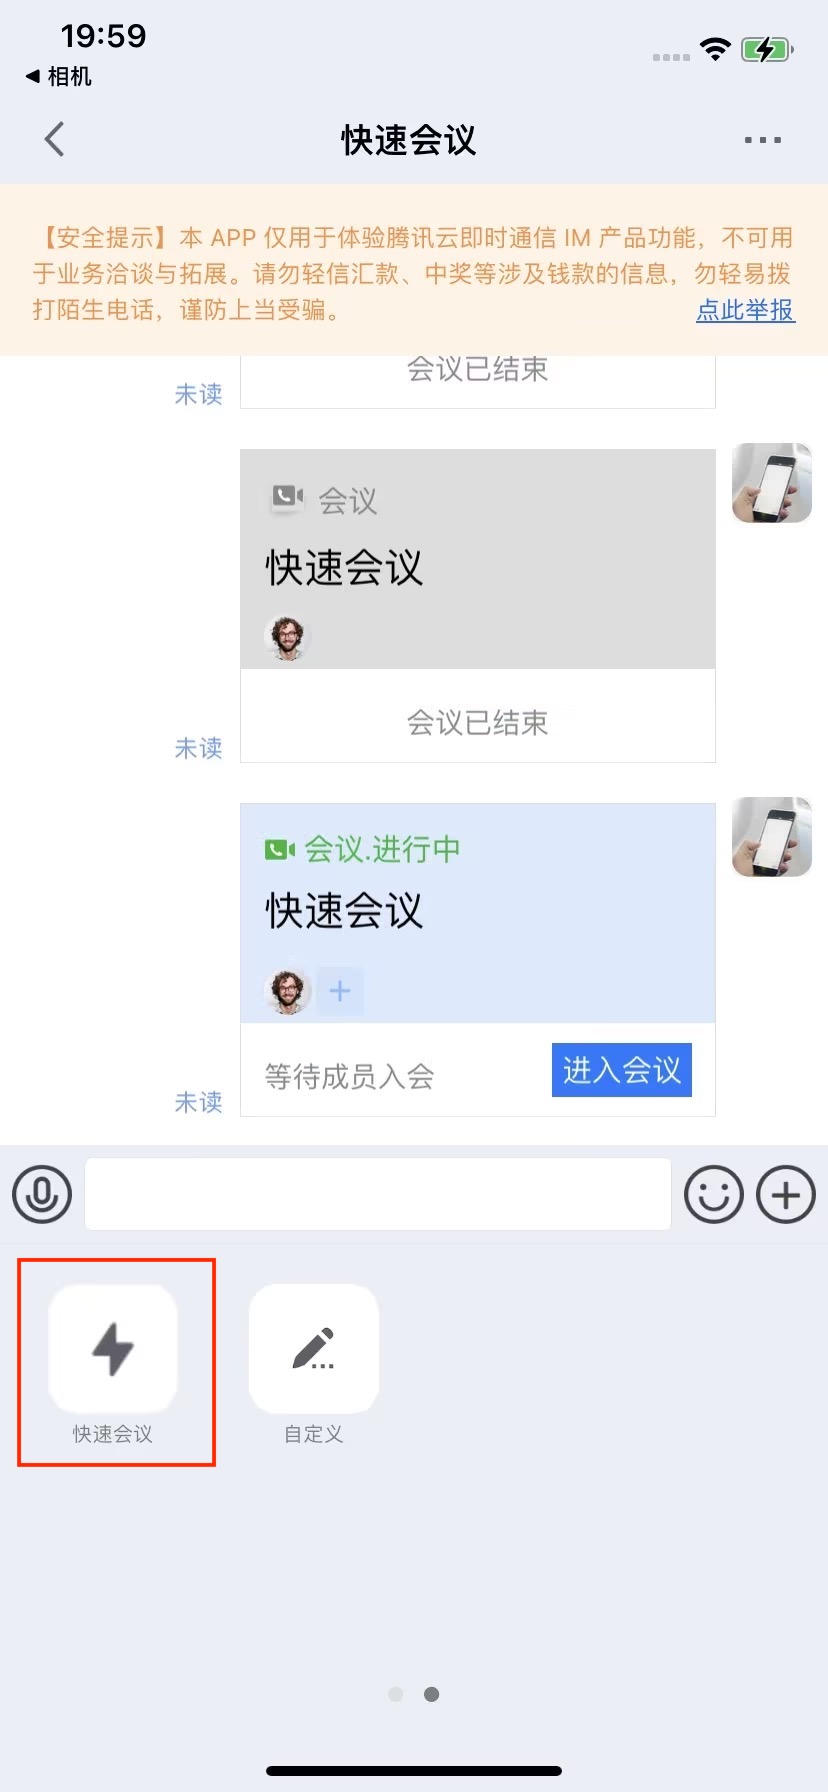
集成 TUIRoomKit 组件后,聊天界面默认会出现 “快速会议” 按钮,当用户点击按钮时,TUIKit 会自动发起会议,并在聊天记录中展示一条会议邀请卡片。
常见问题
音视频常见问题
1. TUICallKit 和自己集成的音视频库冲突了?
腾讯云的音视频库不能同时集成,可能存在符号冲突,可以按照下面的场景处理。
1. 如果您使用了
TXLiteAVSDK_TRTC 库,不会发生符号冲突。可直接在 Podfile 文件中添加依赖,pod 'TUICallKit_Swift'
2. 如果您使用了
TXLiteAVSDK_Professional 库,会产生符号冲突。您可在 Podfile 文件中添加依赖,pod 'TUICallKit_Swift/Professional'
3. 如果您使用了
TXLiteAVSDK_Enterprise 库,会产生符号冲突。建议升级到 TXLiteAVSDK_Professional 后使用 TUICallKit_Swift/Professional。2. 通话邀请的超时时间默认是多久?
通话邀请的默认超时时间是 30 秒。
3. 在邀请超时时间内,被邀请者如果离线再上线,能否立即收到邀请?
如果是单聊通话邀请,被邀请者离线再上线可以收到通话邀请,TUIKit 内部会自动唤起通话邀请界面。
如果是群聊通话邀请,被邀请者离线再上线后会自动拉取最近 30 秒内的邀请,TUIKit 会自动唤起群通话界面。
上架常见问题
1. 上架 App Store 时打包失败,提示 Unsupported Architectures。
问题现象如下图,打包时提示 ImSDK_Plus.framework 中包含了 App Store 不支持的 x86_64 模拟器版本。该问题是由于 IMSDK 为了方便开发者调试,发布时会默认带上模拟器版本。


您可以按照下面的步骤,在打包时去掉模拟器版本:
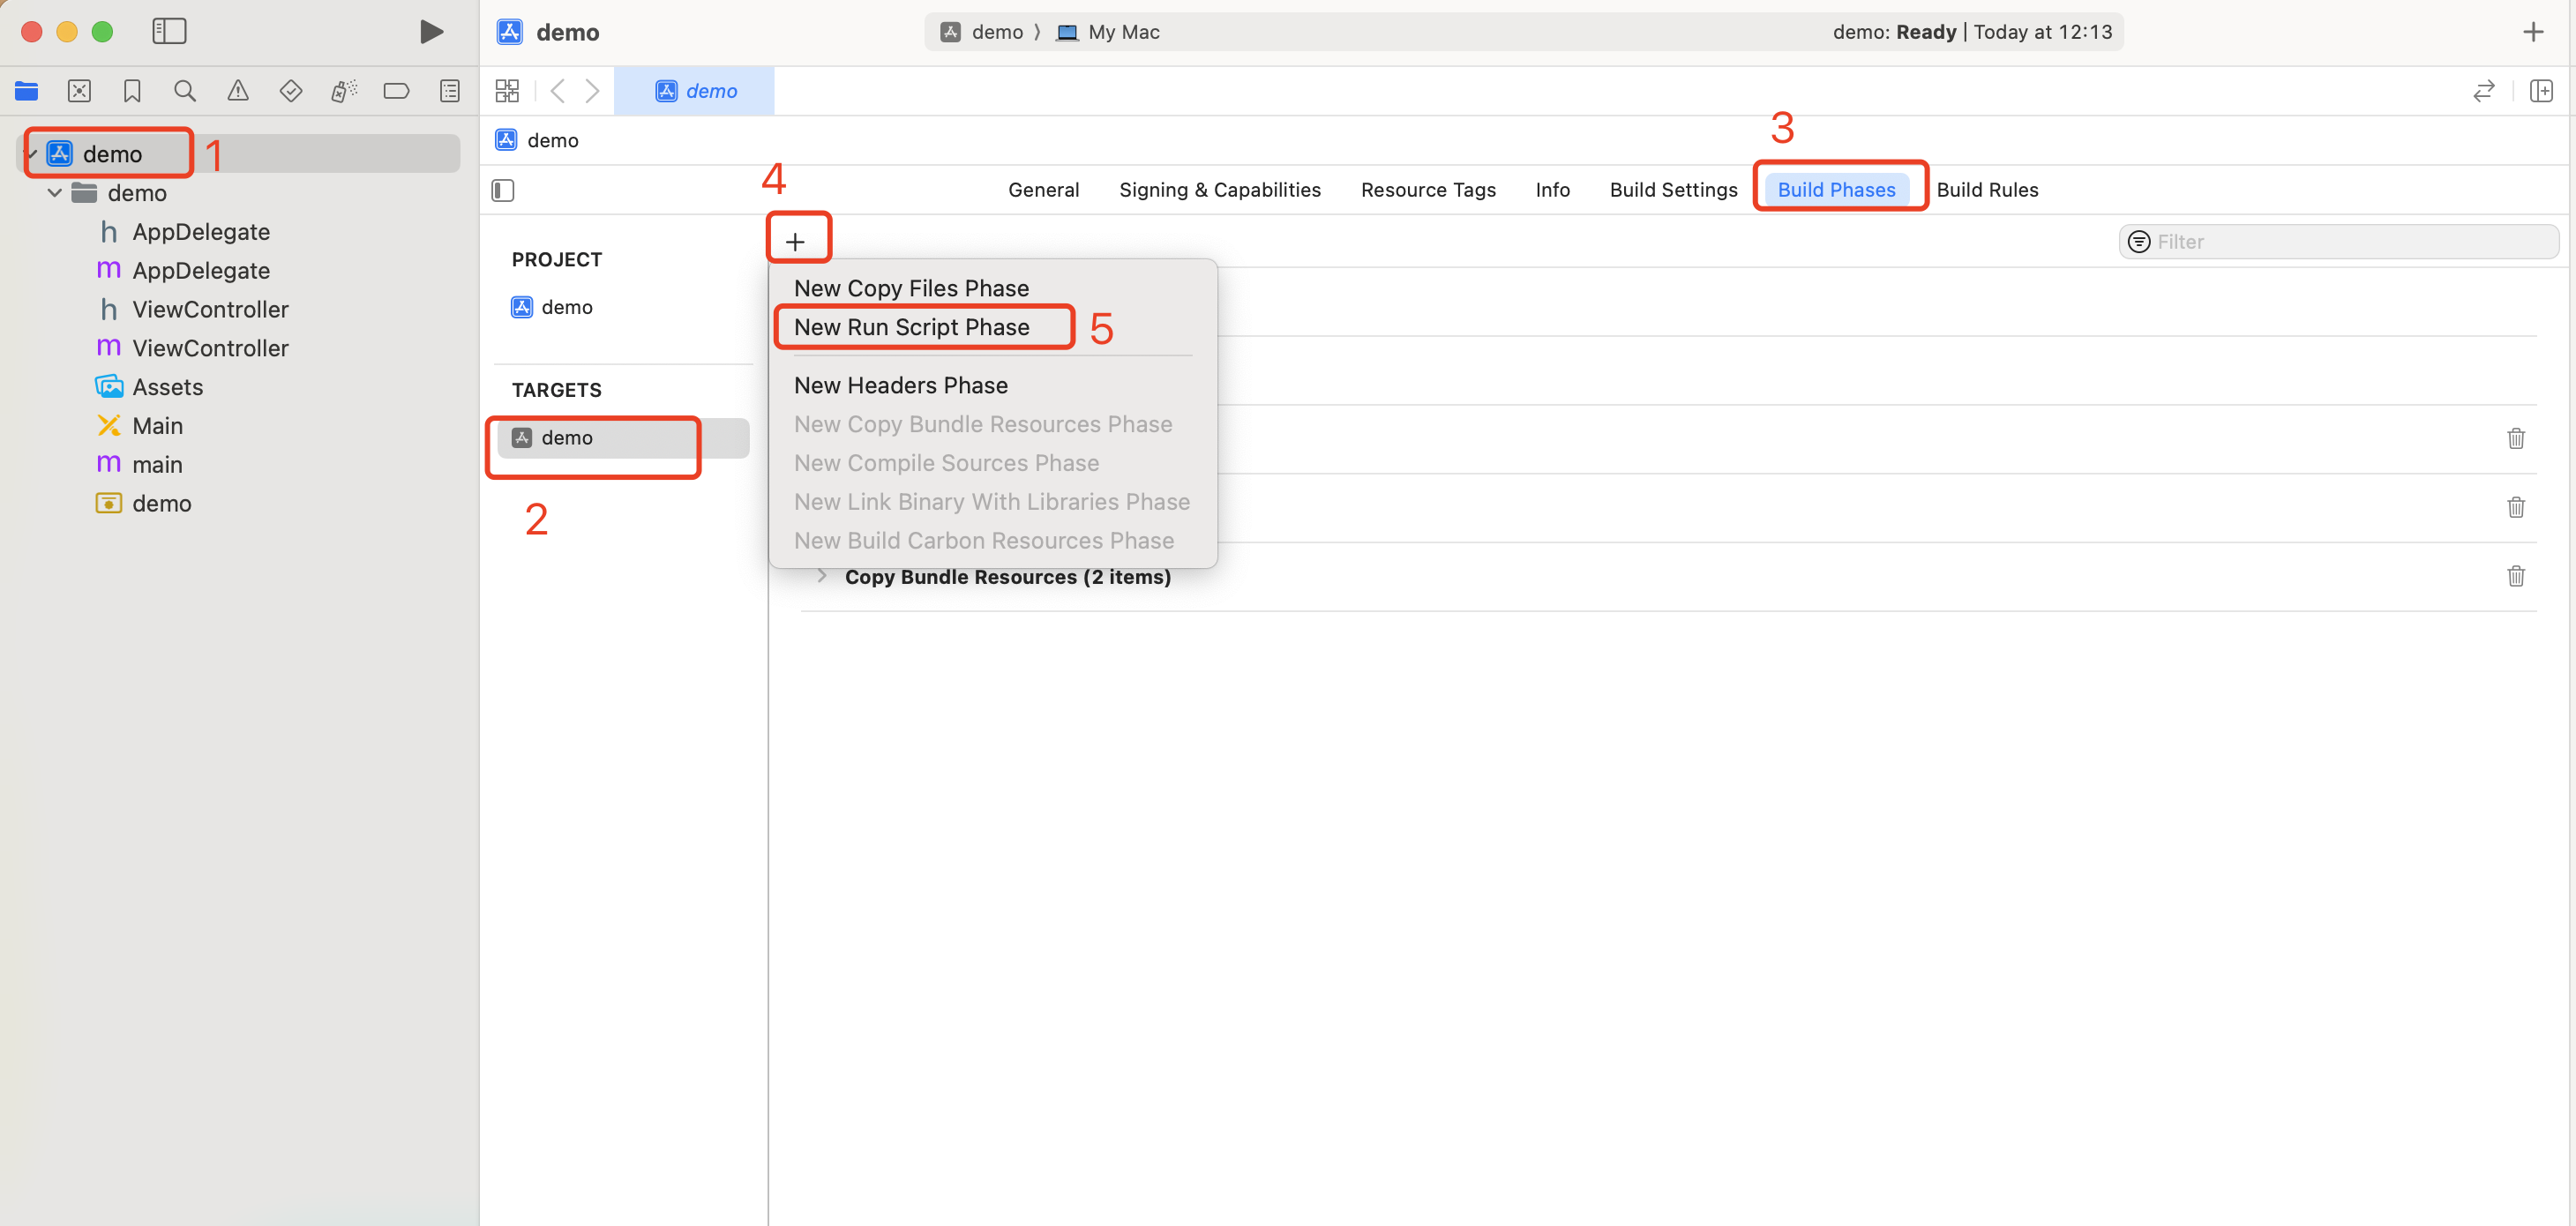
1. 选中您工程的 Target,并点击 Build Phases 选项,在当前面板中添加 Run Script;
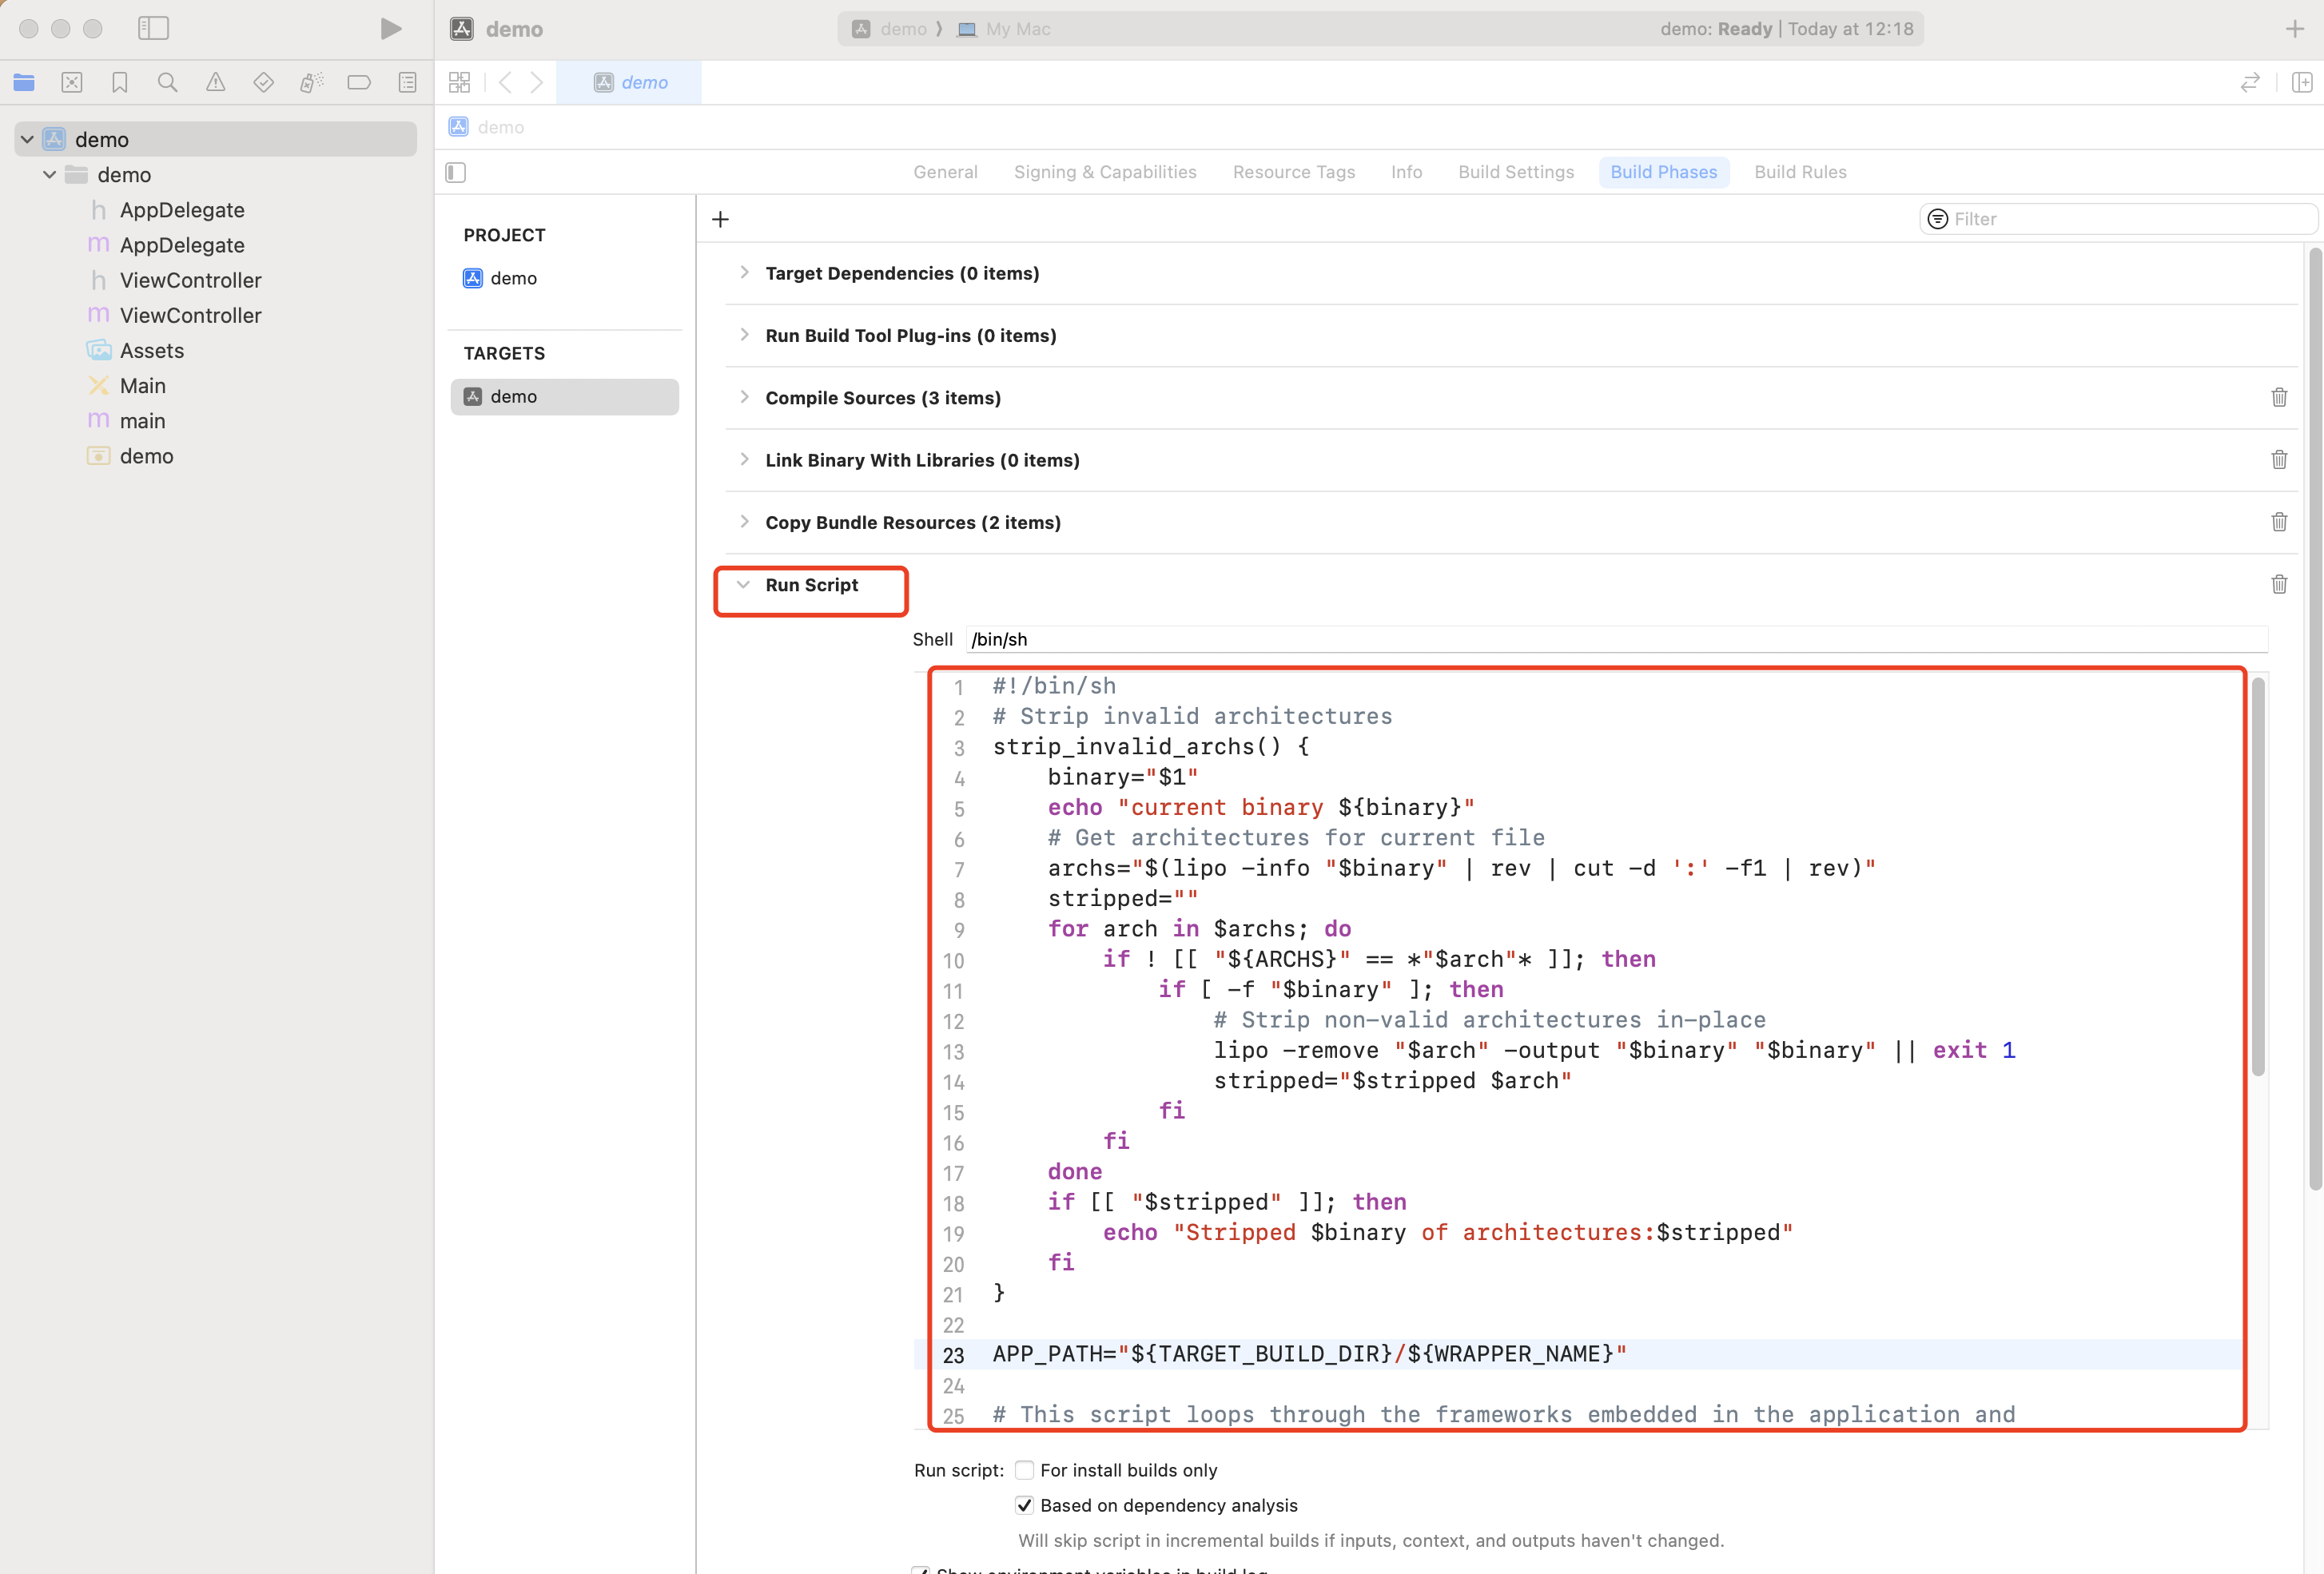
2. 在新增的 Run Script 中,添加如下脚本:
#!/bin/sh# Strip invalid architecturesstrip_invalid_archs() {binary="$1"echo "current binary ${binary}"# Get architectures for current filearchs="$(lipo -info "$binary" | rev | cut -d ':' -f1 | rev)"stripped=""for arch in $archs; doif ! [[ "${ARCHS}" == *"$arch"* ]]; thenif [ -f "$binary" ]; then# Strip non-valid architectures in-placelipo -remove "$arch" -output "$binary" "$binary" || exit 1stripped="$stripped $arch"fifidoneif [[ "$stripped" ]]; thenecho "Stripped $binary of architectures:$stripped"fi}APP_PATH="${TARGET_BUILD_DIR}/${WRAPPER_NAME}"# This script loops through the frameworks embedded in the application and# removes unused architectures.find "$APP_PATH" -name '*.framework' -type d | while read -r FRAMEWORKdoFRAMEWORK_EXECUTABLE_NAME=$(defaults read "$FRAMEWORK/Info.plist" CFBundleExecutable)FRAMEWORK_EXECUTABLE_PATH="$FRAMEWORK/$FRAMEWORK_EXECUTABLE_NAME"echo "Executable is $FRAMEWORK_EXECUTABLE_PATH"strip_invalid_archs "$FRAMEWORK_EXECUTABLE_PATH"done
Xcode 集成常见问题
1. [Xcodeproj] Unknown object version (60). (RuntimeError)

使用 Xcode15 创建新工程来集成 TUIKit 时,输入pod install 后,可能会遇到此问题,原因是使用了较旧版本的 CocoaPods ,此时有两种解决办法:
解决方式一: 修改 Xcode 工程的 Project Format 版本。
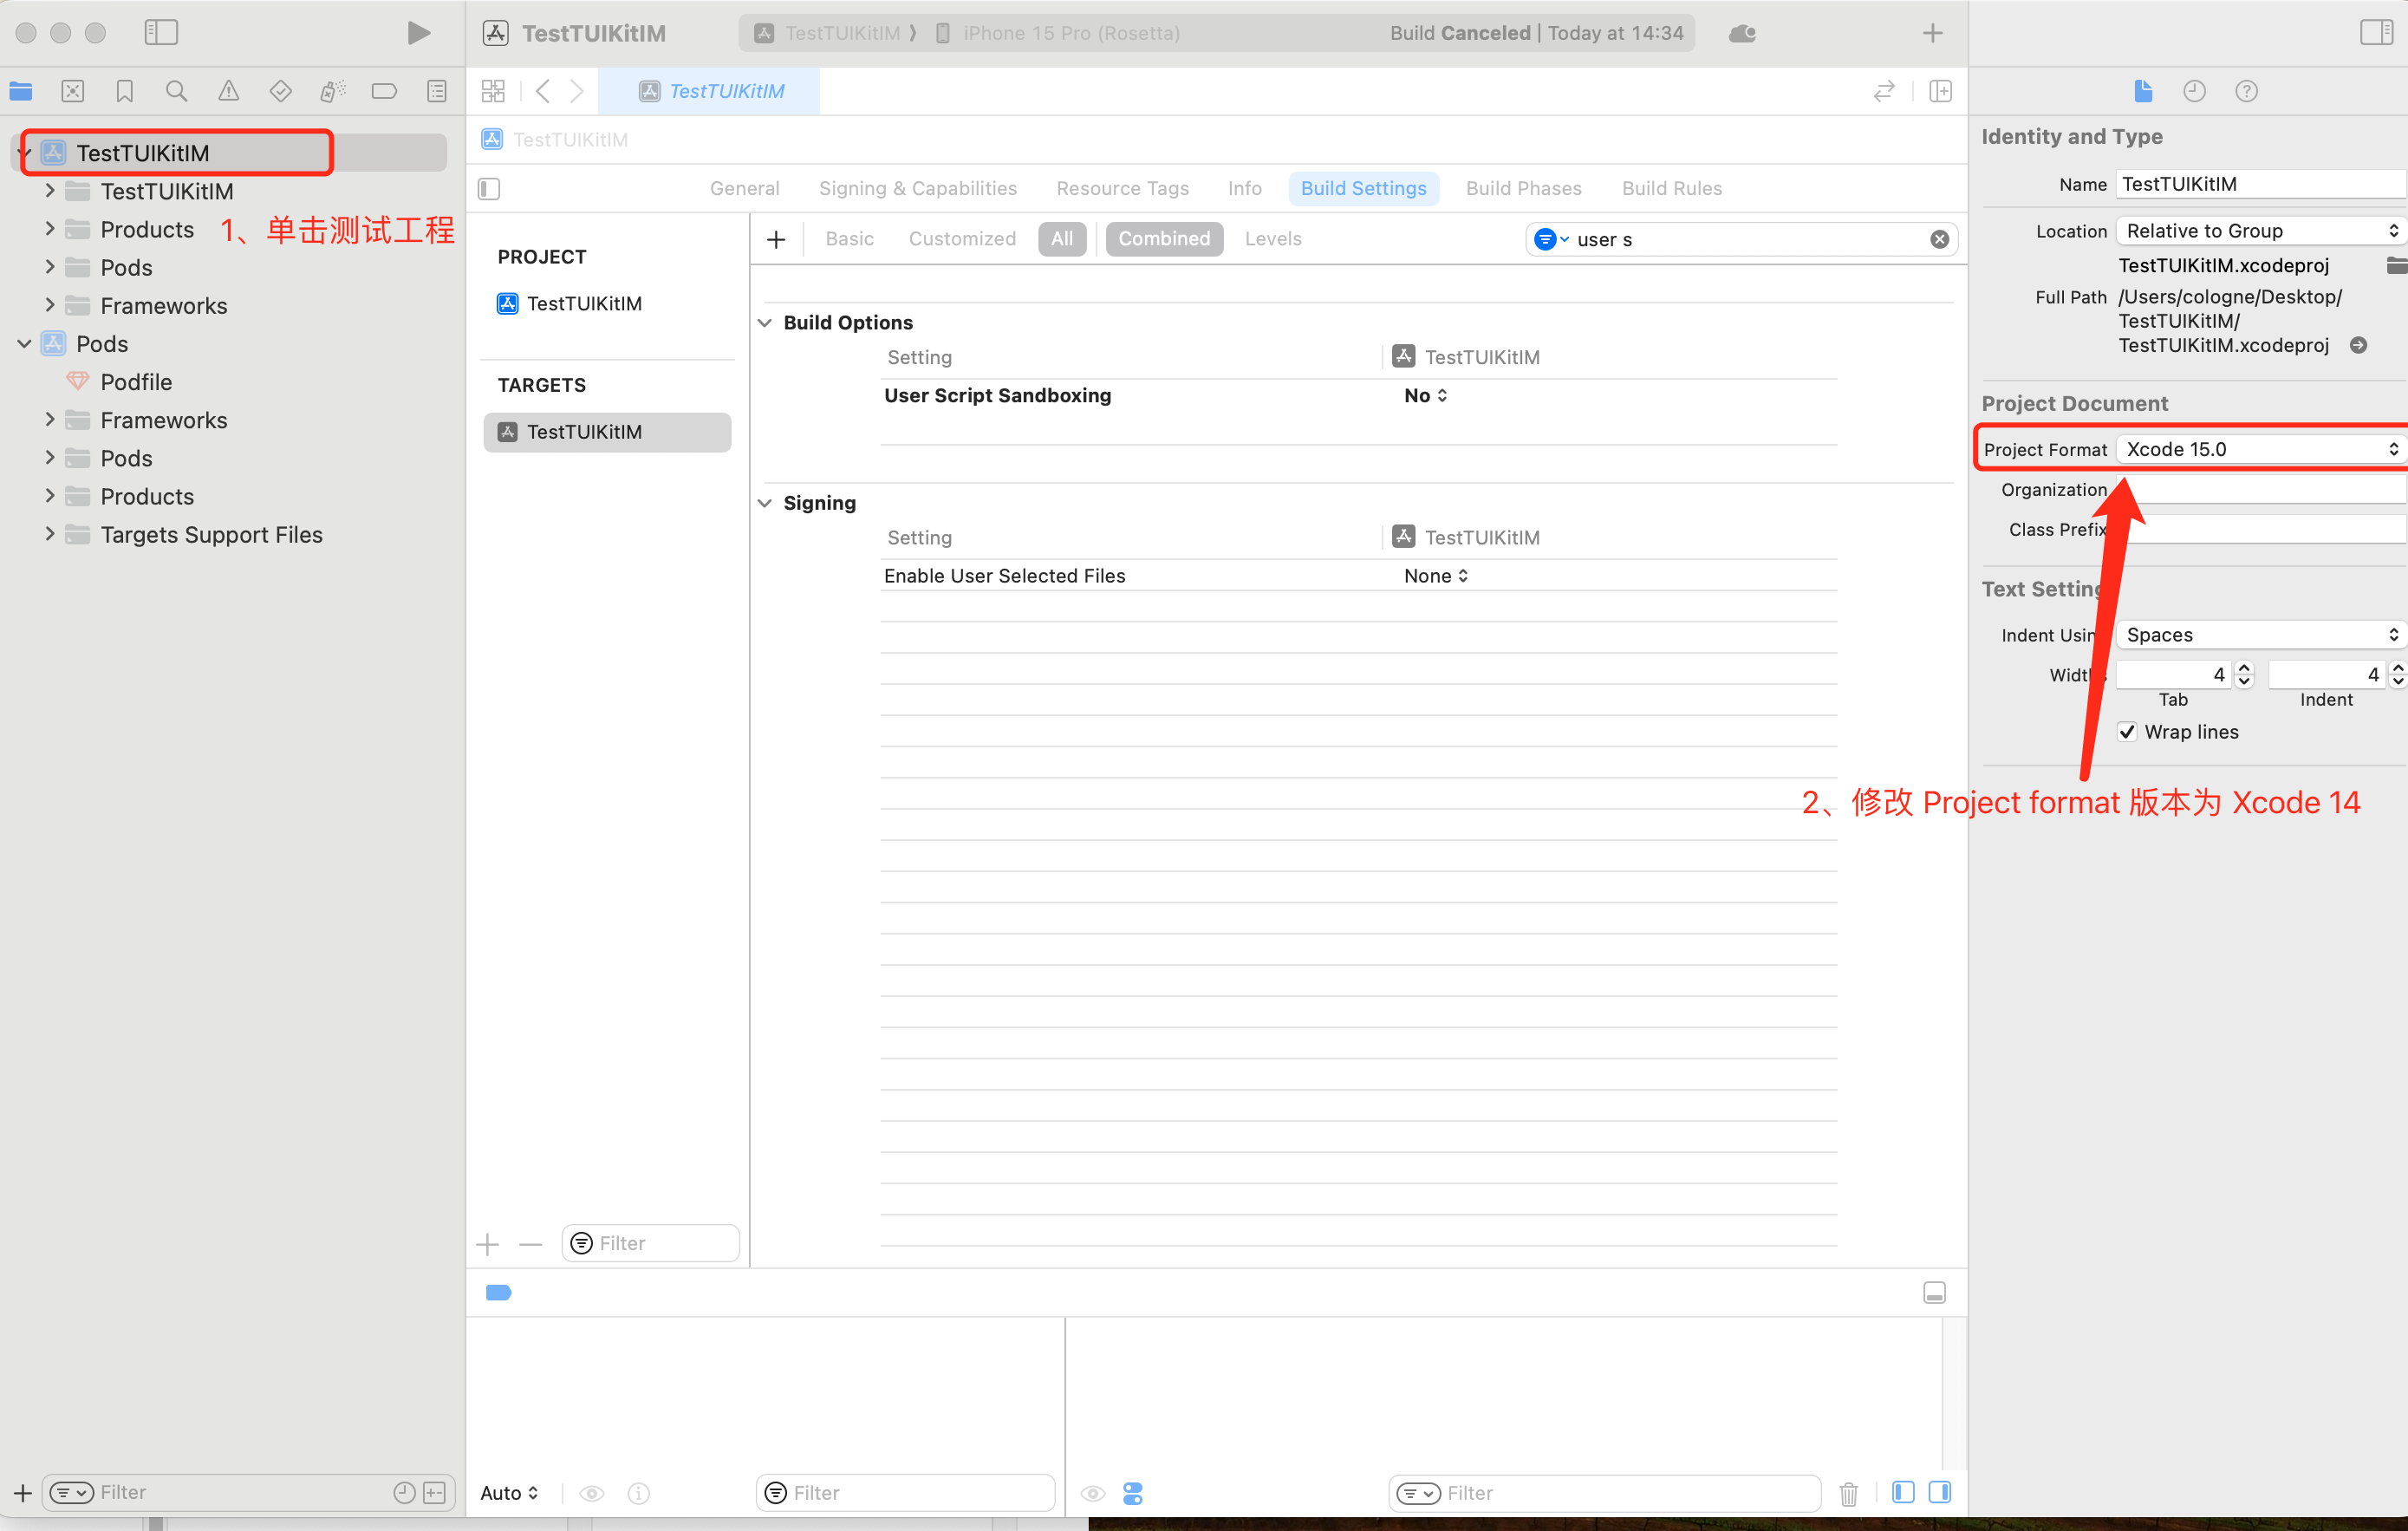
解决方式二: 升级本地的 CocoaPods 版本,升级方式本文不再赘述。
您可以在终端输入 pod --version 查看当前的 Pods 版本。
2. -ld64链接器问题
Assertion failed: (false && "compact unwind compressed function offset doesn't fit in 24 bits"), function operator(), file Layout.cpp,

或是使用 Xcode 15 集成 TUIRoom 时,因最新链接器导致 TUIRoomEngine 的符号冲突,都属于该问题。

解决方式是:修改链接器配置
在 Build Settings 中的Other Linker Flags 中添加"-ld64",即可解决。 参考资料: https://developer.apple.com/forums/thread/735426。
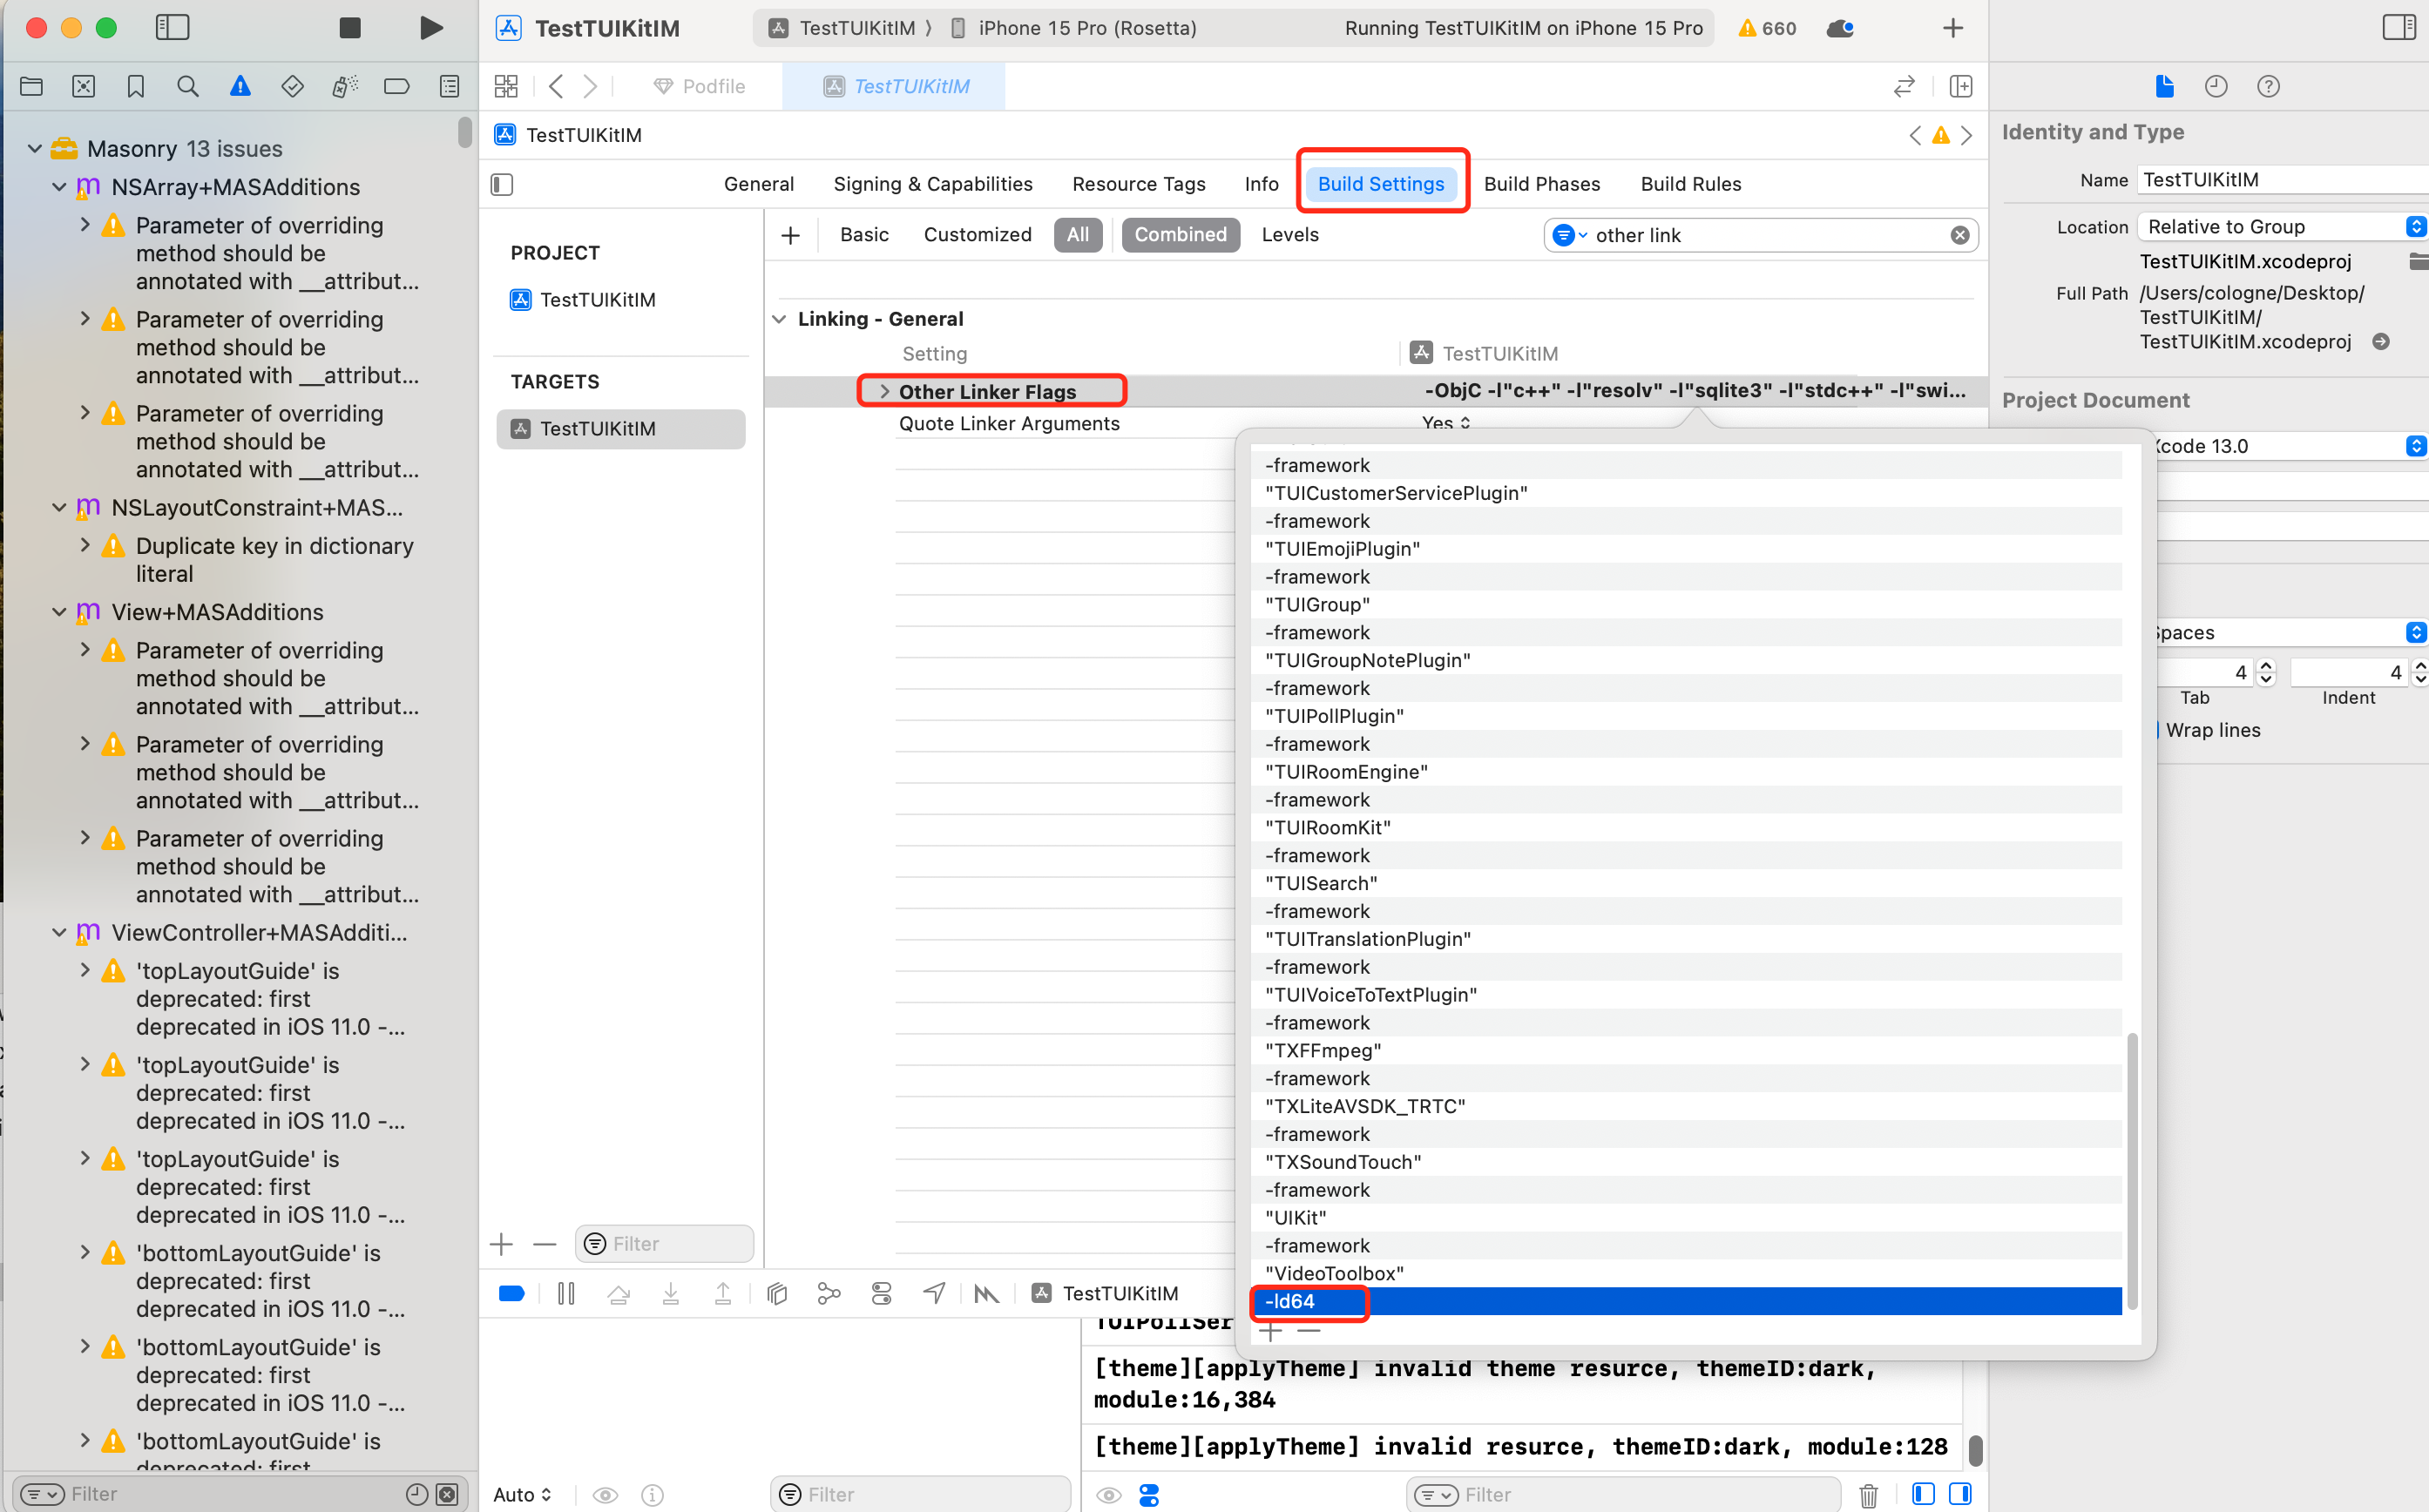
3. Rosetta 模拟器问题
使用苹果芯片(M1\\M2等系列芯片)时会遇到, 原因是包括 SDWebImage 在内的三方库,并未支持 xcframework,不过苹果依旧给出了适配办法,就是在模拟器上开启 Rosetta 设置, 一般情况下编译时会自动弹出 Rosetta 选项。
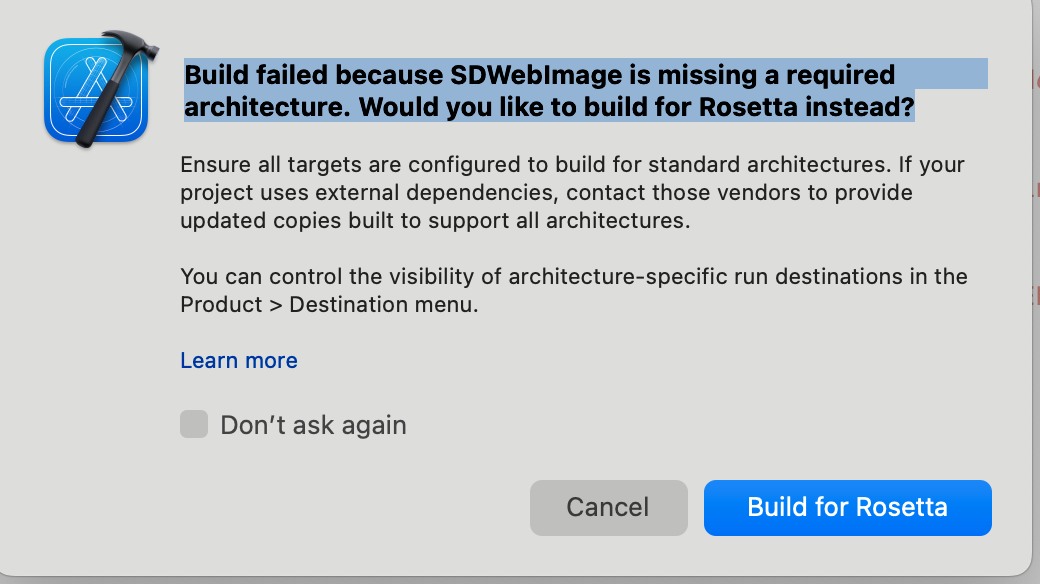
4. Xcode 15 开发者沙盒选项问题
Sandbox: bash(xxx) deny(1) file-write-create
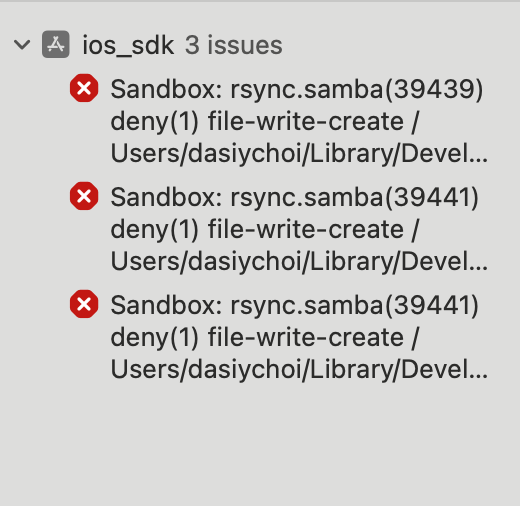
当您使用 Xcode 15 创建一个新工程时, 可能会因为此选项导致编译运行失败,建议您关闭此选项。
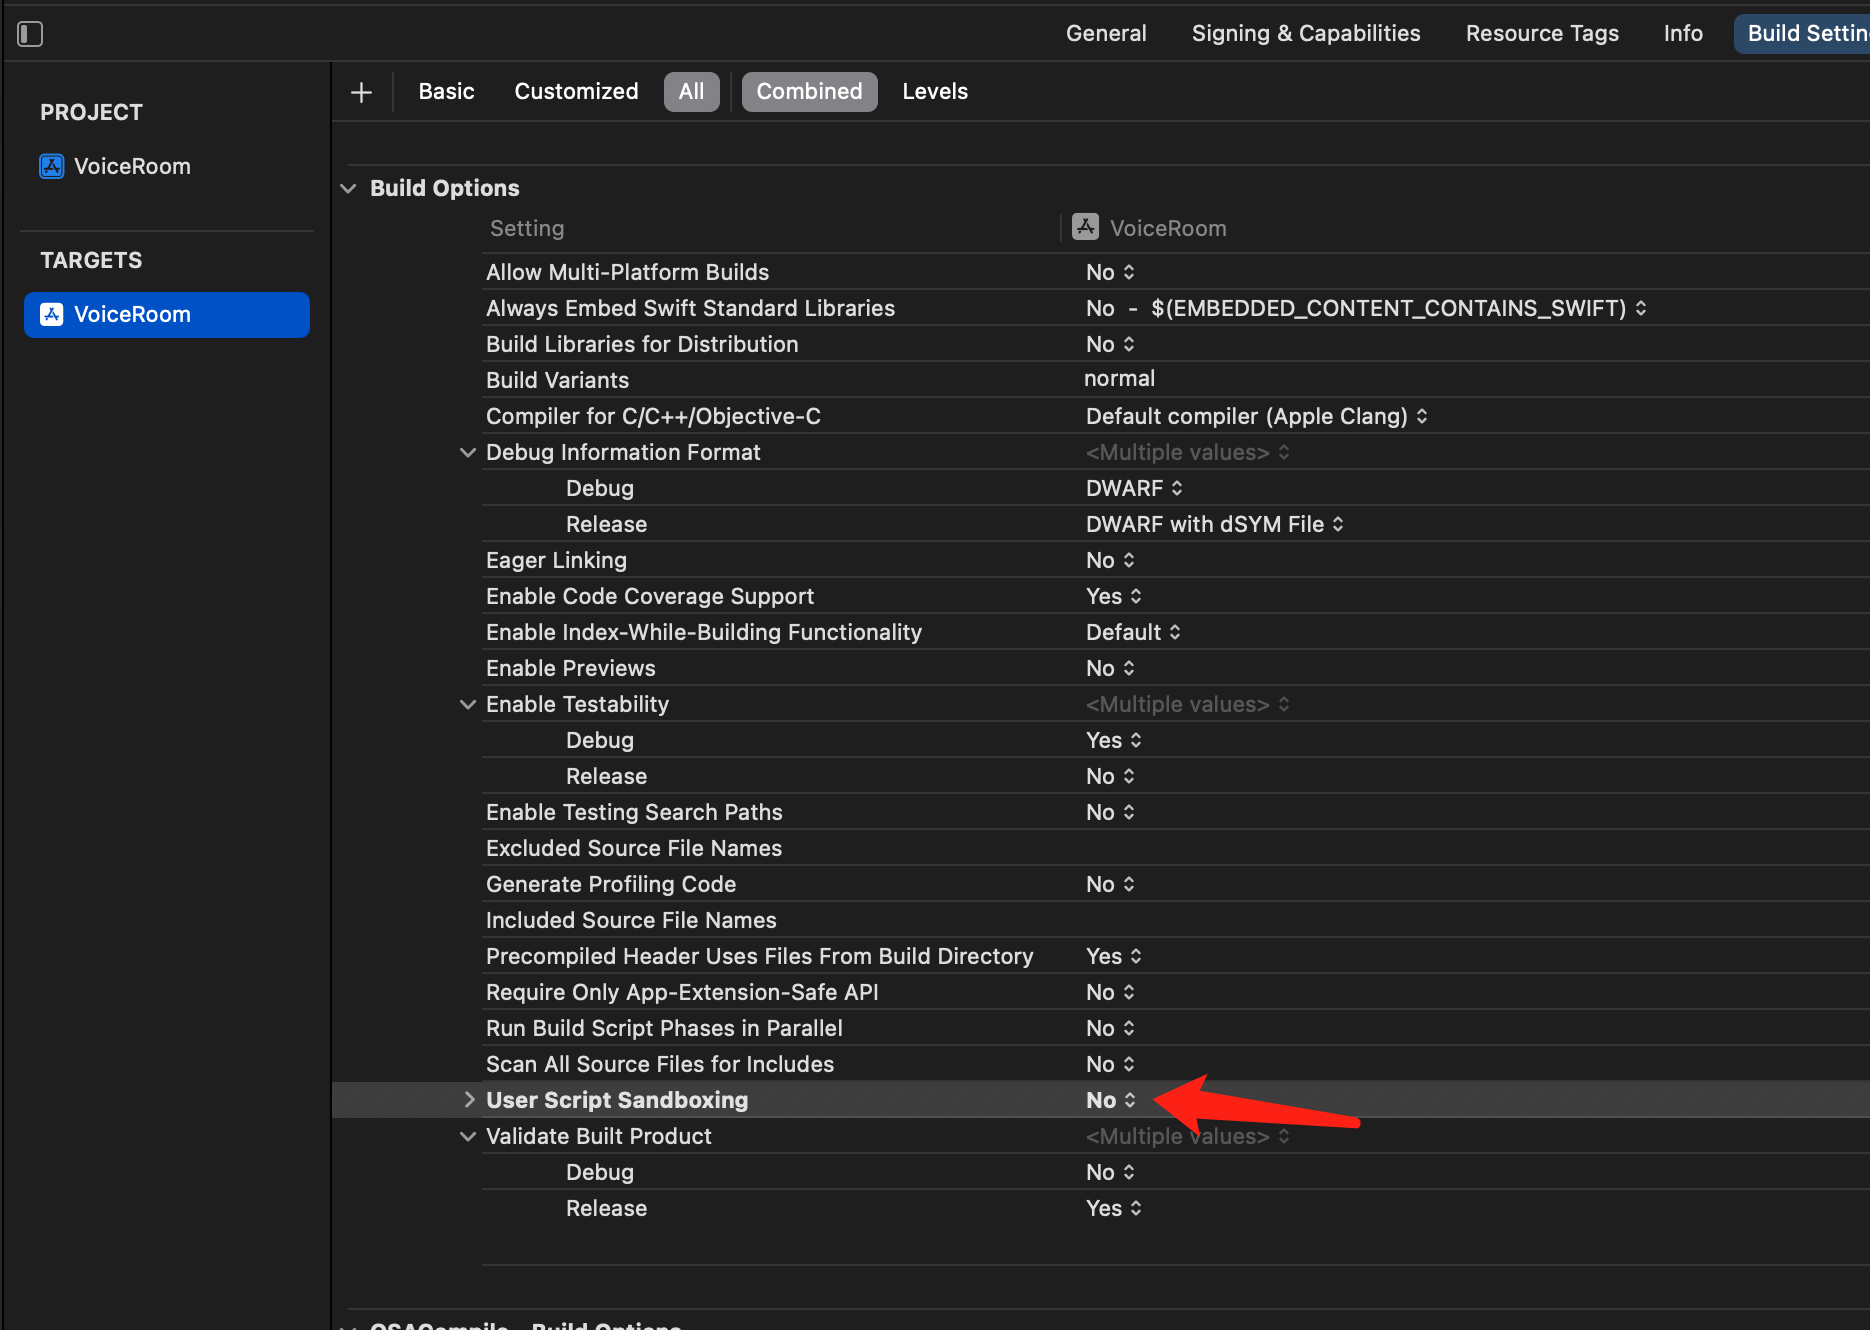
5. Xcode 16 不支持 Framework 开启 bitcode 问题
解决方案1:升级 SDK
如果您使用的是包含 Bitcode 的旧版本 SDK(例如 TXIMSDK_iOS),建议您按照本文档的指引,将 SDK 升级至 TXIMSDK_Plus_iOS_XCFramework。
解决方式2: 修改 Podfile 配置
在您的 Podfile 末尾新增如下配置,重新 Pod install。
post_install do |installer|bitcode_strip_path = 'xcrun --find bitcode_strip'.chop!def strip_bitcode_from_framework(bitcode_strip_path, framework_relative_path)framework_path = File.join(Dir.pwd, framework_relative_path)command = "#{bitcode_strip_path} #{framework_path} -r -o #{framework_path}"puts "Stripping bitcode: #{command}"system(command)endframework_paths = ["/Pods/TXIMSDK_iOS/ImSDK.framework/ImSDK",]framework_paths.each do |framework_relative_path|strip_bitcode_from_framework(bitcode_strip_path, framework_relative_path)endend
CocoaPods 集成常见问题
1. 使用远端集成时,Pod依赖版本不匹配问题
此时请删除 Podfile.lock 文件, 并使用 pod repo update 更新本地代码仓库, 之后使用 pod update 重新更新即可。

2. 使用本地集成时,Pod依赖版本不匹配问题
第一次使用本地集成时,建议您下载我们的示例 Demo 工程,将 Podfile 文件内容替换为 Podfile_local 的内容,执行 Pod update 后相互参照。
