介绍
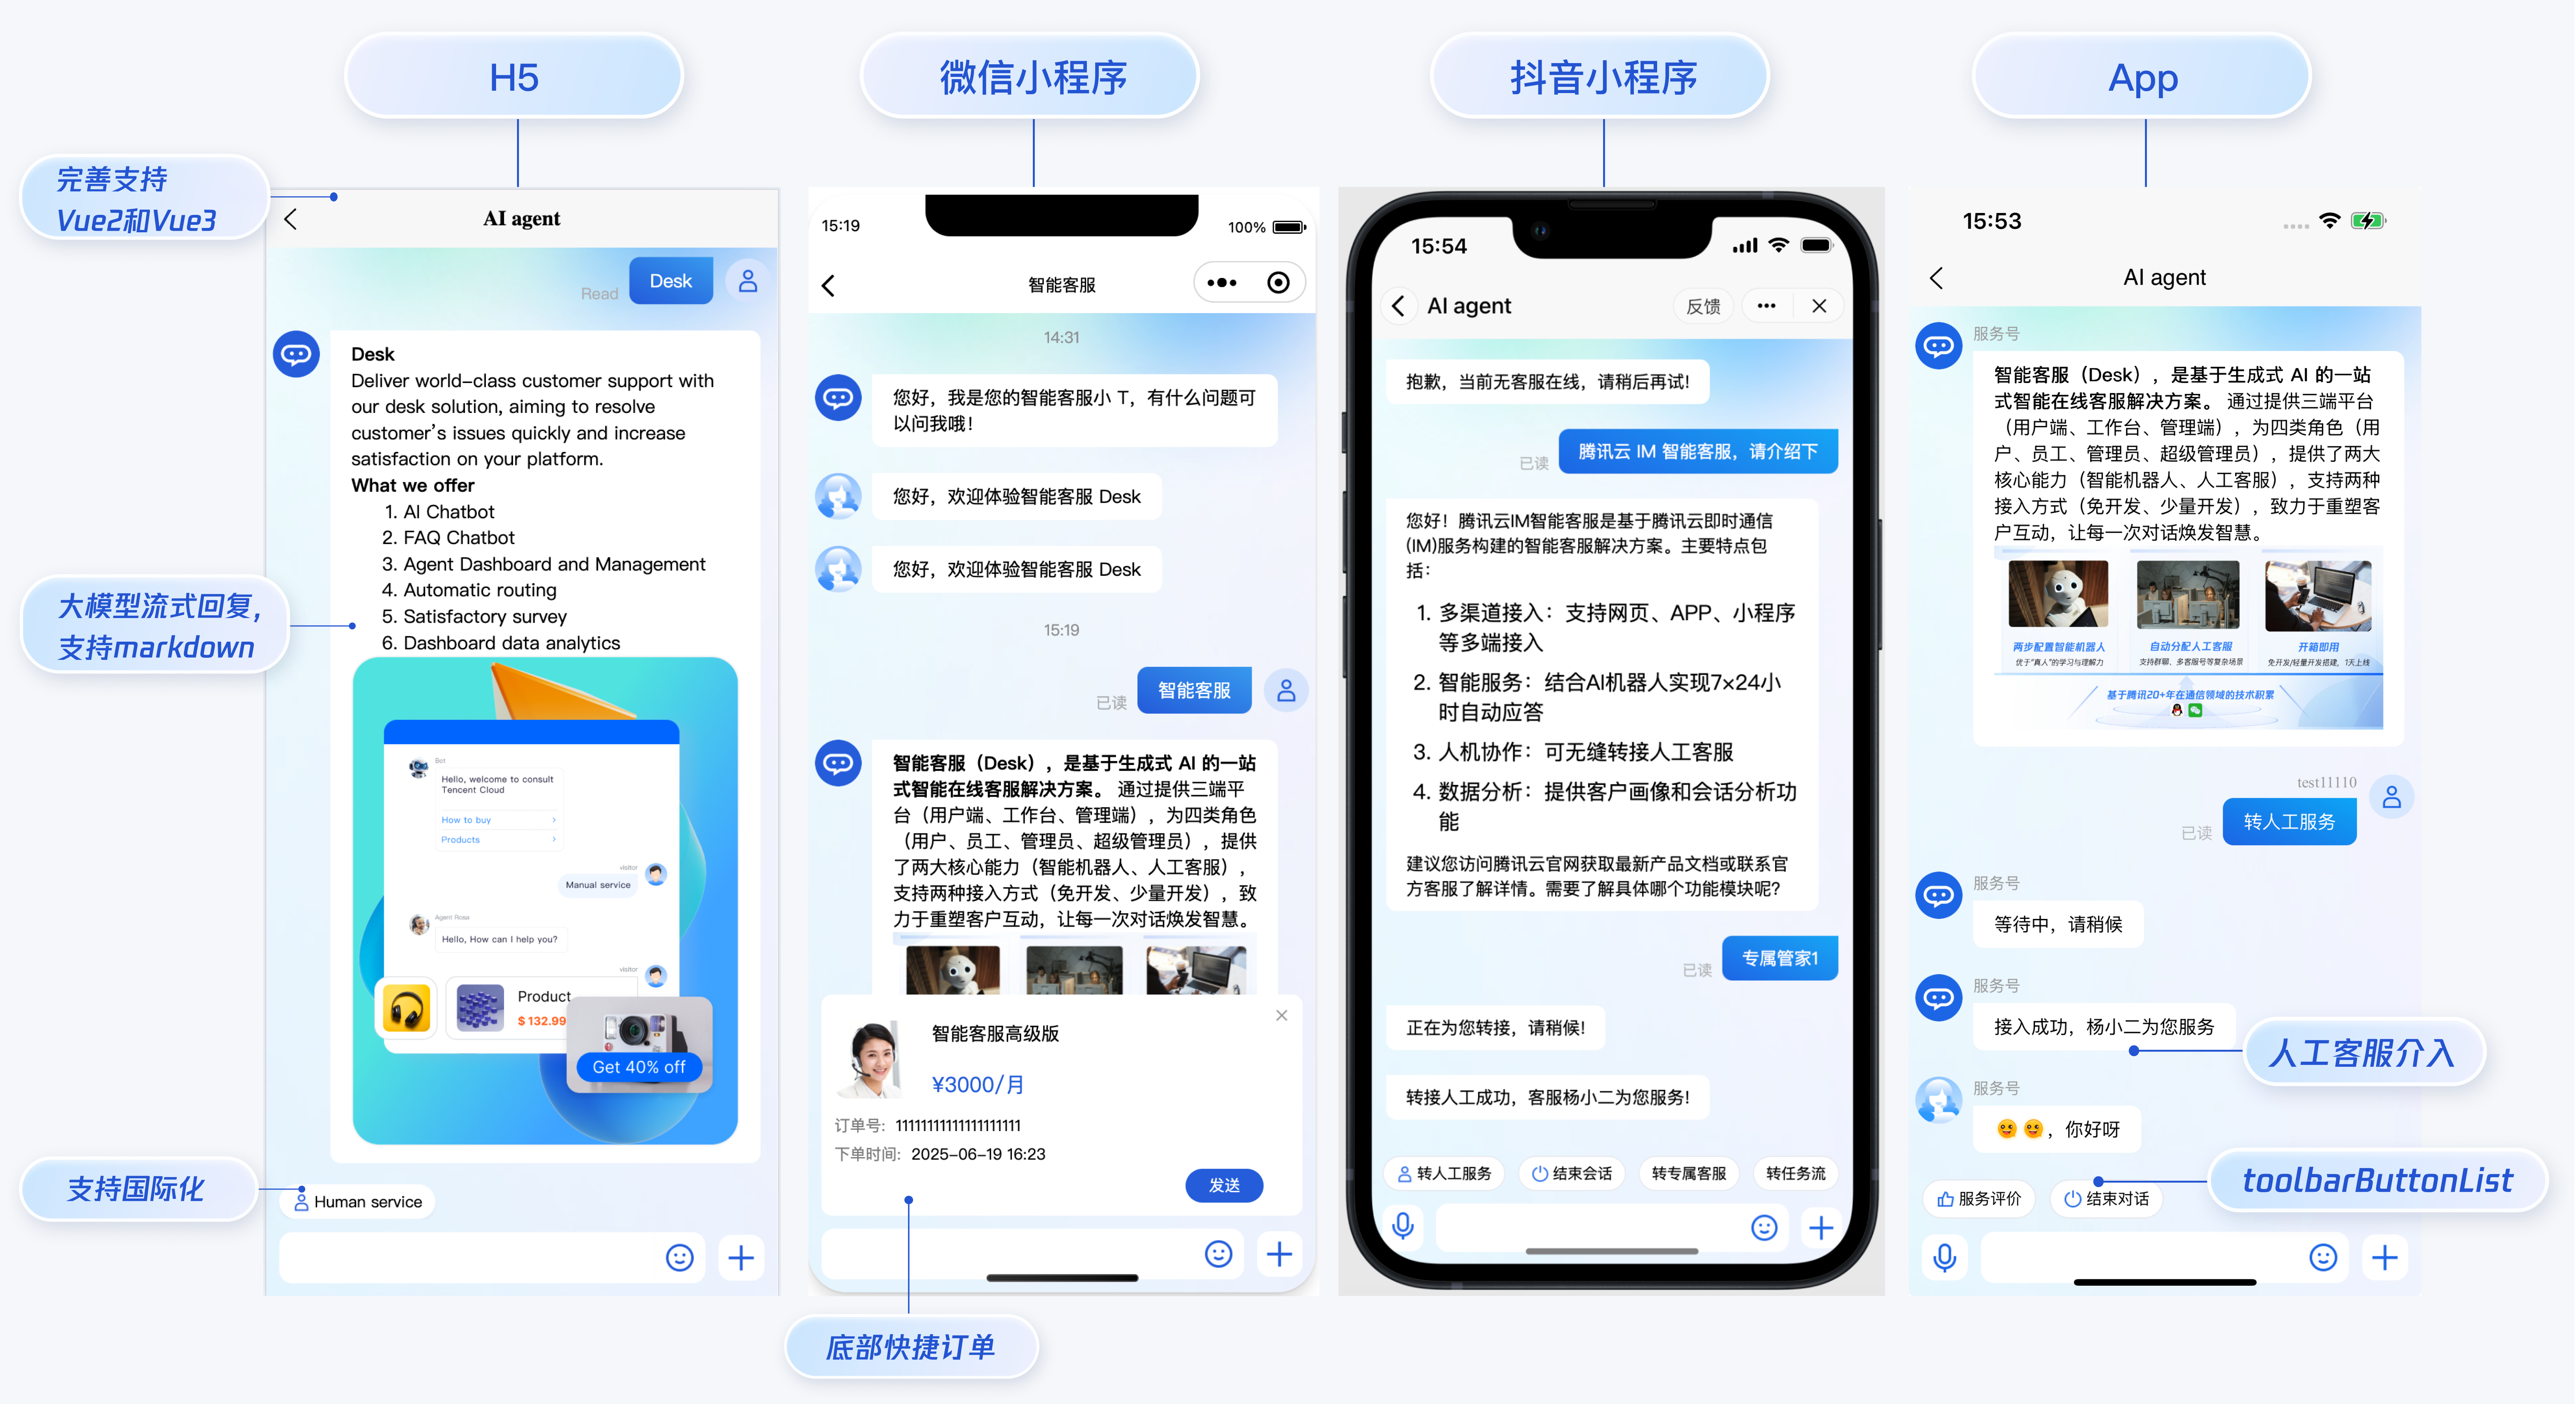
智能客服用户端 uni-app UIKit。使用此 UIKit,您可以在一天内将智能客服的能力集成到您的 H5、小程序、App 项目。极简接入,一套代码多端运行且体验一致,用智能客服为您的产品增收提效,提升用户满意度和付费转化。
说明:
ai-desk-customer-uniapp v1.5.7 或更高版本支持 Vue3 项目打包抖音小程序。
ai-desk-customer-uniapp v1.5.11 或更高版本支持 Vue3 项目打包鸿蒙应用。
ai-desk-customer-uniapp v1.6.0 或更高版本支持 App/微信小程序/H5 转人工成功后发送语音消息。
效果展示
开发环境要求
HBuilderX 升级到最新版本
TypeScript / JavaScript (UIKit 使用 ts 语言开发,支持在 js 或者 ts 项目中集成)
Vue2 / Vue3
sass(sass-loader 版本 ≤ 10.1.1)
node(12.13.0 ≤ node 版本 ≤ 17.0.0, 推荐使用 Node.js 官方 LTS 版本 16.17.0)
npm(版本请与 node 版本匹配)
UIKit 源码集成
步骤1:创建项目(已有项目可忽略)
打开 HBuilderX,在菜单栏中选择 “文件-新建-项目”,创建一个名为
ai-desk-example 的 uni-app 项目。Vue 版本选择推荐 3。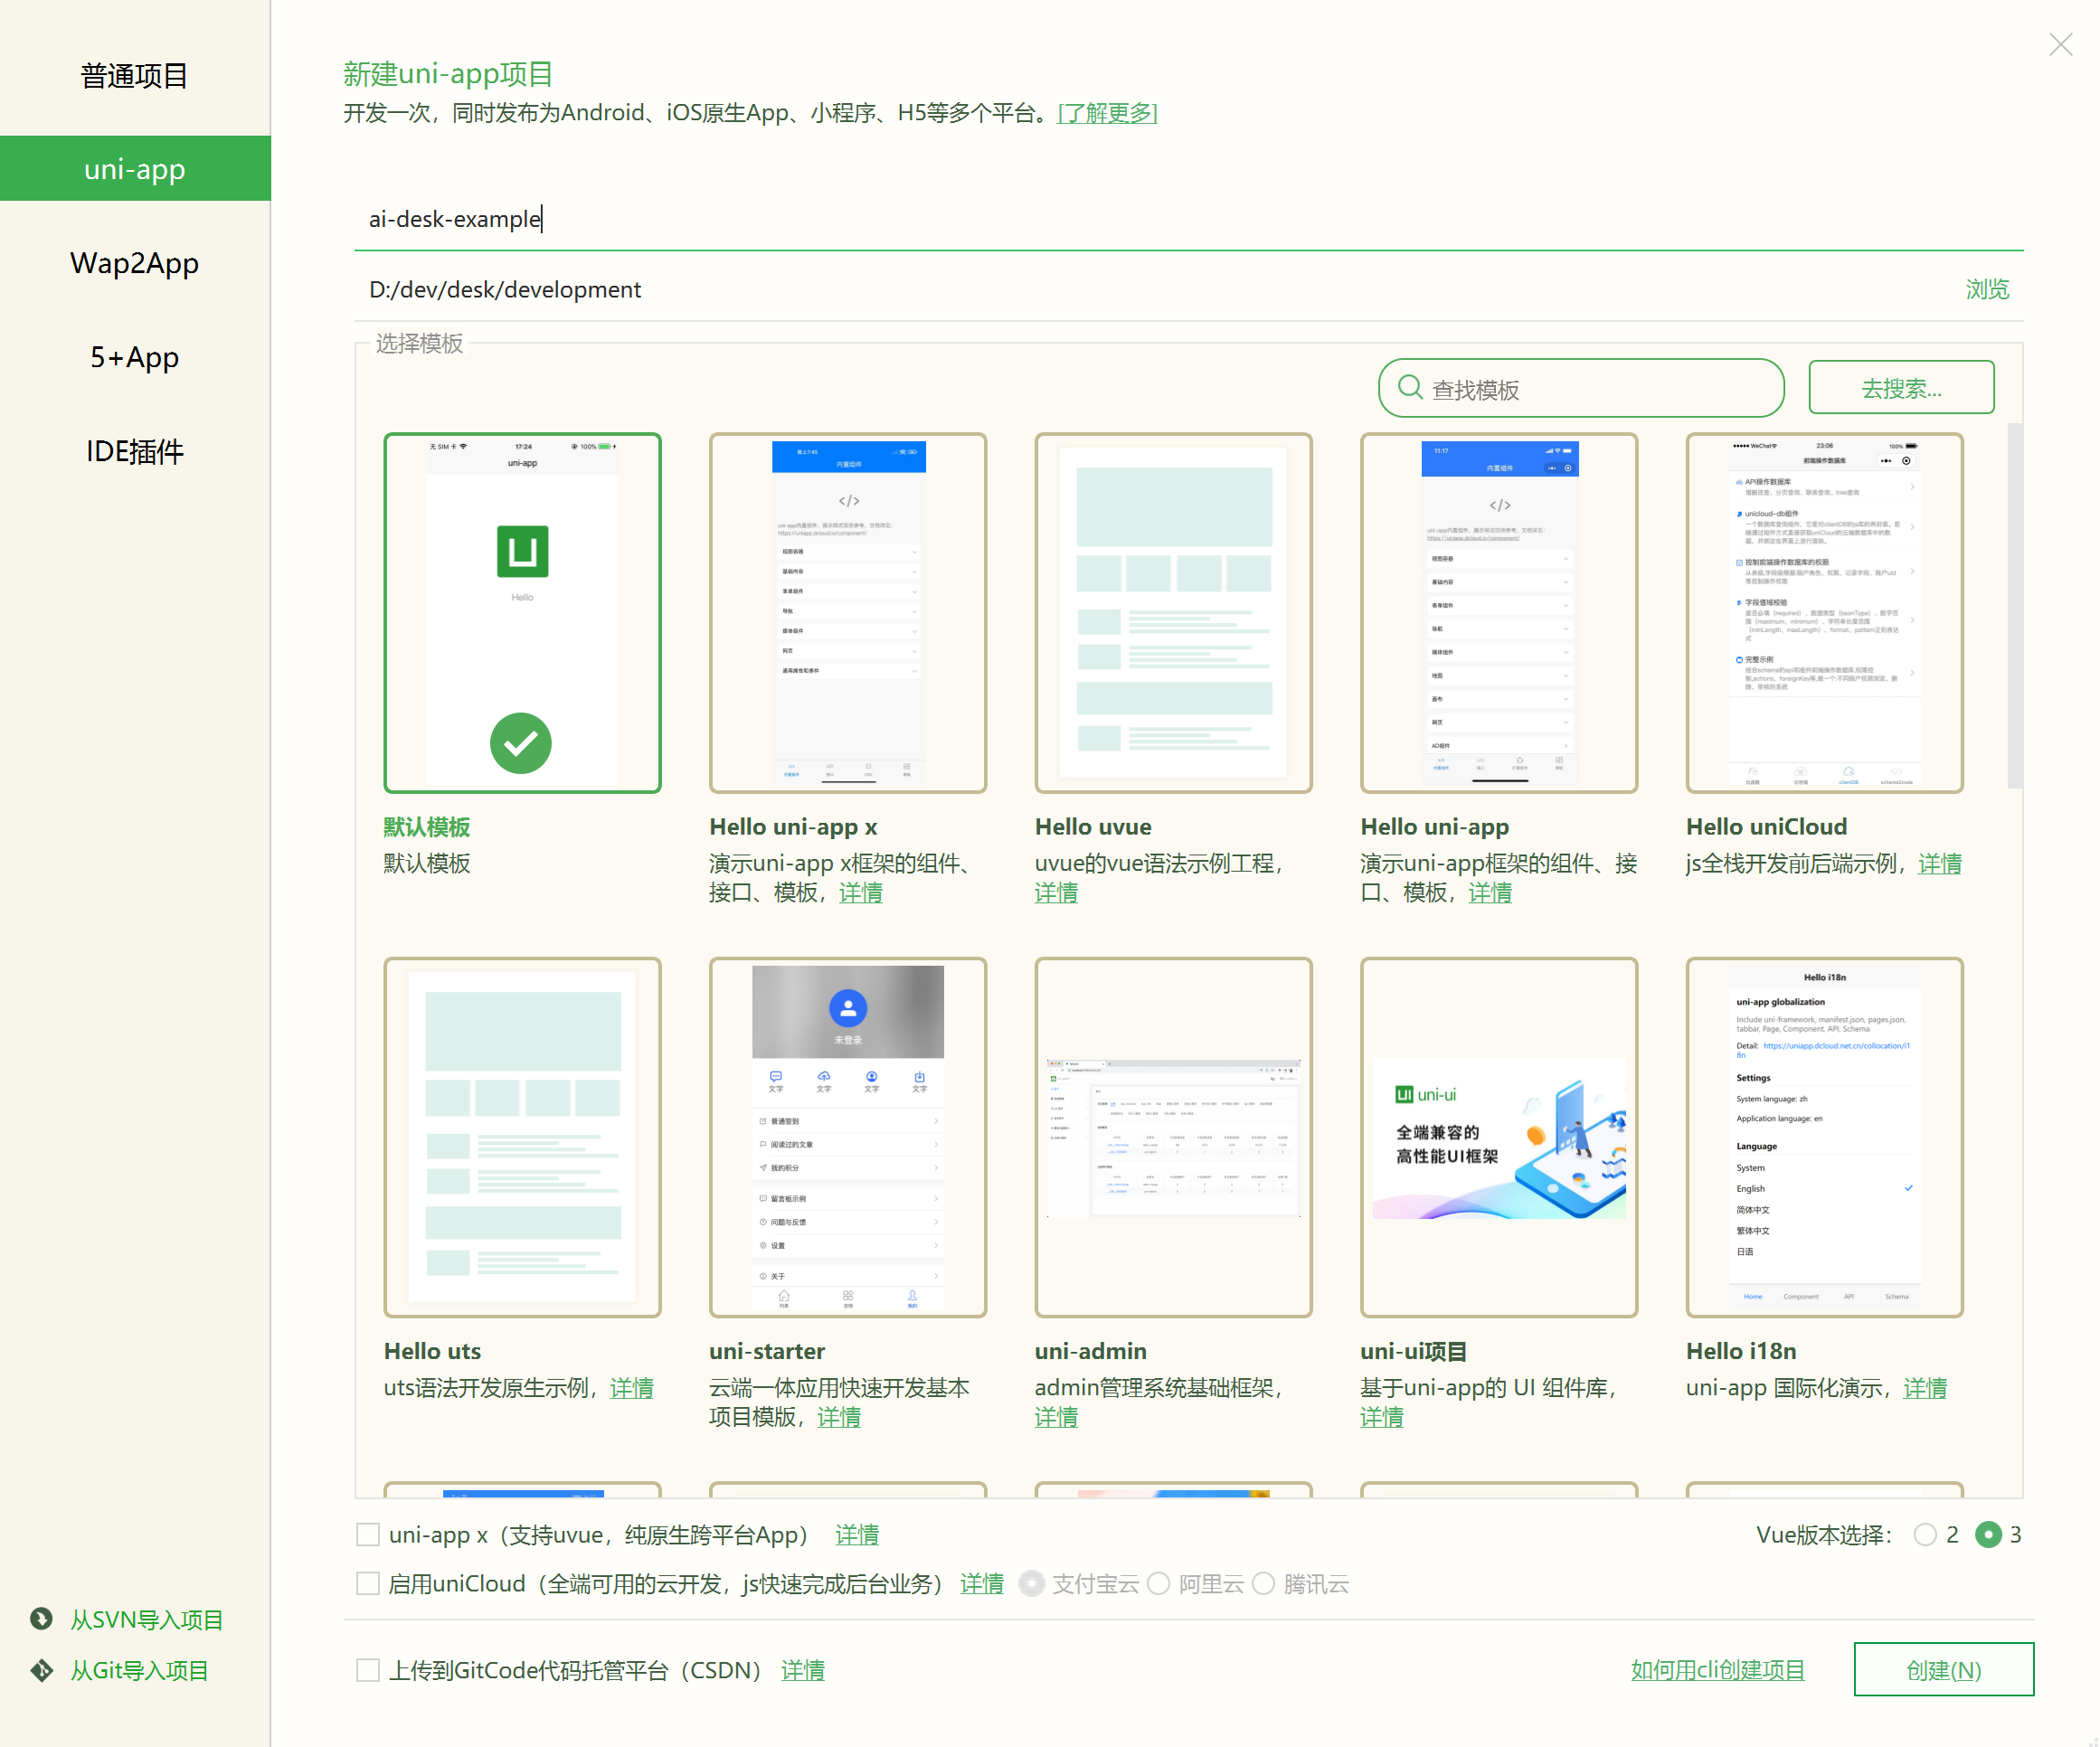
步骤2:下载 UIKit
HBuilderX 创建项目时默认不会创建
package.json 文件,请在项目根目录下执行以下命令创建 package.json 文件:npm init -y
通过 npm 方式下载 UIKit。
npm i @tencentcloud/ai-desk-customer-uniapp@latest unplugin-vue2-script-setup
为了方便您对 UI 进行扩展,请在项目的根目录下执行以下命令,将 UIKit 源码复制到项目中。
mkdir -p ./pages-ai-desk/ai-desk-customer-uniapp &&rsync -av --exclude={'node_modules','excluded-list.txt'} ./node_modules/@tencentcloud/ai-desk-customer-uniapp/ ./pages-ai-desk/ai-desk-customer-uniapp/
robocopy .\\node_modules\\@tencentcloud\\ai-desk-customer-uniapp .\\pages-ai-desk\\ai-desk-customer-uniapp /E
步骤3:引入 UIKit
1. 工程配置
在
manifest.json 文件的源码视图中开启小程序分包 subPackages 和关闭 H5 treeShaking 选项。// weixin miniProgram"mp-weixin" : {"appid" : "","optimization" : {"subPackages" : true}},// H5: close treeshaking to solve the problem of uni[methond]() is not a function"h5" : {"optimization" : {"treeShaking" : {"enable" : false}}},
注意:
小程序默认使用分包集成,打包小程序时
manifest.json 不要配置 lazyCodeLoading 选项。Vue2 项目必须在根目录下创建或修改 vue.config.js 。
const ScriptSetup = require('unplugin-vue2-script-setup/webpack').default;module.exports = {parallel: false,configureWebpack: {plugins: [ScriptSetup({/* options */}),],},chainWebpack(config) {// disable type check and let `vue-tsc` handles itconfig.plugins.delete('fork-ts-checker');},};
2. 分包集成 UIKit
为了规避小程序主包体积超限问题,我们建议您将客服 UIKit 放入分包。假设您的主包页面是
pages/index/index.vue,分包页面是 pages-ai-desk/index/index.vue,主包页面有一个咨询客服的入口,用户点击后跳转至分包的智能客服页面。项目的目录结构如下所示:----YOUR-UNI-APP-PROJECT----pages--------index------------index.vue----pages-ai-desk--------ai-desk-customer-uniapp--------index------------index.vue----App.vue----manifest.json----pages.json
请将以下内容复制到项目对应的文件中。
<script>export default {onLaunch: function() {console.log('App Launch')},onShow: function() {console.log('App Show')},onHide: function() {console.log('App Hide')}}</script><style>uni-page-body,html,body,page {width: 100% !important;height: 100% !important;overflow: hidden;}p {margin: 0;}pre {font-family: -apple-system, BlinkMacSystemFont, 'PingFang SC', 'Microsoft YaHei', '微软雅黑', sans-serif;}.uni-simple-toast__text {display: inline-block;vertical-align: middle;color: #ffffff;background-color: rgba(17, 17, 17, 0.7);padding: 10px 20px;border-radius: 5px;font-size: 13px;text-align: center;max-width: 100%;overflow-wrap: break-word;word-break: normal;white-space: normal;}#app {height: 100% !important;}</style>
{"pages": [{"path": "pages/index/index","style": {"navigationBarTitleText": "uni-app"}}],"subPackages": [{"root": "pages-ai-desk","pages": [{"path": "index/index","style": {"navigationBarTitleText": "智能客服","navigationStyle": "default"}}]}],"globalStyle": {"navigationBarTextStyle": "black","navigationBarTitleText": "uni-app","navigationBarBackgroundColor": "#F8F8F8","backgroundColor": "#F8F8F8"},"uniIdRouter": {},"condition": { //模式配置,仅开发期间生效"current": 0, //当前激活的模式(list 的索引项)"list": [{"name": "", //模式名称"path": "", //启动页面,必选"query": "" //启动参数,在页面的onLoad函数里面得到}]}}
如果您是 Vue2 项目,请在 main.js 中引入组合式 API,防止环境变量
isPC 等无法使用。// #ifndef VUE3import VueCompositionAPI from '@vue/composition-api';Vue.use(VueCompositionAPI);// #endif
3. 在项目中配置智能客服聊天的入口
<template><div class="chat"><button @click="getSupport">咨询客服</button></div></template><script>export default {methods: {getSupport() {uni.navigateTo({url: "/pages-ai-desk/index/index"})}}}</script><style lang="scss" scoped>.chat {height: 100%;overflow: hidden;display: flex;align-items: center;justify-content: center;}</style>
<template><CustomerServiceChat style="height: 100%;"/></template><script>import TUICustomerServer from '../ai-desk-customer-uniapp';import CustomerServiceChat from '../ai-desk-customer-uniapp/components/CustomerServiceChat/index-uniapp.vue';export default {components: {CustomerServiceChat},data() {return {}},onLoad() {// SDKAppID/userID/userSig 的获取请参考步骤4const SDKAppID = 0; // Your SDKAppID,即开通了智能客服 Desk 的应用 IDconst userID = ''; // Your userID,可复用您 app 的账号体系,或随机生成const userSig = ''; // Your userSig,接入阶段可控制台生成,生产阶段请务必由服务端生成// 带昵称和头像登录TUICustomerServer.initWithProfile({SDKAppID,userID,userSig,nickName: '张三 1852010****',avatar: 'https://im.sdk.qcloud.com/download/tuikit-resource/avatar/avatar_3.png'});}}</script><style scoped lang="scss"></style>
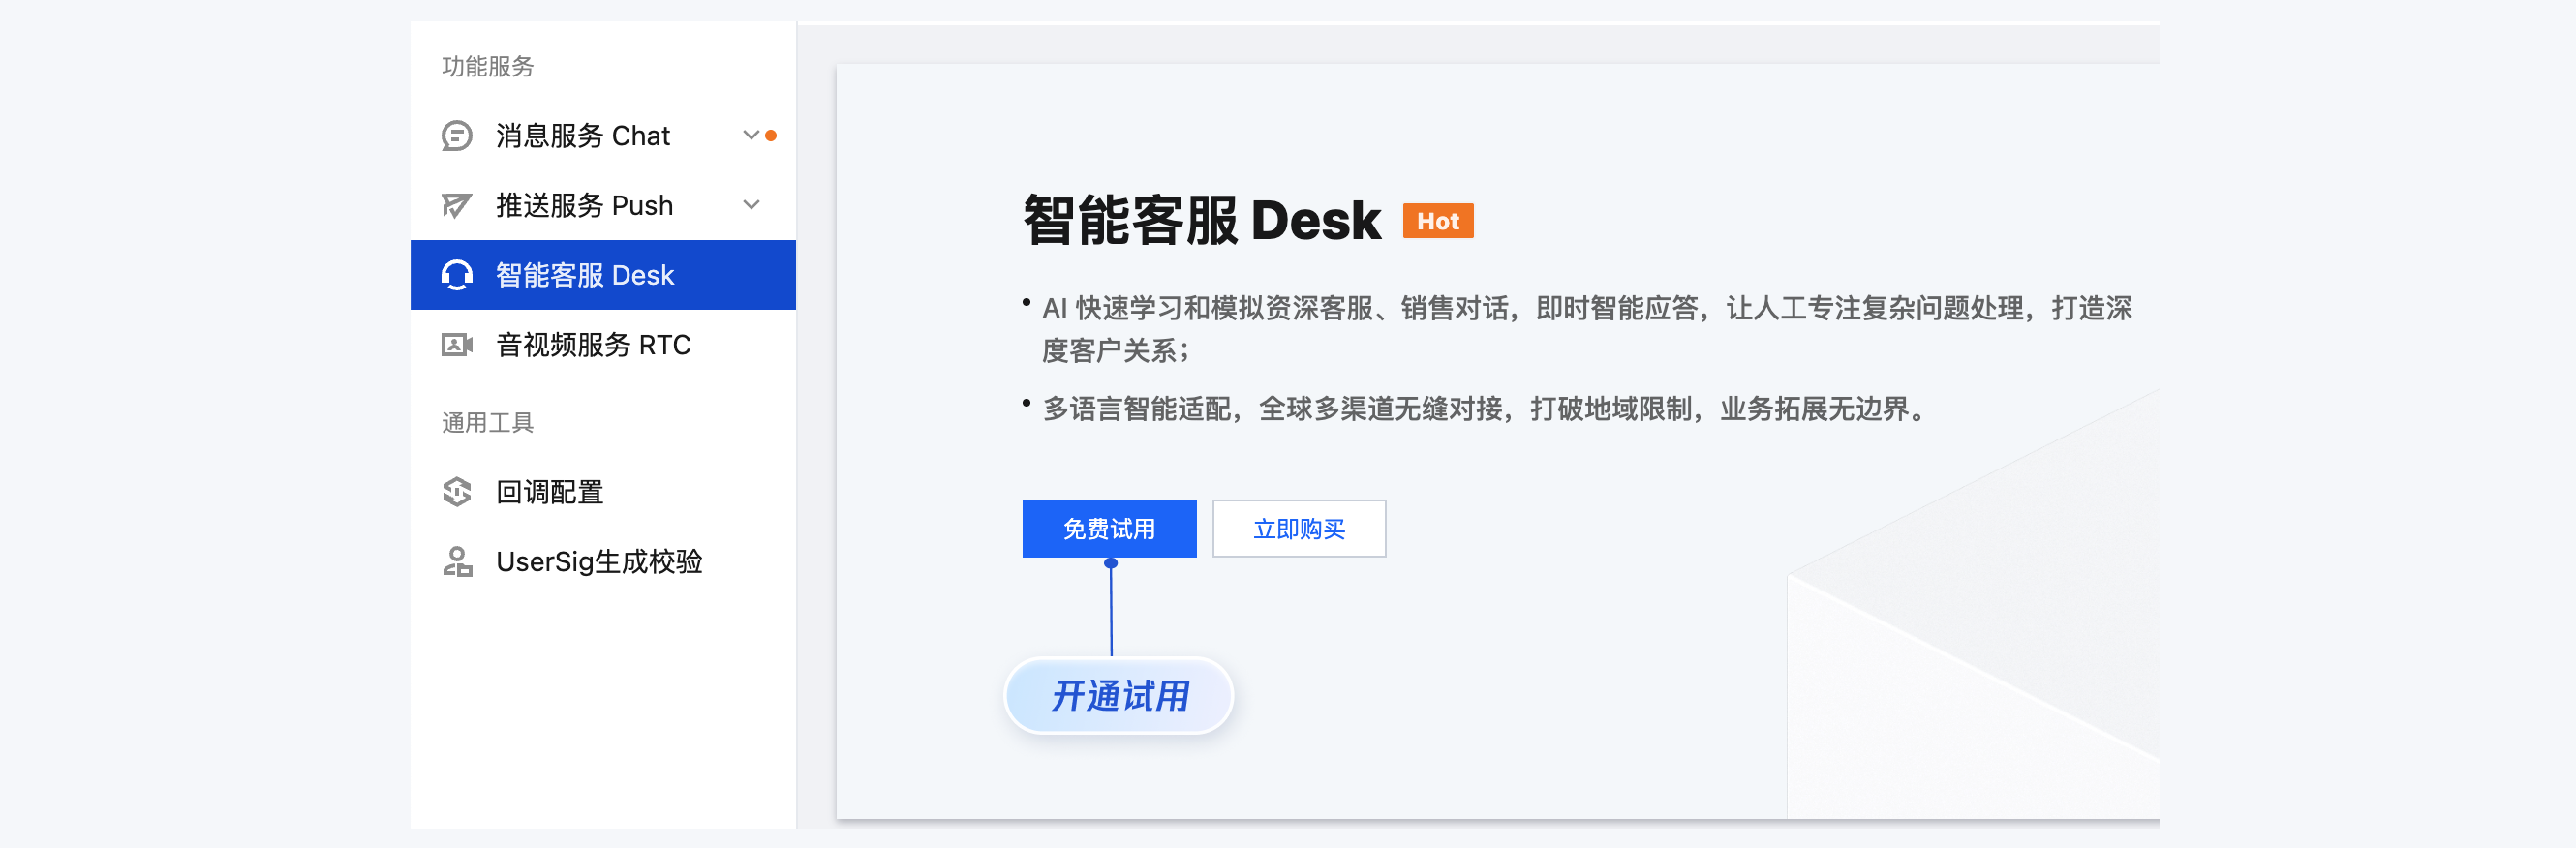
步骤4:获取 SDKAppID 、userID 、 userSig
设置
pages-ai-desk/index/index.vue 中 SDKAppID、userID、userSig。SDKAppID 信息:在 即时通信 IM 控制台 单击应用管理 > 创建新应用,并选择智能客服 Desk,开通智能客服 后获取。

userID 信息,可本地生成一个随机的字符串,例如 test-1234。
说明:
userID 不能包含中文。
userID 不能包含
administrator。userID 不能包含人工客服成员的 ID。
userID 长度不能超过45字节。
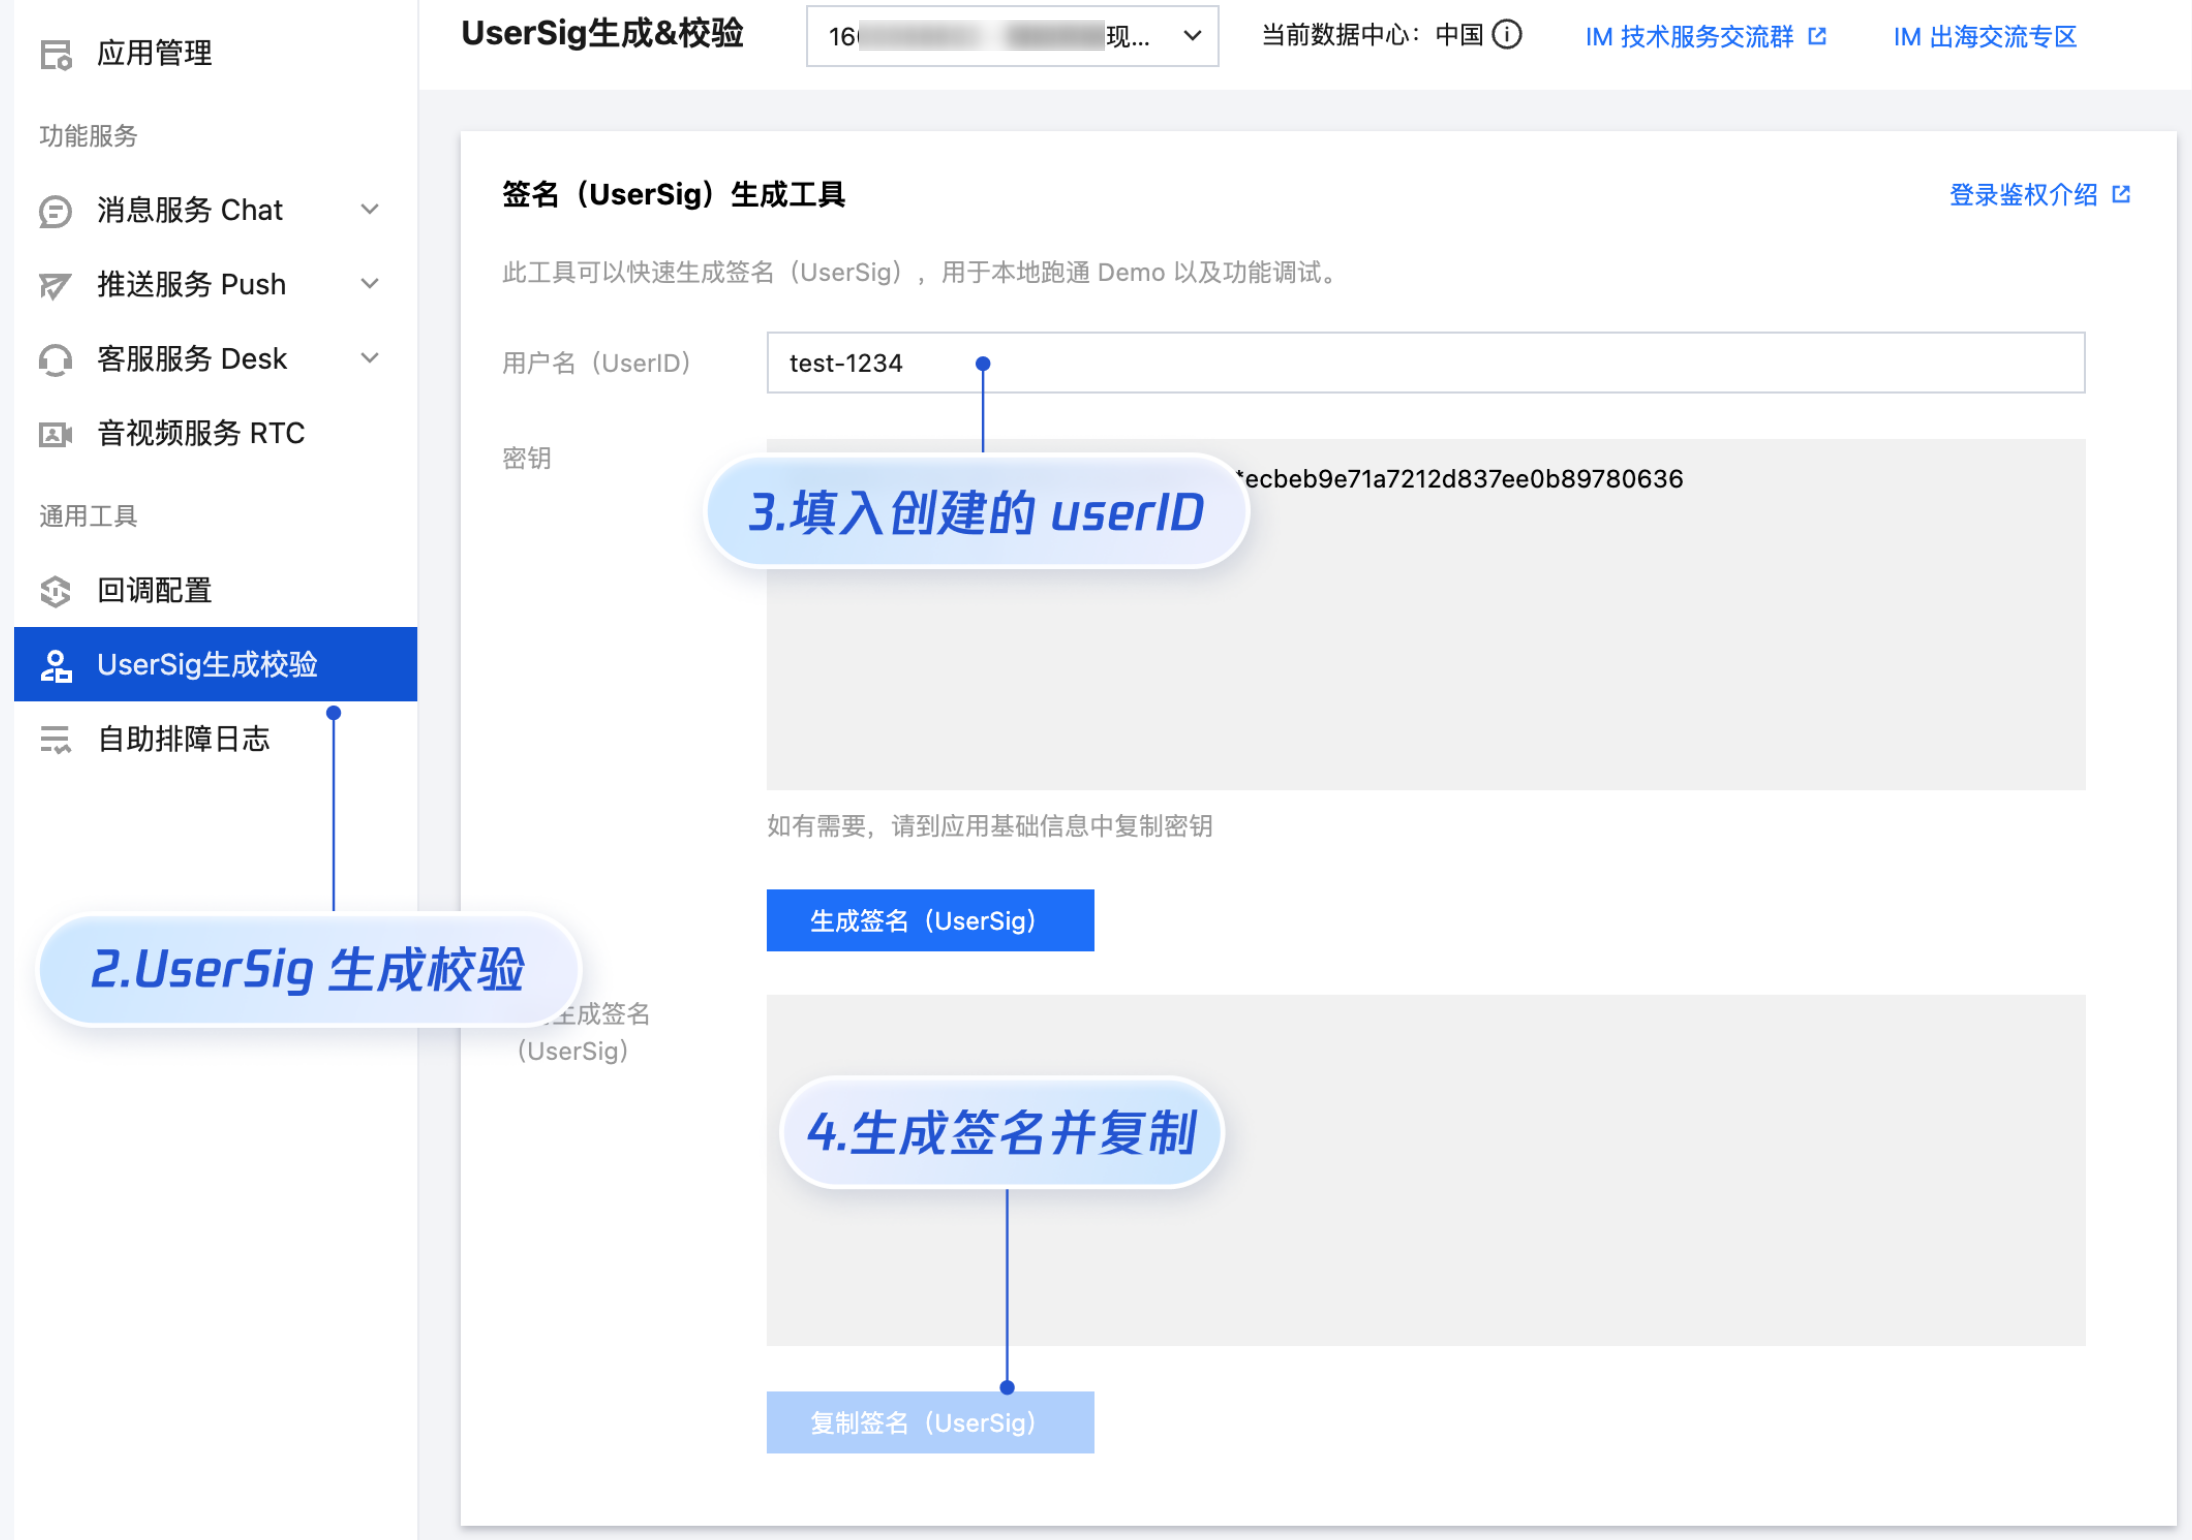
userSig 信息,可单击 即时通信 IM 控制台 > UserSig 生成校验,填写创建的 userID,即可生成 userSig。
说明:
步骤5:启动项目,并发起您的第一条客服咨询
1. 使用 HBuilderX 启动该项目,单击运行,可选择运行到浏览器,或者手机,或者小程序模拟器。
2. 如果您选择了运行到微信开发者工具,但 HBuilderX 没有自动拉起微信开发者工具,请使用微信开发者工具手动打开编译后的项目,目录地址:
unpackage/dist/dev/mp-weixin。3. 小程序开发环境,请选择 详情 > 本地设置 中勾选 不校验合法域名、web-view(业务域名)、TLS 版本以及 HTTPS 证书。上线前请在微信公众平台 > 开发 > 开发管理 > 开发设置 > 服务器域名中进行域名配置,域名配置详见:小程序合法域名。
高级特性
国际化界面语言
UIKit 支持以下界面语言:
语言代码(userLang) | 语言 |
zh_cn | 简体中文 |
en | 英文 |
zh_tw | 繁体中文 |
ja | 日语 |
id | 印尼语 |
ms | 马来语 |
vi | 越南语 |
th | 泰语 |
fil | 菲律宾语 |
ru | 俄语 |
如果您的业务需要出海,且用户语言以英语为主,可在引入智能客服时设置
userLang="en"。如果您不指定 userLang, UIKit 会使用浏览器或 App 设置的语言。<template><CustomerServiceChat style="height: 100%;"userLang="en"/></template>
如果您需要支持动态切换用户语言,可使用
TUICustomerServer.changeLanguage 接口,并通过切换 页面/组件 key 的方式,实现语言动态修改与展示。<template><CustomerServiceChat style="height: 100%;":key="locale":userLang="locale"/></template><script>import TUICustomerServer from '../ai-desk-customer-uniapp';import CustomerServiceChat from '../ai-desk-customer-uniapp/components/CustomerServiceChat/index-uniapp.vue';export default {components: {CustomerServiceChat,},data() {let locale = 'en';return {locale}},methods: {changeLanguage(language) {TUICustomerServer.changeLanguage(language).then(() => {this.locale = language;});}}}</script><style scoped lang="scss"></style>
用户端带昵称和头像登录
如果您希望人工客服在工作台接待用户咨询时,能看到用户的昵称、头像等信息以提升沟通效率,效果如下所示:

请使用
initWithProfile 接口初始化,传入昵称和头像即可。TUICustomerServer.initWithProfile({SDKAppID,userID,userSig,// 用户昵称。设置后,用户端转人工成功时,人工客服在工作台可见。您可将用户手机号,用户来源等信息写入昵称,长度限制500字节// 注意!设置后,即时通信 IM 同 userID 的昵称也会被更新// 如您不希望变更,请勿设置 nickName 字段nickName: '张三 1852010****',// 用户头像。设置后,用户端转人工成功时,人工客服在工作台可见// 注意!设置后,即时通信 IM 同 userID 的头像也会被更新// 如您不希望变更,请勿设置 avatar 字段avatar: 'https://im.sdk.qcloud.com/download/tuikit-resource/avatar/avatar_3.png'});
用户端自定义数据
如果在座席端进线时有扩展随录数据需求(例如设备、用户等级等用户信息),您可以在登录时传入自定义数据
clientCustomData,设置的自定义数据在座席端 SDK 的 会话呼入(callIn)事件中获取。TUICustomerServer.initWithProfile({SDKAppID,userID,userSig,nickName: '张三 1852010****',avatar: 'https://im.sdk.qcloud.com/download/tuikit-resource/avatar/avatar_3.png',clientCustomData: '' // 自定义数据});
工具栏快捷按钮
如果您想实现输入框上方增加快捷按钮,方便用户使用,例如增加“人工客服”,“发送订单消息”等,可在引入智能客服时设置
toolbarButtonList。效果如下所示: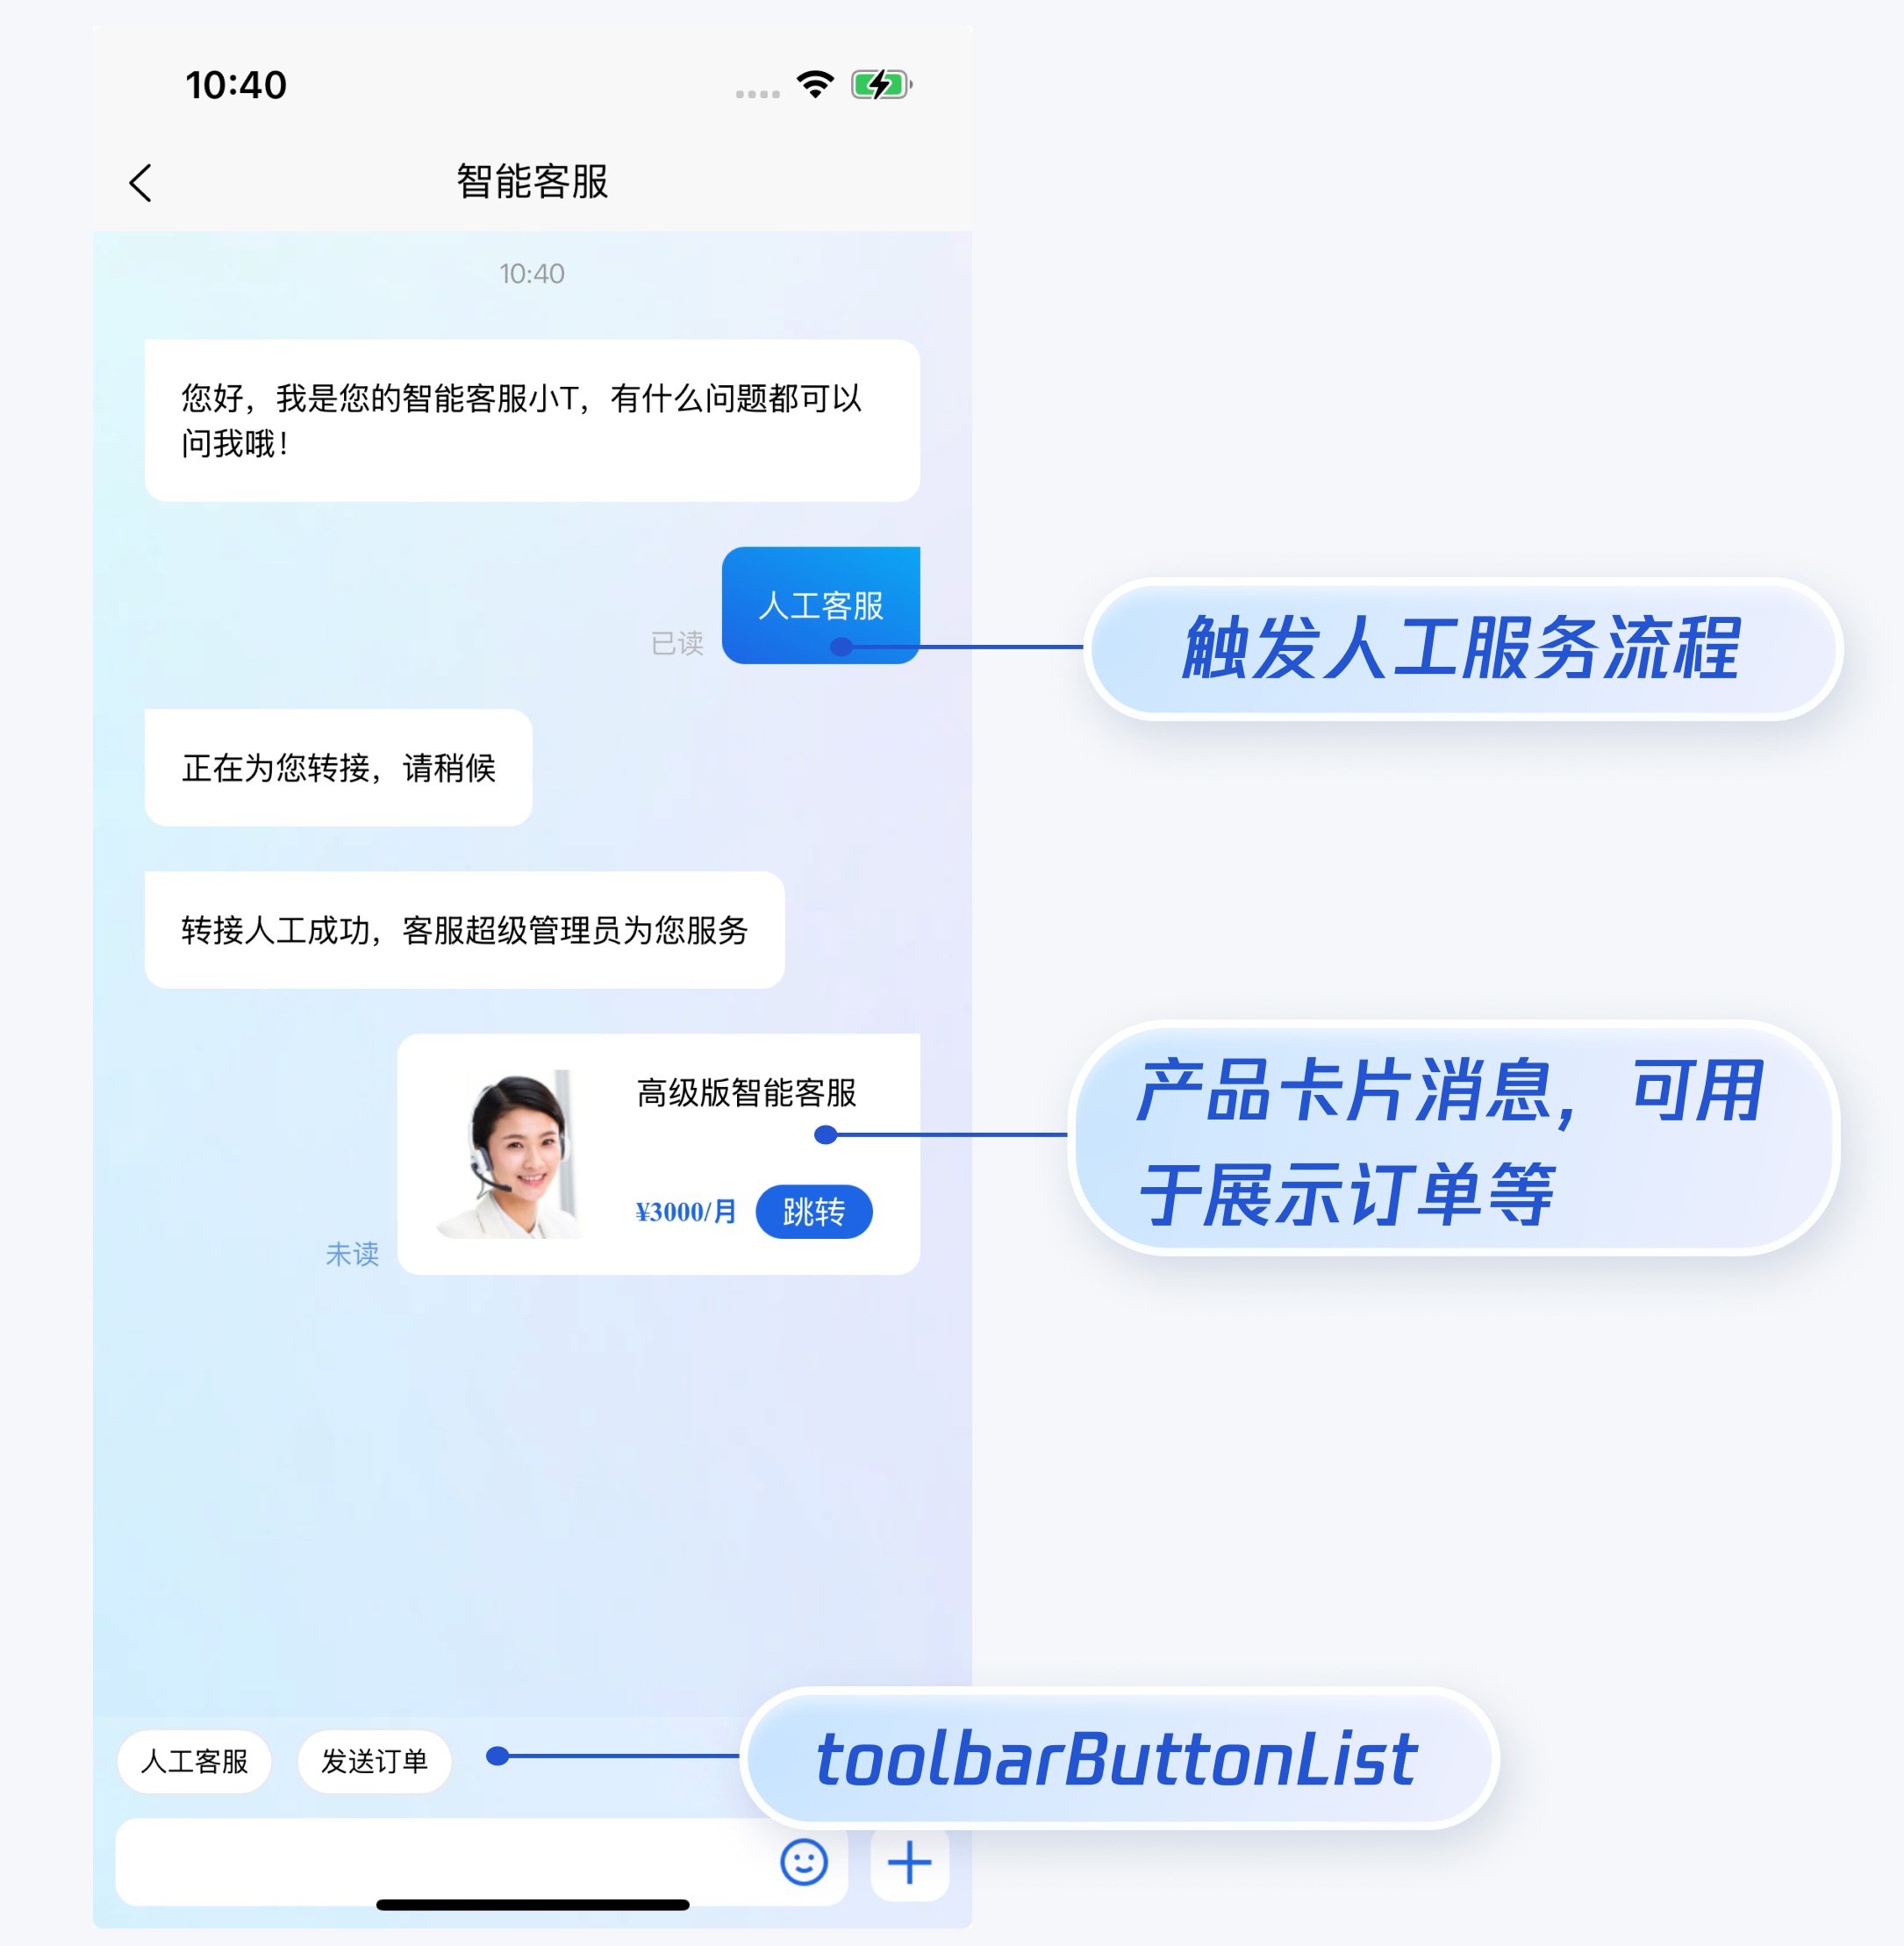
toolbarButtonList 是一个包含了一个或多个配置的数组,配置的描述如下:参数 | 类型 | 是否必填 | 说明 |
title | String | Yes | button 标题。 |
icon | String | No | button 图标 url。 |
isPreset | Number | Yes | 1:客服组件内置功能。 0:非内置功能。 |
presetId | String | No | 当 isPreset 为 1 时,可选值如下: humanService:人工服务。 serviceRating:服务评价。 endHumanService:结束对话。 |
isEnabled | Number | Yes | 1:渲染。 0:不渲染。 |
content | String | No | 当 isPreset 为 0 时,填入文本内容或者 url。 |
type | Number | Yes | 1:点击 button 后客服组件发送 content 对应的文本。 2:点击 button 后客服组件打开 content 对应的 url(小程序打开 url 可能会受限,请提前参考相关文档解决)。 3 - 点击 button 后触发指定任务流。 4 - 点击 button 后转接指定的客服,或者指定的客服分组。 5 - 点击 button 后主动结束排队(v1.6.5 或更高版本支持)。 |
<template><CustomerServiceChat style="height: 100%;":toolbarButtonList="toolbarButtonList"/></template><script>import TUICustomerServer from '../ai-desk-customer-uniapp';import CustomerServiceChat from '../ai-desk-customer-uniapp/components/CustomerServiceChat/index-uniapp.vue';export default {components: {CustomerServiceChat,},data() {const toolbarButtonList = [{"title":"人工服务","icon":"https://tccc-im-agent-avatar-1258344699.cos.ap-nanjing.myqcloud.com/toolbar_button_1.png","type":1,"content":"","isPreset":1,"presetId":"humanService","isEnabled":1},{"title":"服务评价","icon":"https://tccc-im-agent-avatar-sg-1258344699.cos.ap-singapore.myqcloud.com/toolbar_button_2.png","type":1,"content":"","isPreset":1,"presetId":"serviceRating","isEnabled":1},{"title":"结束对话","icon":"https://tccc-im-agent-avatar-sg-1258344699.cos.ap-singapore.myqcloud.com/toolbar_button_3.png","type":1,"content":"","isPreset":1,"presetId":"endHumanService","isEnabled":1},// 发送普通文本{"title":"智能客服","type":1,"content":"智能客服","isPreset":0,"isEnabled":1},// 触发指定任务流,taskFlowID 为任务流 ID{"title":"触发指定任务流","type":3,"content":{"taskFlowID":3226, "description":"your description"},"isPreset":0,"isEnabled":1},// 转指定的人工客服,specificMemberList 为人工客服账号列表{"title":"转指定客服","type":4,"content":{"specificMemberList":["zhangsan@qq.com"], "description":"your description"},"isPreset":0,"isEnabled":1},// 转指定的客服分组,groupID 为客服分组 ID{"title":"转指定客服分组","type":4,"content":{"groupID":111, "description":"your description"},"isPreset":0,"isEnabled":1},{"title":"结束排队","type":5,"isPreset":0,"isEnabled":1},];return {toolbarButtonList,}}}</script><style scoped lang="scss"></style>
底部快捷订单
说明:
如果您想实现打开客服会话时在聊天区域底部展示快捷订单,可以配置
bottomQuickOrder,效果如下所示: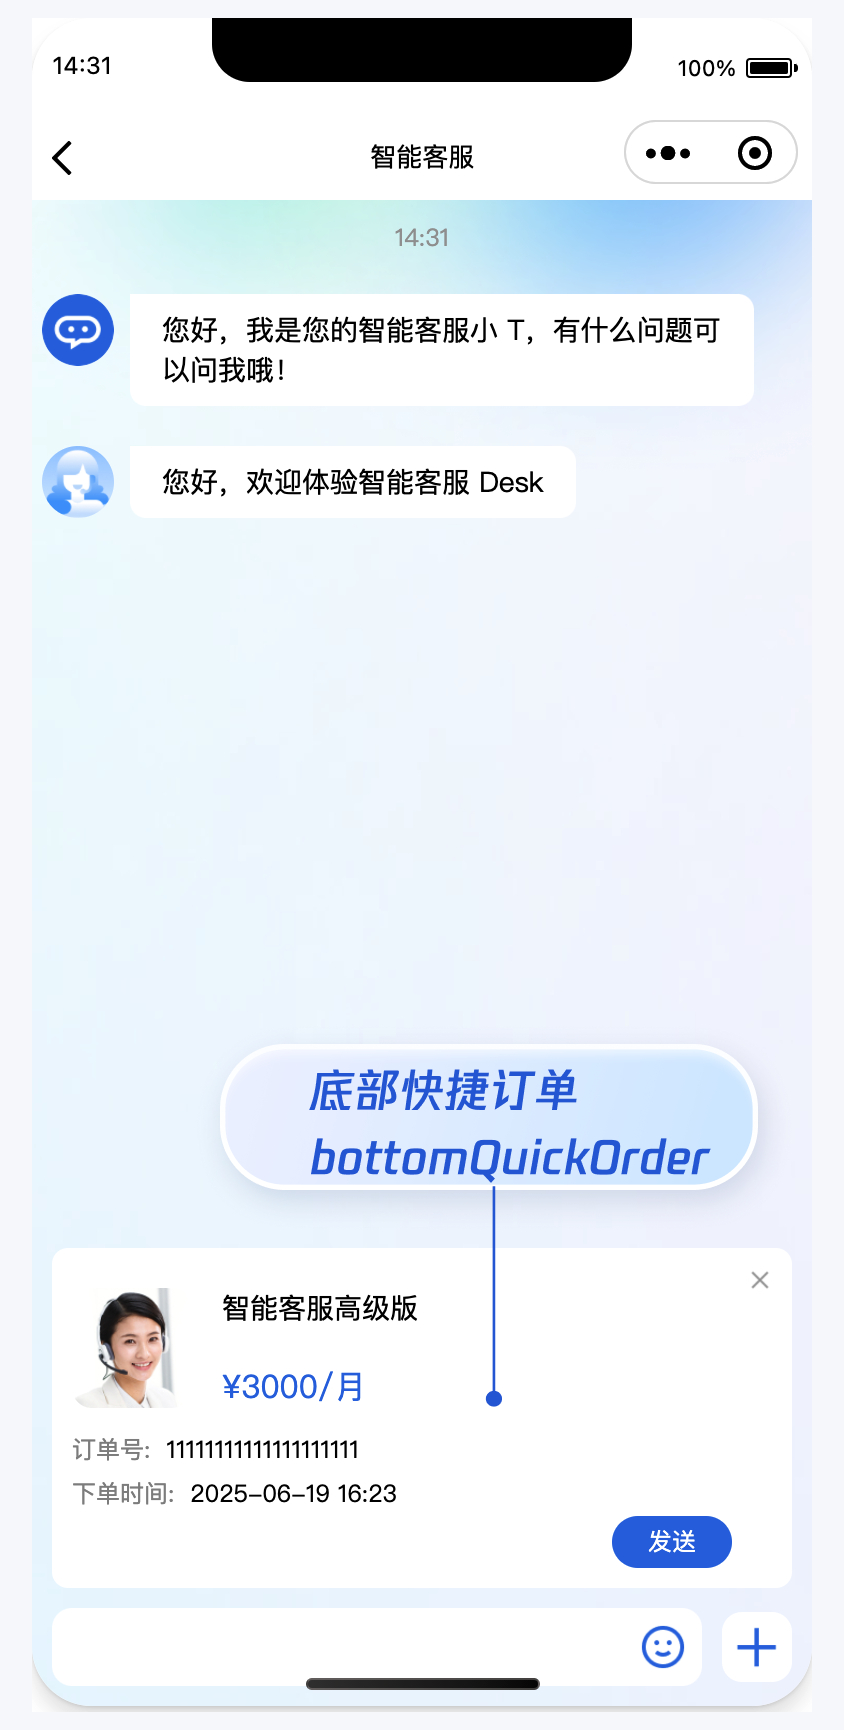
bottomQuickOrder 的参数描述如下:参数 | 类型 | 是否必填 | 说明 |
header | String | Yes | 订单标题,对应上图的“智能客服高级版”。 |
desc | String | Yes | 订单描述,对应上图的“3000/月”。 |
pic | String | No | 订单图片 url。 |
url | String | Yes | 当人工客服收到订单消息时,点击可打开此 url 对应的页面。 |
customField | Array | No | 自定义配置,例如“订单号”,“订单时间”等信息。 |
<template><CustomerServiceChat style="height: 100%;":bottomQuickOrder="bottomQuickOrder"/></template><script>import TUICustomerServer from '../ai-desk-customer-uniapp';import CustomerServiceChat from '../ai-desk-customer-uniapp/components/CustomerServiceChat/index-uniapp.vue';export default {components: {CustomerServiceChat,},data() {const bottomQuickOrder = {header: "高级版智能客服(包含3个客服许可)",desc: "¥3000/月",pic: "https://cloudcache.tencent-cloud.com/qcloud/portal/kit/images/presale.a4955999.jpeg",url: 'https://cloud.tencent.com/document/product/269/97537',customField: [{name: '订单号',value: '11111111111111111111'},{name: '下单时间',value: '2025-07-02 16:23'}]};return {bottomQuickOrder,}}}</script><style scoped lang="scss"></style>
触发指定任务流
说明:
如果您的应用需要在用户登录后自动触发指定任务流,请参考以下代码实现。
TUICustomerServer.initWithProfile({SDKAppID,userID,userSig,nickName: '张三 1852010****',avatar: 'https://im.sdk.qcloud.com/download/tuikit-resource/avatar/avatar_3.png'}).then(() => {TUICustomerServer.transferToTaskFlow({taskFlowID: 0, // 请替换为您应用的任务流 IDdescription: 'your description'});});
多客服号
说明:
如果您的应用内需要多个客服号,为用户提供专属客服功能,以提高服务质量和响应速度,可用 UIKit 提供的多客服号功能实现。效果如下所示:

// 1. 初始化前将业务侧自定义的客服号 ID 传递给 UIKit// 自定义客服号请使用 restapi - https://cloud.tencent.com/document/product/269/111798TUICustomerServer.setCustomerServiceIDList(['customerServiceID_001', 'customerServiceID_002', 'customerServiceID_003']);// 2. 初始化时,带上要发起会话的客服号 ID,比如 'customerServiceID_002'// 如果不带上要发起会话的客服号 ID,则 UIKit 默认使用多客服号列表的第 1 个元素TUICustomerServer.initWithProfile({SDKAppID,userID,userSig,nickName: '张三 1562010****',avatar: 'your avatar url',customerServiceID: 'customerServiceID_002',});
多客服号会话列表

1. 通过 npm 方式下载 UIKit
npm i @tencentcloud/ai-desk-agent-list-uniapp@latest unplugin-vue2-script-setup
2. 将 UIKit 源码复制到项目中。为保证会话未读数实时更新,请将此 UIKit 放入主包。
mkdir -p ./pages-ai-desk-agent-list/ai-desk-agent-list-uniapp &&rsync -av --exclude={'node_modules','excluded-list.txt'} ./node_modules/@tencentcloud/ai-desk-agent-list-uniapp/ ./pages-ai-desk-agent-list/ai-desk-agent-list-uniapp/
xcopy .\\node_modules\\@tencentcloud\\ai-desk-agent-list-uniapp .\\pages-ai-desk-agent-list\\ai-desk-agent-list-uniapp /i /e /exclude:.\\node_modules\\@tencentcloud\\ai-desk-agent-list-uniapp\\excluded-list.txt
3. 在 pages-ai-desk-agent-list 内新建 index/index.vue,引入 UIKit 并登录。
说明:
为了避免多实例登录被踢下线,请登录 即时通信 IM 控制台,选择消息服务 Chat > 功能配置 > 登录与消息 > 登录设置 ,将 Web 端可同时在线个数调整为2或更高。
本功能由腾讯云即时通信 IM 提供底层技术支持,需要您前往即时通信 IM 控制台操作,此操作不会收取额外费用。
<template><TUIAgentList /></template><script>import TUIAgentList from '../ai-desk-agent-list-uniapp/components/TUIConversation/index.vue';import TUIAgentListServer from '../ai-desk-agent-list-uniapp';export default {components: {TUIAgentList,},data() {},onLoad() {const SDKAppID = 0; // Your SDKAppID,即开通了智能客服 Desk 的应用 IDconst userID = ''; // Your userID,可复用您 app 的账号体系,或随机生成const userSig = ''; // Your userSig,接入阶段可控制台生成,生产阶段请务必由服务端生成// 设置业务的客服号列表,设置后 UIKit 会过滤不在列表中的会话TUIAgentListServer.setCustomerServiceIDList(['@customer_service_account', '346236']);// 登录TUIAgentListServer.initWithProfile({SDKAppID,userID,userSig,tabIndex: 2, // 替换为您客服号会话列表页所在 tab 的 indexshowRedDot: true, // 默认展示角标,设置后有新消息展示红点});},onShow() {TUIAgentListServer.onPageShow();}}</script><style lang="scss" scoped>.chat {height: 100%;overflow: hidden;display: flex;align-items: center;justify-content: center;}</style>
识别文本消息超链接并支持点击
说明:
如果您的应用需要识别文本消息超链接并支持点击,请设置
enableURLDetection 值为 1,效果如下所示: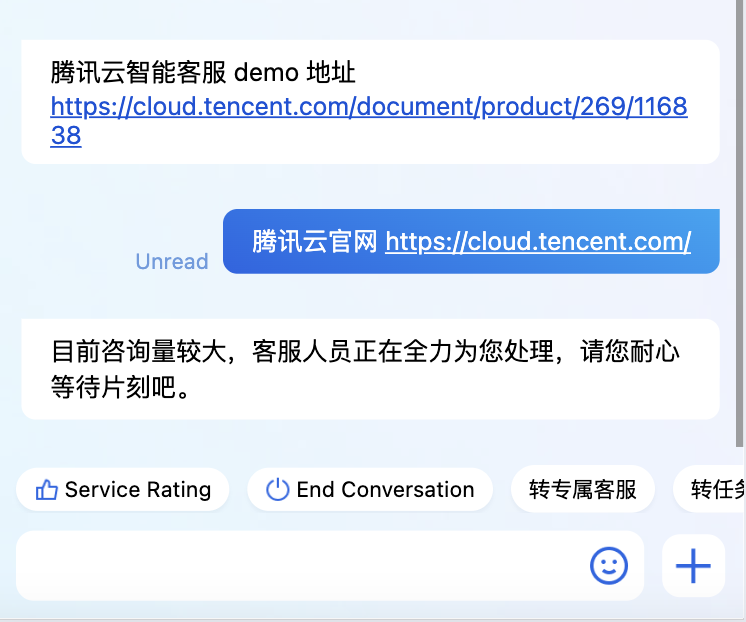
<template><CustomerServiceChat style="height: 100%;":enableURLDetection="1"/></template>
发送语音消息
说明:
1. 请升级 ai-desk-customer-uniapp 到 v1.6.0 或更高版本。
2. 仅在转人工成功后展示,机器人阶段用户端不支持发送语音消息。
3. 采集麦克风涉及用户隐私,请小程序开发者参考 用户隐私保护指引,完善用户隐私保护,避免录音功能不可用。
如果您的应用需要发送语音消息,请设置
enableSendingAudio 值为 1。<template><CustomerServiceChat:style="{ width: '600px', height: '80vh', margin: '10px auto', boxShadow: '0 11px 20px #ccc' }":enableSendingAudio="1"/></template>
用户端主动结束人工会话
说明:
用户端可以通过发送自定义消息的方式实现主动结束会话,适用于以下 3 种情况:
1. 用户转人工触发排队,发送此消息可以结束排队。
2. 客服接待方式为手动接待,用户转人工分配客服成功后等待客服确认接待,发送此消息可以结束等待。
3. 用户转人工且成功接入人工客服,发送此消息可以结束本次会话。
TUICustomerServer.sendCustomMessage({to: '@customer_service_account',conversationType: 'C2C',payload: {data: JSON.stringify({src: '27',customerServicePlugin: 0,}),},}, { onlineUserOnly: true });
设置人工客服的昵称和头像
说明:
请升级 ai-desk-customer-uniapp 到 v1.6.4 或更高版本。
仅转人工成功后,与人工客服对话时有效。
客服成员或管理员可以在智能客服管理端 > 团队管理 > 成员界面,编辑成员的昵称和头像。
如果您的应用需要区分人工客服的昵称和头像,请设置
enableUnifiedMemberProfile 值为 0。默认值为1,即展示统一的人工客服的昵称和头像。如果您未在代码中设置统一的人工客服昵称和头像,则 UIKit 会使用客服号的昵称和头像进行展示。效果如下所示: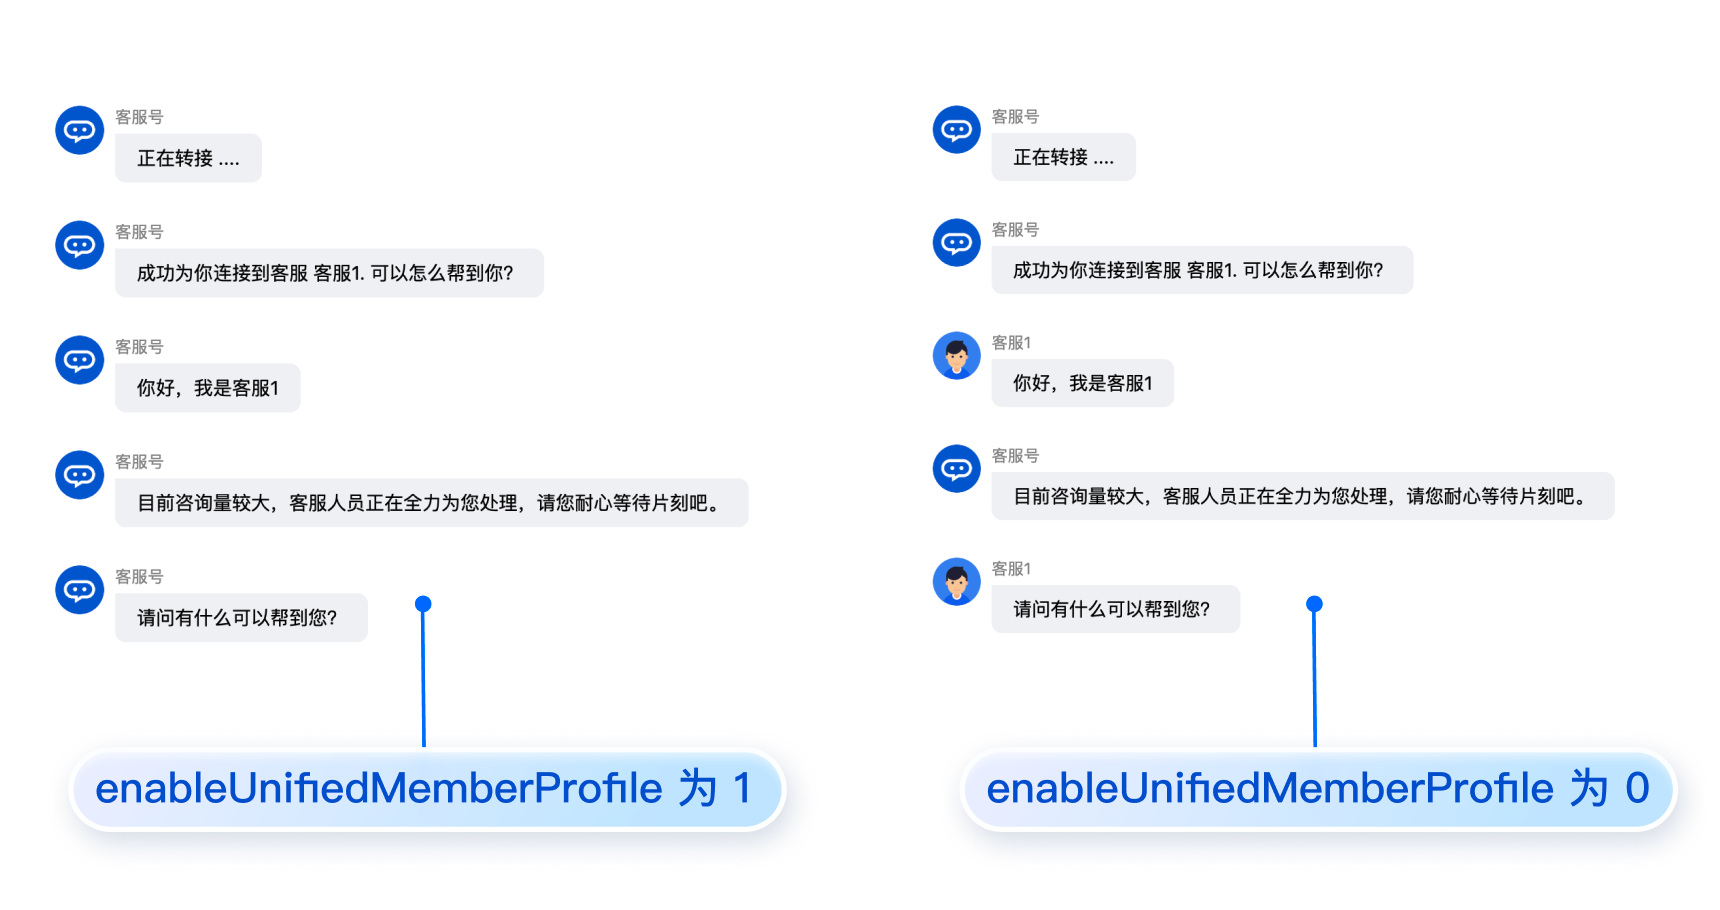
<template><CustomerServiceChat:style="{ width: '600px', height: '80vh', margin: '10px auto', boxShadow: '0 11px 20px #ccc' }"// 1为显示昵称,默认不显示:showNickName="1"// 若为0,人工客服的头像和昵称会同步智能客服管理端配置的成员资料:enableUnifiedMemberProfile="0"// 若 enableUnifiedMemberProfile 为1,统一客服昵称和头像,则会显示下方设置的昵称和头像:memberAvatar="avatarUrl":memberNickName="nickName"/></template>
通过 vue-cli 命令行集成
除了 HBuilderX 可视化界面,您也可以使用 cli 脚手架,通过 vue-cli 创建 uni-app 项目。这两种方式在集成过程上有所区别,请您参考下面的步骤进行。
1. 创建 vue2 项目,使用默认模板。
vue create -p dcloudio/uni-preset-vue my-project
2. 在项目目录 my-project 内下载 UIKit。
npm i @tencentcloud/ai-desk-customer-uniapp@latest unplugin-vue2-script-setup
3. 下载 sass/sass-loader/ts-loader 等。
npm i sass sass-loader@10.1.1 ts-loader typescript @vue/cli-plugin-typescript --legacy-peer-deps
4. 将 UIKit 源码复制到项目中。请注意,复制到工程的 src 目录下。
mkdir -p ./src/pages-ai-desk/ai-desk-customer-uniapp &&rsync -av --exclude={'node_modules','excluded-list.txt'} ./node_modules/@tencentcloud/ai-desk-customer-uniapp/ ./src/pages-ai-desk/ai-desk-customer-uniapp/
xcopy .\\node_modules\\@tencentcloud\\ai-desk-customer-uniapp .\\src\\pages-ai-desk\\ai-desk-customer-uniapp /i /e /exclude:.\\node_modules\\@tencentcloud\\ai-desk-customer-uniapp\\excluded-list.txt
5. 在工程目录下新建 vue.config.js 文件。
const ScriptSetup = require('unplugin-vue2-script-setup/webpack').default;module.exports = {parallel: false,configureWebpack: {plugins: [ScriptSetup({/* options */}),],},chainWebpack(config) {// disable type check and let `vue-tsc` handles itconfig.plugins.delete('fork-ts-checker');config.module.rule('ts').test(/\\.ts$/).use('ts-loader').loader('ts-loader').end();},};
6. 在工程目录下新建 tsconfig.json 文件。
{"compilerOptions": {"target": "esnext","module": "esnext","strict": true,"jsx": "preserve","importHelpers": true,"moduleResolution": "node","esModuleInterop": true,"allowSyntheticDefaultImports": true,"experimentalDecorators":true,"sourceMap": true,"skipLibCheck": true,"baseUrl": ".","types": ["webpack-env","@dcloudio/types"],"paths": {"@/*": ["./src/*"]},"lib": ["esnext","dom","dom.iterable","scripthost"]},"exclude": ["node_modules","unpackage","dist","src/**/*.nvue","src/pages-ai-desk/ai-desk-customer-uniapp"]}
7. 其它步骤同 HBuilderX 可视化界面创建的项目一致,不再赘述。
1. 创建 vue2 项目,使用默认模板(TypeScript)。
vue create -p dcloudio/uni-preset-vue my-project
2. 在项目目录 my-project 内下载 UIKit。
npm i @tencentcloud/ai-desk-customer-uniapp@latest unplugin-vue2-script-setup
3. 下载 sass/sass-loader 等。
npm i sass sass-loader@10.1.1 --legacy-peer-deps
4. 将 UIKit 源码复制到项目中。请注意,复制到工程的 src 目录下。
mkdir -p ./src/pages-ai-desk/ai-desk-customer-uniapp &&rsync -av --exclude={'node_modules','excluded-list.txt'} ./node_modules/@tencentcloud/ai-desk-customer-uniapp/ ./src/pages-ai-desk/ai-desk-customer-uniapp/
xcopy .\\node_modules\\@tencentcloud\\ai-desk-customer-uniapp .\\src\\pages-ai-desk\\ai-desk-customer-uniapp /i /e /exclude:.\\node_modules\\@tencentcloud\\ai-desk-customer-uniapp\\excluded-list.txt
5. 在工程目录下新建 vue.config.js 文件。
const ScriptSetup = require('unplugin-vue2-script-setup/webpack').default;module.exports = {parallel: false,configureWebpack: {plugins: [ScriptSetup({/* options */}),],},chainWebpack(config) {// disable type check and let `vue-tsc` handles itconfig.plugins.delete('fork-ts-checker');},};
6. 编辑 tsconfig.json 文件,exclude UIKit 代码。
"exclude": [..."src/pages-ai-desk/ai-desk-customer-uniapp"]
7. 其它步骤同 HBuilderX 可视化界面创建的项目一致,不再赘述。
1. 创建 vue3 项目,用 JavaScript 开发。
npx degit dcloudio/uni-preset-vue#vite my-project
或创建 vue3 项目,用 TypeScript 开发。
npx degit dcloudio/uni-preset-vue#vite-ts my-project
2. 在项目目录 my-project 内下载 UIKit。
npm i @tencentcloud/ai-desk-customer-uniapp@latest
3. 下载 sass/sass-loader 等。
npm i sass sass-loader@10.1.1 --legacy-peer-deps
4. 将 UIKit 源码复制到项目中。请注意,复制到工程的 src 目录下。
mkdir -p ./src/pages-ai-desk/ai-desk-customer-uniapp &&rsync -av --exclude={'node_modules','excluded-list.txt'} ./node_modules/@tencentcloud/ai-desk-customer-uniapp/ ./src/pages-ai-desk/ai-desk-customer-uniapp/
xcopy .\\node_modules\\@tencentcloud\\ai-desk-customer-uniapp .\\src\\pages-ai-desk\\ai-desk-customer-uniapp /i /e /exclude:.\\node_modules\\@tencentcloud\\ai-desk-customer-uniapp\\excluded-list.txt
5. 其它步骤同 HBuilderX 可视化界面创建的项目一致,不再赘述。
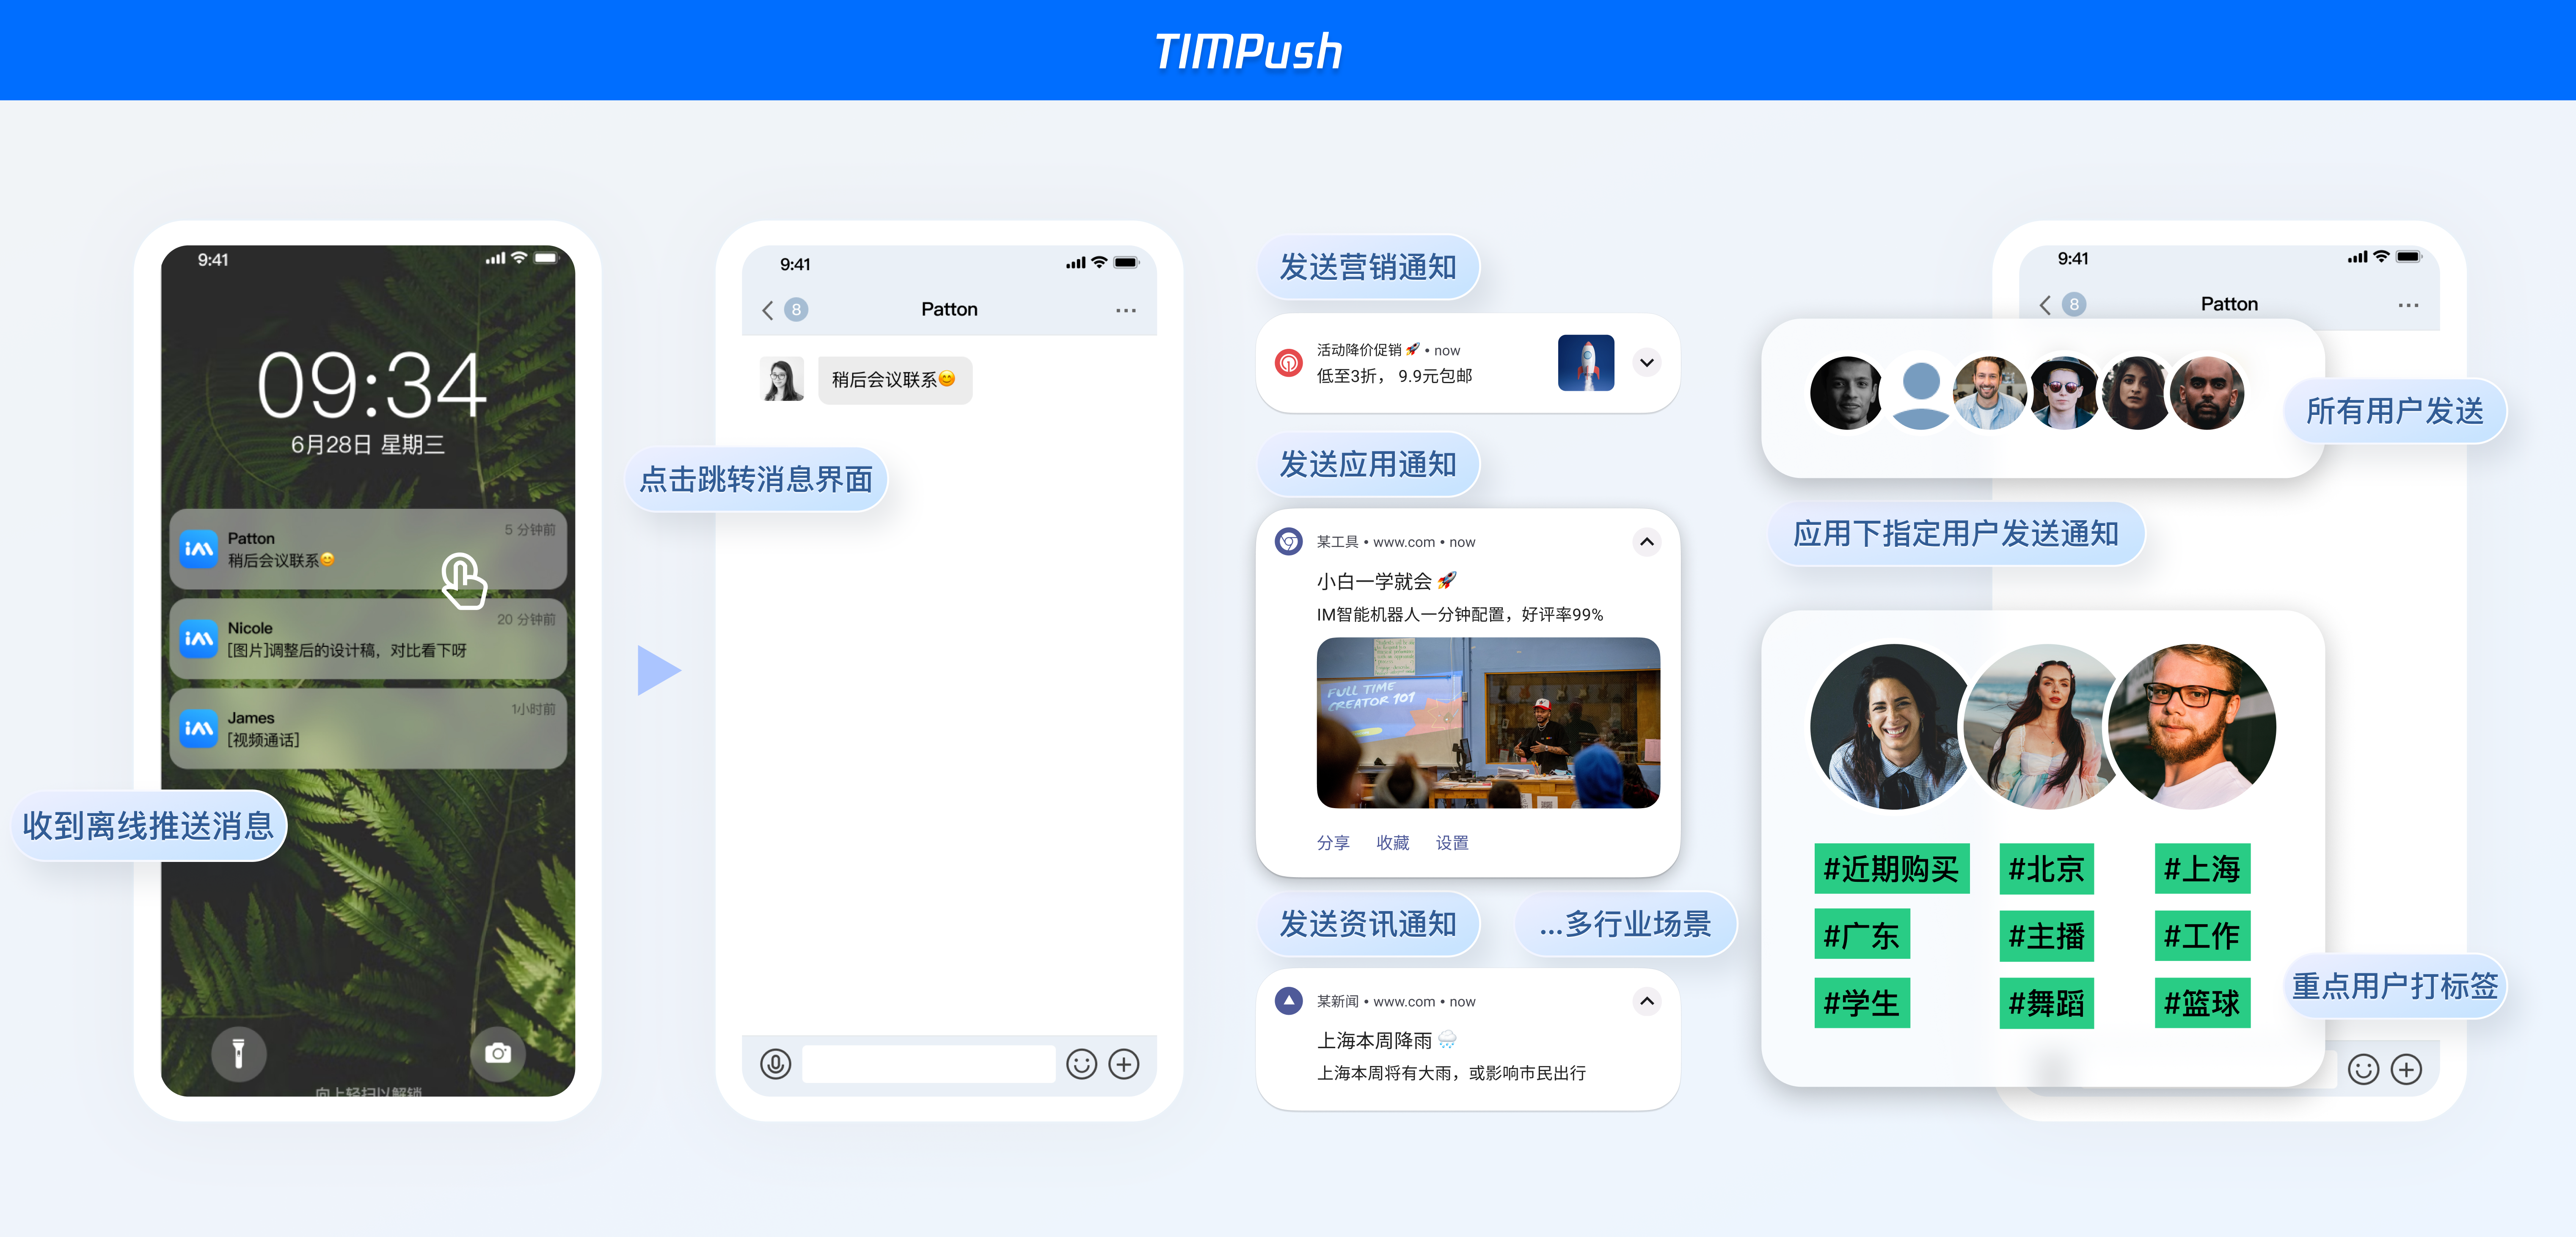
消息推送
说明:
UIKit 中默认没有集成 TencentCloud-TIMPush 推送插件。TencentCloud-TIMPush 是腾讯云即时通信 IM Push 插件。目前推送支持小米、华为、荣耀、OPPO、vivo、魅族、APNs、一加、realme、iQOO 和 苹果等厂商通道。
常见问题
什么是 UserSig?如何生成 UserSig?
UserSig 是用户登录即时通信 IM 的密码,其本质是对 UserID 等信息加密后得到的密文。
UserSig 签发方式是将 UserSig 的计算代码集成到您的服务端,并提供面向项目的接口,在需要 UserSig 时由您的项目向业务服务器发起请求获取动态 UserSig。更多详情请参见 服务端生成 UserSig。
集成 UIKit 在 pages.json 中默认没有配置 tabBar,项目中如何实现 tabBar 功能?
小程序如果需要上线或者部署正式环境怎么办?
联系我们
如果您在接入过程中有任何疑问,请用微信或企业微信扫码加入智能客服交流群进行咨询。