操作场景
Okta 是身份验证与访问管理解决方案提供商。腾讯云支持基于 SAML 2.0(安全断言标记语言 2.0)的联合身份验证,SAML 2.0 是许多身份验证提供商(Identity Provider, IdP)使用的一种开放标准。您可以通过基于 SAML 2.0 联合身份验证将 Okta 与腾讯云进行集成,从而实现 Okta 账户自动登录(单点登录)腾讯云控制台管理腾讯云的资源,不必为企业或组织中的每一个成员都创建一个 CAM 子用户。
操作步骤
创建 Okta 应用程序
说明:
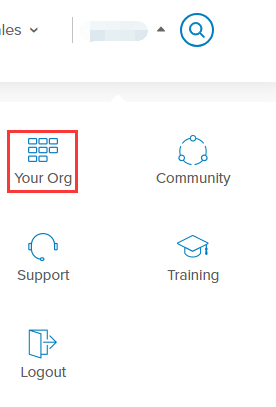
1. 登录进入 Okta 网站,单击右上角用户名称 > Your Org,如下图所示:
2.
在 Okta 主页,单击右上角管理员,进入管理员界面
。3.
在管理员页面,选择 Applications,进入应用管理页面
。如下图所示: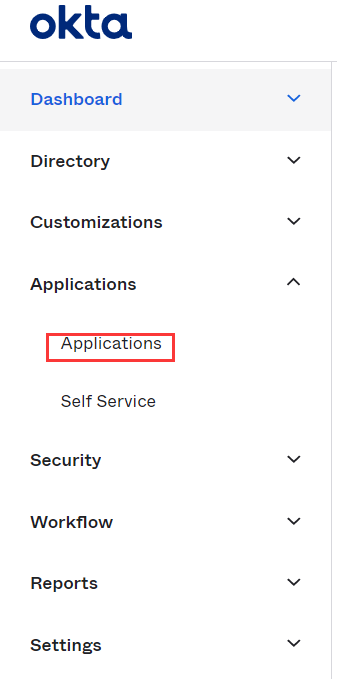
4. 在应用管理页面,单击 Add Application。进入添加应用页面。
5. 在添加应用页面,单击 Create APP Integration。如下图所示:

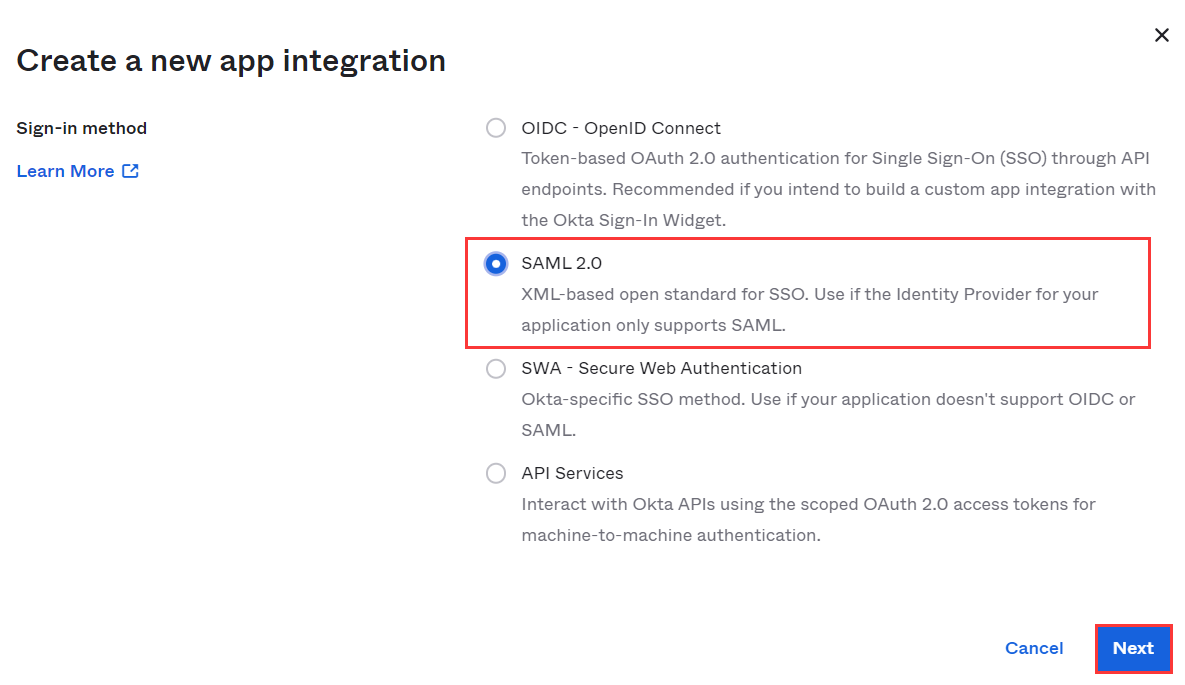
6. 在弹出的创建应用程序/Create a New Application Integration 窗口,选择 Platform 及 Sign-in method,其中 Sign-in method 设置为 SAML 2.0,单击 Next,如下图所示:
7. 在通用设置/General Settings 页面,补充 App name、App logo(可选)、App visibility(可选)信息,单击 Next,此应用程序可以用于和腾讯云进行集成,实现 Okta 账户自动登录(单点登录)腾讯云控制台管理腾讯云的资源。
为 Okta 应用程序配置 SAML
1. 前往 应用管理页面,单击您创建的应用程序名称。
2. 在通用/General 页面,单击 SAML Settings 栏下的 Edit,确认当前 App name、App logo(可选)、App visibility(可选)信息,单击 Next,进入配置 SAML/Configure SAML 页面。
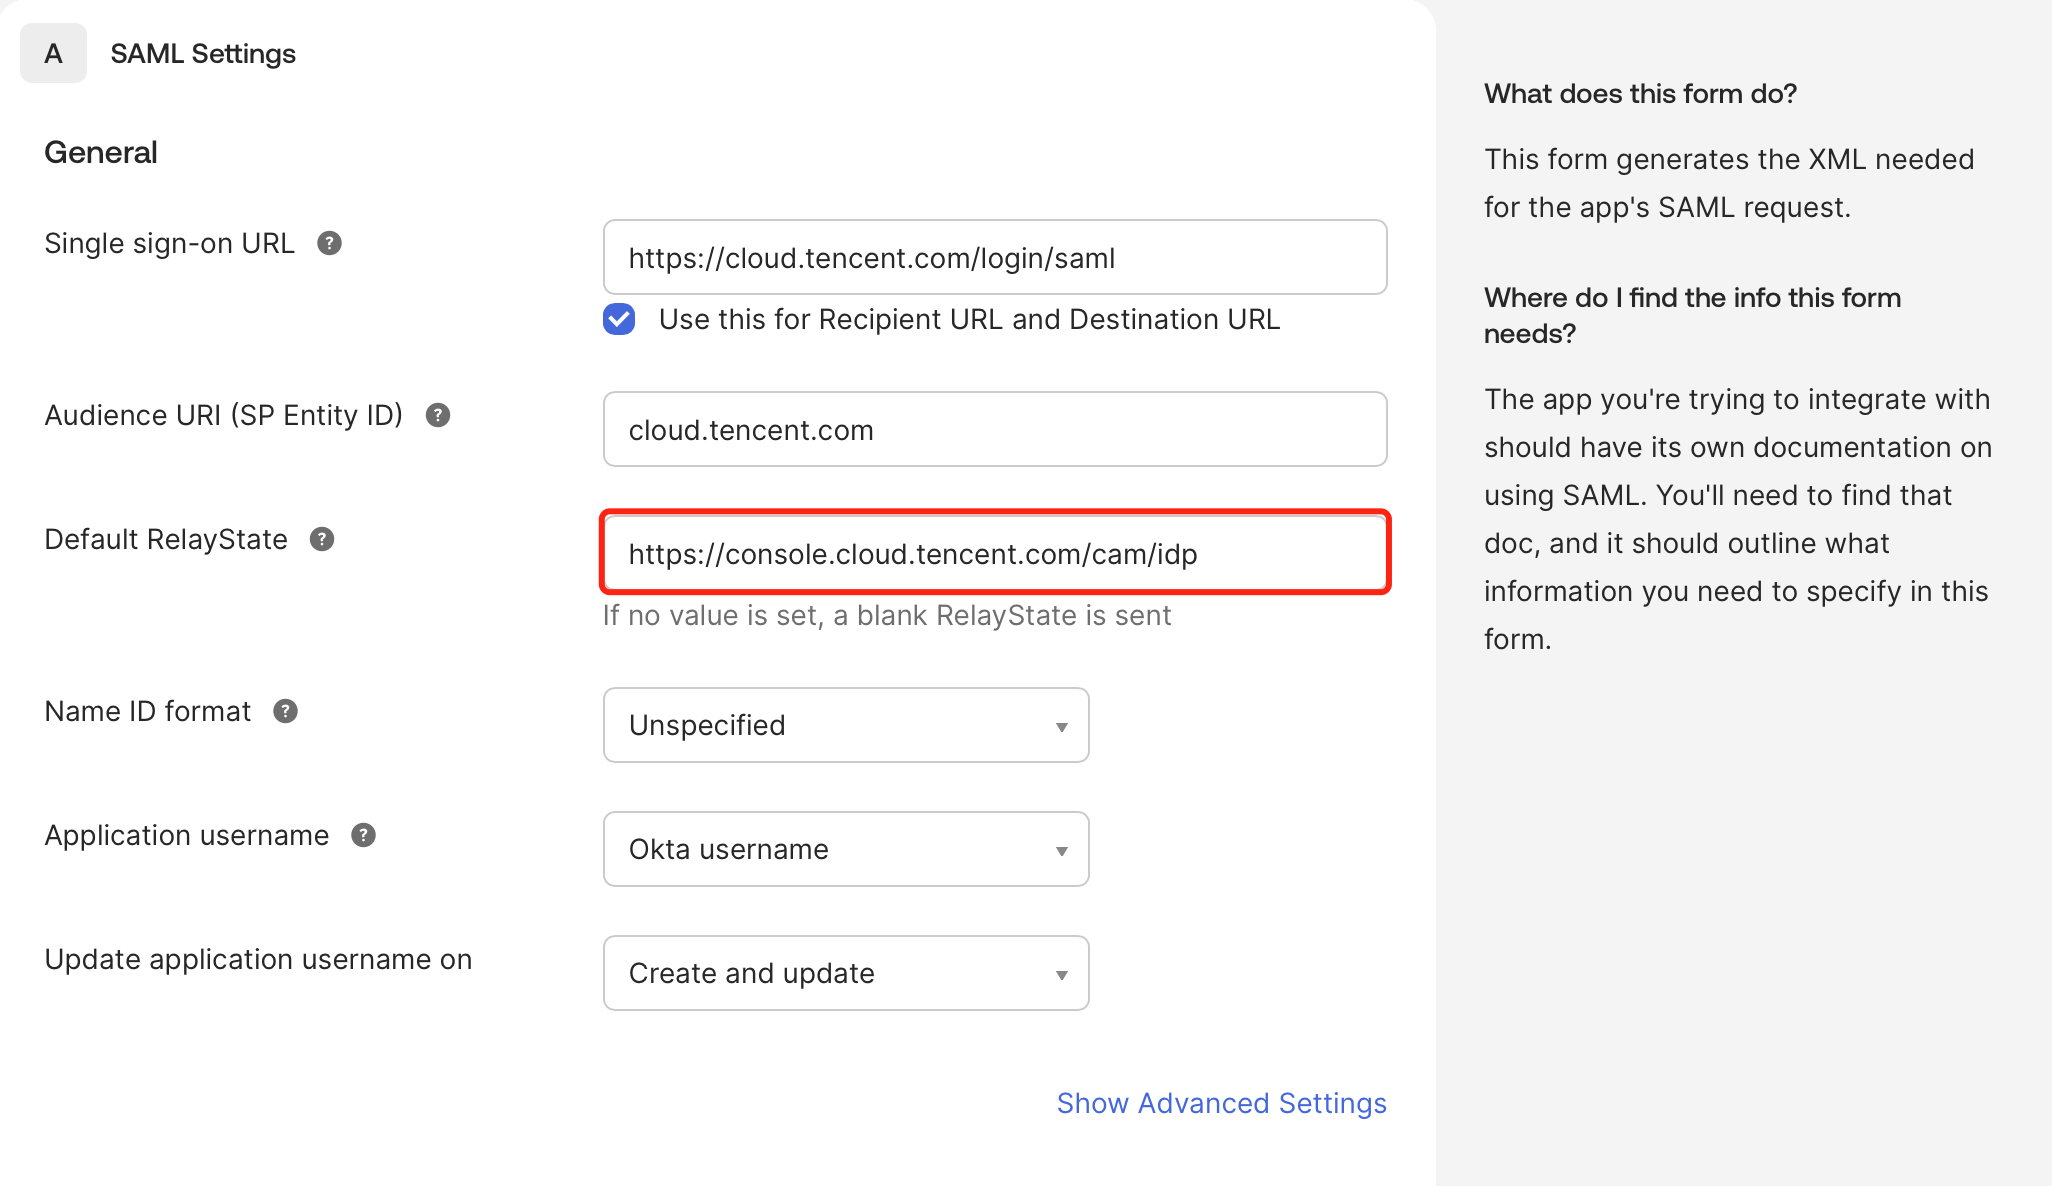
3.
在配置 SAML/Configure SAML 页面
将 General 下 Single sign-on URL 和 Audience URL(SP Entity ID)补充为以下信息,如下图所示: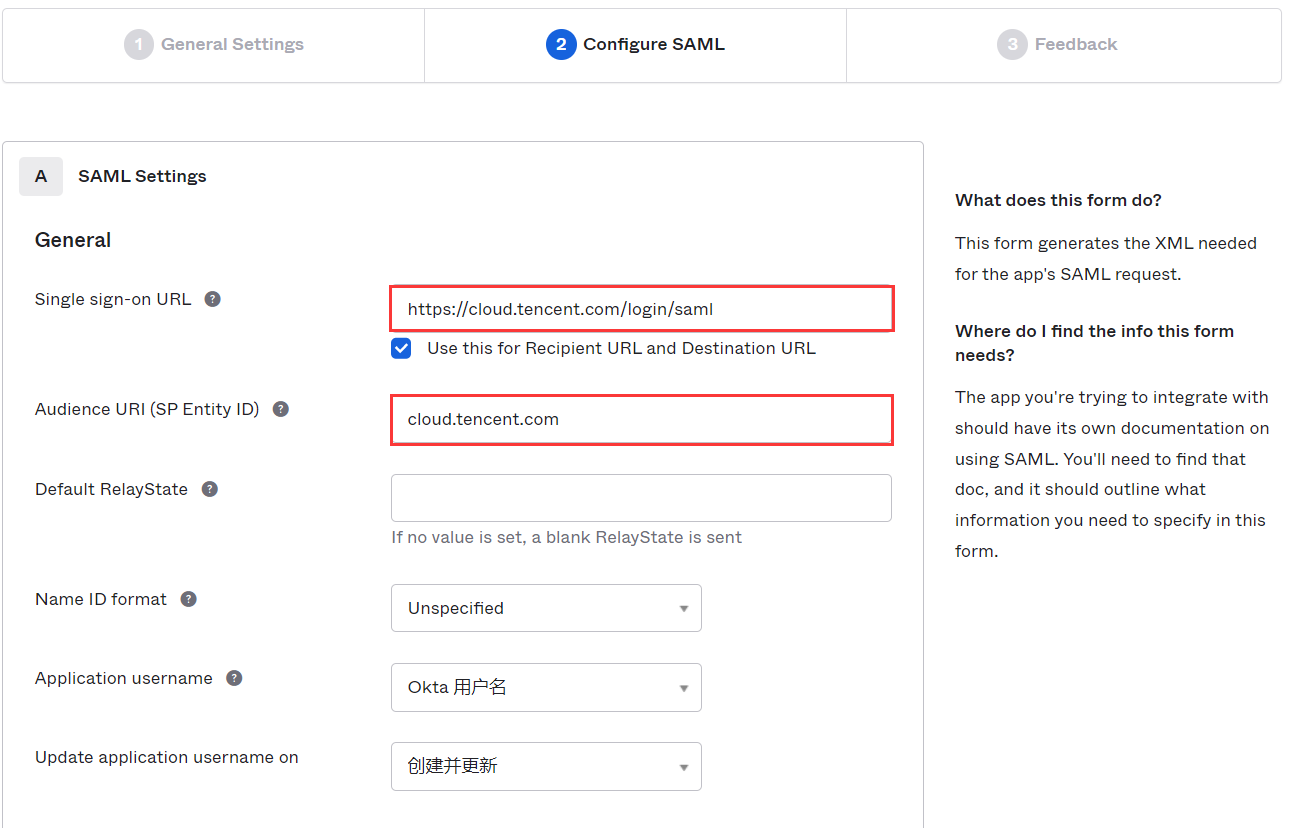
所在站点 | Single sign-on URL | Audience URL(SP Entity ID) |
中国站 | https://cloud.tencent.com/login/saml | cloud.tencent.com |
国际站 | https://www.tencentcloud.com/login/saml | www.tencentcloud.com |
4. 如您希望指定跳转到腾讯云的特定页面,您可以将 Default RelayState(可选)补充为需要指定的地址
说明:
Single sign-on URL 为跳转的腾讯云页面。如您需要指定其他页面,除配置 Default RelayState 之外,您也可使用
https://cloud.tencent.com/login/saml?s_url=xxxx 形式指定,其中 xxxx 为需要指定的地址,需要做 urlencode,但优先解析 Default RelayState 参数。5. 在配置 SAML/Configure SAML 页面将 General 下 Attrlbute statements 补充为以下信息。如下图所示:
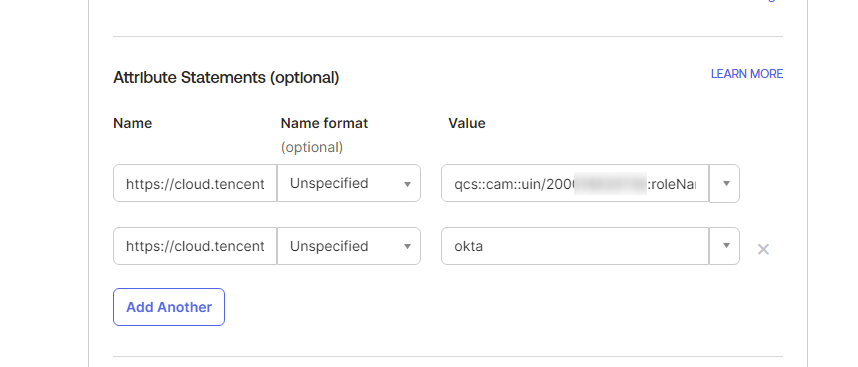
Name | Name format | Value |
https://cloud.tencent.com/SAML/Attributes/Role | Unspecified | qcs::cam::uin/{AccountID}:roleName/{RoleName},qcs::cam::uin/{AccountID}:saml-provider/{ProviderName} |
https://cloud.tencent.com/SAML/Attributes/RoleSessionName | Unspecified | okta |
说明:
在 Value 中 {AccountID},{RoleName},{ProviderName} 分别替换以下内容:
{AccountID} 替换为您的腾讯云账户 ID,可前往 账号信息 - 控制台 查看。
{RoleName}替换您在腾讯云为身份提供商所创建的角色名称(单击查看如何在腾讯云 为身份提供商创建的角色),角色名称可前往 角色 - 控制台 查看,如需要添加更多可按照该格式添加:qcs::cam::uin/{AccountID}:roleName/{RoleName} ,以 ; 隔开。
{ProviderName} 替换您在腾讯云创建的 SAML 身份提供商名称,可前往 身份提供商 - 控制台 查看。
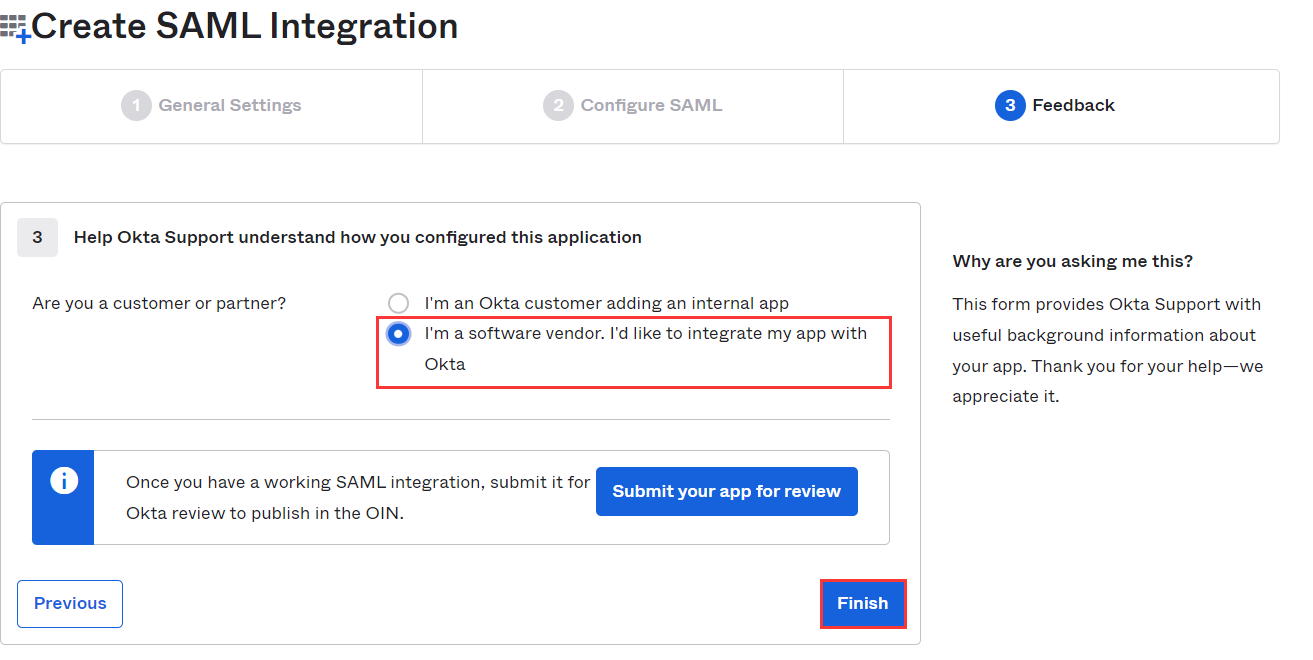
6. 单击 Next,进入反馈/Feedback 页面,选择以下信息之后单击 Finish,完成配置 CAM 操作。如下图所示:
为 Okta 应用程序配置 SAML 集成
说明:
您可以通过本步骤配置 Okta 和腾讯云之间的信任关系使之相互信任。
1. 登录进入 管理员界面,选择 Applications,进入应用管理页面。
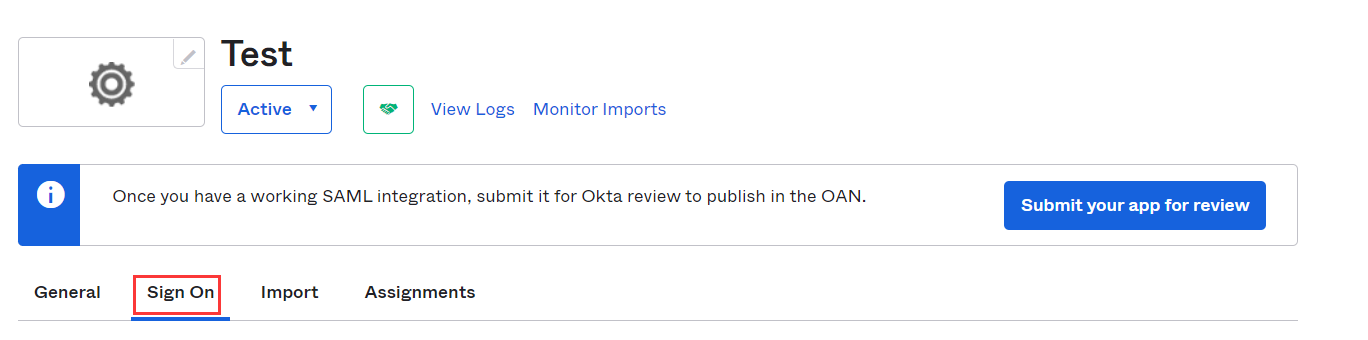
2. 在应用管理页面,单击您创建的应用程序名称,进入应用详情页,单击 Sign On。如下图所示:
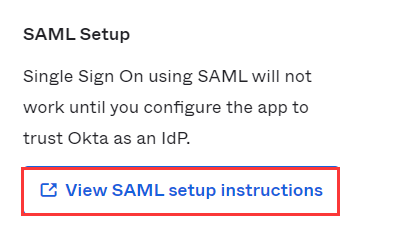
3. 在 Sign On 页面,单击右下角 View SAML setup instructions 查看身份提供商元数据。如下图所示:
4. 获取身份提供商元数据之后可在查看页面右键保存至本地。
5. 在腾讯云创建 SAML 身份提供商及角色,详细操作请参见 创建身份提供商。
配置 Okta 用户
说明:
您可以通过本步骤分配用户访问权限,向 Okta 用户分配腾讯云的 SSO 访问权限。
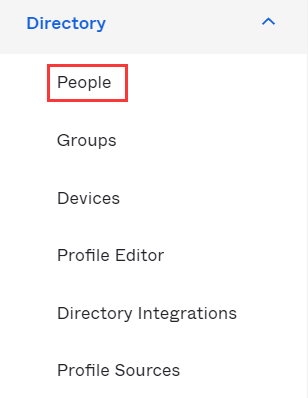
1. 登录进入 管理员界面,单击 Directory 下的 People,进入用户管理页面。如下图所示:
2. 在用户管理页面,找到您需要授权的用户。
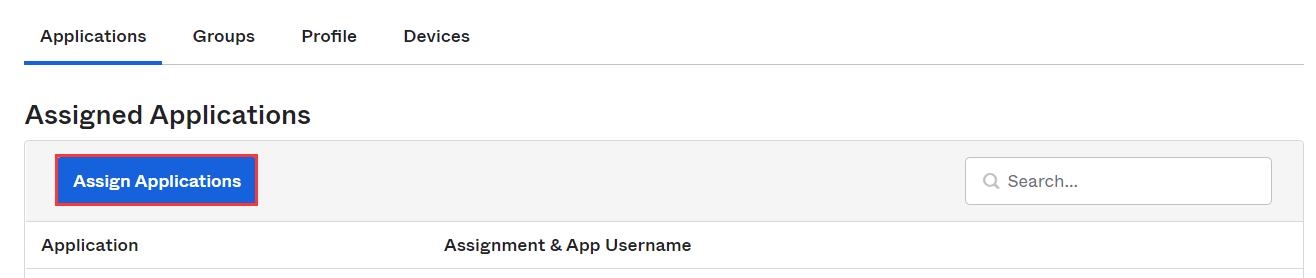
3. 单击用户名称,进入用户详情页,单击左上角 Assign Applications。如下图所示:
4. 在弹出的设置窗口中,单击 Assign,设置 User Name 后,单击 Save and Go Back > Done,完成配置 Okta 用户操作。如下图所示: 
5. 前往 应用管理页面,单击您创建的应用程序名称,进入应用详情页。
6. 在应用详情页,选择 General ,复制 App Embed Link 栏下的 Embed Link,登录腾讯云控制台。


