前提条件
用户已经通过 useLoginState 完成登录鉴权,请参考 接入概览。
用户已经通过 useRoomState 进入房间,请参考 房间管理。
角色与权限体系
标准会议房间中,在线成员由
participantList 维护;房间管理权限由成员角色决定。角色权限说明
角色 | 枚举值 | 权限说明 | 常见操作 |
房主 | RoomParticipantRole.Owner | 房间最高权限,同一时间只有一个房主。 | 设置/撤销管理员、转让房主、移除成员、关闭成员设备、全体禁言、全体禁用设备。 |
管理员 | RoomParticipantRole.Admin | 由房主授予。管理员退房后失去管理员角色。 | 移除成员、关闭成员设备、禁言、处理设备申请、邀请成员开启设备。 |
普通成员 | RoomParticipantRole.GeneralUser | 房间内普通参会者。 | 查看成员列表、更新自身信息、申请开启被禁用的设备。 |
能力矩阵
能力分类 | 能力项 | 房主 | 管理员 | 普通成员 |
基础查看与修改 | 查看成员列表 | 支持 | 支持 | 支持 |
| 修改自己的名片 | 支持 | 支持 | 支持 |
| 修改任意成员名片 | 支持 | 支持 | 不支持 |
房间与角色管理 | 设置/撤销管理员 | 支持 | 不支持 | 不支持 |
| 转让房主 | 支持 | 不支持 | 不支持 |
| 解散房间 | 支持 | 不支持 | 不支持 |
| 踢出成员 | 支持 | 支持 | 不支持 |
设备与消息管控 | 关闭成员媒体设备 | 支持 | 支持 | 不支持 |
| 全体禁用媒体设备 | 支持 | 支持 | 不支持 |
| 单独禁止成员发消息 | 支持 | 支持 | 不支持 |
| 全体禁止发消息 | 支持 | 支持 | 不支持 |
| 申请开启媒体设备 | - | - | 支持 |
说明:
房主和管理员权限应同时在 UI 层和接口调用层做校验。UI 层可隐藏当前成员不可见的管理入口;接口调用层仍需通过
try/catch 处理无权限错误。场景一:集成内置成员列表
如果您的业务只需要快速展示成员列表,并使用视频会议 SDK 提供的默认成员管理交互,可以直接使用
RoomParticipantList 组件。该方式适合快速接入标准会议,对成员列表样式定制要求较低。实现思路
在会议页面中为成员列表准备一个具备明确宽高的容器,并渲染
RoomParticipantList。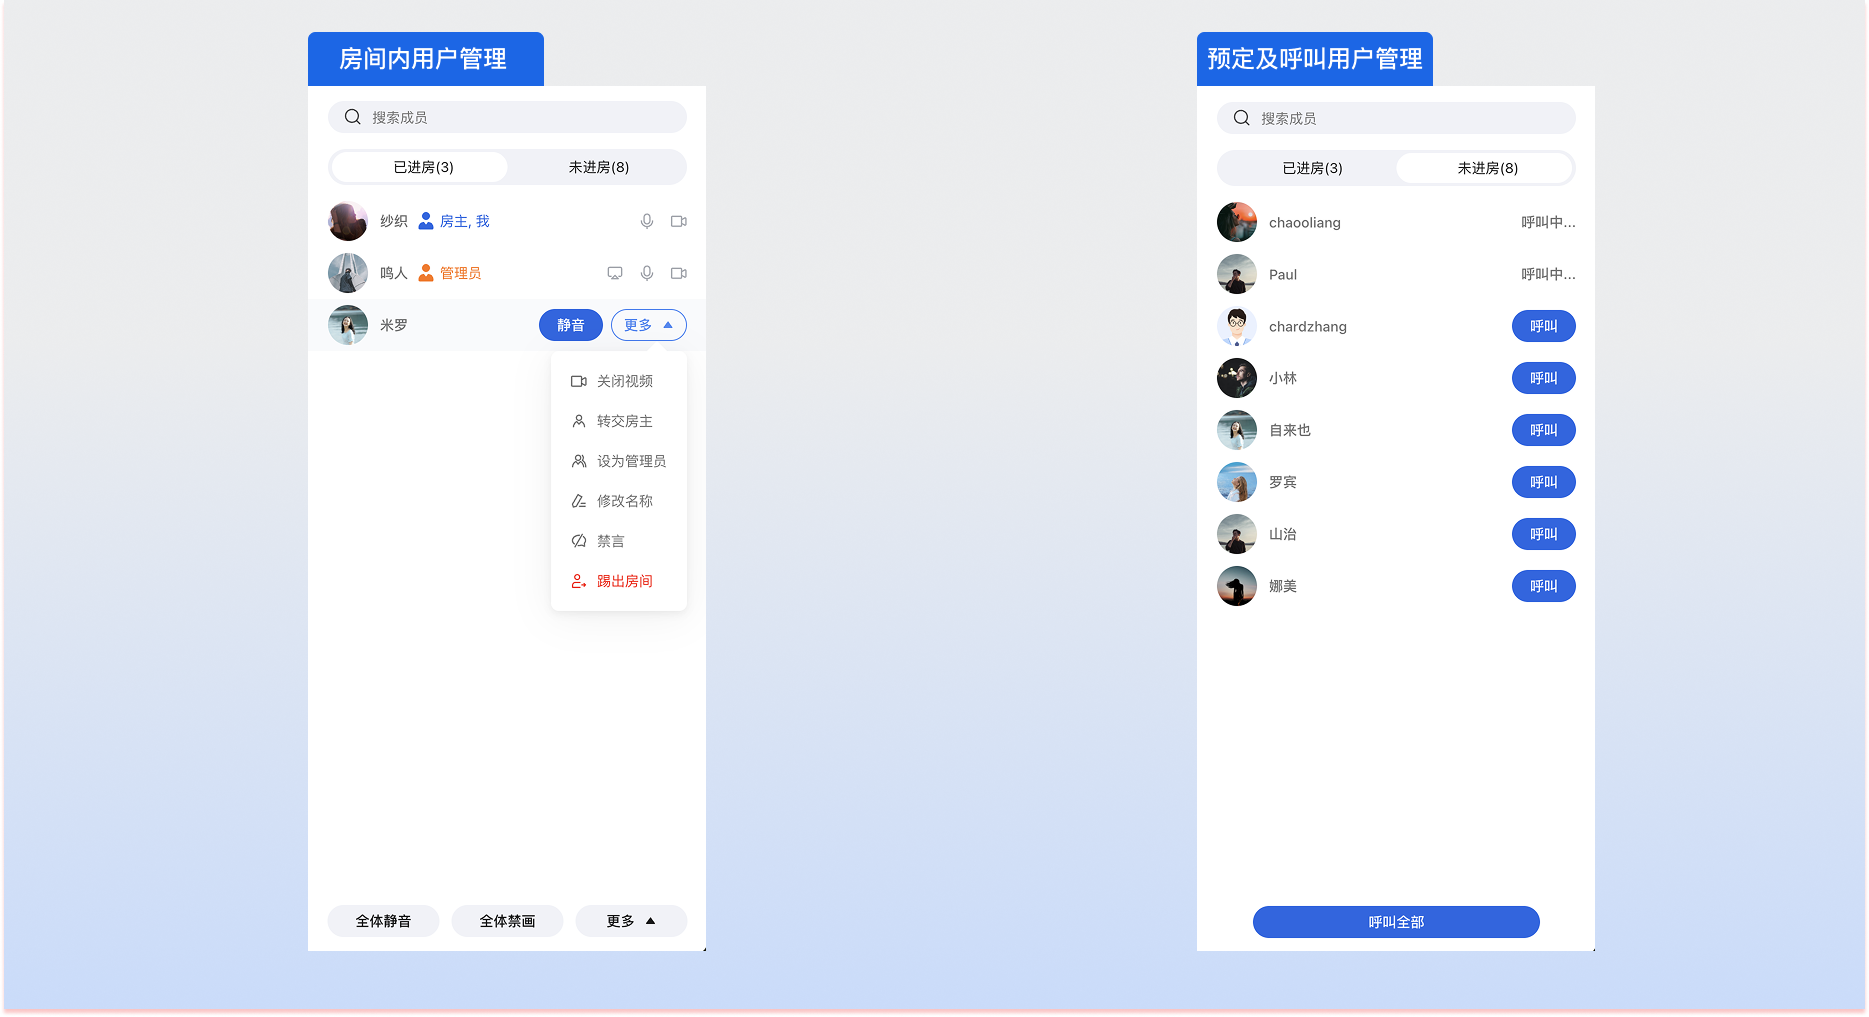
示例代码
<template><aside class="participant-panel"><RoomParticipantList /></aside></template><script setup lang="ts">import { RoomParticipantList } from 'tuikit-atomicx-vue3/room';</script>
import { RoomParticipantList } from 'tuikit-atomicx-react/room';export default function ParticipantPanel() {return (<aside className="participant-panel"><RoomParticipantList /></aside>);}
说明:
如果使用内置成员列表组件
RoomParticipantList,需要在应用根节点配置 UIKitProvider,请参考 接入概览 > 配置全局 UIKitProvider。RoomParticipantList 会自动占满父容器的高度和宽度,请确保父容器具备明确尺寸。如果您需要完全自定义成员列表样式、操作按钮或业务信息展示,建议改用 useRoomParticipantState 自行渲染。场景二:自定义成员列表
当业务需要展示自定义 UI、业务身份、扩展操作菜单或按角色分组时,可通过
useRoomParticipantState 获取成员数据并自行渲染。获取成员列表
用户进入房间后,调用
getParticipantList 拉取成员数据。getParticipantList 使用分页机制,不会一次返回全量成员。接口返回的数据会自动增量更新到响应式状态 participantList 中,无需手动合并列表。目标 | 使用接口/状态 | 处理建议 |
获取成员列表 | getParticipantList、participantList | 进房成功后调用 getParticipantList,UI 渲染 participantList。 |
分页加载 | participantListCursor | 如果 cursor 不为空,滚动到底部时传入上一次返回的 cursor。 |
本地用户 | localParticipant | 可用于展示“我”、判断当前用户角色。 |
<script setup lang="ts">import { onMounted, watch } from 'vue';import { useRoomParticipantState, useRoomState } from 'tuikit-atomicx-vue3/room';const { currentRoom } = useRoomState();const {participantList,participantListCursor,localParticipant,getParticipantList,} = useRoomParticipantState();onMounted(() => {watch(() => currentRoom.value?.roomId,async (roomId) => {if (!roomId) return;try {await getParticipantList({ cursor: '' });} catch (error) {console.error('获取成员列表失败:', error);}},{ immediate: true },);});async function loadMoreParticipants() {if (!participantListCursor.value) return;try {await getParticipantList({ cursor: participantListCursor.value });} catch (error) {console.error('加载更多成员失败:', error);}}</script>
import { useEffect } from 'react';import { useRoomParticipantState, useRoomState } from 'tuikit-atomicx-react/room';const { currentRoom } = useRoomState();const {participantList,participantListCursor,localParticipant,getParticipantList,} = useRoomParticipantState();useEffect(() => {if (!currentRoom?.roomId) return;getParticipantList({ cursor: '' }).catch(error => {console.error('获取成员列表失败:', error);});}, [currentRoom?.roomId]);async function loadMoreParticipants() {if (!participantListCursor) return;try {await getParticipantList({ cursor: participantListCursor });} catch (error) {console.error('加载更多成员失败:', error);}}
渲染成员信息
成员列表可展示身份标识、设备状态和业务扩展信息。
字段 | 说明 | 展示建议 |
userId | 用户 ID | 作为列表 key 和操作目标。 |
userName | 用户昵称 | 优先展示昵称;为空时可展示 userId。 |
avatarUrl | 头像地址 | 用于展示成员头像。 |
role | 成员角色 | 展示房主、管理员、普通成员等角色标签。 |
microphoneStatus | 麦克风状态 | 用于展示开麦/闭麦图标。 |
cameraStatus | 摄像头状态 | 用于展示开摄像头/关摄像头图标。 |
screenShareStatus | 屏幕分享状态 | 用于展示屏幕分享中标识。 |
isMessageDisabled | 消息禁用状态 | 用于展示禁言状态。 |
metaData | 业务自定义数据 | 用于展示职务、等级、购买状态等业务信息。 |
<template><div class="participant-list"><divv-for="item in participantList":key="item.userId"class="participant-item"><img :src="item.avatarUrl || defaultAvatar" class="avatar" /><div class="user-info"><span class="name">{{ item.userName || item.userId }}</span><span v-if="item.role !== RoomParticipantRole.GeneralUser" class="role-tag">{{ item.role === RoomParticipantRole.Owner ? '房主' : '管理员' }}</span></div><div class="status-bar"><i :class="item.microphoneStatus === DeviceStatus.On ? 'icon-mic-on' : 'icon-mic-off'"></i><i :class="item.cameraStatus === DeviceStatus.On ? 'icon-cam-on' : 'icon-cam-off'"></i></div></div></div></template><script setup lang="ts">import {useRoomParticipantState,RoomParticipantRole,DeviceStatus} from 'tuikit-atomicx-vue3/room';const { participantList } = useRoomParticipantState();const defaultAvatar = 'https://path-to-your-default-avatar.png';</script>
import {useRoomParticipantState,RoomParticipantRole,DeviceStatus} from 'tuikit-atomicx-react/room';const defaultAvatar = 'https://path-to-your-default-avatar.png';export default function ParticipantList() {const { participantList } = useRoomParticipantState();return (<div className="participant-list">{participantList.map(item => (<div key={item.userId} className="participant-item"><img src={item.avatarUrl || defaultAvatar} className="avatar" /><div className="user-info"><span className="name">{item.userName || item.userId}</span>{item.role !== RoomParticipantRole.GeneralUser && (<span className="role-tag">{item.role === RoomParticipantRole.Owner ? '房主' : '管理员'}</span>)}</div><div className="status-bar"><i className={item.microphoneStatus === DeviceStatus.On ? 'icon-mic-on' : 'icon-mic-off'}></i><i className={item.cameraStatus === DeviceStatus.On ? 'icon-cam-on' : 'icon-cam-off'}></i></div></div>))}</div>);}
成员列表排序建议
成员列表通常需要结合会议场景进行排序。视频会议无 UI SDK 仅负责维护成员状态,最终展示顺序建议由业务层进行排序。
排序因素 | 说明 |
本地用户 | 通常置顶,并展示“我”用于标识本地用户。 |
房主和管理员 | 优先展示,便于用户识别管理者。 |
屏幕共享成员 | 可置顶或展示“共享中”标识。 |
正在发言成员 | 可短暂前置或高亮展示麦克风 icon。 |
开启摄像头成员 | 可优先展示。 |
开启麦克风成员 | 可优先展示。 |
普通成员 | 可按昵称、入会时间或业务字段排序。 |
<script setup lang="ts">import { computed } from 'vue';import {DeviceStatus,RoomParticipantRole,useRoomParticipantState,} from 'tuikit-atomicx-vue3/room';const {localParticipant,participantList,participantWithScreen,speakingUsers,} = useRoomParticipantState();const sortedParticipantList = computed(() => {return [...participantList.value].sort((a, b) => {const score = (participant) => {if (participant.userId === localParticipant.value?.userId) return 100;if (participant.role === RoomParticipantRole.Owner) return 90;if (participant.role === RoomParticipantRole.Admin) return 80;if (participant.userId === participantWithScreen.value?.userId) return 70;if (speakingUsers.value.has(participant.userId)) return 60;if (participant.cameraStatus === DeviceStatus.On) return 50;if (participant.microphoneStatus === DeviceStatus.On) return 40;return 0;};return score(b) - score(a);});});</script>
import { useMemo } from 'react';import {DeviceStatus,RoomParticipantRole,useRoomParticipantState,} from 'tuikit-atomicx-react/room';const {localParticipant,participantList,participantWithScreen,speakingUsers,} = useRoomParticipantState();const sortedParticipantList = useMemo(() => {return [...participantList].sort((a, b) => {const score = (participant) => {if (participant.userId === localParticipant?.userId) return 100;if (participant.role === RoomParticipantRole.Owner) return 90;if (participant.role === RoomParticipantRole.Admin) return 80;if (participant.userId === participantWithScreen?.userId) return 70;if (speakingUsers.has(participant.userId)) return 60;if (participant.cameraStatus === DeviceStatus.On) return 50;if (participant.microphoneStatus === DeviceStatus.On) return 40;return 0;};return score(b) - score(a);});}, [participantList, localParticipant, participantWithScreen, speakingUsers]);
场景三:成员信息展示
成员列表可组合展示角色、音视频状态、发言状态和业务身份。
角色与设备状态
<script setup lang="ts">import {DeviceStatus,RoomParticipant,RoomParticipantRole,useRoomParticipantState,} from 'tuikit-atomicx-vue3/room';const { localParticipant } = useRoomParticipantState();function getRoleText(role: RoomParticipantRole) {if (role === RoomParticipantRole.Owner) return '房主';if (role === RoomParticipantRole.Admin) return '管理员';return '成员';}function isCameraOn(participant: RoomParticipant) {return participant.cameraStatus === DeviceStatus.On;}function isMicrophoneOn(participant: RoomParticipant) {return participant.microphoneStatus === DeviceStatus.On;}function isLocalUser(userId: string) {return userId === localParticipant.value?.userId;}</script>
import {DeviceStatus,RoomParticipant,RoomParticipantRole,useRoomParticipantState,} from 'tuikit-atomicx-react/room';const { localParticipant } = useRoomParticipantState();function getRoleText(role: RoomParticipantRole) {if (role === RoomParticipantRole.Owner) return '房主';if (role === RoomParticipantRole.Admin) return '管理员';return '成员';}function isCameraOn(participant: RoomParticipant) {return participant.cameraStatus === DeviceStatus.On;}function isMicrophoneOn(participant: RoomParticipant) {return participant.microphoneStatus === DeviceStatus.On;}function isLocalUser(userId: string) {return userId === localParticipant?.userId;}
发言与音量感知
speakingUsers 可获取正在说话的用户及其音量大小,适合实现成员列表音量波纹、发言高亮、闭麦说话提醒等效果。<script setup lang="ts">import { useRoomParticipantState } from 'tuikit-atomicx-vue3/room';const { speakingUsers } = useRoomParticipantState();function isSpeaking(userId: string) {return speakingUsers.value.has(userId);}function getVolume(userId: string) {return speakingUsers.value.get(userId) || 0;}</script>
import { useRoomParticipantState } from 'tuikit-atomicx-react/room';const { speakingUsers } = useRoomParticipantState();function isSpeaking(userId: string) {return speakingUsers.has(userId);}function getVolume(userId: string) {return speakingUsers.get(userId) || 0;}
视频与屏幕共享
可通过
participantListWithVideo 和 participantWithScreen 快速获取开启摄像头或正在屏幕共享的成员。状态 | 说明 | 典型用途 |
participantListWithVideo | 当前开启摄像头的成员列表。 | 视频成员筛选、视频宫格排序。 |
participantWithScreen | 当前正在屏幕共享的成员。 | 展示“共享中”标识、屏幕共享置顶。 |
<script setup lang="ts">import { useRoomParticipantState } from 'tuikit-atomicx-vue3/room';const {participantListWithVideo,participantWithScreen,} = useRoomParticipantState();function isSharingScreen(userId: string) {return participantWithScreen.value?.userId === userId;}</script>
import { useRoomParticipantState } from 'tuikit-atomicx-react/room';const {participantListWithVideo,participantWithScreen,} = useRoomParticipantState();function isSharingScreen(userId: string) {return participantWithScreen?.userId === userId;}
名片与扩展信息
业务可通过
updateParticipantNameCard 修改房间内展示名片,通过 updateParticipantMetaData 写入业务扩展信息。目标 | 使用接口/状态 | 处理建议 |
修改成员名片 | updateParticipantNameCard | 房主、管理员可修改任意用户,普通用户只能修改自己。 |
写入业务扩展信息 | updateParticipantMetaData | metaData 为键值对对象。 |
展示业务扩展信息 | participant.metaData | 在成员列表中读取并渲染。 |
<script setup lang="ts">import { useRoomParticipantState } from 'tuikit-atomicx-vue3/room';const {updateParticipantNameCard,updateParticipantMetaData,} = useRoomParticipantState();async function updateUserNameCard(userId: string) {try {await updateParticipantNameCard({userId,nameCard: '产品经理',});} catch (error) {console.error('修改成员名片失败:', error);}}async function updateUserMetaData(userId: string) {try {await updateParticipantMetaData({userId,metaData: {level: '1',department: 'Product',},});} catch (error) {console.error('更新成员扩展信息失败:', error);}}</script>
import { useRoomParticipantState } from 'tuikit-atomicx-react/room';const {updateParticipantNameCard,updateParticipantMetaData,} = useRoomParticipantState();async function updateUserNameCard(userId: string) {try {await updateParticipantNameCard({userId,nameCard: '产品经理',});} catch (error) {console.error('修改成员名片失败:', error);}}async function updateUserMetaData(userId: string) {try {await updateParticipantMetaData({userId,metaData: {level: '1',department: 'Product',},});} catch (error) {console.error('更新成员扩展信息失败:', error);}}
场景四:成员角色管理
仅房主有权限转让房主、设置管理员和撤销管理员。
角色管理
目标 | 使用接口/状态 | 权限要求 |
转让房主 | transferOwner | 仅房主可调用。 |
设置管理员 | setAdmin | 仅房主可调用。 |
撤销管理员 | revokeAdmin | 仅房主可调用。 |
判断本地权限 | localParticipant.role | 用于控制 UI 是否展示管理入口。 |
判断目标成员角色 | participant.role | 用于决定是否展示某个成员的管理菜单。 |
示例代码
import { computed } from 'vue';import { RoomParticipantRole, useRoomParticipantState } from 'tuikit-atomicx-vue3/room';const {localParticipant,transferOwner,setAdmin,revokeAdmin,} = useRoomParticipantState();const hasOwnerPermission = computed(() => localParticipant.value?.role === RoomParticipantRole.Owner);async function setUserAsAdmin(userId: string) {if (!hasOwnerPermission.value) return;await setAdmin({ userId });}async function revokeUserAdmin(userId: string) {if (!hasOwnerPermission.value) return;await revokeAdmin({ userId });}async function transferRoomOwner(userId: string) {if (!hasOwnerPermission.value) return;await transferOwner({ userId });}
import { useMemo } from 'react';import { RoomParticipantRole, useRoomParticipantState } from 'tuikit-atomicx-react/room';const {localParticipant,transferOwner,setAdmin,revokeAdmin,} = useRoomParticipantState();const hasOwnerPermission = useMemo(() => localParticipant?.role === RoomParticipantRole.Owner, [localParticipant?.role]);async function setUserAsAdmin(userId: string) {if (!hasOwnerPermission) return;await setAdmin({ userId });}async function revokeUserAdmin(userId: string) {if (!hasOwnerPermission) return;await revokeAdmin({ userId });}async function transferRoomOwner(userId: string) {if (!hasOwnerPermission) return;await transferOwner({ userId });}
场景五:会控协作
房主或管理员可维护会议秩序,包括关闭成员设备、全员禁用设备、禁用消息、处理设备申请和邀请成员开启设备。
会控操作生效后,视频会议 SDK 会自动更新对应的成员状态。业务 UI 可直接使用
participant 对象上的 microphoneStatus、cameraStatus、screenShareStatus、isMessageDisabled 等响应式属性,不需要依赖事件手动维护成员状态。无 UI SDK 抛出的事件监听可用于展示 toast、弹窗、系统通知等即时提示。关闭指定成员媒体设备
房主或管理员可调用
closeParticipantDevice 强制关闭指定成员的麦克风、摄像头或屏幕分享。被关闭设备的用户会收到 RoomParticipantEvent.onParticipantDeviceClosed 事件,可在业务侧提示成员麦克风已被管理员关闭。import { DeviceType, useRoomParticipantState } from 'tuikit-atomicx-vue3/room';const { closeParticipantDevice } = useRoomParticipantState();async function closeUserMicrophone(userId: string) {await closeParticipantDevice({userId,deviceType: DeviceType.Microphone,});}async function closeUserCamera(userId: string) {await closeParticipantDevice({userId,deviceType: DeviceType.Camera,});}
import { DeviceType, useRoomParticipantState } from 'tuikit-atomicx-react/room';const { closeParticipantDevice } = useRoomParticipantState();async function closeUserMicrophone(userId: string) {await closeParticipantDevice({userId,deviceType: DeviceType.Microphone,});}async function closeUserCamera(userId: string) {await closeParticipantDevice({userId,deviceType: DeviceType.Camera,});}
禁用全员媒体设备
房主或管理员可以通过
disableAllDevices 禁用或启用全体成员的指定设备。禁用后,普通成员不能自行开启对应设备。import { DeviceType, useRoomParticipantState } from 'tuikit-atomicx-vue3/room';const { disableAllDevices } = useRoomParticipantState();async function disableAllMicrophones() {await disableAllDevices({deviceType: DeviceType.Microphone,disable: true,});}async function enableAllMicrophones() {await disableAllDevices({deviceType: DeviceType.Microphone,disable: false,});}
import { DeviceType, useRoomParticipantState } from 'tuikit-atomicx-react/room';const { disableAllDevices } = useRoomParticipantState();async function disableAllMicrophones() {await disableAllDevices({deviceType: DeviceType.Microphone,disable: true,});}async function enableAllMicrophones() {await disableAllDevices({deviceType: DeviceType.Microphone,disable: false,});}
禁用消息发送
成员消息权限分为“单独禁言”和“全体禁言”两类:
目标 | 使用接口 | 说明 |
禁用指定用户发消息 | disableUserMessage | 房主或管理员对房间内单个成员进行禁言或解禁。 |
全体禁言/解禁 | disableAllMessages | 房主或管理员对房间全体成员进行禁言或解禁。 |
import { useRoomParticipantState } from 'tuikit-atomicx-vue3/room';const { disableUserMessage, disableAllMessages } = useRoomParticipantState();async function disableUserChat(userId: string) {await disableUserMessage({userId,disable: true,});}async function disableRoomChat() {await disableAllMessages({ disable: true });}
import { useRoomParticipantState } from 'tuikit-atomicx-react/room';const { disableUserMessage, disableAllMessages } = useRoomParticipantState();async function disableUserChat(userId: string) {await disableUserMessage({userId,disable: true,});}async function disableRoomChat() {await disableAllMessages({ disable: true });}
普通成员申请开启设备
房主或管理员开启全员禁麦、全员禁摄像头等策略后,普通成员可向房主或管理员申请开启设备;
import { DeviceType, useRoomParticipantState } from 'tuikit-atomicx-vue3/room';const { requestToOpenDevice, cancelOpenDeviceRequest } = useRoomParticipantState();async function requestToOpenMicrophone() {await requestToOpenDevice({device: DeviceType.Microphone,timeout: 60,});}async function cancelMicrophoneRequest() {await cancelOpenDeviceRequest({device: DeviceType.Microphone,});}
import { DeviceType, useRoomParticipantState } from 'tuikit-atomicx-react/room';const { requestToOpenDevice, cancelOpenDeviceRequest } = useRoomParticipantState();async function requestToOpenMicrophone() {await requestToOpenDevice({device: DeviceType.Microphone,timeout: 60,});}async function cancelMicrophoneRequest() {await cancelOpenDeviceRequest({device: DeviceType.Microphone,});}
房主/管理员处理设备申请
房主/管理员通过
pendingDeviceApplications 或 RoomParticipantEvent.onDeviceRequestReceived 获取待处理申请,并调用 approveOpenDeviceRequest 或 rejectOpenDeviceRequest 处理。<template><div class="device-application-list"><divv-for="application in pendingDeviceApplications":key="`${application.senderUserId}-${application.deviceType}-${application.timestamp}`"class="device-application-item"><img :src="application.senderAvatarUrl" class="avatar" /><div class="application-info"><span class="name">{{ application.senderNameCard || application.senderUserName || application.senderUserId }}</span><span class="desc">申请开启{{ getDeviceName(application.deviceType) }}</span></div><button @click="approveDeviceApplication(application)">同意</button><button @click="rejectDeviceApplication(application)">拒绝</button></div></div></template><script setup lang="ts">import { onBeforeUnmount, onMounted } from 'vue';import {type DeviceRequestInfo,DeviceType,RoomParticipantEvent,useRoomParticipantState,} from 'tuikit-atomicx-vue3/room';const {pendingDeviceApplications,approveOpenDeviceRequest,rejectOpenDeviceRequest,subscribeEvent,unsubscribeEvent,} = useRoomParticipantState();function getDeviceName(deviceType: DeviceType) {if (deviceType === DeviceType.Microphone) return '麦克风';if (deviceType === DeviceType.Camera) return '摄像头';return '屏幕分享';}async function approveDeviceApplication(application: DeviceRequestInfo) {await approveOpenDeviceRequest({userId: application.senderUserId,device: application.deviceType,});}async function rejectDeviceApplication(application: DeviceRequestInfo) {await rejectOpenDeviceRequest({userId: application.senderUserId,device: application.deviceType,});}</script>
import {type DeviceRequestInfo,DeviceType,useRoomParticipantState,} from 'tuikit-atomicx-react/room';export default function DeviceApplicationList() {const {pendingDeviceApplications,approveOpenDeviceRequest,rejectOpenDeviceRequest,} = useRoomParticipantState();function getDeviceName(deviceType: DeviceType) {if (deviceType === DeviceType.Microphone) return '麦克风';if (deviceType === DeviceType.Camera) return '摄像头';return '屏幕分享';}async function approveDeviceApplication(application: DeviceRequestInfo) {await approveOpenDeviceRequest({userId: application.senderUserId,device: application.deviceType,});}async function rejectDeviceApplication(application: DeviceRequestInfo) {await rejectOpenDeviceRequest({userId: application.senderUserId,device: application.deviceType,});}return (<div className="device-application-list">{pendingDeviceApplications.map(application => (<divkey={`${application.senderUserId}-${application.deviceType}-${application.timestamp}`}className="device-application-item"><img src={application.senderAvatarUrl} className="avatar" /><div className="application-info"><span className="name">{application.senderNameCard || application.senderUserName || application.senderUserId}</span><span className="desc">申请开启{getDeviceName(application.deviceType)}</span></div><button onClick={() => approveDeviceApplication(application)}>同意</button><button onClick={() => rejectDeviceApplication(application)}>拒绝</button></div>))}</div>);}
状态 / 事件 | 触发时机 | 处理建议 |
pendingDeviceApplications | 当前待房主/管理员处理的设备开启申请。 | 用于渲染待处理申请列表。 |
RoomParticipantEvent.onDeviceRequestReceived | 房主/管理员收到成员申请。 | 展示审批弹窗或申请入口提醒。 |
RoomParticipantEvent.onDeviceRequestCancelled | 申请者取消申请。 | 移除待处理申请。 |
RoomParticipantEvent.onDeviceRequestTimeout | 申请超时。 | 提示申请已失效,并刷新申请列表。 |
RoomParticipantEvent.onDeviceRequestApproved | 申请被批准。 | 申请者可继续打开对应设备。 |
RoomParticipantEvent.onDeviceRequestRejected | 申请被拒绝。 | 申请者展示拒绝提示。 |
RoomParticipantEvent.onDeviceRequestProcessed | 申请已被其他管理员处理。 | 关闭本地审批入口,避免重复处理。 |
房主/管理员邀请成员开启设备
普通成员未开启摄像头或麦克风设备时,房主或管理员可邀请普通成员开启设备;
import { DeviceType, useRoomParticipantState } from 'tuikit-atomicx-vue3/room';const {inviteToOpenDevice,cancelOpenDeviceInvitation,acceptOpenDeviceInvitation,declineOpenDeviceInvitation,} = useRoomParticipantState();async function inviteUserToOpenCamera(userId: string) {await inviteToOpenDevice({userId,device: DeviceType.Camera,timeout: 60,});}
import { DeviceType, useRoomParticipantState } from 'tuikit-atomicx-react/room';const {inviteToOpenDevice,cancelOpenDeviceInvitation,acceptOpenDeviceInvitation,declineOpenDeviceInvitation,} = useRoomParticipantState();async function inviteUserToOpenCamera(userId: string) {await inviteToOpenDevice({userId,device: DeviceType.Camera,timeout: 60,});}
状态 / 事件 | 触发时机 | 处理建议 |
pendingDeviceInvitations | 本地用户待处理的设备开启邀请。 | 用于渲染邀请弹窗或入口提醒。 |
RoomParticipantEvent.onDeviceInvitationReceived | 成员收到房主/管理员邀请。 | 展示接受/拒绝入口。 |
RoomParticipantEvent.onDeviceInvitationCancelled | 房主/管理员取消邀请。 | 关闭邀请弹窗。 |
RoomParticipantEvent.onDeviceInvitationTimeout | 邀请超时。 | 提示邀请已失效。 |
RoomParticipantEvent.onDeviceInvitationAccepted | 成员接受邀请。 | 管理员侧更新邀请状态。 |
RoomParticipantEvent.onDeviceInvitationDeclined | 成员拒绝邀请。 | 管理员侧展示拒绝结果。 |
说明:
场景六:事件监听处理
成员被踢出房间、设备被管理员关闭等场景,可通过事件监听展示 toast、弹窗等提示。成员列表和设备状态仍以
participant 对象上的响应式属性为准。订阅事件放在 onMounted,取消订阅放在 onBeforeUnmount,避免组件销毁后继续响应事件。import { onMounted, onUnmounted } from 'vue';import {RoomParticipantEvent,useRoomParticipantState,} from 'tuikit-atomicx-vue3/room';const { subscribeEvent, unsubscribeEvent } = useRoomParticipantState();function onKickedFromRoom({ reason, message }) {console.warn('当前用户已被移出房间:', reason, message);}function onParticipantDeviceClosed({ device, operator }) {console.warn('设备已被管理员关闭:', device, operator);}onMounted(() => {subscribeEvent(RoomParticipantEvent.onKickedFromRoom, onKickedFromRoom);subscribeEvent(RoomParticipantEvent.onParticipantDeviceClosed, onParticipantDeviceClosed);});onUnmounted(() => {unsubscribeEvent(RoomParticipantEvent.onKickedFromRoom, onKickedFromRoom);unsubscribeEvent(RoomParticipantEvent.onParticipantDeviceClosed, onParticipantDeviceClosed);});
import { useEffect } from 'react';import {RoomParticipantEvent,useRoomParticipantState,} from 'tuikit-atomicx-react/room';const { subscribeEvent, unsubscribeEvent } = useRoomParticipantState();function onKickedFromRoom({ reason, message }) {console.warn('当前用户已被移出房间:', reason, message);}function onParticipantDeviceClosed({ device, operator }) {console.warn('设备已被管理员关闭:', device, operator);}useEffect(() => {subscribeEvent(RoomParticipantEvent.onKickedFromRoom, onKickedFromRoom);subscribeEvent(RoomParticipantEvent.onParticipantDeviceClosed, onParticipantDeviceClosed);return () => {unsubscribeEvent(RoomParticipantEvent.onKickedFromRoom, onKickedFromRoom);unsubscribeEvent(RoomParticipantEvent.onParticipantDeviceClosed, onParticipantDeviceClosed);};}, []);
API 文档
State/Component | 功能描述 | API 文档 |
useRoomParticipantState | 包含房间内用户数据,用户管理接口。 |
常见问题
成员列表应该如何排序?
建议业务层自行排序。常见做法是本地用户、房主、管理员、屏幕共享成员、正在发言成员、开启摄像头成员优先展示,其余成员按昵称、入会时间或业务字段排序。
为什么调用成员管理接口失败?
常见原因包括当前用户无权限、目标用户已离开房间、申请或邀请已超时。建议使用
try/catch 处理失败,并在失败后刷新成员列表或待处理申请列表。成员自定义信息应该使用 nameCard 还是 metaData?
如果只是修改成员在房间内展示的名片,使用
updateParticipantNameCard。如果需要存储业务扩展字段,例如职务、等级、购买状态,使用 updateParticipantMetaData。如何避免普通成员误触管理操作?
建议在 UI 层基于
RoomParticipantRole.Owner 和 RoomParticipantRole.Admin 判断权限,只向房主和管理员展示管理入口。同时接口调用仍需使用 try/catch 兜底处理无权限错误。


