本文旨在介绍在 TI-ONE 平台的各个场景和功能模块里,如何使用 CFS 文件系统。
一、CFS 简介
文件存储(Cloud File Storage,CFS)是腾讯云上提供的分布式文件存储系统,提供了可扩展的共享文件存储服务,可与腾讯云的 CVM 等服务搭配使用。CFS 提供了标准的 NFS 文件系统访问协议,为多个 CVM 实例提供共享的数据源,支持弹性容量和性能的扩展,现有应用无需修改即可挂载使用,是一种高可用、高可靠的分布式文件系统,适合于大数据分析、媒体处理和内容管理等场景。
二、CFS 基本使用
CFS 存储通过挂载的方式使用。CFS 支持 Linux 和 Windows 操作系统下的挂载。由于 TI-ONE 平台主要以 Linux 系统为主,以下仅介绍 Linux 系统下 CFS 的使用。
CFS 在 Linux 系统下通过 mount 命令挂载,您可参考 在 Linux 客户端上使用 CFS 文件系统。mount 命令需要指定挂载分区的源目录和目标挂载系统的挂载路径,从而可以实现在目标挂载系统(如 CVM 或者容器等)上访问分区文件。
在 TI-ONE 平台中,您不用关心挂载的命令等细节,只需在使用任务式建模或者开发机模块时,指定 CFS 的路径和目标挂载路径即可。
三、CFS 的组网模式
CFS 存储的规格主要分为通用系列和 Turbo 系列,Turbo 系列具有高 IOPS 的特性,更适合于 AI 高性能计算场景。关于 CFS 具体规格的差异介绍,您可以参考 存储类型及性能规格,根据自身需求和预算购买对应的实例。
需要特别注意的是:
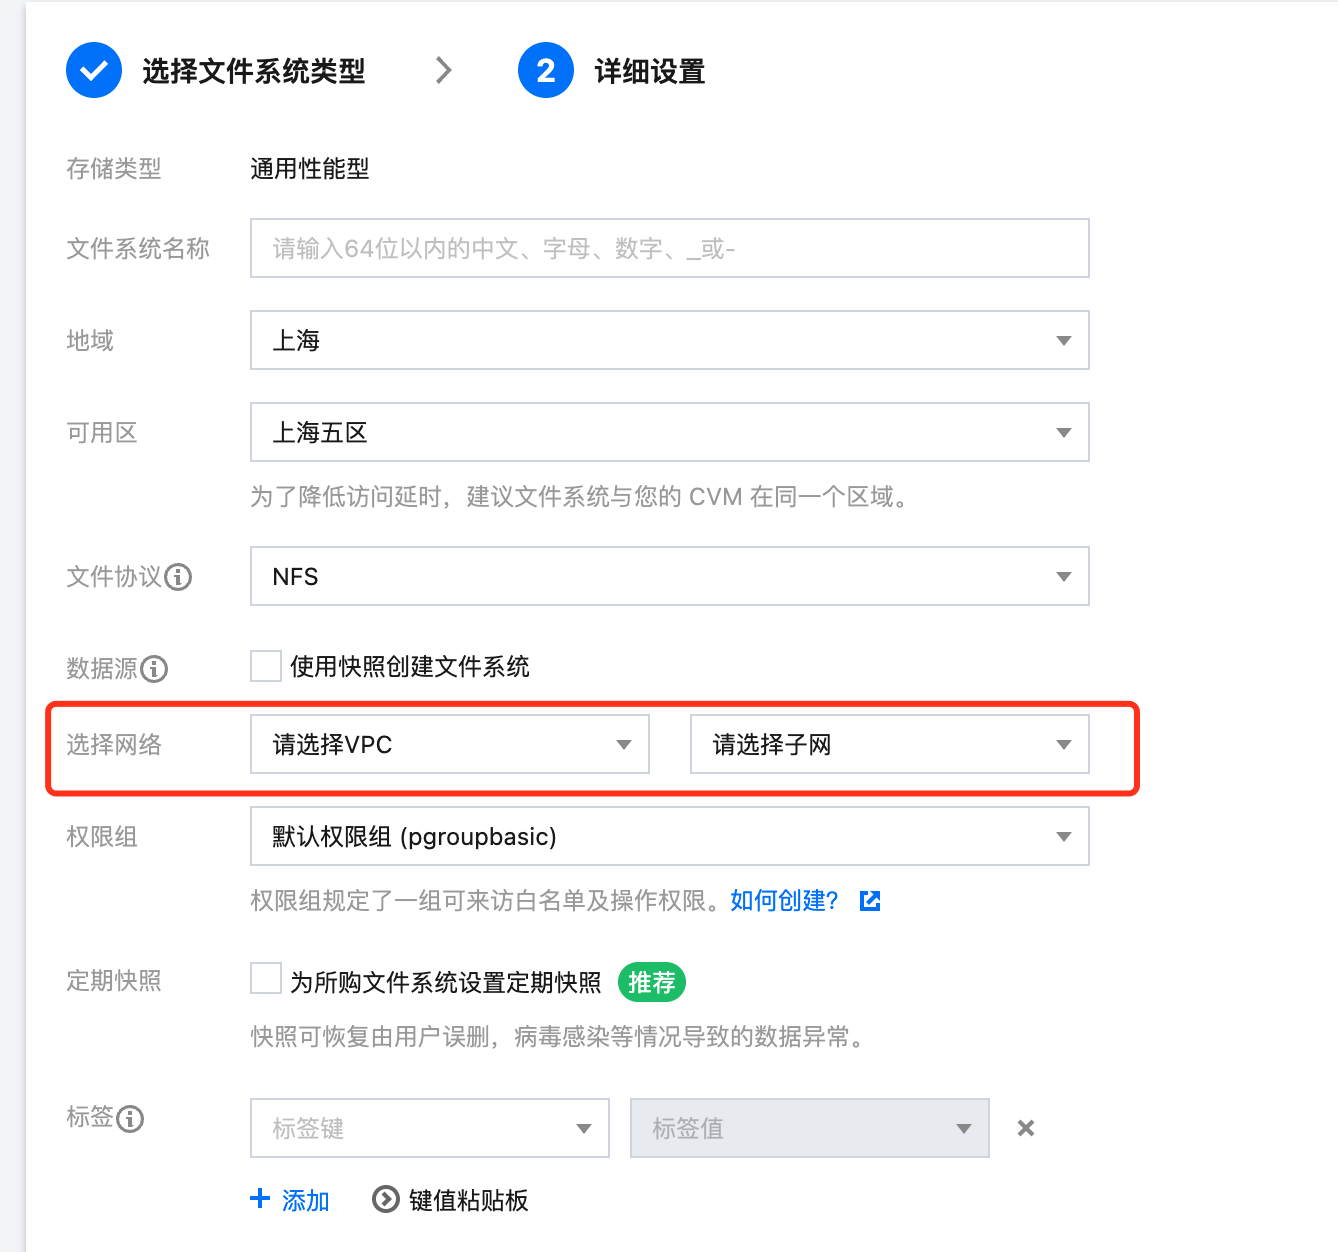
CFS 通用系列只支持 VPC 组网模式:即创建 CVM 的时候,需要指定 CFS 所在的 VPC 网络,后续访问该 CFS 的 CVM,需要在这个 VPC 下或者与该 VPC 通过云联网互通,您可参考 跨可用区、跨网络访问指引。
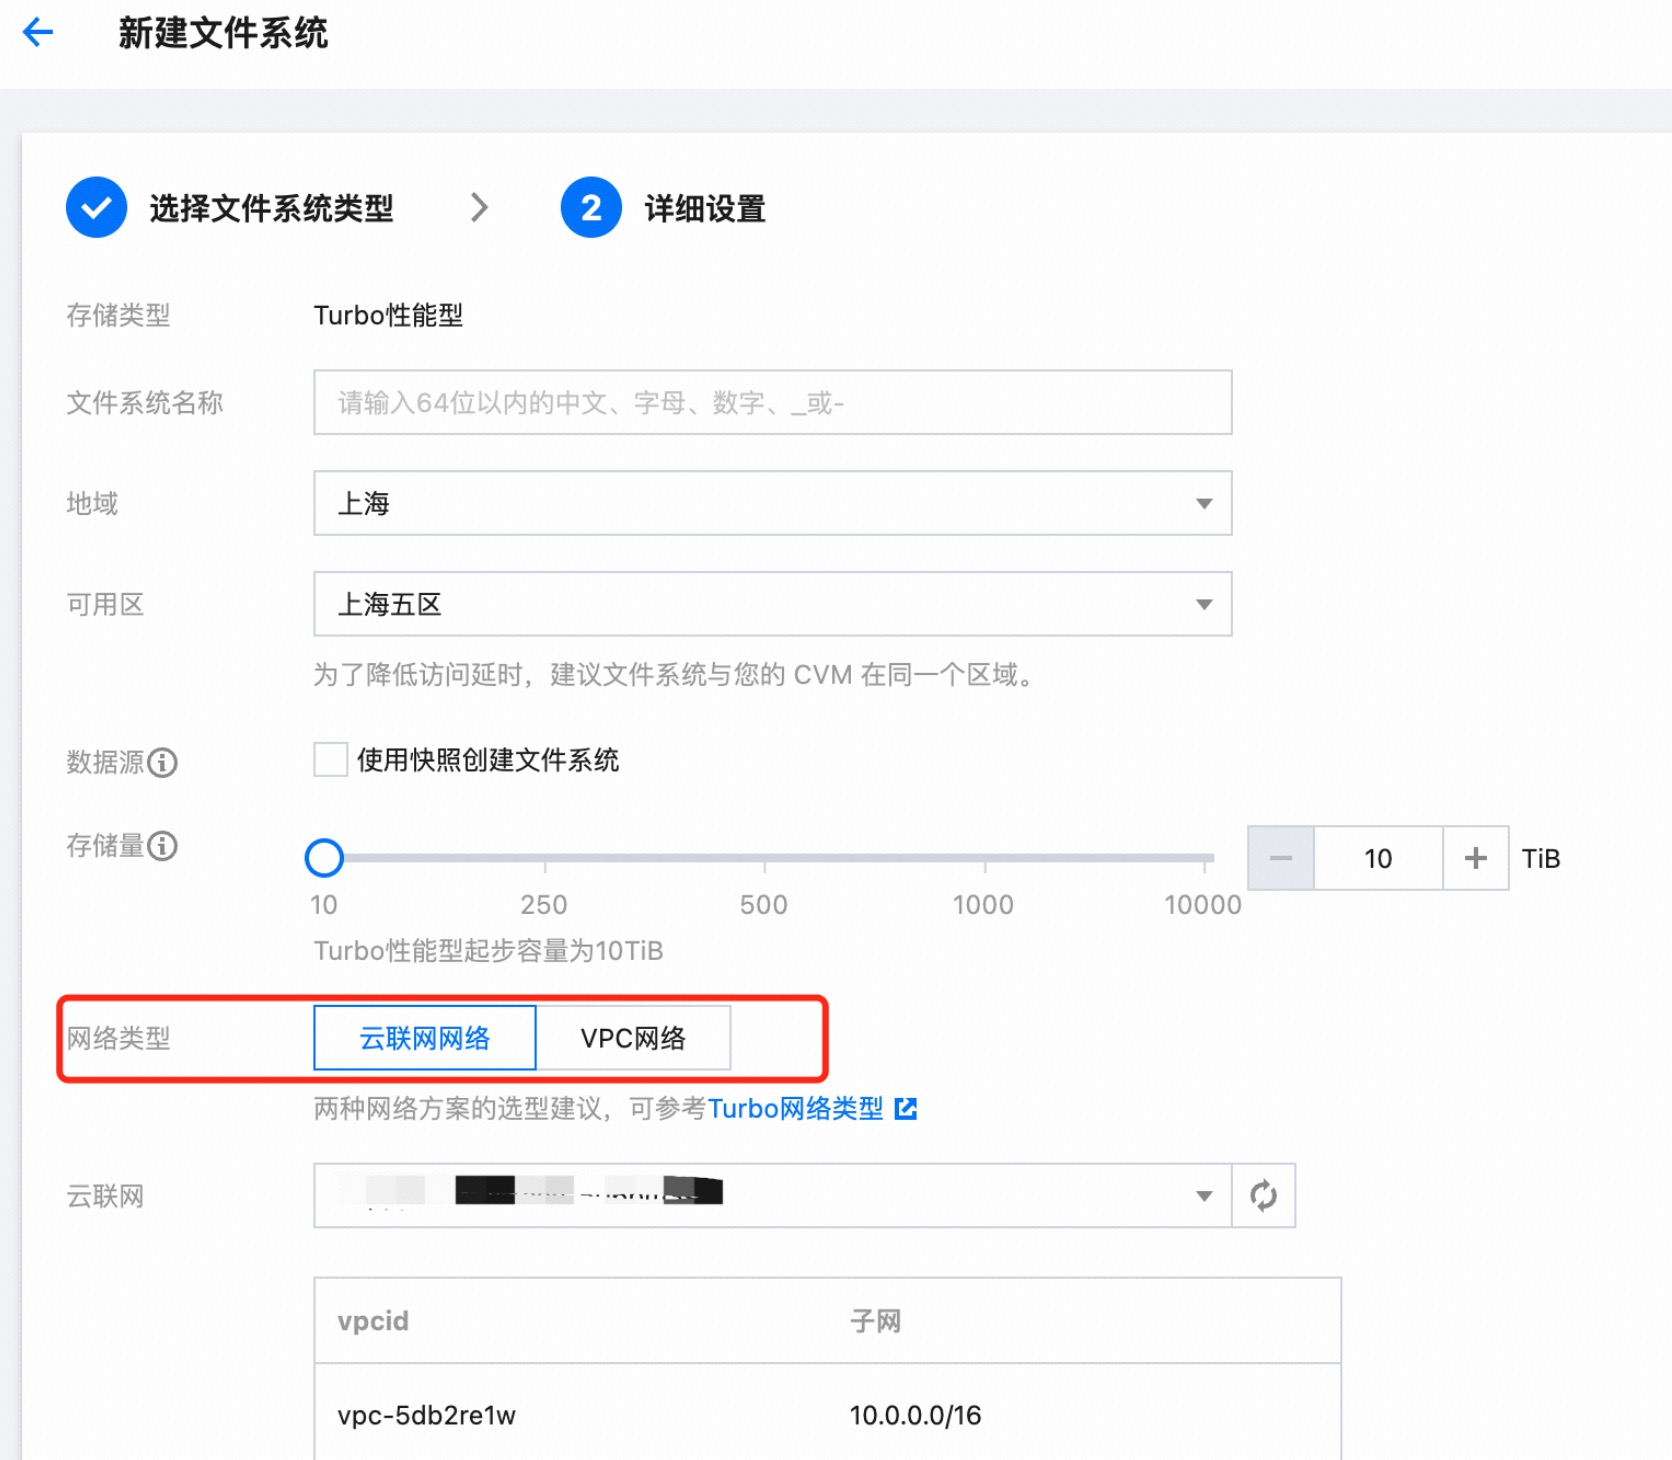
CFS Turbo 系列同时支持 VPC 组网模式和云联网模式,您可参考 Turbo 文件系统网络选择。
VPC 组网模式:创建 CFS 实例的时候,指定 CFS 所属的 VPC 网络,后续访问该 CFS 的 CVM,需要在这个 VPC 下或者与该 VPC 通过云联网互通。
云联网模式:创建 CFS 实例的时候,指定一个云联网实例,所有加入该云联网实例的 VPC 均可访问该 CFS。
四、CFS 在 TI-ONE 场景下的使用模式
TI-ONE 平台在深度学习/大模型训练精调等场景下推荐您使用 CFS 存放训练/推理的物料,包括代码/训练模型/训练数据集等。
TI-ONE 平台有以下场景:
按量付费:您使用 TI-ONE 提供的机器进行开发机开发或者任务式建模,需要挂载您自己的 CFS 存储到 TI-ONE 平台机器下。该模式下,TI-ONE 平台负责打通机器和您 CFS 存储之间的网络。
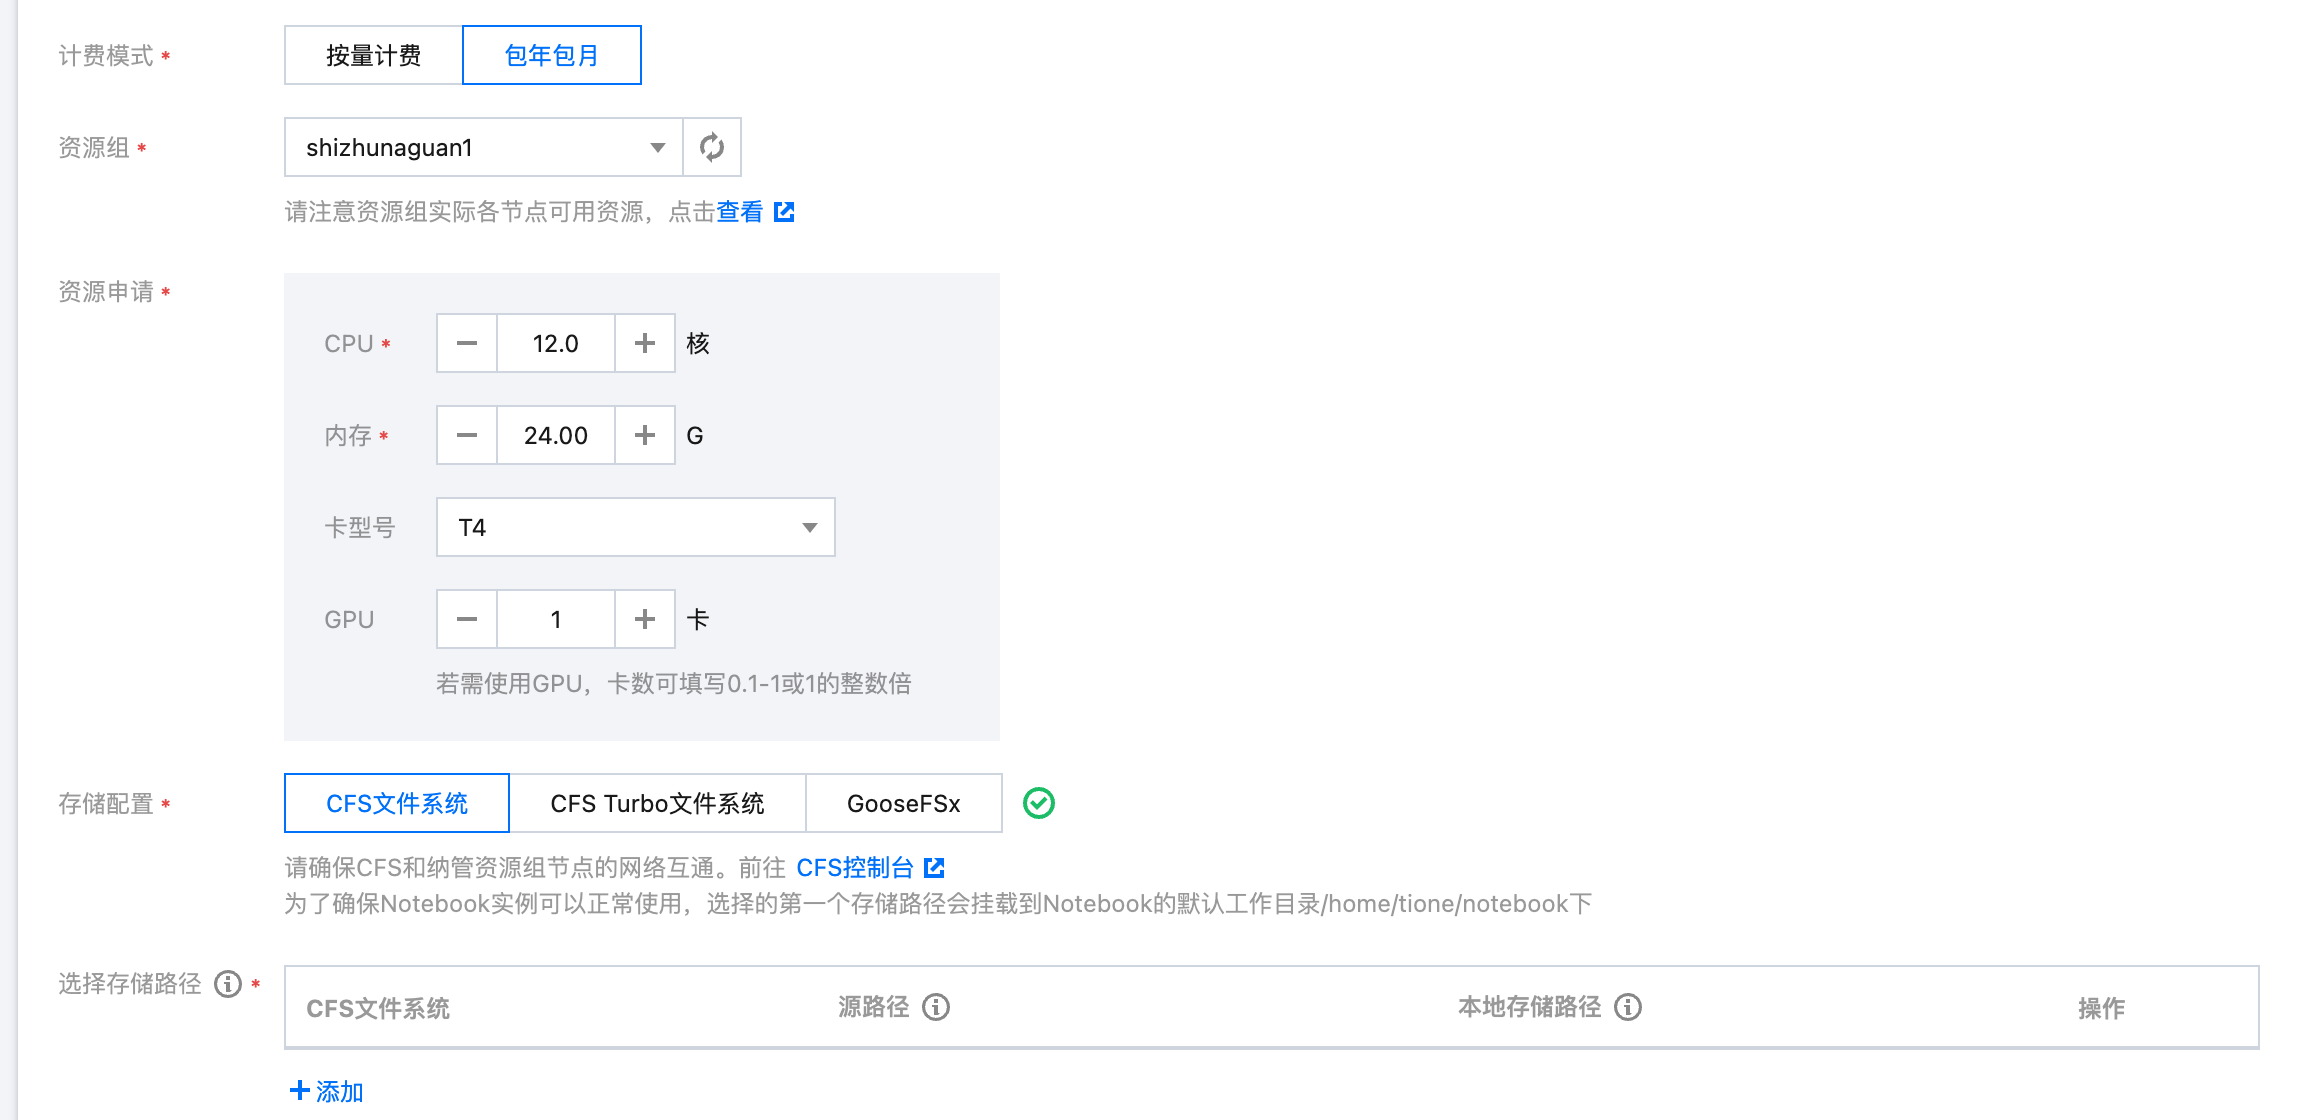
包年包月管理您的 CVM 机器:您在 CVM 控制台购买好机器后,在 TI-ONE 平台管理该机器资源用开发机开发或者任务式建模,需要挂载您自己的 CFS 存储到您 CVM 机器下。该模式下,您需要保证自己的机器资源和 CFS 存储之间的网络是联通的。
五、CFS 不同组网模式在 TI-ONE 场景下的使用差异
第一种:TI-ONE 按量付费模式 + CFS VPC 组网模式
CVM 机器资源在 TI-ONE 平台账号下,CFS 在您账号下,天然不在一个 VPC,因此 TI-ONE 平台会自动打通 TI-ONE 平台 VPC 和您 CFS 所在 VPC 之间的网络。您无需关注网络打通的细节,该场景下,您的 CFS 创建时只需要指定您账号下面任意一个 VPC 网络即可。
注意:
如果您需要在开发机一个实例中或者任务式建模一个任务中同时挂载多个 CFS,需要自行确保这些 CFS 在同一个 VPC 下或者同一个云联网下。
第二种:TI-ONE 按量付费模式 + CFS 云联网组网模式
CVM 机器资源在 TI-ONE 平台账号下,CFS 在您账号下,且该 CFS 已加入您账号下某个云联网实例。TI-ONE 平台会自动打通 TI-ONE 平台 VPC 和您 CFS 之间的云联网网络。您无需关注网络打通的细节。
注意:
该场景下由于云联网的一些限制,可能存在失败的场景,如果您遇到问题,可以联系我们进行支持和处理。
如果您需要在开发机一个实例中或者任务式建模一个任务中同时挂载多个 CFS,需要自行确保这些 CFS 在同一个 VPC 下或者同一个云联网下。
第三种:TI-ONE 用户自有资源管理模式 + CFS VPC 组网模式
CVM 机器资源在您自己账号下,CFS 也在您账号下,您需要保证 CFS 和 CVM 是互通的。互通的方式可以是在同一个 VPC 下面,也可以通过云联网方式打通,您可以参考 跨可用区、跨网络访问指引。
注意:
如果您需要在开发机一个实例中或者任务式建模一个任务中同时挂载多个 CFS,需要自行确保这些 CFS 和您在 TI-ONE 管理的机器网络是互通的。
第四种:TI-ONE 用户自有资源管理模式 + CFS 云联网组网模式
CVM 机器资源在您自己账号下,CFS 也在您账号下,您需要保证 CFS 和 CVM 是互通的。您可以通过把 CVM 所在 VPC 加入到 CFS 所在云联网实例中,云联网相关您可以参考 云联网产品概述。
注意:
如果您需要在开发机一个实例中或者任务式建模一个任务中同时挂载多个 CFS,需要自行确保这些 CFS 和您在 TI-ONE 管理的机器网络是互通的。
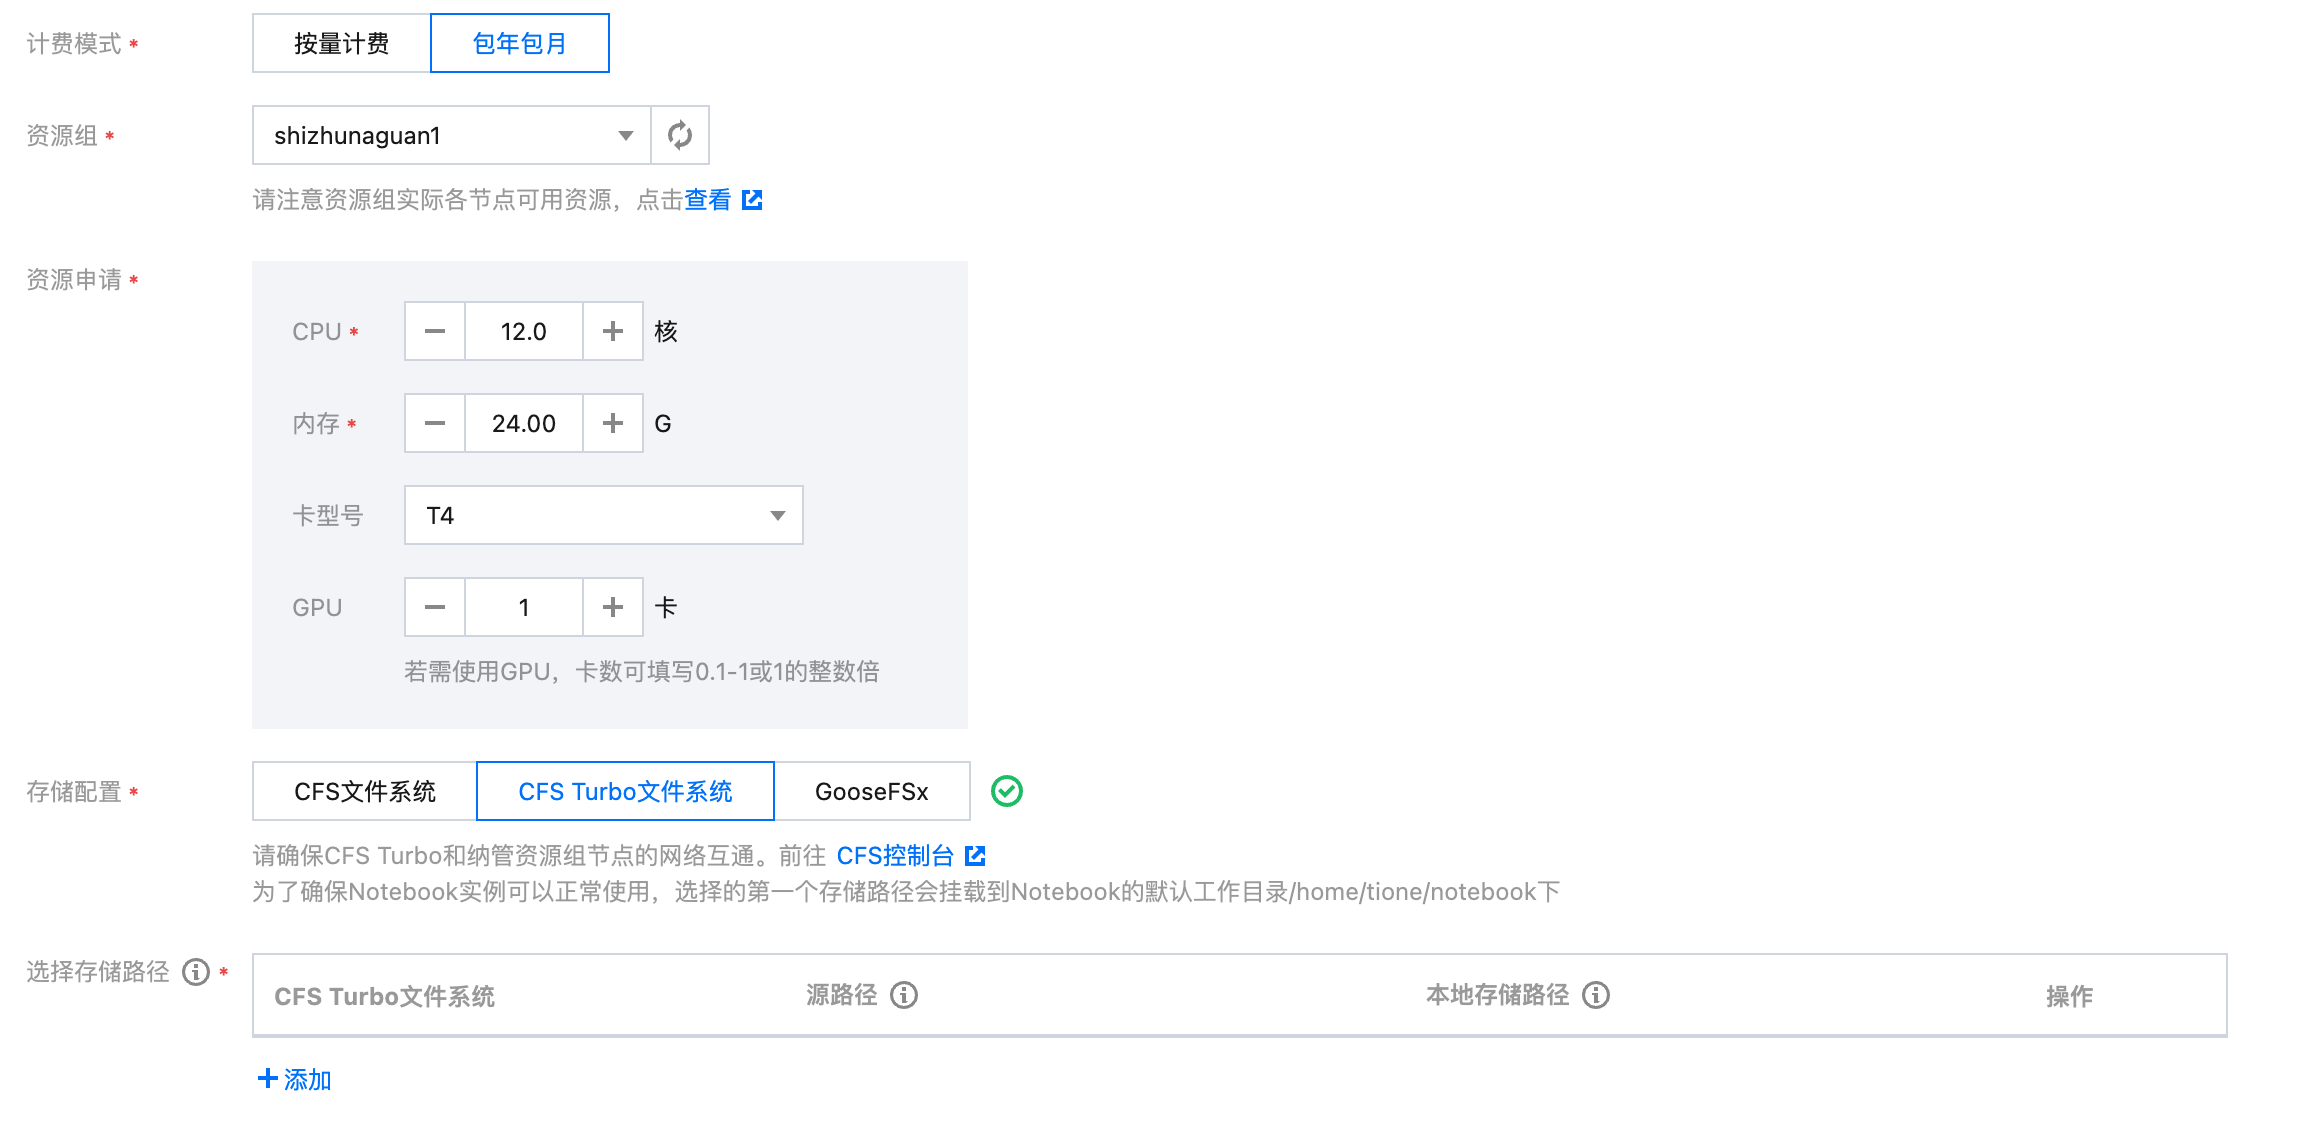
六、挂载 CFS 使用的不同场景
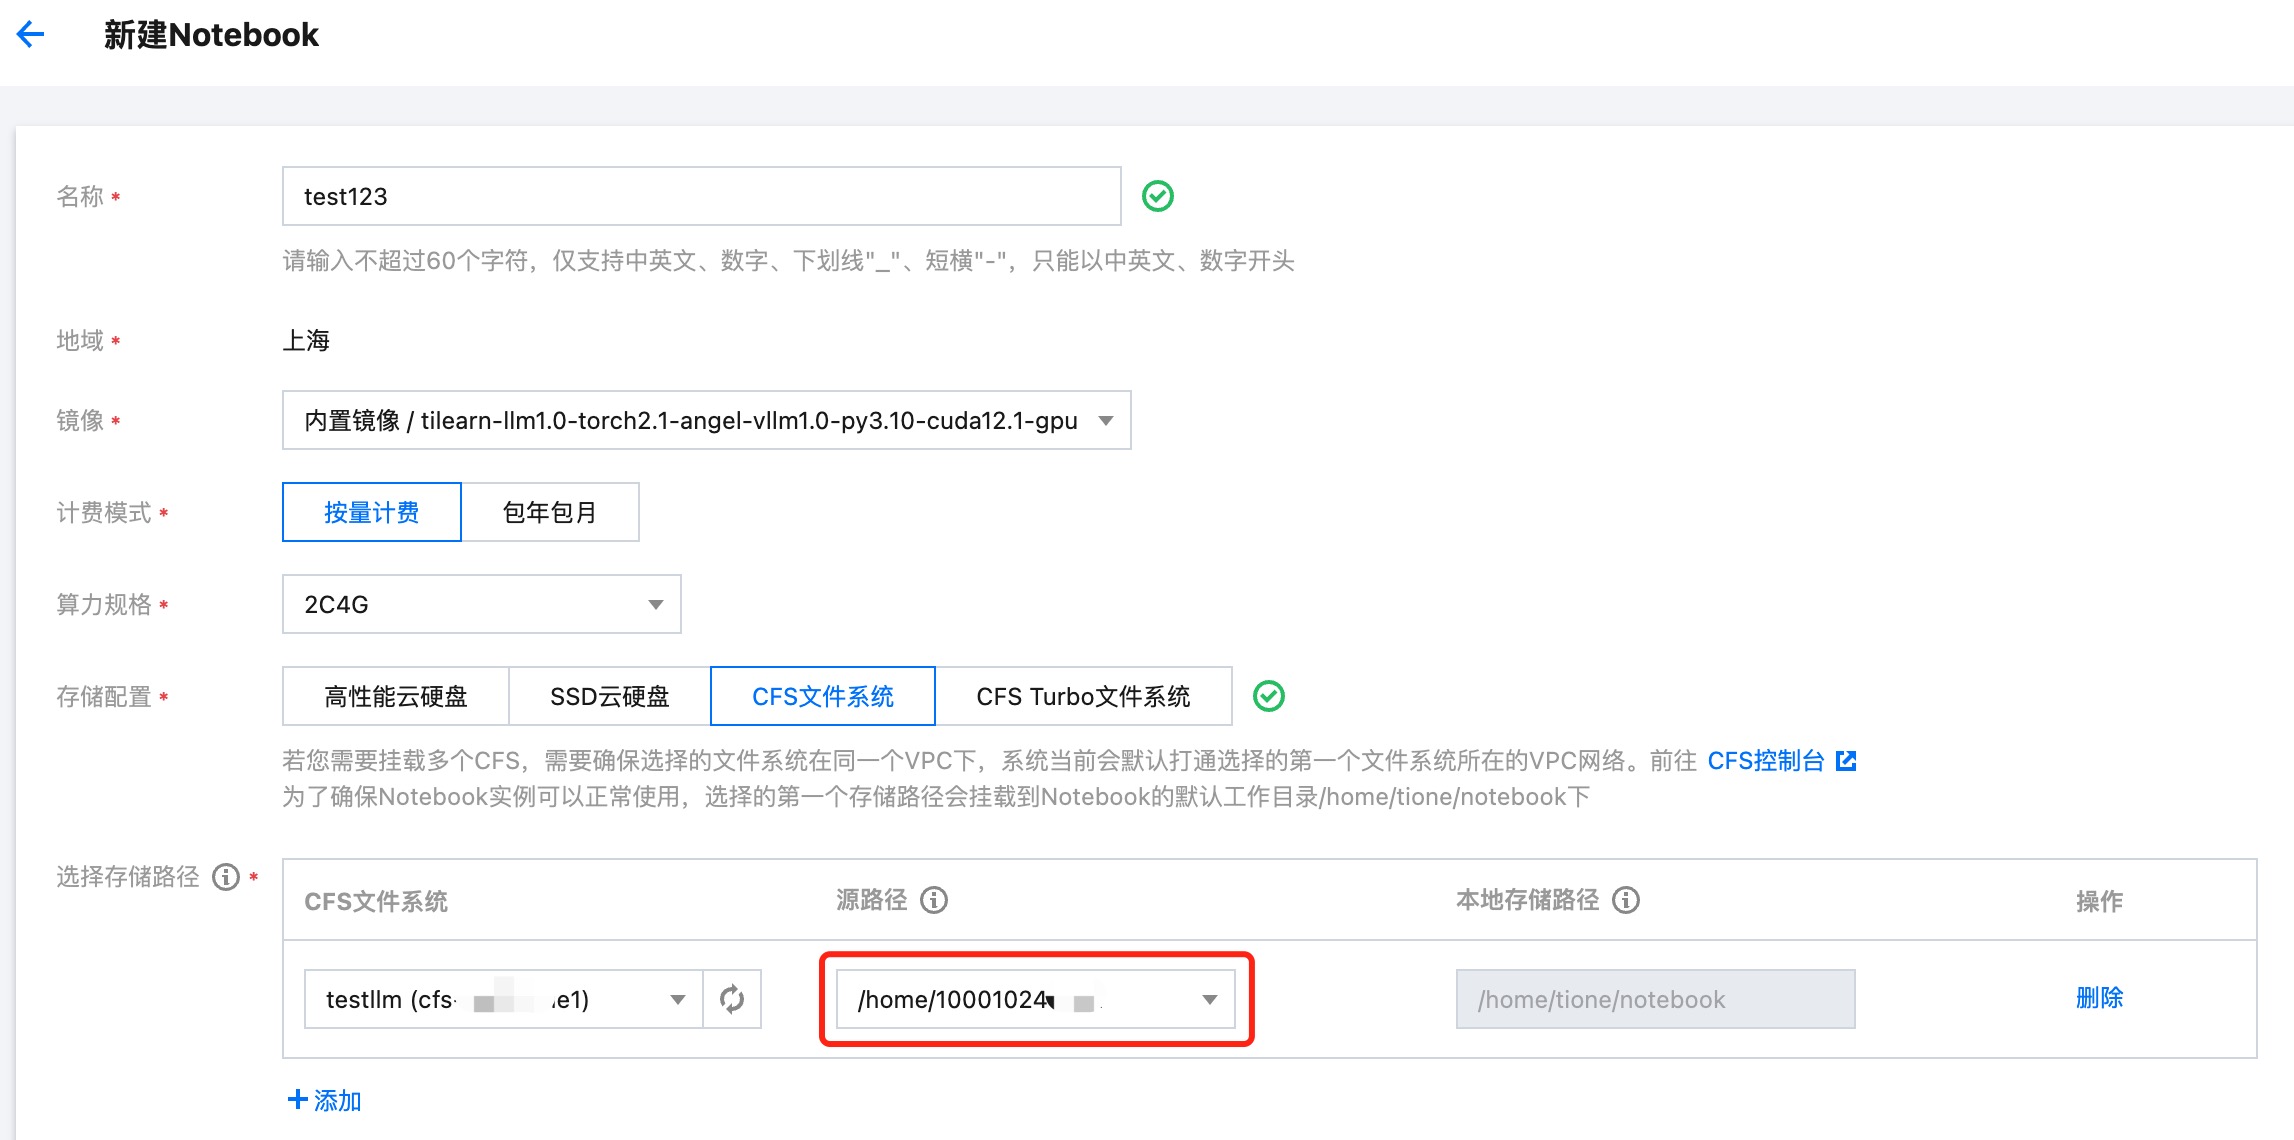
第一种:在开发机中使用 CFS
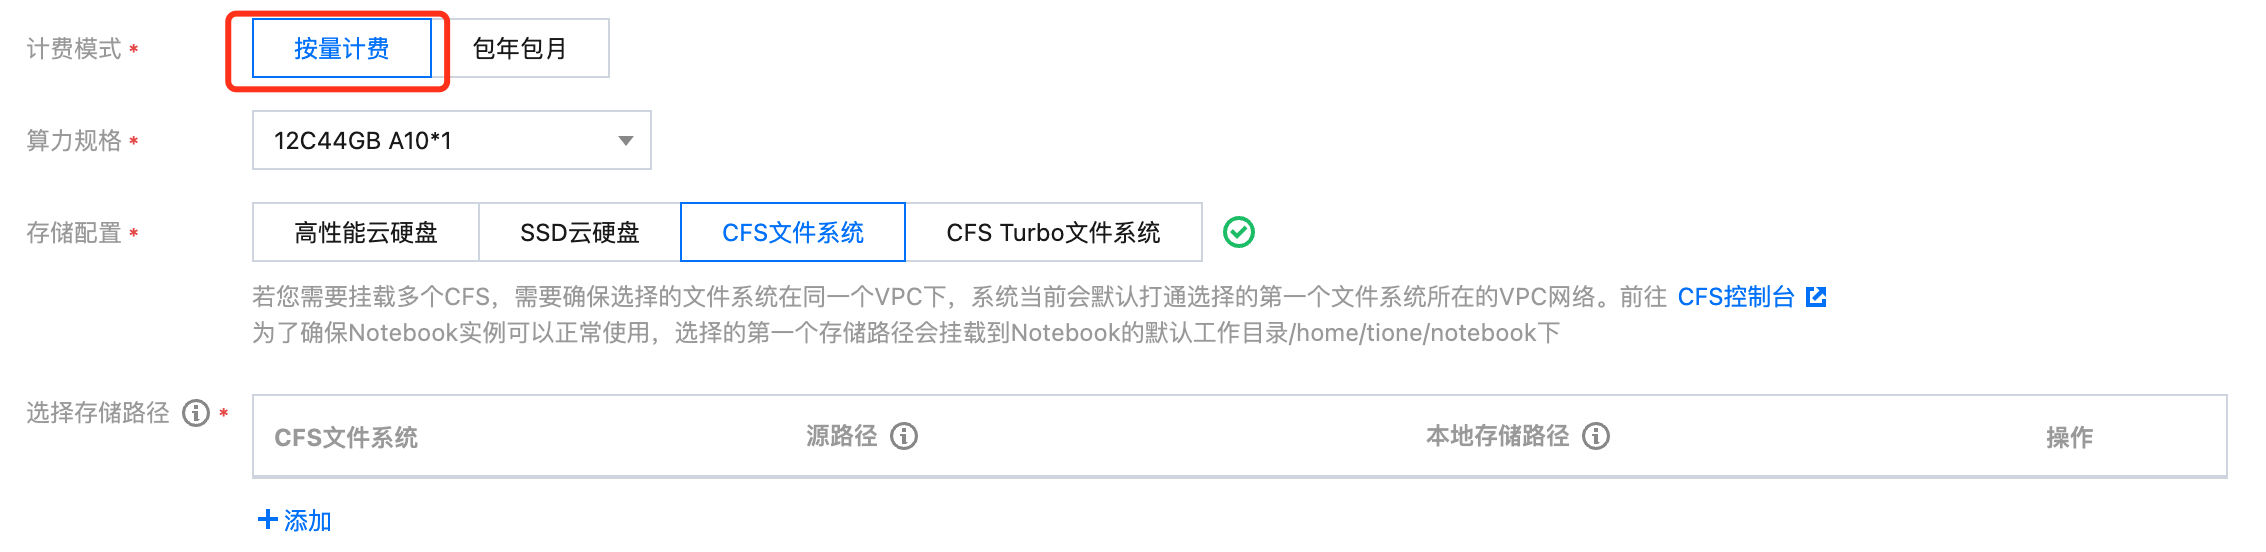
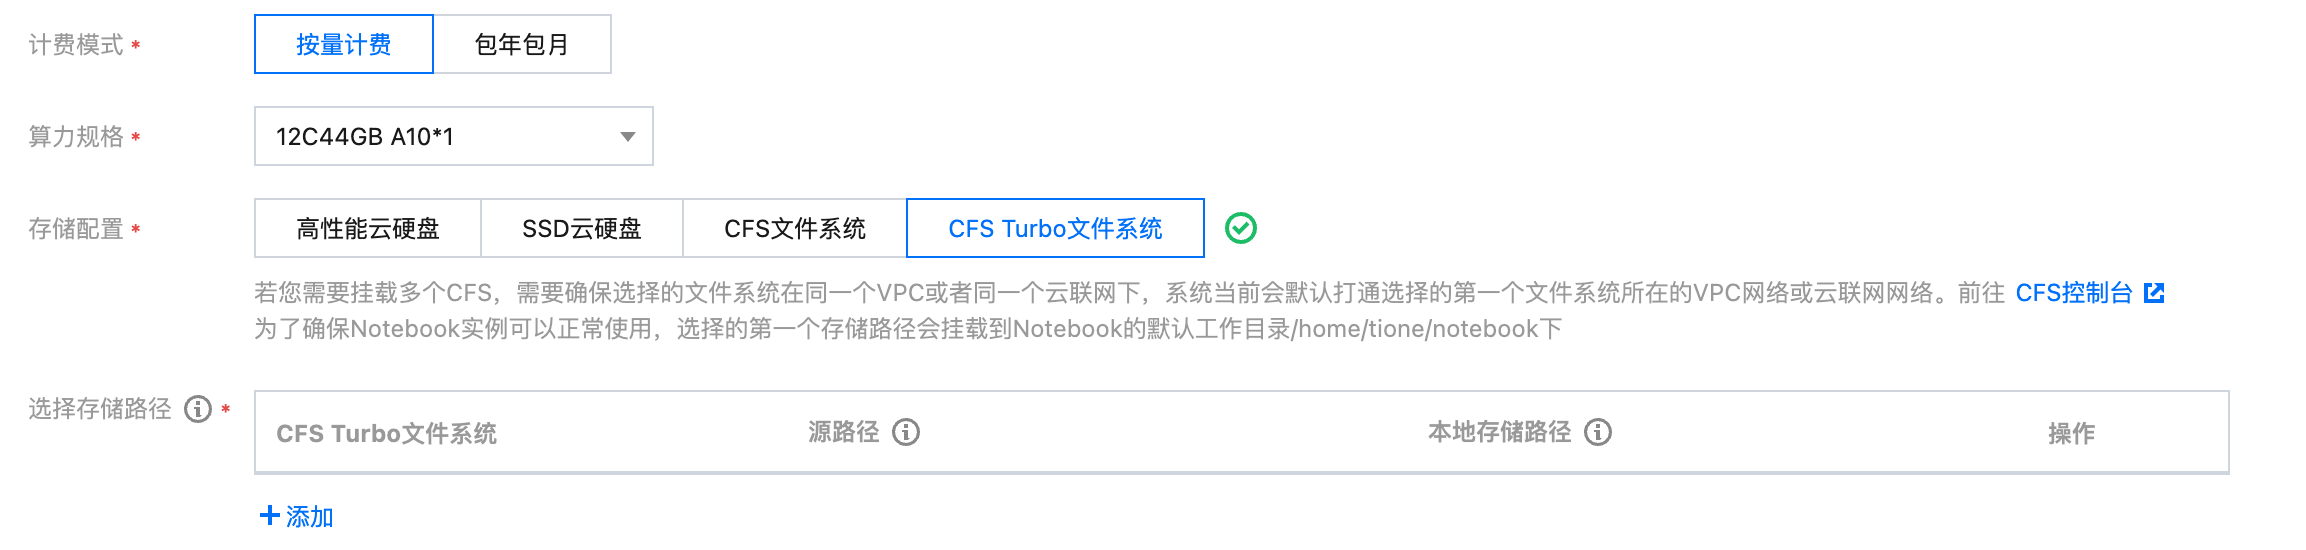
在您创建完 CFS 文件存储后,默认的 CFS 存储根目录/为空。您可以通过挂载到 CVM 的方式进行文件上传或创建的操作,也可以在开发机中挂载使用。
创建开发机时,为了确保开发机实例可以正常使用,选择的第一个 CFS 存储路径会挂载到开发机 的默认工作目录 /home/tione/notebook 下。
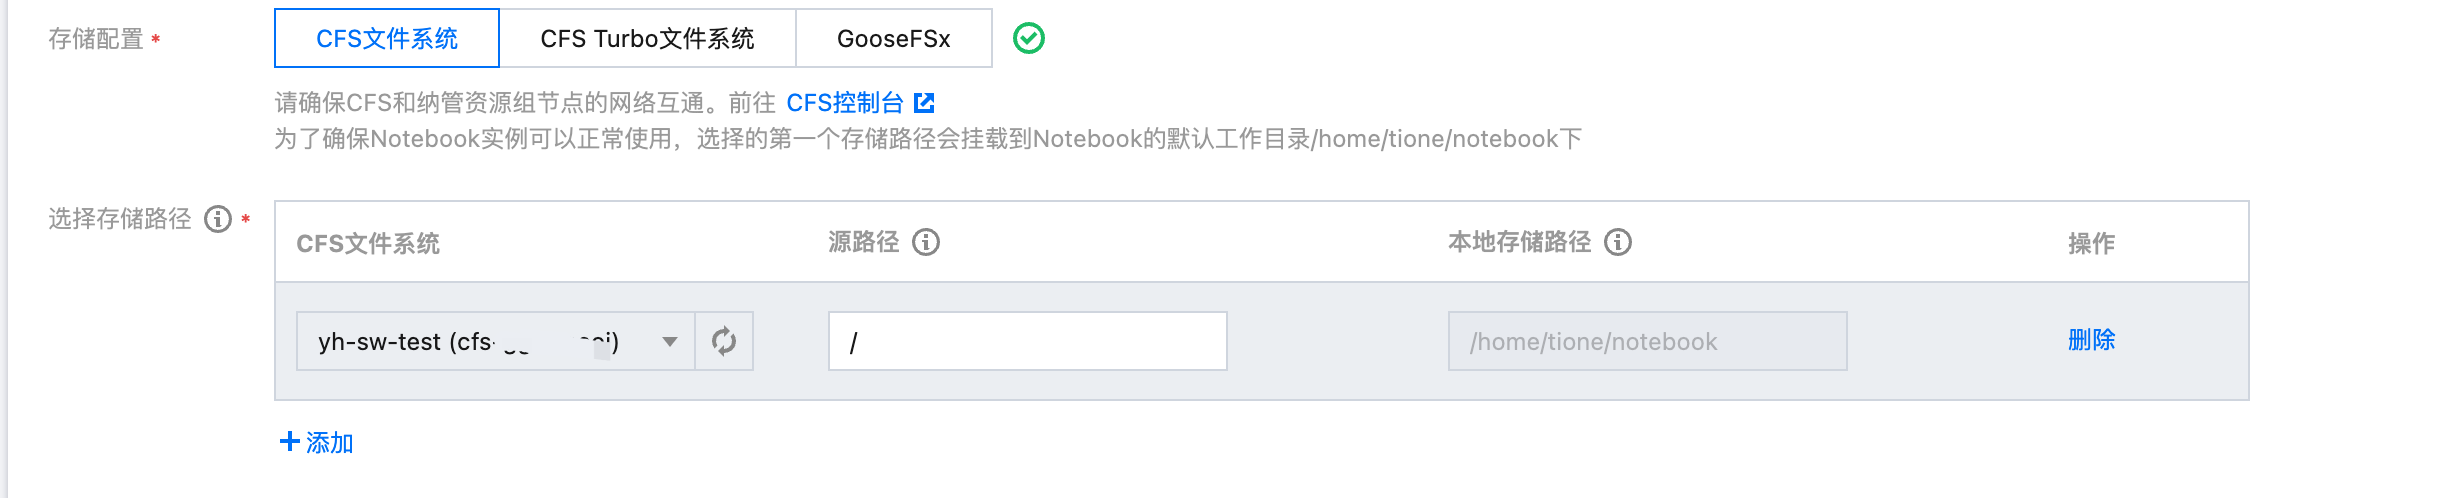
其中源路径您可以指定 CFS 的根目录或者您创建的任意目录,指定目录下的内容会被挂载到 /home/tione/notebook 下面。
以下是挂载路径和开发机路径映射的示例。
示例一:
挂载 CFS 源路径为 / | 开发机路径 /home/tione/notebook |
/ | /home/tione/notebook |
/data | /home/tione/notebook/data |
/model | /home/tione/notebook/model |
/code | /home/tione/notebook/code |
示例二:
挂载 CFS 源路径为 /user01 | 开发机路径 /home/tione/notebook |
/user01 | /home/tione/notebook |
/user01/data | /home/tione/notebook/data |
/user02 | 不可访问 |
第二种:在数据构建中使用 CFS
数据构建输入
假定您已经创建了单轮问答格式数据构建 PPL 对应的开发机,并挂载了 CFS 实例。挂载CFS源目录为/,挂载目标目录为 /home/tione/notebook。
则进入到开发机实例后,系统会在您的挂载源目录/(即开发机的挂载目录/home/tione/notebook)下创建数据构建的脚本工具和对应的目录,您可以把对应的数据上传到该目录进行处理。
脚本工具具体的目录格式为:挂载路径/<nb-id>/<ppl-type>/raw_dataset_files。
其中:
ppl-type 为选择的数据构建 ppl 类型,单轮问答为:single_round_qa_pipeline;多轮问答为:multi_round_qa_pipeline;无监督为:unsupervised_pipeline。
nb-id 为当前开发机的实例 ID,您可以通过 URL 链接查看对应的 ID。请注意,不要被开发机文件栏展示的/目录所误导,打开开发机默认的目录为/home/tione/notebook,即您挂载的源目录。您可以通过打开终端输入 pwd 命令查看当前路径。
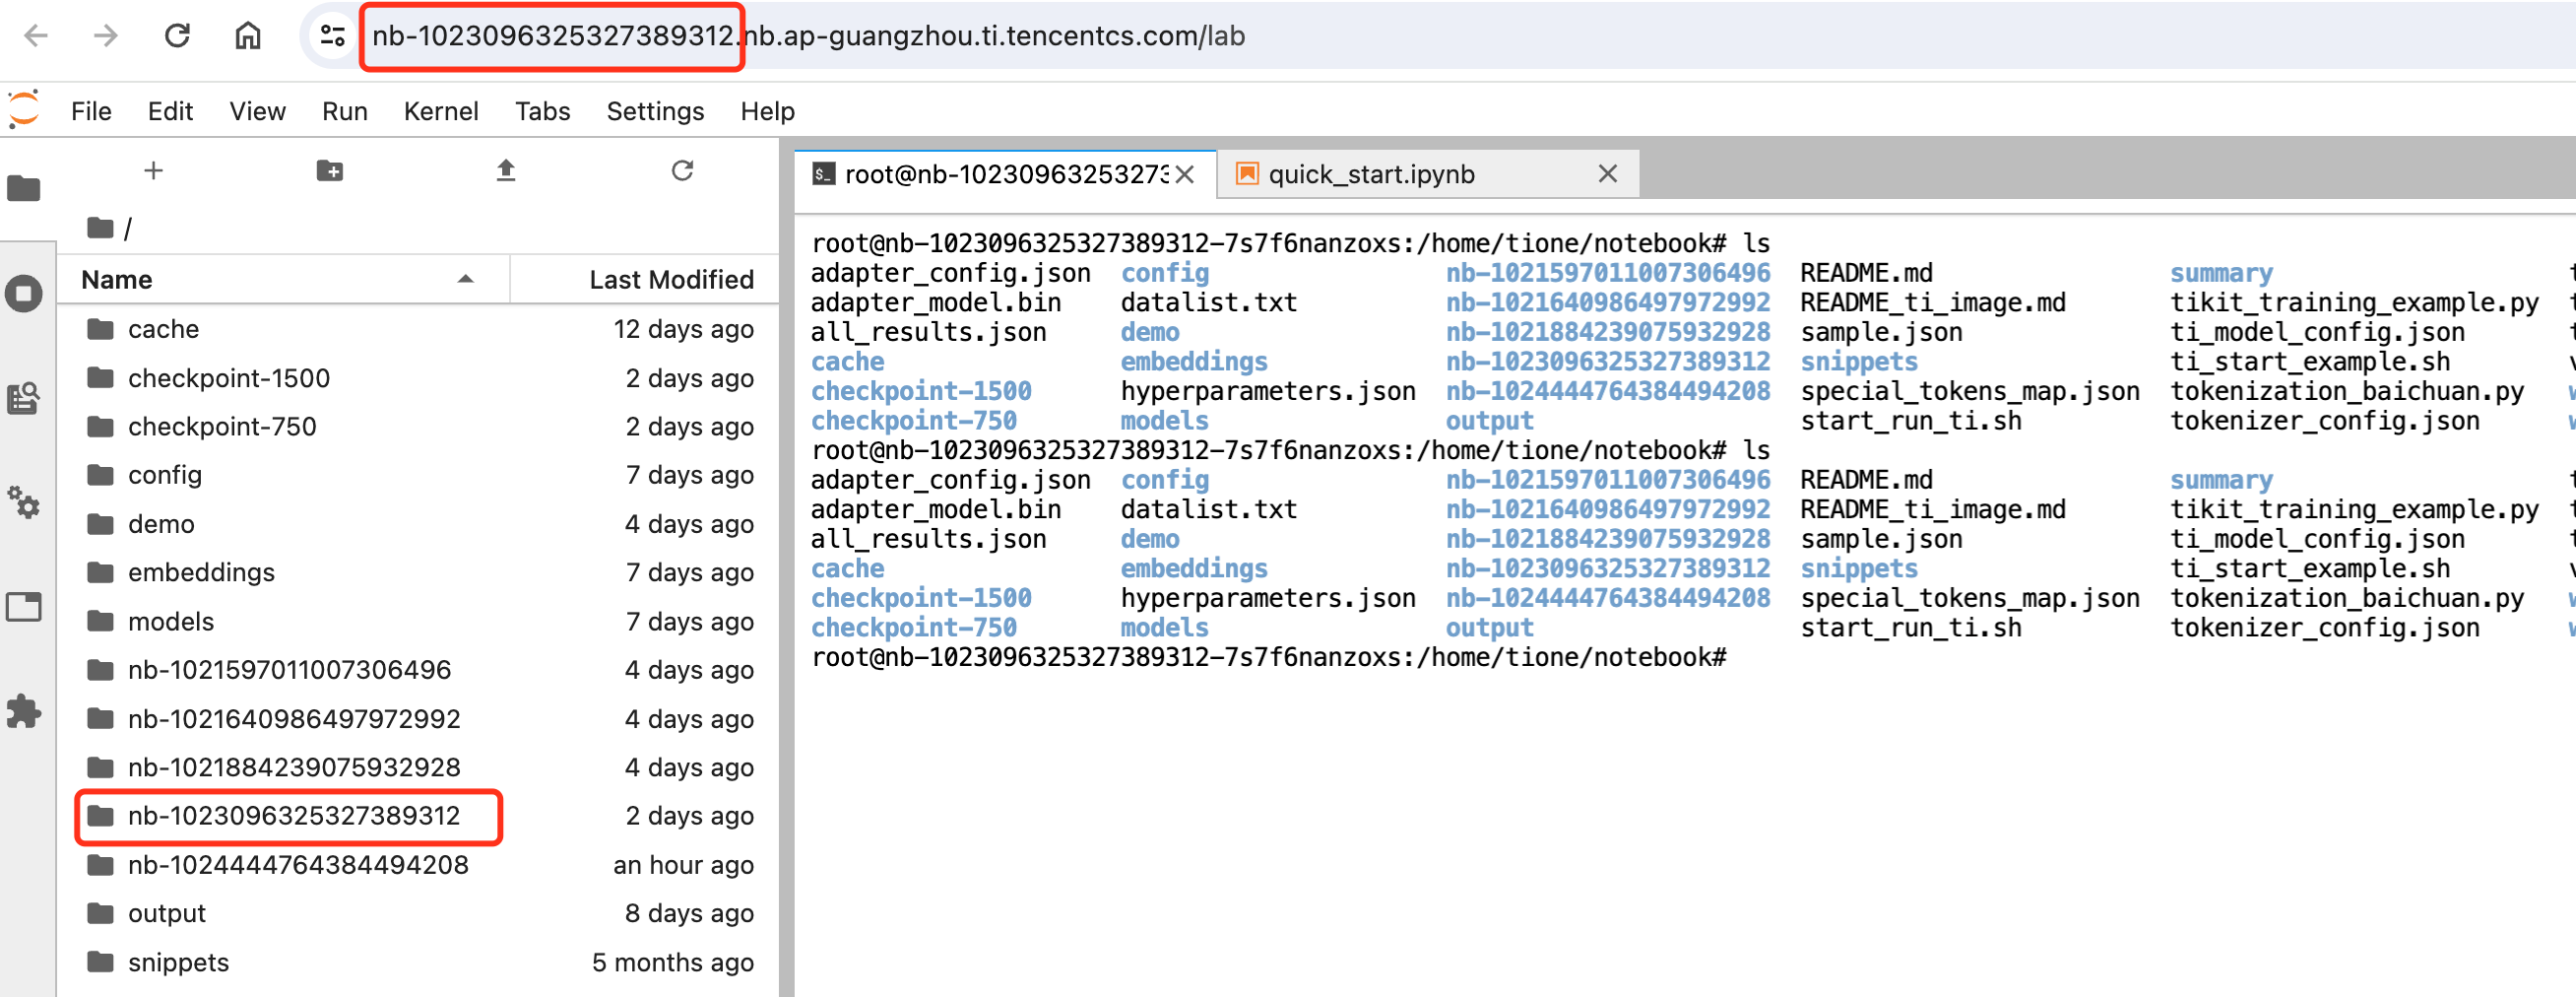
single_round_qa_pipeline 为单轮问答 PPL 的脚本路径,当您选择的是多轮或者无监督时,路径是不同的。
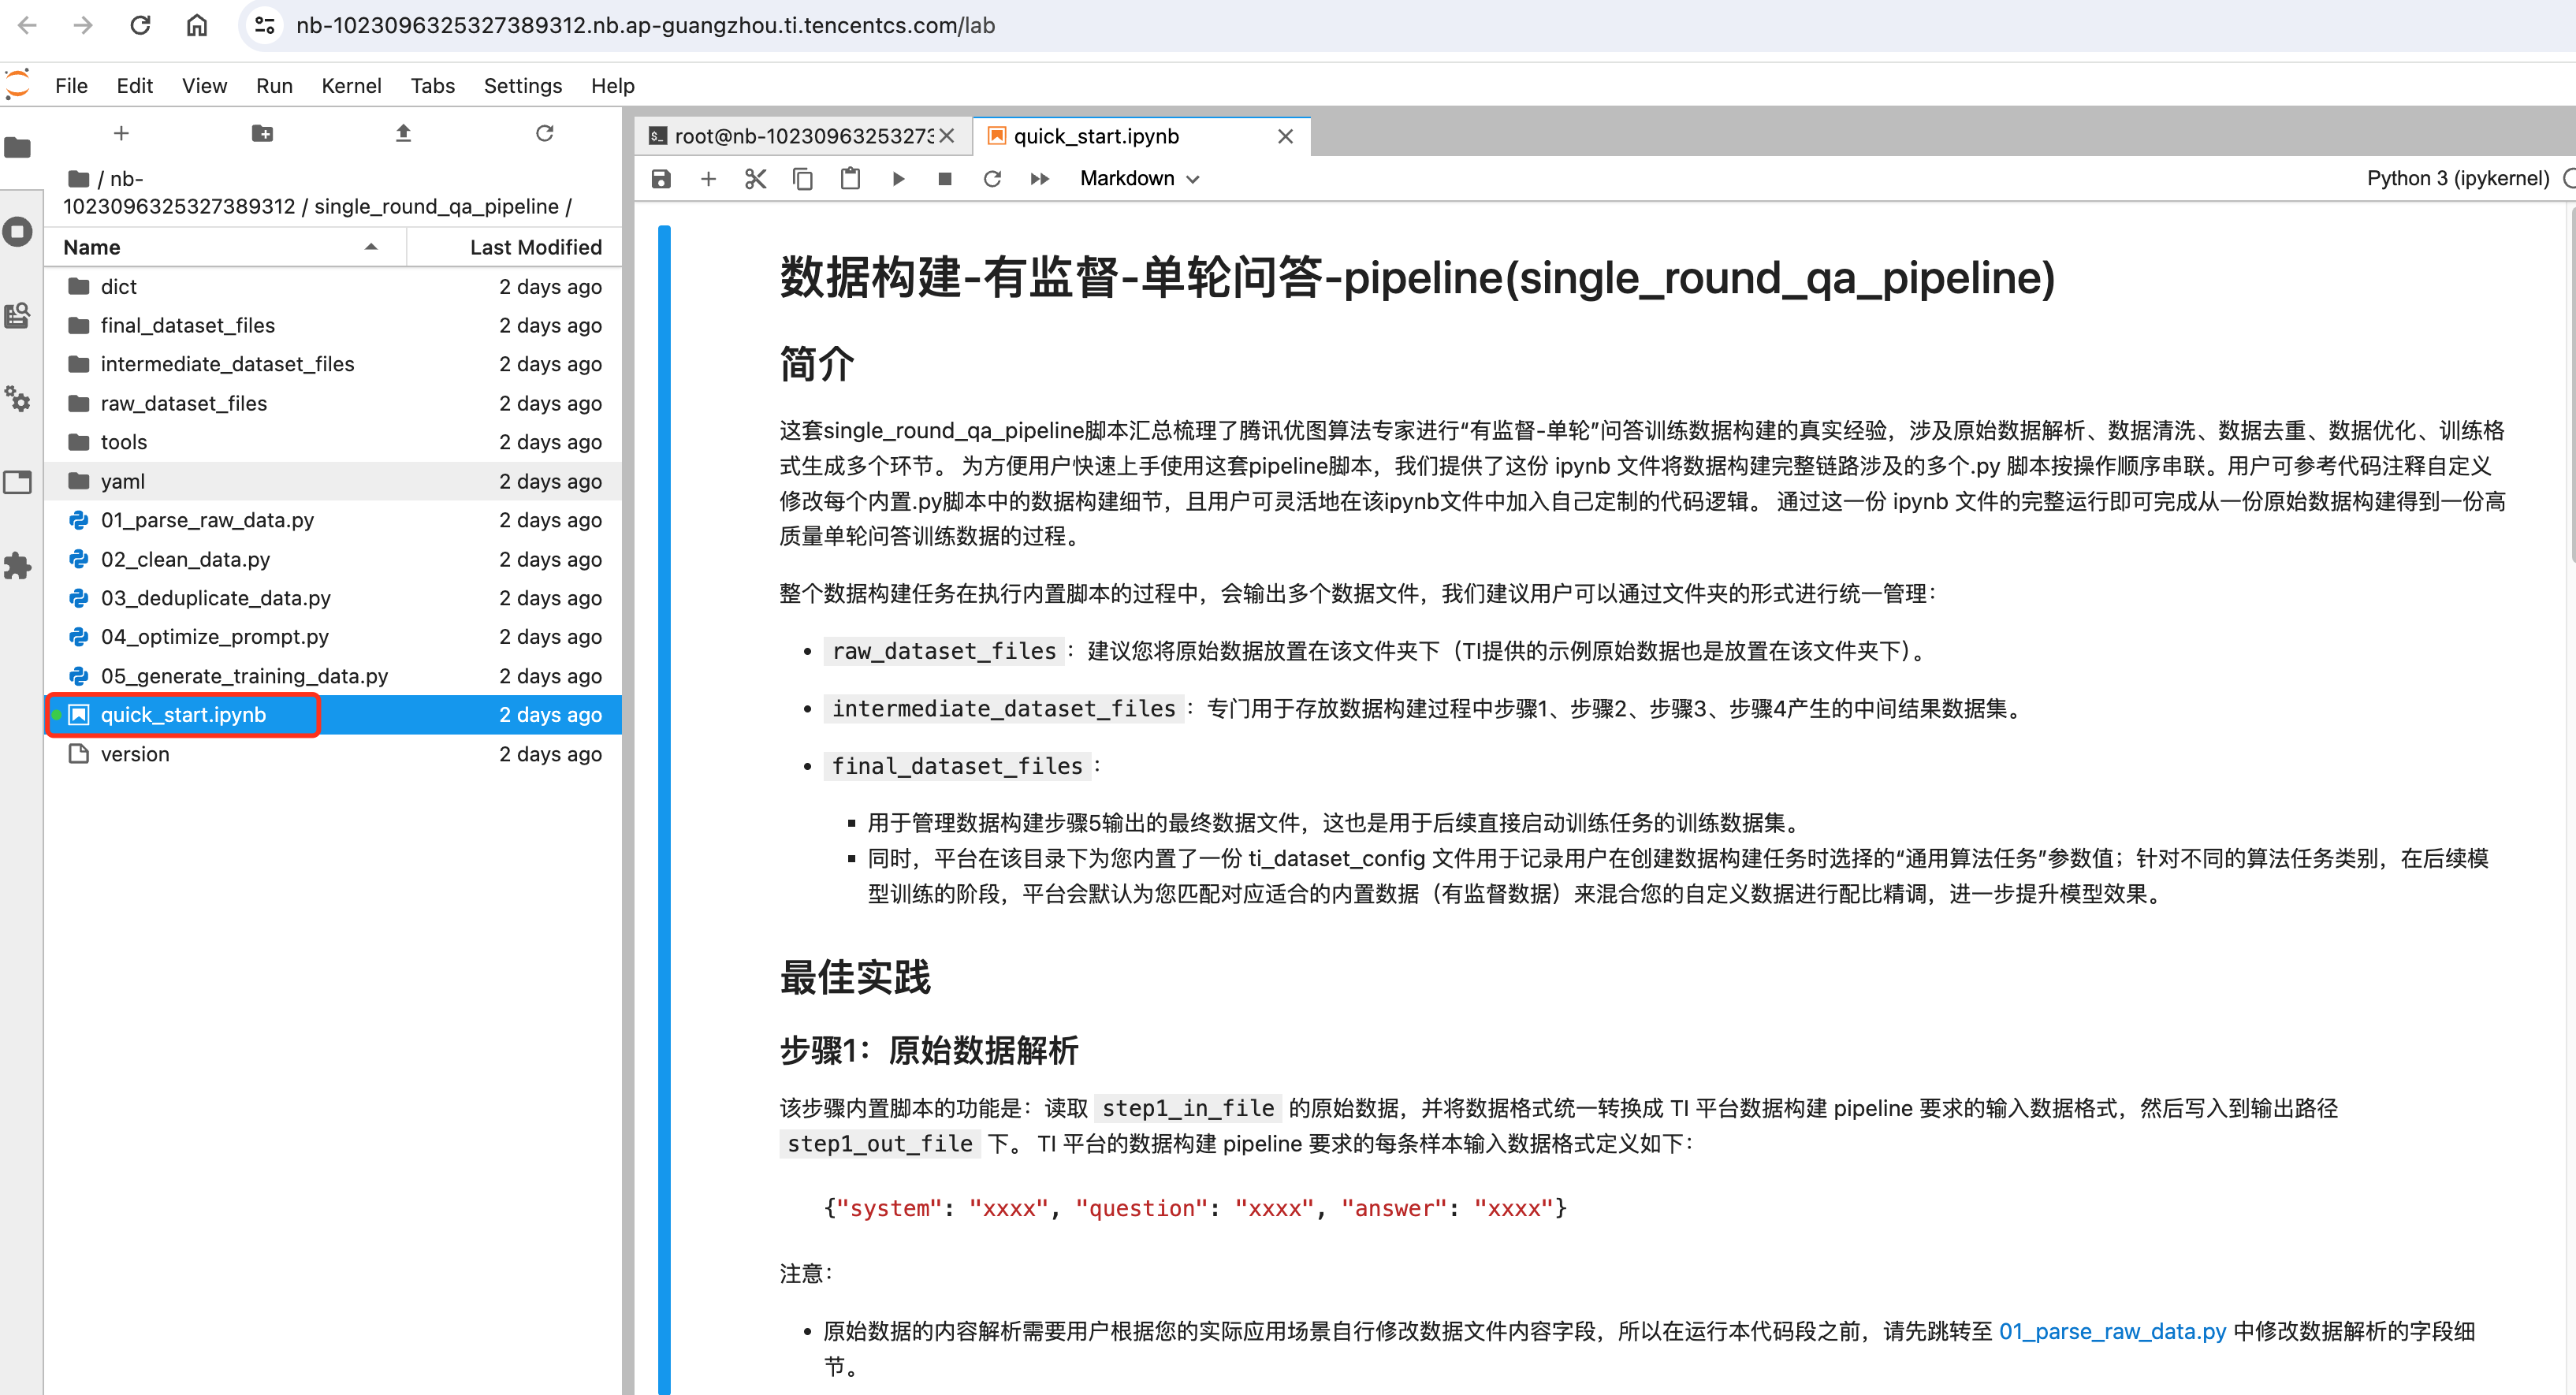
进入到 ppl-type 层级目录后,您可以查看 quick_start.ipynb 指引进行进一步的数据构建操作。
数据构建输出
当您完成数据构建的处理操作后,因为挂载了 CFS,实际输出文件已经存在于您的 CFS 存储中。所以如果需要在任务式建模中使用,您需要能够映射出 CFS 的路径。
示例一:
挂载 CFS 源路径 | / |
开发机输出路径 | /home/tione/notebook/nb-1023096325327389312/single_round_qa_pipeline/final_dataset_files/SelfMade_NL2SQLpilot_for_training.jsonl |
CFS 实际路径 | /nb-1023096325327389312/single_round_qa_pipeline/final_dataset_files/SelfMade_NL2SQLpilot_for_training.jsonl |
示例二:
挂载 CFS 源路径 | /user01 |
开发机输出路径 | /home/tione/notebook/nb-1023096325327389312/single_round_qa_pipeline/final_dataset_files/SelfMade_NL2SQLpilot_for_training.jsonl |
CFS 实际路径 | /user01/nb-1023096325327389312/single_round_qa_pipeline/final_dataset_files/SelfMade_NL2SQLpilot_for_training.jsonl |
第三种:在任务式建模中使用 CFS
在使用任务式建模时,您可以把对应的代码/模型/数据集放到 CFS 上,通过挂载的方式进行使用。
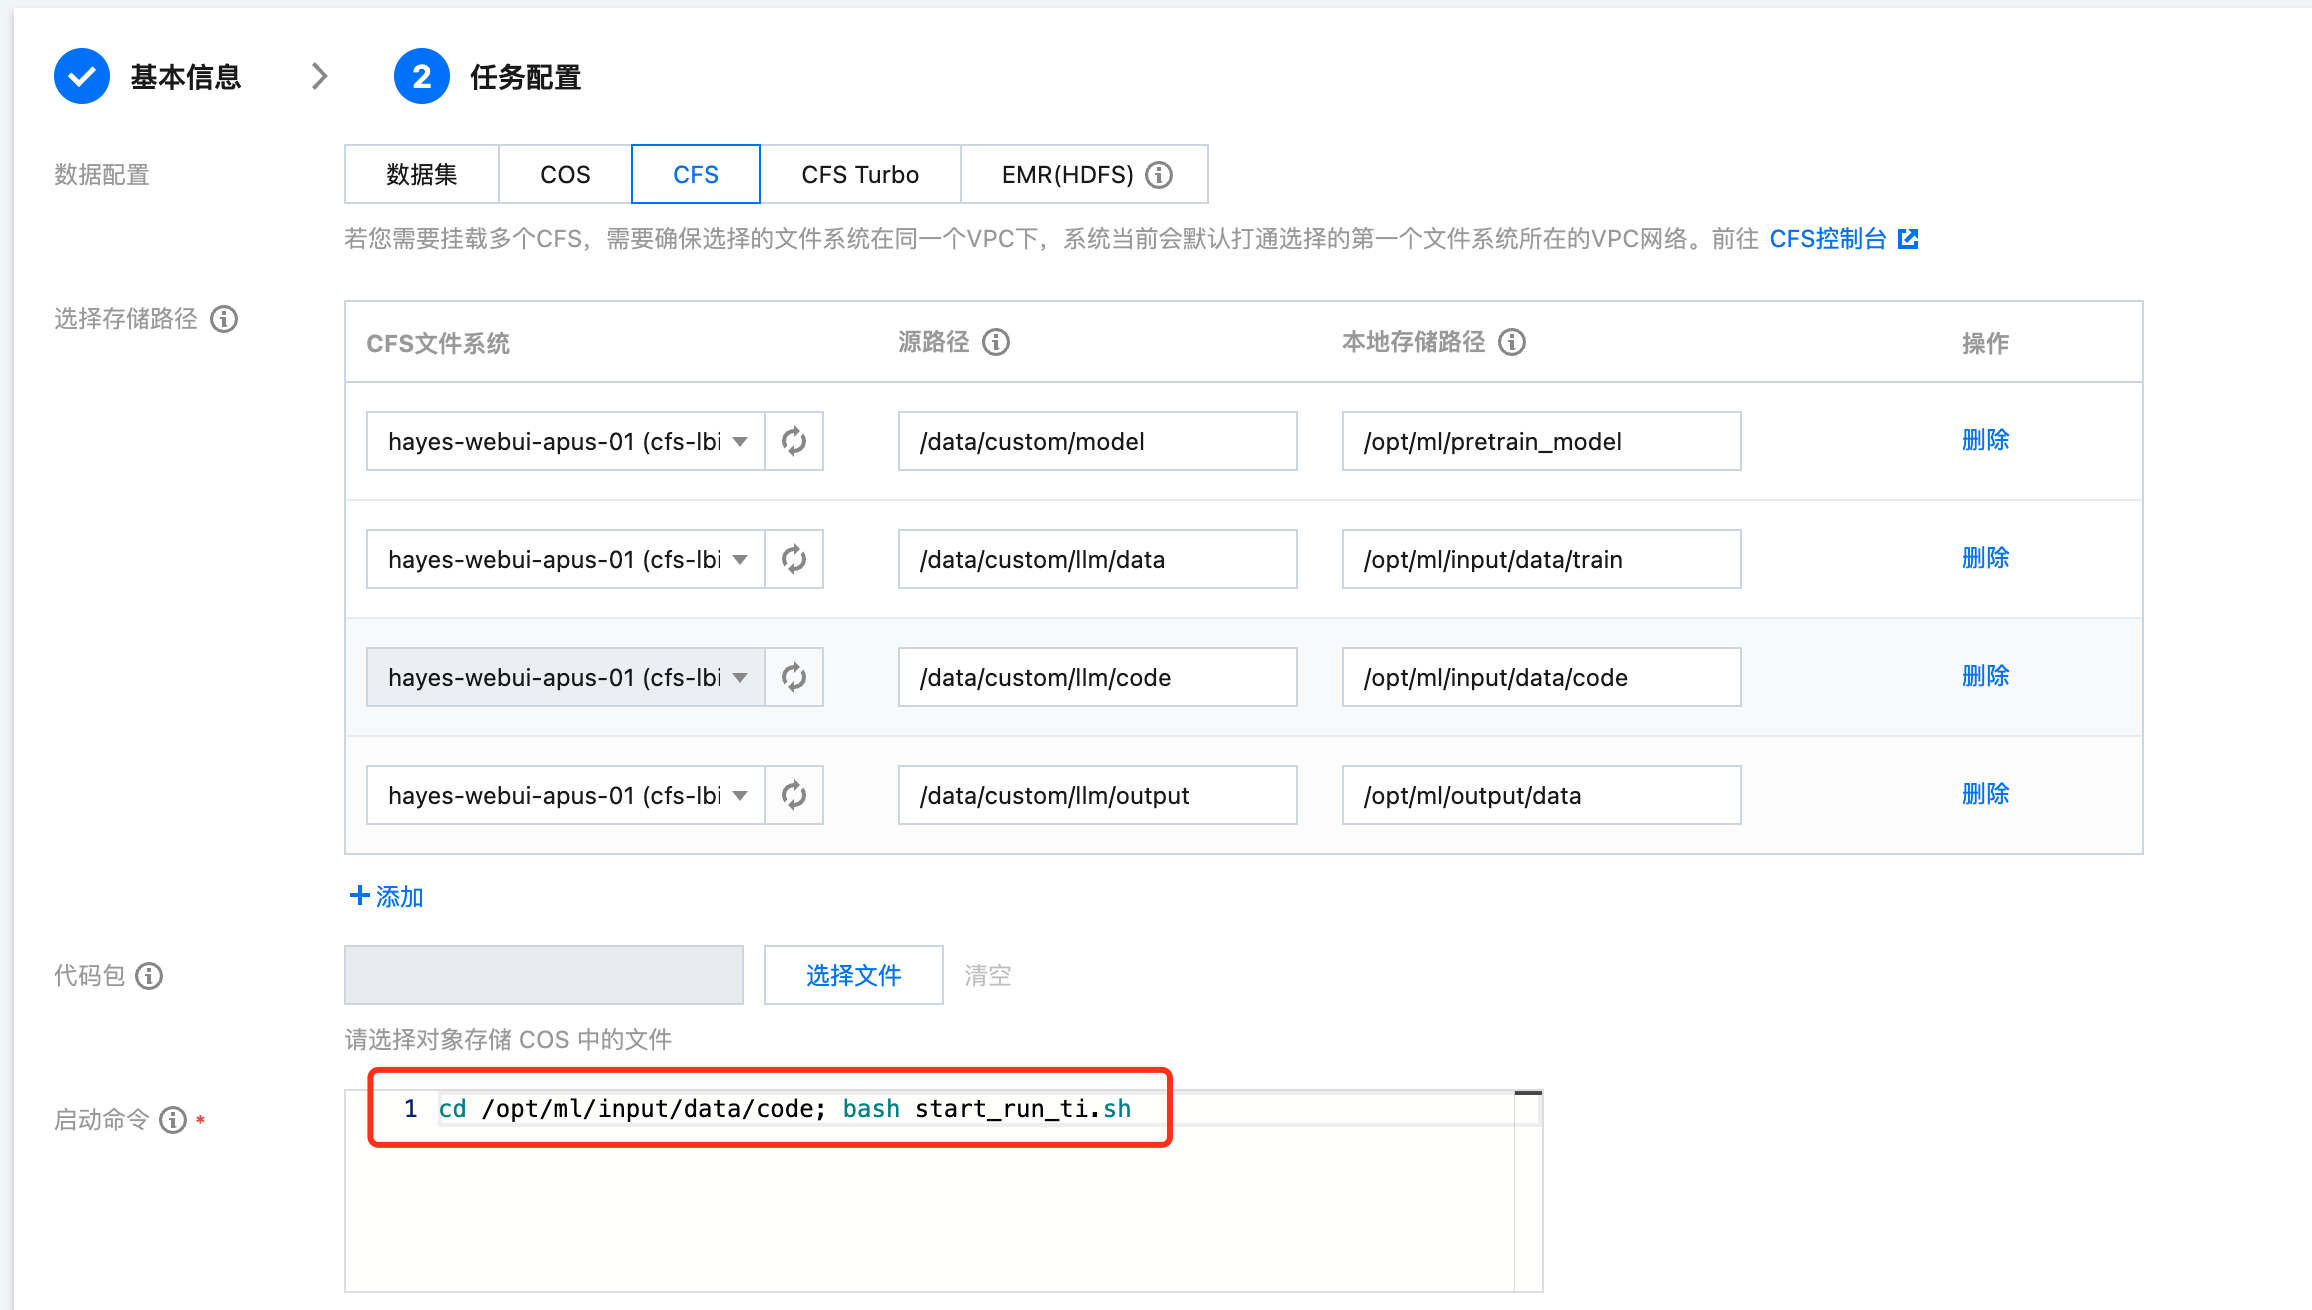
假设在开发机阶段,您调试了如下的 code/model/data 之后,最终数据都在 CFS 路径 /data/custom 下面。
文件类型 | CFS 挂载源路径 /data/custom | 开发机挂载路径 /home/tione/notebook |
model | /data/custom/model | /home/tione/notebook/model |
data | /data/custom/llm/data | /home/tione/notebook/llm/data |
code | /data/custom/llm/code | /home/tione/notebook/llm/code |
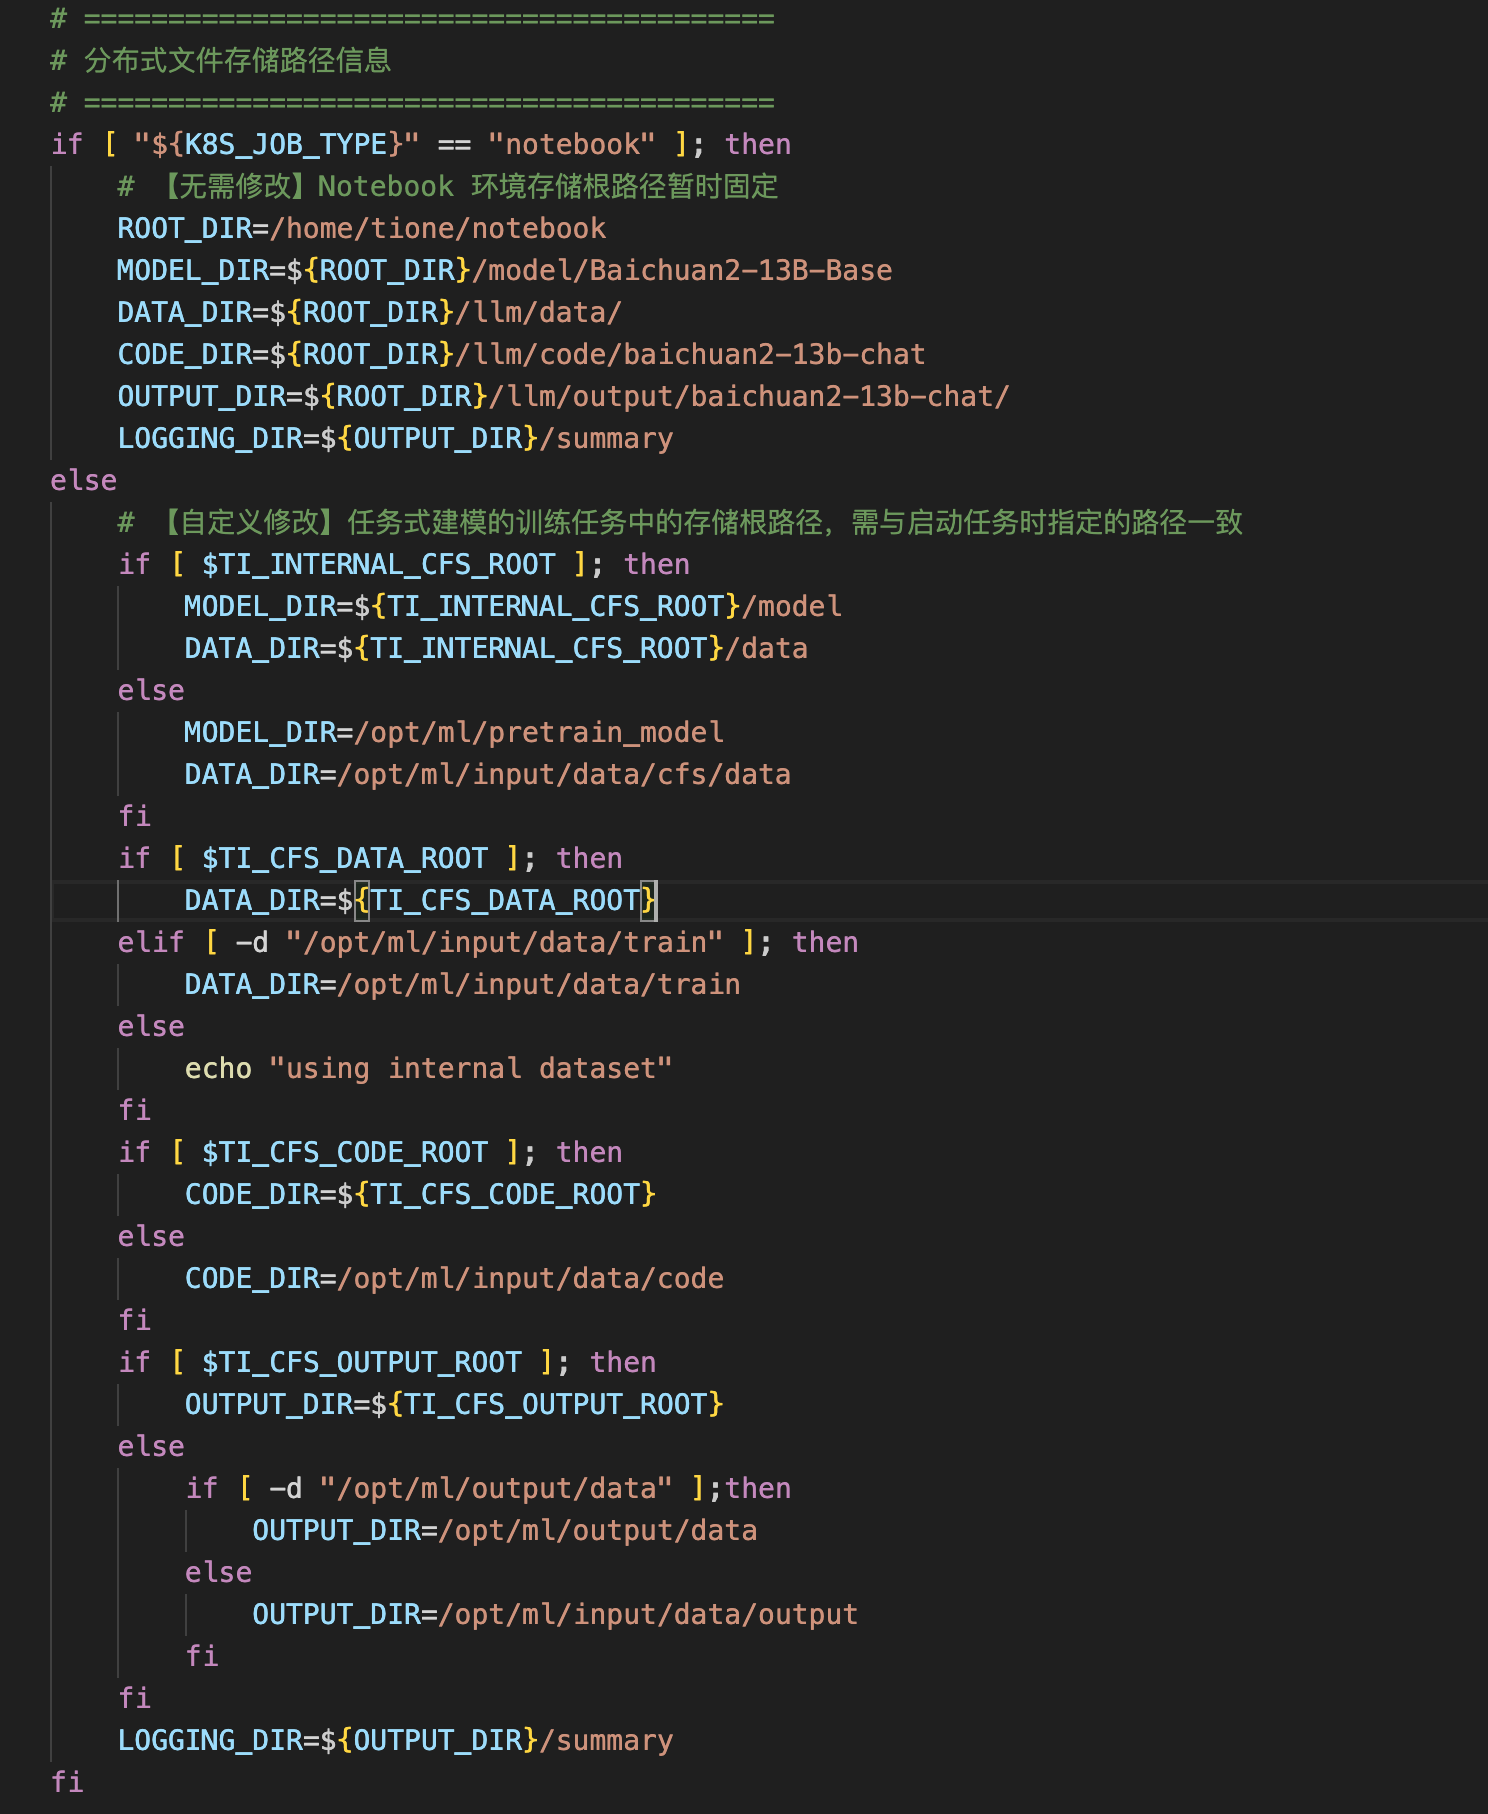
然后您进行任务式建模,由于任务式建模和开发机的差异,一般把数据挂载到 /opt/ml 下进行处理。
文件类型 | CFS 挂载源路径 | 任务式建模挂载路径 |
model | /data/custom/model | /opt/ml/pretrain_model |
dataset | /data/custom/llm/data | /opt/ml/input/data/train |
code | /data/custom/llm/code | /opt/ml/input/data/code |
output | /data/custom/llm/output | /opt/ml/output |
注意:
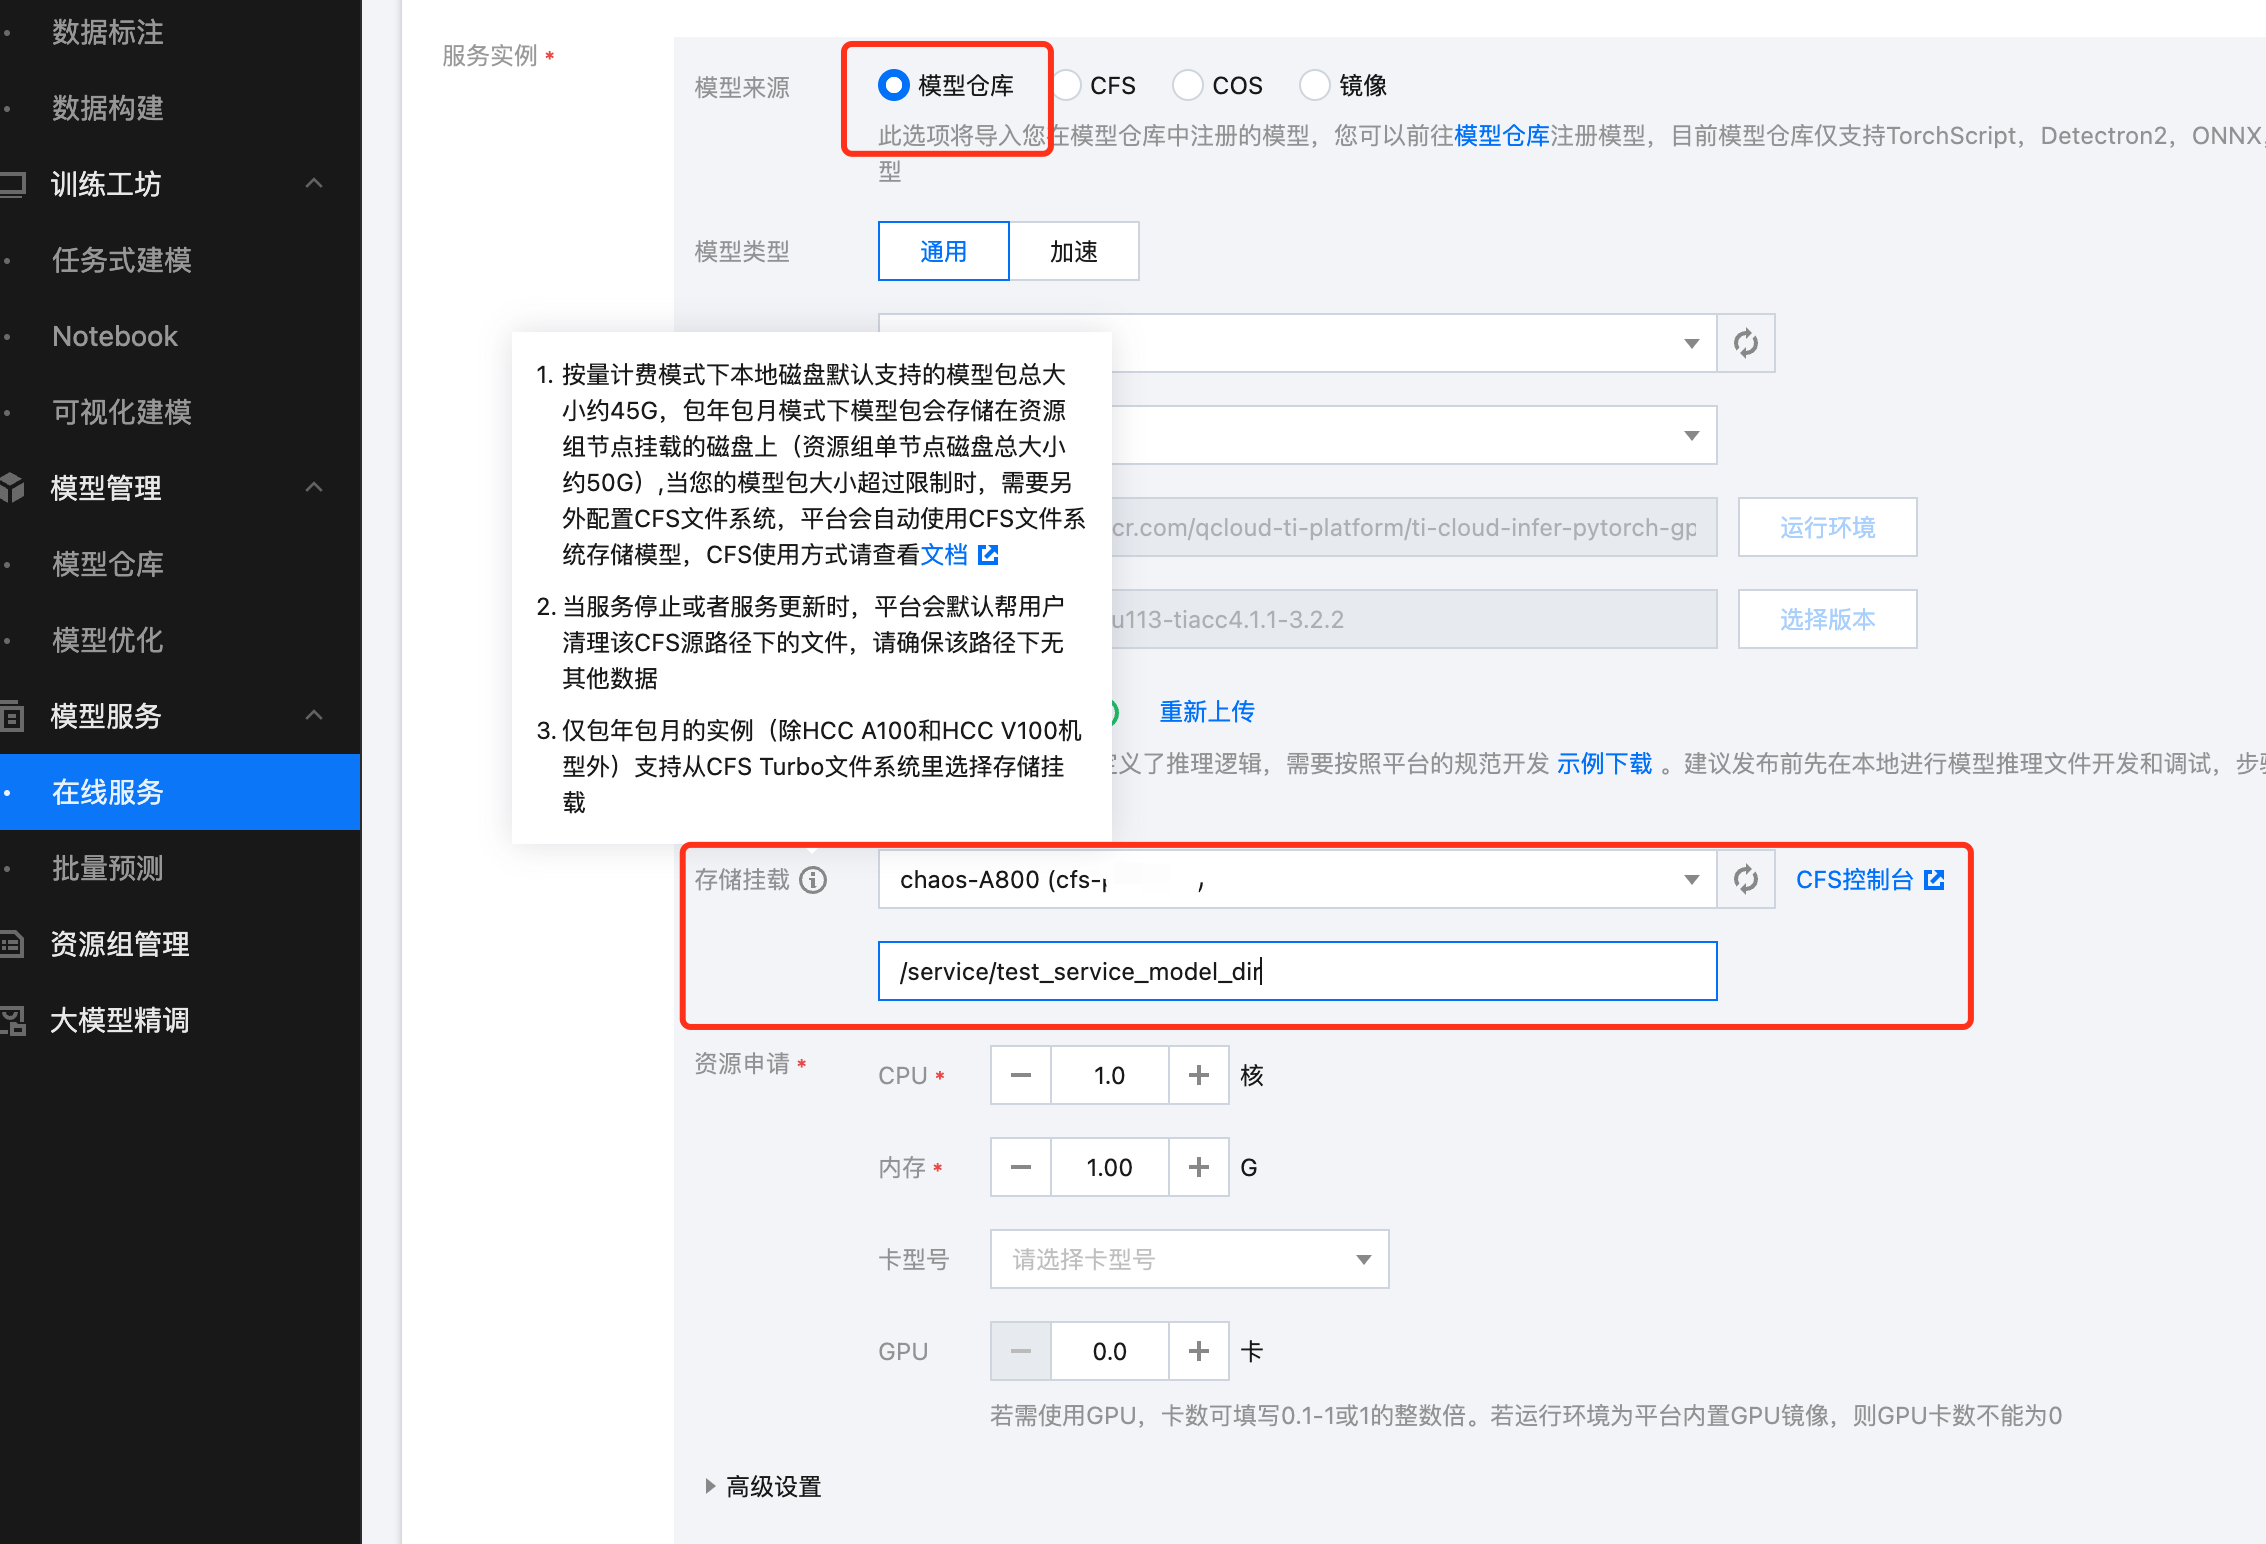
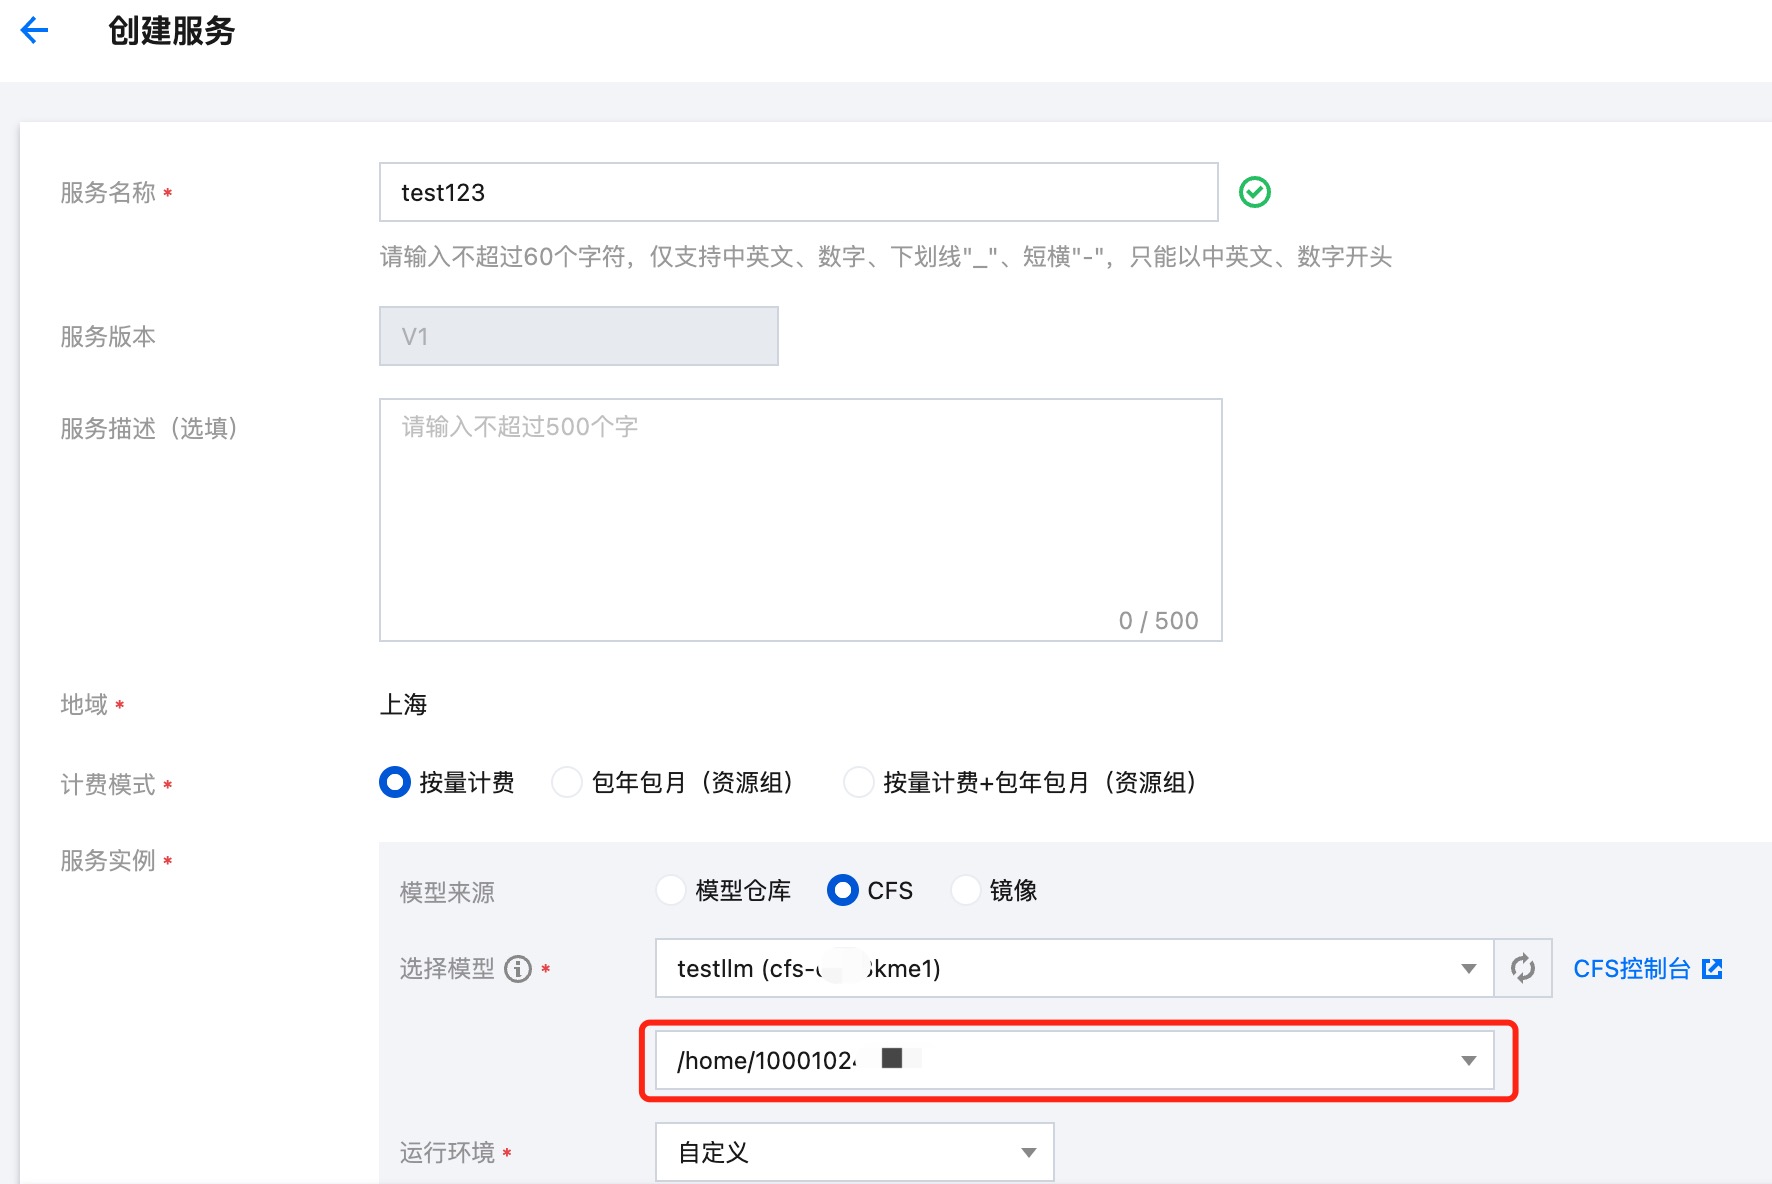
第四种:在在线服务中使用 CFS
直接从 CFS 加载模型
大模型场景下模型一般较大,推荐使用链路为:使用开发机挂载 CFS 调试训练代码,使用任务式建模挂载 CFS 执行分布式训练任务,最终在 CFS 存储系统存放精调后的模型。TI-ONE 推理场景的在线服务模块,支持直接从 CFS 文件系统读取模型文件。此时,您只需要指定您的模型文件在 CFS 存储中的绝对路径即可。
注意:
部分裸金属物理机(如 HCC A100 和 HCC V100 机型等)因为不支持弹性网卡,无法支持 CFS Turbo 实例挂载。
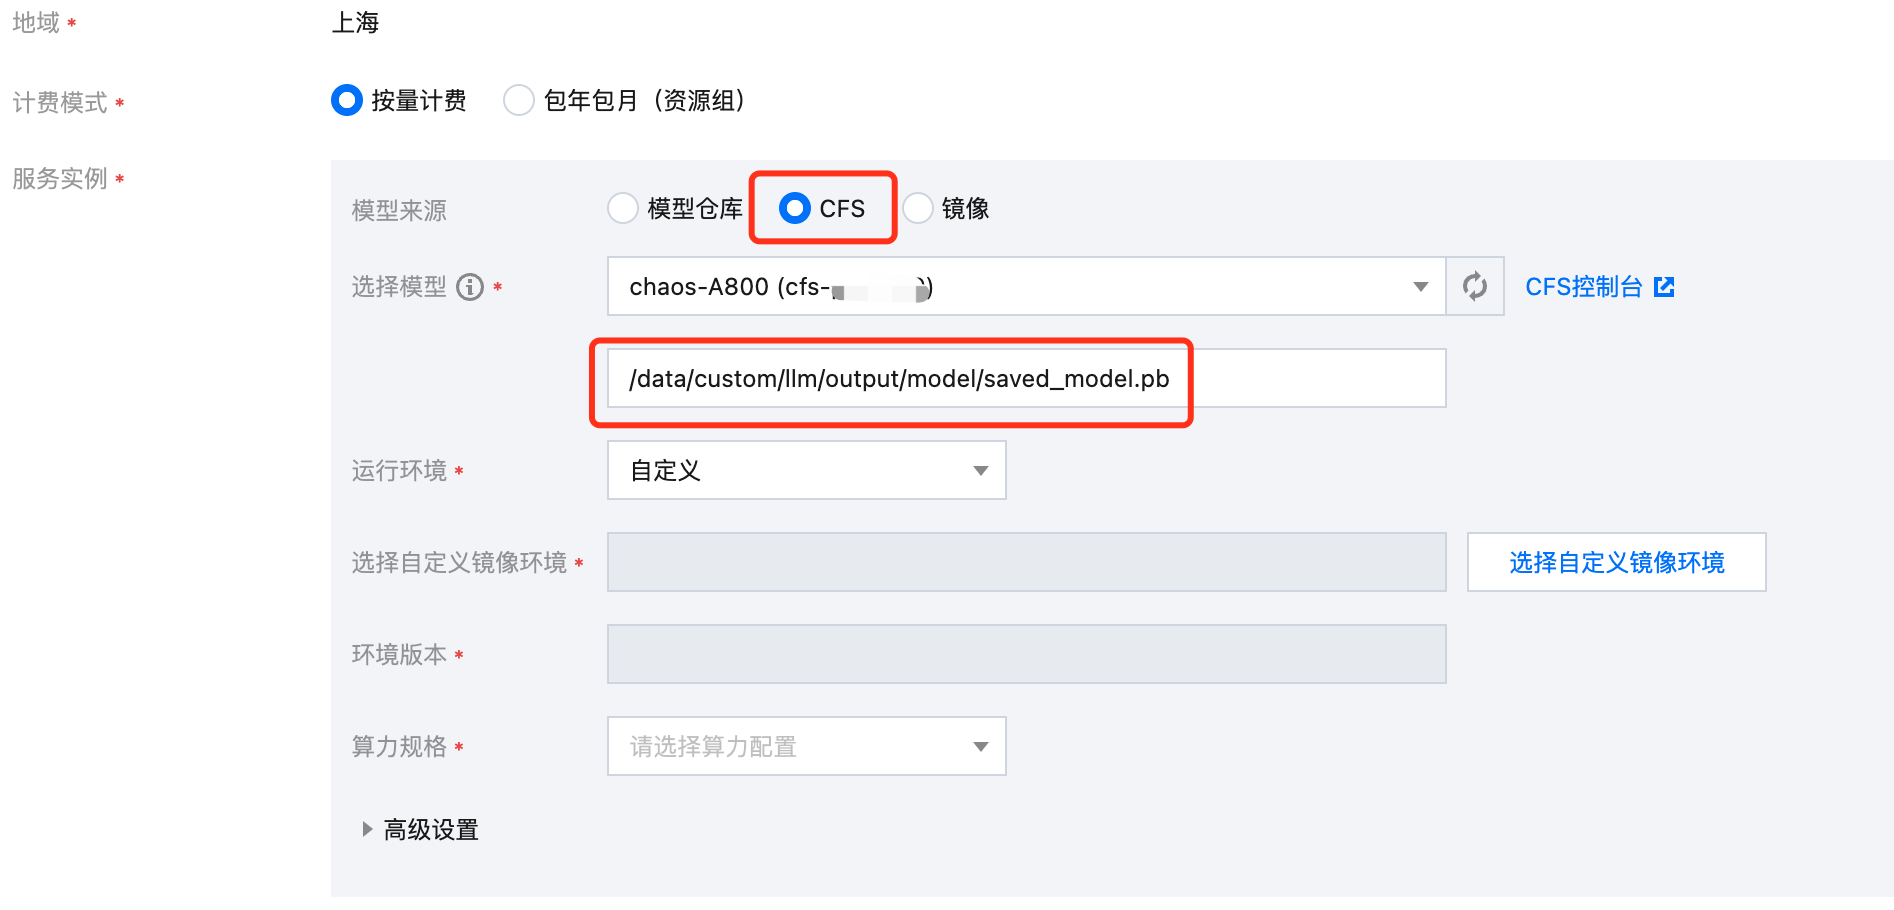
示例:
在任务式建模完成后,我们把训练后的模型存储到 /opt/ml/output/model/saved_model.pb 路径下,那么对应的 CFS 路径为:/data/custom/llm/output/model/saved_model.pb。
| CFS 挂载源路径 | 任务式建模挂载路径 |
output | /data/custom/llm/output | /opt/ml/output |
从模型仓库导入模型时使用 CFS 作为临时存储
当您的模型已经注册到模型仓库之后,可以从模型仓库导入模型用于创建在线服务。
按量计费模式下本地磁盘默认支持的模型包总大小约45G,包年包月模式下模型包会存储在资源组节点挂载的磁盘上。
当您的模型包大小超过限制时,需要另外配置 CFS 文件系统,平台会自动使用 CFS 文件系统存储模型。此时您需要选择一个 CFS 文件系统和配置一个空的 CFS 路径,在线服务运行的时候,会挂载这个路径,并且把模型仓库的模型文件拷贝到该路径下,用于服务启动加载。
当在线服务停止或者服务更新时,平台会默认帮用户清理该 CFS 源路径下的文件,请确保该路径下无其他数据。
注意:
部分裸金属物理机(如 HCC A100 和 HCC V100 机型等)因为不支持弹性网卡,无法支持 CFS Turbo 实例挂载。
七、CFS 、CFS Turbo 如何实现子账户之间的目录隔离(已下线)
注意:
该章节将指导您,如何在 CFS、CFS Turbo 同个实例下,通过打标签的方式,实现不同子账户之间的文件目录隔离。
第一步:创建标签
1. 登录 标签控制台,在左侧导航栏中选择标签列表,选择自定义标签,单击新建标签。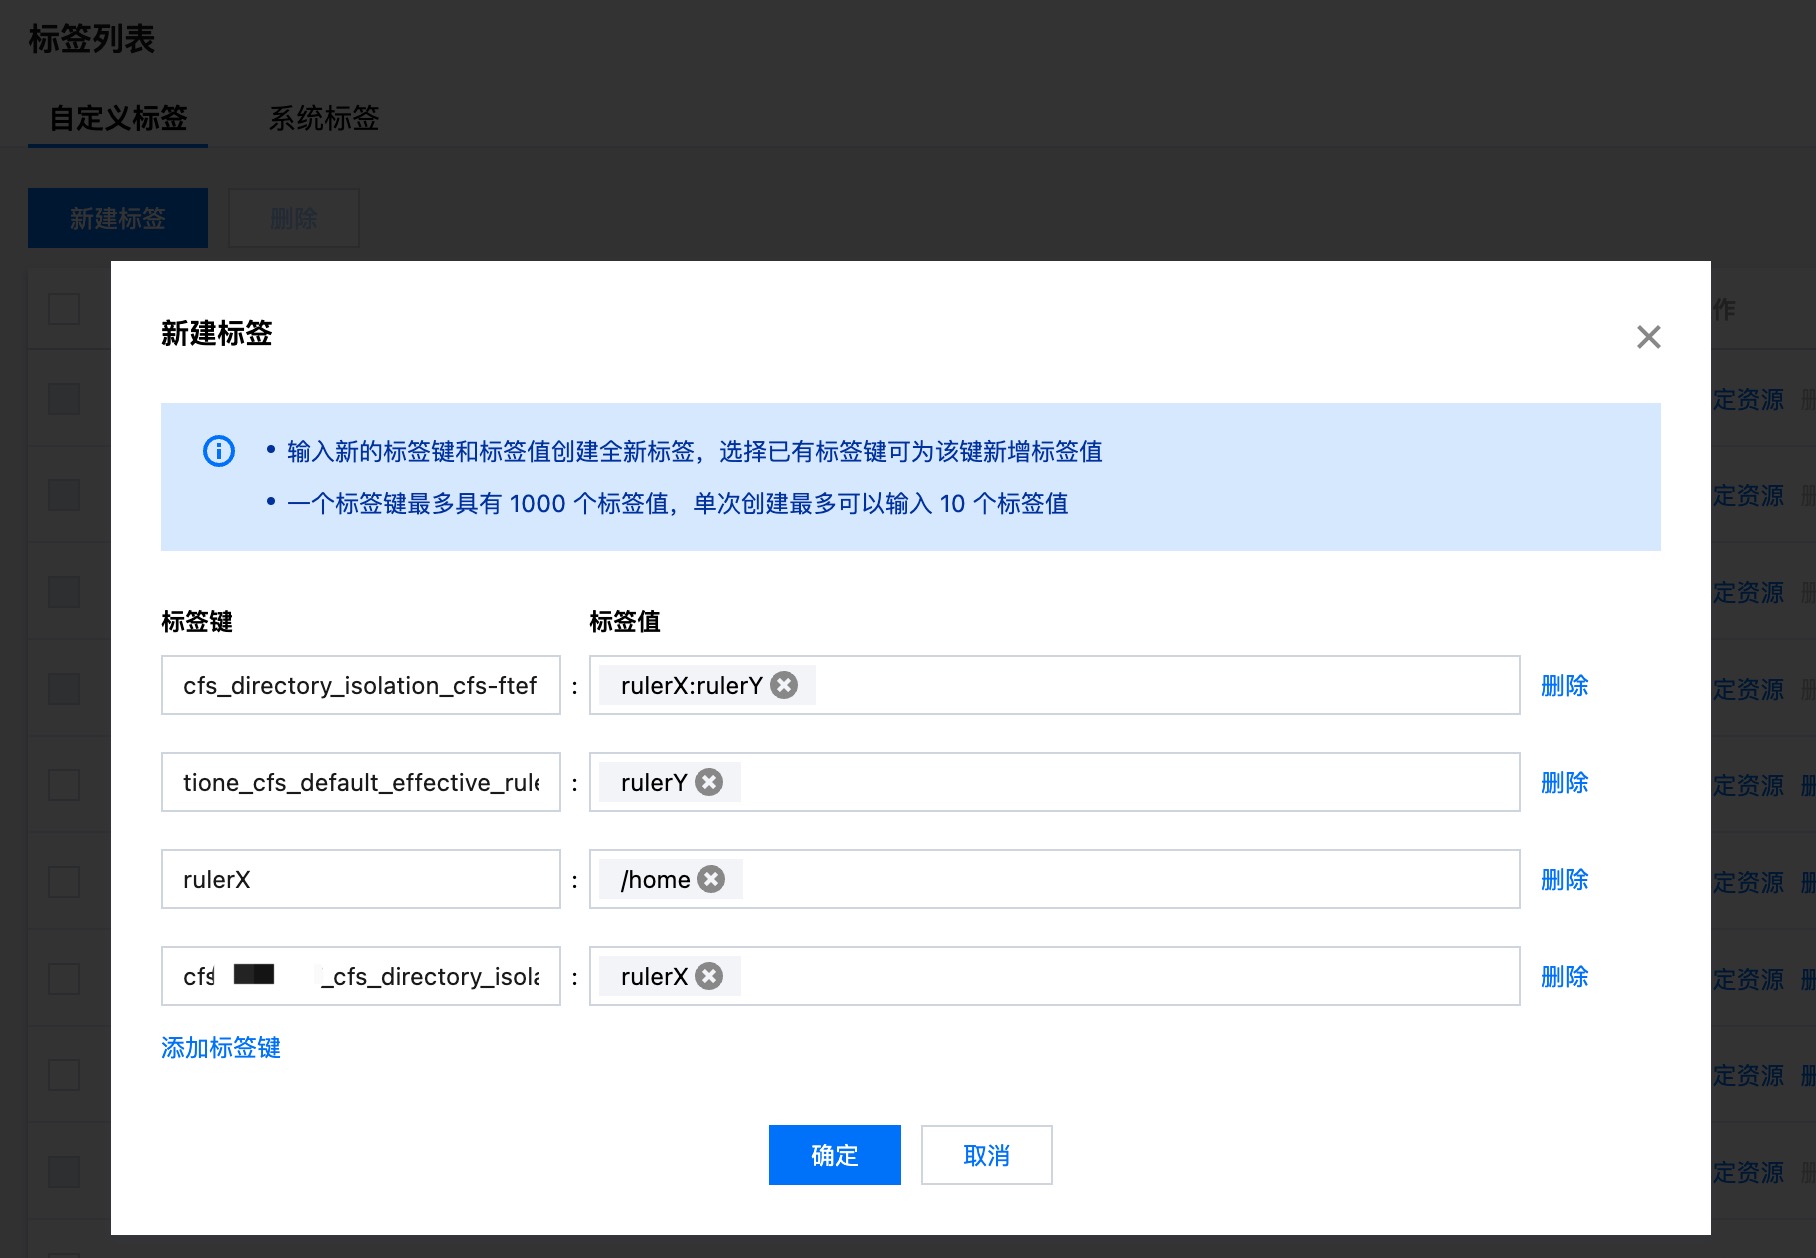
2. 按照以下规则填入标签键、标签值:
| 标签键 | 标签值 | 规则说明 |
1 | tione_cfs_directory_isolation_rulelists | RuleA:RuleB:RuleC | 一个 CFS、CFS Turbo 实例上,如果被加上了标签键为“tione_cfs_directory_isolation_rulelists”的标签,则认为该文件实例需要做子账户之间的目录隔离,否则为全局共用权限。 标签值可填写多个规则,用:隔离,多个规则取并集,规则的具体路径可通过3定义。 |
2 | tione_cfs_default_effective_rulelists | RuleA | 一个 CFS、CFS Turbo 实例上,如果在1的基础上,再被加上了标签键为“tione_cfs_default_effective_rulelists”的标签,则认为标签值里的规则 RuleA,为默认生效规则,即使子账户不配置4,也会默认生效,但只能配置一条,配置多条时会随机选择一条生效即配置错误。 |
3 | RuleA | PathA:PathB:PathC | 具体一条隔离规则,标签键对应1、2、4里填写的标签值,标签值为该 CFS、CFS Turbo 实例上要做隔离的文件路径,多个路径取并集。路径规则必须以斜杠"/"开头、只能包含中英文、数字、下划线"_"、短横"-"、点".";路径里的文件夹名字只能以中英文、数字、下划线"_"开头。 特殊: 1. 支持路径配置通配符 <@subaccount>,表示子账户 UIN,如RuleA:/home/<@subaccount>,您只需填写一条标签路径规则,即可自动将使用账号的子账户UIN默认填写进去。 2. 支持路径配置通配符 <@subusername>,表示子账户昵称,如RuleA:/home/<@subusername>,您只需填写一条标签路径规则,即可自动将使用账号的子账户昵称默认填写进去。 |
4 | cfsidxx_cfs_directory_isolation | RuleA:RuleB | 一个子账户上,如果被加上了标签键为“cfsidxx_cfs_directory_isolation”的标签(cfsidxx 为具体的 CFS、CFS Turbo 实例 ID),则认为子账户能访问该文件实例 ID 的路径,是4标签值和1、2标签值的交集。 如果子账户没加上4标签,则没有该 CFS 实例的全部权限。 |
第二步:往 CFS、CFS Turbo 实例上打标签
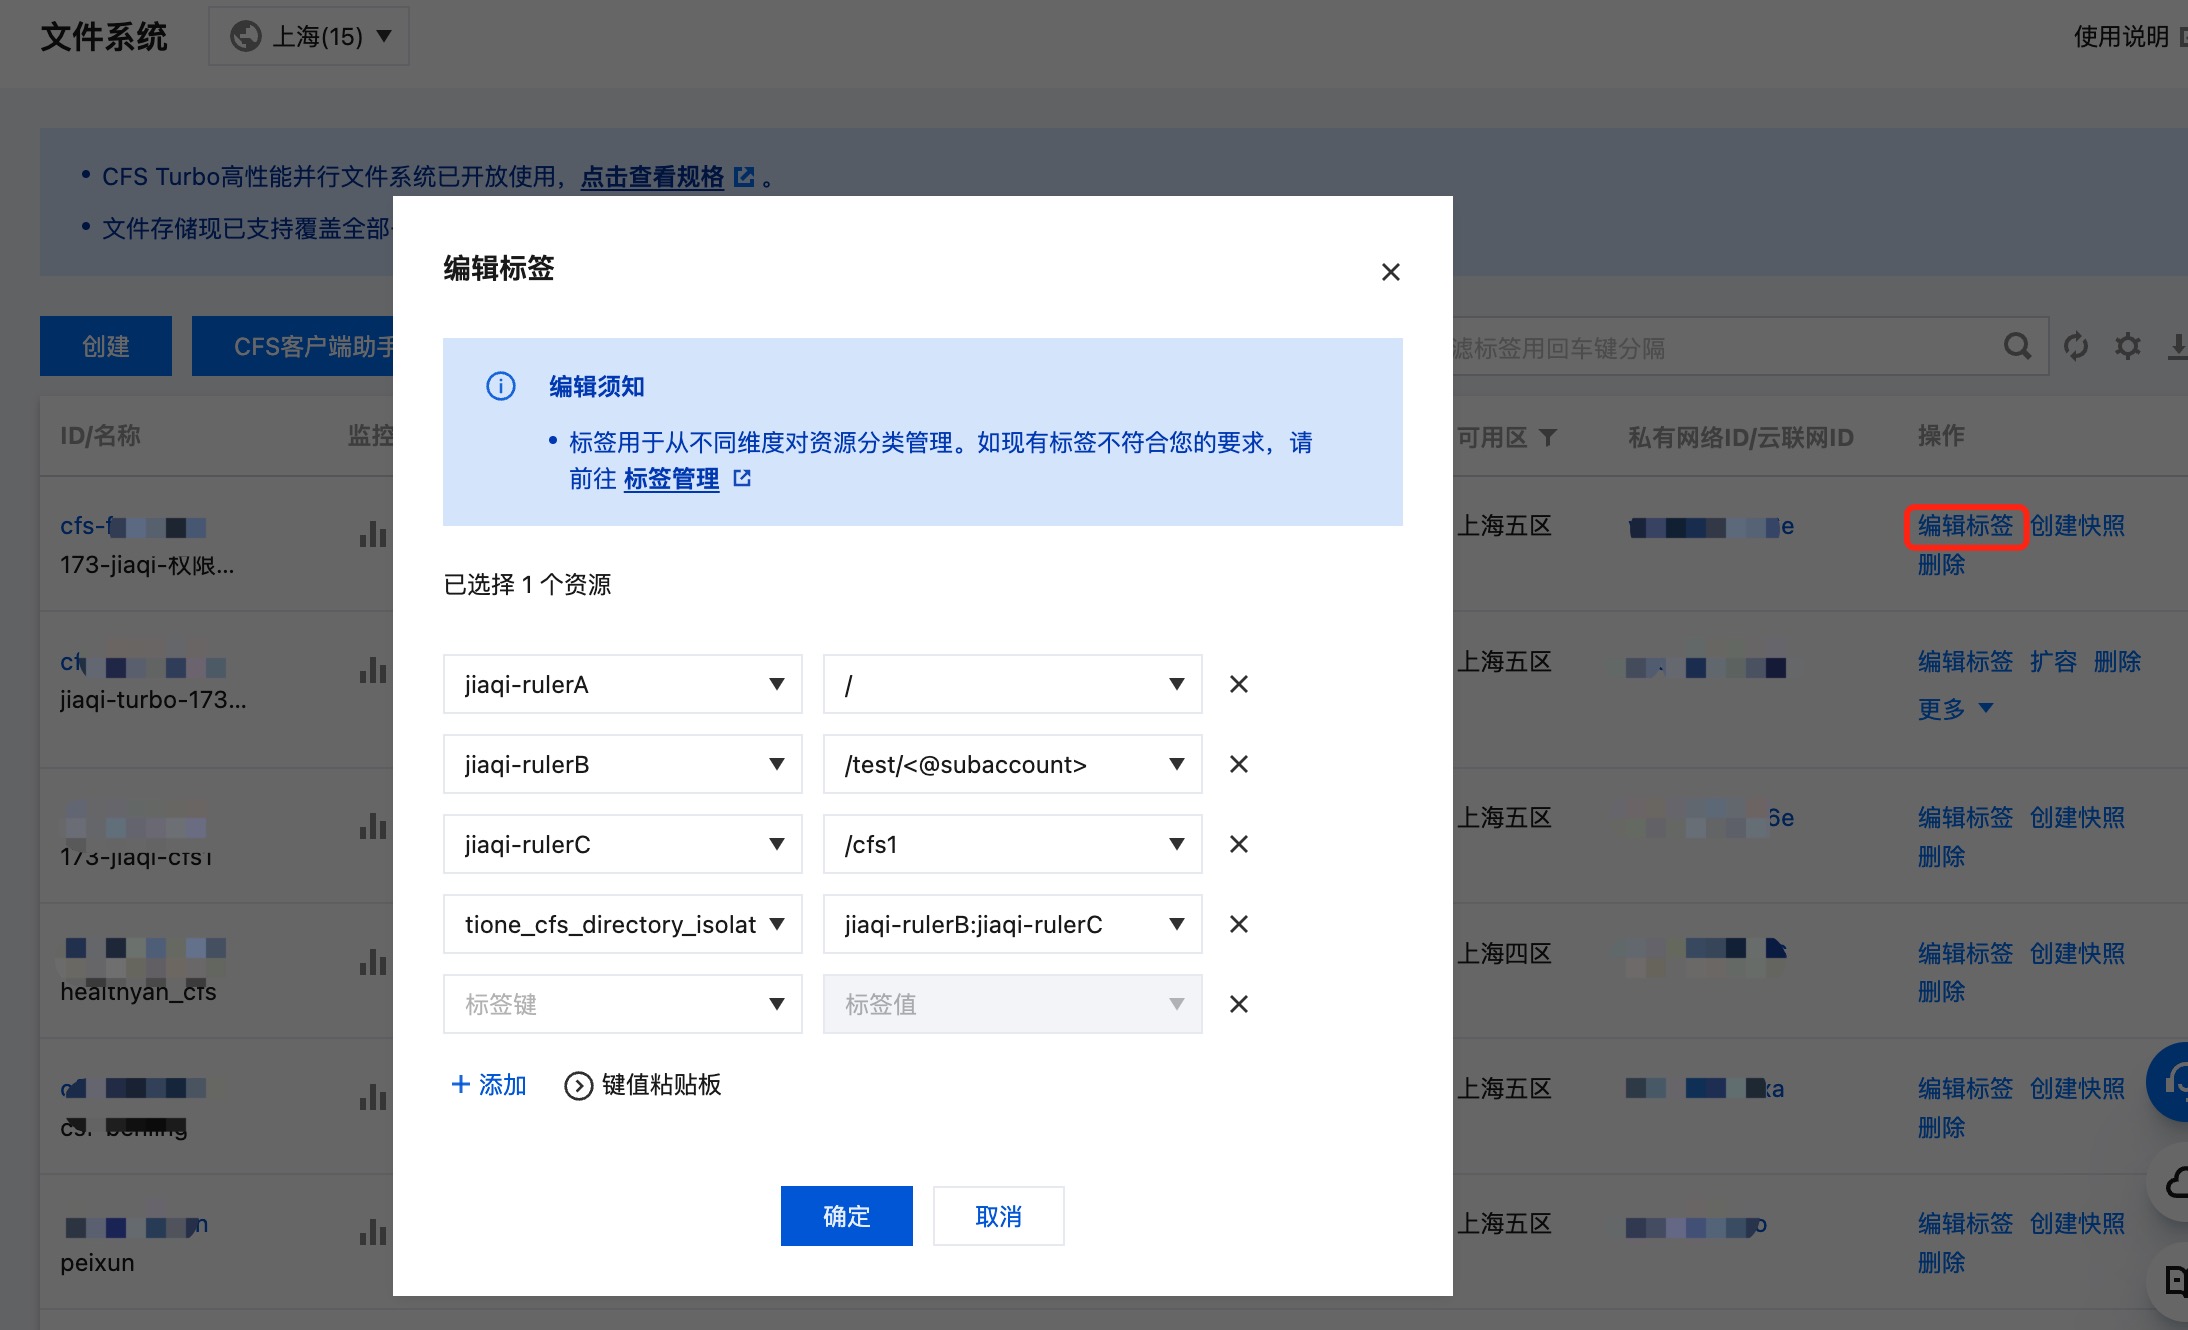
2. 加上了标签键为“tione_cfs_directory_isolation_rulelists”标签的 CFS、CFS Turbo 实例,则该文件实例需要做子账户之间的目录隔离,否则为全局共用权限。
第三步:往子账户上打标签

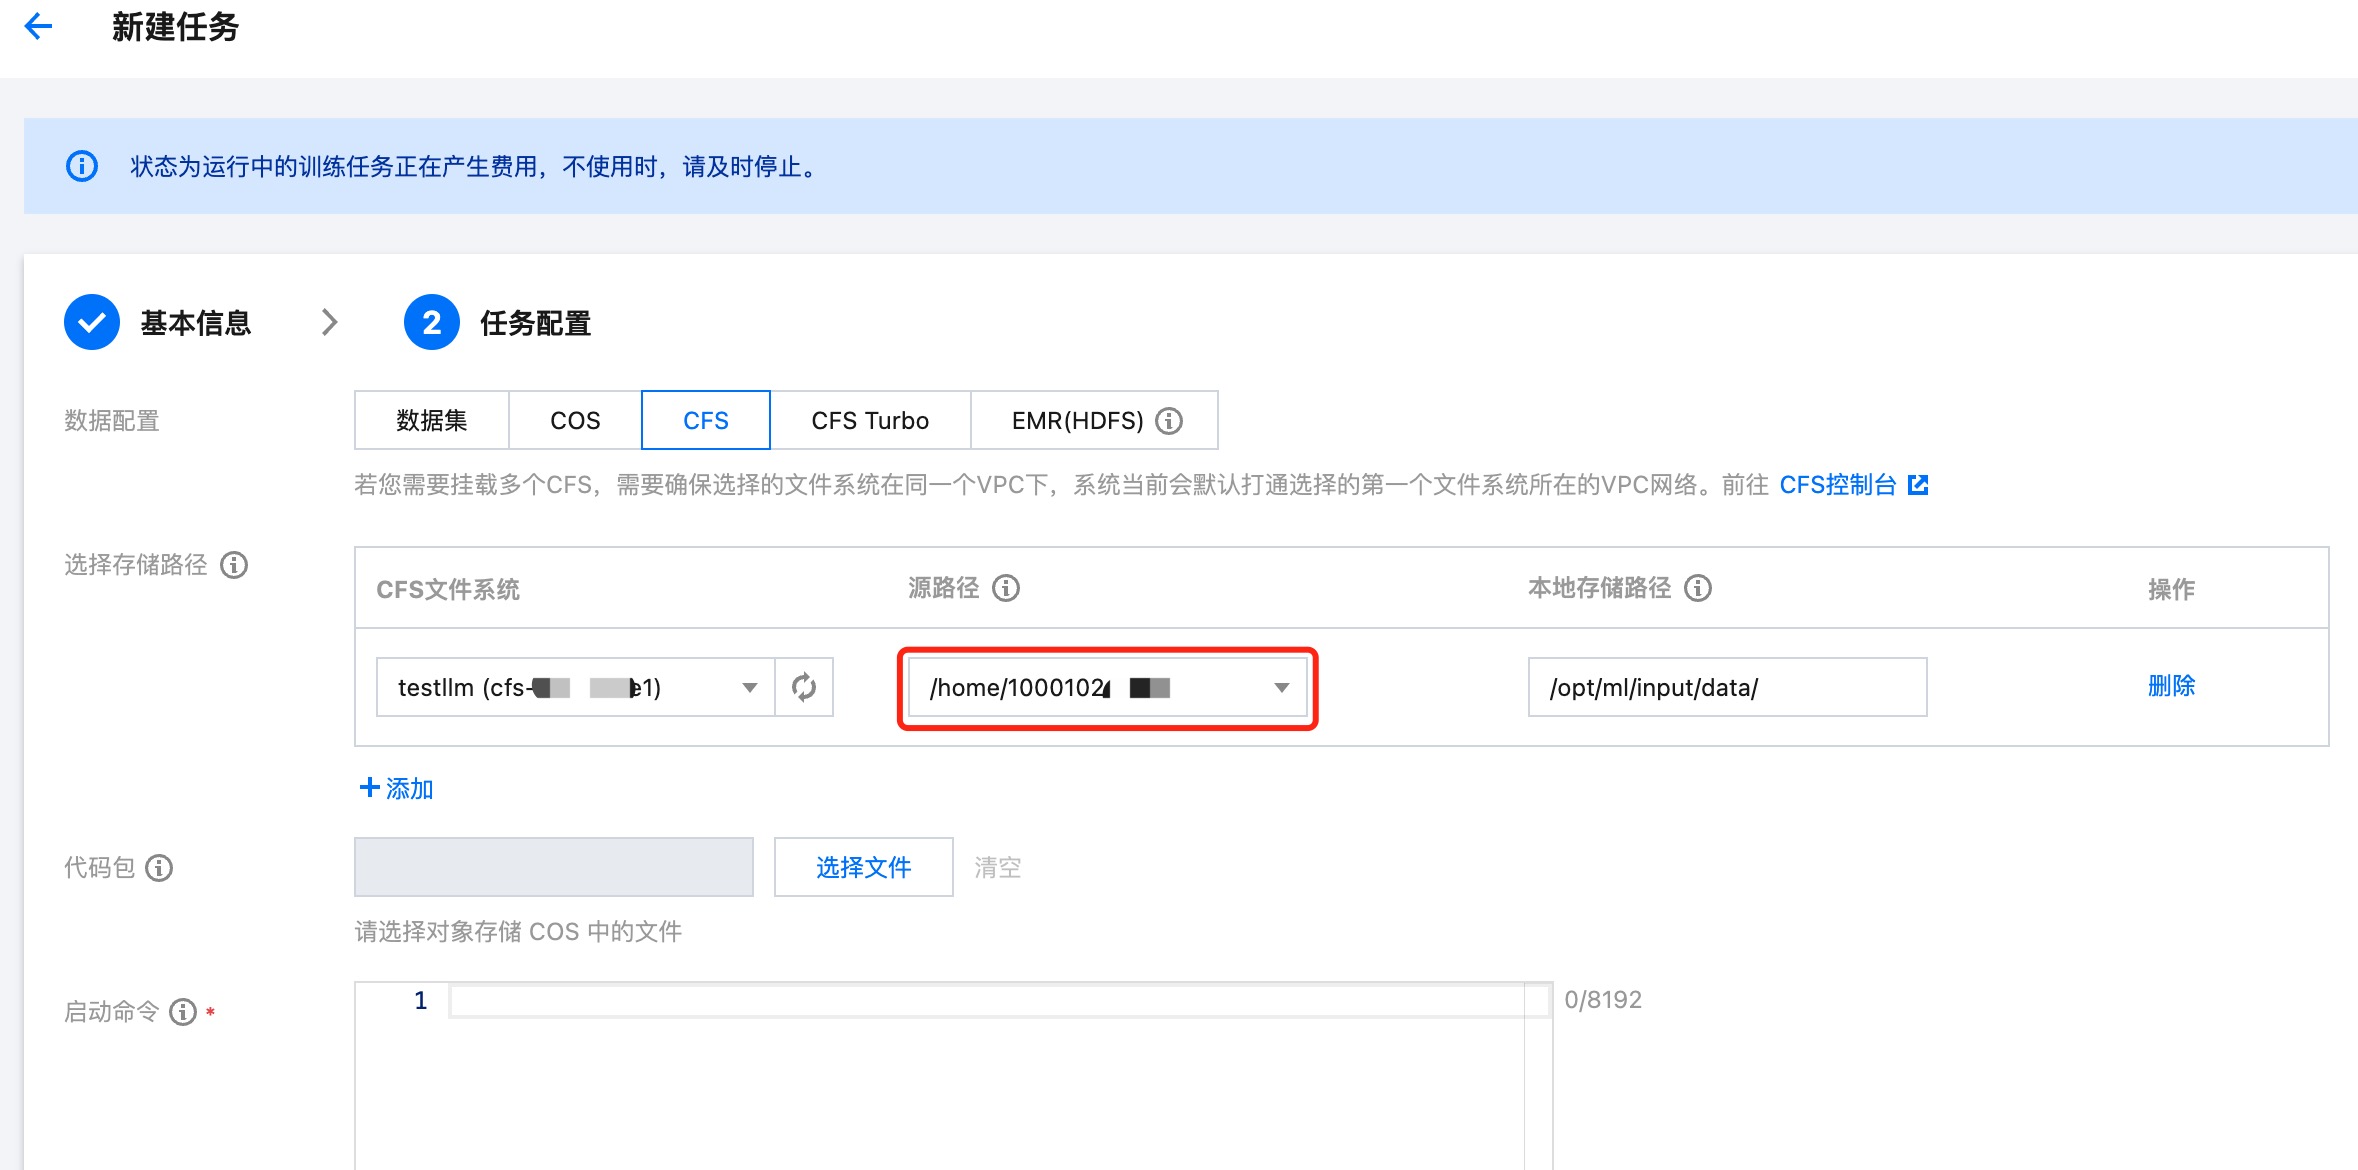
第四步:使用被打标签的 CFS、CFS Turbo 实例去训练、推理
1. 登录 TI-ONE 控制台,在左侧导航栏中选择训练工坊/任务式建模,单击新建任务,选择您打好标签的 CFS、CFS Turbo 实例,选择后,路径会出现其上添加标签的标签值路径,您可下拉选择使用。
2. 登录 TI-ONE 控制台,在左侧导航栏中选择训练工坊/开发机,单击新建任务,选择您打好标签的 CFS、CFS Turbo 实例,选择后,路径会出现其上添加标签的标签值路径,您可下拉选择使用。
3. 登录 TI-ONE 控制台,在左侧导航栏中选择模型服务/在线服务,单击新建服务,选择您打好标签的 CFS 实例,选择后,路径会出现其上添加标签的标签值路径,您可下拉选择使用。
说明:
1. 如果您填写的标签值路径不符合要求,会置灰不能选择,请您联系腾讯云账号管理员重新调整标签上的路径标签值配置。
2. 路径规则:必须以斜杠"/"开头、只能包含中英文、数字、下划线"_"、短横"-"、点".";路径里的文件夹名字只能以中英文、数字、下划线"_"开头。


