概述
本文档将向您介绍 TI-ONE 自定义镜像部署在线服务的2种方式,和部署需要遵循的规范约束,再通过典型案例向您演示如何制作自定义镜像,发布在线服务。
操作步骤
基于 tiinfer 制作自定义镜像
tiinfer 框架基础镜像说明
平台提供了内置 tiinfer 框架的基础推理镜像:
ccr.ccs.tencentyun.com/tione-public-images/ti-cloud-gpu-base-tiinfer:py38-cu111-1.0.0基础镜像基于 centos 制作,其中包含的软件包有:
软件或包 | 版本 |
CUDA | 11.1.1 |
python | 3.9.13 |
cos-python-sdk-v5 | 1.9.14 |
coscmd | 1.8.6.24 |
numpy | 1.23.1 |
msgpack | 1.0.5 |
opencv-python | 4.6.0.66 |
opencv-contrib-python | 4.6.0.66 |
pandas | 1.4.3 |
Pillow | 9.4.0 |
tiinfer | 0.1.1 |
mosec-tiinfer | 0.0.6 |
基础镜像的启动命令 /usr/local/service/ti-cloud-infer/entrypoint.sh
entrypoint.sh 中的内容为:
#!/bin/bashsource /etc/profilesource /root/.bashrcexport LD_LIBRARY_PATH=/usr/local/python3/lib/python3.8/site-packages/torch/lib:/usr/local/openmpi/lib:/usr/local/nccl/lib:/usr/local/cuda/lib64:/usr/local/python3/lib:/usr/local/python3/lib64:/usr/local/openmpi/lib:/usr/local/gcc/lib:/usr/local/gcc/lib64MODEL_DIR=/data/modelecho "================== code path ${MODEL_DIR}=========="cd ${MODEL_DIR}if [ -f "requirements.txt" ]; thenecho "============== install python requirements ======================"echo "python3 -m pip install -r requirements.txt"python3 -m pip install -r requirements.txtecho "============== install python requirements done ================="fiecho "====================== start serving ============================"echo "python3 -m tiinfer"export TI_MODEL_DIR=${MODEL_DIR}python3 -m tiinfer --timeout 30000
启动逻辑为:
1.1 读取环境变量
${MODEL_DIR} 目录下的 requirements.txt 文件,使用 pip 安装其中指定的依赖 python 包。1.2 tiinfer 框架会读取环境变量
${MODEL_DIR} 下的文件,加载模型后,启动一个 HTTP 服务并监听在环境变量 ${REST_PORT} 定义的端口。1.3 tiinfer 框架启动时,会从 model_service.py 文件中加载模型。
自定义镜像规范
1. Dockerfile 文件中添加对基础镜像的引用,例如:
FROM ccr.ccs.tencentyun.com/tione-public-images/ti-cloud-gpu-base-tiinfer:py38-cu111-1.0.02. 自定义逻辑实现集中在 model_service.py 文件及 entrypoint.sh 文件的修改。
3. 使用 CFS、COS 或 GooseFS 作为模型来源时,平台默认将源路径下的模型文件(包括子目录),放在服务实例的
/data/model目录下。因此自定义的代码及数据不能置于 /data/model目录,否则会被平台覆盖。制作镜像
本案例介绍了基于 tiinfer 框架基础镜像,通过修改 model_service.py 及 entrypoint.sh 文件,实现一个简单的加法器。
注意:本案例不使用平台提供的模型仓库功能托管模型,而是将模型、推理代码直接封装到镜像中,所以需要避免将模型、代码放到
/data/model目录。编写代码
一共包含三个文件:
文件 | 作用 |
model_service.py | 按照 tiinfer 的要求,编写加法器模型。 |
entrypoint.sh | 启动脚本,可在此自行安装更多的依赖包。 |
Dockerfile | 负责将前两个文件拷贝到镜像中。 |
1. model_service.py 的内容:
from typing import Dictimport tiinferclass AdderModel(tiinfer.Model):def __init__(self, model_dir: str):super().__init__(model_dir)def load(self) -> bool:self.ready = Truereturn self.readydef preprocess(self, request: Dict) -> Dict:return requestdef predict(self, request: Dict) -> Dict:return {'result': request['a'] + request['b']}def postprocess(self, result: Dict) -> Dict:return result
2. entrypoint.sh 的内容:
#!/bin/bashsource /etc/profilesource /root/.bashrcexport LD_LIBRARY_PATH=/usr/local/python3/lib/python3.8/site-packages/torch/lib:/usr/local/openmpi/lib:/usr/local/nccl/lib:/usr/local/cuda/lib64:/usr/local/python3/lib:/usr/local/python3/lib64:/usr/local/openmpi/lib:/usr/local/gcc/lib:/usr/local/gcc/lib64MODEL_DIR=/opt/modelecho "================== code path ${MODEL_DIR}=========="cd ${MODEL_DIR}if [ -f "requirements.txt" ]; thenecho "============== install python requirements ======================"echo "python3 -m pip install -r requirements.txt"python3 -m pip install -r requirements.txtecho "============== install python requirements done ================="fiecho "====================== start serving ============================"echo "python3 -m tiinfer"export TI_MODEL_DIR=${MODEL_DIR}python3 -m tiinfer --timeout 30000
注意: 上述代码中的
MODEL_DIR=/opt/model这一行,将启动目录由默认的/data/model改为/opt/model,避免被平台覆盖。3. Dockerfile 的内容:
FROMccr.ccs.tencentyun.com/tione-public-images/ti-cloud-gpu-base-tiinfer:py38-cu111-1.0.0COPY model_service.py /opt/model/model_service.pyCOPY entrypoint.sh ./entrypoint.shRUN chmod +x ./entrypoint.sh
需要注意的是,上述代码将 model_service.py 拷贝到
/opt/model目录,而非默认的/data/model目录,避免被平台覆盖。打包镜像
1. 整体步骤:
本地配置 docker 环境,并开通腾讯云容器镜像服务;
创建命名空间及新建个人镜像仓库;
编译自定义推理镜像,推送到个人镜像仓库;
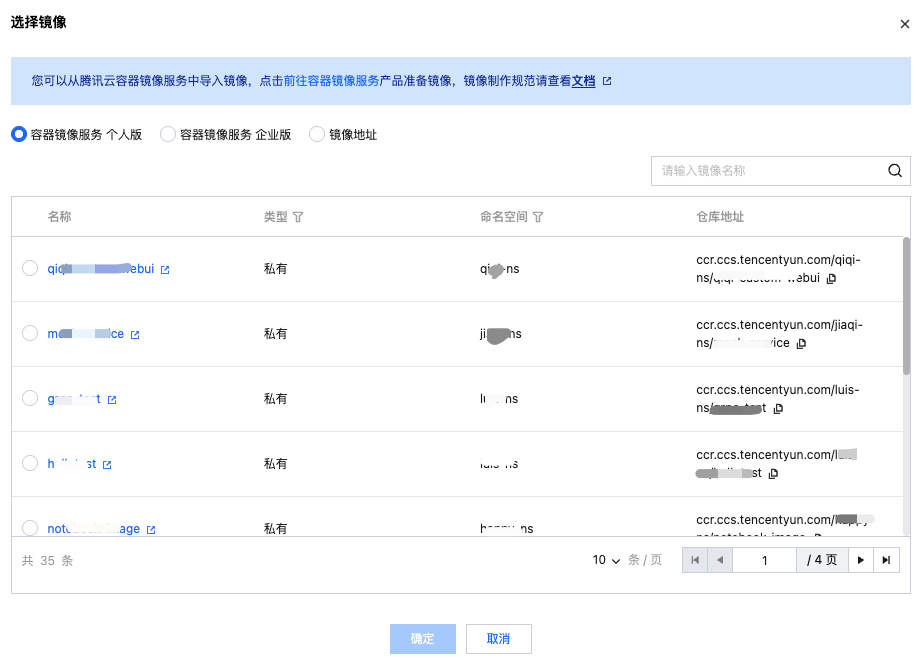
在启动模型服务时,实例容器栏选择不使用模型文件,选择运行环境进入个人镜像仓库列表,选择上一步推送的自定义镜像环境;
配置好参数,启动服务。
2. 详细说明:
执行如下命令来打包:
docker build . --tag ccr.ccs.tencentyun.com/YOUR_NAMESPACE/YOUR_IMAGENAME
打包完成后,可以通过如下方式在本地检查服务运行是否正常:
执行
docker run -d --name myinfer ccr.ccs.tencentyun.com/YOUR_NAMESPACE/YOUT_IMAGENAME 将服务运行起来;执行
docker exec -it myinfer bash 进入容器中;在容器中执行
curl http://127.0.0.1:8501/v1/models/m:predict -d '{"a": 1, "b": 2}' 得到正确返回: {"result": 3} 退出容器,回到本地环境,上传镜像:
docker push ccr.ccs.tencentyun.com/YOUR_NAMESPACE/YOUR_IMAGENAME。基于其他推理框架制作自定义镜像
平台支持使用其它推理框架,通过自定义镜像的方式来部署模型在线服务。
自定义镜像规范
1. 服务必须以 HTTP 协议接收请求,并且只支持 POST 方法。
2. 使用 CFS、COS、GooseFSx 作为模型来源时,平台默认将源路径下的模型文件(包括子目录),放在服务实例的
/data/model目录下。因此自定义的代码及数据不能置于 /data/model目录,否则会被平台覆盖。3. 镜像在本地经过验证,可以正常提供服务。
上传自定义镜像并发布推理服务
上传自定义镜像
1. 登录 腾讯云容器镜像服务。
2. 在镜像仓库页面,单击新建。
3. 上传镜像。
单击镜像仓库中的快捷指令,查看操作命令,上传镜像。
发布在线服务
在 TI-ONE【在线服务】页面,单击新建服务。
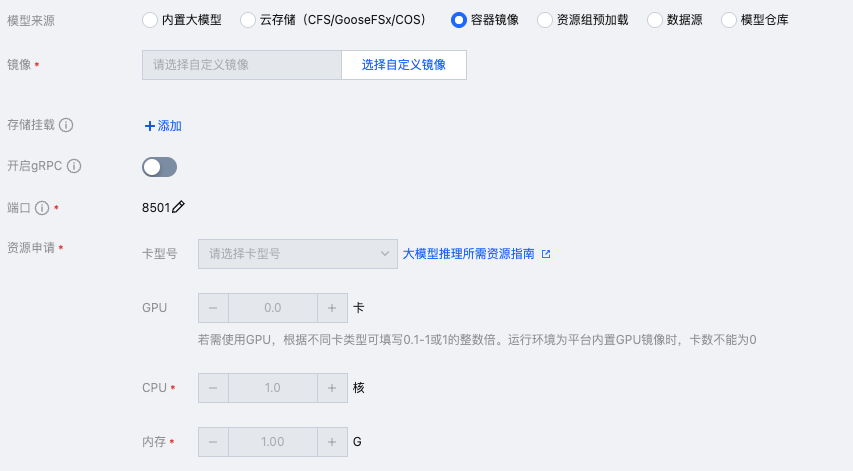
方式一:模型打包在镜像中使用
若您已将模型打包在镜像中,可以直接使用镜像发布服务。
【服务副本】配置如下:
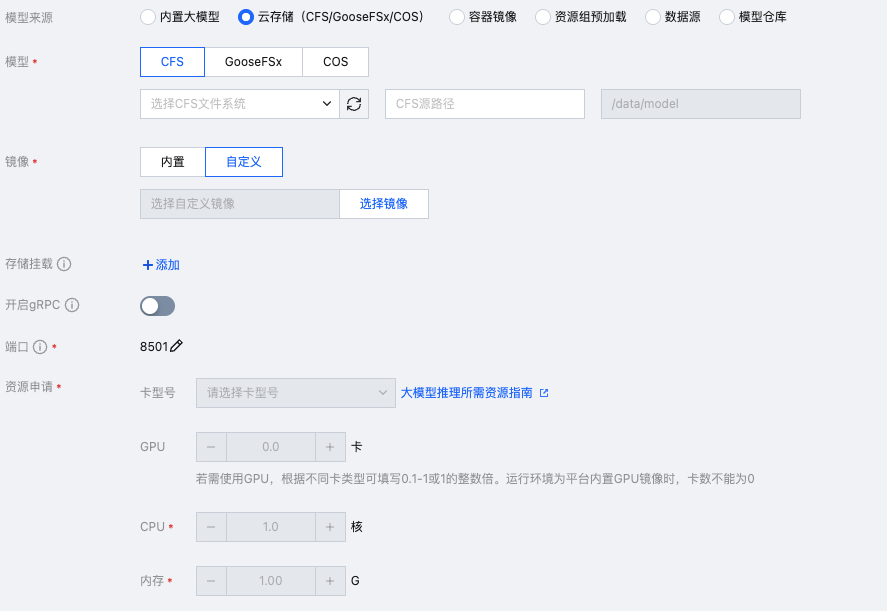
方式二:模型在 CFS,挂载到容器中使用(GooseFSx 操作和 CFS 类似)
若您的镜像仅为服务运行环境,模型可以上传到 CFS 后,挂载到容器内部。模型会挂载到 /data/model 目录下,您的服务可以从此目录加载模型。
【服务副本】配置如下: