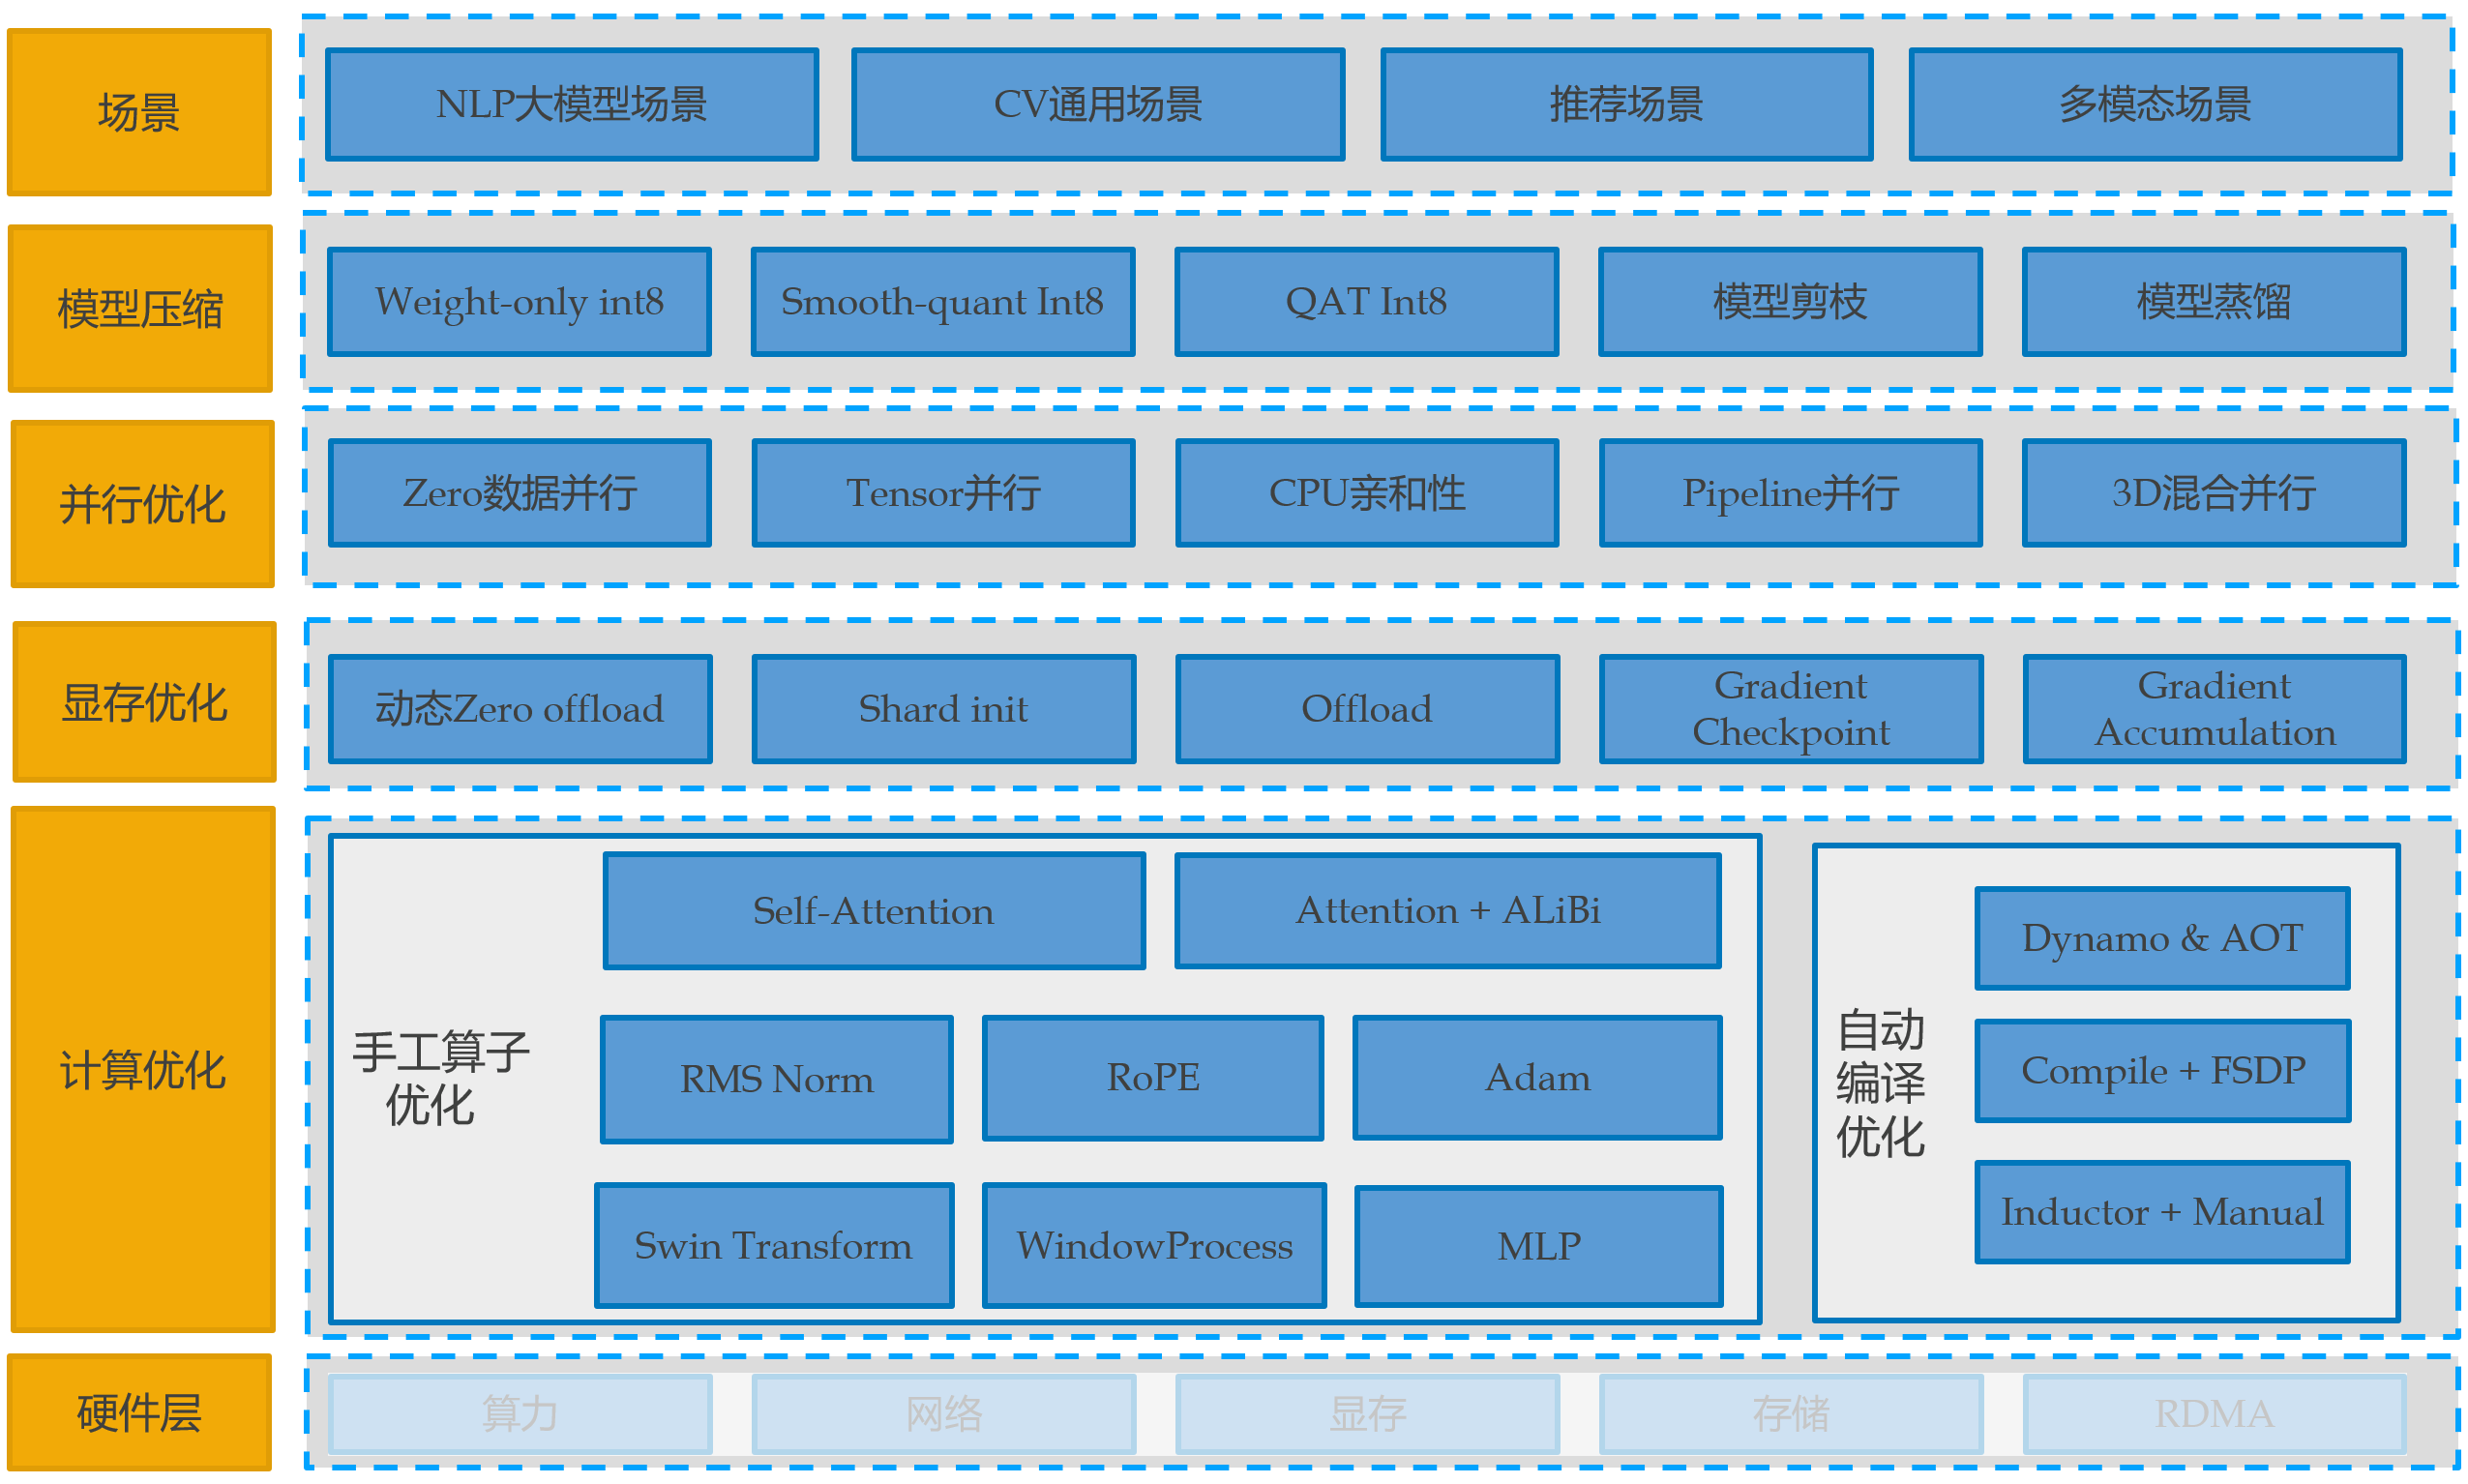
Tilearn-Angel 由 tiacc_training 升级而来,提供兼容 huggingface 生态的大模型训练加速能力,支持手工 cuda 算子结合自动编译优化的计算优化能力,支持兼容 huggingface 生态的 3D 混合并行(TensorParallel、PipelineParallel、DateParallel),支持兼容原生的 DDP 的通信加速能力,用户无需修改原生的使用代码、无需进行模型转换可直接进行使用。此外支持优化器融合、CPU/GPU 亲和性优化、自适应混合精度等通用训练加速能力和模型压缩能力,用户仅需增加几行代码即可开启。
一、Tilearn-Angel 大模型训练加速镜像
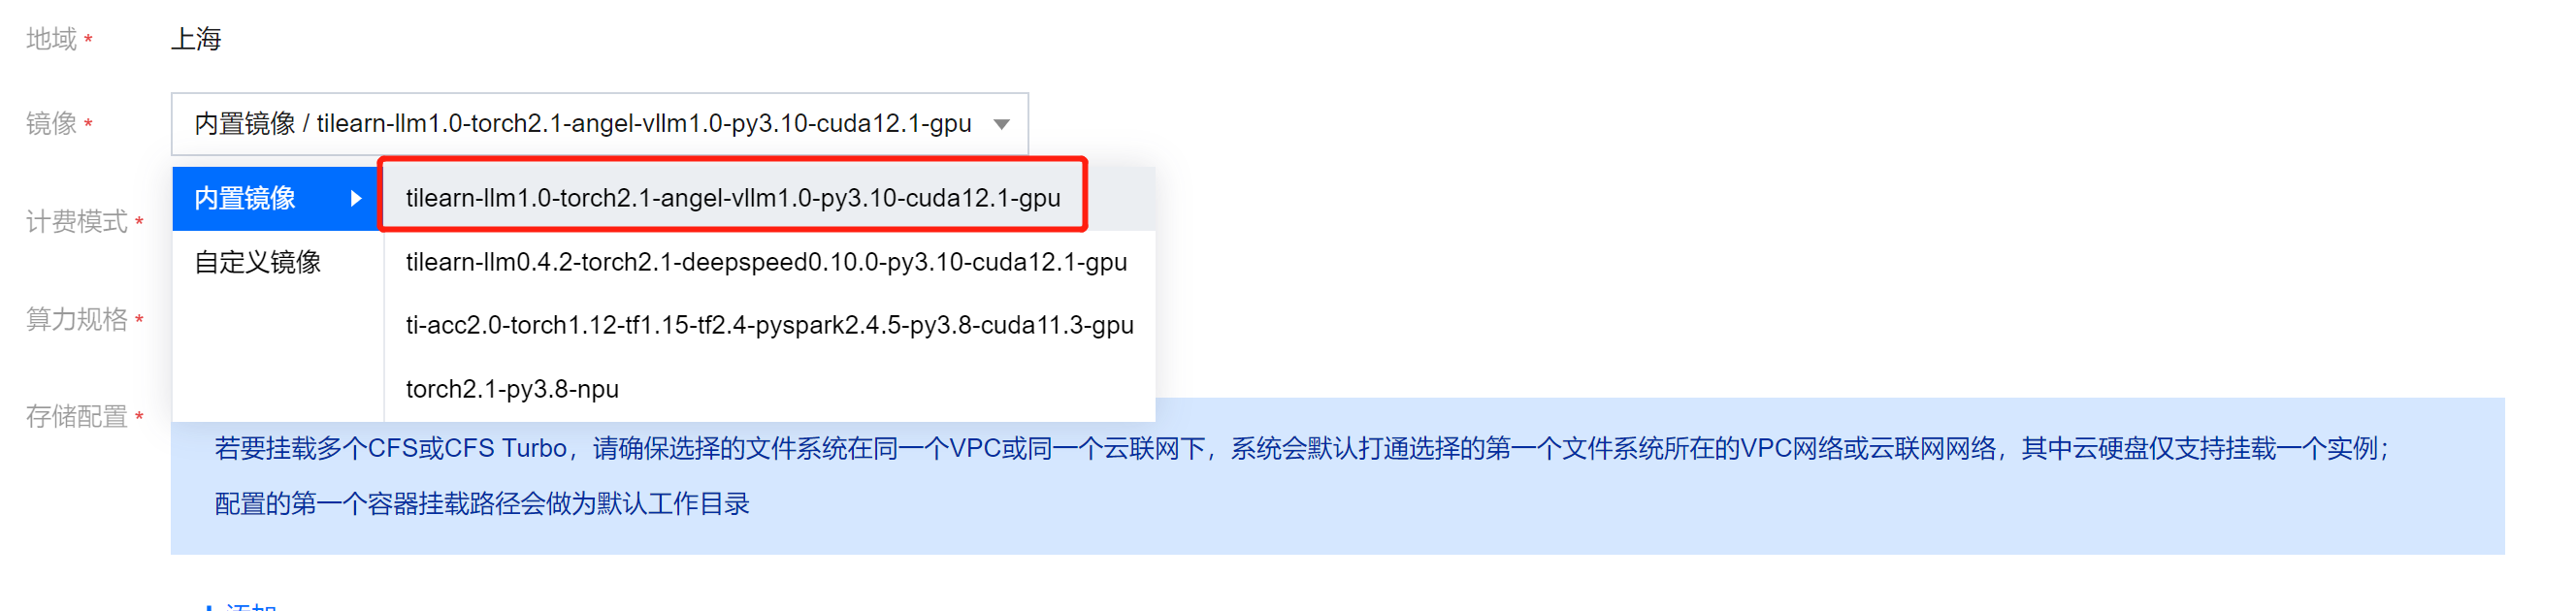
推荐使用平台内置镜像:
tilearn-llm1.0-torch2.1-angel-vllm1.0-py3.10-cuda12.1-gpu
在镜像内更新最新的 tilearn.llm 和 tilearn.ops 包(可选)
# tilearn-llm>=0.9.3# tilearn.ops>=0.2.1.172pip3 uninstall -y tilearn.llm tilearn.opspip3 install tilearn-llm==0.9.3 -i https://pypi.tuna.tsinghua.edu.cn/simplepip3 install tilearn.ops==0.2.1.172 -i https://g-bnvx3728-pypi.pkg.coding.net/tione/tilearn/simplewget https://tione-public-cos-1308945662.cos.ap-shanghai.myqcloud.com/tilearn/hybrid_parallel/colossalai-0.3.4.1-cp310-cp310-linux_x86_64.whlpip3 install colossalai-0.3.4.1-cp310-cp310-linux_x86_64.whl
在自定义镜像使用需满足以下条件:
基于 pytorch/pytorch:2.1.2-cuda12.1-cudnn8-devel 制作的自定义镜像,镜像中的 torch.version=='2.1.2'。
或基于平台镜像 tilearn-llm1.0-torch2.1-angel-vllm1.0-py3.10-cuda12.1-gpu 制作的自定义镜像。
其他情况请联系加速团队进行支持。
二、Tilearn-Angel使用文档
2.1 Tilearn-Angel 计算加速
主要介绍大模型计算优化能力,通用训练加速能力详细使用文档(通信优化、优化器融合、CPU/GPU 亲和性优化、自适应混合精度)
以 llama 模型为例,计算优化使用方法-代码修改如下:
### TILEARN.LLMfrom tilearn.llm.transformers import LlamaForCausalLM### 模型接口与标准huggingface一致model = LlamaForCausalLM.from_pretrained(...)
使用 AutoModelForCausalLM 接口
### TILEARN.LLMfrom tilearn.llm.transformers import AutoModelForCausalLM### 模型接口与标准huggingface一致model = AutoModelForCausalLM.from_pretrained(...)
特殊说明:
由于 baichuan1 13B 和 baichuan2 13B 会产生冲突,目前 tilearn.llm.transformers.AutoModelForCausalLM 默认开启了 baichuan1 13B,如果需要使用 baichuan2 13B,需要在启动训练脚本中设置环境变量:
export TILEARN_LLM_BAICHUAN_13B=2目前加速已经支持的模型llama、bloom、baichuan1、baichuan2,详情请参考 Tilearn.llm使用说明。
2.2 Tilearn-Angel 3D 混合并行加速
Tilearn-Angel 支持兼容 huggingface 生态的 3D 混合并行(TensorParallel、PipelineParallel、DateParallel),无需进行模型转换,使用 huggingface trainer 即可进行 3D 并行训练,使用方法如下。详情请参考 3d 混合并行 notebook 案例集。
环境变量配置
export TILEARN_HYBRID_TP_SIZE=1export TILEARN_HYBRID_PP_SIZE=2
训练代码配置
### 计算优化from tilearn.llm.transformers import LlamaForCausalLMfrom tilearn.llm.transformers import AutoModelForCausalLM### 3D并行import tilearn.llm.hybrid_paralleldef main():### 模型接口与标准huggingface一致model = AutoModelForCausalLM.from_pretrained(...)run_exp()
大模型精调时的参数配置建议
llama3 8b 模型 (seqlength=4096)
# 8 x A100 40G 默认参数GradienAccumulationSteps=64BatchSize=1GradientCheckPointing=FalseTilearnHybridTPSize=2TilearnHybridPPSize=2TilearnHybridZeroStage=1# 8 x A800 80G 默认参数GradienAccumulationSteps=32BatchSize=1GradientCheckPointing=FalseTilearnHybridTPSize=1TilearnHybridPPSize=2TilearnHybridZeroStage=1 三、Tilearn-Angel训练加速效果
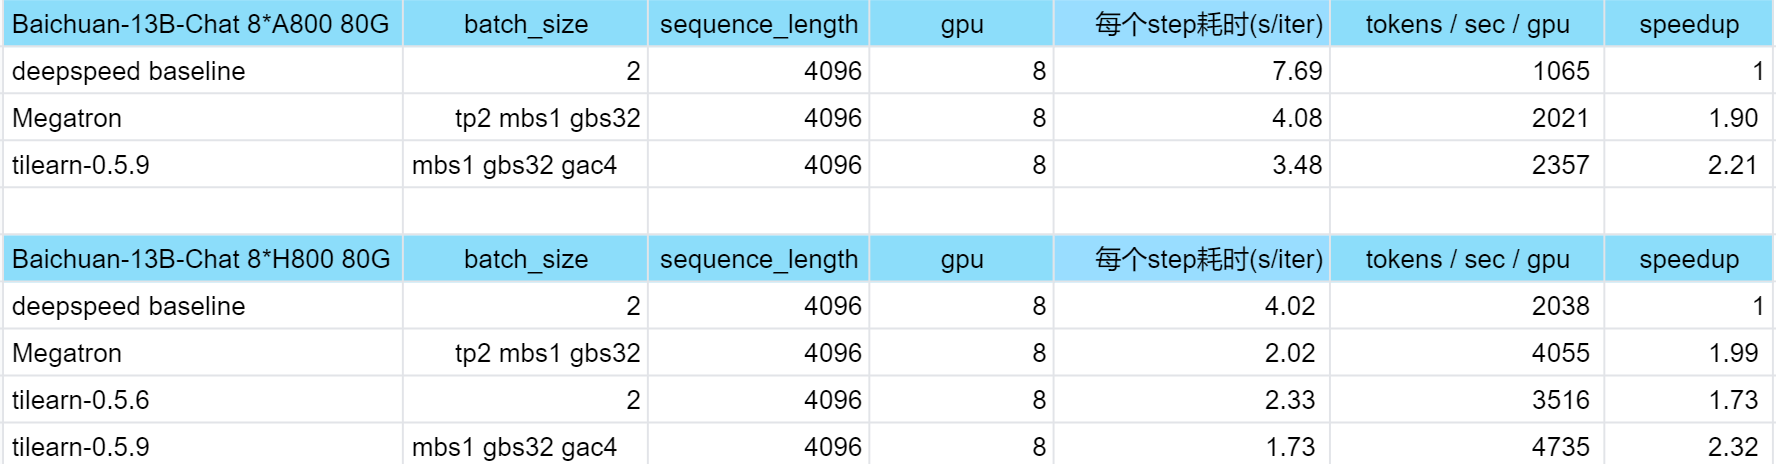
三、附录:
Tiacc_training 旧版训练加速
使用新的平台镜像 tilearn-llm0.4.2-torch2.1-deepspeed0.10.0-py3.10-cuda12.1-gpu 可直接使用旧版功能
环境相关
推荐使用平台内置 torch 镜像和 tensorflow 镜像:
torch 镜像:
ti-acc2.0-torch1.9-py3.8-cuda11.1-gpu 
tensorflow 镜像:
ti-acc1.0-tf1.15-py3.6-cuda10.0-gpu
使用 DDP 分布式训练通信优化(PyTorch + DPP)
以兼容原生 DDP 的方式启动训练脚本,无需进行训练代码的修改,启动命令参考示例如下:
python3 -u -m tiacc_training.distributed.launch --nproc_per_node $GPUS_PER_NODE --nnodes $NNODES --node_rank $NODE_RANK --master_addr $MASTER_ADDR --master_port $MASTER_PORT main.py
DDP 分布式训练通信优化实测效果:
(加速效果在多机多卡场景方有体现,单机多卡场景与原生 DDP 性能无异。)
硬件环境 | 模型 | GPU 卡数 | 原生 DDP(examples/sec per V100) | TI-ACC 通信优化(examples/sec per V100) |
腾讯云GN10Xp.20XLARGE320 | resnext50_32x4d | 1(单机) | 227 | 227 |
| | 8(单机) | 215 | 215 |
| | 16(双机) | 116 | 158.6 |
使用自适应混合精度优化(PyTorch)
import torch.cuda.amp as ampimport tiacc_training.torchscaler = amp.GradScaler()#实例化自适应混合精度策略类的对象policy = tiacc_training.torch.tiacc_torch_warp.MixedPrecision_TrainingPolicy(policy,start_step,hold_step,end_step,interval_time,interval_hold_time)#根据输入的参数得到当前epoch是否需要开启混合精度mixed_precision = policy.enable_mixed_precision(epoch,lr=lr,loss=loss,scaler=scaler)with amp.autocast(enabled=mixed_precision):outputs = model(inputs)loss = criterion(outputs, targets)scaler.scale(loss).backward()scaler.step(optimizer)scaler.update()
自适应混合精度优化实测效果:
硬件环境 | 模型 | GPU 卡数 | 原生PyTorch(examples/sec per V100) | TI-ACC 数据 IO 优化(examples/sec per V100) | TI-ACC 数据 IO + 自适应混合精度优化(examples/sec per V100) |
腾讯云GN10Xp.20XLARGE320 | resnet50 mmcls | 8(单机) | 70.8 | 350.5 | 379.2 |
| centernet mmdet | 8(单机) | 26.4 | 28.6 | 30.6 |
使用优化后的 embedding 变量构造(TensorFlow + PS)
# 启动容器docker run -itd --name tiacc-rec-fm --network=host --ipc=host ccr.ccs.tencentyun.com/ti-platform/tensorflow:1.15.5-py3-rec-0121# 进入容器docker exec -it tiacc-rec-fm bash# 原生tensorflow embedding使用方法cd wideanddeep && bash start_all.sh --fm# tiacc lookup优化使用方法cd wideanddeep && bash start_all.sh --tiacc --fm
embedding 变量构造 +lookup 计算优化实测效果:
硬件环境 | 模型 | GPU 卡数 | 原生 TensorFlow(global_steps/sec per V100) | TI-ACC 优化后(global_steps/sec per V100) |
腾讯云GN10Xp.20XLARGE320 | DeepFM | 16(双机) | 41.9 - 56 | 96.1 - 103.3 |
| Wide & Deep | 16(双机) | 49.9 - 69 | 120 - 128 |
Acknowledgement
Tilearn-Angel 加速引擎和相关案例集 demo 受益于Deepspeed, ColossalAI, transformers, LLaMA-Factory, flash-attention 和 pytorch感谢以上项目作者的付出。


