一文了解 TKG 如何使用 GPU 资源池

相关文章:
有了这个办法,跑AI任务再也不用在机器上插GPU卡了
随着科技进步和产业变革的加速演进,人工智能(AI)已经成为兵家必争之地。在政府、学术机构、企业等各个层面,AI都受到高度重视,其在学术研究、技术创新、人才教育等方面的发展都呈现全新发展态势。作为AI市场中的重要组成,以 GPU 技术为主的 AI 加速市场也得到了快速的发展,与此同时,由于 GPU 硬件价格昂贵,传统使用 GPU 算力的独占式使用方式缺乏灵活性和经济性,同时随着云原生技术的发展,细粒度,快速交付切分 GPU 算力需求,急需经济高效 GPU 算力池化方案。
VMware 作为虚拟化与云原生技术的领导者,在 GPU 算力资源池化领域也是一直处于领先地位,针对不同使用场景有对应的 GPU 资源池化方案。
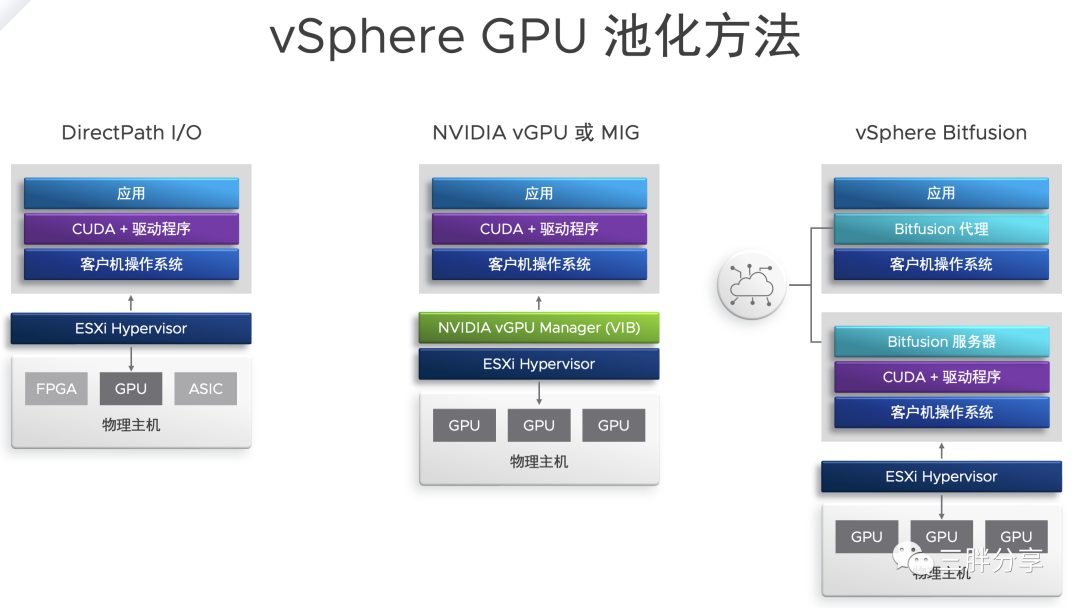
GPU 算力池化方式 | 优点 | 缺点 | 备注 |
|---|---|---|---|
GPU直通方式 | GPU独占模式,运算功能强 | GPU资源浪费;不支持共享GPU资源;不支持vMotion | 支持虚拟机,vsphere with Tanzu方案 |
vGPU方式 | GPU共享;支持vMotion,挂起/恢复 | GPU配置文件固定;资源分配静态;需要购买vGPU License | 支持虚拟机,vSphere with Tanzu方案 |
Bitfusion GPU池化方式 | 通过网络远程调用GPU算力资源;任意指定GPU使用比率 | 对网络延时要求较高;仅适用于CUDA架构 | 支持虚拟机、物理机、K8s,Tanzu方案 |
前两种方案当前客户采用比较多,读者都比较熟悉,本文重点介绍 VMware vSphere Bitfusion GPU池化方案。
VMware vSphere Bitfusion 是什么?
VMware vSphere Bitfusion是vSphere 7的一个强大功能,通过网络提供远程 GPU 池。Bitfusion 可虚拟化硬件加速器(例如图形处理单元 (GPU)),以提供可通过网络访问的共享资源池,从而支持人工智能 (AI) 和机器学习 (ML) 工作负载。Bitfusion 使得 GPU 可以像计算资源一样被抽象、分区、自动化和共享。帮助客户构建数据中心级AI 算力资源池,使用户应用无需修改就能透明地共享和使用数据中心内任何服务器之上的 AI 加速器。
可以在裸机、虚拟机或容器中部署 vSphere Bitfusion客户端,以便在数据中心环境中使用。通过 vCenter vSphere Bitfusion 可以监控网络中所有 GPU 服务器的运行状况、利用率、效率和可用性。此外,还可以监控客户端对 GPU 的使用情况并分配配额和时间限制。
vSphere Bitfusion 需要利用到 NVIDIA 的 CUDA 框架,CUDA 是 AI/ML 程序的开发运行框架,Bitfusion 主要是实现 CUDA 的远程调用。可与 TensorFlow 和 PyTorch 、TensorRT,PaddlePaddle 等人工智能框架配合使用。

VMware vSphere Bitfusion 架构图
Bitfusion Server 需要部署带有GPU 卡的vSphere ESXi主机上,GPU卡通过直通模式分配给 Bitfusion server ;
需要消费GPU资源的AI/ML应用和TensorFlow 等框架等可以部署在VM,物理机器,容器环境,同时安装Bitfusion客户端,Bitfusion客户端通过低延迟网络实现GPU的远程切分调用;
Bitfusion server 和Bitfusion 客户端之间的低延迟网络,建议与管理网络分开,可以支持TCP/IP,RoCE或Infiniband。
VMware vSphere Bitfusion与 Kubernetes
在资源管理调度平台上,Kubernetes 已成为事实标准。所以很多客户选择在 Kubernetes 中使用 GPU 运行 AI 计算任务。Kubernetes 提供 device plugin 机制,可以让节点发现和上报设备资源,供 Pod 使用。GPU 资源也是通过该方式提供。使用 Kubernetes 调度 GPU 代理以下好处:加速部署:通过容器构想避免重复部署机器学习复杂环境;提升集群资源使用率:统一调度和分配集群资源;保障资源独享:利用容器隔离异构设备,避免互相影响
结合 Kubernetes 灵活的资源调度与Bitfusion的的GPU算力切分与远程调用功能,能充分发挥二者的优势,首先是加速部署,避免把时间浪费在环境准备的环节中。通过容器镜像技术,将整个部署过程进行固化和复用,许许多多的框架都提供了容器镜像。我们可以借此提升 GPU 的使用效率。通过 Bitfusion 分时复用、动态切分、远程调用,结合 Kubernetes 的统一调度能力,使得资源使用方能够做到用即申请、完即释放,从而盘活整个 GPU 的资源池。
VMware中国研发云原生实验室推出了 Bitfusion 的 device plugin 插件,并且开源了相关代码。该项目通过在 Kubernetes 使用 Bitfusion 的方式来实现 GPU 共享能力。
项目地址
https://github.com/vmware/bitfusion-with-kubernetes-integration
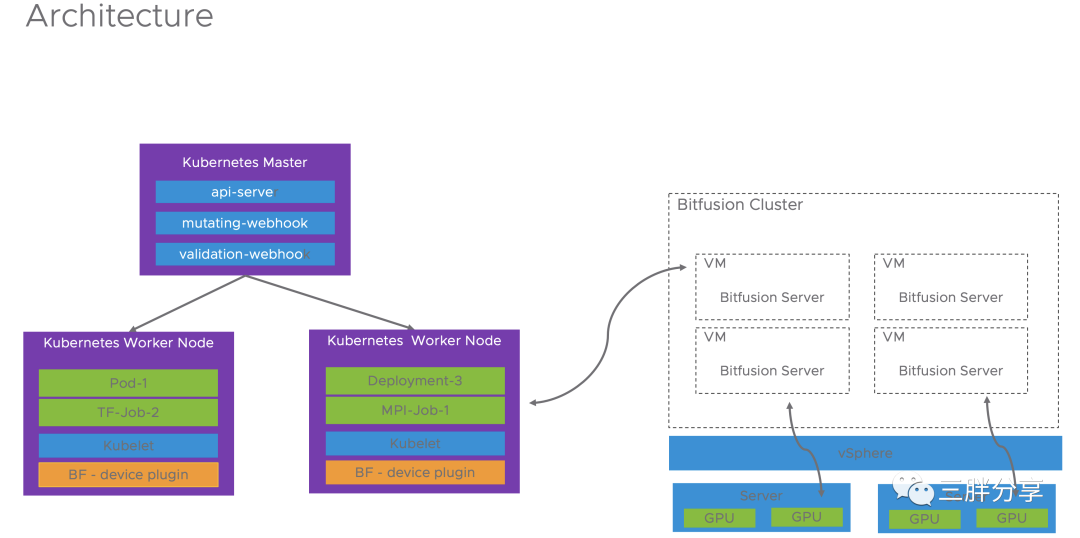
通过两个组件来实现允许 Kubernetes 使用 Bitfusion 的目的。
- bitfusion-device-plugin
- bitfusion-webhook
组件1和组件2分别内置在独立的容器镜像中。
bitfusion-device-plugin 作为 DaemonSet 运行在 kubelet所在的每个工作节点上。
bitfusion-webhook 作为 Deployment 运行在 Kubernetes主节点上
VMware vSphere Bitfusion 与 TKG
Tanzu Kubernetes Grid (TKG) 是 Tanzu 产品家族中的一个产品,是 VMware 的 Kubernetes 企业发行版本,可以在私有云和公有云多种云环境中部署,为用户提供一致的 Kubernetes 使用体验,与社区的 Kubernetes完全兼容。
TKG通过 Bitfusion device plugin插件,实现对 Bitfusion GPU 资源池的远程调用,实现GPU的算力资源的灵活使用。
TKG 与 vSphere Bitfusion 架构示意图
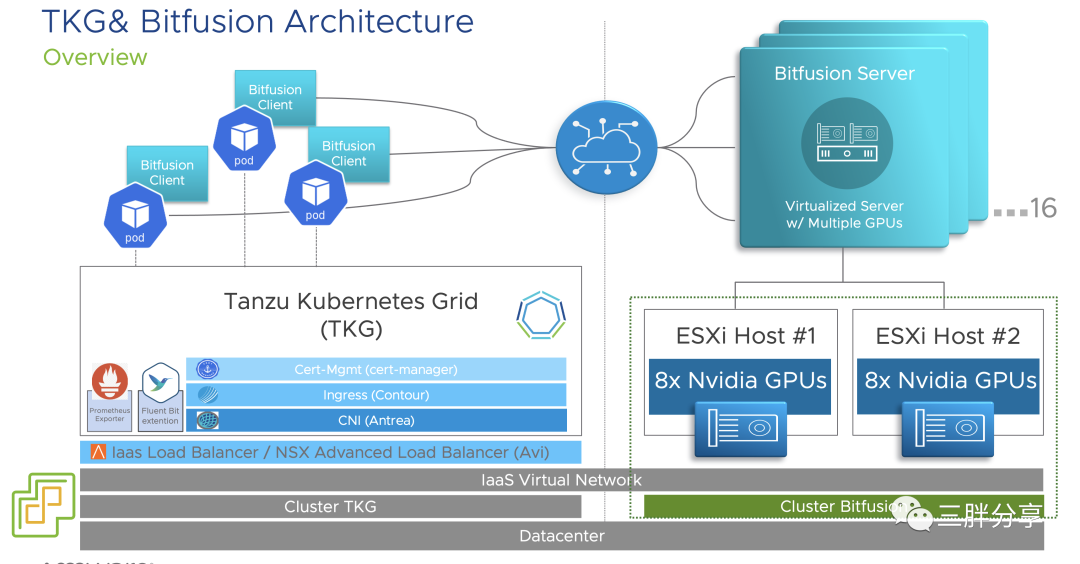
下面我们将要测试 TKG 与 Bitfusion 方案测试
vSphere Bitfusion 与 TKG 方案测试
测试拓扑
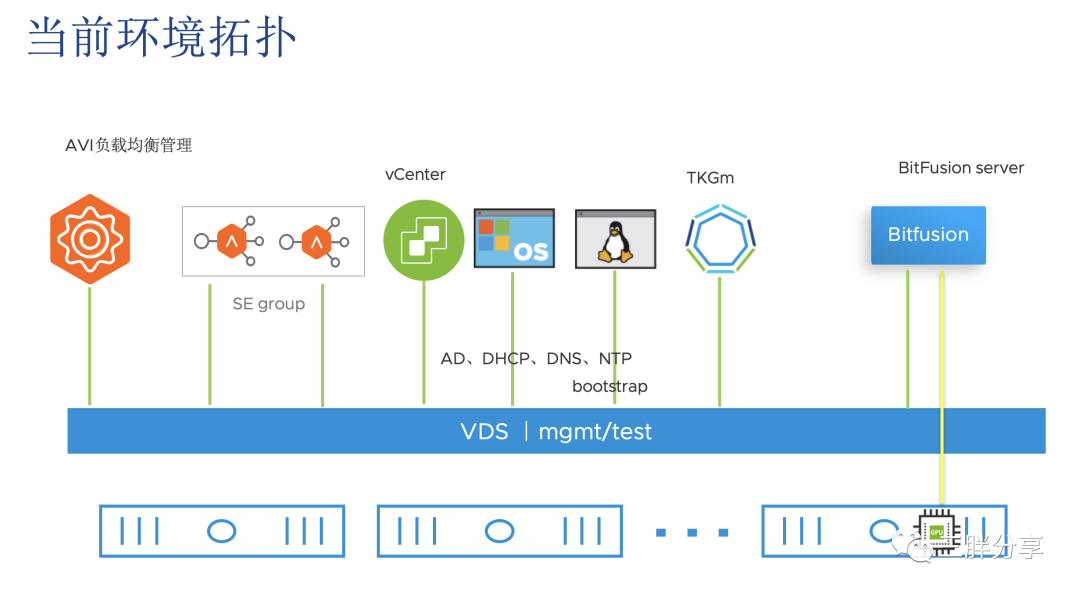
角色 | 版本 | 备注 |
|---|---|---|
Bitfusion server | 4.5.2 | 部署在安装T4 GPU卡的ESXi |
TKGm | 1.5.4 | |
Kubernetes | v1.20.15+vmware.1 | 当前不支持v1.22+;OS只支持 Ubuntu Linux,使用TKG Ubuntu 模版 |
测试步骤
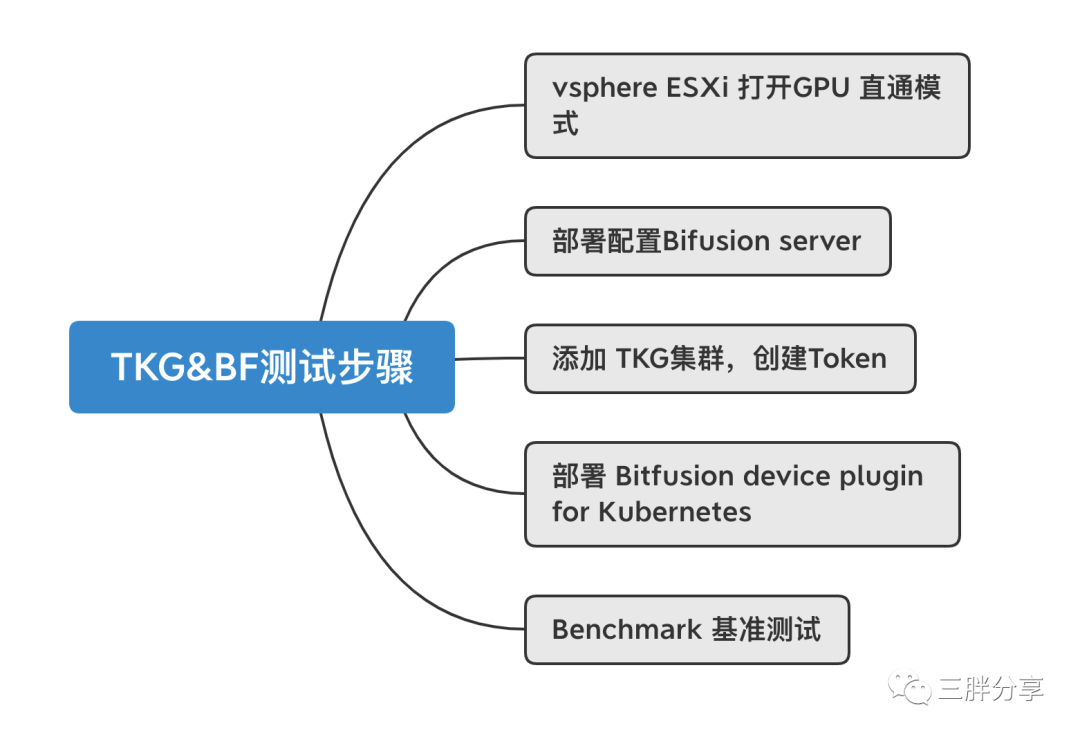
1
vSphere ESXi 打开GPU 直通模式
ESXi 主机的 BIOS 设置中为 GPU 启用直通
- 在 ESXi 主机上为 GPU 启用直通吗,启动GPU直通之后,重启ESX i主机
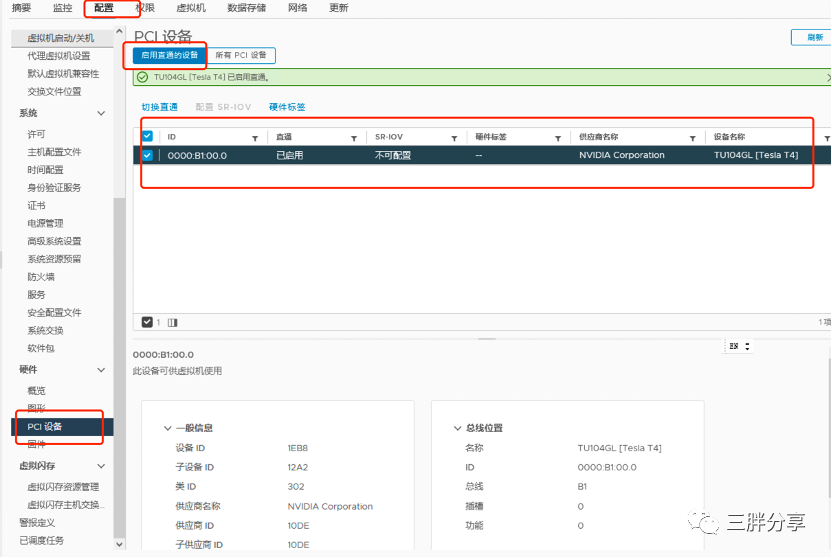
2. 在 ESXi 主机上为 GPU启动GPU直通模式之后,需要重启ESX i主机
2
部署配置BitFusion Server
- https://customerconnect.vmware.com 下载最新版本的 BitFusion Server
- 登陆 vSphere vcenter 导入 Bitfusion OVA 文件
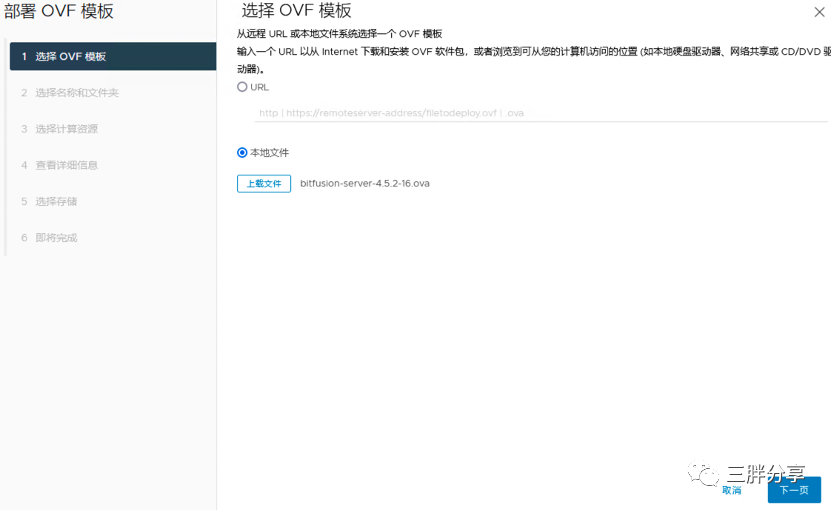
- 设置bf VM显示名称
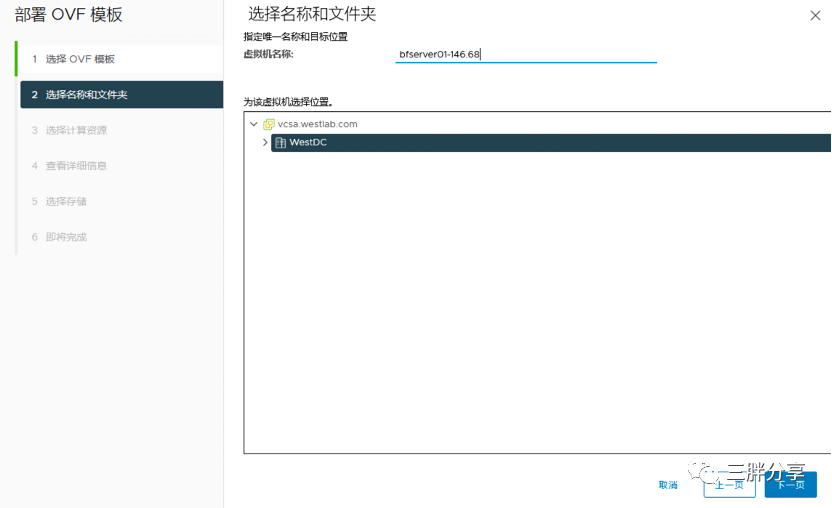
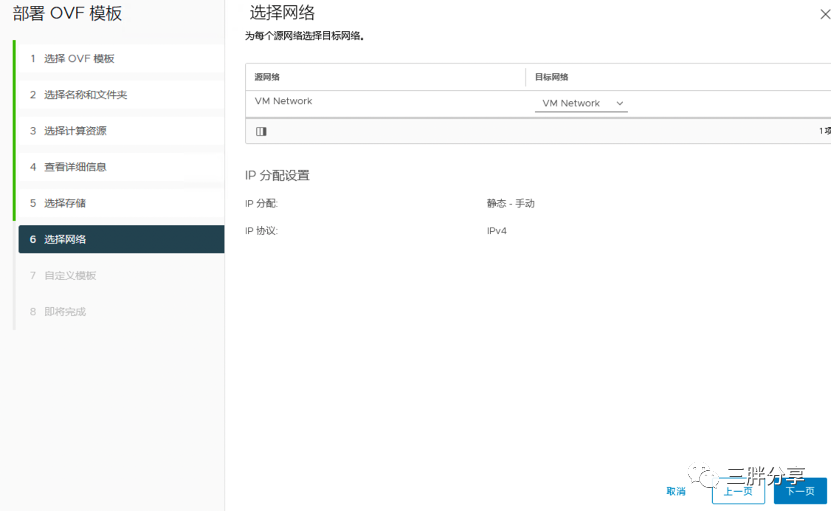
- 设置BF 网络
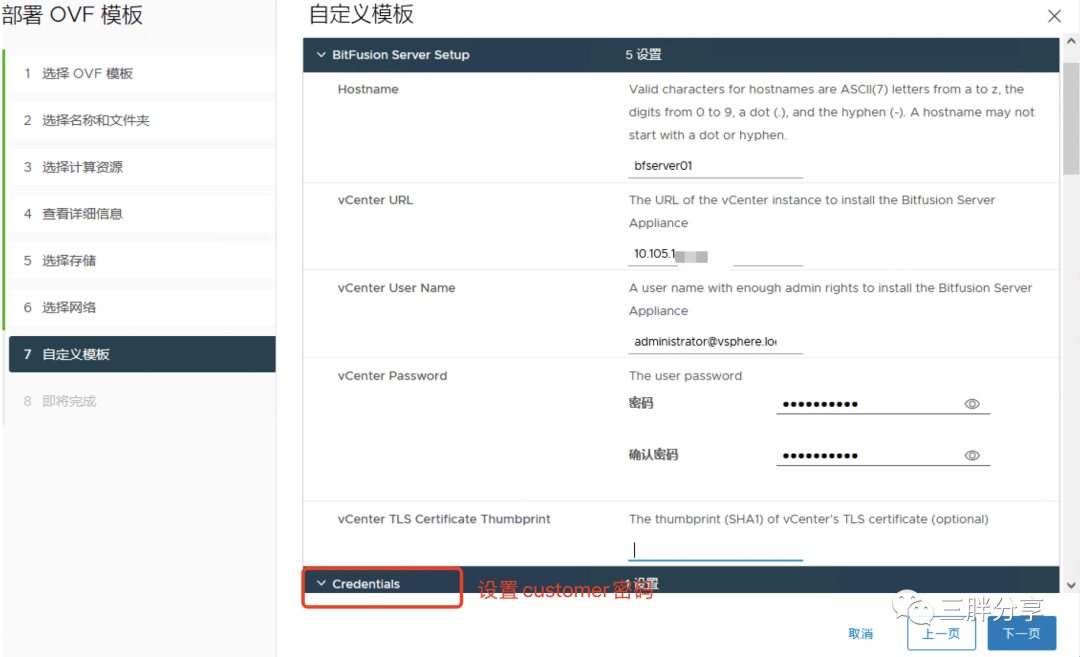
- 自定义设置 BF 模版,输入名称,VC地址,用户名,密码,在 credentials 部分指定 Bitfusion server的 customer 用户密码。
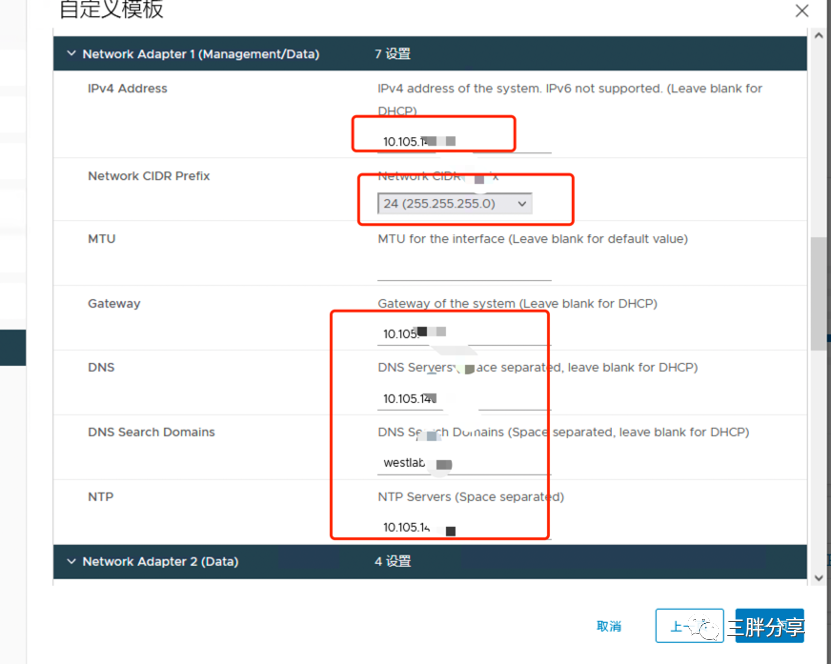
- 设置是否自动下载 NVIDIA 包 (自动下载需要链接互联网,离线模式不需要勾选),设置 BF server 管理网络信息,IP地址,掩码,网关、DNS、NTP
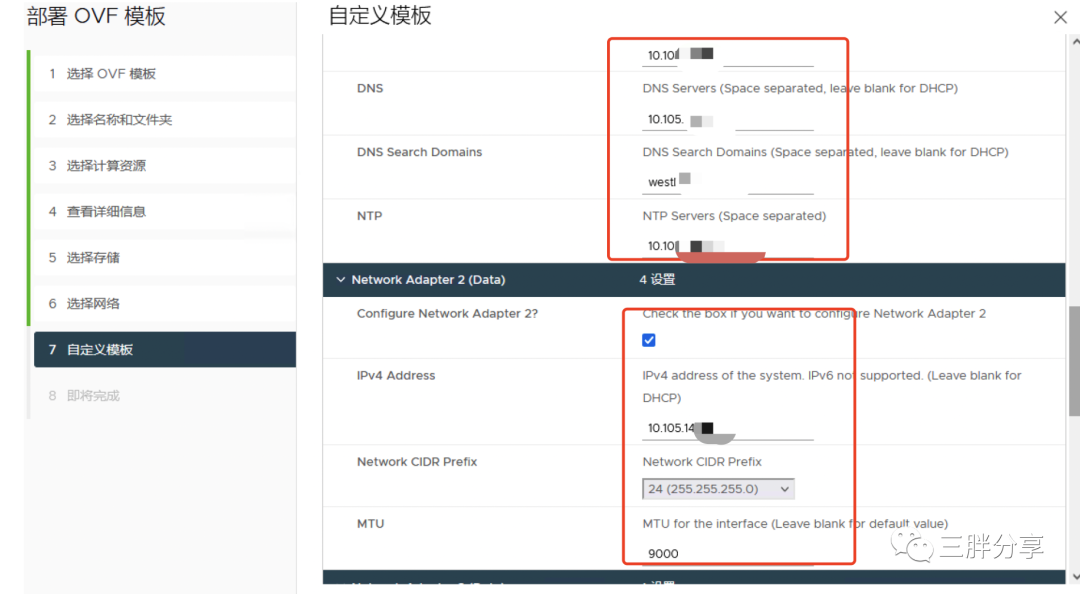
- 建议管理网和 BF 传输数据网络分开,所以需要设置数据网卡信息,注意 MTU 建议 9000 (需要匹配交换机设置)
- 汇总自定义模版信息,完成设置

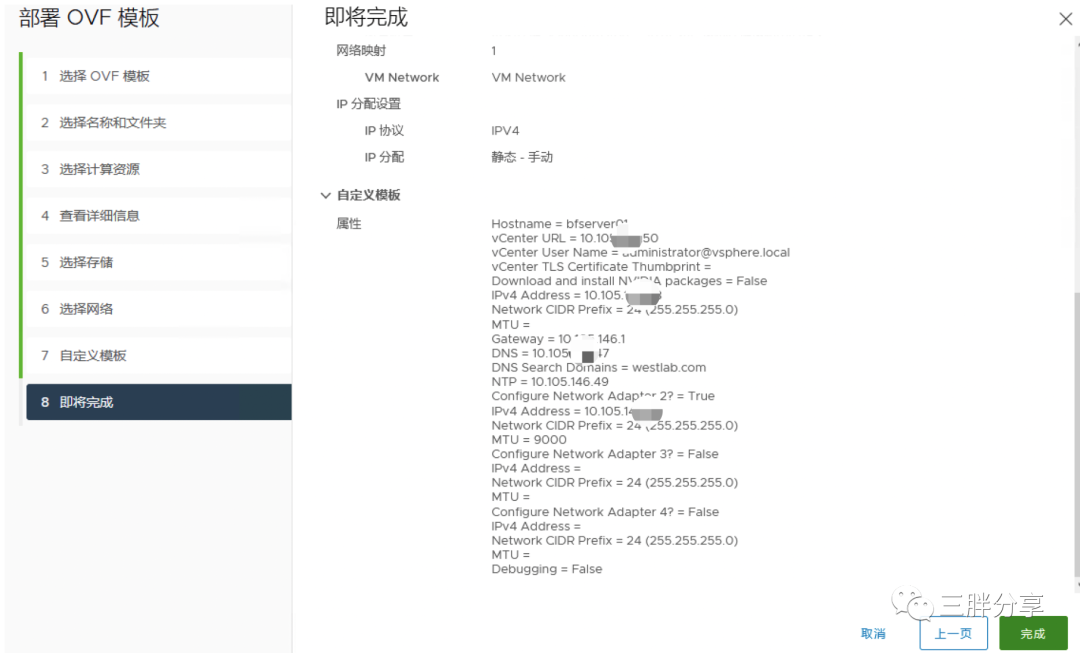
- OVF 导入完成后,不要开机,编辑虚机 添加网卡(默认只有1块网卡),添加所有直通 GPU 卡,设置内存预留
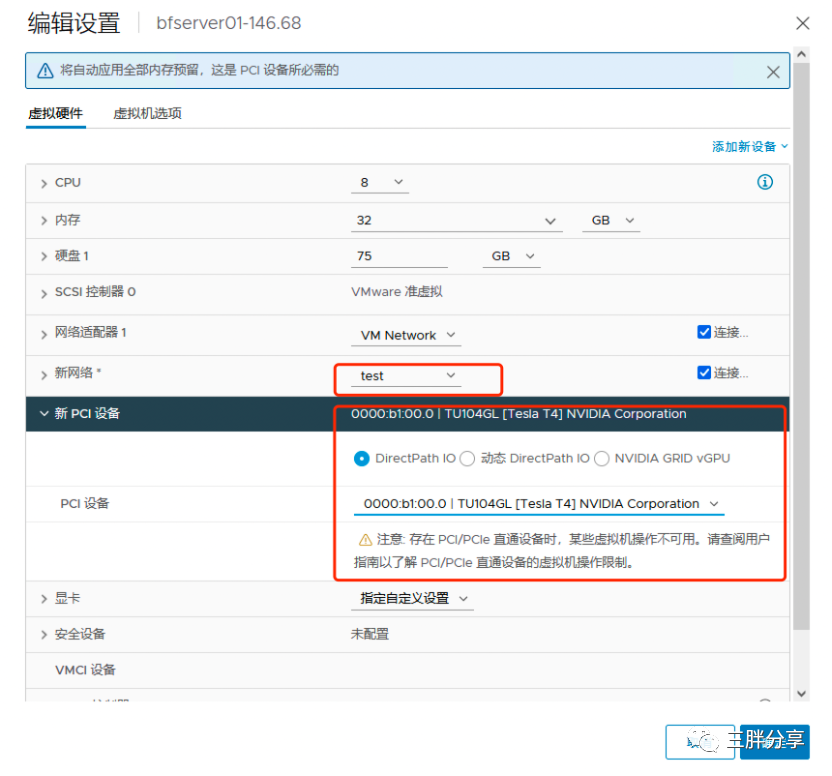
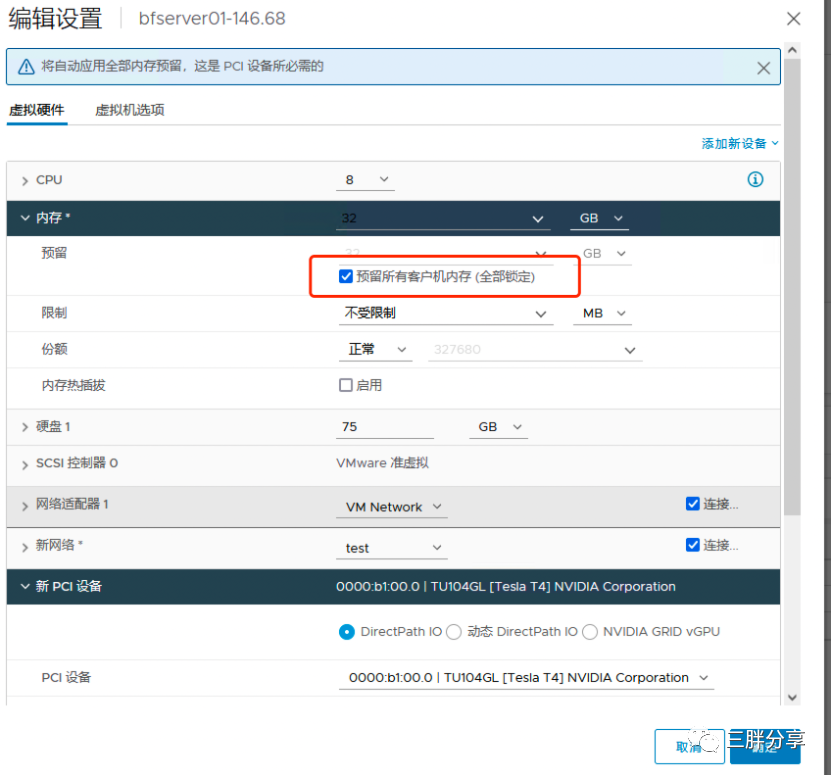
- 配置完成后打开 BitFusion 电源,等待10分钟左右
- 下载 vSphere Bitfusion 配合使用的 NVIDIA 驱动程序,,当前BF4.5.2 版本要求470.129.06版本,NVIDIA-Linux-x86_64-470.129.06.run ,下载地址为 https://www.nvidia.com/content/DriverDownload-March2009/confirmation.php?url=/XFree86/Linux-x86_64/470.129.06/NVIDIA-Linux-x86_64-470.129.06.run&lang=us&type=TITAN
- 使用 customer 用户(密码在部署过程中设置)复制驱动 NVIDIA-Linux-x86_64-470.129.06.run 到 bfserver 的 ~/nvidia-packages/ 目录
# scp -rp NVIDIA-Linux-x86_64-470.129.06.run  customer@10.105.148.10:~/nvidia-packages/
The authenticity of host '10.105.148.10 (10.105.148.10)' can't be established.
ECDSA key fingerprint is SHA256:WA23EW5G81JwP/42sRU+BBHRniSksntITEr1XrkMABE.
ECDSA key fingerprint is MD5:53:5d:c7:11:94:3e:7f:68:d9:f0:21:e0:38:d4:76:a9.
Are you sure you want to continue connecting (yes/no)? yes
Warning: Permanently added '10.105.148.10' (ECDSA) to the list of known hosts.
Password:
NVIDIA-Linux-x86_64-470.129.06.run                                                                                                         100%  260MB 141.8MB/s   00:01
[root@tanzu-cli ~]#- 使用 customer 用户(密码在部署过程中设置)登陆到bfserver,安装NVIDIA-Linux-x86_64-470.129.06.run 驱动包。安装成功之后重启bf server
# ssh customer@10.105.148.10
Password:
 14:13:50 up 8 min,  0 users,  load average: 0.04, 0.06, 0.03
tdnf update info not available yet!

customer@bfserver01 [ ~ ]$ cd ~/nvidia-packages
customer@bfserver01 [ ~/nvidia-packages ]$ sudo install-nvidia-packages --driver ./NVIDIA-Linux-x86_64-470.129.06.run
[2022-08-05 14:14:15] Installing NVIDIA driver
[2022-08-05 14:14:15] ./NVIDIA-Linux-x86_64-470.129.06.run --kernel-source-path=/usr/src/linux-headers-5.10.109-4.ph4 --no-drm --ui=none --no-opengl-files
Verifying archive integrity... OK
Uncompressing NVIDIA Accelerated Graphics Driver for Linux-x86_64 470.129.06..........................................................................................................................................................................................................................................................................................................................................................................................................................................................................................................................................................................................................

Welcome to the NVIDIA Software Installer for Unix/Linux

Detected 8 CPUs online; setting concurrency level to 8.
Installing NVIDIA driver version 470.129.06.

WARNING: The nvidia-drm module will not be installed. As a result, DRM-KMS will not function with this installation of the NVIDIA driver.


Would you like to register the kernel module sources with DKMS? This will allow DKMS to automatically build a new module, if you install a different kernel later.
  [default: (N)o]:
Performing CC sanity check with CC="/bin/cc".
Performing CC check.
Using the kernel source path '/usr/src/linux-headers-5.10.109-4.ph4' as specified by the '--kernel-source-path' commandline option.
Kernel source path: '/usr/src/linux-headers-5.10.109-4.ph4'
Kernel output path: '/usr/src/linux-headers-5.10.109-4.ph4'
Performing Compiler check.
Performing Dom0 check.
Performing Xen check.
Performing PREEMPT_RT check.
Performing vgpu_kvm check.
Cleaning kernel module build directory.
Building kernel modules
  : [##############################] 100%
Kernel module compilation complete.
Kernel messages:
[  486.546764] audit: type=1006 audit(1659708830.147:64): pid=5168 uid=0 subj==unconfined old-auid=4294967295 auid=2021 tty=(none) old-ses=4294967295 ses=49 res=1
[  486.606441] audit: type=1006 audit(1659708830.203:65): pid=5155 uid=0 subj==unconfined old-auid=4294967295 auid=2021 tty=(none) old-ses=4294967295 ses=50 res=1
[  495.968742] audit: type=1006 audit(1659708839.567:66): pid=5307 uid=1040 subj==unconfined old-auid=4294967295 auid=0 tty=(none) old-ses=4294967295 ses=51 res=1
[  505.970923] audit: type=1006 audit(1659708849.571:67): pid=5320 uid=1040 subj==unconfined old-auid=4294967295 auid=0 tty=(none) old-ses=4294967295 ses=52 res=1
[  512.362837] audit: type=1006 audit(1659708855.963:68): pid=5422 uid=2021 subj==unconfined old-auid=2021 auid=0 tty=pts0 old-ses=50 ses=53 res=1
[  515.965780] audit: type=1006 audit(1659708859.563:69): pid=5465 uid=1040 subj==unconfined old-auid=4294967295 auid=0 tty=(none) old-ses=4294967295 ses=54 res=1
[  525.970876] audit: type=1006 audit(1659708869.571:70): pid=5570 uid=1040 subj==unconfined old-auid=4294967295 auid=0 tty=(none) old-ses=4294967295 ses=55 res=1
[  535.968578] audit: type=1006 audit(1659708879.567:71): pid=5632 uid=1040 subj==unconfined old-auid=4294967295 auid=0 tty=(none) old-ses=4294967295 ses=56 res=1
[  545.965592] audit: type=1006 audit(1659708889.563:72): pid=7677 uid=1040 subj==unconfined old-auid=4294967295 auid=0 tty=(none) old-ses=4294967295 ses=57 res=1
[  555.975588] audit: type=1006 audit(1659708899.575:73): pid=10440 uid=1040 subj==unconfined old-auid=4294967295 auid=0 tty=(none) old-ses=4294967295 ses=58 res=1
[  562.972669] VFIO - User Level meta-driver version: 0.3
[  562.998245] nvidia: loading out-of-tree module taints kernel.
[  562.998252] nvidia: module license 'NVIDIA' taints kernel.
[  562.998253] Disabling lock debugging due to kernel taint
[  563.011519] nvidia: module verification failed: signature and/or required key missing - tainting kernel
[  563.017521] nvidia-nvlink: Nvlink Core is being initialized, major device number 240

[  563.018594] nvidia 0000:13:00.0: enabling device (0000 -> 0002)
[  563.067605] NVRM: loading NVIDIA UNIX x86_64 Kernel Module  470.129.06  Thu May 12 22:52:02 UTC 2022
[  563.080188] nvidia_uvm: module uses symbols from proprietary module nvidia, inheriting taint.
[  563.081939] nvidia-uvm: Loaded the UVM driver, major device number 238.
[  563.084850] nvidia-modeset: Loading NVIDIA Kernel Mode Setting Driver for UNIX platforms  470.129.06  Thu May 12 22:42:45 UTC 2022
[  563.088244] nvidia-modeset: Unloading
[  563.106981] nvidia-uvm: Unloaded the UVM driver.
[  563.134276] nvidia-nvlink: Unregistered the Nvlink Core, major device number 240

WARNING: nvidia-installer was forced to guess the X library path '/usr/lib64' and X module path '/usr/lib64/xorg/modules'; these paths were not queryable from the system.
         If X fails to find the NVIDIA X driver module, please install the `pkg-config` utility and the X.Org SDK/development package for your distribution and reinstall
         the driver.


WARNING: Unable to find a suitable destination to install 32-bit compatibility libraries. Your system may not be set up for 32-bit compatibility. 32-bit compatibility files
         will not be installed; if you wish to install them, re-run the installation and set a valid directory with the --compat32-libdir option.

Searching for conflicting files:
  Searching: [##############################] 100%
Installing 'NVIDIA Accelerated Graphics Driver for Linux-x86_64' (470.129.06):
  Installing: [##############################] 100%
Driver file installation is complete.
Running post-install sanity check:
  Checking: [##############################] 100%
Post-install sanity check passed.
Running runtime sanity check:
  Checking: [##############################] 100%
Runtime sanity check passed.

Installation of the kernel module for the NVIDIA Accelerated Graphics Driver for Linux-x86_64 (version 470.129.06) is now complete.

Created symlink /etc/systemd/system/multi-user.target.wants/nvidia-persistenced.service → /usr/lib/systemd/system/nvidia-persistenced.service.
[2022-08-05 14:15:11] Finished installing NVIDIA packages

customer@bfserver01 [ ~/nvidia-packages ]$ sudo reboot- 重启10分钟左右BitFusion会自动注册vcenter Plugin,刷新浏览器,可以看到bitfusion插件已经注册成功
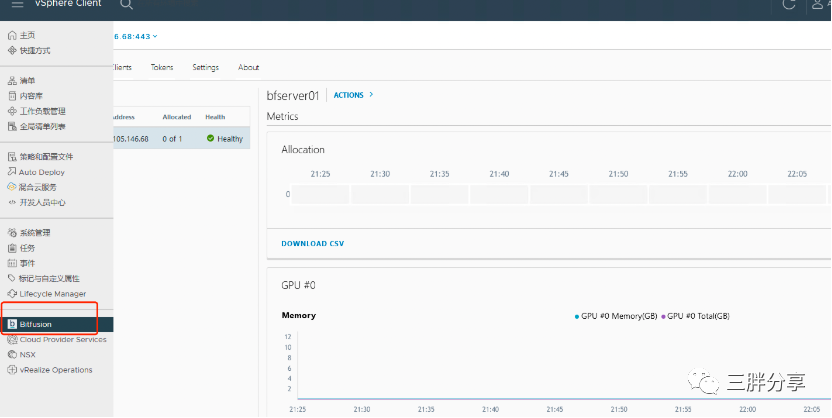
3
注入的Bitfusion token文件到TKG 集群
配置流程:
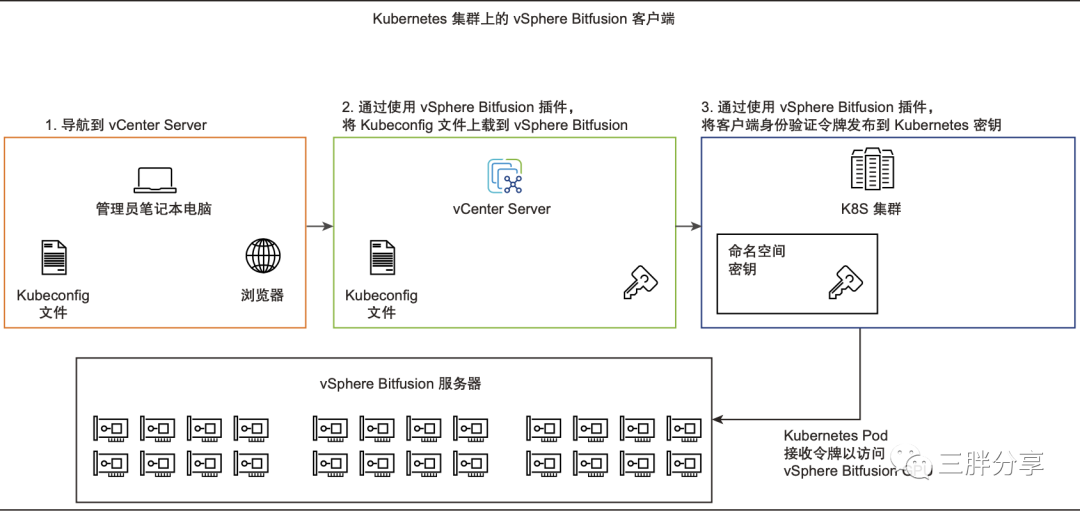
- 在bootstrap 主机导出 tkg 集群kubeconfig 文件
# tanzu cluster kubeconfig get bftkg01 --admin -n map --export-file bftkg01config
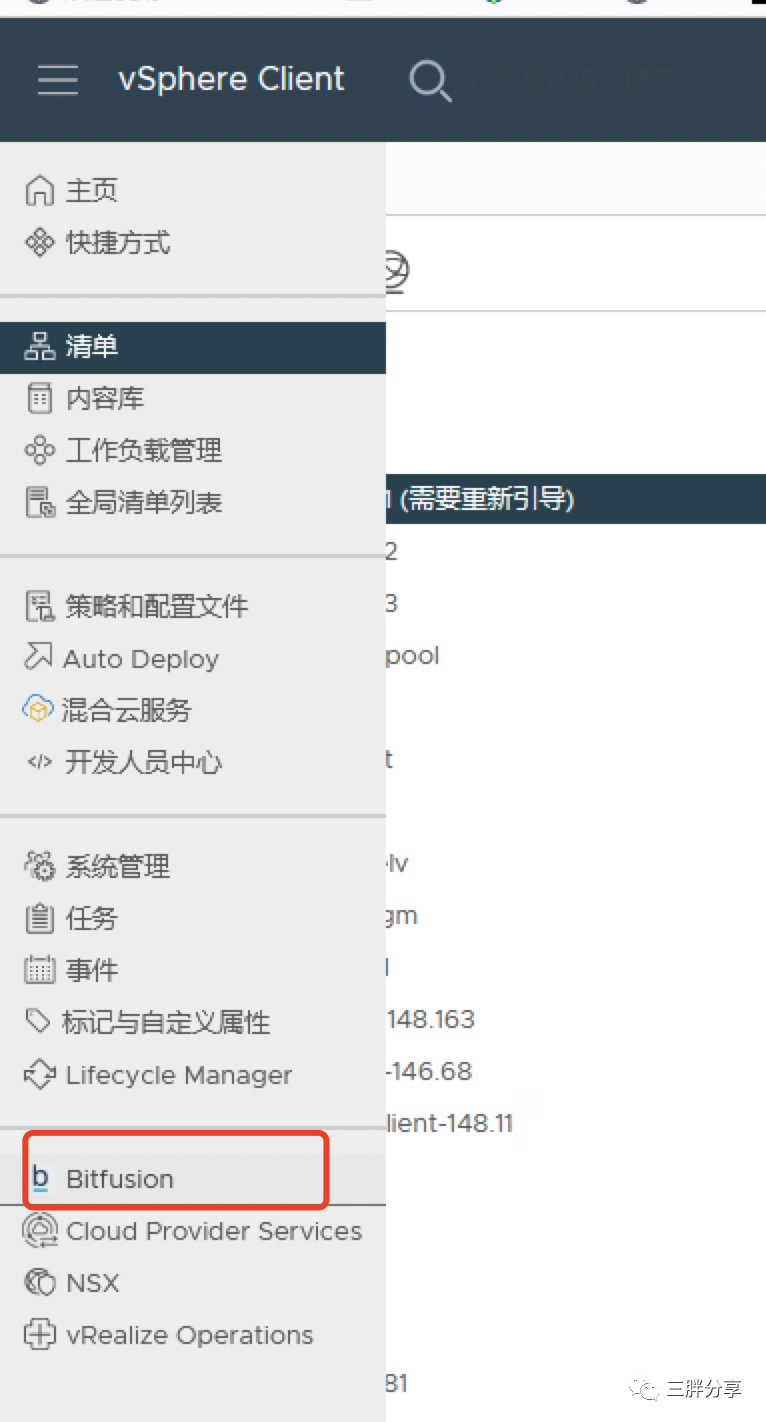
- 切换到bitfusion插件管理界面
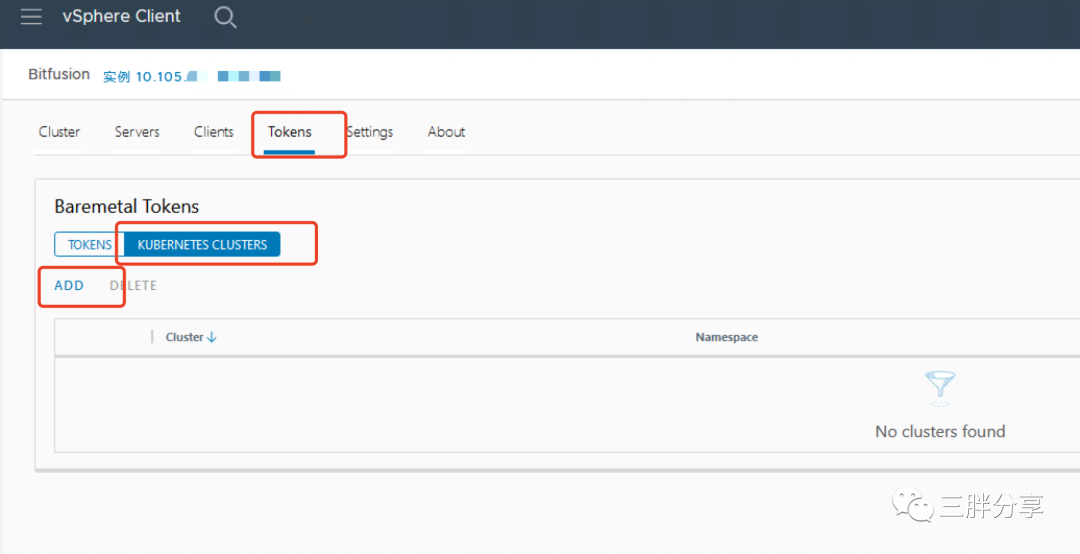
- 切换到token 的 Kubernetes cluster ,点击 ADD,添加集群认证
- 上传 kubeconfig 文件,并选择 kube-system 命名空间
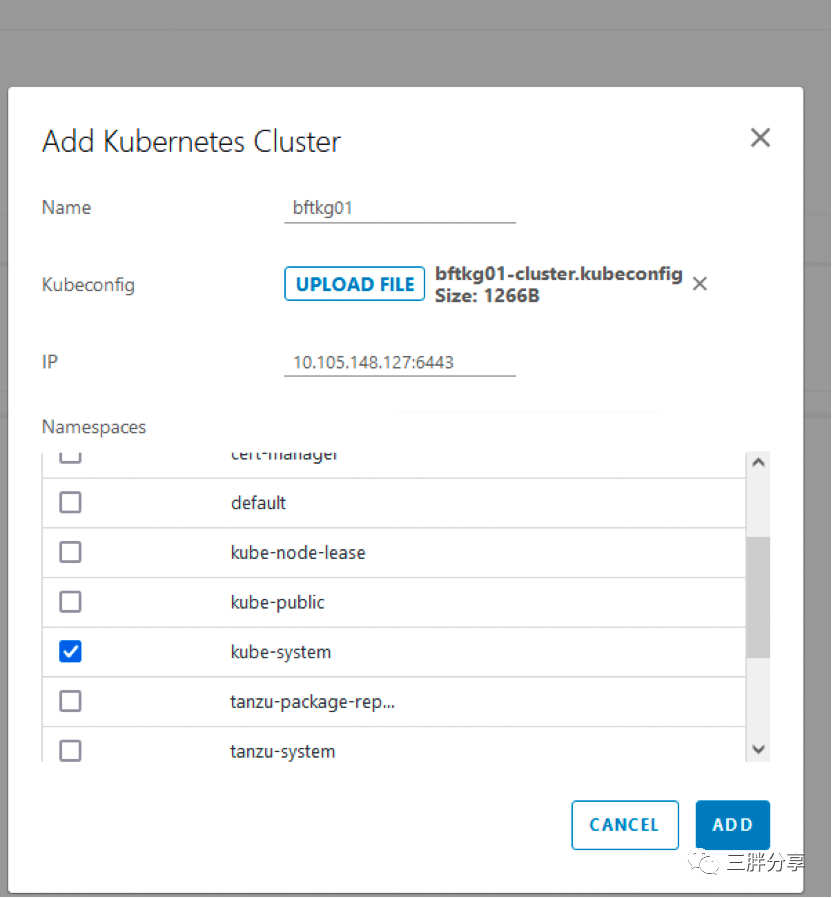
- 创建的 token 文件,自动注入到 TKG 集群
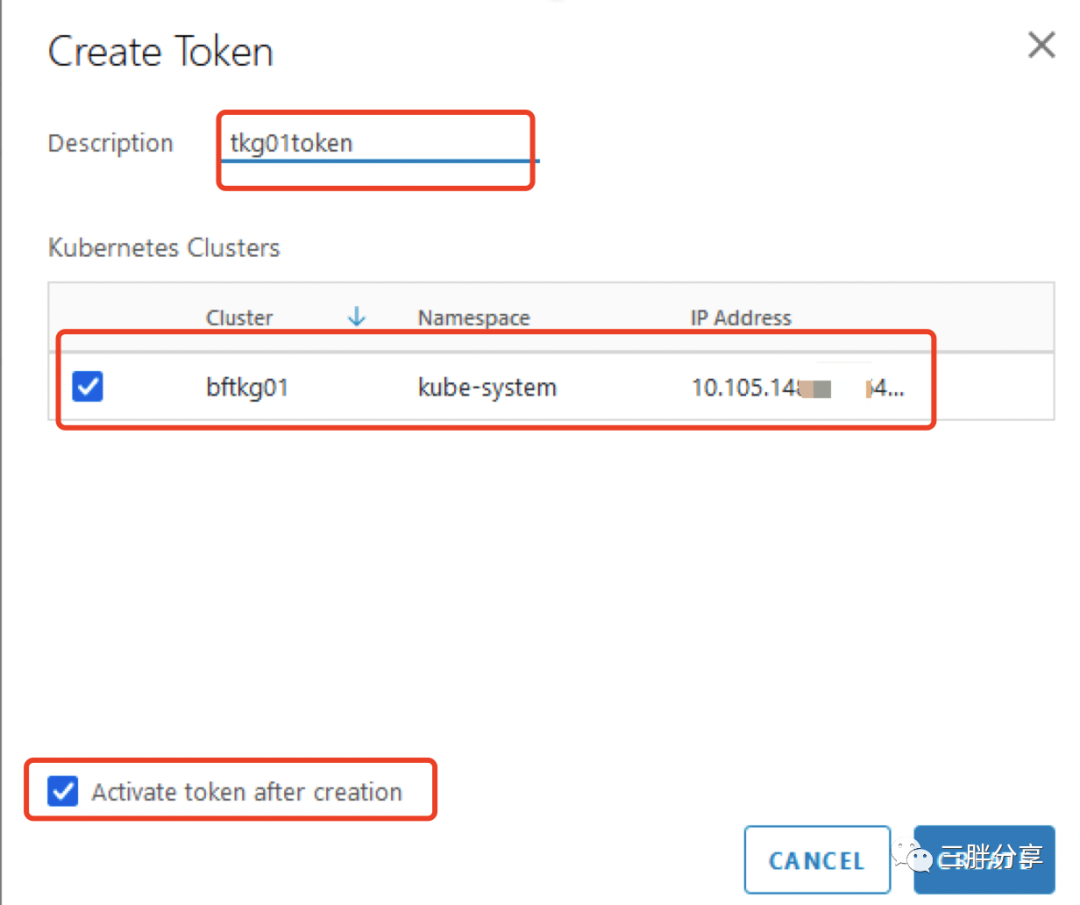
- 登陆 TKG 集群查看 token 文件成功注入
# kubectl get secrets -n kube-system |grep bit
bitfusion-client-secret-ca.crt                   Opaque                                1      154m
bitfusion-client-secret-client.yml               Opaque                                1      154m
bitfusion-client-secret-servers.conf             Opaque                                1      154m
4
部署 Bitfusion device plugin for Kubernetes
Bitfusion device plugin for Kubernetes有两种部署的方式:
1) 使用已经构建好的容器镜像部署
2) 使用代码构建容器镜像,并用生成的镜像部署
本次测试采用第一种方式
第二种方式可以参考项目地址 https://github.com/vmware/bitfusion-with-kubernetes-integration
第一种方式可以修改使用腾讯云image地址:
ccr.ccs.tencentyun.com/bitfusion/bitfusion-device-plugin:0.4
ccr.ccs.tencentyun.com/bitfusion/bitfusion-webhook:0.4
ccr.ccs.tencentyun.com/bitfusion/bitfusion-client:0.4
- 使用以下命令克隆源github 代码:
# git clone https://github.com/vmware/bitfusion-with-kubernetes-integration.git
Cloning into 'bitfusion-with-kubernetes-integration'...
remote: Enumerating objects: 417, done.
remote: Counting objects: 100% (184/184), done.
remote: Compressing objects: 100% (128/128), done.
remote: Total 417 (delta 138), reused 56 (delta 56), pack-reused 233
Receiving objects: 100% (417/417), 3.32 MiB | 2.55 MiB/s, done.
Resolving deltas: 100% (205/205), done.- 使用以下命令部署 Bitfusion device plugin 和其他相关组件,需要确保Kubernetes 集群可以连接到 Internet
备注1: 可以修改 /bitfusion-with-kubernetes-integration/bitfusion_device_plugin/Makefile 为腾讯云镜像地址IMAGE_REPO ?= ccr.ccs.tencentyun.com/bitfusion
备注2: 如果需要启用配额功能或者使用 gpu-memory参数指定Bitfusion资源分配,需要更新 bitfusion-injector.yaml 文件,设置TOTAL_GPU_MEMORY。
例如:
 # vim bitfusion-with-kubernetes-integration/bitfusion_device_plugin/webhook/deployment/bitfusion-injector.yaml


apiVersion: apps/v1
...
         env:
           - name: TOTAL_GPU_MEMORY
             value: 16000
...
使用 make deploy 命令部署
cd bitfusion-with-kubernetes-integration-main/bitfusion_device_plugin

# make deploy

Create file device-plugin/deployment/deploy_device_plugin.yml by device-plugin/deployment/device_plugin.yml: rewrite phaedobf/device-plugin:v0.1 to docker.io/bitfusiondeviceplugin/bitfusion-device-plugin:0.4 ...
Create file webhook/deployment/deploy-bitfusion-injector-webhook-configmap.yaml by webhook/deployment/bitfusion-injector-webhook-configmap.yaml: rewrite phaedobf/bitfusion-client-ubuntu1804_2.5.0-10_amd64:v0.1 to docker.io/bitfusiondeviceplugin/bitfusion-client:0.4 ...
Create file webhook/deployment/deploy-bitfusion-injector.yaml by webhook/deployment/bitfusion-injector.yaml: rewrite phaedobf/sidecar-injector:v0.1 to docker.io/bitfusiondeviceplugin/bitfusion-webhook:0.4 ...
Create device-plugin ...
kubectl delete -f device-plugin/deployment/deploy_device_plugin.yml
Error from server (NotFound): error when deleting "device-plugin/deployment/deploy_device_plugin.yml": daemonsets.apps "bitfusion-cli-device-plugin" not found
make: [create] Error 1 (ignored)
daemonset.apps/bitfusion-cli-device-plugin created
Create webhook ...
namespace/bwki created
/root/bf/bitfusion-with-kubernetes-integration/bitfusion_device_plugin
/root/bf/bitfusion-with-kubernetes-integration/bitfusion_device_plugin/webhook
K8S_PLATFORM == community
creating certs in tmpdir /tmp/tmp.kh94bERflW
Generating RSA private key, 2048 bit long modulus
......................................+++
..........................................+++
e is 65537 (0x10001)
Warning: certificates.k8s.io/v1beta1 CertificateSigningRequest is deprecated in v1.19+, unavailable in v1.22+; use certificates.k8s.io/v1 CertificateSigningRequest
certificatesigningrequest.certificates.k8s.io/bwki-webhook-svc.bwki created
NAME                    AGE   SIGNERNAME                     REQUESTOR          CONDITION
bwki-webhook-svc.bwki   0s    kubernetes.io/legacy-unknown   kubernetes-admin   Pending
certificatesigningrequest.certificates.k8s.io/bwki-webhook-svc.bwki approved
W0808 21:46:19.054194   29067 helpers.go:557] --dry-run is deprecated and can be replaced with --dry-run=client.
secret/bwki-webhook-certs created
deployment.apps/bitfusion-webhook-deployment created
service/bwki-webhook-svc created
configmap/bwki-webhook-configmap created
serviceaccount/bwki-webhook-deployment created
clusterrolebinding.rbac.authorization.k8s.io/bwki-webhook-deployment created
validatingwebhookconfiguration.admissionregistration.k8s.io/validation.bitfusion.io-cfg created
Warning: admissionregistration.k8s.io/v1beta1 MutatingWebhookConfiguration is deprecated in v1.16+, unavailable in v1.22+; use admissionregistration.k8s.io/v1 MutatingWebhookConfiguration
mutatingwebhookconfiguration.admissionregistration.k8s.io/bwki-webhook-cfg created
configmap/bwki-bitfusion-client-configmap created
NAME                                            READY   STATUS              RESTARTS   AGE
bitfusion-webhook-deployment-6cbc6cb554-ssxbg 0/1 ContainerCreating 0 2s- 验证Bitfusion device plugin 以及相关组件部署成功
检查 device plugin 是否正在运行:
# kubectl get pod -n kube-system |grep bit
bitfusion-cli-device-plugin-9flht                     1/1     Running   0               57s
bitfusion-cli-device-plugin-kz66p                     1/1     Running   0               57s
bitfusion-cli-device-plugin-pbwzw                     1/1     Running   0               57s
检查 webhook 是否正在运行:
# kubectl get pod -n bwki
NAME                                            READY   STATUS    RESTARTS   AGE
bitfusion-webhook-deployment-6cbc6cb554-ssxbg   1/1     Running   0          41s
验证 cm 、sa 等组件
#  kubectl get configmap -n bwki
NAME                              DATA   AGE
bwki-bitfusion-client-configmap   1      2m42s
bwki-webhook-configmap            1      2m43s
kube-root-ca.crt                  1      2m45s
#  kubectl get serviceaccount  -n bwki
NAME                      SECRETS   AGE
bwki-webhook-deployment   1         2m51s
default                   1         2m53s
# kubectl get ValidatingWebhookConfiguration  -n bwki
NAME                                   WEBHOOKS   AGE
cert-manager-webhook                   1          3h27m
crdvalidator.antrea.tanzu.vmware.com   4          3h32m
validation.bitfusion.io-cfg            1          3m1s

#  kubectl get MutatingWebhookConfiguration   -n bwki
NAME                                 WEBHOOKS   AGE
cert-manager-webhook                 1          3h27m
crdmutator.antrea.io                 2          3h32m
crdmutator.antrea.tanzu.vmware.com   2          3h32m
# kubectl get svc   -n bwki
NAME               TYPE        CLUSTER-IP      EXTERNAL-IP   PORT(S)   AGE
bwki-webhook-svc   ClusterIP   100.68.195.68   <none>        443/TCP   3m24s
5
在 TKG 集群进行 TF 基准测试
完成安装后,用户可以编写 YAML 文件来使用 Bitfusion 资源。在 YAML 文件中有以下几个与 Bitfusion 资源相关的参数:
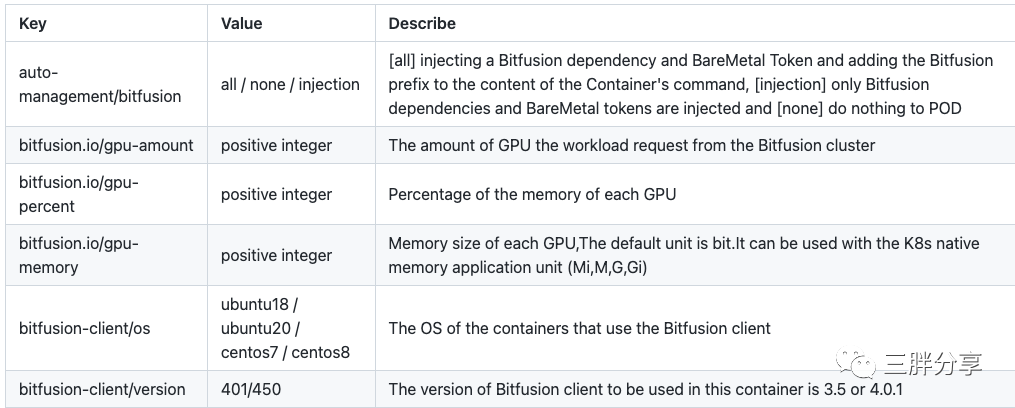
可以通过设置gpu资源百分比或者设置显存大小进行GPU算力分配
备注:使用 nvcr.io/nvidia/tensorflow:19.07-py3 进行测试
bitfusion-client/version: "450" 要匹配bfserver 版本
测试yaml模版位置:bitfusion-with-kubernetes-integration/bitfusion_device_plugin/example
- 通过 gpu-percent 参数指定Bitfusion资源切分
apiVersion: v1
kind: Pod
metadata:
annotations:
 auto-management/bitfusion: "all"
 bitfusion-client/os: "ubuntu18"
 bitfusion-client/version: "450"
name: bf-pkgs
# You can specify any namespace
namespace: tensorflow-benchmark
spec:
containers:
 - image: nvcr.io/nvidia/tensorflow:19.07-py3
   imagePullPolicy: IfNotPresent
   name: bf-pkgs
   command: ["python /benchmark/scripts/tf_cnn_benchmarks/tf_cnn_benchmarks.py --local_parameter_device=gpu --batch_size=32 --model=inception3"]
   resources:
     limits:
       # Request one GPU for this Pod from the Bitfusion cluster
       bitfusion.io/gpu-amount: 1
       # 50 percent of each GPU to be consumed
       bitfusion.io/gpu-percent: 50
   volumeMounts:
     - name: code
       mountPath: /benchmark
volumes:
 - name: code
       # The Benchmarks used for the test came from: https://github.com/tensorflow/benchmarks/tree/tf_benchmark_stage
       # Please make sure you have the corresponding content in /home/benchmarks directory on your node
   hostPath:
path: /home/benchmarks- 通过 gpu-memory 参数指定Bitfusion资源切分
备注:安装插件时需要设置TOTAL_GPU_MEMORY
apiVersion: v1
kind: Pod
metadata:
annotations:
  auto-management/bitfusion: "all"
  bitfusion-client/os: "ubuntu18"
  bitfusion-client/version: "450"
name: bf-pkgs
# You can specify any namespace
namespace: tensorflow-benchmark
spec:
containers:
  - image: nvcr.io/nvidia/tensorflow:19.07-py3
    imagePullPolicy: IfNotPresent
    name: bf-pkgs
    command: ["python /benchmark/scripts/tf_cnn_benchmarks/tf_cnn_benchmarks.py --local_parameter_device=gpu --batch_size=32 --model=inception3"]
    resources:
      limits:
        # Request one GPU for this Pod from the Bitfusion cluster
        bitfusion.io/gpu-amount: 1
        # 50 percent of each GPU to be consumed
        bitfusion.io/gpu-memory: 8000M
    volumeMounts:
      - name: code
        mountPath: /benchmark
volumes:
  - name: code
        # The Benchmarks used for the test came from: https://github.com/tensorflow/benchmarks/tree/tf_benchmark_stage
        # Please make sure you have the corresponding content in /home/benchmarks directory on your node
    hostPath:
path: /home/benchmarks- 下载TensorFlow 基准测试脚本,并拷贝到tkg集群的work节点
tensorflow/benchmarks 是TensorFlow 基准测试项目
项目地址:
https://github.com/tensorflow/benchmarks/tree/tf_benchmark_stage
拷贝测试脚本到TKG集群的worker 节点/home/benchmarks目录下:
例如:
  root@bftkg01-md-0-78ddf5fd45-59xx6:/home/benchmarks# ls
LICENSE perfzero README.md scripts- 运行以下命令创建ns,并提交基准测试任务
gpu-percent 方式测试
# kubectl create namespace tensorflow-benchmark
# kubectl create -f pod.yaml
基准测试日志输出如下:
TensorFlow:  1.14
Model:       inception3
Dataset:     imagenet (synthetic)
Mode:        training
SingleSess:  False
Batch size:  32 global
          32 per device
Num batches: 100
Num epochs:  0.00
Devices:     ['/gpu:0']
NUMA bind:   False
Data format: NCHW
Optimizer:   sgd
Variables:   parameter_server
==========
Generating training model
Initializing graph
Running warm up
Done warm up
Step    Img/sec total_loss
1       images/sec: 74.9 +/- 0.0 (jitter = 0.0) 7.297
10      images/sec: 74.3 +/- 0.3 (jitter = 0.4) 7.326
20      images/sec: 74.1 +/- 0.2 (jitter = 0.8) 7.335
30      images/sec: 74.0 +/- 0.1 (jitter = 1.0) 7.294
40      images/sec: 73.6 +/- 0.2 (jitter = 0.9) 7.244
50      images/sec: 73.4 +/- 0.1 (jitter = 1.2) 7.288
60      images/sec: 73.1 +/- 0.1 (jitter = 1.4) 7.333
70      images/sec: 72.9 +/- 0.1 (jitter = 1.4) 7.296
80      images/sec: 72.8 +/- 0.1 (jitter = 1.4) 7.307
90      images/sec: 72.6 +/- 0.1 (jitter = 1.3) 7.329
100     images/sec: 72.6 +/- 0.1 (jitter = 1.2) 7.366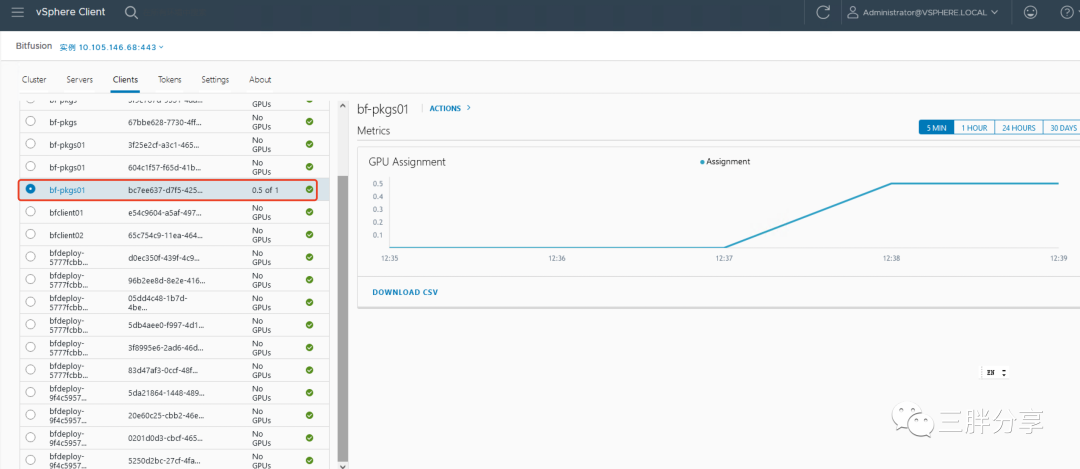
gpu-memory 方式测试
# kubectl create namespace tensorflow-benchmark
# kubectl create -f podmem.yaml
基准测试结果
  TensorFlow:  1.14
Model:       inception3
Dataset:     imagenet (synthetic)
Mode:        training
SingleSess:  False
Batch size:  32 global
           32 per device
Num batches: 100
Num epochs:  0.00
Devices:     ['/gpu:0']
NUMA bind:   False
Data format: NCHW
Optimizer:   sgd
Variables:   parameter_server
==========
Generating training model
Initializing graph
Running warm up
Done warm up
Step    Img/sec total_loss
1       images/sec: 73.9 +/- 0.0 (jitter = 0.0) 7.297
10      images/sec: 73.3 +/- 0.2 (jitter = 0.5) 7.336
20      images/sec: 73.3 +/- 0.1 (jitter = 0.6) 7.369
30      images/sec: 73.3 +/- 0.1 (jitter = 0.6) 7.284
40      images/sec: 73.2 +/- 0.1 (jitter = 0.6) 7.274
50      images/sec: 73.1 +/- 0.1 (jitter = 0.8) 7.254
60      images/sec: 72.9 +/- 0.1 (jitter = 0.9) 7.351
70      images/sec: 72.7 +/- 0.1 (jitter = 1.0) 7.270
80      images/sec: 72.6 +/- 0.1 (jitter = 1.1) 7.310
90      images/sec: 72.5 +/- 0.1 (jitter = 1.1) 7.307
100     images/sec: 72.4 +/- 0.1 (jitter = 1.1) 7.376
----------------------------------------------------------------
total images/sec: 72.37
----------------------------------------------------------------
[INFO] 2022-08-21T07:03:14Z Releasing GPUs from config file '/tmp/bitfusion929786101'...
[INFO] 2022-08-21T07:03:14Z Released GPUs on 1 servers and removed generated config file '/tmp/bitfusion929786101'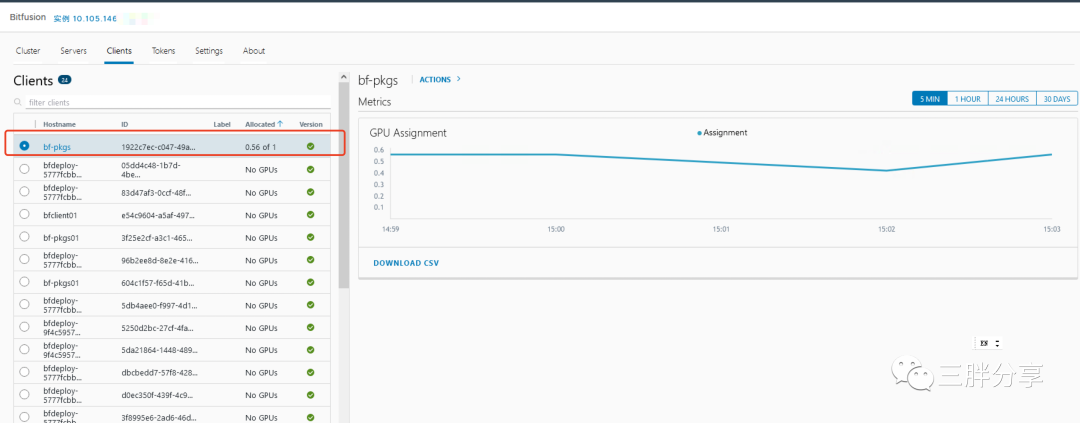
- Deployment 方式测试多个pod 同时发起基准测试
备注:bitfusion-client/version: "450" 要符合bf server 版本 设置副本数量
apiVersion: apps/v1
kind: Deployment
metadata:
  annotations:
  labels:
    app: bfdeploy
  name: bfdeploy
  namespace: tensorflow-benchmark
spec:
  replicas: 2
  selector:
    matchLabels:
      app: bfdeploy
  strategy: {}
  template:
    metadata:
      annotations:
        auto-management/bitfusion: "all"
        bitfusion-client/os: "ubuntu18"
        bitfusion-client/version: "450"
      labels:
        app: bfdeploy
    spec:
      containers:
        - image: nvcr.io/nvidia/tensorflow:19.07-py3
          name: bfdeploy
          command: ["python /benchmark/scripts/tf_cnn_benchmarks/tf_cnn_benchmarks.py --local_parameter_device=gpu --batch_size=32 --model=inception3"]
          resources:
            limits:
              bitfusion.io/gpu-amount: 1
              bitfusion.io/gpu-percent: 30
          volumeMounts:
            - name: code
              mountPath: /benchmark
      volumes:
        - name: code
          hostPath:
path: /home/benchmarks#kubectl apply -f bfdeploy.yaml
deployment.apps/bfdeploy created基准测试结果
TensorFlow:  1.14
Model:       inception3
Dataset:     imagenet (synthetic)
Mode:        training
SingleSess:  False
Batch size:  32 global
           32 per device
Num batches: 100
Num epochs:  0.00
Devices:     ['/gpu:0']
NUMA bind:   False
Data format: NCHW
Optimizer:   sgd
Variables:   parameter_server
==========
Generating training model
Initializing graph
Running warm up
Done warm up
Step    Img/sec total_loss
1       images/sec: 36.2 +/- 0.0 (jitter = 0.0) 7.305
10      images/sec: 37.5 +/- 1.0 (jitter = 0.9) 7.322
20      images/sec: 36.1 +/- 0.6 (jitter = 0.5) 7.343
30      images/sec: 35.6 +/- 0.4 (jitter = 0.5) 7.279
40      images/sec: 35.3 +/- 0.3 (jitter = 0.5) 7.240
50      images/sec: 35.1 +/- 0.3 (jitter = 0.4) 7.293
60      images/sec: 34.9 +/- 0.2 (jitter = 0.4) 7.320
70      images/sec: 34.8 +/- 0.2 (jitter = 0.5) 7.255
80      images/sec: 34.7 +/- 0.2 (jitter = 0.5) 7.348
90      images/sec: 34.6 +/- 0.2 (jitter = 0.6) 7.348
100     images/sec: 34.5 +/- 0.1 (jitter = 0.5) 7.349
----------------------------------------------------------------
total images/sec: 34.52
-------------------------TensorFlow: 1.14
Model: inception3
Dataset: imagenet (synthetic)
Mode: training
SingleSess: False
Batch size: 32 global
32 per device
Num batches: 100
Num epochs: 0.00
Devices: ['/gpu:0']
NUMA bind: False
Data format: NCHW
Optimizer: sgd
Variables: parameter_server
==========
Generating training model
Initializing graph
Running warm up
Done warm up
Step Img/sec total_loss
1 images/sec: 34.5 +/- 0.0 (jitter = 0.0) 7.324
10 images/sec: 34.5 +/- 0.1 (jitter = 0.3) 7.317
20 images/sec: 34.6 +/- 0.1 (jitter = 0.2) 7.360
30 images/sec: 34.6 +/- 0.0 (jitter = 0.2) 7.328
40 images/sec: 34.6 +/- 0.0 (jitter = 0.2) 7.290
50 images/sec: 38.0 +/- 2.0 (jitter = 0.2) 7.319
60 images/sec: 41.4 +/- 2.3 (jitter = 0.3) 7.320
70 images/sec: 44.2 +/- 2.3 (jitter = 0.6) 7.242
80 images/sec: 46.5 +/- 2.2 (jitter = 1.4) 7.306
90 images/sec: 48.6 +/- 2.1 (jitter = 2.4) 7.320
100 images/sec: 50.3 +/- 2.0 (jitter = 1.4) 7.353
----------------------------------------------------------------
total images/sec: 50.31
- auto-management/bitfusion的设置选项
auto-management/bitfusion:
[all] injecting a Bitfusion dependency and BareMetal Token and adding the Bitfusion p refix to the content of the Container's command
[injection] only Bitfusion dependencies and BareMetal tokens are injected and
[none] do nothing to POD
      annotations:
auto-management/bitfusion: "all"- GPU资源配额的设置和使用
可以给集群的namespace设置配额
device plugin使用的资源bitfusion.io/gpu,使用以下命令来创建配额。requests.bitfusion.io/gpu: 100代表在指定的namespace下的作业,最多可以使用Bitfusion的一张GPU卡的100%的能力。
apiVersion: v1
kind: List
items:
- apiVersion: v1
 kind: ResourceQuota
 metadata:
   name: bitfusion-quota
   namespace: tensorflow-benchmark
 spec:
   hard:
       requests.bitfusion.io/gpu: 100


kubectl apply -f quota.yaml# kubectl describe quota -n tensorflow-benchmark bitfusion-quota
Name: bitfusion-quota
Namespace: tensorflow-benchmark
Resource Used Hard
-------- ---- ----
requests.bitfusion.io/gpu 0 100发起一个任务gpu-percent=50 参数pod,显示used为50
# kubectl describe quota -n tensorflow-benchmark bitfusion-quota
Name:                      bitfusion-quota
Namespace:                 tensorflow-benchmark
Resource                   Used  Hard
--------                   ----  ----
requests.bitfusion.io/gpu  50    100
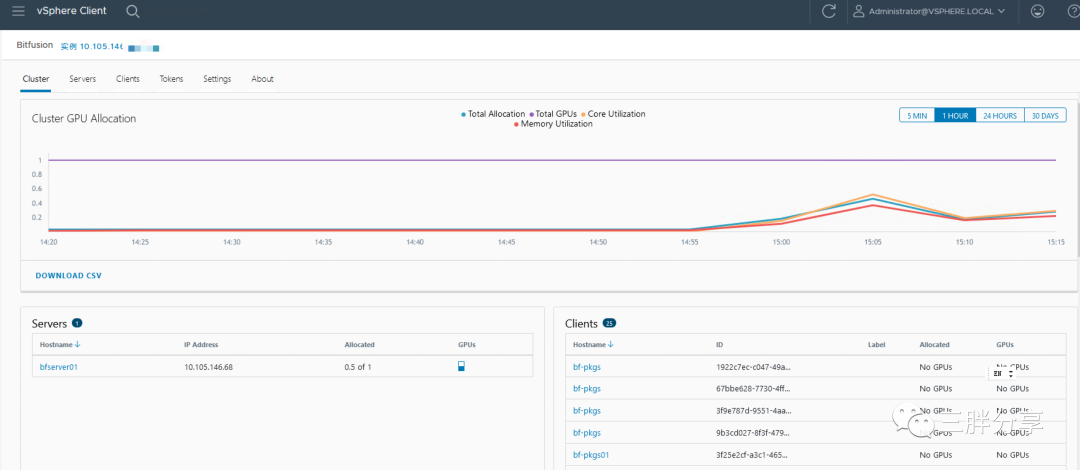
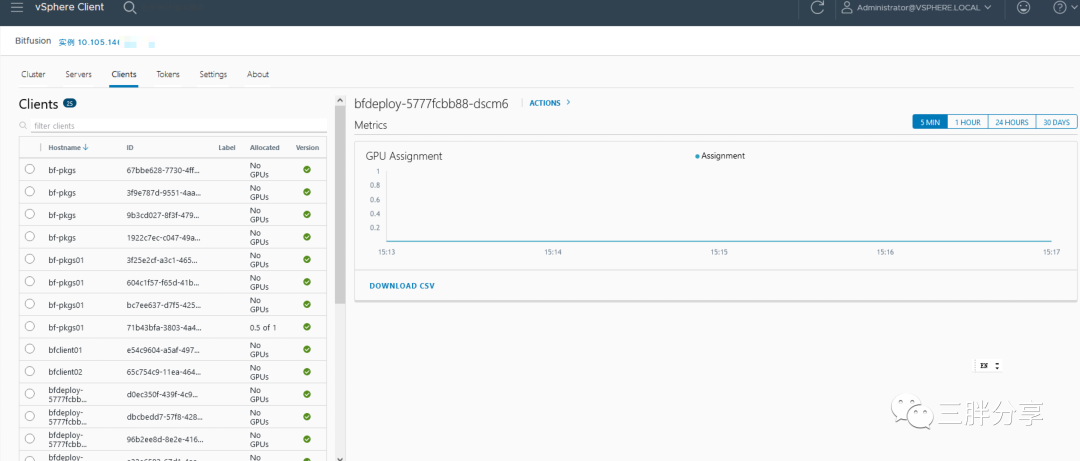
Bitfusion GPU 监控
1. 查看 bitfusion 集群 GPU 资源使用情况
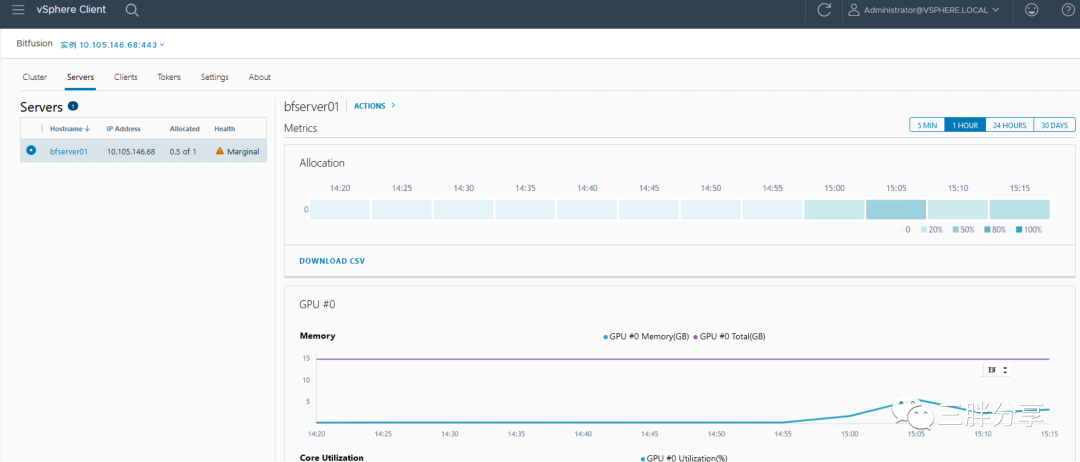
2. 查看 bitfusion server 健康状态、GPU信息、资源使用情况
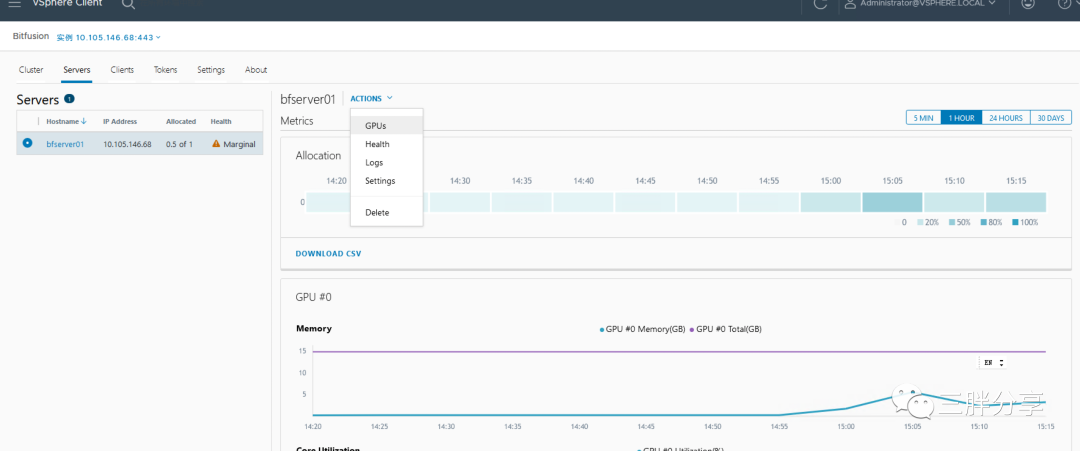
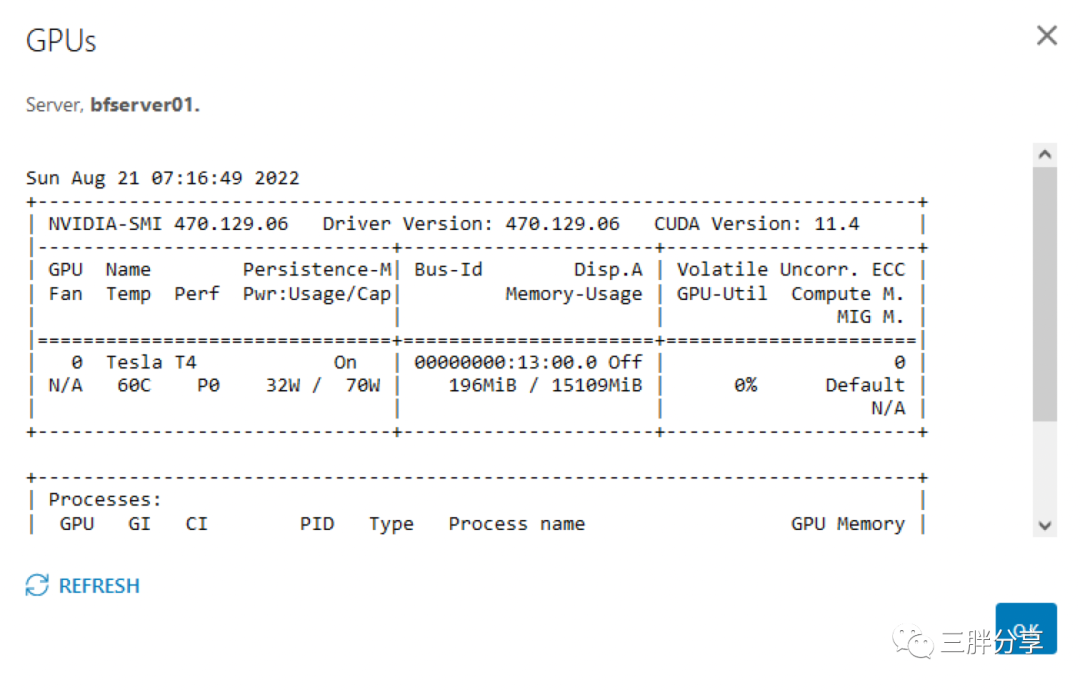
3. 查看 bitfusion 客户端GPU 资源使用情况
要想了解联邦学习、隐私计算、云原生和区块链等技术原理,请立即长按以下二维码,关注本公众号亨利笔记 ( henglibiji ),以免错过更新。

本文参与 腾讯云自媒体同步曝光计划,分享自微信公众号。
原始发表:2022-09-18,如有侵权请联系 cloudcommunity@tencent.com 删除
评论
登录后参与评论
推荐阅读
目录


