Netty 入门篇 Day 2---ByteBuffer
🌷🍁 博主猫头虎 带您 Go to New World.✨🍁 🦄 博客首页——猫头虎的博客🎐 🐳《面试题大全专栏》 文章图文并茂🦕生动形象🦖简单易学!欢迎大家来踩踩~🌺 🌊 《IDEA开发秘籍专栏》学会IDEA常用操作,工作效率翻倍~💐 🌊 《100天精通Golang(基础入门篇)》学会Golang语言,畅玩云原生,走遍大小厂~💐
🪁🍁 希望本文能够给您带来一定的帮助🌸文章粗浅,敬请批评指正!🍁🐥
3.ByteBuffer的使用
3.1ByteBuffer的使用步骤
1> 往buffer中写数据,可以通过 channel.read(buffer)
2> 切换buffer为 读模式, 通过 buffer.flip()
3> 从buffer中读取数据, 调用buffer.get()
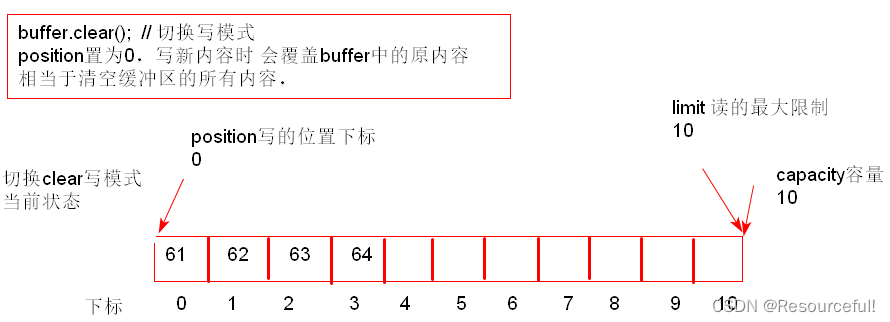
4> 切换buffer为 写模式, 通过 buffer.clear() 或 buffer.compact()
重复1-4步
3.2ByteBuffer的内存结构
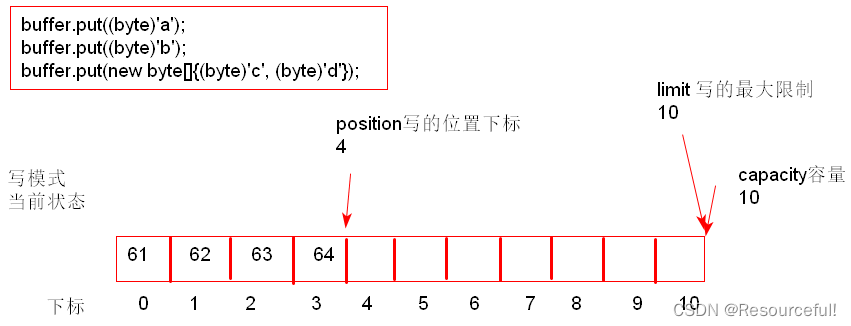
ByteBuffer的主要属性:
     capacity   容量/总大小
     position   读或写时指针的位置索引下标
     limit      限制(限制读或写允许的最大大小)
创建ByteBuffer对象:
     ByteBuffer buffer = ByteBuffer.allocate(10);
初始状态(写模式):
缓冲区内存分配后,默认处于写模式,positon为0, capacity和limit相同 均为最大容量10。


3.3ByteBuffer的常见方法
1. 分配空间
    ByteBuffer.allocate(长度);  // 分配堆空间
2. 向缓冲区中写数据
    buffer.put((byte)'a');
    buffer.put(new byte[]{(byte)'c', (byte)'d'});
    或
    int len = channel.read(buffer);
3. 从buffer中读内容
    byte b = buffer.get(); // 读1个字节内容,并返回    position会变
    byte b = buffer.get(idx); // 读指定索引处的1个字节内容,并返回     position不会变
    或
    channel.write(buffer);

    注意:读模式下 可以使用 buffer.rewind(); 重置position的值为0,相当于重头开始读。
4. mark和reset
	buffer.mark();  在当前position做标记
	buffer.reset();  回到标记位置
	注意:rewind和flip都会清除mark的位置内容。
3.4字符串和ByteBuffer的转换
ByteBuffer buffer1 = ByteBuffer.allocate(16);

// String -> buffer
// 1. put
buffer1.put("hello".getBytes());
ByteBufferUtil.debugAll(buffer1); // position: [5], limit: [16]

// 2. Charset
// 写完后 直接切换到读模式
ByteBuffer buffer2 = StandardCharsets.UTF_8.encode("你好");
ByteBufferUtil.debugAll(buffer2); // position: [0], limit: [6]

// 3. wrap
// 写完后 直接切换到读模式
ByteBuffer buffer3 = ByteBuffer.wrap("hello".getBytes());
ByteBufferUtil.debugAll(buffer3); // position: [0], limit: [5]

// buffer -> String
// 使用第2 和 3种方式,直接读即可
String str = StandardCharsets.UTF_8.decode(buffer2).toString();
System.out.println(str); // 你好

// 第1种写的方式 ,必须 先切换到读模式 才能读取
buffer1.flip();  // position: [0], limit: [5]
String str2 = StandardCharsets.UTF_8.decode(buffer1).toString();
System.out.println(str2); // hello
3.5综合练习
/*
需求: 模拟网络编程中的现象:
        Hello World!\n
        I'm Baizhi!\n
        How are you?\n
    实际情况,可能是:
        Hello World!\nI'm Baizhi!\nHo
        w are you?\n
    黏包现象:2项内容合并到一起 进行传输,效率相对高
    半包现象:1项内容被进行了拆分切断 处理,后半部分 会下次进行传输
要求:  通过编程,实现对乱格式的数据 恢复成原始按\n为分隔的正确格式的数据
     */
	public static void main(String[] args) {
        ByteBuffer buffer = ByteBuffer.allocate(40);
        buffer.put("Hello World!\nI'm Baizhi!\nHo".getBytes());
        split(buffer);
        buffer.put("w are you?\n".getBytes());
        split(buffer);
    }
    // 拆分缓冲区中的数据
    private static void split(ByteBuffer source){
        source.flip(); // 切换原缓冲区为 读模式

        // 依次按字节读取原缓冲区内容,当读到\n, 把完整的1项内容  写到新缓冲区
        // 依次按字节读取原缓冲区内容
        for(int i=0; i<source.limit(); i++){
            // 当读到 \n 时  (格式正确 的一项完整内容)
            if (source.get(i)=='\n'){
                // 把格式正确的数据 存入 新的缓冲区
                // 获取实际读到的字节数量
                int length = i - source.position() + 1;
                // System.out.println(i);
                // 分配新缓冲区内存大小 (实际读到的字节数量)
                ByteBuffer target = ByteBuffer.allocate(length);
                // 从source中读, 边读 边写入target
                for(int j=0; j<length; j++){
                    target.put(source.get()); // 使用get()读内容时,position会发生改变
                }
                ByteBufferUtil.debugAll(target);
            }
            // System.out.println((char)source.get(i));
        }

        // 切换原缓冲区为 写模式
        // 注意:此外必须为compact,把未读的内容 自动前移(相当于删除了已读过的内容),且position为未读内容的长度
        //   未读的内容  将和 新内容 连接到一起
        source.compact();
    }
4.FileChannel的使用
对文件进行操作处理的channel
1> 获取FileChannel
	通过FileInputStream、FileOutputStream或者RandomAccessFile对象 的getChannel()方法 来进行获取。
	a) 通过FileInputStream获取的channe 只能读
	b) 通过FileOutputStream获取的channe 只能写
	c) 通过RandomAccessFile的不同构造,可以设置channel为可读或可写模式
2> 读取
	// 通过channel读数据 并保存到buffer缓冲区
	int len = channel.read(buffer);// 返回裤子坟场到的字节数,-1代表读到了结尾
3> 写入
    // 把buffer缓冲区中的内容 通过channel写到文件
	channel.write(buffer);
4> 关闭
	if (channel!=null) channel.close();
5> 位置
	long pos = channel.position();  // 获取channel的当前位置
	channel.position(pos); // 设置channel的位置
6> 大小
	channel.size(); // 获取文件的大小
案例:简单的文件拷贝(2G以内的文件)
 // 文件的拷贝(缺点: 适用于文件大小2G以内)
public static void main(String[] args) {
    FileChannel readChannel = null;
    FileChannel toChannel = null;
    try{
        readChannel = new FileInputStream("e:\\data.txt").getChannel(); // 创建读文件的channel
        toChannel = new FileOutputStream("e:\\to.txt").getChannel(); // 创建写文件的channel

        readChannel.transferTo(0, readChannel.size(), toChannel); // 文件传输/拷贝

        System.out.println("file copy ok...");
    } catch(Exception e) {
        e.printStackTrace();
    } finally {
        // 关闭channel
        try {
            if (readChannel != null) readChannel.close();
            if (toChannel != null) toChannel.close();
        }catch (Exception e){
            e.printStackTrace();
        }
    }
}
5.其它相关的类
JDK7+ 引入了Path、Paths、Files 类
1> Path: 表示文件路径
2> Paths:是工具类,用于获取Path实例
	如:Path path = Paths.get("e:\\data.txt"); // 获取到了一个Path对象
3> Files: 工具类,提供对文件进行操作的工具方法
	如:Path path = Paths.get("e:\\data.txt");
	   boolean bn = Files.exists(path);  // 判断文件是否存在
       Files.createDirectory(path); // 创建目录

       Path path1 = Paths.get("e:\\data.txt");
       Path path2 = Paths.get("e:\\to.txt");
       Files.copy(path1, path2);
       ...
; // 判断文件是否存在 Files.createDirectory(path); // 创建目录
   Path path1 = Paths.get("e:\\data.txt");
   Path path2 = Paths.get("e:\\to.txt");
   Files.copy(path1, path2);
   ...
结语
如果这篇文章对您有所帮助,或者有所启发的话,求一键三连:点赞、评论、收藏➕关注,您的支持是我坚持写作最大的动力。
本文参与 腾讯云自媒体同步曝光计划,分享自作者个人站点/博客。
原始发表:2023-08-11,如有侵权请联系 cloudcommunity@tencent.com 删除
评论
登录后参与评论
推荐阅读
目录

