基于YOLO11的PCB元器件检测系统(Python源码+数据集+Pyside6界面)
原创
基于YOLO11的PCB元器件检测系统(Python源码+数据集+Pyside6界面)
原创
AI小怪兽
发布于 2025-11-27 09:10:13
发布于 2025-11-27 09:10:13
💡💡💡本文摘要:基于YOLO11的PCB元器件检测系统,阐述了整个数据制作和训练可视化过程
博主简介

AI小怪兽 | 计算机视觉算法专家 | 目标检测领域创新者
深耕计算机视觉与深度学习领域,专注于目标检测前沿技术的探索与突破。长期致力于YOLO系列算法的结构性创新、性能极限优化与工业级落地实践,旨在打通从学术研究到产业应用的最后一公里。
🚀 核心专长与技术创新
- YOLO算法结构性创新:于CSDN平台原创发布《YOLOv13魔术师》、《YOLOv12魔术师》等全系列深度专栏。系统性提出并开源了多项原创自研模块,在模型轻量化设计、多维度注意力机制融合、特征金字塔重构等关键方向完成了一系列突破性实践,为行业提供了具备高参考价值的技术路径与完整解决方案。
- 技术生态建设与知识传播:独立运营 “计算机视觉大作战” 公众号(粉丝1.6万),成功构建高质量的技术交流社群。致力于将复杂算法转化为通俗易懂的解读与可复现的工程代码,显著降低了计算机视觉的技术入门门槛。
🏆 行业影响力与商业实践
- 荣获腾讯云年度影响力作者与创作之星奖项,内容质量与专业性获行业权威平台认证。
- 全网累计拥有 7万+ 垂直领域技术受众,专栏文章总阅读量突破百万,在目标检测领域形成了广泛的学术与工业影响力。
- 具备丰富的企业级项目交付经验,曾为工业视觉检测、智慧城市安防等多个关键领域提供定制化的算法模型与解决方案,驱动业务智能化升级。
💡 未来方向与使命
秉持 “让每一行代码都有温度” 的技术理念,未来将持续聚焦于实时检测、语义分割及工业缺陷检测的商业化闭环等核心方向。愿与业界同仁协同创新,共同推动技术边界,以坚实的技术能力赋能实体经济与行业变革。
1.YOLO11介绍
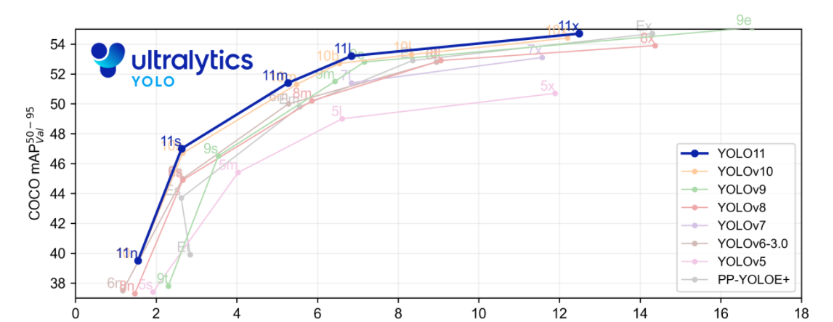
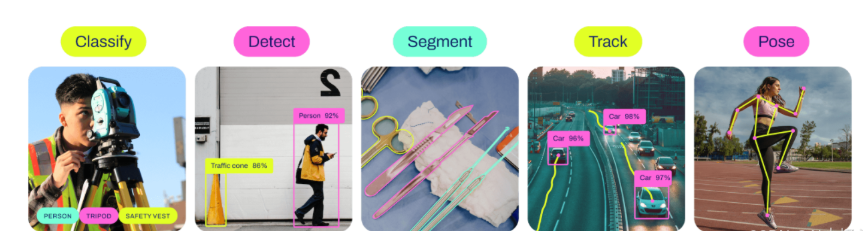
Ultralytics YOLO11是一款尖端的、最先进的模型,它在之前YOLO版本成功的基础上进行了构建,并引入了新功能和改进,以进一步提升性能和灵活性。YOLO11设计快速、准确且易于使用,使其成为各种物体检测和跟踪、实例分割、图像分类以及姿态估计任务的绝佳选择。
结构图如下:
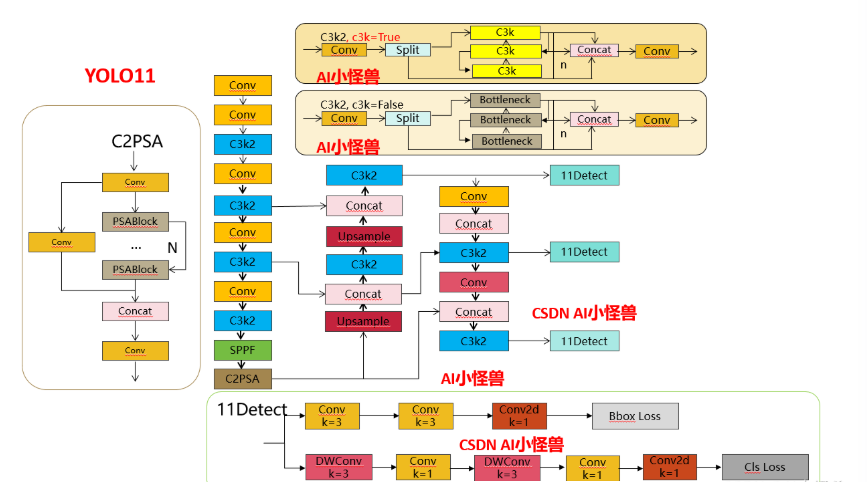
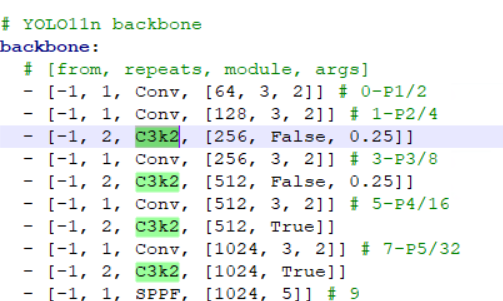
1.1 C3k2
C3k2,结构图如下
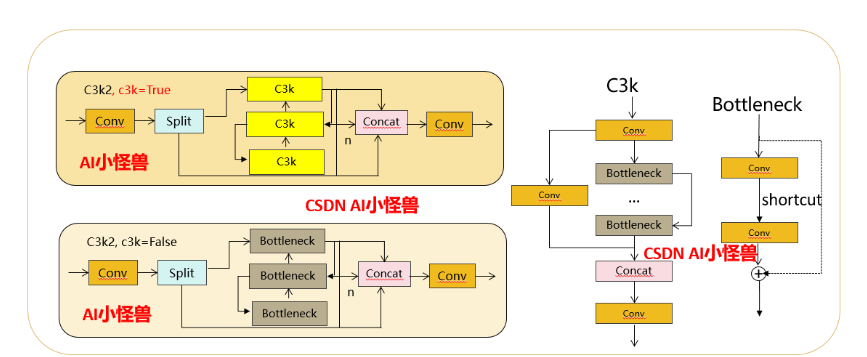
C3k2,继承自类C2f,其中通过c3k设置False或者Ture来决定选择使用C3k还是Bottleneck
实现代码ultralytics/nn/modules/block.py
class C3k2(C2f):
    """Faster Implementation of CSP Bottleneck with 2 convolutions."""

    def __init__(self, c1, c2, n=1, c3k=False, e=0.5, g=1, shortcut=True):
        """Initializes the C3k2 module, a faster CSP Bottleneck with 2 convolutions and optional C3k blocks."""
        super().__init__(c1, c2, n, shortcut, g, e)
        self.m = nn.ModuleList(
            C3k(self.c, self.c, 2, shortcut, g) if c3k else Bottleneck(self.c, self.c, shortcut, g) for _ in range(n)
        )


class C3k(C3):
    """C3k is a CSP bottleneck module with customizable kernel sizes for feature extraction in neural networks."""

    def __init__(self, c1, c2, n=1, shortcut=True, g=1, e=0.5, k=3):
        """Initializes the C3k module with specified channels, number of layers, and configurations."""
        super().__init__(c1, c2, n, shortcut, g, e)
        c_ = int(c2 * e)  # hidden channels
        # self.m = nn.Sequential(*(RepBottleneck(c_, c_, shortcut, g, k=(k, k), e=1.0) for _ in range(n)))
        self.m = nn.Sequential(*(Bottleneck(c_, c_, shortcut, g, k=(k, k), e=1.0) for _ in range(n)))
1.2 C2PSA介绍
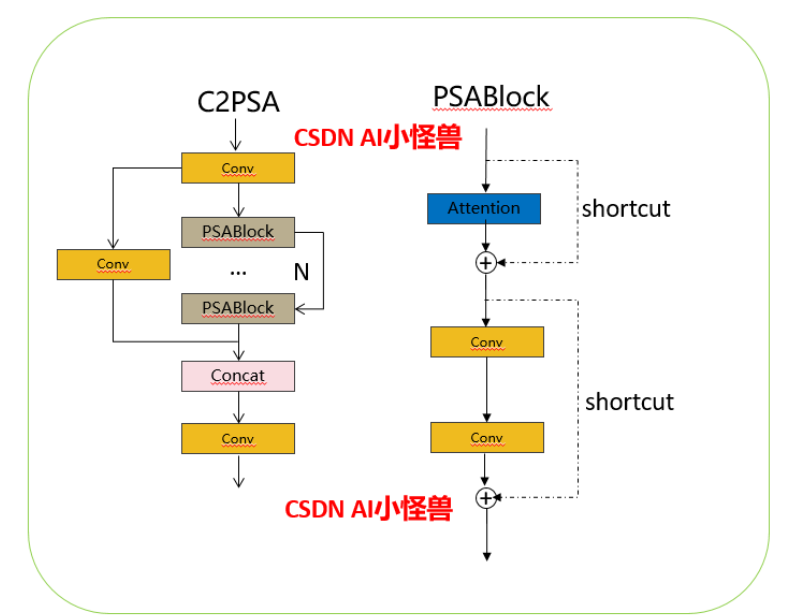
借鉴V10 PSA结构,实现了C2PSA和C2fPSA,最终选择了基于C2的C2PSA(可能涨点更好?)
实现代码ultralytics/nn/modules/block.py
class PSABlock(nn.Module):
"""
PSABlock class implementing a Position-Sensitive Attention block for neural networks.
This class encapsulates the functionality for applying multi-head attention and feed-forward neural network layers
with optional shortcut connections.
Attributes:
attn (Attention): Multi-head attention module.
ffn (nn.Sequential): Feed-forward neural network module.
add (bool): Flag indicating whether to add shortcut connections.
Methods:
forward: Performs a forward pass through the PSABlock, applying attention and feed-forward layers.
Examples:
Create a PSABlock and perform a forward pass
>>> psablock = PSABlock(c=128, attn_ratio=0.5, num_heads=4, shortcut=True)
>>> input_tensor = torch.randn(1, 128, 32, 32)
>>> output_tensor = psablock(input_tensor)
"""
def __init__(self, c, attn_ratio=0.5, num_heads=4, shortcut=True) -> None:
"""Initializes the PSABlock with attention and feed-forward layers for enhanced feature extraction."""
super().__init__()
self.attn = Attention(c, attn_ratio=attn_ratio, num_heads=num_heads)
self.ffn = nn.Sequential(Conv(c, c * 2, 1), Conv(c * 2, c, 1, act=False))
self.add = shortcut
def forward(self, x):
"""Executes a forward pass through PSABlock, applying attention and feed-forward layers to the input tensor."""
x = x + self.attn(x) if self.add else self.attn(x)
x = x + self.ffn(x) if self.add else self.ffn(x)
return x
class C2PSA(nn.Module):
"""
C2PSA module with attention mechanism for enhanced feature extraction and processing.
This module implements a convolutional block with attention mechanisms to enhance feature extraction and processing
capabilities. It includes a series of PSABlock modules for self-attention and feed-forward operations.
Attributes:
c (int): Number of hidden channels.
cv1 (Conv): 1x1 convolution layer to reduce the number of input channels to 2*c.
cv2 (Conv): 1x1 convolution layer to reduce the number of output channels to c.
m (nn.Sequential): Sequential container of PSABlock modules for attention and feed-forward operations.
Methods:
forward: Performs a forward pass through the C2PSA module, applying attention and feed-forward operations.
Notes:
This module essentially is the same as PSA module, but refactored to allow stacking more PSABlock modules.
Examples:
>>> c2psa = C2PSA(c1=256, c2=256, n=3, e=0.5)
>>> input_tensor = torch.randn(1, 256, 64, 64)
>>> output_tensor = c2psa(input_tensor)
"""
def __init__(self, c1, c2, n=1, e=0.5):
"""Initializes the C2PSA module with specified input/output channels, number of layers, and expansion ratio."""
super().__init__()
assert c1 == c2
self.c = int(c1 * e)
self.cv1 = Conv(c1, 2 * self.c, 1, 1)
self.cv2 = Conv(2 * self.c, c1, 1)
self.m = nn.Sequential(*(PSABlock(self.c, attn_ratio=0.5, num_heads=self.c // 64) for _ in range(n)))
def forward(self, x):
"""Processes the input tensor 'x' through a series of PSA blocks and returns the transformed tensor."""
a, b = self.cv1(x).split((self.c, self.c), dim=1)
b = self.m(b)
return self.cv2(torch.cat((a, b), 1))
class C2fPSA(C2f):
"""
C2fPSA module with enhanced feature extraction using PSA blocks.
This class extends the C2f module by incorporating PSA blocks for improved attention mechanisms and feature extraction.
Attributes:
c (int): Number of hidden channels.
cv1 (Conv): 1x1 convolution layer to reduce the number of input channels to 2*c.
cv2 (Conv): 1x1 convolution layer to reduce the number of output channels to c.
m (nn.ModuleList): List of PSA blocks for feature extraction.
Methods:
forward: Performs a forward pass through the C2fPSA module.
forward_split: Performs a forward pass using split() instead of chunk().
Examples:
>>> import torch
>>> from ultralytics.models.common import C2fPSA
>>> model = C2fPSA(c1=64, c2=64, n=3, e=0.5)
>>> x = torch.randn(1, 64, 128, 128)
>>> output = model(x)
>>> print(output.shape)
"""
def __init__(self, c1, c2, n=1, e=0.5):
"""Initializes the C2fPSA module, a variant of C2f with PSA blocks for enhanced feature extraction."""
assert c1 == c2
super().__init__(c1, c2, n=n, e=e)
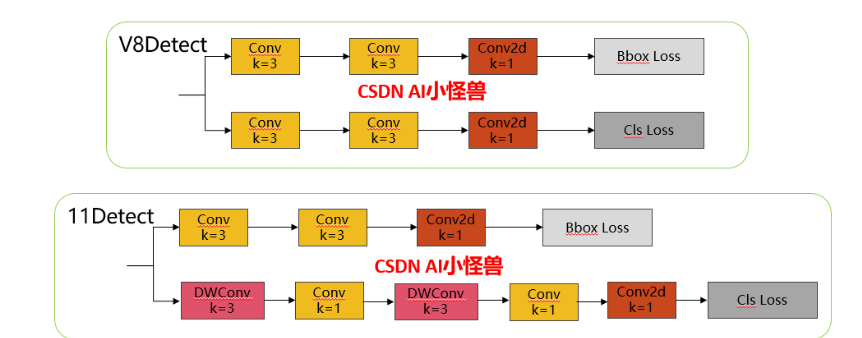
self.m = nn.ModuleList(PSABlock(self.c, attn_ratio=0.5, num_heads=self.c // 64) for _ in range(n))1.3 11 Detect介绍
分类检测头引入了DWConv(更加轻量级,为后续二次创新提供了改进点),结构图如下(和V8的区别):
实现代码ultralytics/nn/modules/head.py
        self.cv2 = nn.ModuleList(
            nn.Sequential(Conv(x, c2, 3), Conv(c2, c2, 3), nn.Conv2d(c2, 4 * self.reg_max, 1)) for x in ch
        )
        self.cv3 = nn.ModuleList(
            nn.Sequential(
                nn.Sequential(DWConv(x, x, 3), Conv(x, c3, 1)),
                nn.Sequential(DWConv(c3, c3, 3), Conv(c3, c3, 1)),
                nn.Conv2d(c3, self.nc, 1),
            )
            for x in ch
)2.如何训练元器件数据集
2.1 数据集介绍
常见的八类元器件图片共计800张
数据集大小:
640 images for training
80 images for validation
80 images for test
类别8类:
nc: 8

# Classes
names:
  0: Chip resistor
  1: Diode
  2: Power inductor
  3: SMD capacitor
  4: Through-hole aluminum electrolytic capacitor
  5: transistor
  6: train
  7: varistor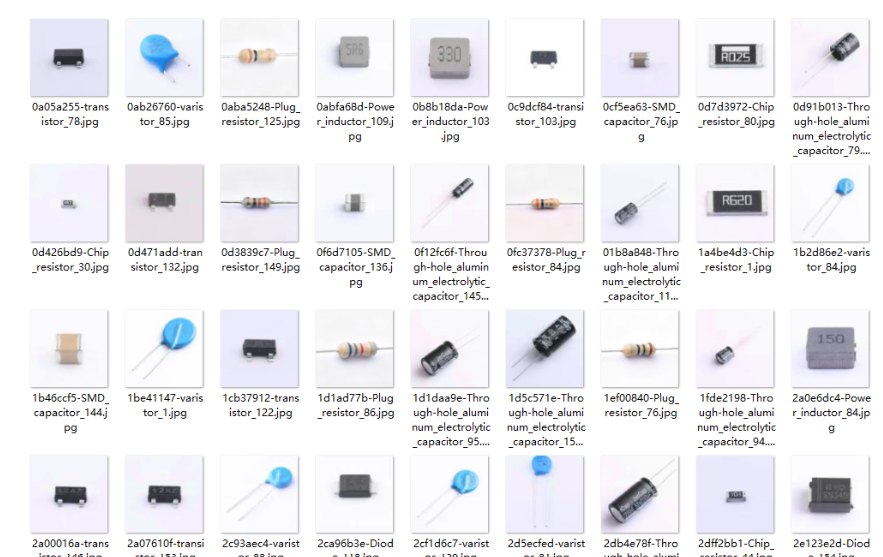
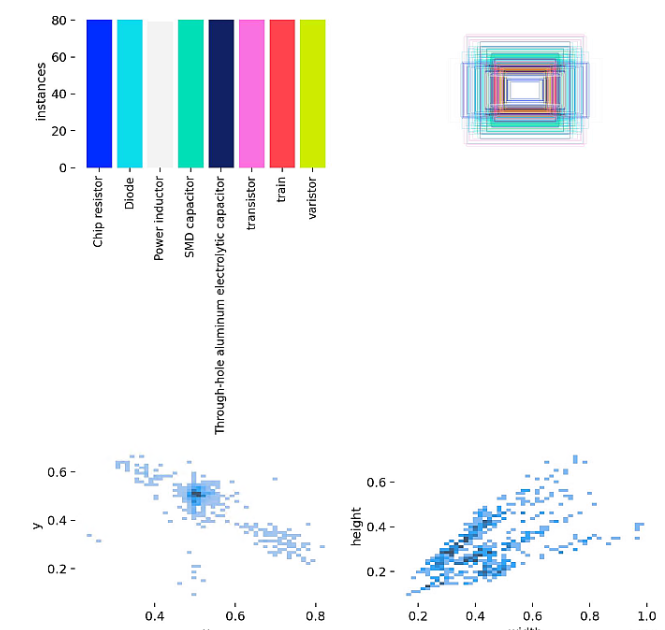
标签可视化分析
2.2 超参数修改
位置如下default.yaml

2.3 配置pcb_yolo.yaml
ps:建议填写绝对路径
path: D:/YOLOv11/data/pcb_yolo_dataset/
train: images/train # train images (relative to 'path') 128 images
val: images/val # val images (relative to 'path') 128 images
test: images/test # test images (optional)

nc: 8

# Classes
names:
  0: Chip resistor
  1: Diode
  2: Power inductor
  3: SMD capacitor
  4: Through-hole aluminum electrolytic capacitor
  5: transistor
  6: train
  7: varistor
2.4 如何训练
import warnings
warnings.filterwarnings('ignore')
from ultralytics import YOLO

if __name__ == '__main__':
    model = YOLO('ultralytics/cfg/models/11/yolo11.yaml')
    #model.load('yolo11n.pt') # loading pretrain weights
    model.train(data='data/pcb_yolo.yaml',
                cache=False,
                imgsz=640,
                epochs=200,
                batch=8,
                close_mosaic=10,
                device='0',
                optimizer='SGD', # using SGD
                project='runs/train',
                name='exp',
                )
2.5 训练结果可视化结果
YOLO11 summary (fused): 341 layers, 3,266,854 parameters, 0 gradients, 7.1 GFLOPs
                 Class     Images  Instances      Box(P          R      mAP50  mAP50-95): 100%|██████████| 3/3 [00:01<00:00,  2.32it/s]
                   all         80         79      0.981          1       0.99      0.896
         Chip resistor         10         10      0.994          1      0.995      0.898
                 Diode         10         10      0.992          1      0.995      0.938
        Power inductor         10         10      0.996          1      0.995      0.899
         SMD capacitor          9          9      0.893          1      0.951      0.942
Through-hole aluminum electrolytic capacitor         10         10      0.994          1      0.995      0.931
            transistor         10         10      0.994          1      0.995      0.882
                 train         10         10      0.992          1      0.995      0.926
              varistor         10         10      0.993          1      0.995      0.753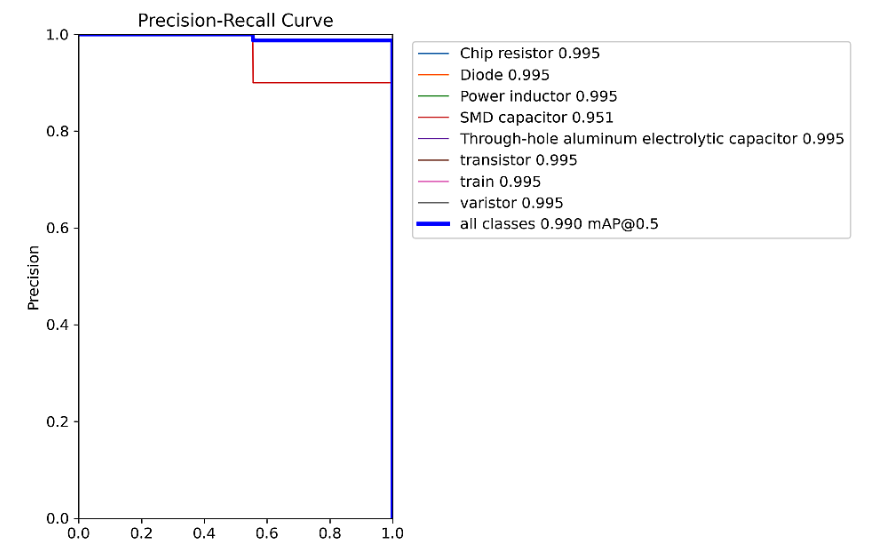
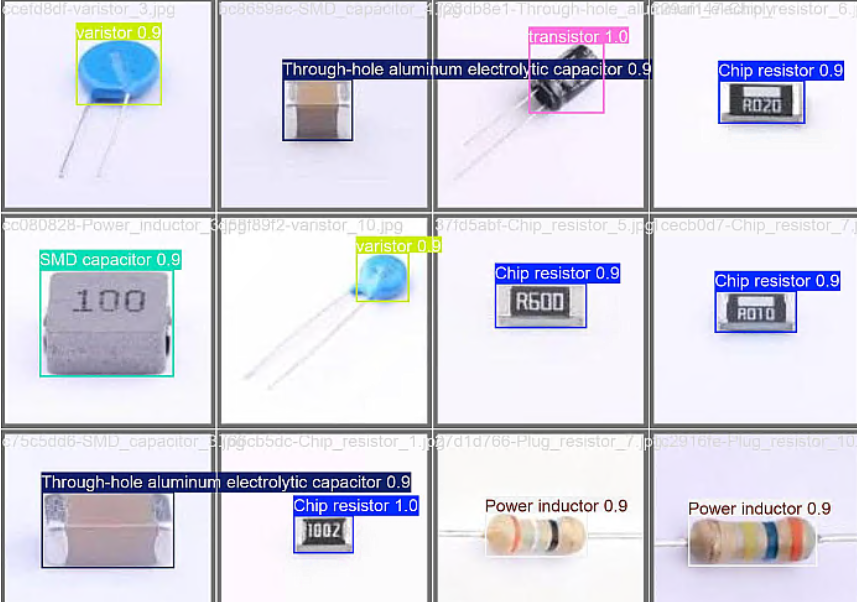
预测结果:
3.元器件检测系统设计
3.1 PySide6介绍
受益于人工智能的崛起,Python语言几乎以压倒性优势在众多编程语言中异军突起,成为AI时代的首选语言。在很多情况下,我们想要以图形化方式将我们的人工智能算法打包提供给用户使用,这时候选择以python为主的GUI框架就非常合适了。
PySide是Qt公司的产品,PyQt是第三方公司的产品,二者用法基本相同,不过在使用协议上却有很大差别。PySide可以在LGPL协议下使用,PyQt则在GPL协议下使用。
PySide目前常见的有两个版本:PySide2和PySide6。PySide2由C++版的Qt5开发而来.,而PySide6对应的则是C++版的Qt6。从PySide6开始,PySide的命名也会与Qt的大版本号保持一致,不会再出现类似PySide2对应Qt5这种容易混淆的情况。
3.2 安装PySide6
pip install --upgrade pip
pip install pyside6 -i https://mirror.baidu.com/pypi/simple
基于PySide6开发GUI程序包含下面三个基本步骤:
- 设计GUI,图形化拖拽或手撸;
- 响应UI的操作(如点击按钮、输入数据、服务器更新),使用信号与Slot连接界面和业务;
- 打包发布;
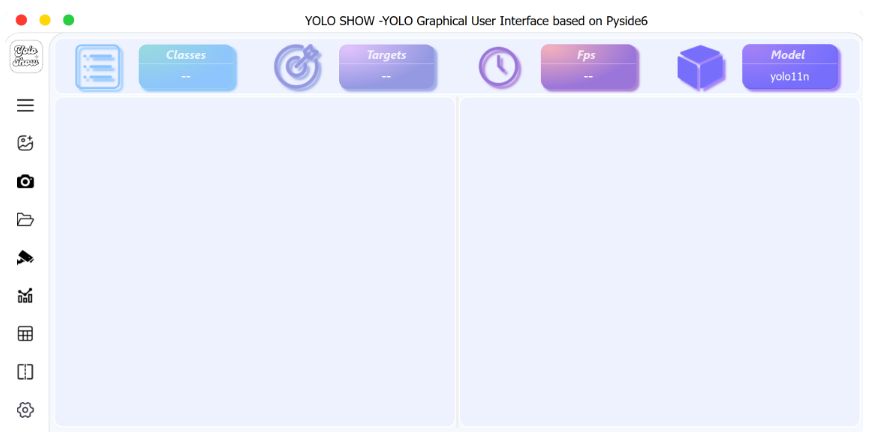
3.3 元器件智能检测系统设计
原创声明:本文系作者授权腾讯云开发者社区发表,未经许可,不得转载。
如有侵权,请联系 cloudcommunity@tencent.com 删除。
原创声明:本文系作者授权腾讯云开发者社区发表,未经许可,不得转载。
如有侵权,请联系 cloudcommunity@tencent.com 删除。
评论
登录后参与评论
推荐阅读
目录
腾讯云开发者

Copyright © 2013 - 2026 Tencent Cloud. All Rights Reserved. 腾讯云 版权所有
深圳市腾讯计算机系统有限公司 ICP备案/许可证号:粤B2-20090059 ![]() 粤公网安备44030502008569号
粤公网安备44030502008569号
腾讯云计算(北京)有限责任公司 京ICP证150476号 | 京ICP备11018762号