操作场景
腾讯云容器镜像服务(Tencent Container Registry,TCR)支持托管 Helm Chart,满足用户对云原生应用托管分发的需要。用户可在同个命名空间内同时管理容器镜像及 Helm Chart,实现在业务项目内同时使用容器镜像和 Helm Chart 云原生交付物。
目前仅企业版实例支持托管 Helm Chart,支持使用控制台或 Helm 客户端实现 Chart 的上传及下载。Helm Chart 仓库继承其所属的命名空间的公开及私有属性,无需额外配置。在权限管理上,Helm Chart 与容器镜像共用 repository 资源类型,即
qcs::tcr:$region:$account:repository/tcr-xxxxxx/project-a/* 资源描述将包含命名空间 project-a 内全部镜像仓库及 Helm Chart,用户可在进行资源权限管理时灵活使用。 前提条件
在上传并管理 TCR 企业版实例内的 Helm Chart 前,您需要完成以下准备工作:
已成功 购买企业版实例。
如使用子账号进行操作,请参考 企业版授权方案示例 提前为子账号授予对应实例的操作权限。
操作步骤
使用控制台管理 Helm Chart
1. 登录 容器镜像服务 控制台,选择左侧导航栏中的Helm Chart。
2. 在 Helm Chart 页面即可查看当前实例内的 Helm Chart 列表。如需切换实例,请在页面上方的实例下拉列表中进行选择。如下图所示:

名称:Helm Chart 名称,单击可进入 Chart 详情页,可查看并管理 Chart 各个版本,并可在基本信息页签内查看各个版本 Chart 包内的文件详情。
命名空间:Helm Chart 所属命名空间。
创建时间:Helm 首次推送至仓库的时间。
操作:单击快捷指令获取操作当前仓库的快捷指令,具体操作指令请参考 使用 Helm 客户端上传及下载 Helm Chart;单击删除以删除当前仓库。
3. 单击指定 Helm Chart 仓库名称,进入该仓库详情页。
版本管理:此页面展示当前仓库内已有的 Chart 版本,可下载或删除指定版本。如下图所示:

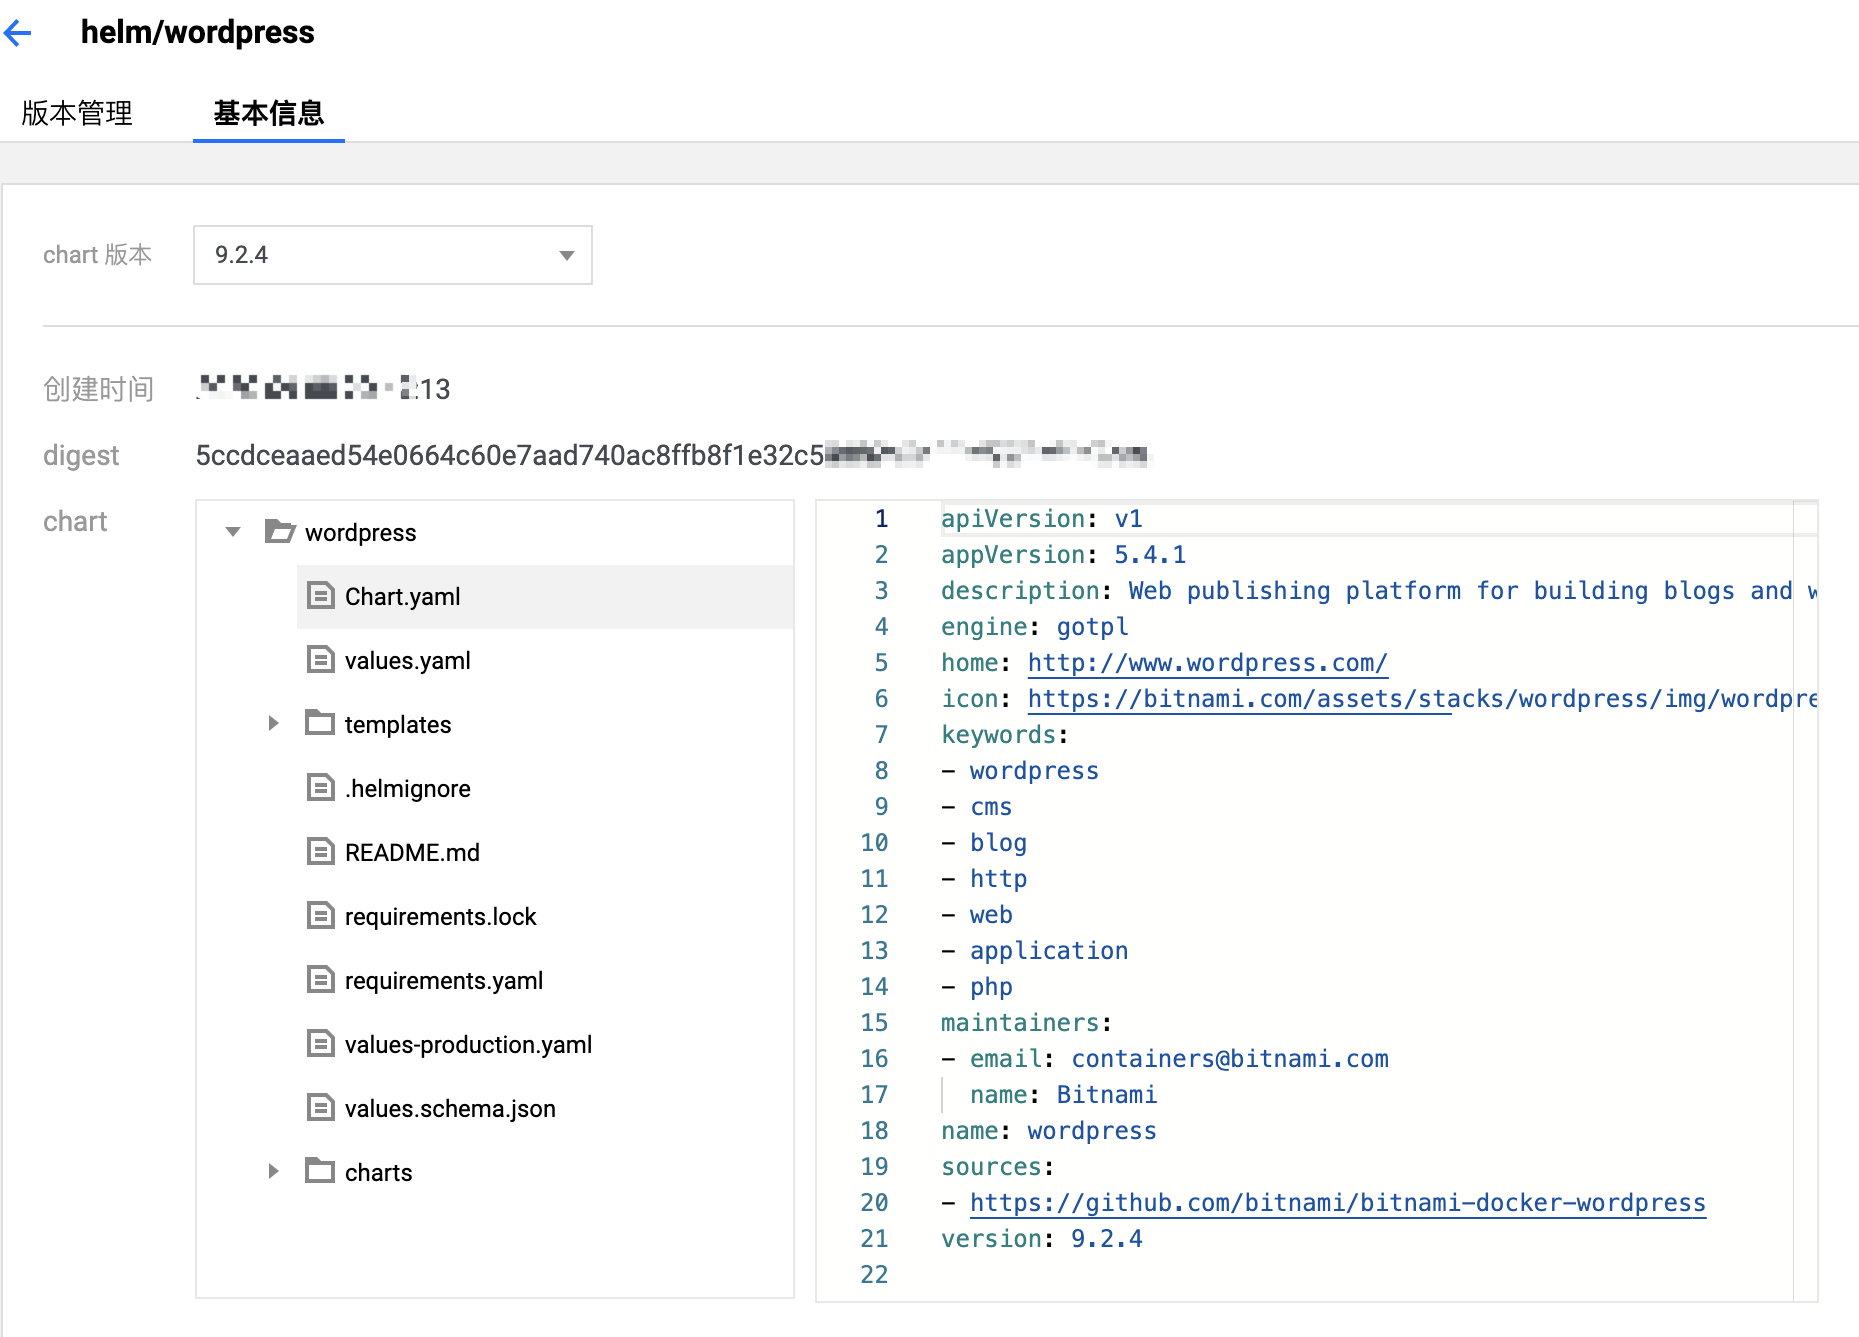
基本信息:此页面可浏览指定 Chart 版本内的详细信息,如 Chart.yaml。如下图所示:
使用控制台上传及下载 Helm Chart
上传本地 Helm Chart 包
1. 登录 容器镜像服务 控制台,选择左侧导航栏中的Helm Chart。
在“Helm Chart”页面即可查看当前实例内的 Helm Chart 仓库列表。如需切换实例,请在页面上方的“实例名称”下拉列表中进行选择。
2. 单击上传,在“上传 Helm Chart”窗口中,参考以下提示进行配置。如下图所示:
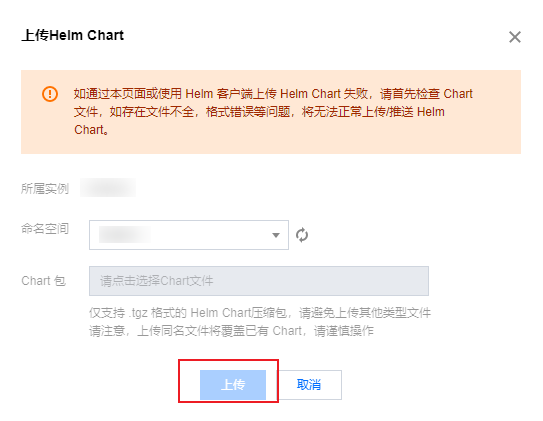
所属实例:当前所选实例。
命名空间:Helm Chart 所属的命名空间,如果列表为空,请先在该实例内 新建命名空间。
Chart 包:单击后选择本地已下载的 Helm Chart 包。
注意:
仅支持 .tgz 格式的 Helm Chart压缩包,请避免上传其他类型文件。请注意,上传同名文件将覆盖已有 Chart,请谨慎操作。
3. 单击上传即可开始上传该 Helm Chart 包。上传完成后,可在仓库列表页查看已上传的 Helm Chart,若上传的 Helm Chart 包没有对应的 Helm Chart 仓库,将自动新建一个 Chart 仓库。
下载 Helm Chart 包至本地
1. 在Helm Chart页面查看当前实例内的 Helm Chart 仓库列表。单击指定仓库,即可进入该 Helm 仓库的版本管理页面。
2. 选择该 Chart 仓库内指定版本,单击该版本所在行右侧的下载,即可自动下载该版本的 Chart 包至本地。根据浏览器及配置的不同,可选择指定下载路径。
使用 Helm 客户端上传及下载 Helm Chart
安装 Helm 客户端
说明:
若您当前希望在容器服务 TKE 中使用 Helm,请选择 Helm v3.x.x 版本。可执行
helm version -c 命令查看已安装的客户端版本。本文以在 Linux 操作系统的节点上安装为例,如在其他平台安装请下载对应安装包。
curl -fsSL -o get_helm.sh https://raw.githubusercontent.com/helm/helm/master/scripts/get-helm-3
chmod 700 get_helm.sh
./get_helm.sh
添加 Helm 仓库
1. 登录 容器镜像服务控制台,在“实例列表”页面选择实例名称,进入实例详情页。
2.
参考
获取实例访问凭证 获取用户名及登录密码。3. 在节点上执行以下命令,添加希望用于托管 Helm Chart 的命名空间至本地 Helm 仓库。
helm repo add $instance-$namespace https://$instance.tencentcloudcr.com/chartrepo/$namespace --username $username --password $instance-token
$instance-$namespace:为 helm repo 名称,建议使用实例名称+命名空间名称组合的方式命名,以便于区分各个实例及命名空间。https://$instance.tencentcloudcr.com/chartrepo/$namespace:为 helm repo 的远端地址。$username:为 步骤2 中已获取的用户名。$instance-token:为 步骤2 中已获取的登录密码。如添加成功将提示以下信息。
"$instance-$namespace" has been added to your repositories
推送 Helm Chart
1. 安装 Helm Push 插件
注意:
使用 Helm CLI 上传 Chart 包需要安装 helm-push 插件,该插件支持使用
helm push 指令推送 helm chart 至指定 repo,同时支持上传目录及压缩包。helm plugin install https://github.com/chartmuseum/helm-push
2. 在节点上执行以下命令,创建一个 Chart。
helm create tcr-chart-demo
3. 执行以下命令,可直接推送指定目录至 Chart 仓库(可选)。
helm cm-push tcr-chart-demo $instance-$namespace
其中
$instance-$namespace 为已添加的本地仓库名称。4. 执行以下命令,可压缩指定目录,并推送至 Chart 仓库。
tar zcvf tcr-chart-demo-1.0.0.tgz tcr-chart-demo/
helm cm-push tcr-chart-demo-1.0.0.tgz $instance-$namespace
其中
$instance-$namespace 为已添加的本地仓库名称。拉取 Helm Chart
1. 在节点上执行以下命令,获取最新的 Chart 信息。
helm repo update
2. 执行以下命令,拉取指定版本 Helm Chart。
helm fetch <本地仓库名称>/<Chart 名称> --version <Chart 版本>
以从企业版实例 tcr-demo 中拉取命名空间 project-a 内 tcr-chart-demo 1.0.0 版本为例:
helm fetch tcr-demo-project-a/tcr-chart-demo --version 1.0.0


