Attaching Cloud Disks

Last updated: 2025-05-28 16:18:42

Scenario

You can attach elastic cloud disks to a CVM instance in the same availability zone as a data disk. Up to 20 data disks can be attached to a CVM instance.
After creating a cloud disk, it needs to be attached to an existing CVM instance in the same availability zone via the console or API. Please refer to this document to complete the cloud disk attachment process.
Note
Some Linux CVM instances may not recognize the elastic cloud disk. You can first enable the hot swapping feature in the CVM instance. For more information, please refer to Enabling Disk Hot Swapping.

Instructions

Attaching cloud disks in the CBS console

1. Log in to the Cloud Disk Console.
2. On the cloud disk list page, you can use the following methods to mount cloud disks.
Attach a Single Cloud Disk: Select More > Attach on the right side of the row where the cloud disk with the status "To be mounted" is located.
Batch Attach Cloud Disks: Select the cloud disks with the status "To be mounted", and click Attach above the cloud disk list to batch attach.
3. The Attach to Instance window will pop up, and you will enter the Attach to Instance step, as shown in the figure below:

Select the instance to which the disk needs to be attached and refer to the following information to choose the "Attach Option". Depending on whether your cloud disk has auto-renewal enabled and its expiration time, there will be three scenarios for the attach option. Please choose as needed:
Unified expiry time with the instance (XXX)
Auto-renew the disk monthly upon expiration (Recommended)
Attach directly
4. Click Next. In the "Subsequent Operation Tips" step, understand the following: After manually attaching a cloud disk, the disk is offline. You need to log in to the instance and perform initialization operations to make the cloud disk usable.
5. Click Start Mounting. If the status of the cloud disk changes to "Mounted", it indicates that the mounting was successful.
6. Perform the subsequent operations corresponding to different cloud disk capacities.
Creation Mode
Cloud disk capacity
See Also
Manually created
Cloud disk capacity < 2 TB
Cloud disk capacity ≥ 2 TB
Created from a snapshot
Cloud disk capacity = Snapshot capacity
To attach to a Windows CVM: After logging in to the instance, go to Server Management > Storage > Disk Management. The disk can be used once it is online.
To attach to a Linux CVM instance: After logging in to the instance, run the mount <disk partition> <mount point> command, for example, mount /dev/vdb /mnt to start using it.
Snapshot capacity < Cloud disk capacity ≤ 2 TB
Or 2 TB < Snapshot capacity < Cloud disk capacity
Snapshot capacity ≤ 2 TB < Cloud disk capacity
If the snapshot uses a MBR partition,
You need to refer to Initializing Cloud Disk (Greater than or Equal to 2TB) to repartition using GPT. This operation will delete existing data.
If the snapshot uses a GPT partition,

Using the API to attach cloud disks

You can use the AttachDisks interface to attach cloud disks. For specific operations, please refer to Attaching Cloud Disks.

Related Actions

Enabling the disk hot swapping feature

All images currently provided support the mounting/unmounting operations of elastic cloud disks. Before unmounting a cloud disk, you need to first execute umount(Linux) or offline (Windows) operations, otherwise, it may cause the CVM instance to fail to recognize the elastic cloud disk when it is mounted again.
Note
Hot swapping is only recommended for CVMs with the following operating systems.
CVM Operating System Type
Version
CentOS
5.11 64-bit
5.11 32-bit
5.8 64-bit
5.8 32-bit
Debian
6.0.3 32-bit
Ubuntu
10.04 64-bit
10.04 32-bit
openSUSE
12.3 64-bit
12.3 32-bit
1. Log in to the Linux CVM as the root user. See Logging in to Linux CVM.
2. Run the following command to add the driver.
modprobe acpiphp
Note
If you need to load the acpiphp driver module after shutting down or restarting the CVM instance, it is recommended to follow Step 3 to set the acpiphp module to load automatically at startup.
3. (
Optional
) Depending on the operating system, choose the corresponding method to set the
acpiphp
module to load automatically at startup:
CentOS 5 Series
Debian 6 series, Ubuntu 10.04 series
openSUSE 12.3 Series
1. Run the following command to create and open the acpiphp.modules file.
vi /etc/sysconfig/modules/acpiphp.modules
2. Add the following content to the file, and save it.
#!/bin/bash
modprobe acpiphp >& /dev/null
3. Run the following command to grant execute permissions on the file.
chmod a+x /etc/sysconfig/modules/acpiphp.modules
1. Run the following command to modify the file.
vi /etc/modules
2. Add the following content to the file, and save it.
acpiphp
1. Run the following command to modify the file.
vi /etc/sysconfig/kernel
2. Add the following content to the file, and save it.
MODULES_LOADED_ON_BOOT="acpiphp"

Automatically Attach Cloud Disk When Creating an Instance

If you specify a custom image and data disk snapshot when creating a CVM instance, the concurrently created cloud disk will automatically be attached to the CVM instance. There is no need for partitioning, formatting, or other disk initialization operations to read and write data directly. However, your custom image and data disk snapshot must meet the following requirements:
Windows Instances
Linux Instances
If you create a Windows CVM instance using a custom image, the platform will automatically attach the cloud disk created from the corresponding data disk snapshot of the image. The custom image and corresponding data disk snapshot must meet the following requirements:
The data disk must be formatted to NTFS or FAT32 before creating a snapshot.
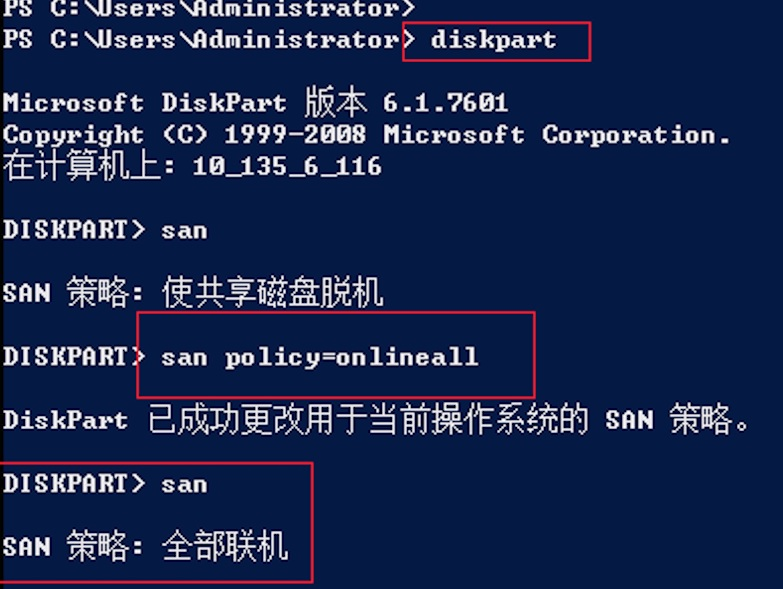
The SAN policy in the custom image is set to onlineAll.

Checking configurations

Although the public Windows images provided by Tencent Cloud have default settings, it is still recommended to check these configurations before creating a custom image. Please execute the following commands in sequence and check the returned results.
diskpart
san
If you create a Linux CVM instance using a custom image, the platform will automatically mount the cloud disk created from the data disk snapshot corresponding to the image. The custom image and the corresponding data disk snapshot must meet the following requirements:
The data disk must be formatted before creating a snapshot, that is, it has been successfully mounted on the source CVM instance.
Before creating a custom image from the system disk, you need to add the following command to the /etc/rc.local file to write the data disk mount point into the file.
mkdir -p <mount-point>
mount <device-id> <mount-point>
Note
<mount-point> should be set as the mount point of the file system, such as /mydata.
<device-id> should be set to the actual file partition location. For instance, enter /dev/vdb when there is no partition with a file system, and /dev/vdb1 when there is a partition with a file system.