操作场景
本文为您介绍如何初始化已挂载至云服务器的空云硬盘,在云硬盘上创建文件系统并向其中写入一个名为
qcloud.txt 的文件。注意事项
前提条件
操作步骤
说明:
本文使用的 Windows 云服务器操作系统以 Windows Server 2012 R2 数据中心版 64位中文版为例,不同版本操作系统步骤有一定区别,请您结合实际情况进行操作。
1. 以管理员身份登录 Windows 云服务器,详情请参见 使用 RDP 登录 Windows 实例(推荐)。
2. 在云服务器桌面,右键单击左下角的 
3. 在弹出的菜单中,选择磁盘管理,打开磁盘管理窗口。
4. (可选)右键单击目标空磁盘,选择联机。
当磁盘状态变为没有初始化时,表示联机完成。
5. (可选)右键单击已联机的磁盘,选择初始化磁盘。在弹出的初始化磁盘窗口中,选择 MBR(主启动记录),并单击确定。
说明:
MBR(Main Boot Record)格式分区支持的磁盘最大容量为2TB,GPT(GUID Partition Table)分区表最大支持的磁盘容量为18EB。如果您需要使用大于2TB的磁盘容量,请采用 GPT 分区方式。
若磁盘投入使用后,再切换磁盘分区形式,则磁盘上的原有数据将会被清除,因此请在磁盘初始化时谨慎选择磁盘分区形式。
6. 右键单击目标磁盘,选择新建简单卷,并在弹出的新建简单卷窗口中单击下一步。
7. 输入简单卷大小,单击下一步。
8. 选择驱动器号或驱动器路径,单击下一步,本文以分配驱动器号 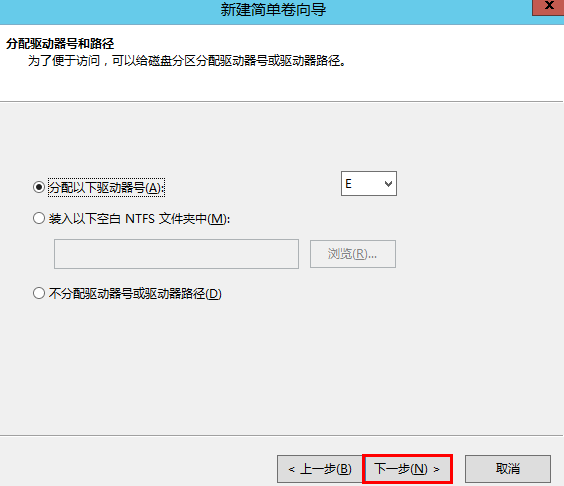
E 为例。如下图所示:
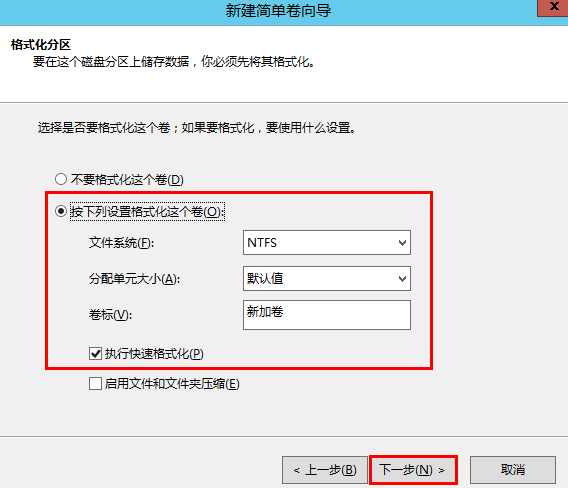
9. 选择文件系统及格式化分区,单击下一步。
10. 单击完成。
目标磁盘显示正在格式化,需要等待片刻让系统完成初始化操作。当卷状态为状态良好时,表示初始化磁盘成功。初始化成功后,在计算机界面可以看到新分区的数据盘。
11. 进入新分区的数据盘,新建文件
qcloud.txt,输入您需要的内容,选择文件 > 保存。注意:
本文使用的 Linux 云服务器操作系统以 CentOS 7.8 为例,不同版本操作系统步骤有一定区别,请您结合实际情况进行操作。
本文以使用 EXT4 文件系统为例。
1. 以 root 用户登录 Linux 云服务器,详情请参见 使用标准登录方式登录 Linux 实例(推荐)。
2. 执行以下命令,查看连接到实例的磁盘名称。
fdisk -l
回显信息如下图所示,则表示当前的云服务器有两块磁盘,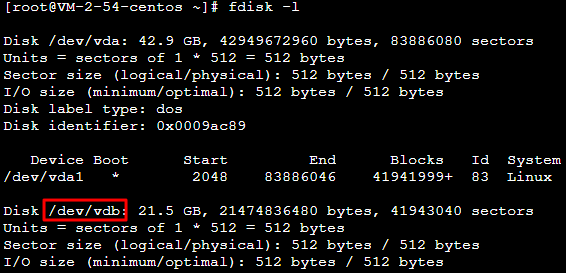
/dev/vda 是系统盘,/dev/vdb 是新增数据盘。
本文连接到实例的磁盘名称以 /dev/vdb 为例。如下图所示:
3. 执行以下命令,格式化该磁盘。
mkfs.ext4 /dev/vdb
4. 执行以下命令,将该磁盘挂载到
/data 挂载点。mount /dev/vdb /data
5. 依次执行以下命令,进入该磁盘,并新建文件
qcloud.txt。cd /data
vi qcloud.txt
6. 按
i 进入编辑模式,可输入 This is my first test.。7. 按 Esc 退出编辑模式,输入
:wq 后,按 Enter 保存并退出文件。8. 执行
ls 命令,可查看到 qcloud.txt 文件已写入盘中。9.
执行以下命令
,备份 /etc/fstab 文件。以备份到 /home 目录下为例:cp -r /etc/fstab /home
10. 执行以下命令,使用 VI 编辑器打开
/etc/fstab 文件。vi /etc/fstab
11. 按
i 进入编辑模式。12. 将光标移至文件末尾,按 Enter,添加如下内容。
<设备信息> <挂载点> <文件系统格式> <文件系统安装选项> <文件系统转储频率> <启动时的文件系统检查顺序>
以使用弹性云硬盘的软链接自动挂载为例,结合前文示例添加如下内容:
/dev/disk/by-id/virtio-disk-drkhklpe /data ext4 defaults 0 0
说明:
您可使用
ls -l /dev/disk/by-id 命令,查看弹性云硬盘的软链接。13. 按 Esc,输入
:wq,按 Enter。
保存设置并退出编辑器。14.
执行以下命令
,检查 /etc/fstab 文件是否写入成功。mount -a
如果运行通过则说明文件写入成功,新建的文件系统会在操作系统启动时自动挂载。
说明:


